Mardi Gras Macarons
Hello friends! Today I will show you how to make Mardi Gras Macarons.
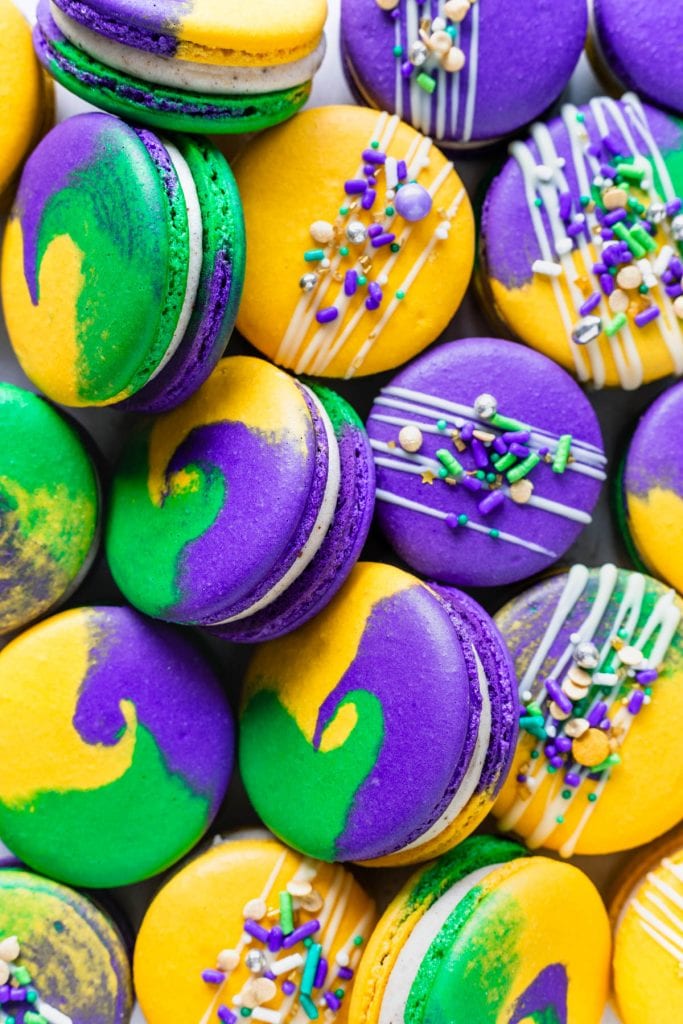
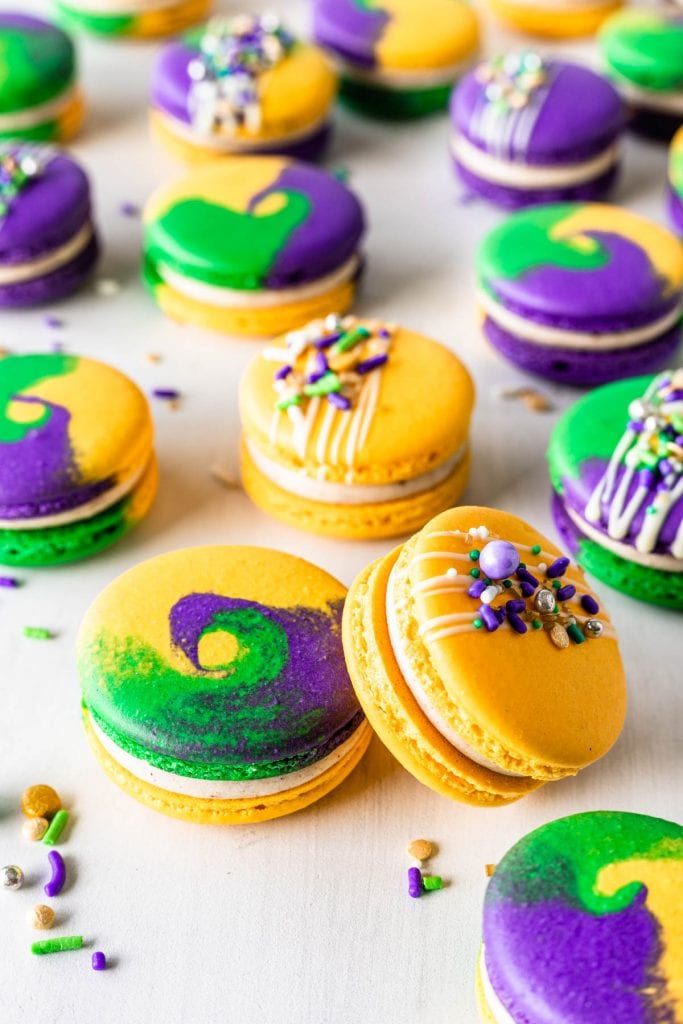
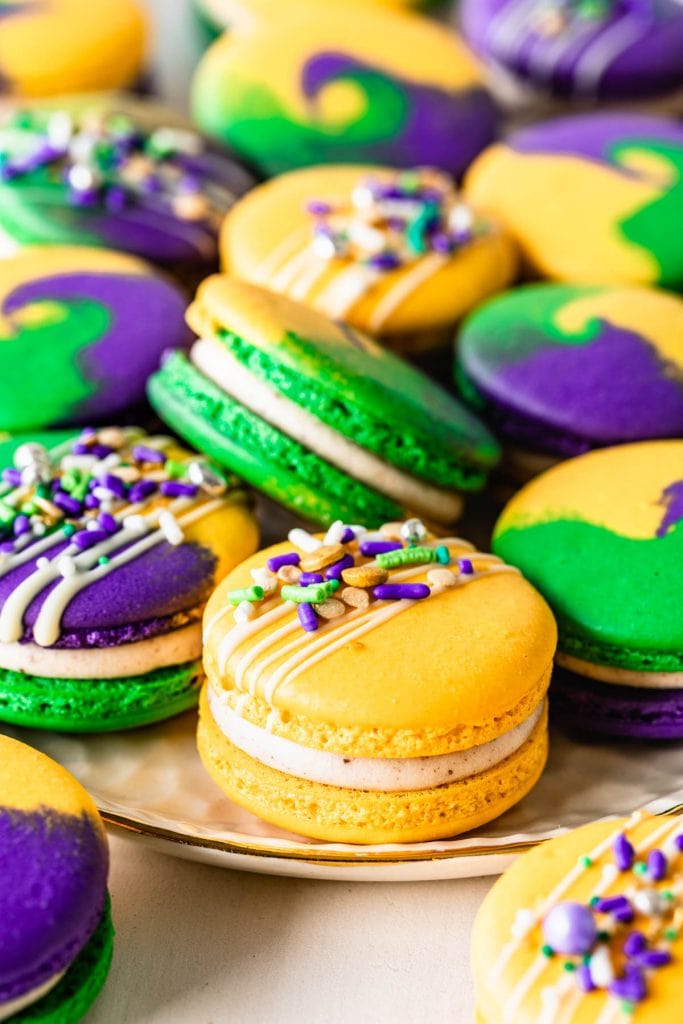
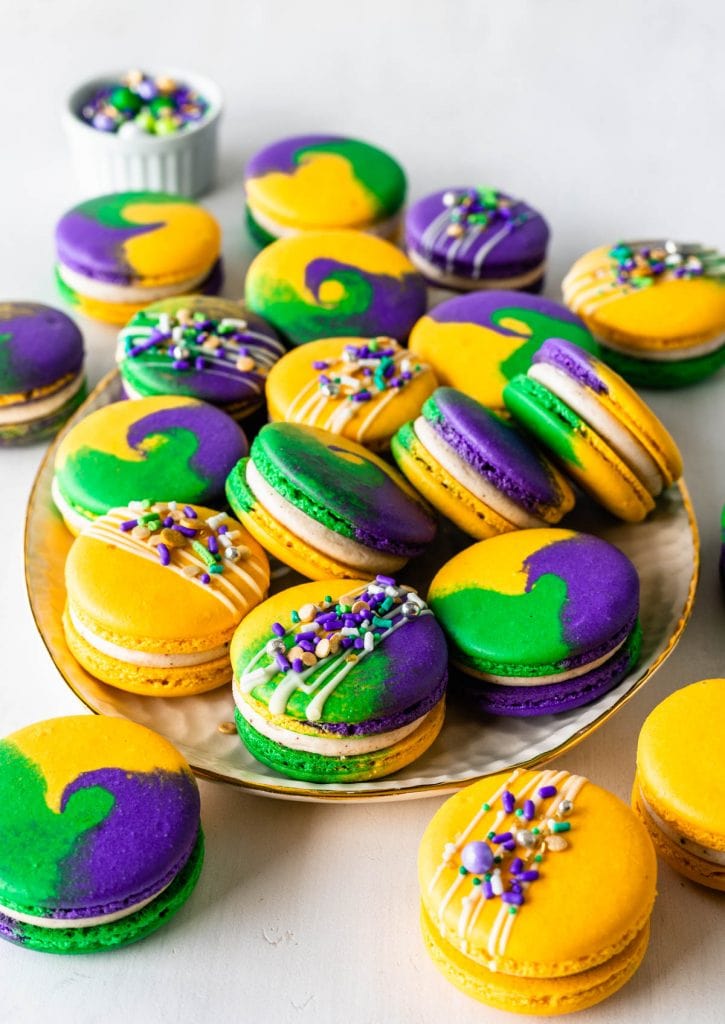
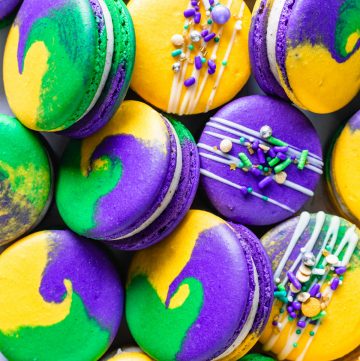
These festive Mardi Gras Macarons are filled with Cinnamon Cream Cheese Frosting. The shells are purple, green, and yellow, and I will teach you how to make all the colors from just one batch of macarons!
Make sure to watch the video on this page or on YouTube, showing you exactly how to make these Mardi Gras Macarons.
This post may contain affiliate links. I earn a commission from qualified purchases. Please read our Privacy policy here.
For the filling of the macarons I decided to make a Cinnamon Cream Cheese Frosting, because there’s usually cinnamon in King’s Cake, a typical Mardi Gras dessert.
And I also decorated some of the shells with fun sprinkles because Mardi Gras is all about celebration and party, so I wanted these macarons to be festive, vibrant, and colorful!
To make the shells, I decided to make three different colors from the same batch. And that’s really easy to do!
I use this technique for many shells!
How to make multiple colors out of one batch
Make the meringue, and sift the almond flour and powdered sugar as you usually would.
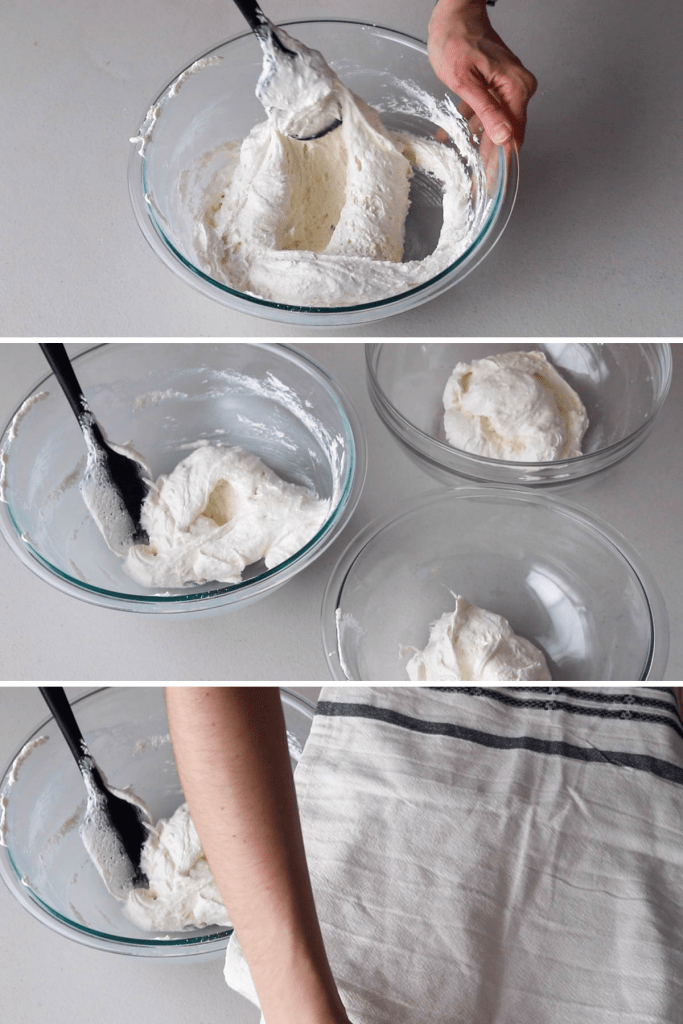
Then add the dry ingredients to the meringue and stir JUST until incorporated.
Once you see no more dry ingredients in the meringue, divide it between three different bowls.
Keep the remaining bowls covered as you work with one at a time.
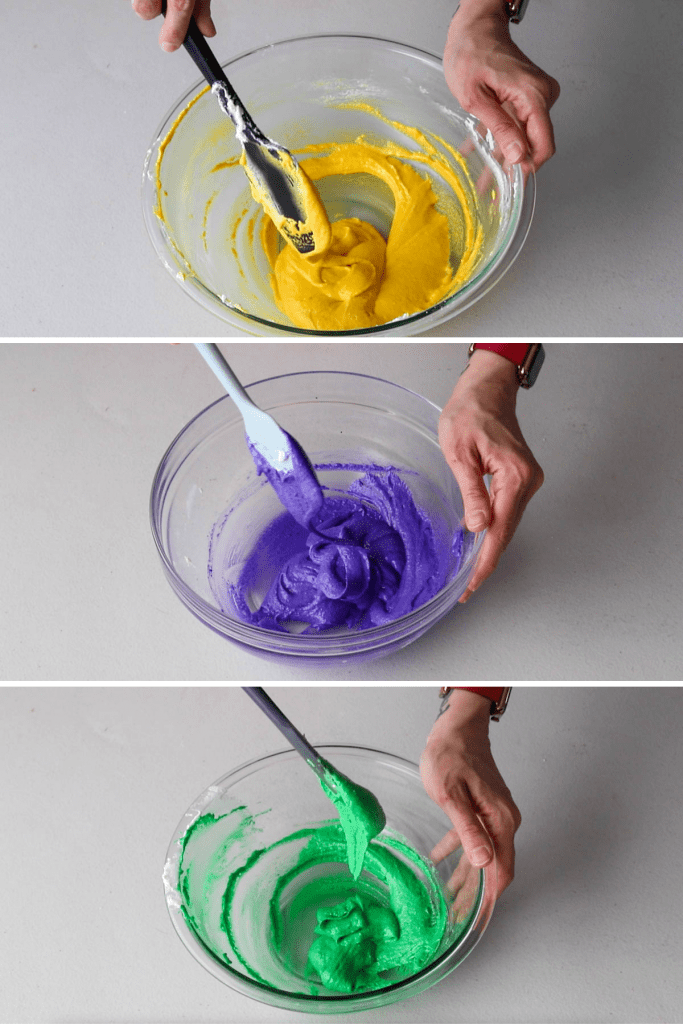
Color each batter the desired color. I used yellow, purple, and green.
Right after getting each batter to the perfect consistency, immediately transfer it to a piping bag without the end cut. The piping bag should be whole, so the batter won’t scape through the end.
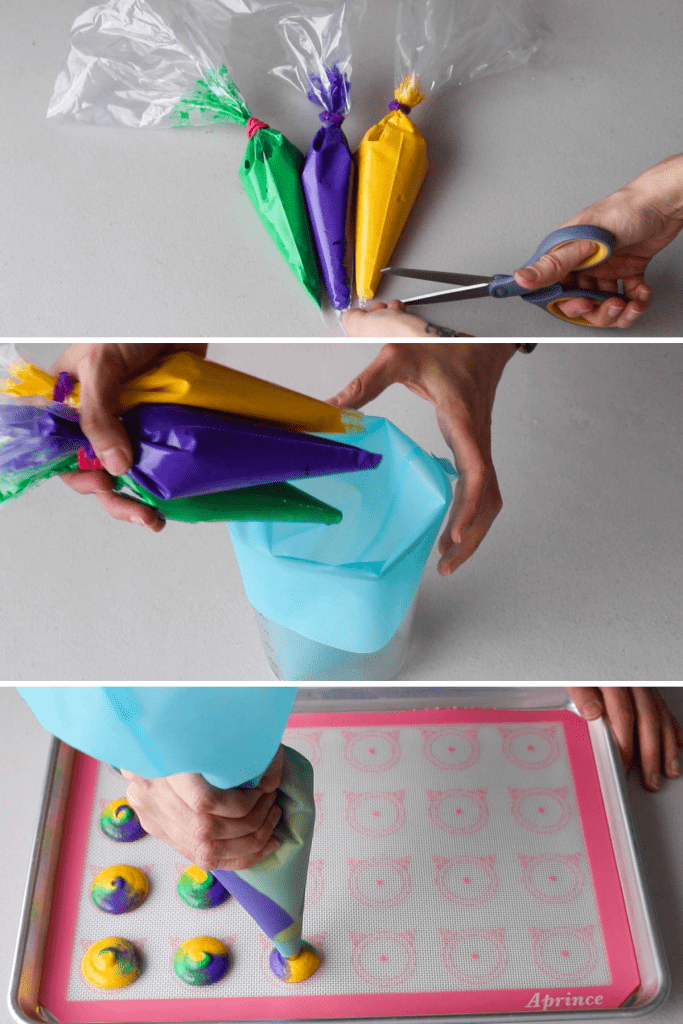
Snip the ends of the piping bags with scissors.
And place the piping bags in a larger piping bag fitted with a round tip.
Then you can begin piping.
Also make sure to watch the video on this page or on YouTube, showing you exactly how to make and pipe these macarons.
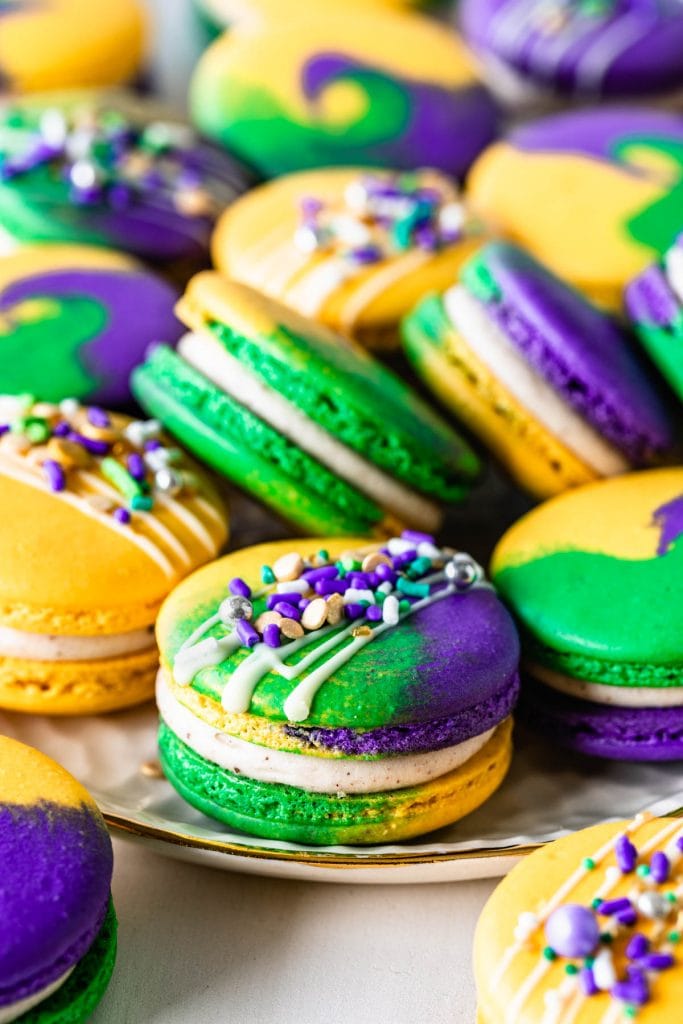
I also ended up piping some plain shells and then drizzling melted white chocolate on them and putting festive sprinkles on top to decorate.
I couldn’t find a Mardi Gras sprinkles mix, so I made my own by mixing several different sprinkles sets I had, I mixed purple sprinkles with green, yellow, golden, and that seemed to do the trick.
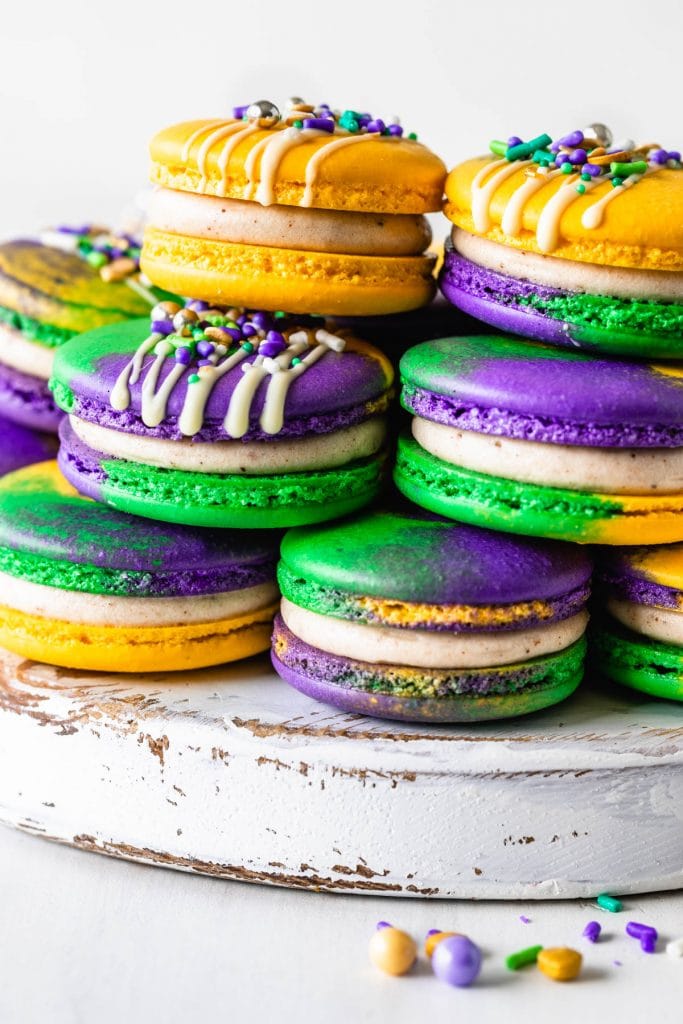
I figured I’d share with you different purple, green, and yellow macarons bellow.
Purple Macarons
Yellow Macarons
Green Macarons
- Matcha Macarons
- Kiwi Macarons
- Pistachio Macarons
- Key Lime Macarons
- Guinness Macarons
- Mint Chocolate Macarons
If you are interested in learning more about macarons and improving your macaron skills, check out Macaron School, a place where you can find all the best information and knowledge to help you become a better macaron baker!
Thank you so much for reading!
If you make these Mardi Gras Macarons tag me on instagram or leave a comment below! I love hearing from you!
Mardi Gras Macarons
Ingredients
Macaron Shells
- 4 grams egg white powder optional read notes
- 100 grams granulated sugar
- 100 grams egg whites
- 105 grams almond flour
- 105 grams powdered sugar
- Food coloring I used purple yellow, and green gel food coloring
Cinnamon Cream Cheese Frosting
- 85 grams cream cheese softened
- 42.5 grams unsalted butter softened
- 113 grams powdered sugar about
- 1 tsp cinnamon powder or more to taste
- 1/4 teaspoon vanilla extract
Instructions
Macaron Shells
- Before you start, get all of the ingredients ready.
- Pre-heat the oven to 300℉.
- Prepare one large piping bag, fitted with a round tip, I used a 1/4” diameter tip. Also leave 3 piping bags set aside, without the ends cut. Set aside.
- Line two baking sheets with parchment paper or silicone mat.
- Measure out all of the ingredients.
- Sift the powdered sugar and almond flour. Set it aside.
- Whisk the sugar and the egg white powder (if using) in a bowl, and place it over a pan with barely simmering water. Add the egg whites to the sugar and whisk the mixture until frothy and the sugar is completely melted. It will take a couple of minutes. You can test by touching the mixture between your fingers, and if you feel any sugar granules just keep whisking the mixture over the water bath.
- Make sure the bottom of the bowl isn’t touching the simmering water because you don’t want the whites to cook.
- Also, don’t overheat the sugar syrup, this may cause issues down the line, such as wrinkly macarons.
- Transfer the syrup to the bowl of a stand mixer.
- With the whisk attachment, start whisking the syrup on low for about 30 seconds, then gradually start increasing speed to medium. Whisk on medium for one to two minutes, until the mixture is white and starting to become fluffy. Raise the speed to high, or medium-high and whisk for a few minutes until stiff peaks are formed. Best way to check this is to keep your eye on the whites. Once they get glossy and you start seeing streaks formed by the whisk, it might be time to stop.
- Whip until stiff peaks have formed. When you pull your whisk up, the peak should be stiff and shooting straight up, with possibly a slight bend at the top, but not bending down to the side.
- Pour the sifted powdered sugar and almond flour into the stiff meringue.
- Start folding gently forming a letter J with a spatula.
- Fold the dry ingredients with the meringue just until you see no more dry ingredients in the meringue.
- As soon as you see no more dry ingredients in the meringue, stop stirring. Divide the batter between three different bowls.
- Work with one bowl at a time, leaving the other ones covered meanwhile.
- To the first batter add yellow gel food coloring and stir until the perfect consistency is achieved. The batter should be flowing slowly and effortlessly off the spatula, you should be able to pick up some batter with the spatula and draw several figure 8s with the batter that’s flowing, without having the batter break up. And even after the batter breaks up, it should still continue to flow off the spatula slowly.
- There’s another test you can do. I call it the Teaspoon test.
- Grab a teaspoon of batter and spoon onto the parchment paper or silicon mat. Wait a minute to see how it behaves.
- If the batter stays stiff, forming a point and doesn’t spread out, fold a little bit more, about 3 folds.
- Test again.
- Once the batter spreads out a bit and starts to look glossy and smooth on top, on the parchment paper, it’s ready.
- You don’t want your batter to be too runny either. So be careful not to over mix. It’s always best to under mix and test several times until the proper consistency has been achieved.
- Once the first batter achieves the perfect consistency, transfer it to one of the piping bags that doesn’t have the end cut. Secure the top with a tie, so the batter doesn’t scape while piping, and to keep the batter from drying out while you work with the remaining batters. Set the piping bag aside.
- Now, it’s time to work with the second batter. I colored the second batter purple. After adding food coloring, stir until the perfect consistency is achieved, like I’ve explained above.
- Transfer the purple batter to another piping bag, also without the end cut. And secure the top with a tie.
- Now finally work with the final batter, I chose to color it green. Add food coloring, fold until the perfect consistency is achieved and transfer it to a piping bag, and secure the top with a tie.
- Place the large piping bag fitted with the round tip (I used a 1/4” piping tip) in a cup, so this way the bag will be held open.
- Using a pair of scissors, snip the ends of each piping bag that contains the colorful batters.
- Place the three bags inside the large piping bag. I really recommend watching my video to see how to do this, it’s very easy to understand once you watch the video.
- Now position the piping bag over the center of the circle template, and start applying gentle pressure to release the batter for 3 to 5 seconds. Then pull the bag up twisting slightly at the top.
- Once you’ve piped as many circles as you could, bang the trays against the counter.
- Use a toothpick to pop any air bubbles on the surface of the shells.
- Let the trays sit for a while so the shells will dry out a little bit. I usually leave about 20-40 minutes, depending on how humid the day is, how much food coloring you have added, and on the consistency of the batter. You’ll know the macarons are ready to be baked. when you gently touch the surface of a macaron and it seems dry, and doesn’t stick to your finger.
- Make sure the oven is pre-heated enough.
- Bake one tray at a time.
- Bake for 5 minutes, rotate tray.
- I bake each tray for about 15 to 20 minutes.
- When baked, the macarons will have a deeper color and formed feet. If you try to move a macaron, it shouldn’t feel jiggly. If the macaron is still jiggly, keep baking.
- Remove from the oven and bake the other tray.
- Let the macarons cool down before proceeding with the filling.
Cinnamon Cream Cheese Frosting
- Start by sifting the powdered sugar with the cinnamon. Set it aside.
- Now, beat the softened cream cheese and butter together in the bowl of an electric mixer, for about 2 minutes, until light and fluffy.
- With the mixer off, add powdered sugar/cinnamon mixture to the bowl.
- Turn mixer on low to incorporate the powdered sugar with the cream cheese and butter.
- Once you see no streaks of dry powdered sugar, cream mixture on medium high for one minute.
- Add vanilla extract. Mix to combine.
- This frosting will store well in the fridge for up to 5 days, covered.
- Make sure to always leave your frosting covered. Cover the bowl with a lid or plastic wrap, because otherwise, the surface will dry out and create a skin.
To assemble
- Place the frosting in a piping bag fitter with the tip of choice. I just used a round piping tip.
- Pipe a dollop of frosting on each bottom shell. Top with another shell.
- For some of the macarons, I drizzled melted white chocolate on top of the shells, and put sprinkles on top to make them festive!
- Let the macarons mature overnight before enjoying.
Storage
- These macarons will store well in the fridge for 4 to 5 days, or in the freezer for 1 to 2 months.
Seus macarons são sensacionais!!
How many drops of each food coloring did you use to achieve these colors?
I dont know, I never count it, and I can’t really count drops with the americolor lol it just comes out a blob of food coloring, but if you watch the video you can sort of gauge how much I’ve added.
Thank you!
A week ago I made these Mardi Gras inspired macarons for a festive brunch and they were a hit! I’ve been reading your blog and using your recipes for a few months now and I appreciate your meticulous explanations and video tutorials. As a beginner in the macaron world, your blog has helped boost my confidence and has made me feel adventurous when it comes to macarons. Your site has become my go-to for ideas and troubleshooting. Thank you!
Thank you so much!! I appreciate you being here! I’m so happy my information is helpful to you!!!
Crazy delicious! Thank you for your amazing recipe!
Thank you so much!
Que visual fantástico!!!!!!