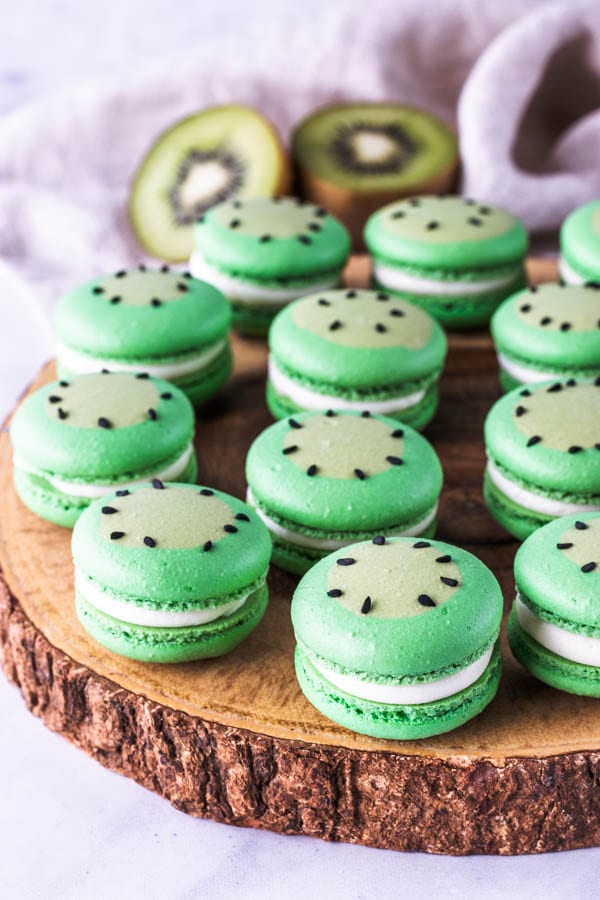
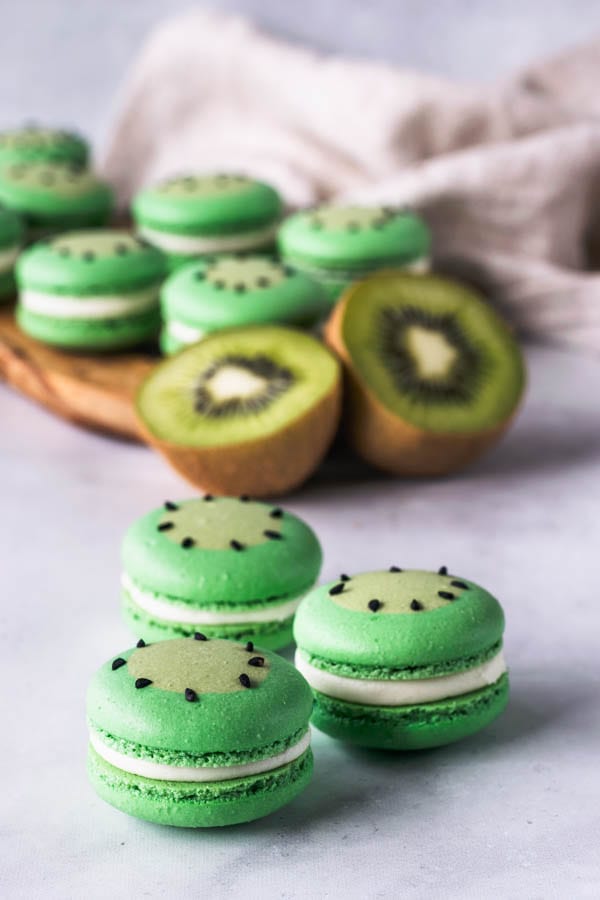
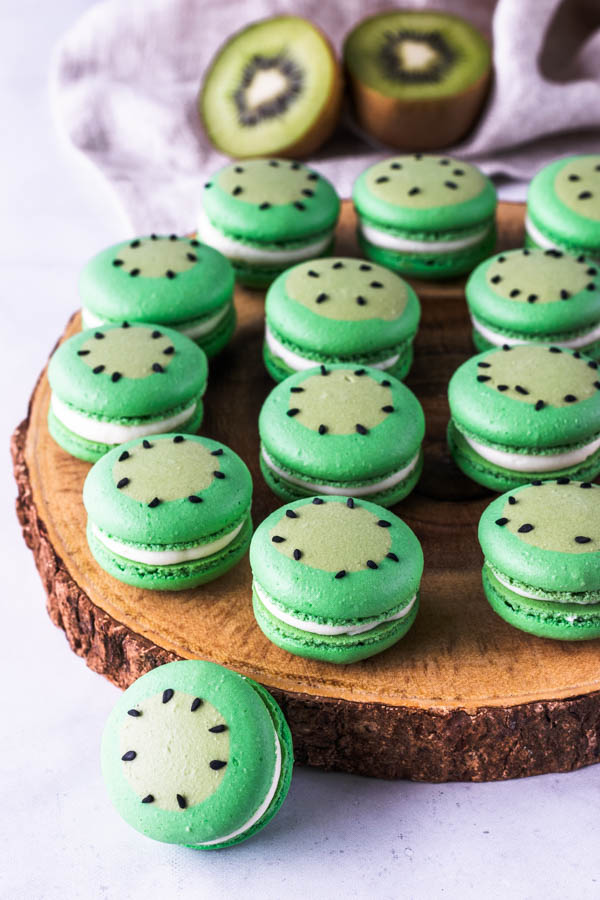
Kiwi Macarons
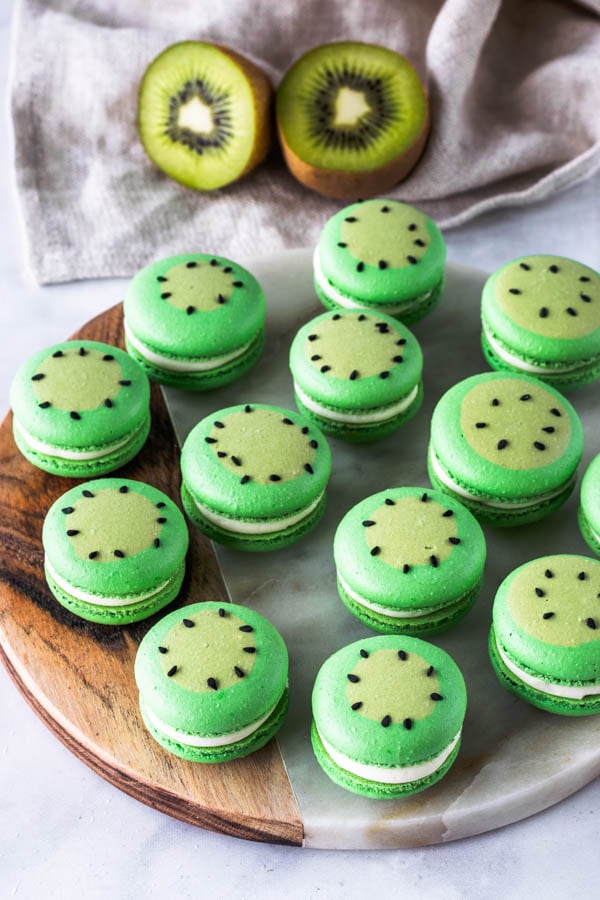
Presenting to you today, Kiwi Macarons! Filled with kiwi jam!
Have you ever had kiwi jam before? Neither have I before I made these Kiwi Macarons.
I made the kiwi jam just like I usually make any other jam, a little bit of sugar (or maple syrup), some cornstarch and that’s it. Very simple, very delicious!
This post may contain affiliate links. I earn a commission from qualified purchases. Please read our Privacy policy here.
Making these Kiwi macarons was super fun.
I had a lot of fun making this tutorial, and I hope this Kiwi Macaron tutorial helps others out there!

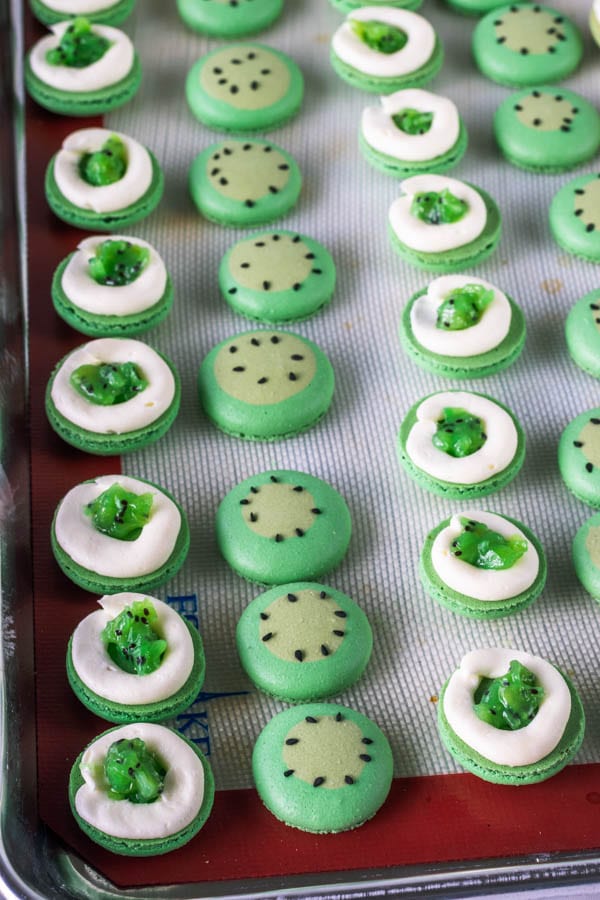
To make these Kiwi Macarons, basically I separated the macaron batter into two separate bowls, about 3/4 of the batter in one bowl, and 1/4 in another bowl.
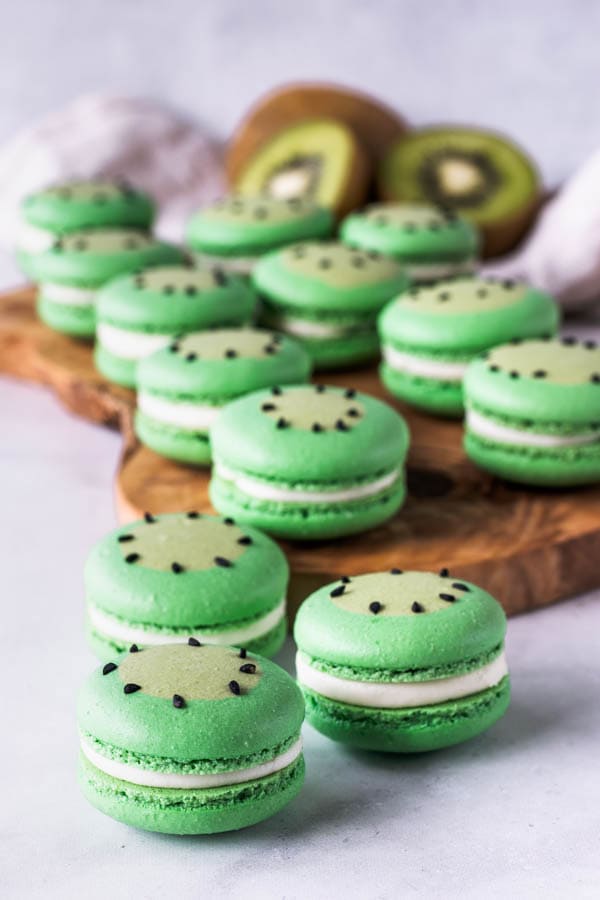
I colored the 3/4 of the batter with green food coloring, and the 1/4 of the batter with less food coloring to make a lighter color, in order to make the middle of the kiwi macarons.
Then I topped the shells with some black sesame seeds, to replicate the kiwi seeds.

Please read down below some tips on how to make these Kiwi Macarons, and also watch my Jumprope tutorial, so you can see in detail how I make my macarons in general and how I piped these kiwi macaron shells.
Tips to make the Kiwi Macarons:
- When you divide the batters between the two different bowls, keep the batter you aren’t working on covered, as the macaron batter will dry fast.
- Work quickly because you don’t want the batters to start setting and drying, even being covered.
- Once you finish folding the first batter, place it in the piping bag, and seal the piping bag by twisting the top, so the batter doesn’t get dry.
- It will help to place the piping bags in a cup, so this way, the piping bag will be held upright.
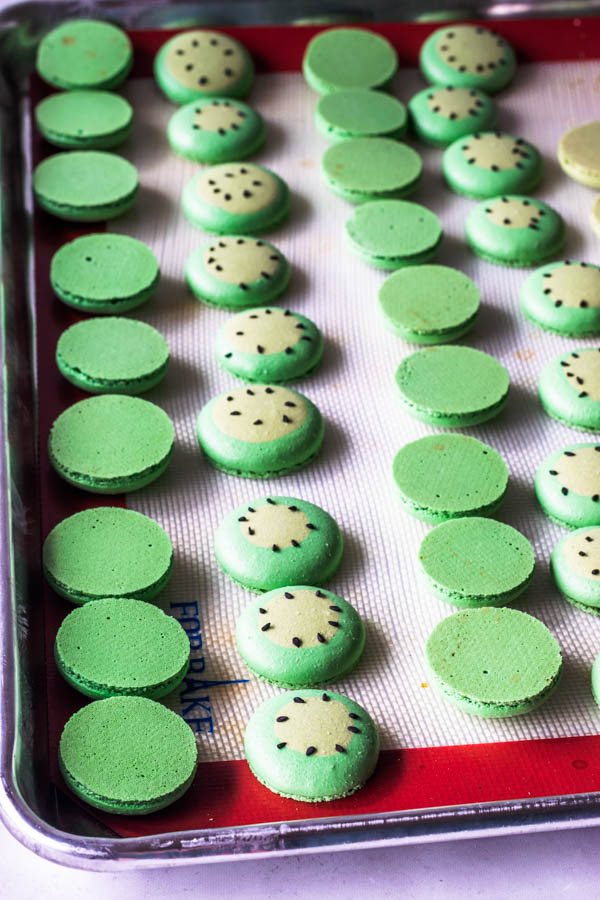
- It will be better if you work in rows, instead of piping the whole tray at once. Pipe a row of the darker color batter, then immediately pipe the lighter color in the center of that row. Place sesame seeds on top of the first row, and tap the tray to release air bubbles. Then move on to the next row.
- The macarons will start to dry pretty quickly, specially if you are in a dry climate. And that’s why you have to work in rows, because otherwise, the sesame seeds won’t stick to a dry shell.
- Use a toothpick to pop any air bubbles you see in the shells of your kiwi macarons.
What did you think about my Kiwi Macarons? Do you enjoy kiwis? They were pretty much my favorite fruit as a kid! I am so happy I got to turn them into macarons!! I loved how they turned out!
Not to mention that I absolutely loved the kiwi jam! I had never tried kiwi jam before. But I am a huge fan now!
This recipe will probably leave you with a bit of kiwi jam leftover. But I don’t think you will have a problem using it up. Just eat it with a spoon, or spread it over a biscuit.
The leftover kiwi jam will keep for quite a bit in the refrigerator, if well covered. Probably up to 10 days. Mine didn’t last that long.
If you like making macarons, please enjoy some more of my Macaron Recipes, as I have a tone on my website.
Here are some suggestions:
- Blueberry Macarons with blueberry jam filling
- Cookie Dough Macarons
- Toffee Macarons
- Blackberry Macarons
- Brigadeiro Macarons
- French Vanilla Macarons
- Pomegranate Macarons
- Pecan Macarons
- Dulce de Leche Macarons
If you are new to making macarons, you can find tones of tips about how to make macarons on my blog posts.
Also, I am always open to answering questions, just contact me on my instagram dm, send me an email, or leave a comment below.
I will be more than happy to assist you in your macaron journey, to help you achieve your most desired macaron dreams!
I hope you liked today’s recipe. Have a great day, thank you for reading!! I appreciate each and everyone of you who make my dreams come true, by allowing me to share this passion of mine with the world!
Kiwi Macarons
Ingredients
Macaron Shells
- 100 grams egg whites 3.5 oz
- 100 grams white granulated sugar 3.5 oz
- 105 grams almond flour 3.7 oz
- 105 grams powdered sugar 3.7 oz
- Green food coloring
- Black sesame seeds to make kiwi seeds
Kiwi Jam
- 1 cup chopped kiwi
- 2-3 tablespoons maple syrup you can use granulated sugar or other sweetener instead more or less according to how sweet your kiwi is, and how sweet you like your jam to be
- 1 tablespoon cornstarch
- 2 tablespoons cold water
Vanilla Buttercream
- 1 cup confectioners’ sugar sifted
- 4 tbsp unsalted butter softened
- 1/2 tsp vanilla extract
Instructions
Macaron Shells
- Before you start, get all of your ingredients ready. Prepare a large piping bag, fitted with a large round tip.
- Line two baking sheets with parchment paper or silicone mat.
- I use a baking mat with the macaron template already in it. There are places you can print your own, and just place it under silicon mat, or parchment paper.
- Measure out all of your ingredients.
- Sift powdered sugar and almond flour together. Set aside.
- Now you can finally start.
- Place egg whites and granulated sugar in a heat proof bowl or in a double boiler. Over a pan of simmering water, whisk the whites and sugar until frothy and sugar completely melted. It will take a couple minutes. You can test by touching the mixture between your fingers, and if you feel any sugar granules just keep whisking mixture over the water bath.
- Make sure the bottom of the bowl isn’t touching the simmering water.
- Transfer mixture to the bowl of a stand mixer.
- With the whisk attachment, whisk mixture on high speed for a few minutes until stiff peaks are formed.
- Best way to check this is to keep your eye on the whites. Once they get glossy and you start seeing streaks formed by the whisk, it might be time to stop.
- You don’t want to overbeat the mixture at this point, because you don’t want to add too much air to it. Just whisk until stiff peaks have formed.
- Pour powdered sugar and almond flour into stiff whites.
- Start folding gently forming a letter J with a spatula.
- Once you don’t see the dry ingredients any more, separate the batter into two different bowls.
- I grabbed about 3/4 of the batter for the darker green color, and 1/4 for the lighter green that would be the middle of the kiwi.
- Dye each batter at a time. Add the green food coloring to the larger batter amount, fold to the perfect consistency (see steps below to identify the perfect consistency). Place batter in a piping bag, twist the top of the bag so the batter won’t dry while you color and fold the other batter.
- Dye the second batter with less green food coloring, so you can have a lighter green. Fold to the perfect consistency (see steps below to identify the perfect consistency), place it in a piping bag fitted with a small round tip, since you will need to pipe smaller amounts of the light green batter to make the center of your kiwi shells. Set aside.
- It’s time to stop folding when the batter is glossy and has a thick and flowing consistency. There are several ways to test this, and you might have to have a couple failed batches before you get this right.
- First, pick up some batter with the spatula and try to draw a figure 8 with the batter that is dripping off the spatula. If you can form several 8 figures without the batter breaking up, that’s one indication that it might be ready.
- There’s another test you can do. I call it the Teaspoon test. Grab a teaspoon of batter and spoon onto the parchment paper or silicon mat. Wait a minute to see how it behaves.
- Test again.
- Once the batter spreads out a bit and starts to look glossy and smooth on top, on the parchment paper, it's ready.
- You don’t want your batter to be too runny either. So be careful not to overmix. It’s always best to undermix and test several times until the proper consistency has been achieved.
- When you hold the spatula with batter on top of the bowl and the batter falls off the spatula slowly but effortlessly the batter is ready. The batter will keep flowing off the spatula non-stop, but not too quickly.
- Transfer the batter to the piping bag.
- Place the piping bag directly 90 degrees over the center of each macaron template. Apply gentle pressure and carefully pipe for about 3 seconds, and then quickly pull the bag up twisting slightly.
- If putting sesame seeds on top of the macaron shells, do so right after piping the macarons, as the shells will start to dry out as soon as you pipe them, and the sesame seeds might not stick to the shells if the batter has dried. I used tweezers to help place the seeds in the center of the macaron in a nice circumference.
- You want to do this in half of the shells, and leave the other shells plain, since they will be the bottom shells of the kiwi macarons, and they don’t need to have the seeds and lighter green in the middle unless you want them to.
- Bang the trays against the counter a few times each. This will release air bubbles that are in the batter and prevent your macaron shells from cracking.
- Let your trays sit for a while so the shells will dry out a little bit. I usually leave about 20-40 minutes, depending on how humid the day is. You’ll know they’re ready when you gently touch the surface of a macaron and it seems dry.
- Pre-heat the oven to 300°F.
- Bake one tray at a time.
- Bake for 5 minutes, rotate tray.
- Bake for 5 more minutes. Rotate again.
- I bake each tray for about 15 to 20 minutes. When baked, the macarons will have a deeper color and formed feet. If you try to move a macaron, it shouldn’t feel jiggly. If the macaron is still jiggly, keep baking.
- Remove from the oven and bake the other tray.
- Let the macarons cool down before proceeding with the filling.
Kiwi Jam
- Mix kiwi and maple syrup (or sweetener) in a small pot. Bring to a boil over medium heat, cook, stirring, for about 5 minutes. Use the spoon to break up the kiwi as you stir.
- Mix cornstarch and cold water in a small bowl.
- Once kiwi has boiled and reduced a bit, add cornstarch and water to the pan.
- Bring back to a boil, stirring constantly, until mixture is thickened.
- Let jam cool. Cover it with plastic wrap and place it in the fridge.
Vanilla Buttercream
- Sift powdered sugar. Set aside.
- Cream butter at medium speed in the bowl of an electric mixer for about 1 minute. With the mixer off, add all of the powdered sugar in.
- On low speed, beat the sugar and butter together. Once they are incorporated, turn speed to medium and cream for 1-2 minutes until very fluffy. Add vanilla extract and beat for a another 30-45 seconds.
- If buttercream is too stiff, add a bit of milk or water to make it a bit softer. And if buttercream is too runny, add a bit more sifted powdered sugar.
How to assemble
- Pipe a circle of buttercream around the edges of the macaron, in a way that you have a little hole in the middle. Fill the little hole with a bit of kiwi jam. Don’t overfill it. Place another shell on top.
Storage
- These Kiwi Macarons will be at their best up to 4-7 days in the fridge.
- I don’t recommend freezing macarons with jam fillings, since they will often turn soggy because of the jam.
Este minunat tot ce ne prezinti, se poate invata din expunerile tale amanuntite cum sa stapinesti aceasta tehnica.Multumesc si pentru diversitatea retetelor de coji si creme.
Thank you so much!!!! 🙂
These macarons are so gorgeous and such a great video tutorial. It’s really helpful to see the different stages.. I really want to try kiwi jam now too.
Thank you Marie!!!
Assim é covardia, nem deu tempo pra eu fazer a última receita e você apresenta outra maravilha dessas!!!!!!! Que macarons sensacionais!!!!!!