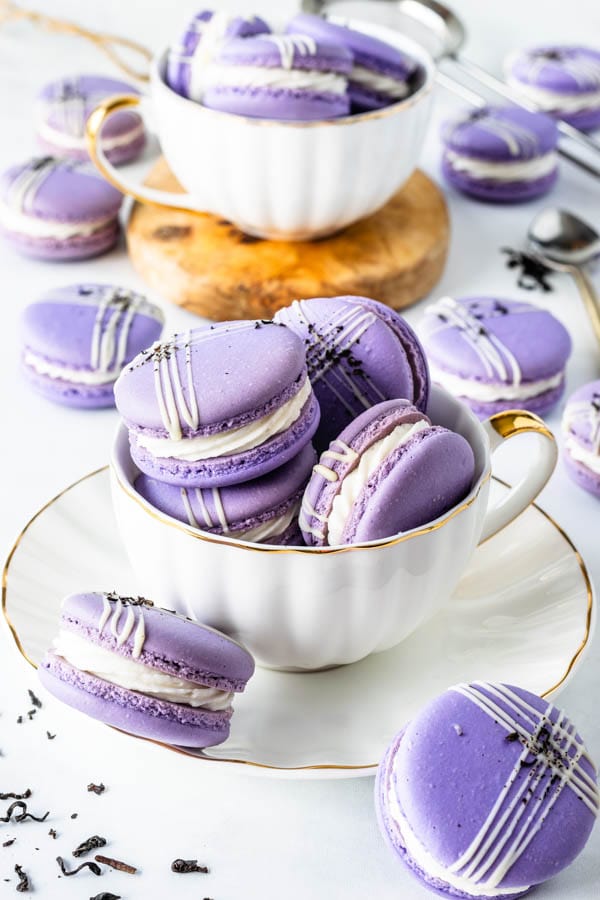
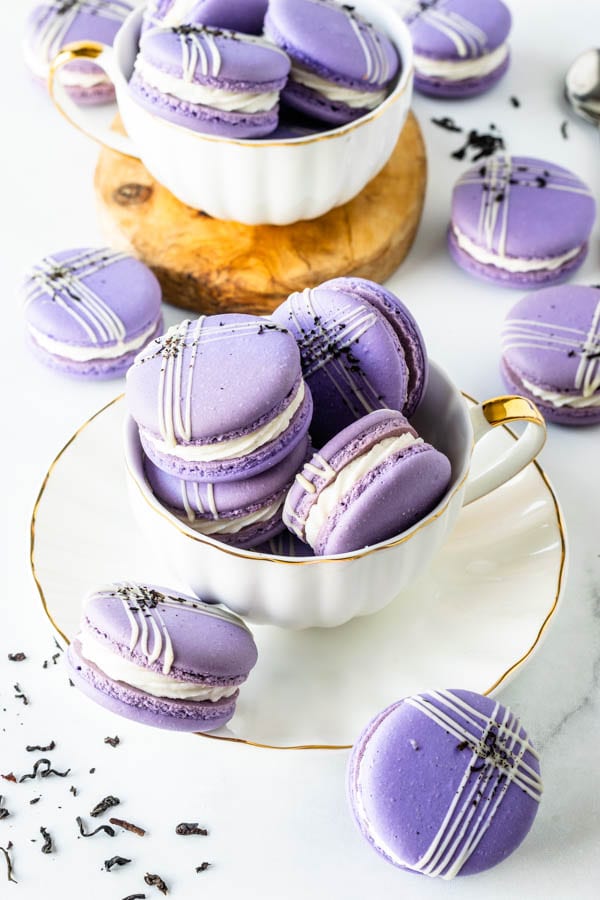
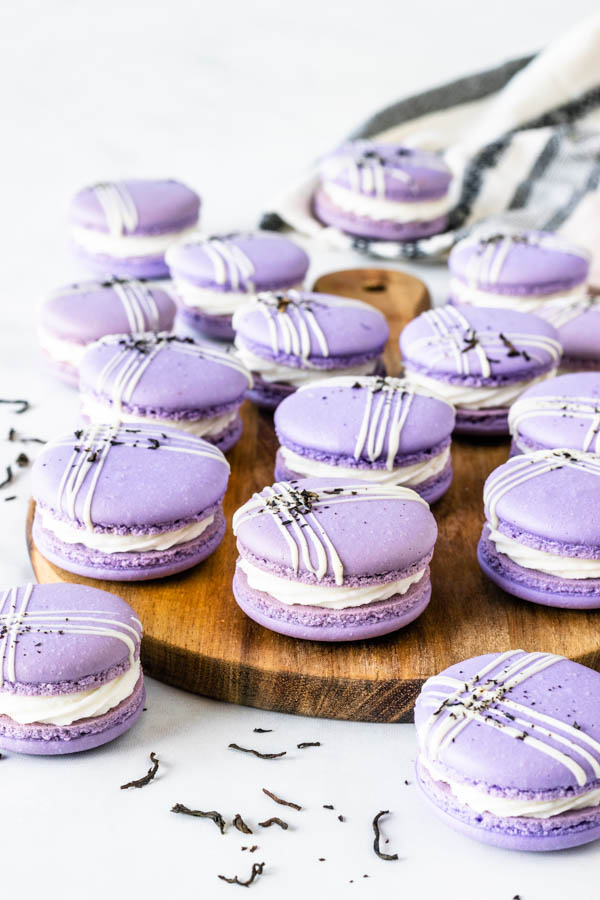
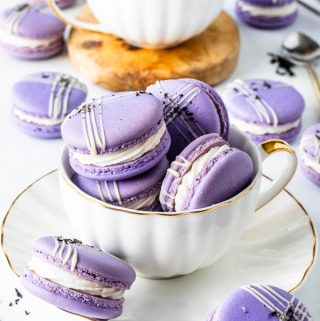
Earl Grey Macarons
Hello sweet friends! Let’s make something sweet today! Perfect for tea time! These Earl Grey Macarons are filled with rich and silky Earl Grey Custard and a delicious Earl Grey Buttercream.
Earl Grey is probably my favorite type of black tea. I’ve been loving experimenting with it in my baking as well! I have a delicious Earl Grey flavor of cupcake coming up on my book to be published later this year, and that inspired me to create these Earl Grey Macarons.
Earl Grey tea is a blend of black tea enhanced with bergamot oil.
This post may contain affiliate links. I earn a commission from qualified purchases. Please read our Privacy policy here.
And if you’re wondering what bergamot is, this article will explain it to you. It’s a citrus fruit, and essential oils are extracted from its rind, to lend flavor and aroma to soaps, perfumes, and of course, Earl Grey Tea.
The flavors of Earl Grey are floral, sweet, assertive, yet smooth, and slightly lemony.
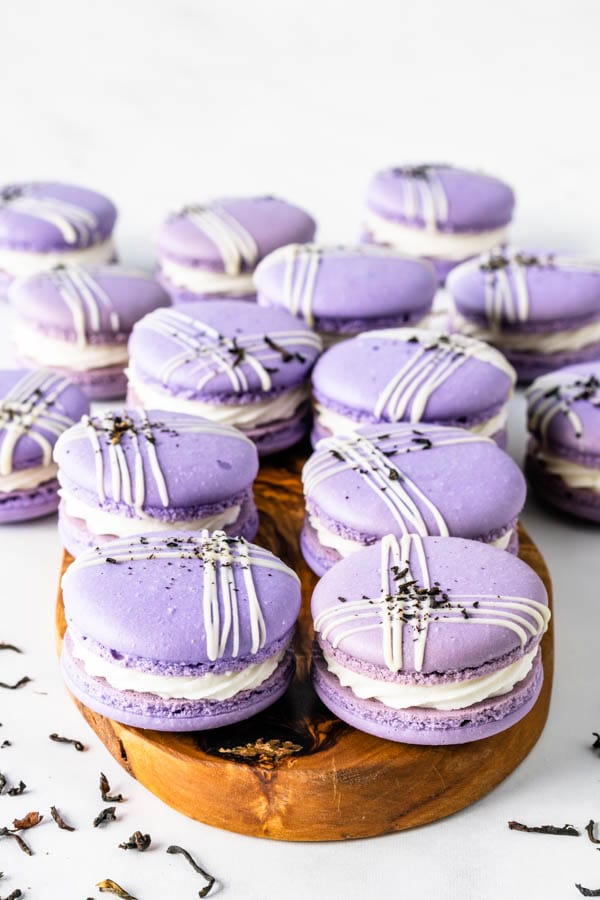
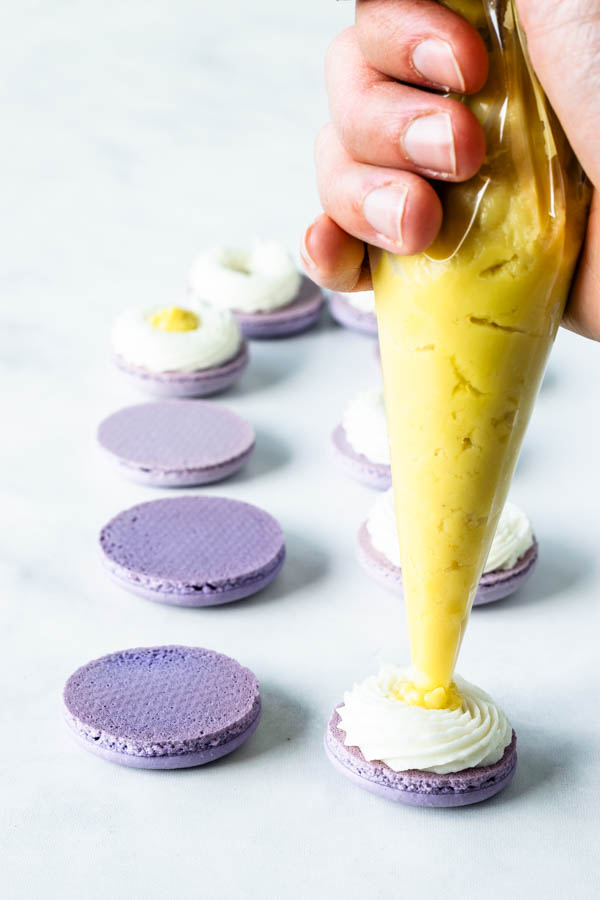
For the filling of these Earl Grey Macarons, I decided to go with an Earl Grey Custard, and Earl Grey Buttercream.
To make both, we use milk infused with Earl Grey tea leaves. You can use loose leaves, or tea bags to infuse the milk.
Feel free to add more than I have indicated here if you already know you love a more pronounced tea flavor. And after you infuse the milk, you can always taste it, and choose to infuse it with more tea for a bit longer if you feel like you need a bit more tea in there.
Also note that I made sure the custard was very thick, with the addition of a bit more cornstarch that I would usually use to make custard, in order to yield a filling that wasn’t going to be too wet and cause the macarons to become soggy.
I usually don’t recommend freezing macarons with custard, curd, or jam fillings, because a wet filling can cause the shells to become soggy as they sit.
However, since the custard filling is nice and thick, feel free to freeze these Earl Grey Macarons for up to 1 month.
This is the container I use to freeze and refrigerate my macarons.
If you are new to making macarons, or would like to learn more, check out my Youtube Channel with some videos showing how I make my macarons.
Also check out my many blog posts where I give tips, tricks, and valuable information that can help you on your macaron baking journey.
And here are some more macaron flavors and ideas you might enjoy:
- Chai Macarons
- Matcha Macarons
- Orange Macarons
- White Chocolate Macadamia Macarons
- Chocolate Macarons
- Pistachio Macarons
- French Vanilla Macarons
- Espresso Peanut Butter Macarons
- Eggnog Macarons
Hope you’ve enjoyed today’s post and our newest Earl Grey Macarons!

Earl Grey Macarons
Ingredients
Macaron Shells
- 100 grams egg whites 3.5 oz
- 100 grams granulated sugar 3.5 oz
- 105 grams almond flour 3.7 oz
- 105 grams powdered sugar 3.7 oz
- Food coloring I used a touch of purple
Earl Grey Custard
- 1/2 cup plus 2 tbsp milk 150 ml
- 1 tsp earl grey leaves or 1 to 2 earl grey tea sachet*
- 3 tbsp granulated sugar 37 grams
- 1 large egg yolk
- 1 tbsp cornstarch 8 grams
- 1 tsp unsalted butter 5 grams
Earl Grey Buttercream
- 1 1/3 cups confectioners’ sugar sifted
- 4 tbsp unsalted butter softened
- 1/2 tsp vanilla extract
- 2 tbsp infused Earl Grey milk**
Instructions
Macaron Shells
- Before you start, get all of your ingredients ready. Prepare a large piping bag, fitted with a large round tip. Set aside.
- Line two baking sheets with parchment paper or silicone mat.
- I use a baking mat with the macaron template already in it. You can make your own or print it from the internet, and just place it under silicone mat, or parchment paper. I recommend using a silicone mat.
- Measure out all of your ingredients.
- Sift powdered sugar and almond flour together. Set aside.
- Place egg whites and granulated sugar in a heat proof bowl or in a double boiler. Over a pan of simmering water, whisk the whites and sugar until frothy and sugar completely melted. It will take a couple minutes. You can test by touching the mixture between your fingers, and if you feel any sugar granules just keep whisking mixture over the water bath.
- Make sure the bottom of the bowl isn’t touching the simmering water.
- Transfer mixture to the bowl of a stand mixer.
- With the whisk attachment, start whisking mixture on low for about 30 seconds, then gradually start increasing speed to medium. Whisk on medium for one to two minutes, until mixture is white and starting to become fluffy. Raise speed to high for a few minutes until stiff peaks are formed. Best way to check this is to keep your eye on the whites. Once they get glossy and you start seeing streaks formed by the whisk, it might be time to stop.
- Whisk until stiff peaks have formed. When you pull your whip up, the peak should form a bird’s beak shape, but shouldn’t be falling to the side, the peak should be stiff, forming a slightly curved shape at the top.
- Pour sifted powdered sugar and almond flour into stiff whites.
- Start folding gently forming a letter J with a spatula.
- Add the food coloring at this point, if using.
- It’s time to stop folding when the batter is glossy and has a thick and flowing consistency. There are several ways to test this, and you might have a couple failed batches before you get this right.
- How to know when to stop folding the batter: It’s time to stop folding when the batter is glossy and has a thick and flowing consistency. There are several ways to test this.
- First, I pick up some batter with my spatula and try to draw a figure 8 with the batter that is dripping off the spatula. If you can form several 8 figures without the batter breaking up, that’s one indication that it might be ready.
- There’s another test you can do. I call it the Teaspoon test.
- Grab a teaspoon of batter and spoon onto the parchment paper or silicon mat. Wait a minute to see how it behaves.
- If the batter stays stiff, forming a point and doesn’t spread out a bit, I start folding a little bit more, about 3 folds.
- Test again.
- Once the batter spreads out a bit and starts to look glossy and smooth on top, on the parchment paper, transfer it to the piping bag.
- You don’t want your batter to be too runny either. So be careful not to overmix. It’s always best to undermix and test several times until the proper consistency has been achieved.
- The best way I can describe this stage being perfect is when you hold the spatula with batter on top of the bowl and the batter falls off the spatula slowly but effortlessly. The batter will keep flowing off the spatula non-stop, but not too quickly.
- Place the piping bag directly 90 degrees over the center of each macaron template. Apply equal pressure and carefully pipe for about 3 seconds, and then quickly pull the bag up twisting slightly.
- Once you’ve piped as many circles as you could, bang the trays against the counter a few times each. This will release air bubbles that are in the batter and prevent your macaron shells from cracking.
- Use a toothpick to pop any air bubbles in the surface of the shells.
- Let your trays sit for a while so the shells will dry out a little bit. I usually leave about 20-40 minutes, depending on how humid the day is. You’ll know they’re ready when you gently touch the surface of a macaron and it seems dry.
- Pre-heat the oven to 300°F.
- Bake one tray at a time.
- Bake for 5 minutes, rotate tray.
- I bake each tray for about 18 minutes minutes.
- When baked, the macarons will have a deeper color and formed feet. If you try to move a macaron, it shouldn’t feel jiggly. If the macaron is still jiggly, keep baking.
- Remove from the oven and bake the other tray.
- Let the macarons cool down before proceeding with the filling.
Earl Grey Custard
- Place the milk in a small saucepan, and bring the mixture almost to a boil, over medium heat.
- Remove the milk from the heat and add the earl grey tea leaves, or tea sachet to the milk. Let the tea infuse for 10 minutes with the milk. Discard the tea leaves or sachet.
- Remove 2 tbsp of the infused milk and set aside to use in the buttercream later on.
- To the remaining 1/2 cup of infused milk, add 2 tbsp of sugar, and place it back in the heat. As soon as the sugar dissolves, remove the mixture from the heat. Meanwhile, in a bowl, whisk the yolk, the remaining 1 tbsp of sugar, and the cornstarch together until the mixture is lightened in color.
- Slowly add just a couple of tablespoons of the hot milk and sugar mixture to the yolk, while whisking.
- This is called tempering the eggs, and it’s done so that the eggs won’t cook as you add the hot liquid to it, which is why we add only a little bit at a time. Once the first bit of milk has been whisked with the eggs, add a bit more, and do this until all the milk has been added to the yolk. Return the mixture to the saucepan, through a fine mesh sieve, so any bits of cooked egg will be left out. Place the pan over medium heat and begin to stir with a spatula or wooden spatula. Stir the mixture vigorously while cooking.
- Don’t stop stirring at any point, or the eggs will cook on the bottom of the pan.
- Cook the cream for a few minutes. First it will start to look lumpy, and slowly, as you keep stirring, it will thicken and smooth out, becoming a rich and silky custard.
- When that happens, remove from the heat immediately, stir the butter in, and transfer the cream to a small bowl. Cover it with a piece of plastic wrap directly on top of the cream, so it doesn’t form a skin as it cools down. Place the cream in the fridge for a couple of hours until completely chilled.
Earl Grey Buttercream
- Start by sifting the powdered sugar, and set it aside.
- Now, cream the butter in the bowl of an electric mixer, for about 2 minutes, until light and fluffy.
- With the mixer off, add the powdered sugar to the bowl.
- Turn the mixer on low to incorporate the powdered sugar with the butter.
- Once you see no streaks of dry powdered sugar, cream mixture on medium high for one minute.
- Add vanilla extract and milk. Mix to combine.
- If the buttercream is too runny, add a bit more sifted powdered sugar in. If the buttercream is too stiff, add a bit more milk, by the teaspoon, until you achieve the desired consistency, which should be firm, but not stiff, and should also be creamy and smooth.
- This frosting will store well in the fridge for up to 5 days, covered.
- Make sure to always leave your frosting covered. Cover the bowl with a lid or plastic wrap, because otherwise, the surface will dry out and get hard. To decorate the macarons, I drizzled some white chocolate and sprinkled some crunched Earl Grey Tea leaves on top.
To assemble
- To assemble the macarons, pipe a ring of Earl Grey Buttercream around the edges of a bottom shell. Fill it with a bit of Earl Grey Custard. Top with another shell.
Storage
- These macarons will store in the fridge for up to 4 days. They will also freeze well for up to 1 month.
I was wondering if you have a video making this recipe. I made it tonight and the curd turned out weird. I’m a visual learner so I’m worried I messed something up. TIA!
I don’t have one. What turned out weird about it? If you have an image send to camila @ piesandtacos . com.
Thanks for the recipe! Can’t wait to try it. I’m still new to making macarons. How long would these last in the refrigerator? If I freeze them, how long would it take to thaw and mature in the fridge?
in the fridge about 4 to 5 days. If youre going to freeze them, first make them and fill, then refrigerate for 24 hours to mature. Then place in the freezer. they can be frozen for up to 1 month. no need to thaw really when serving, just let them sit at room temp 20 to 30 minutes before serving.
Hi! What would happen if I forgot to add in the butter to the custard at the end? Would that affect the taste? Or anything else?
the butter makes it a bit richer and thicker, so you could go without but it definitely enhances the recipe.
Hello! I’ve just finished prepping the custard and buttercream. Normally I use a SMBC but this time I thought I’d try yours. For some reason my BC is separating? Would melting a small amount of the BC and beating it together bring it back? Or do you have any other suggestions? Thanks so much for your help! Your recipes are all so amazing!
Was the butter too cold? Or the custard? Maybe they were too warm? If the buttercream was too warm, I’d place it in the fridge for 5 min and then whip again, and if it was too cold, let it sit at room temperature and then whip again. Or it just needed more powdered sugar.
hi there! how far in advance can the custard be made? thank you 🙂
I’d say no longer than 2 days.
Is the Earl Grey Buttercream recipe a German buttercream?
no, it’s just a regular buttercream. It would be german buttercream if I mixed the custard with butter and powdered sugar
Love this recipe, me and my coworkers went crazy over them, haha! I just made a new batch of macs and subbed Irist tea for earl grey to celebrate St. Patrick’s Day and they are sooooo good as well. Thank you for this recipe!
That’s so awesome to hear!! Thank you!!!
hiii! i’ve made your matcha macarons many times & bomb!! super quick tho, the instructions for the custard are a little confusing.
Earl Grey Custard
1/2 cup plus 2 tbsp 150 ml milk
1 tsp earl grey leaves or 1 to 2 earl grey tea sachet*
3 tbsp cup 37 grams granulated sugar (3 tbsp plus 37 grams?)
1 large egg yolk
1 tbsp 8 grams cornstarch (1 tbsp plus 8 grams?)
1 tsp 5 grams unsalted butter (1 tsp plus 5 grams?)
1/2 cup plus 2 tbsp of milk will equate 150 ml
3 tbsp of sugar will equate 37 grams… etc
I am just writing the gram measurement next to the tbsp/cup measurements.
oh okay thank you! i was mainly confused bc it said 3 tbsp cup 37 grams haha!
omg I know! for me it was showing on the side, but when I went to look on the actual post I saw it was showing in the middle! It was a mess lol 😆 🙈 sorry about that. thanks for bringing to my attention!
Can I just fill the macarons with the earl grey curd? Will it be thick enough?
I wouldn’t use it. You can make a german buttercream with the earl grey custard as an alternative.
Hi there! I’m trying this recipe and quick question- maybe i missed it, but how did you create your milk infused with earl gray? Do you have a ratio or recipe listed? I might have missed it!
Te instructions on how to infuse the milk are on the Earl Grey Custard instructions:
“Place the milk in a small saucepan, and bring the mixture almost to a boil, over medium heat.
Remove the milk from the heat and add the earl grey tea leaves, or tea sachet to the milk. Let the tea infuse for 10 minutes with the milk. Discard the tea leaves or sachet.
Remove 2 tbsp of the infused milk and set aside to use in the buttercream later on.
[…]”
I’ll try that! Thanks so much!
Hi there! I made these yesterday (modified based on your other recipes to make them vegan) and the earl gray flavor in the frosting has faded completely. Do you have any tips for infusing into the frosting? This is my first time ever making macarons and I’m not a baker so apologies in advance if this is an obvious answer. Thanks for all your work on this and sharing it with the world!
I added infused milk to the frosting. You can do that, and add more powdered sugar to compensate for the milk if it becomes too runny. Also, you can grind up a bit of earl grey and add it to the buttercream. A little will go a long way.
How do I make the earl grey crunch for the top?! I’m making them right now and I cannot wait to try them!
Hello Brittany, I just crumbled some earl grey loose leaves and put them on top of the drizzled white chocolate 🙂 Thanks and enjoy!!!
Love love love these! Earl Gray works so well for baking!
So well! I am loving it!!
Gostei muito desses macarons, você sempre apresenta um sabor fantástico!!!!!!
Obrigada pai! 🙂