Lemon Tart
I’ve tested quite a few lemon tart recipes over the years, and this one has become one of my favorites when I want something reliable, bright, and balanced. The filling is smooth and full of fresh lemon flavor without being overly sharp, and the crust has that buttery texture I personally love in a tart.
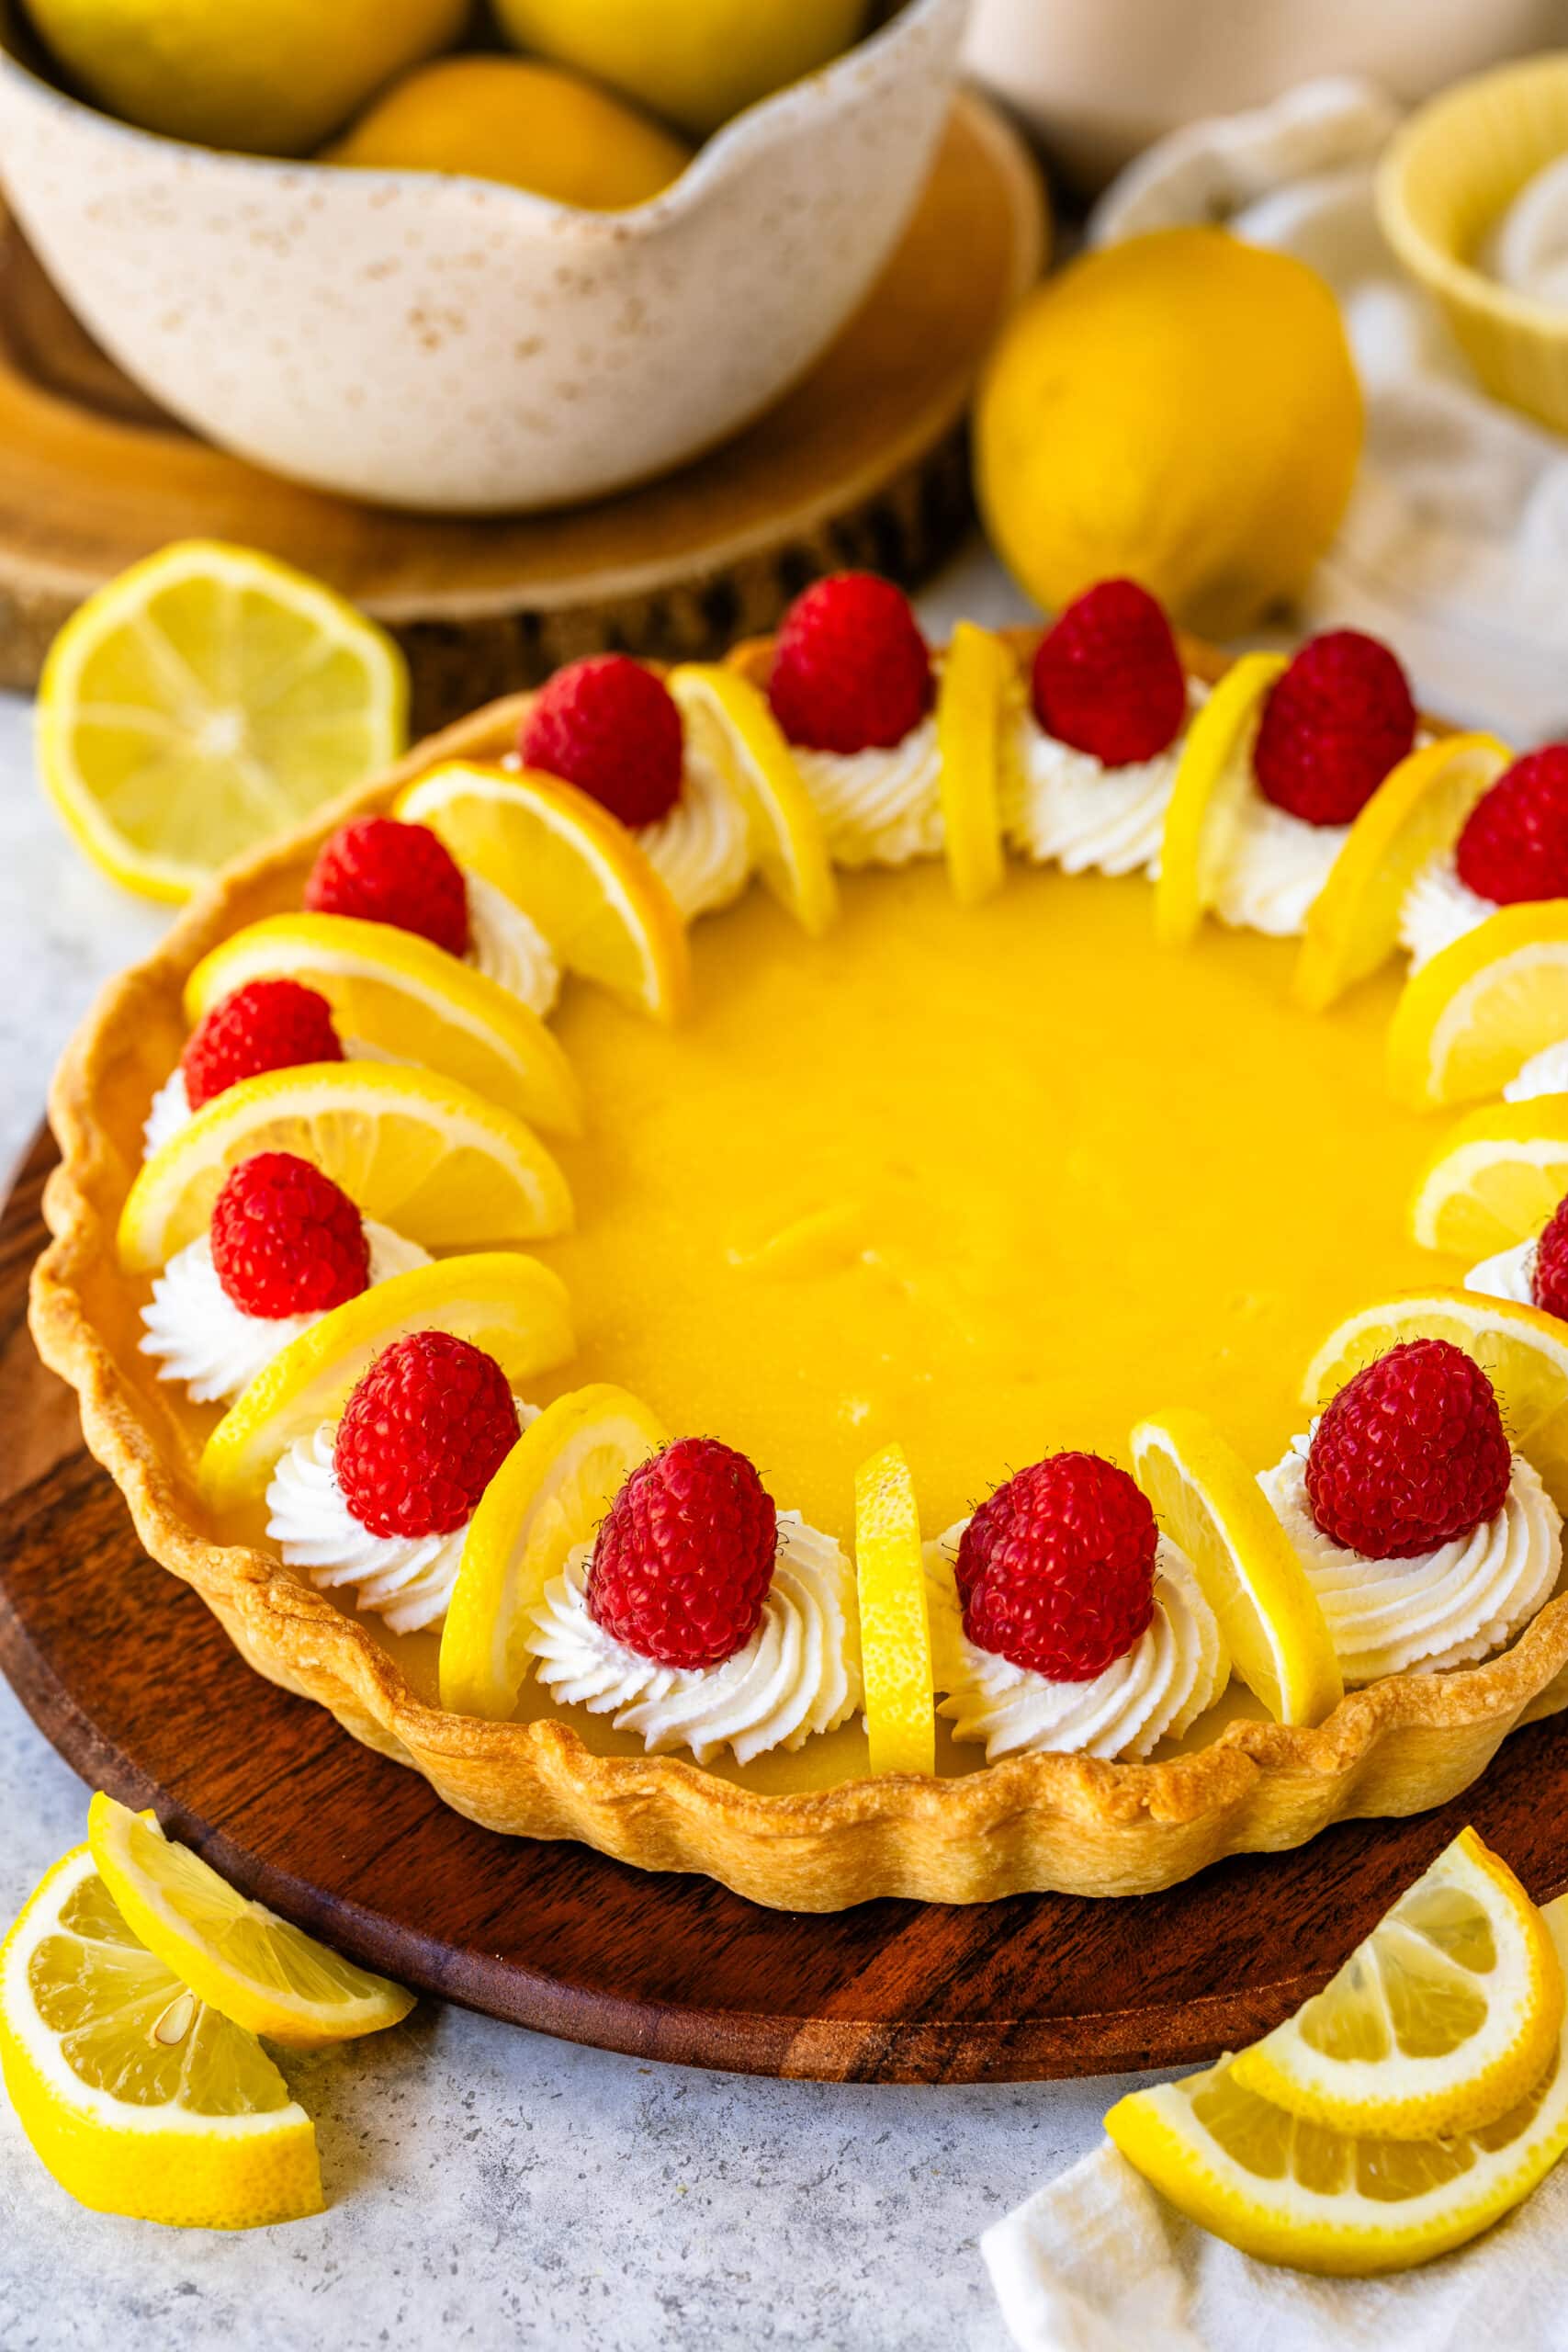
It’s a classic tarte au citron with a simple sweet tart crust and a creamy lemon curd filling that sets beautifully after chilling. I usually top mine with whipped cream, fresh berries, and thin lemon slices, but it’s just as good plain straight from the fridge.
Why You’ll Love This Lemon Tart
What I love most about this tart is how balanced it is. The filling is bright and creamy without being too sharp, and the buttery crust keeps everything rich without feeling heavy.
This post may contain affiliate links. I earn a commission from qualified purchases. Please read our Privacy policy here.
- The lemon curd is smooth, creamy, and full of fresh lemon flavor.
- The tart crust stays delicate and crisp even after chilling.
- I love that the filling sets beautifully without becoming dense.
- The recipe can be made ahead, which honestly makes it even better for serving guests.
- It’s simple enough for a casual dessert, but still feels elegant.
- Fresh berries and whipped cream pair perfectly with the lemon flavor.
Lemon Tart Recipe
The full recipe card is at the bottom of the page, but I wanted to walk you through exactly how I make this tart step by step because a few small details really do make a difference here, especially with the crust and the lemon curd.

What you need
Lemons: I highly recommend using fresh lemons here instead of bottled juice. The flavor is much brighter and cleaner, and the zest adds a lot to the filling. I usually use regular Eureka lemons, but Meyer lemons also work if you want a slightly softer citrus flavor.
Butter: The butter is used in both the crust and the filling. In the crust, it gives the tart that buttery, delicate texture. In the curd, it helps create a smooth and creamy consistency. I always use unsalted butter so I can control the salt level myself.
Eggs and Egg Yolks: The combination of whole eggs and yolks gives the filling structure while keeping it rich and silky. The extra yolks also help the curd set nicely without becoming rubbery.
Powdered Sugar: I prefer powdered sugar in the tart dough because it creates a softer and more tender crust than granulated sugar.
Flour and Salt: The flour gives the crust structure, while the salt balances the sweetness and helps bring out the lemon flavor.
Whipped Cream and Fresh Berries: These are optional for decorating, but I honestly love serving lemon tart with raspberries because the slight tartness pairs really well with the filling.
How to Make a Lemon Tart
Let’s start with the tart shell first.
The crust is very simple to make. It has more of a buttery cookie texture than a flaky pie crust, which is personally what I prefer with lemon tart because it holds the filling beautifully without becoming soggy.
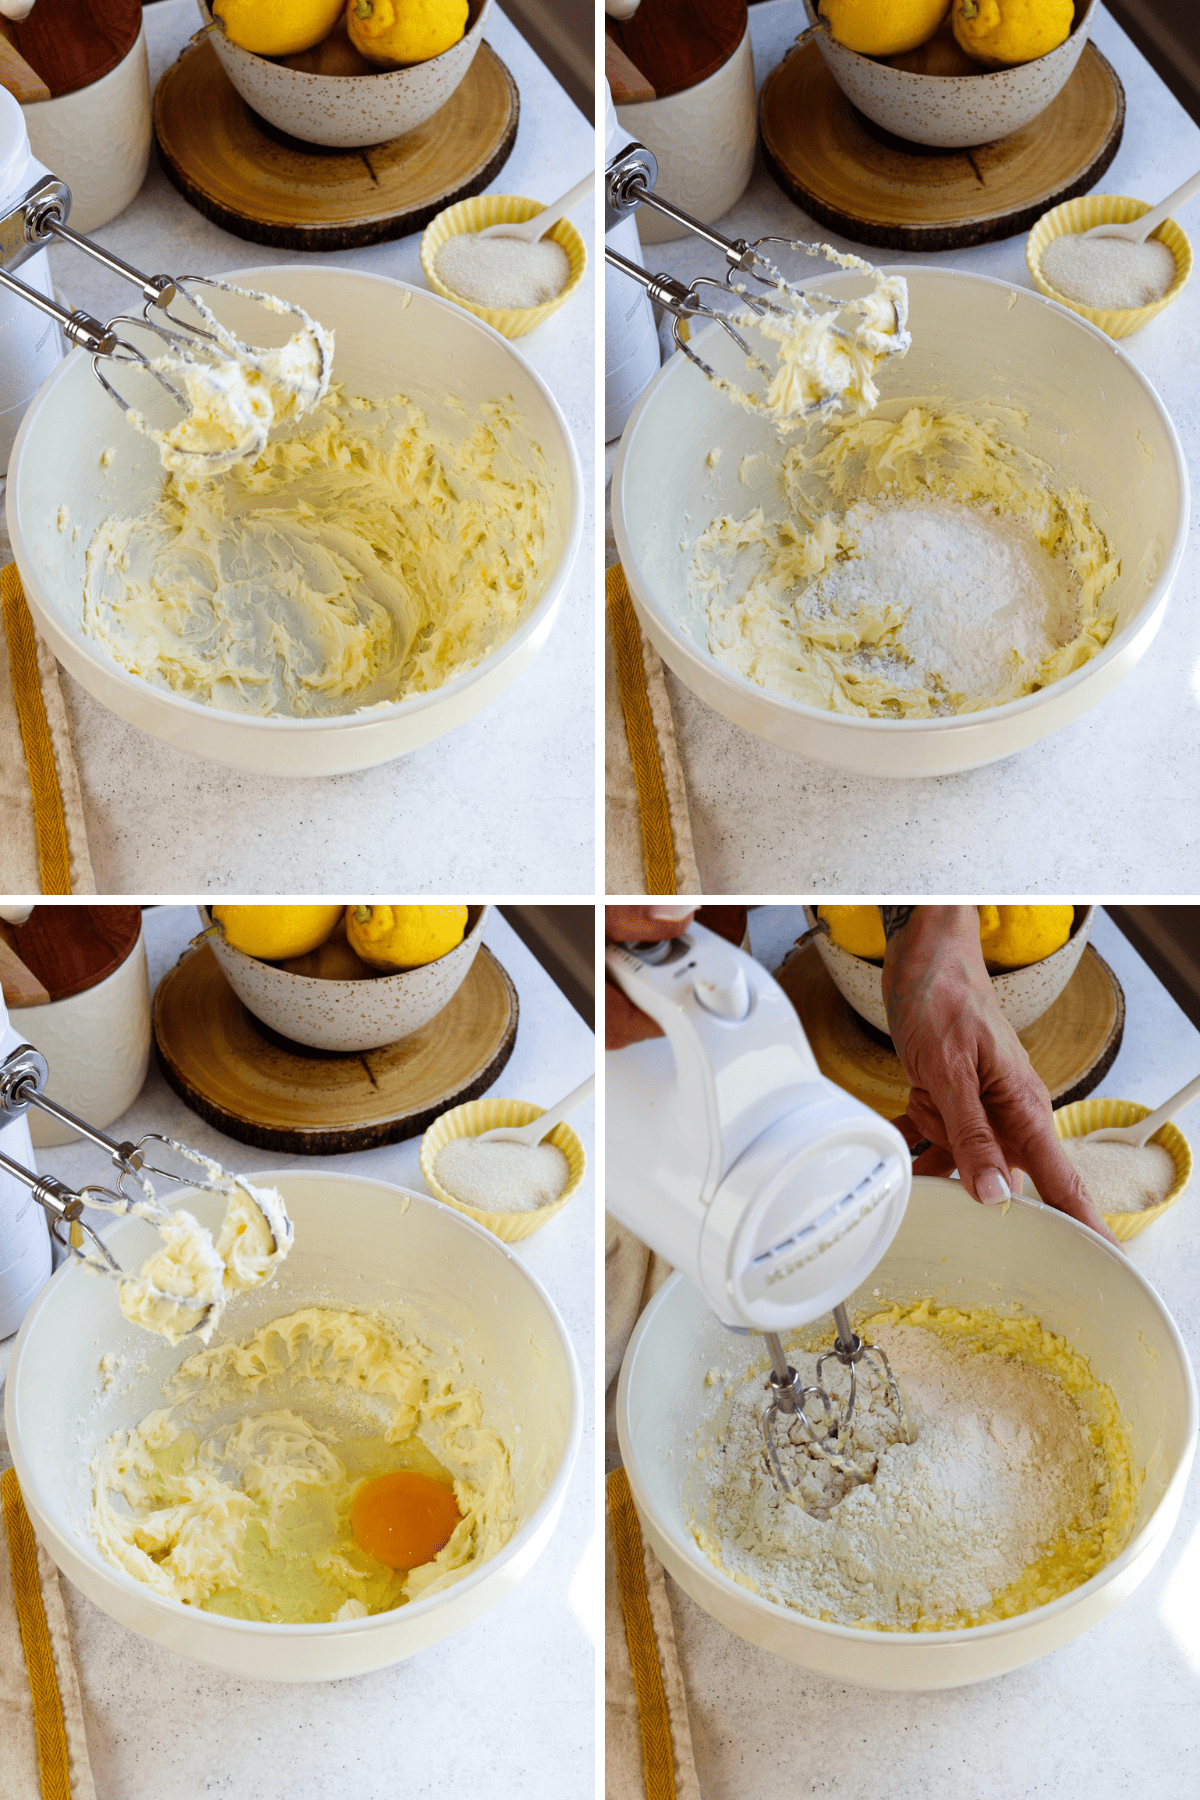
Step 1: Make The Tart Dough
To make the flaky pastry crust, we will start by beating some room temperature butter with a mixer. You can use a stand mixer or a hand mixer.
Add the powdered sugar to the bowl and beat to combine. Next, add the egg and mix.
As always, remember to scrape the sides of the bowl while making anything in the mixer, to ensure the ingredients are properly incorporated together.
Add the flour and the salt, and mix on low. You can finish mixing with a spatula to ensure the dough won’t get overmixed.
The tart dough should be soft, without any dry pieces of flour.
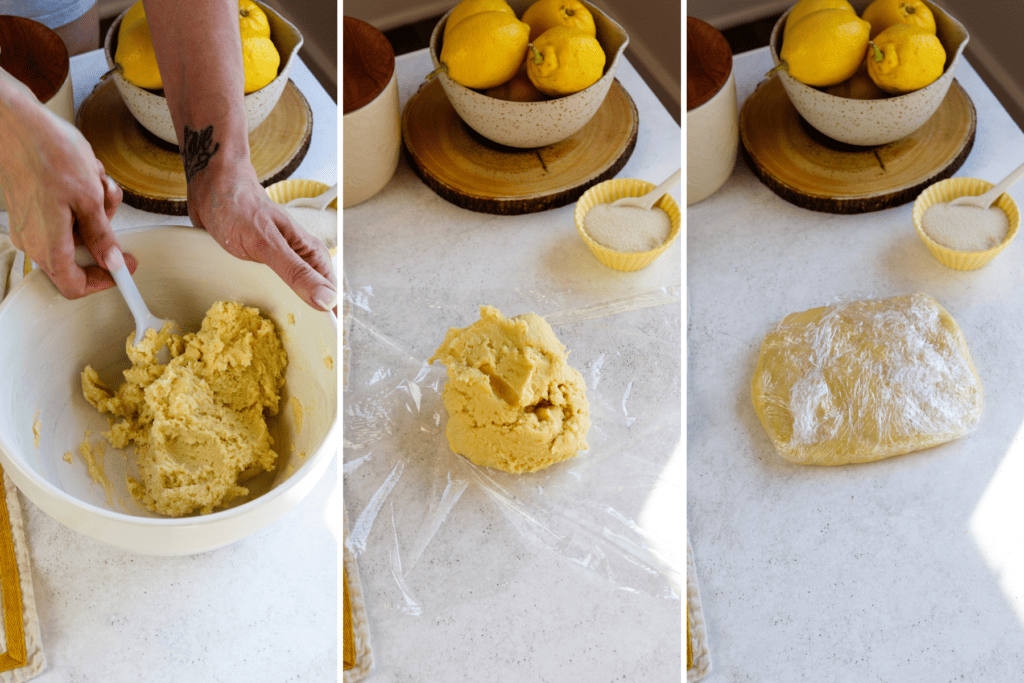
Step 2: Chill the Crust Dough
Lay out a piece of plastic wrap on the counter. Place the dough on top of the plastic. Wrap it tightly, flatten the dough into a disc, and place it in the fridge for at least one hour.
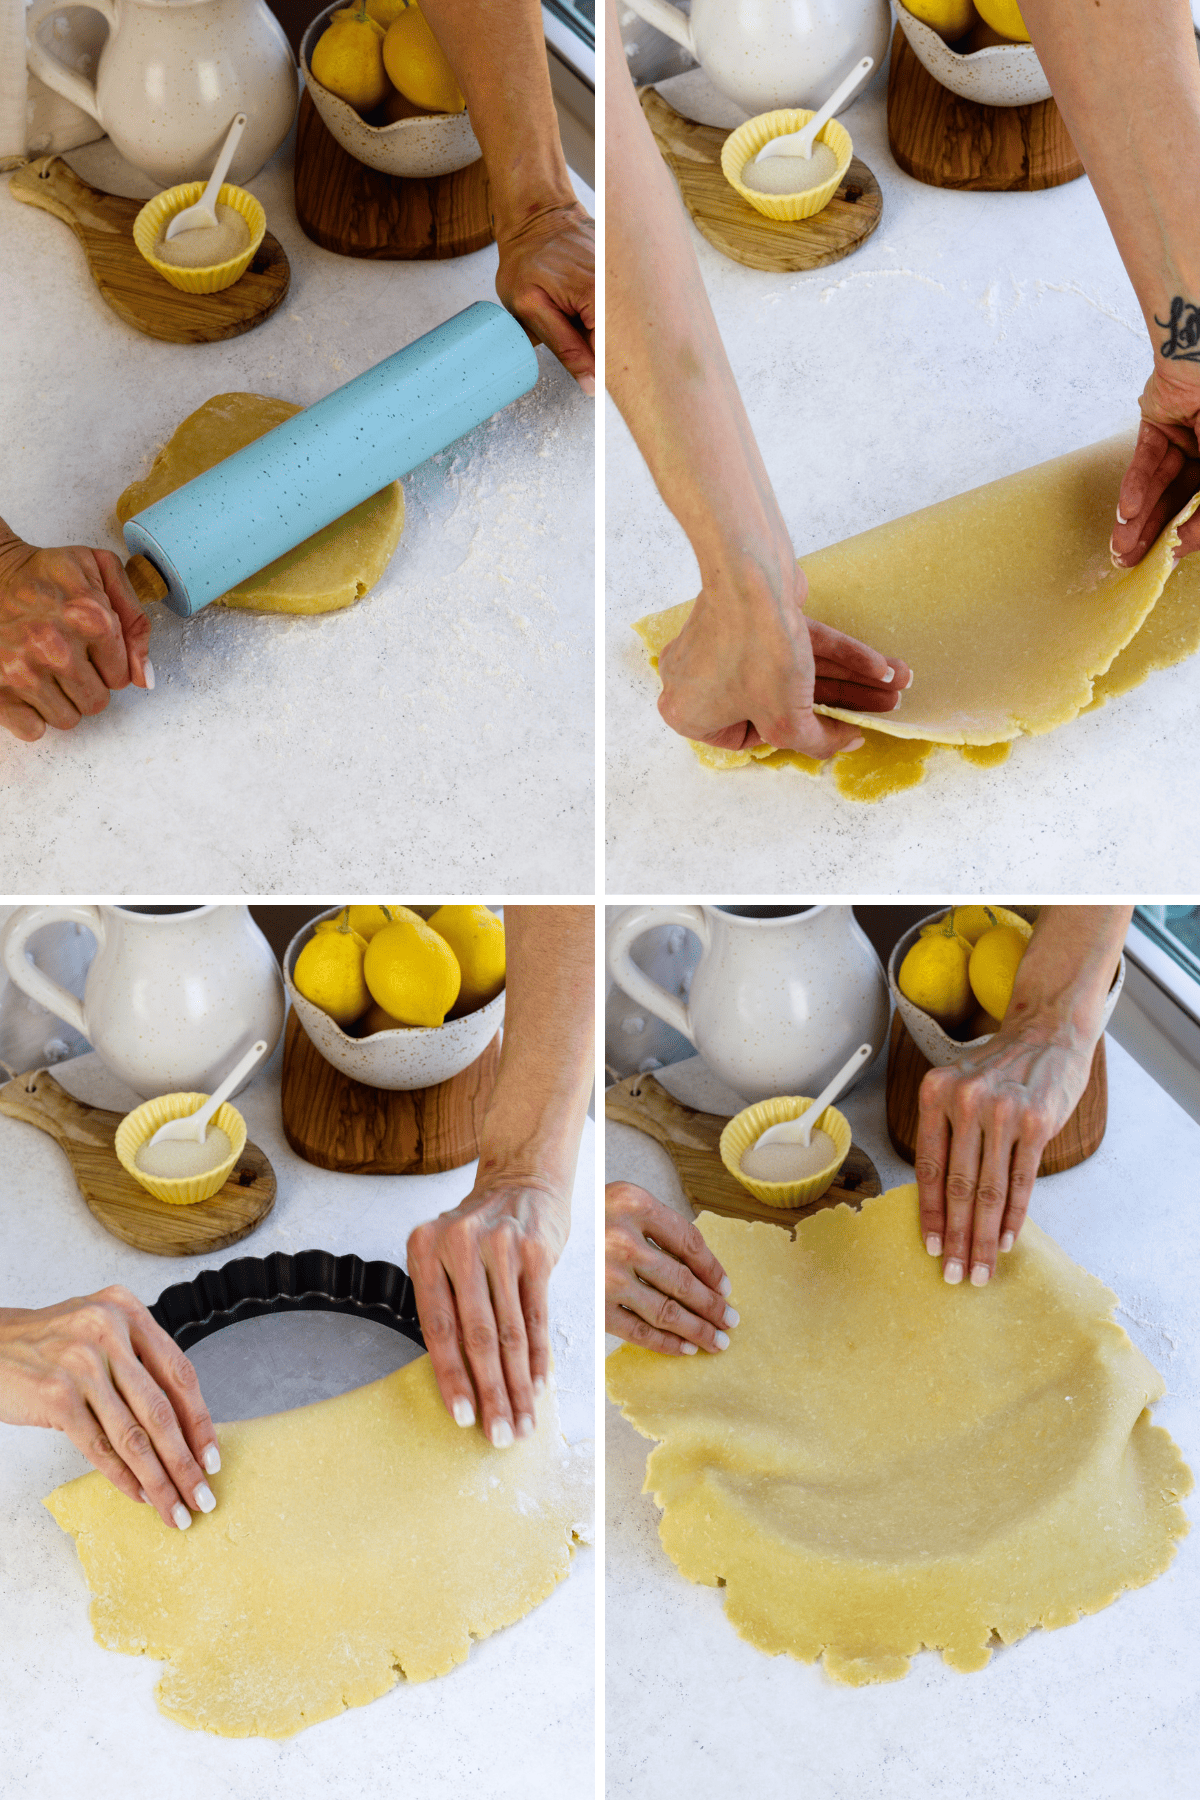
Step 3: Roll the Crust Dough
Remove the dough from the fridge and let it sit on the counter for a few minutes to soften up slightly.
Sprinkle some flour on the counter.
Roll the dough with the rolling pin, into a 11 to 13-inch circle.
I like folding the dough in half before transferring it to the pan because it makes it much easier to handle without tearing.
Place it on top of a 9-inch tart pan with a removable bottom. You can also use a regular pie plate.
Unfold the dough and gently press it down the pan, being careful not to stretch it too much, otherwise the dough can shrink once baked.
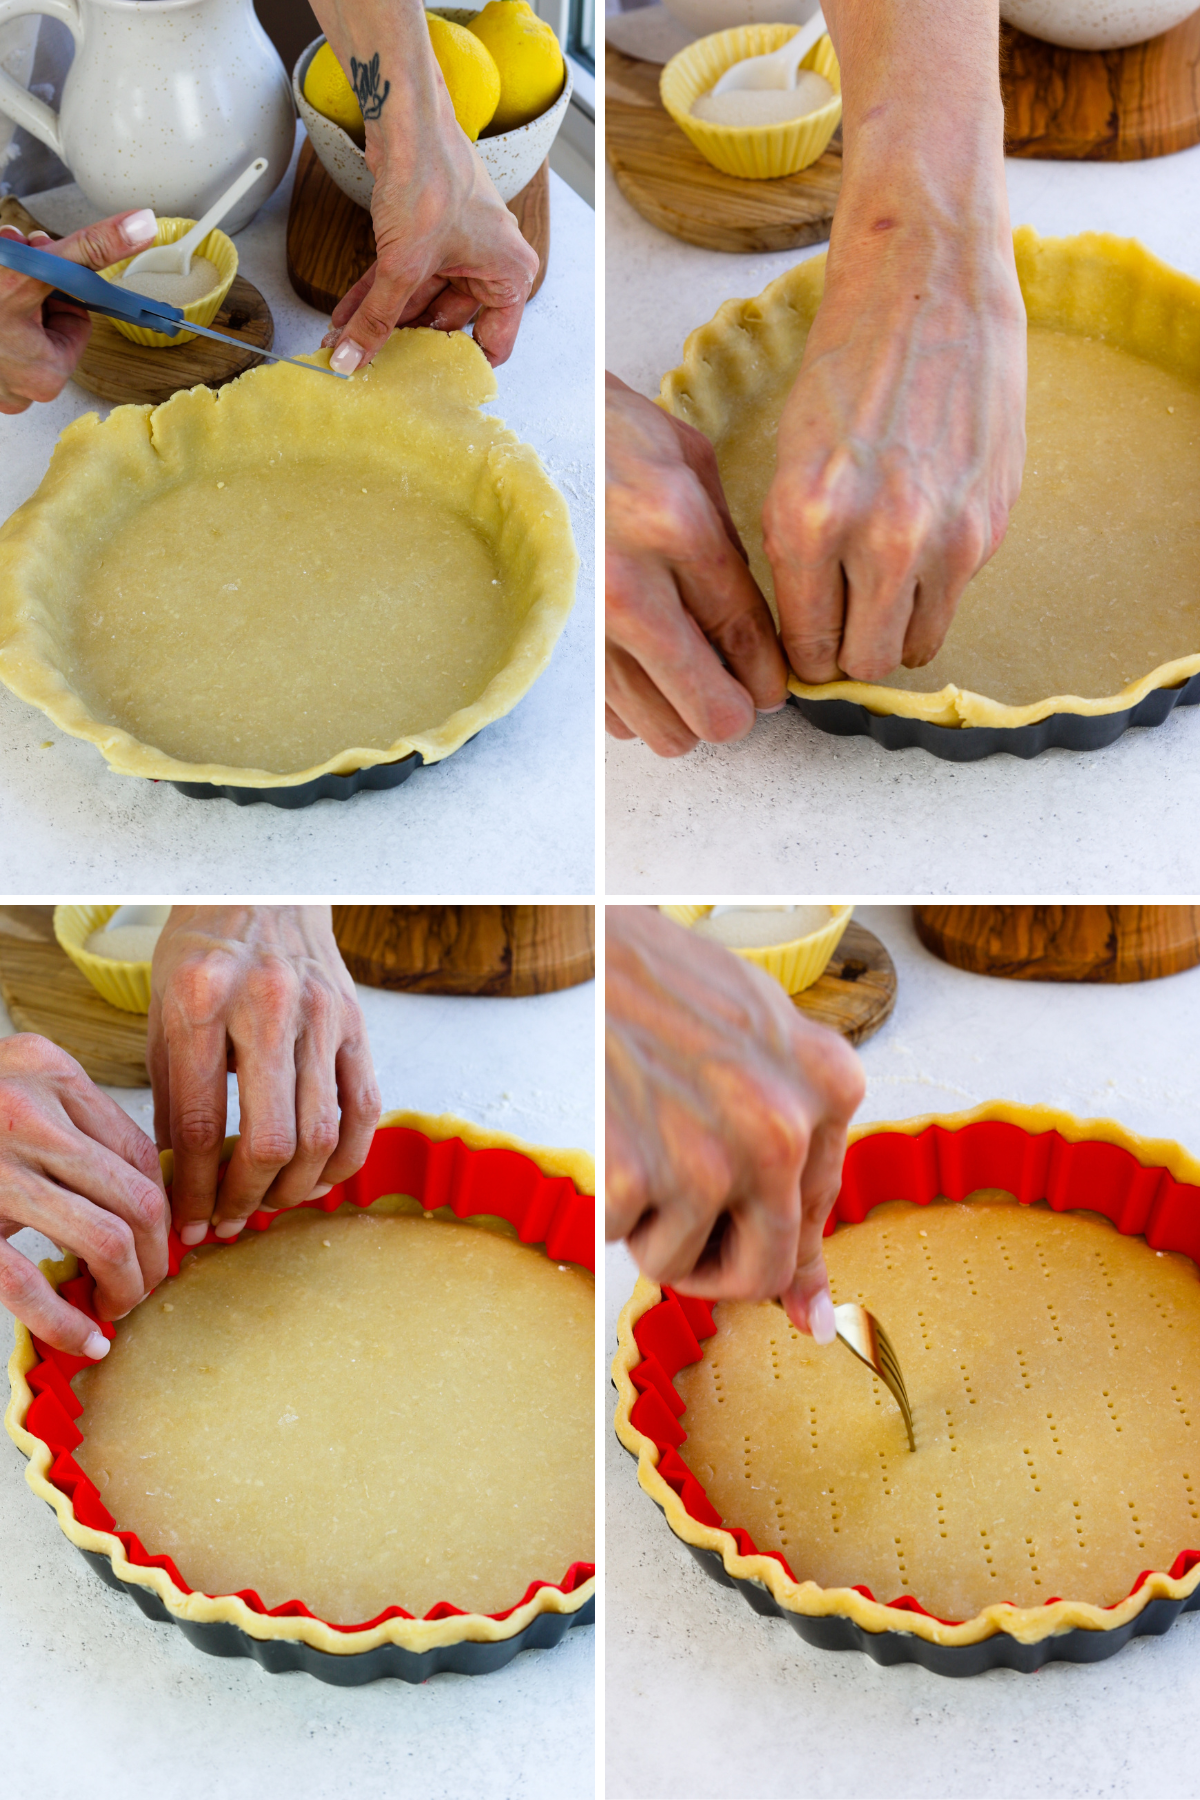
Step 4: Shape the Crust
Unfold the dough and gently press it down the pan, being careful not to stretch it too much, otherwise the dough can shrink once baked.
Trim off any excess dough on top of the tart pan. Use your fingers to crease the sides. See the picture below.
Poke the bottom of the dough with a fork. Place it in the freezer while the oven pre-heats.
Step 5: Blind Bake the Crust
Remove the dough from the freezer and line the pan with the silicone mold or with a piece of parchment paper of aluminum foil.
Fill the parchment or aluminum with the pie weights, or dry beans.
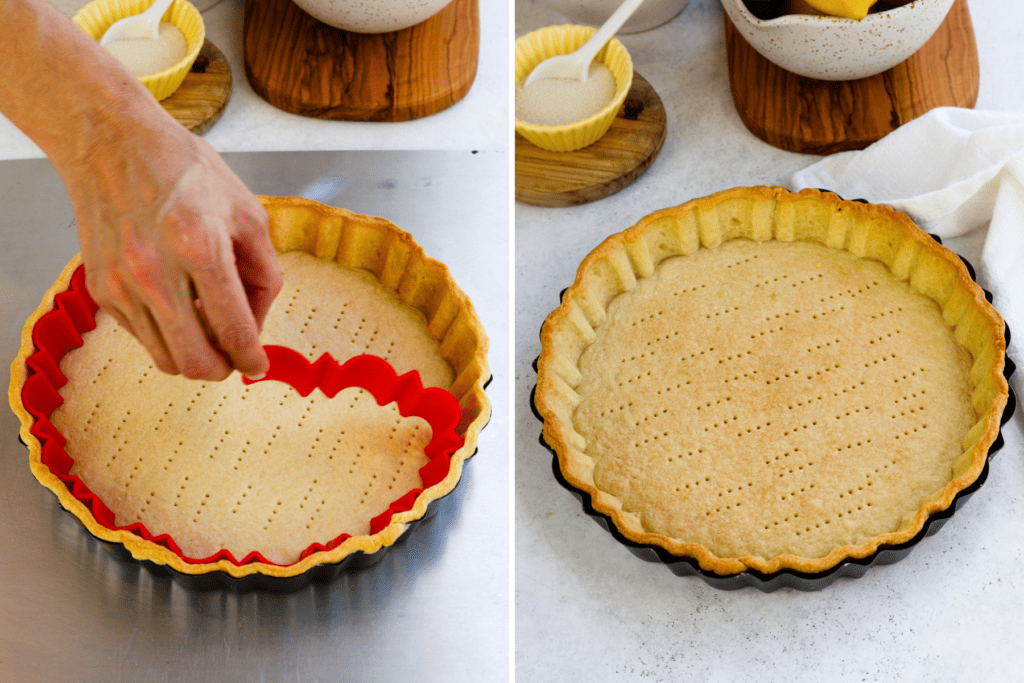
Bake the dough in the oven for 15 minutes.
Remove the silicone edge, or the parchment with the pie weights and bake for another 5 to 10 minutes, until the bottom of the pan is lightly golden brown.
I always let the crust cool before adding the filling. Pouring curd into a hot crust can soften it too much and affect the final texture.
Crust Pro Tips
Tart crust can be a little frustrating the first few times because shrinkage is very common. These are the things that make the biggest difference for me:
- Don’t overmix the dough once the flour is added.
- Avoid rolling the dough too thin.
- Use only enough flour to keep the dough from sticking.
- Gently press the dough into the pan instead of stretching it.
- Chill or freeze the crust before baking.
- Use pie weights during blind baking so the sides keep their shape.
This is honestly one of those recipes where patience during the crust stage pays off later.
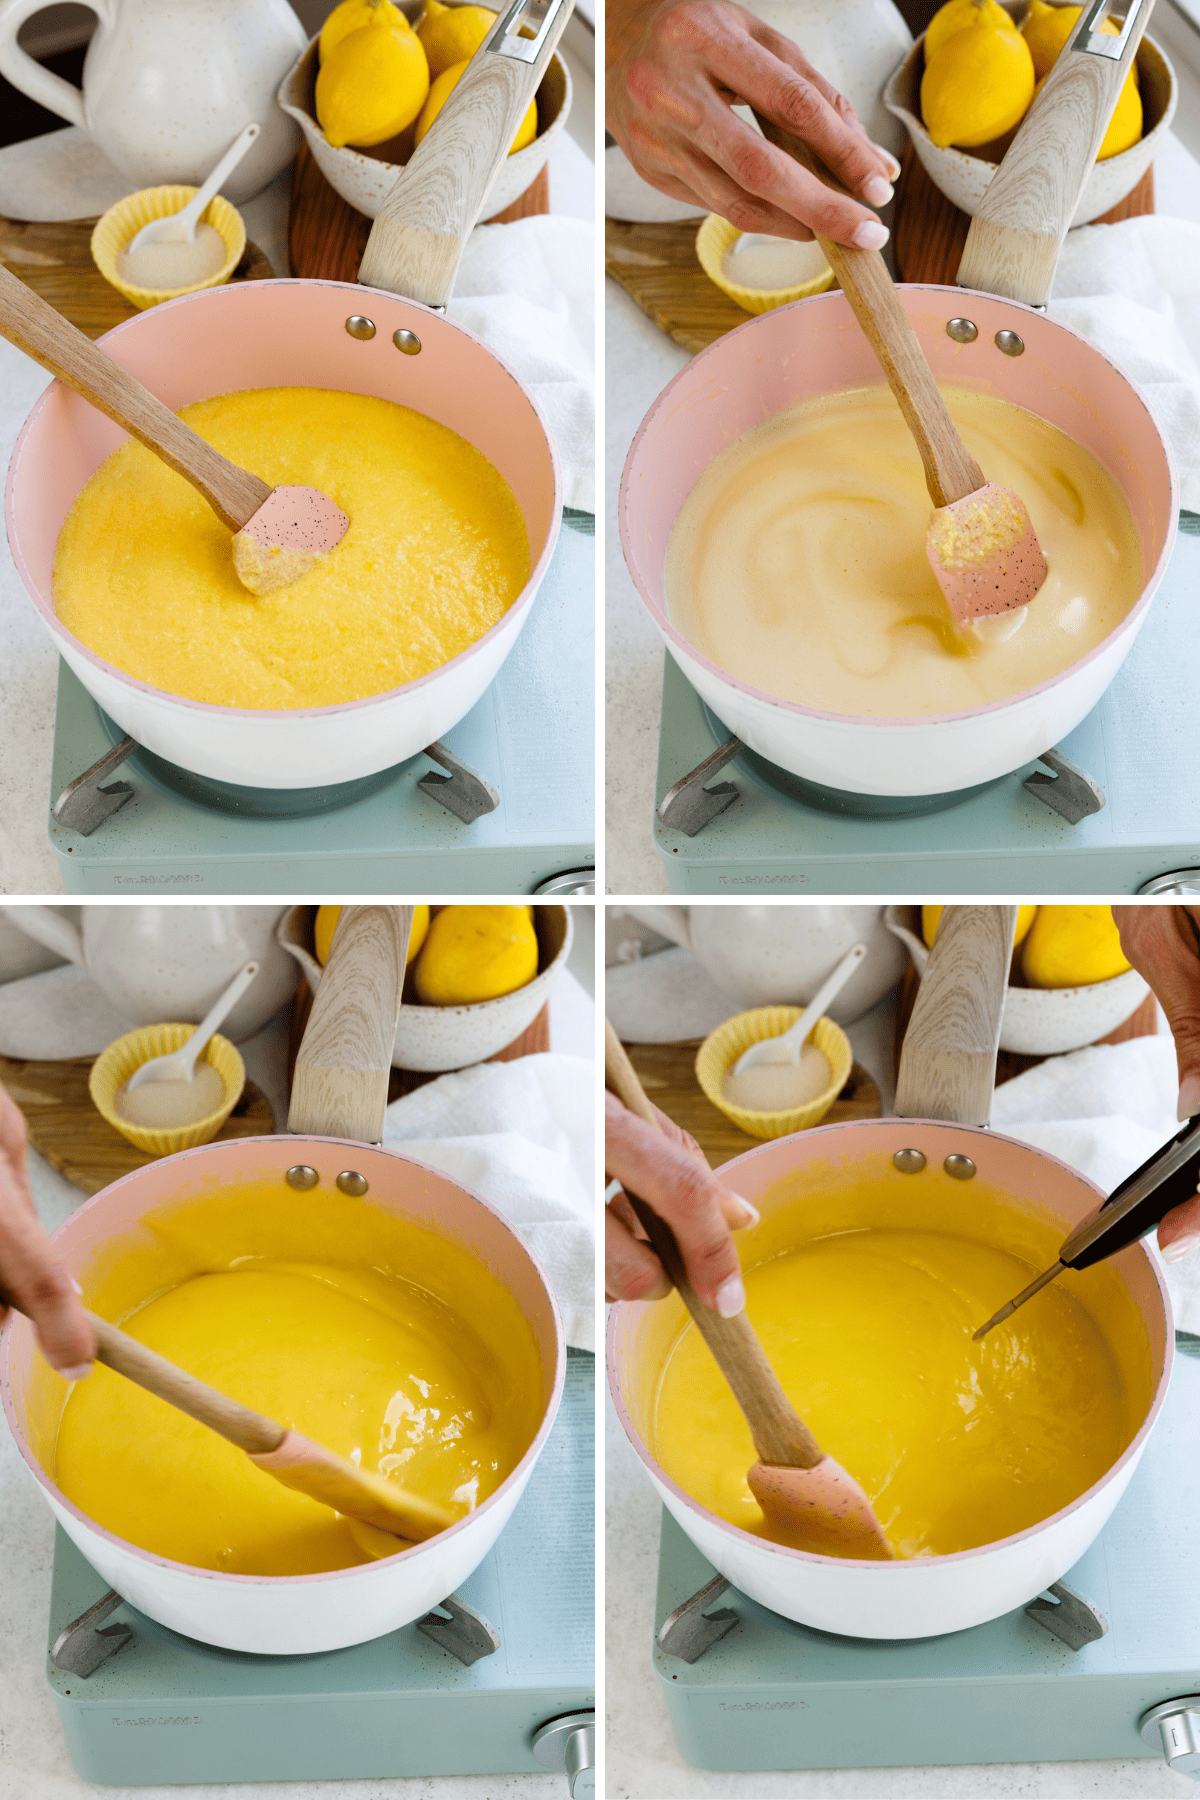
Step 6: Lemon Curd Filling
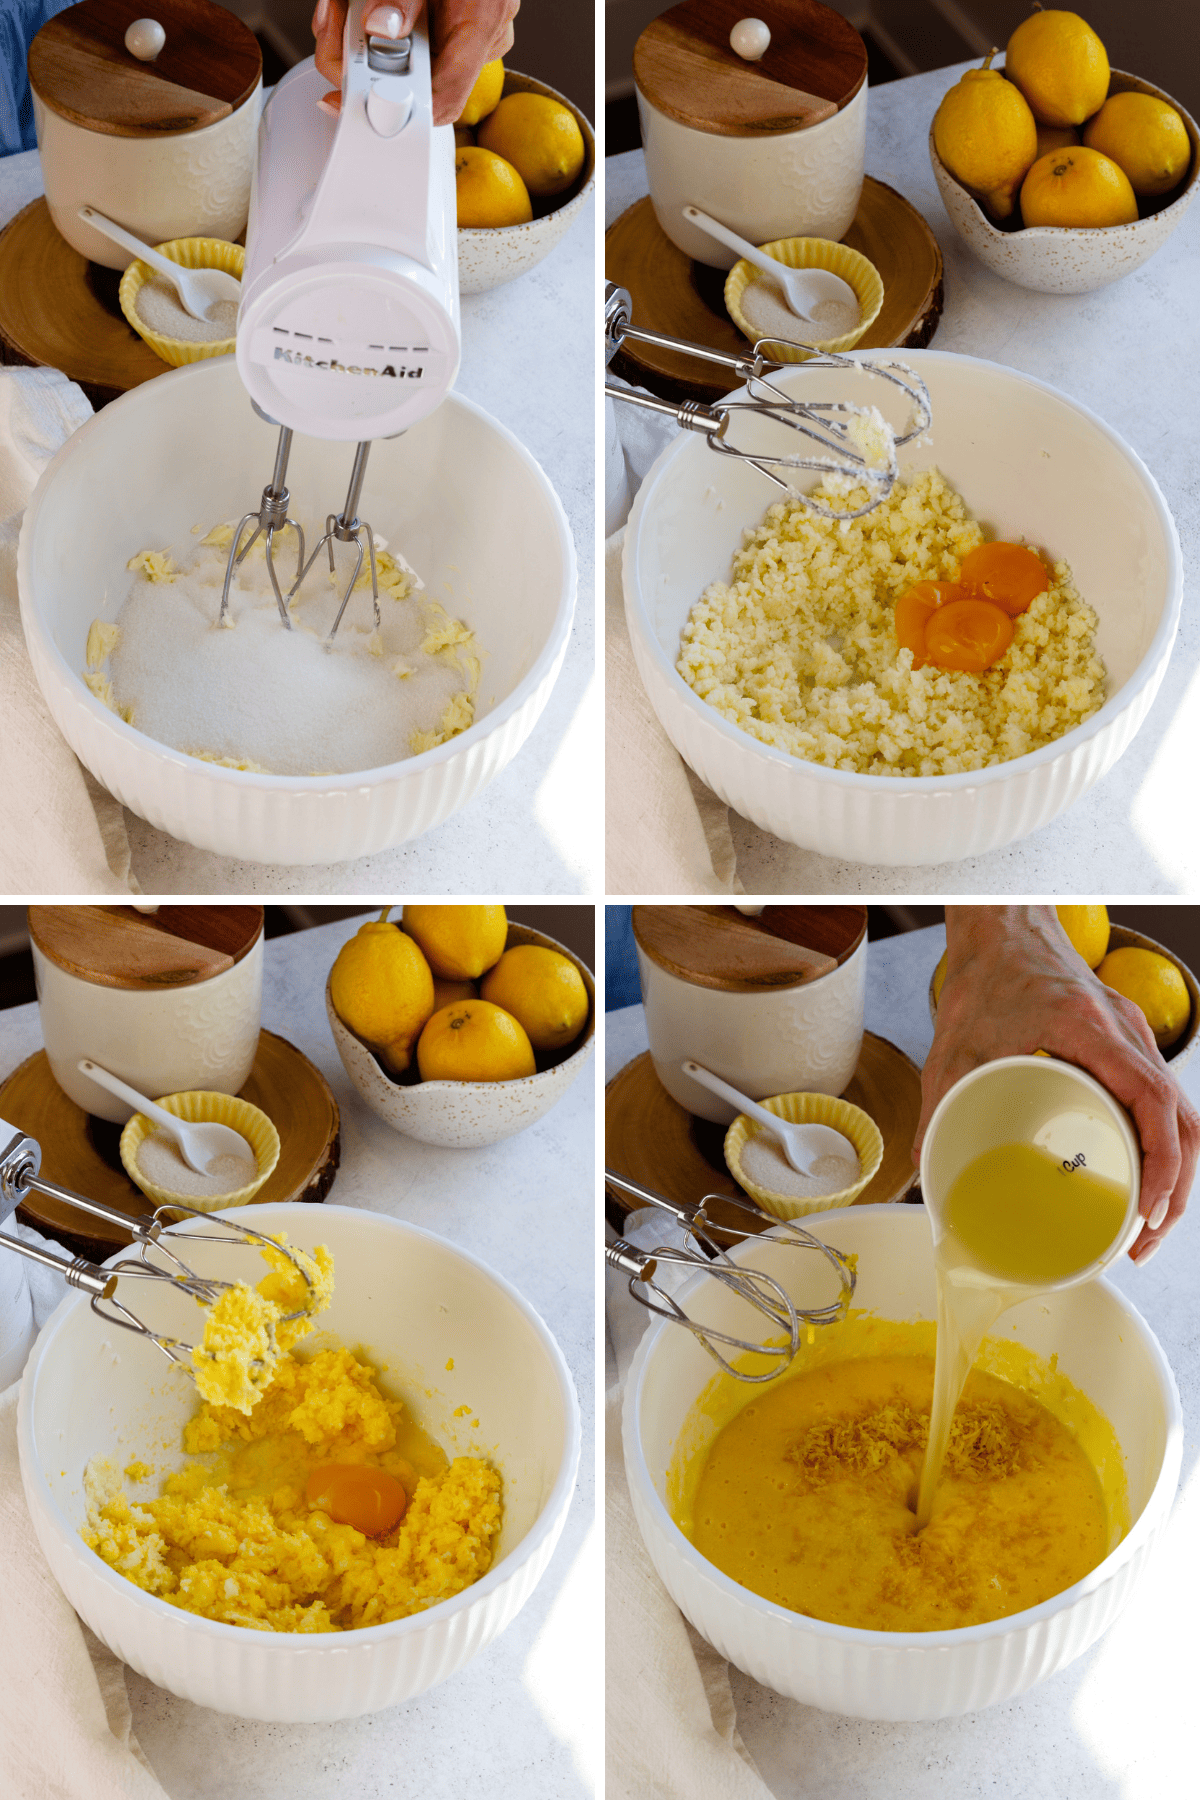
For the filling, I start by beating the butter and sugar together before adding the eggs and yolks.
Once the eggs are added, mix for about 2 to 3 minutes until the mixture looks smooth and creamy.
Add the lemon zest and lemon juice and mix until combined.
I’ve found that properly beating the butter, sugar, and eggs before cooking helps the curd stay smooth and prevents that strong eggy flavor some lemon curds can have.
Step 7: Cooking the Filling
Pour the mixture into a saucepan and cook over medium-low heat, stirring constantly, until thickened.
I highly recommend using a thermometer here if you have one. I stop cooking the curd once it reaches 170ºF because that gives me the best consistency without overcooking the eggs.
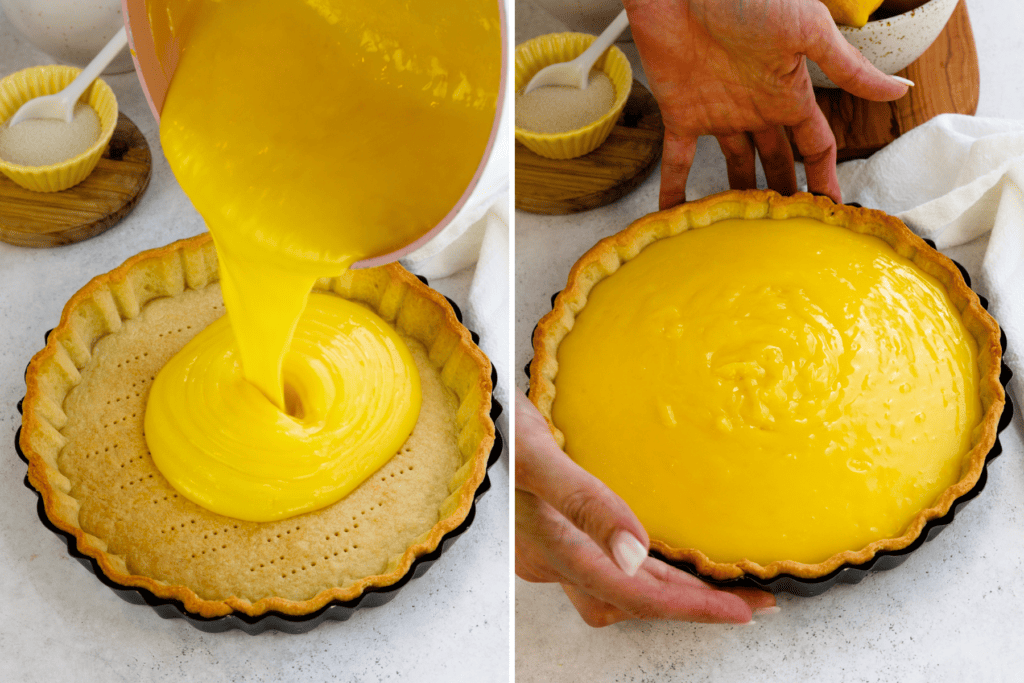
Step 8: Bake the Tart
Pour the lemon curd into the cooled tart shell and bake for about 15 minutes.
The center should still have a slight jiggle when you remove it from the oven, but the edges should look set.
Let the tart cool completely, then refrigerate it for at least 5 hours before slicing. I actually prefer making this tart a day ahead because the texture gets even better after chilling overnight.
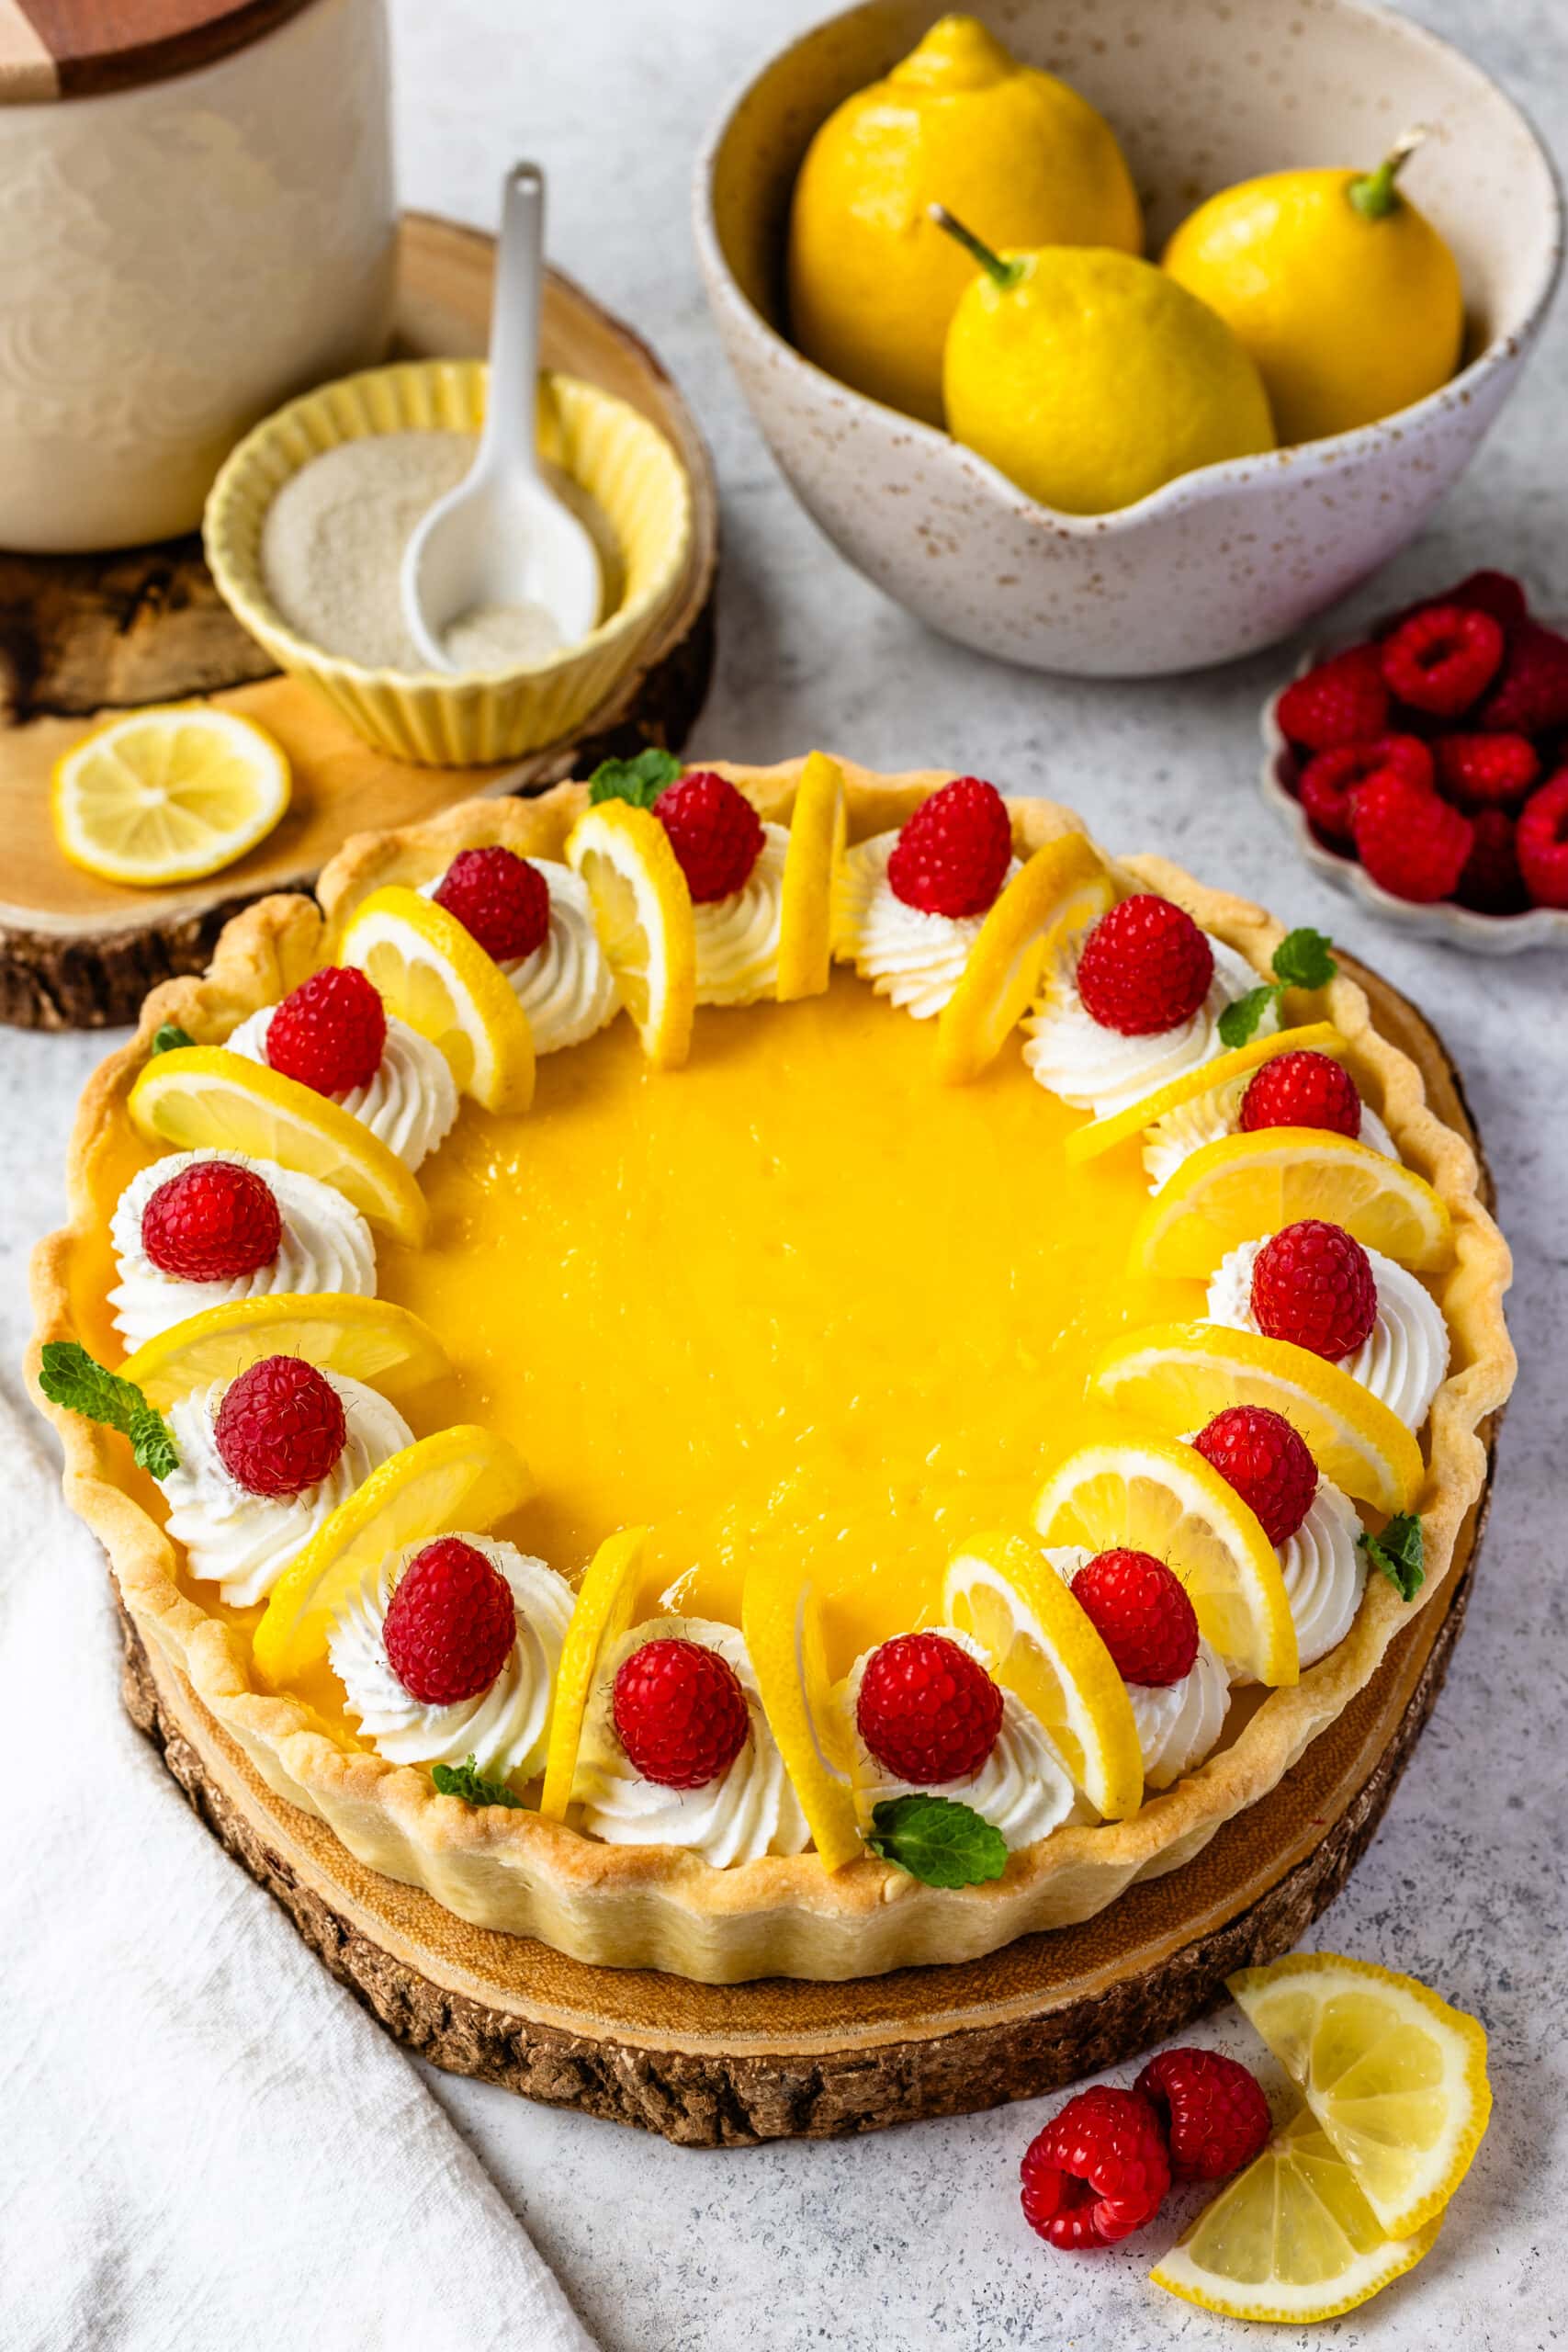
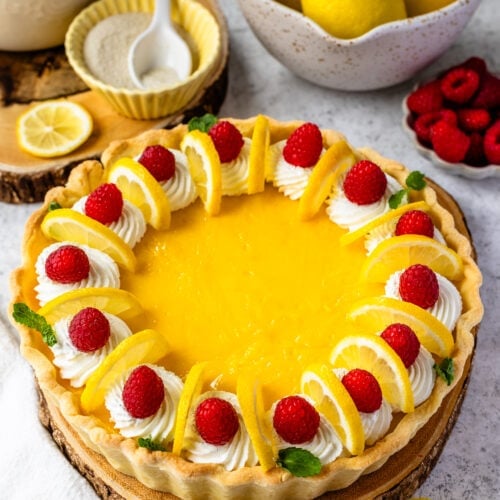
Step 9: To Decorate
I usually pipe whipped cream around the edges and finish the tart with fresh berries, lemon slices, or mint leaves.
If I’m serving this for guests, I love adding raspberries because they pair really well with the lemon without overpowering it.

Expert Tips
A Few Important Tips Before You Bake
- Beat the butter, sugar, and eggs well before cooking the curd. This helps keep the filling smooth and balanced in flavor.
- Cook the curd until it reaches 170ºF so it sets properly.
- Don’t underbake the tart or the filling may stay too loose after chilling.
- Let the crust cool before adding the filling.
- Give the tart enough time to chill before slicing. The texture improves a lot once fully cold.

Variations
There are quite a few ways to adapt this tart depending on what you have on hand.
- You can make this recipe with essentially any other citrus, lime or orange.
- Top the pie with meringue frosting, and toast it, to make it into a Lemon Meringue Pie.
- Use a different type of crust, such as a graham cracker crust, or pie crust, or even an Almond Cookie Crust, like I use in this Lemon Pie Recipe.
- Top the pie with crystallized lemon slices.
- Make the recipe into mini pies.
- Sift some powdered sugar on top of the pie to decorate it.

More Lemon Recipes
If you enjoy lemon desserts, you might also like my Lemon Brownies, Lemon Pie Recipe, Lemon Cheesecake, or Limoncello Tiramisu. They all have that same bright citrus flavor but with completely different textures.
And if you make this tart, make sure to leave a comment or tag me on Instagram. I always love seeing your versions and hearing how it turned out for you.
Frequently Asked Questions
Yes, and I actually recommend it. The tart slices much cleaner after chilling overnight, and the flavor settles beautifully by the next day.
Usually the curd either didn’t cook long enough or the tart didn’t chill long enough. I always cook the curd to 170ºF and let the tart chill for several hours before slicing.
This can happen if the crust wasn’t baked long enough before filling, or if the tart sits in the fridge for too many days. I like baking the crust until lightly golden so it stays crisp longer.
Most of the time, cracked filling means the tart baked a little too long. I remove mine from the oven while the center still has a slight jiggle because it continues setting as it cools.
Yes. I prefer freezing it without whipped cream or fresh fruit on top. Once chilled, wrap it well and freeze for up to 1 month. Thaw overnight in the refrigerator before serving
Print The Recipe
Lemon Tart
Ingredients
Tart Crust
- 6 tbsp unsalted butter room temperature (85 grams)
- 1/3 cup powdered sugar 41 grams
- 1 large egg
- 1 1/2 cup all-purpose flour 191 grams
- 1/4 tsp salt
Lemon Curd Filling
- 10 tbsp unsalted butter room temperature (141 grams)
- 1 cup granulated sugar 200 grams
- 4 large egg yolks
- 3 large eggs
- 4 tbsp lemon zest
- 1/2 cup lemon juice 120 ml
Whipped Cream
- 3/4 cup heavy whipping cream 180 ml
- 2 tbsp powdered sugar optional
- 1/2 tsp vanilla extract
To decorate
- Lemon slices
- Fresh raspberries
Instructions
Tart Crust
- Beat the butter with a mixer on medium speed for 30 seconds. You can use a stand mixer with the paddle attachment, or you can use a hand mixer.
- Add the powdered sugar and beat for one minute.
- Scrape the bowl as needed.
- Add the egg and beat to combine, for about one minute.
- Add the flour and salt, and mix on low. The dough will start to come together.
- Use a spatula to finish mixing, or finish mixing by hand.
- Don’t over mix the dough once you add the flour in, but make sure there aren’t any dry bits of flour in the dough. It shouldn’t be too sticky, but also shouldn’t be dry.
- Gather the dough into a ball and wrap in a piece of plastic wrap. Flatten it into a disc.
- Place the dough in the fridge for at least 1 hour, or up to 2 days. You can also freeze the dough for up to 2 months, in an airtight container, or freezer ziplock bag. To thaw, remove the dough to the fridge the night before you plan to use it.
- Remove the dough from the fridge and let it sit at room temperature for 10 minutes.
- Unwrap it, and place it on a lightly floured counter.
- Use a rolling pin to roll out the dough until it’s about 1/4” thick, and its diameter measures about 11 inches.
- Fold the dough in half and lift it from the counter. Place on top of a 9-inch tart pan with a removable bottom, or a 9” pie pan.
- Then unfold the dough to cover the entire surface of the tart pan.
- Adjust the pastry to fit into the pan, don’t stretch it too much. Press the dough gently on the bottom and up against the sides of the tart dish.
- Use a knife or scissors to trim off the excess dough off the top. You can also use your fingers to crease the sides of the dough along the edges of the pan.
- Prick all over the bottom of the tart with a fork.
- Place the dough in the fridge for 15 minutes.
- Meanwhile pre-heat the oven to 375ºF for conventional, or 350ºF for convection oven.
Blind bake
- Remove the dough from the fridge and line the bottom of the dough with parchment paper or foil. Fill it up with baking beads or dry beans. I didn’t line my pan with the beads or beans because I use this pan that has a silicone edge that fits the bottom and sides of the pan and prevents shrinkage, you can check it out on the photos above in the post.
- Bake the crust for 15 minutes in the pre-heated oven. Remove the beads by pulling the parchment paper up, or if you’re using a pan like mine, remove the silicone edge, and return the pan to the oven for another 5 to 10 minutes, until the bottom and sides are fully baked, and lightly golden brown.
- Remove from the oven and let the pie crust cool down for at least 20 minutes or so. Waiting for the pie crust to cool down will prevent it from getting soggy once you fill it with the Lemon Filling.
Lemon Curd Filling
- Pre-heat the oven to 350ºF for conventional oven and 325ºF for convection oven.
- Beat the butter and sugar together with a mixer for one minute.
- Add the egg yolks and beat for 30 seconds. Add the eggs to the bowl and beat for one minute. Scrape the bowl and beat for another minute.
- Add the lemon zest and lemon juice to the bowl. Beat to combine.
- Transfer the mixture to a medium saucepan, place over medium heat.
- Cook the lemon filling, stirring with a spatula.
- Don’t stop stirring at any point, and don’t keep the heat too high.
- You don’t want the mixture to come to a boil. Cook for a few minutes, until the curd registers 170ºF. It should be thick and coating the spatula.
- Remove the curd from the heat.
- If you notice little bits of cooked egg, which will look like white clumps, strain the curd. If you did a good job at stirring the whole time, and maintaining the heat low, that shouldn’t be an issue. However, it can happen, specially if it’s your first time making this type of curd.
- Pour the curd over the slightly cooled crust.
- Bake in the pre-heated oven for 10 to 15 minutes, until the filling is slightly jiggly in the center but looks a bit firm.
- Remove from the oven.
- Let it cool down before placing it in the refrigerator for at least 5 hours.
Whipped Cream
- Beat the heavy cream, powdered sugar, and vanilla with the whisk attachment, or with a hand mixer over medium-high speed. It should take about 3 minutes or so to achieve stiff peaks.
- Place the cream in a piping bag fitted with the tip of your choice.
- I used tip 4B.
To decorate
- Place the pie plate on top of a cup, to slide the sides down.
- Pipe the cream on the pie. Decorate with the lemon slices and fresh raspberries.
- Slice and serve.
Storage
- Store the pie in an air-tight container in the fridge for up to 3 days. You can freeze the pie for up to 2 months.
Notes
- Don’t overwork the dough once you add the flour in.
- When rolling out the dough, don’t roll it too thin.
- Freeze the dough before baking.
- Don’t stretch the dough too much in the pan, give it room to fit in the pan without stretching it.
- Use pie weights or a pan like the one I am using to prevent the dough from shrinking.
Has anyone tried this with a gluten free flour?
You can use a gluten free 1:1 baking flour instead of the all-purpose flour.
My question is about the lemon curd. If you make it the day before, do you still bake for 15 min after the tart is baked and cooled?
Lemon tarts are the BEST! Lemon is such a good flavour for desserts 😋 I’ve only had mini lemon tarts before, but this big one is absolutely gorgeous, I honestly can’t stop staring at them 😍
I’ve got to ask, what is the red ring you used around the edge of the pastry? I only saw you mention pie weights, and the only pie weights I have are beads you put at the bottom of the crust.
I got it on amazon, I just avoid sharing the link because sometimes the product will be un-listed and then I’ll just have a broken link on my website forever. So this is the exact name of the product: Patz&Patz Fluted Tart Pan with Removable Bottom – 9 in. Nonstick Carbon Steel pie pan With Crust Shaper Ring – for Pies, Tarts, and Quiche Baking Dish. If you type this on amazon you will find it.