No-Bake Cheesecake
I have so many cheesecake recipes on this blog—baked, swirled, layered, topped, you name it—but I realized I was missing one essential: a go-to no-bake cheesecake. The kind you can rely on when you want something classic, creamy, and effortless, without turning on the oven. This recipe is exactly that: a simple, dependable no-bake cheesecake that works as a blank canvas or shines all on its own.
Why I Love This Easy Cheesecake
This no-bake cheesecake comes together in about 30 minutes, making it perfect for when you want an impressive dessert without a long prep day. The only real waiting is letting it firm up in the fridge, which means no oven time and very little hands-on effort.
It’s also made with simple, everyday ingredients you likely already have in your fridge and pantry. Nothing fancy or hard to find—just a classic, reliable cheesecake base you can make on a whim and dress up however you like.
This post may contain affiliate links. I earn a commission from qualified purchases. Please read our Privacy policy here.
Key Ingredients & Why I Use Them
For a No-Bake Cheesecake, the ingredients make all the difference. These will help you achieve a firm cheesecake that requires NO BAKING.
- Graham crackers: if you don’t have graham crackers, you can use digestive biscuits or other light cookies.
- Brown sugar: Brown sugar gives more complex flavor in the crust, but granulated sugar can also be used.
- Butter: melted butter binds the crust together and helps it firm up once chilled.
- Cream cheese: use full-fat cream cheese, from a block, not the spreadable kind, for the best texture and structure. Make sure it’s room temperature. You don’t want big chunks of cream cheese.
- Powdered sugar: Using powdered instead of granulated sugar is key, because it sweetens the filling while keeping it smooth and lump-free.
- Sour cream: can be substituted with Greek yogurt; it adds creaminess and a slight tang.
- Lemon juice: it gives the cheesecake a subtle tang, but more importantly, it reacts with the cream cheese, sour cream, and whipping cream to help the filling thicken properly.
- Vanilla extract: adds warmth and rounds out the flavor of the cheesecake.
- Heavy whipping cream: whipped to stiff peaks, it gives the cheesecake its light and airy structure without baking.
Making the Cheesecake
I have full step-by-step instructions in the recipe card at the bottom of this post. But if you want the why behind the steps, keep reading!
Step 1: Making the Crust
To make the graham cracker crust, you will need graham cracker crumbs. Place the graham cracker cookies in a food processor, and process until it becomes a fine crumb. Alternatively, you can place the crackers inside of a ziploc bag, and use a rolling pin to crumble the cookies.
Next, mix the brown sugar with the graham cracker crumbs. I then add the melted butter and pulse.
Pour the mixture for the crust on the bottom of a 9″ or 8″ springform or cheesecake pan. If using an 8″ pan, it must be at least 3″ deep. Use a spatula and your fingers to press the crumbs up the sides of the pan to coat it evenly. Then use a cup to press the crumbs on the bottom of the pan.
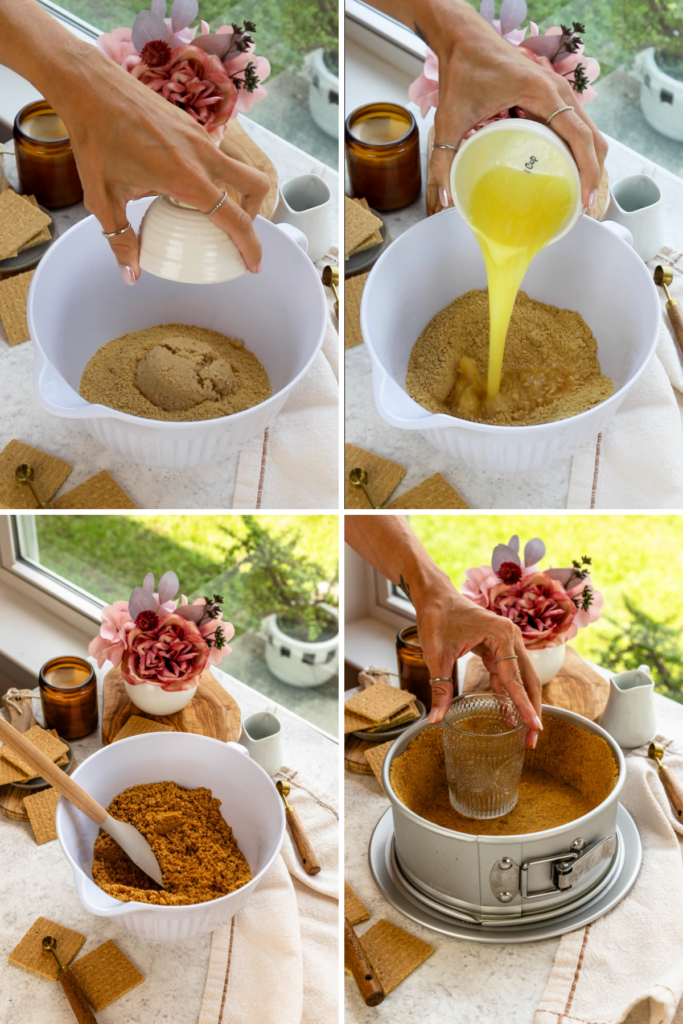
Place the pan with the crust in the freezer for 15 minutes, while you make the cheesecake batter.
Step 2: Cheesecake Filling
To make the No-Bake Cheesecake Filling, start by beating the room temperature full-fat cream cheese with a mixer in a fresh bowl. Beat for 2 minutes at medium speed. I always make sure the cream cheese is room temperature before I start so that it incorporates evenly.
Then, add the powdered sugar, lemon juice, sour cream, and vanilla. Beat for another 2 minutes until combined. Remember to scrape the sides of the bowl frequently.
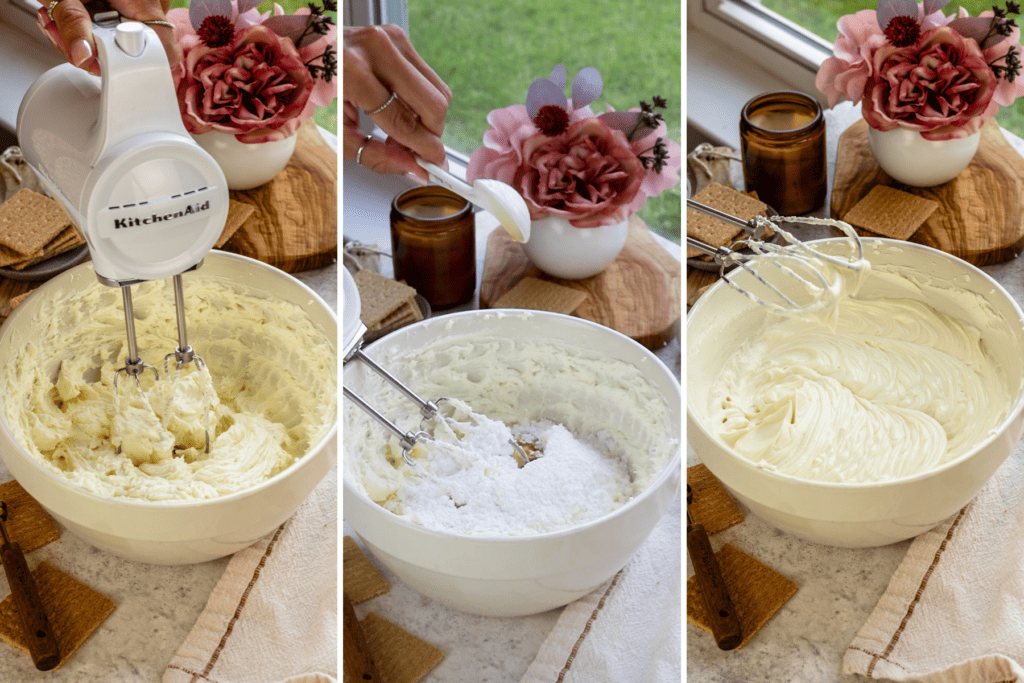
Set the bowl aside. Now it’s time to whip the heavy cream. Make sure it’s super cold from the fridge. This is the only ingredient that SHOULD be cold because it will whip up firmer. In a new bowl, whip with an electric mixer, or stand mixer with the whisk attachment, for about 3 minutes on medium-high speed, until stiff peaks form.
Next, add the whipped cream to the cream cheese mixture in two parts. Add half of it, fold until combined. Then, add the remaining half of the whipped cream, and fold again, until the cheesecake batter is smooth.

Now that the batter is creamy and smooth, pour it on the bottom of the cheesecake crust. I like using a spatula to spread it around and smooth it out.

Step 3: Chilling
Place the cheesecake in the refrigerator and chill at least 6 hours, preferably overnight.
Storage
Remember to store any leftovers in an airtight container in the fridge for up to 5 days. You can also freeze the cheesecake by wrapping it tightly in plastic wrap, then in aluminum foil, and finally place it in an airtight container. I find it easier to cut it into slices first, and freeze the individually wrapped slices. It makes it easier not only to store it, but also to thaw it.
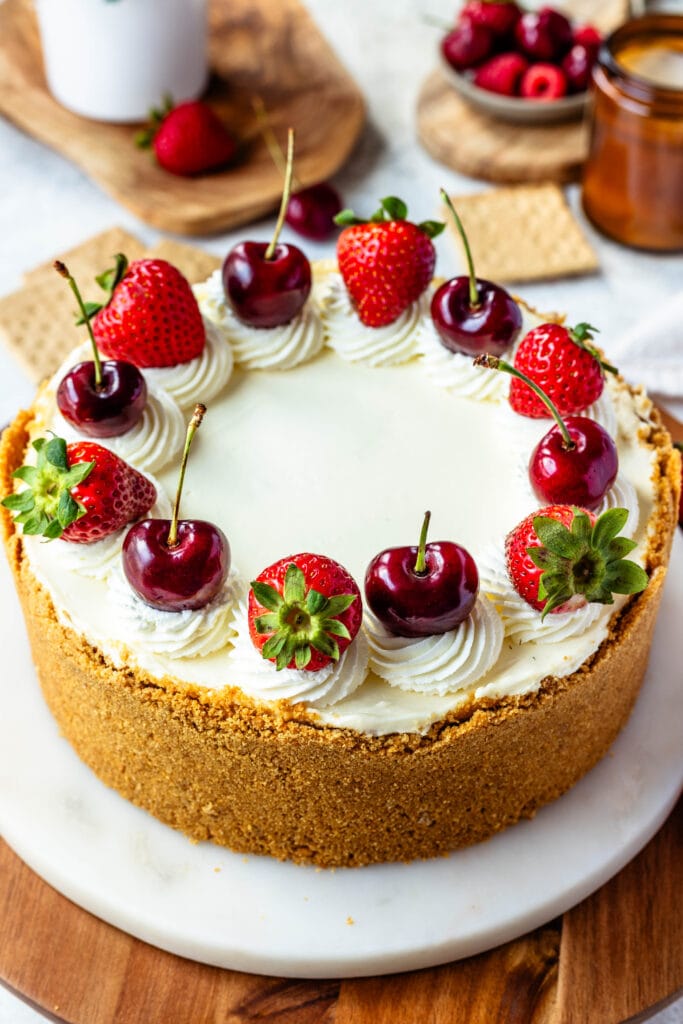
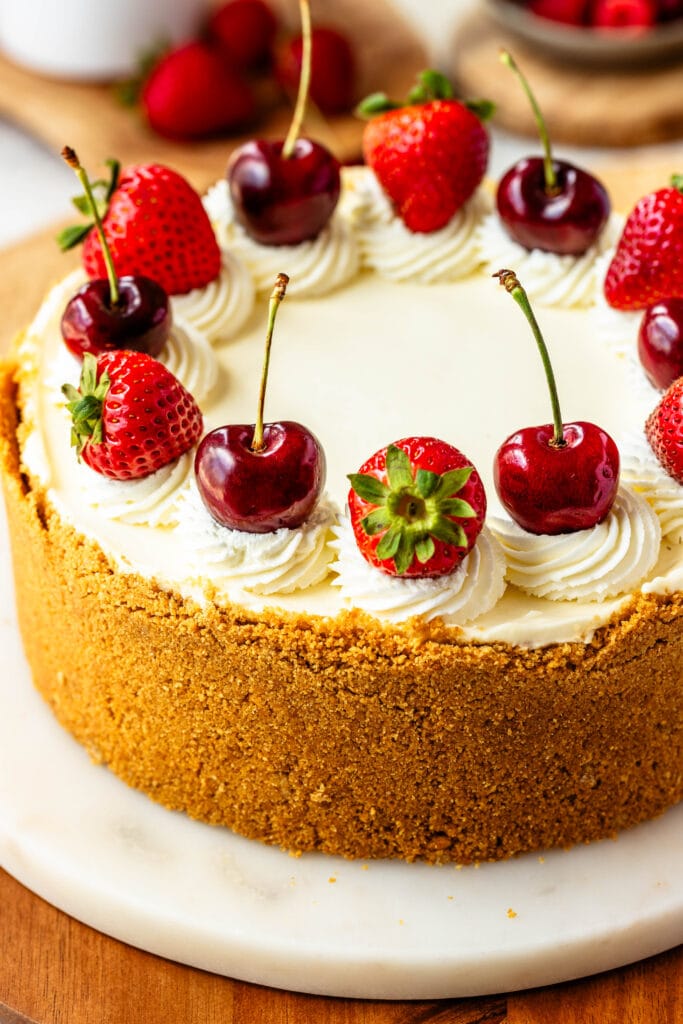
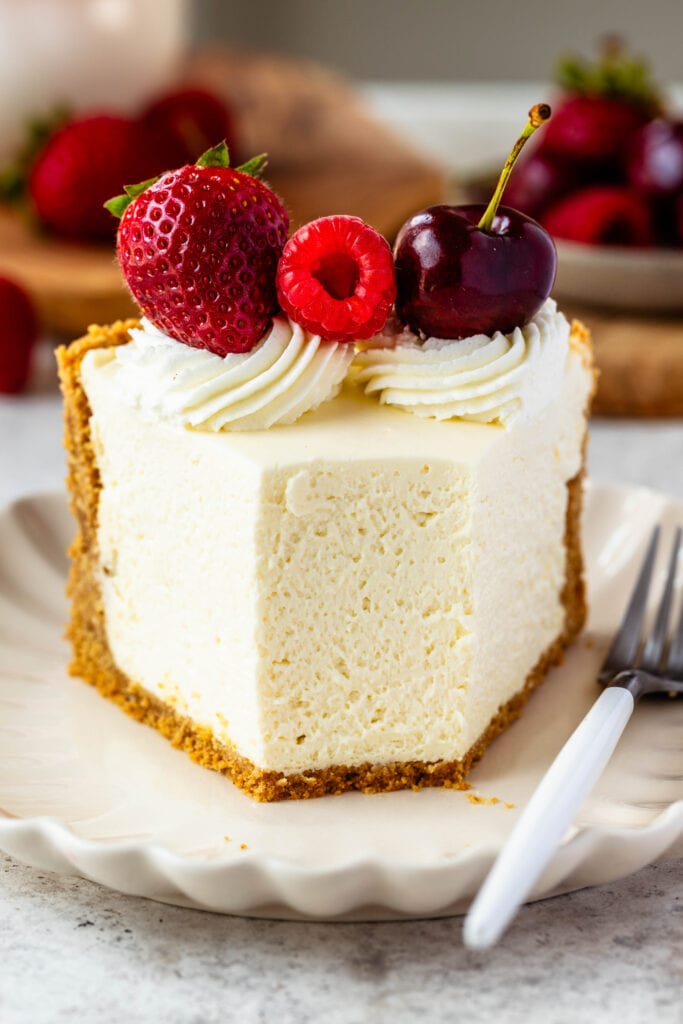
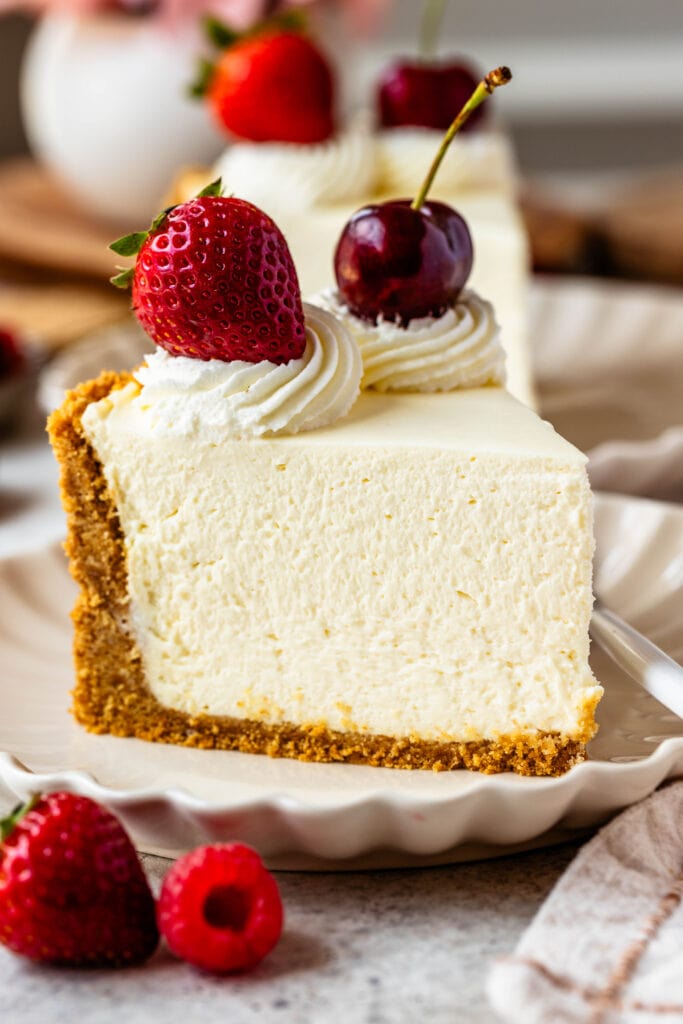
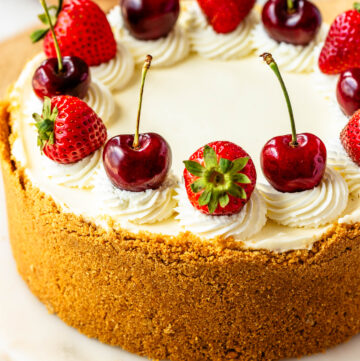
Decorating the Cheesecake
Here are some other suggestions for topping the cheesecake once it’s done chilling:
- Whipped Cream: No explanation needed, it’s just that good.
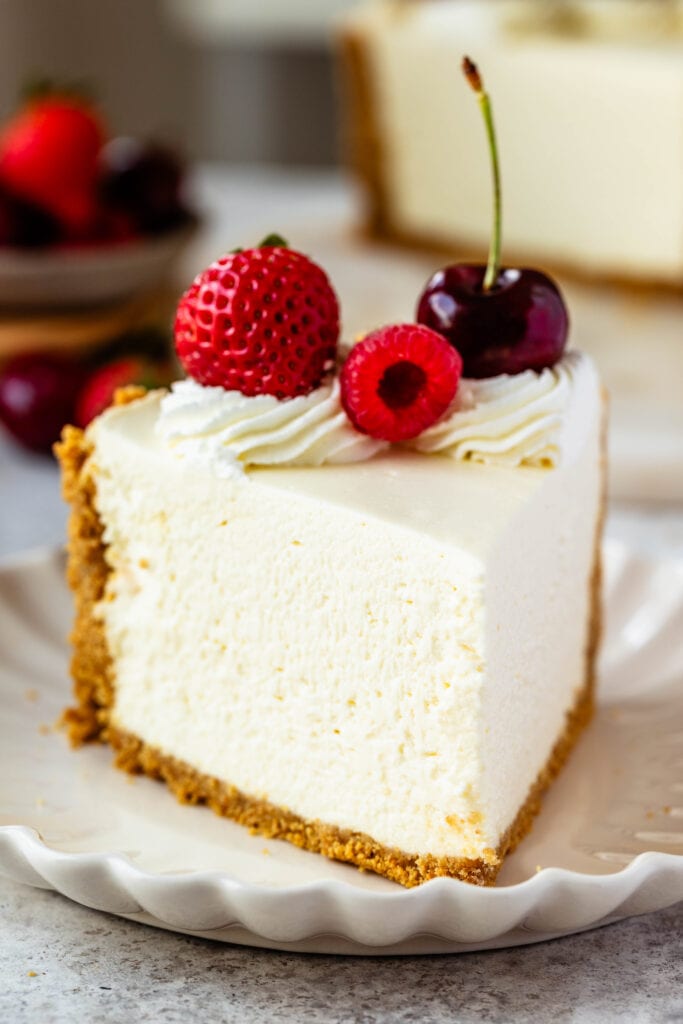
- Fresh berries and fruits such as strawberries, blueberries, cherries, raspberries, blackberries
- Curd: lemon curd, passionfruit curd, mango curd
- Dulce de leche or caramel sauce
- Strawberry sauce or raspberry sauce
- Chocolate sauce
Recipe Variations
Pie version: Sometimes, I prefer a cheesecake pie, so here’s what you can do. Divide the crust and filling between two 8-inch pie pans, or keep things easy and use store-bought graham cracker crusts. Mini graham cracker pie shells work great too—I usually get about 20 mini pies this way.
Mini cheesecakes: For individual servings, divide the crust and filling between 18–20 cupcake cavities. Line the pan with cupcake liners, press the crust firmly into the bottoms, and pop the pan in the freezer while you make the filling. Once the batter is ready, divide it evenly between the cups and smooth the tops.
No matter which version you make, be sure to let the cheesecakes chill in the fridge for a few hours before serving so they fully set. You can top them with any of the toppings mentioned above, or honestly, whatever you’re craving—this recipe is meant to be a blank canvas.
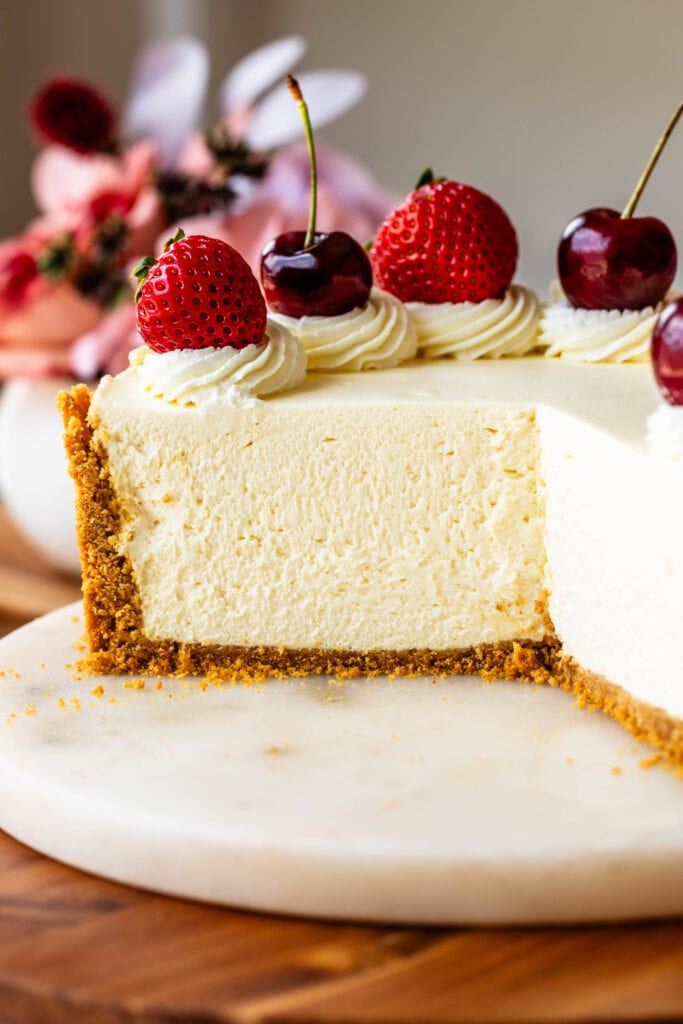
The texture of this no-bake cheesecake is fluffy, light, and irresistible! It’s not overly sweet, but also not bland. It has a tangy flavor, and it’s absolutely delicious! It’s the perfect dessert to bring to a dinner at a friend’s house, or to a celebration or holiday! Everyone will love it.
FAQs
At minimum, the cheesecake should chill for 6 hours, but overnight is ideal. This gives the filling enough time to fully set and slice cleanly.
This usually happens if the whipped cream wasn’t whipped to stiff peaks, the cream cheese was too warm and loose, or the cheesecake didn’t chill long enough. Full-fat block cream cheese and properly whipped cold cream are key for structure.
Yes—this is a great make-ahead dessert. You can prepare it 1–2 days in advance and keep it covered in the refrigerator until ready to serve.
Absolutely. This cheesecake freezes very well. Wrap it tightly or freeze individual slices for easy storage, then thaw overnight in the fridge before serving.
Try Some of My Other Cheesecakes…
If you loved this no-bake cheesecake, you might also enjoy some of my other cheesecake favorites, like my creamy Pistachio Cheesecake, bright and tangy Lemon Cheesecake, or rich Biscoff Cheesecake. For more no-bake options, the No-Bake Strawberry Cheesecake and No-Bake Blueberry Cheesecake are both easy, crowd-pleasing desserts that come together without turning on the oven.
If you make this recipe, tag me on instagram, or leave a comment below, I love to hear from you!

Watch Video

No-Bake Cheesecake
Ingredients
Crust
- 2 1/4 cups graham cracker crumbs 270 grams
- 1/3 cup brown sugar 73 grams
- 10 tbsp unsalted butter melted (141 grams)
No-Bake Cheesecake Filling
- 3 blocks cream cheese softened (24 oz, 680 grams)
- 1 1/2 cups powdered sugar 187 grams
- 1 tbsp lemon juice
- 2 tsp vanilla extract
- 1/3 cup sour cream 80 grams
- 1 1/2 cups cold heavy whipping cream 360 ml
To decorate
- 1/2 cup cold heavy whipping cream
- 1 cup berries
Instructions
Crust
- In a medium bowl, mix the graham cracker crumbs with the brown sugar. Add the melted unsalted butter and mix to combine.
- Pour the mixture on the bottom of a 9” or 8” springform pan or cheesecake pan. If using an 8” pan, it must be deep.
- Use a spatula to press the crumb up the sides of the pan. Press hard to make the crumb stick to the sides. If it falls off, just keep repeating and working the crust up the sides of the pan.
- Then use a cup to press the crust on the bottom of the pan. You can also use the sides of the cup to press the crust on the sides. Make sure the crust is very packed. Take your time packing it. This will prevent the crust from falling apart when you are ready to serve the cheesecake.
- Place the crust in the freezer for at least 15 minutes.
No-Bake Cheesecake Filling
- To make the cheesecake filling, add the cream cheese to a large mixing bowl. Beat the cream cheese with a mixer. You can use a stand mixer with the paddle attachment, or a hand mixer. Beating time should be around 2 minutes, until the cream cheese is smooth.
- Add the powdered sugar, lemon juice, vanilla, and sour cream to the bowl. Beat for another 2 minutes at medium speed until combined.
- Remember to scrape the sides of the bowl in between.
- Set it aside.
- In another large bowl, whip the heavy cream by beating with a mixer at medium speed for about 3 minutes, until stiff peaks form. If using a stand mixer, use the whisk attachment.
- Add half of the whipped cream to the cream cheese mixture, fold with a spatula to combine.
- Once the first half is incorporated, add the remaining whipped cream to the mixture. Fold again until the batter is smooth and creamy.
- Remove the cheesecake pan from the freezer.
- Pour the batter on the bottom of the cheesecake pan. Use a spatula to smooth out the top, and to spread the mixture evenly.
- Place the cheesecake in the fridge for 6 hours or overnight.
To decorate
- Beat the whipping cream with a mixer for 2 to 3 minutes, until stiff peaks form. Place the whipping cream in a piping bag fitted with the tip of your choice, I used a 4B.
- Pipe the whipped cream on top of the cheesecake, and top with the desired berries.
- Slice and serve.
- See the notes section for more options on toppings.
Storage
- Store the cheesecake in the fridge for up to 4 days. You can freeze the cheesecake as well. To freeze, wrap it tightly in plastic, and place it in an air tight container. Sometimes it can be easier to cut into slices before freezing, making sure the plastic wrap is directly placed on the surface of the cheesecake, so it doesn’t form a skin.
- Freeze for up to 2 months. To thaw, simply place it in the fridge overnight.
Can I add a raspberry jam layer in the middle?
You sure can!
Hi, can i omit the wipping cream or can i substitute it for something else?
You can use a whipped topping like Cool Whip or another non-dairy alternative.
Ratio: Use 1 ½ cups, measured after it’s thawed.
Notes: This is lighter and sweeter than heavy whipping cream but works well in no-bake recipes.
Hi! Would love to use this recipe for mini cheesecakes, what suggestions would you be willing to share?
Yes, you can just make it into about 24 mini cheesecakes using mini cheesecake pans. Line the bottom of each with two pieces of parchment paper overlapping, so you can easily lift up the mini cheesecakes once they have baked and cooled. Press the crust on the bottom of the cavity, on top of the parchment paper. And then you should be good to go.
This recipe for the no bake will make about 24 minis?
I believe between 24 and 30. It depends on the size of the mini pan youre using.
Is there a way to make this recipe Gluten-free?
all you’d have to do is use gluten-free graham crackers
It’s not necessary to add gelatine?
It is not necessary
I don’t see gelatine listed in the ingredients. Has it been left out, or?
I see here you state that it is necessary after being asked. Just wanted to confirm:)
I probably meant to say “it is not necessary” (ops!) because it isn’t necessary. It’s a no-gelatin recipe. Thanks for confirming. I’ve fixed my comment.
Sem palavras para descrever essa delícia!!😋😋😋😋😋
In the uk we can only buy the spreadable cream cheese (Philadelphia ) will that be ok or not??
That depends on the cream cheese. In Brazil we have a philadelphia spreadable cream cheese that works for this recipe, I’ve used it and it’s the only one they have in Brazil. It works fine for no bake cheesecake. But in the USA, the type of spreadable cream cheese we have doesn’t work for this recipe. Im not sure if in the UK that’s the same, maybe your spreadable cream cheese is thicker like it is in Brazil. Does the cream cheese look like it’s been whipped? What’s the consistency like? If it has a fairly thick consistency, more solid than liquid I’d say, I’d use it and try to make the recipe.
Can I omit the whipping cream or is there a substitute for it?
You can use a whipped topping like Cool Whip or another non-dairy alternative.
Ratio: Use 1 ½ cups, measured after it’s thawed.
Notes: This is lighter and sweeter than heavy whipping cream but works well in no-bake recipes.