Strawberry Shortcake Cake
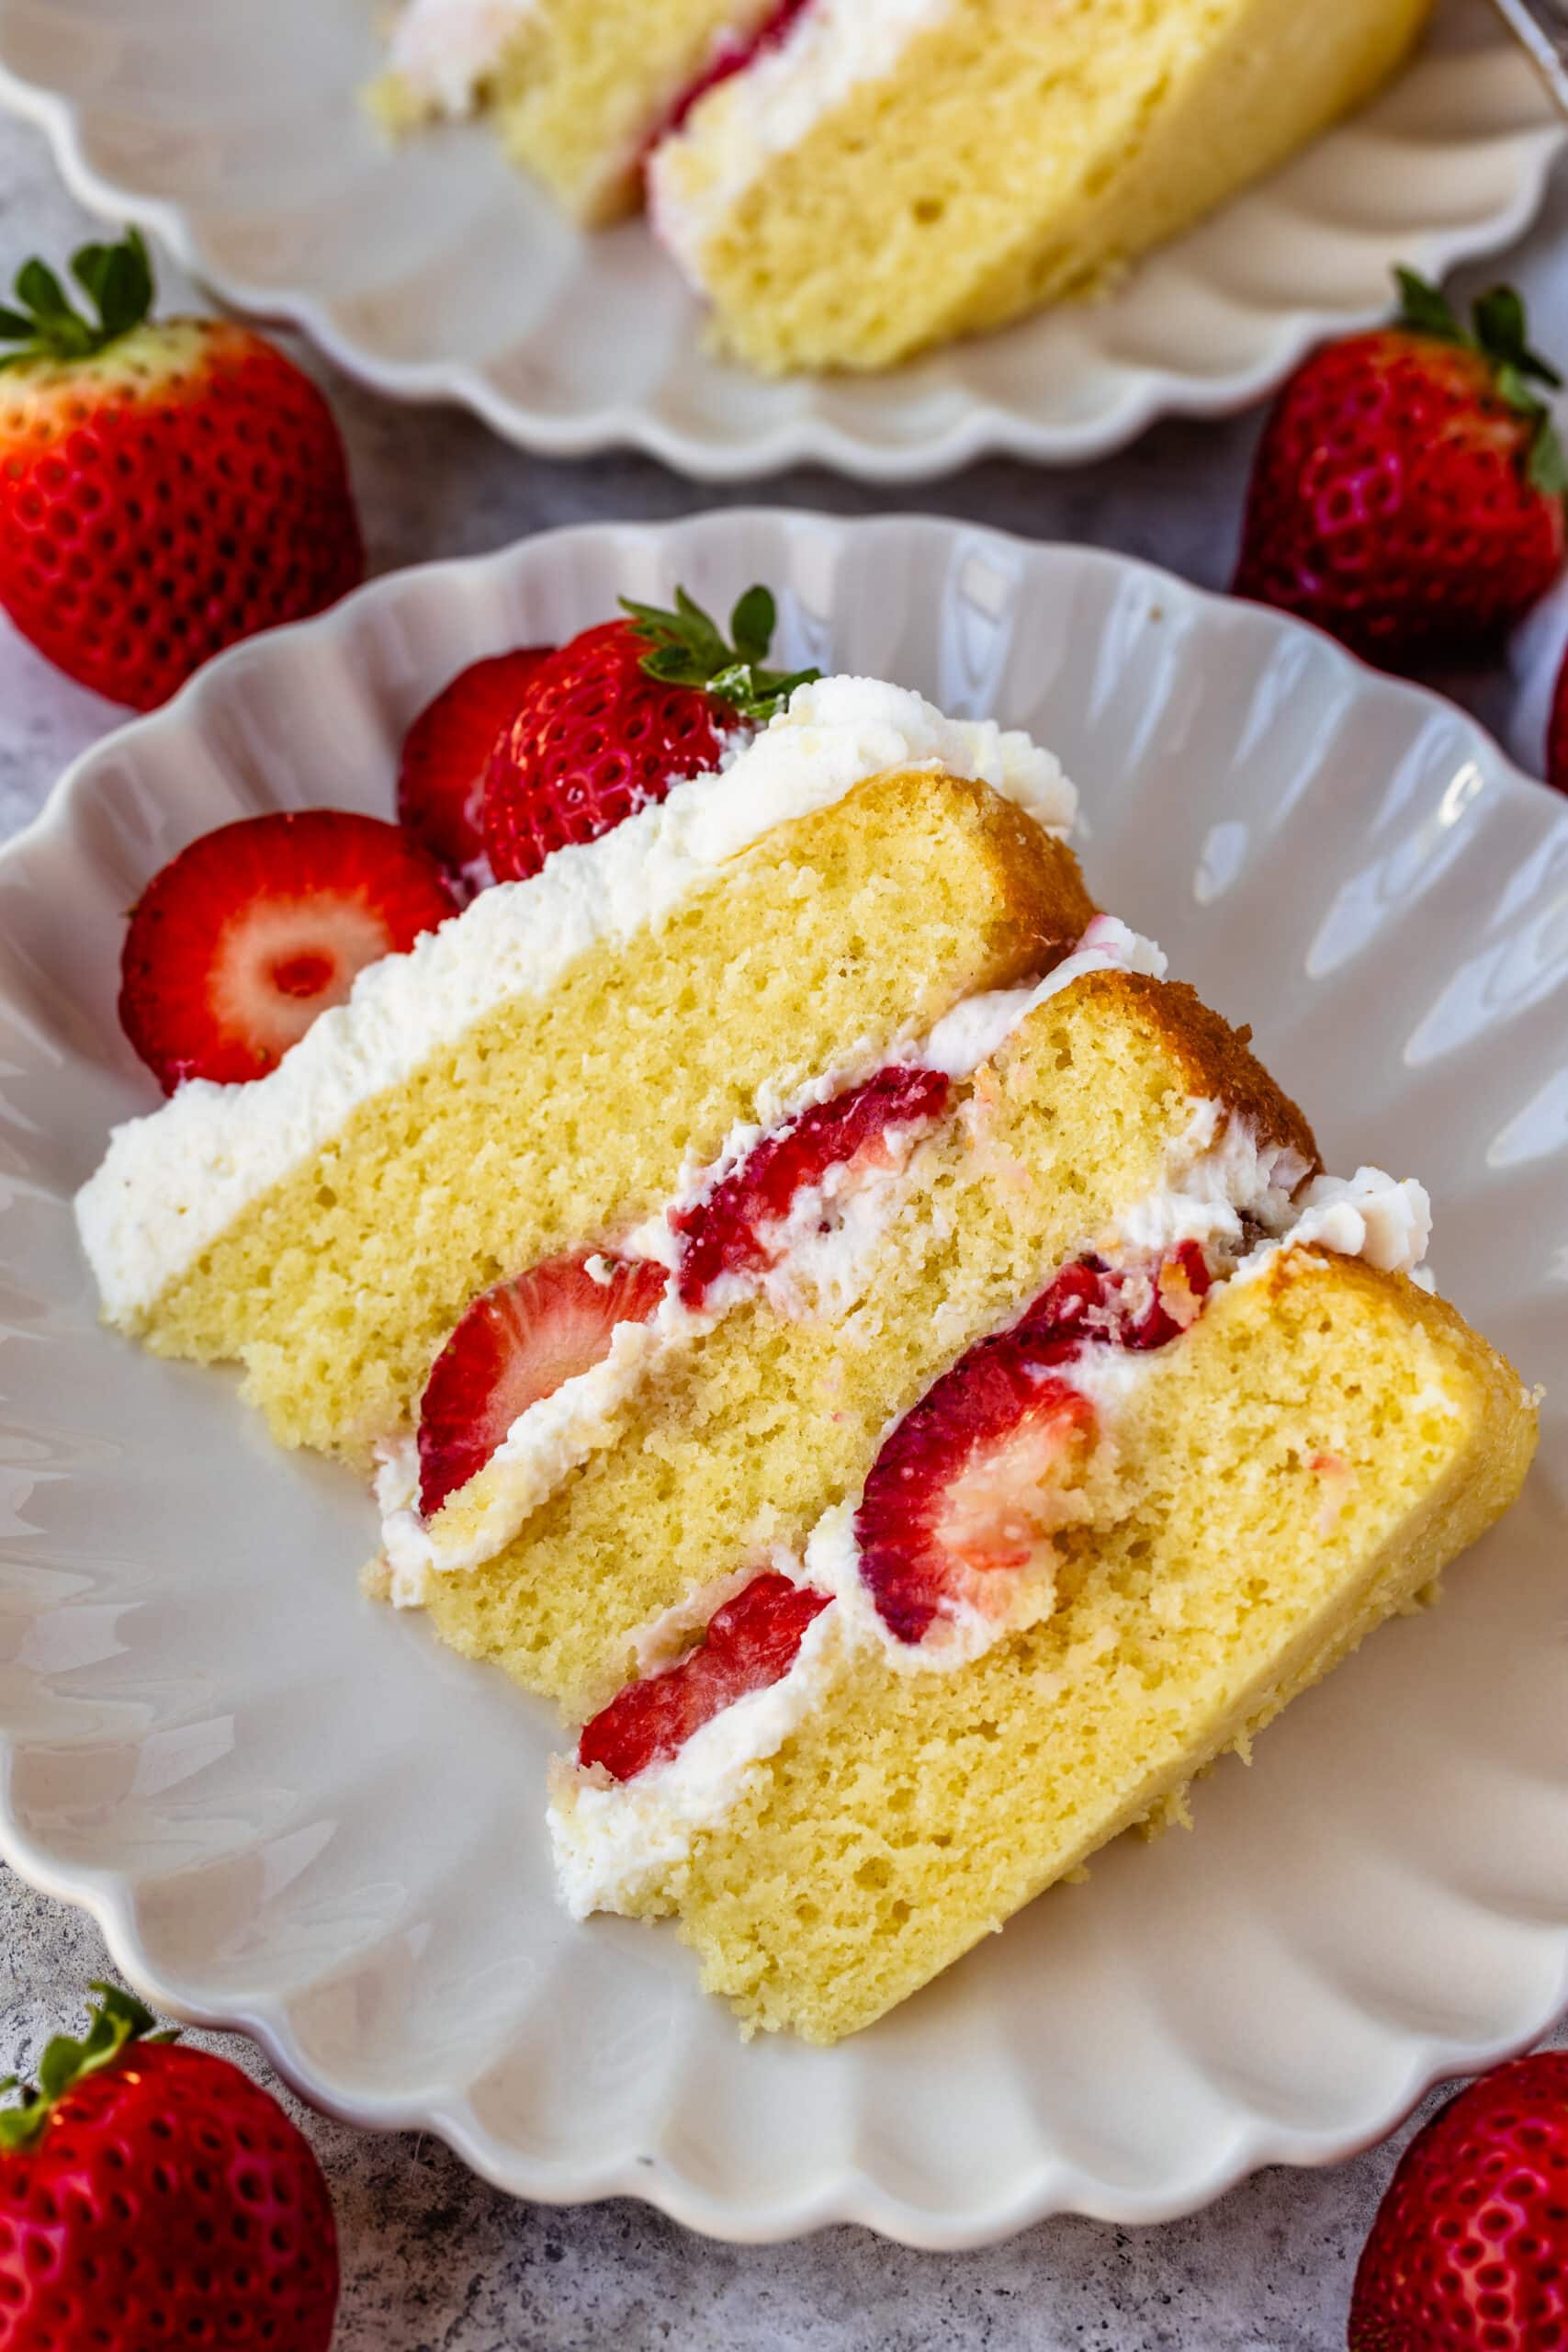
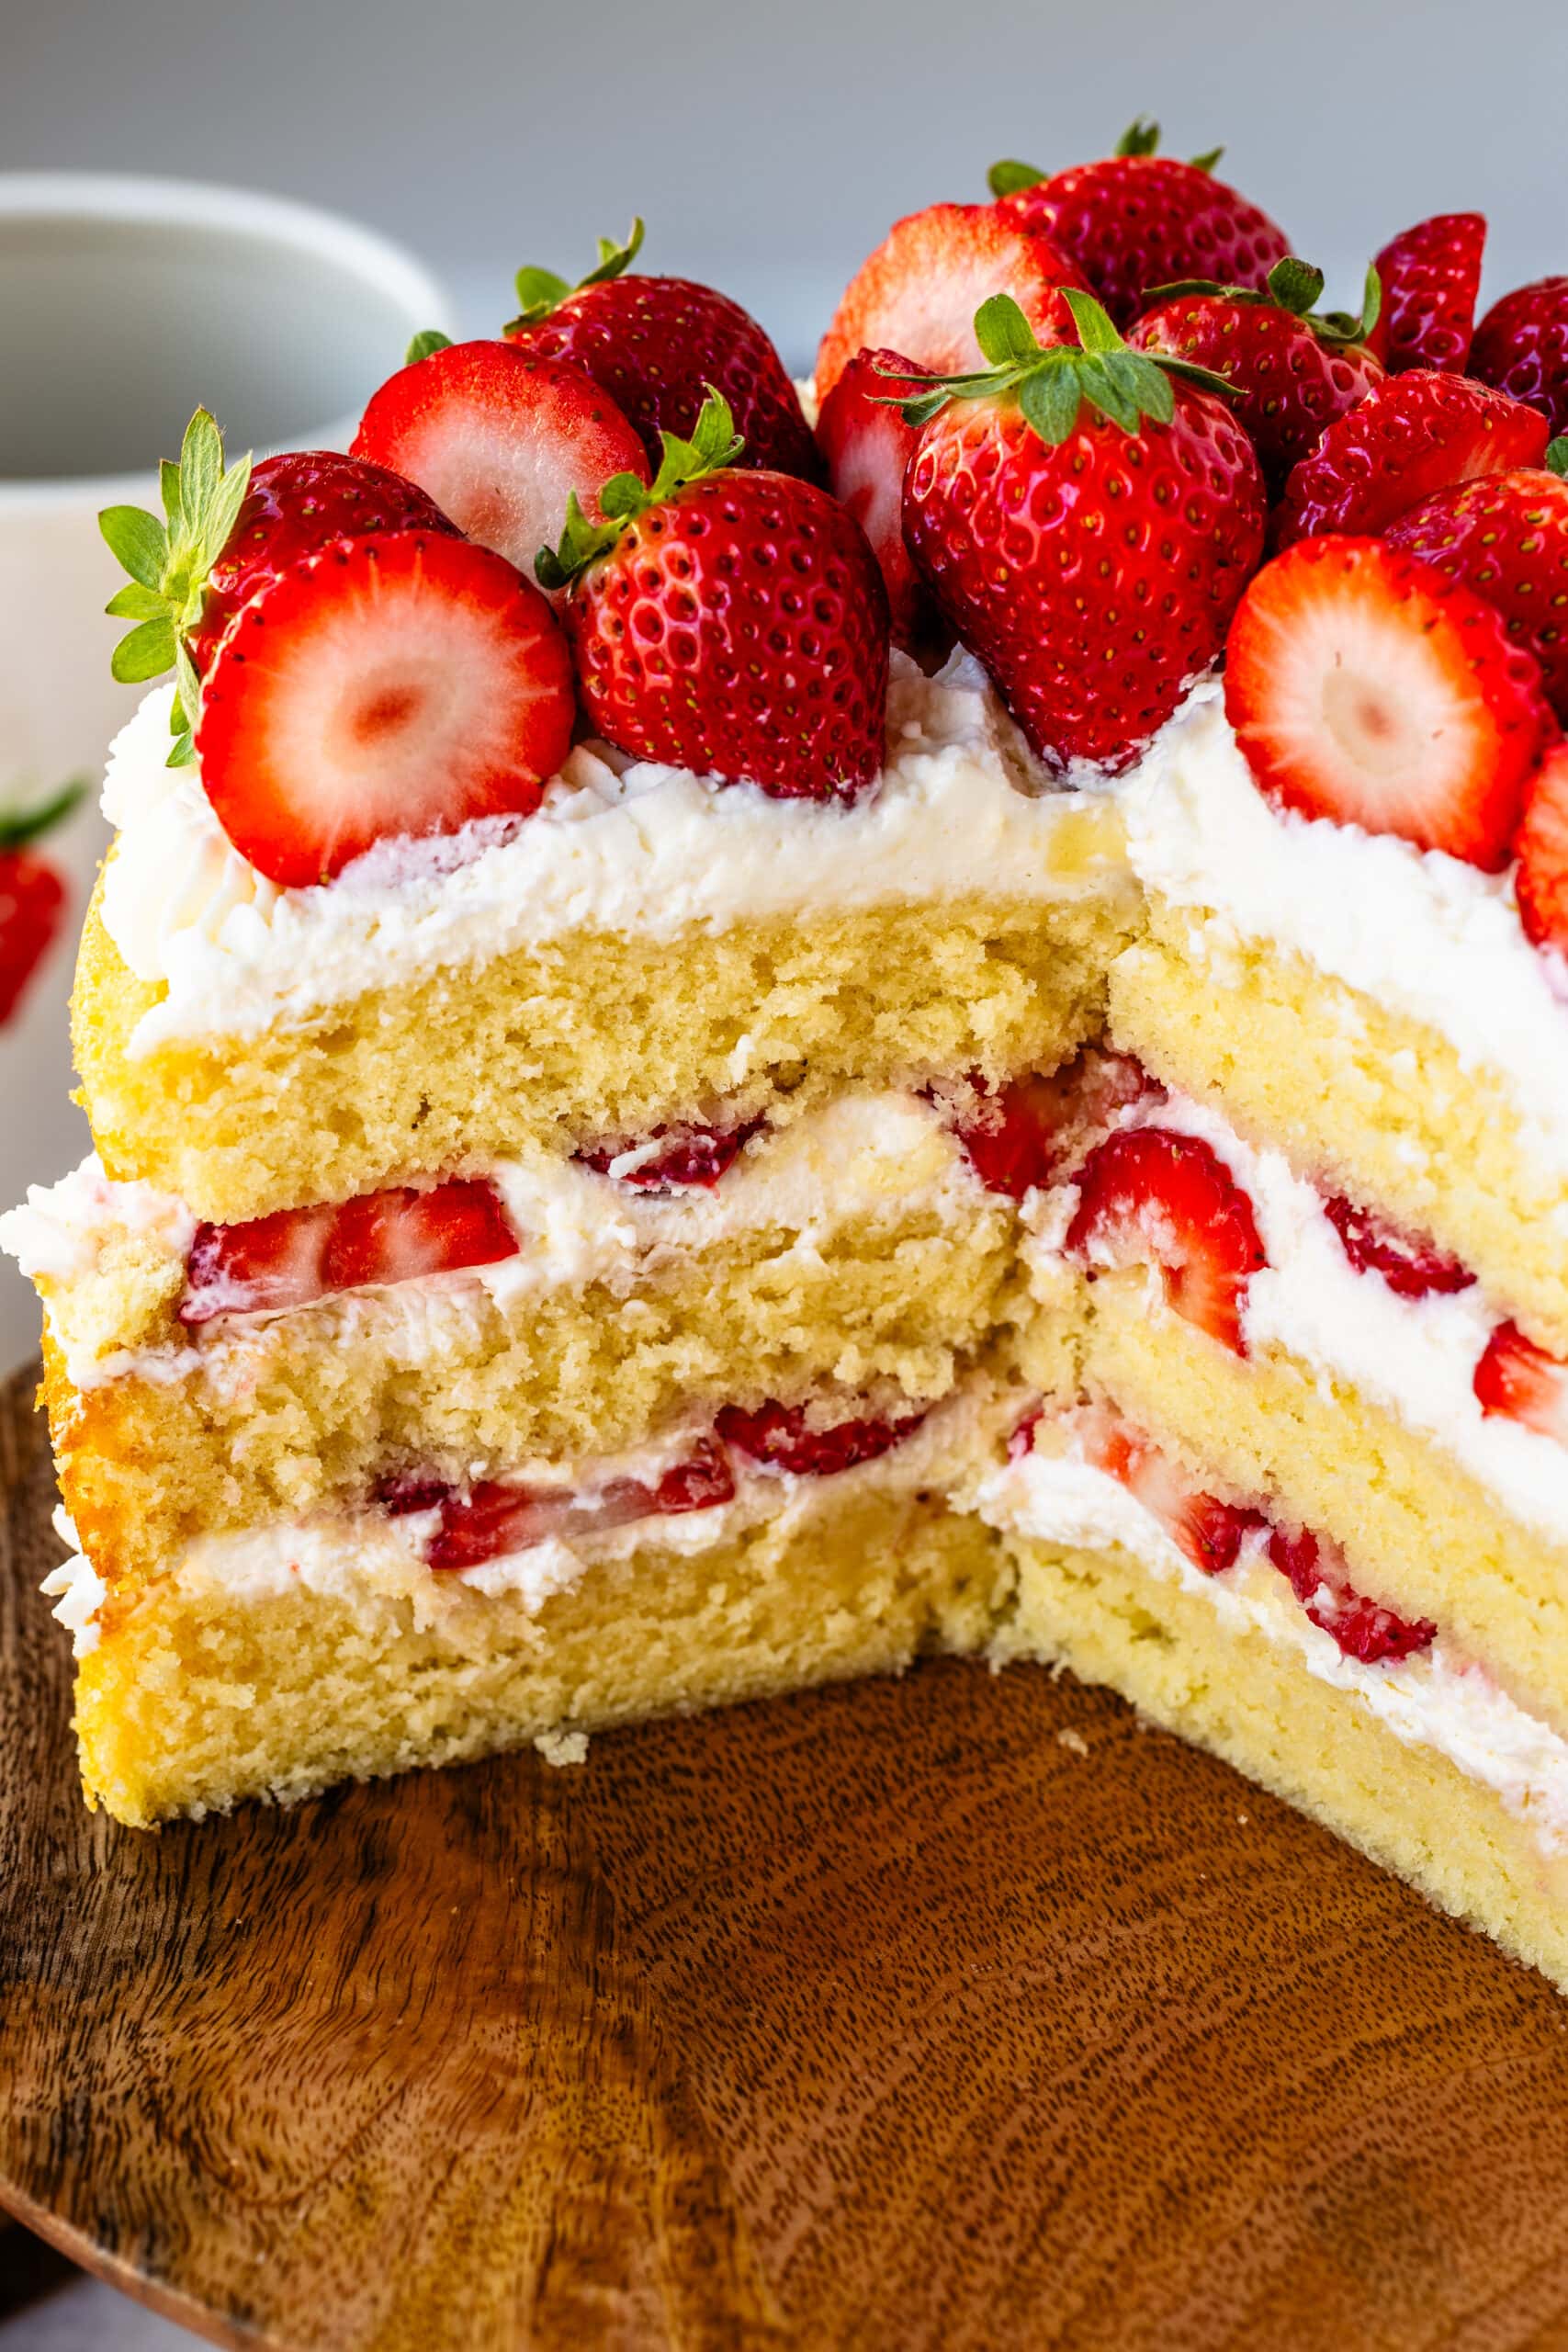
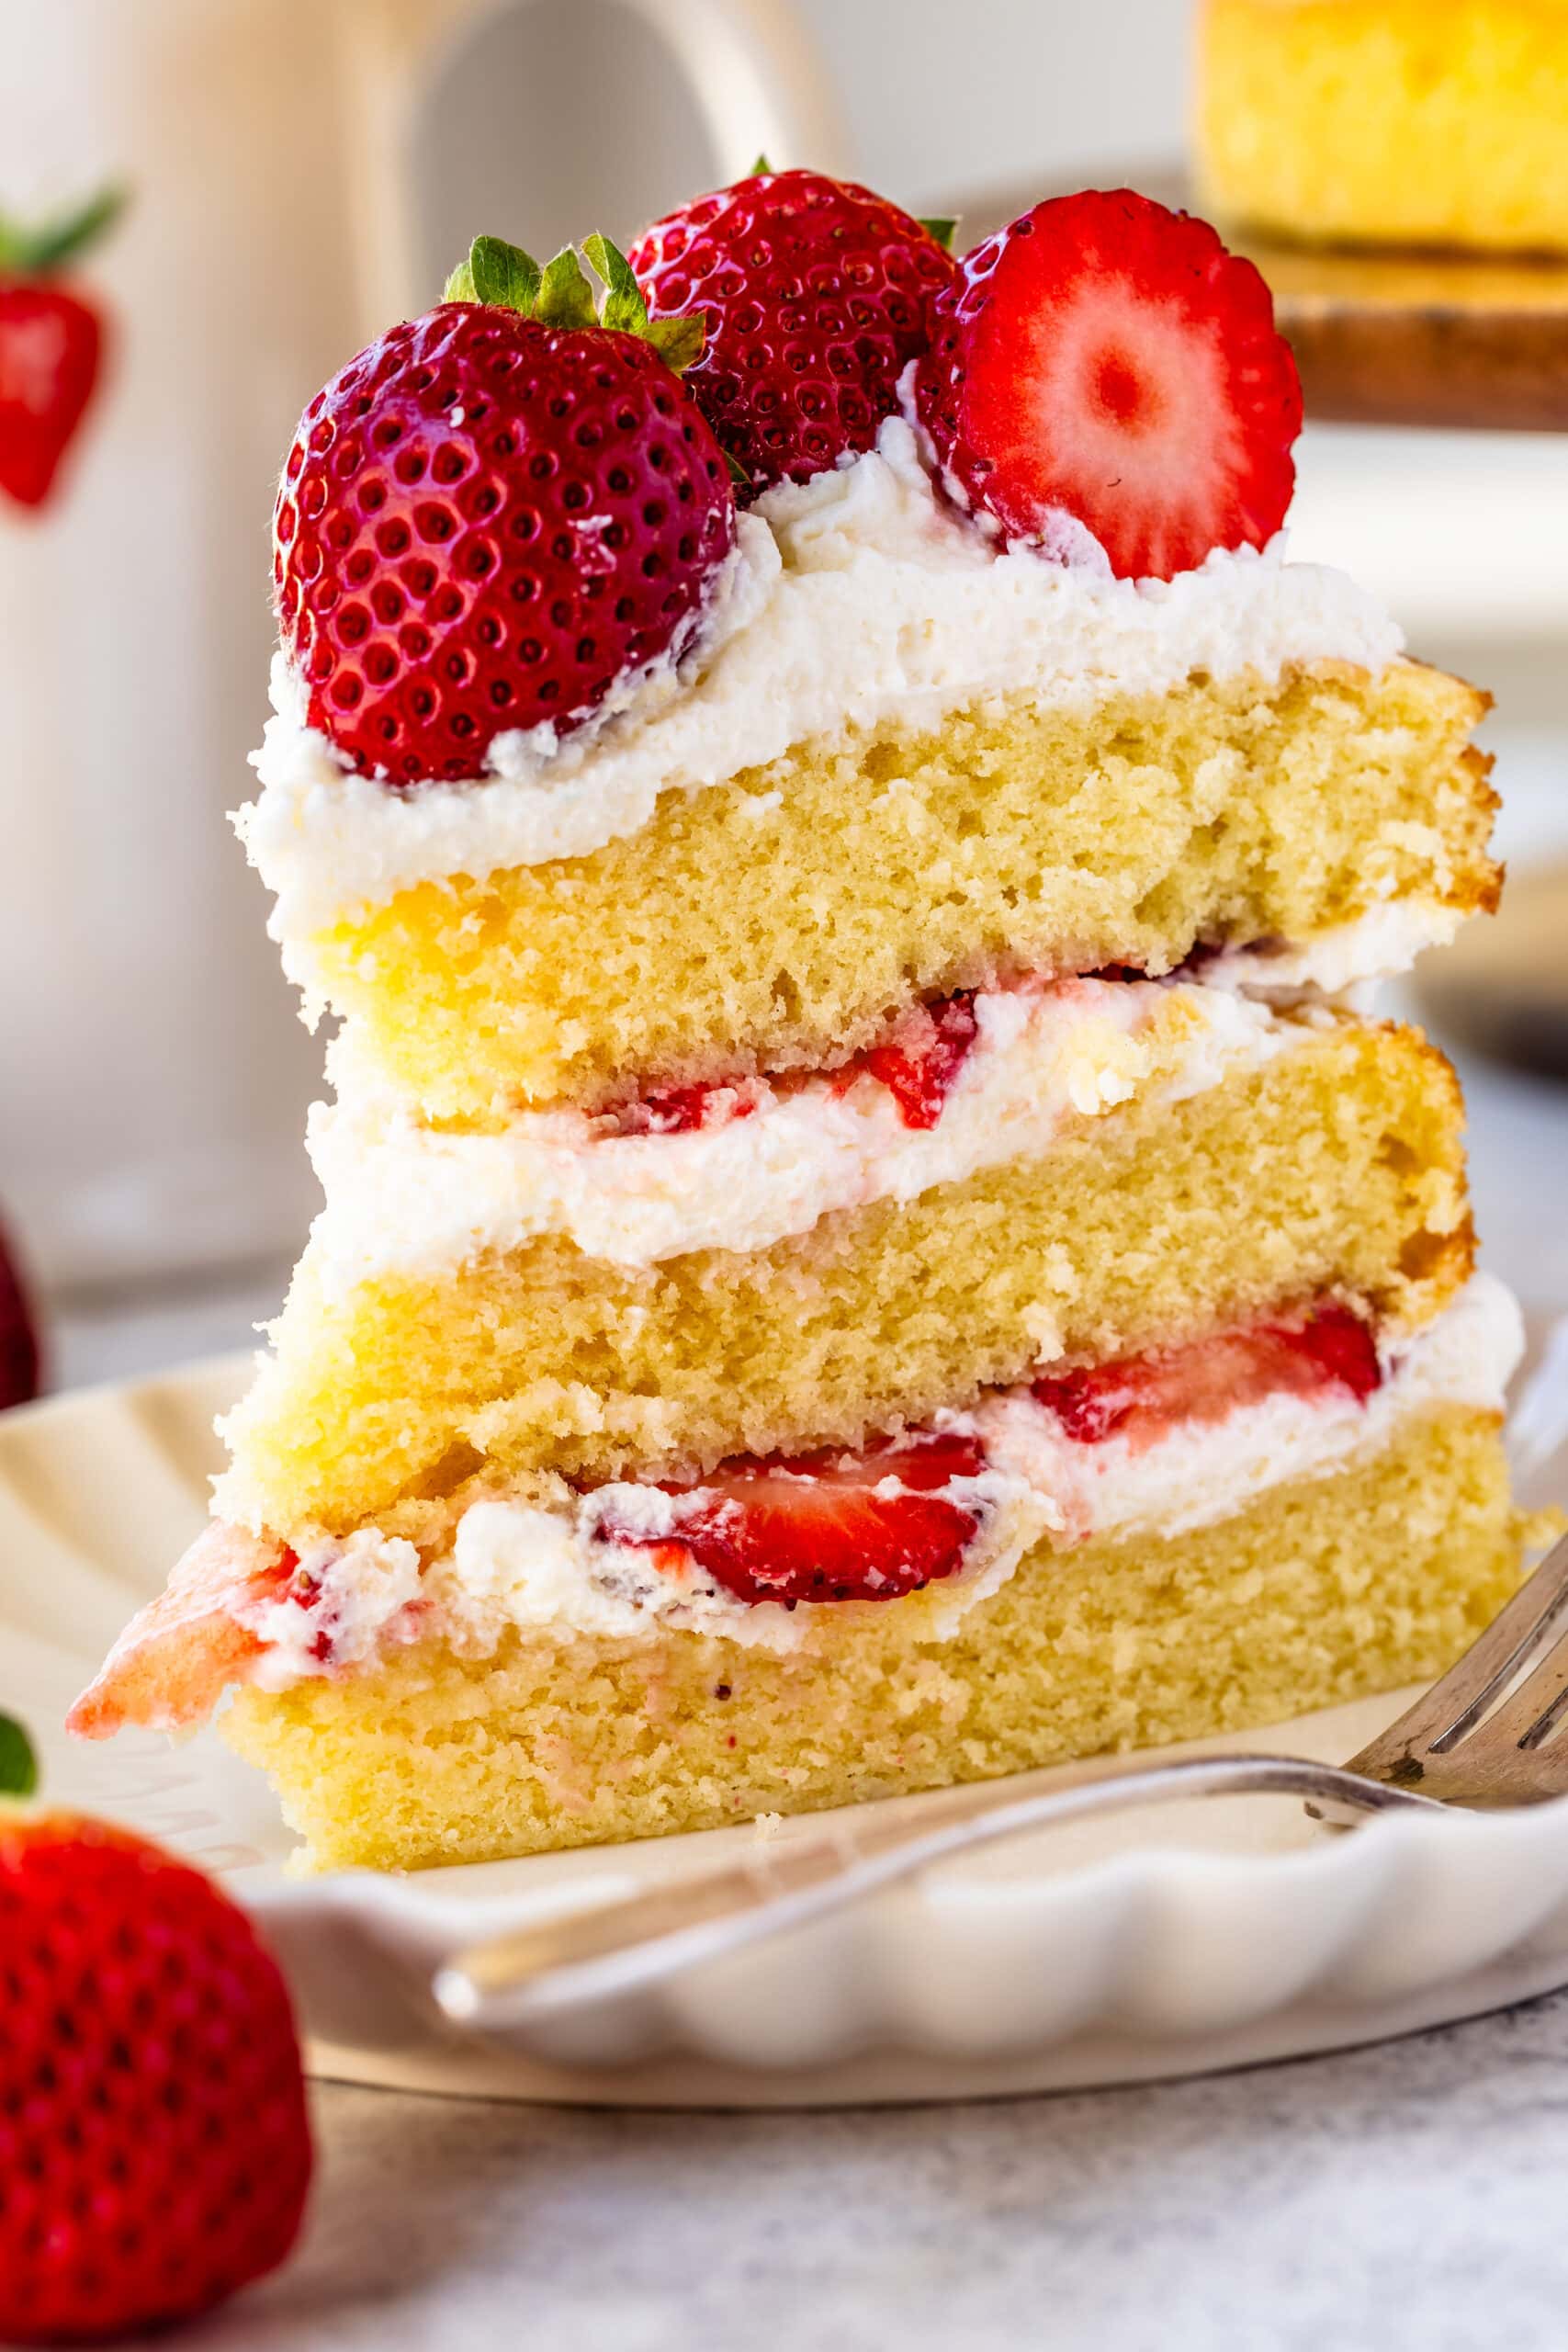
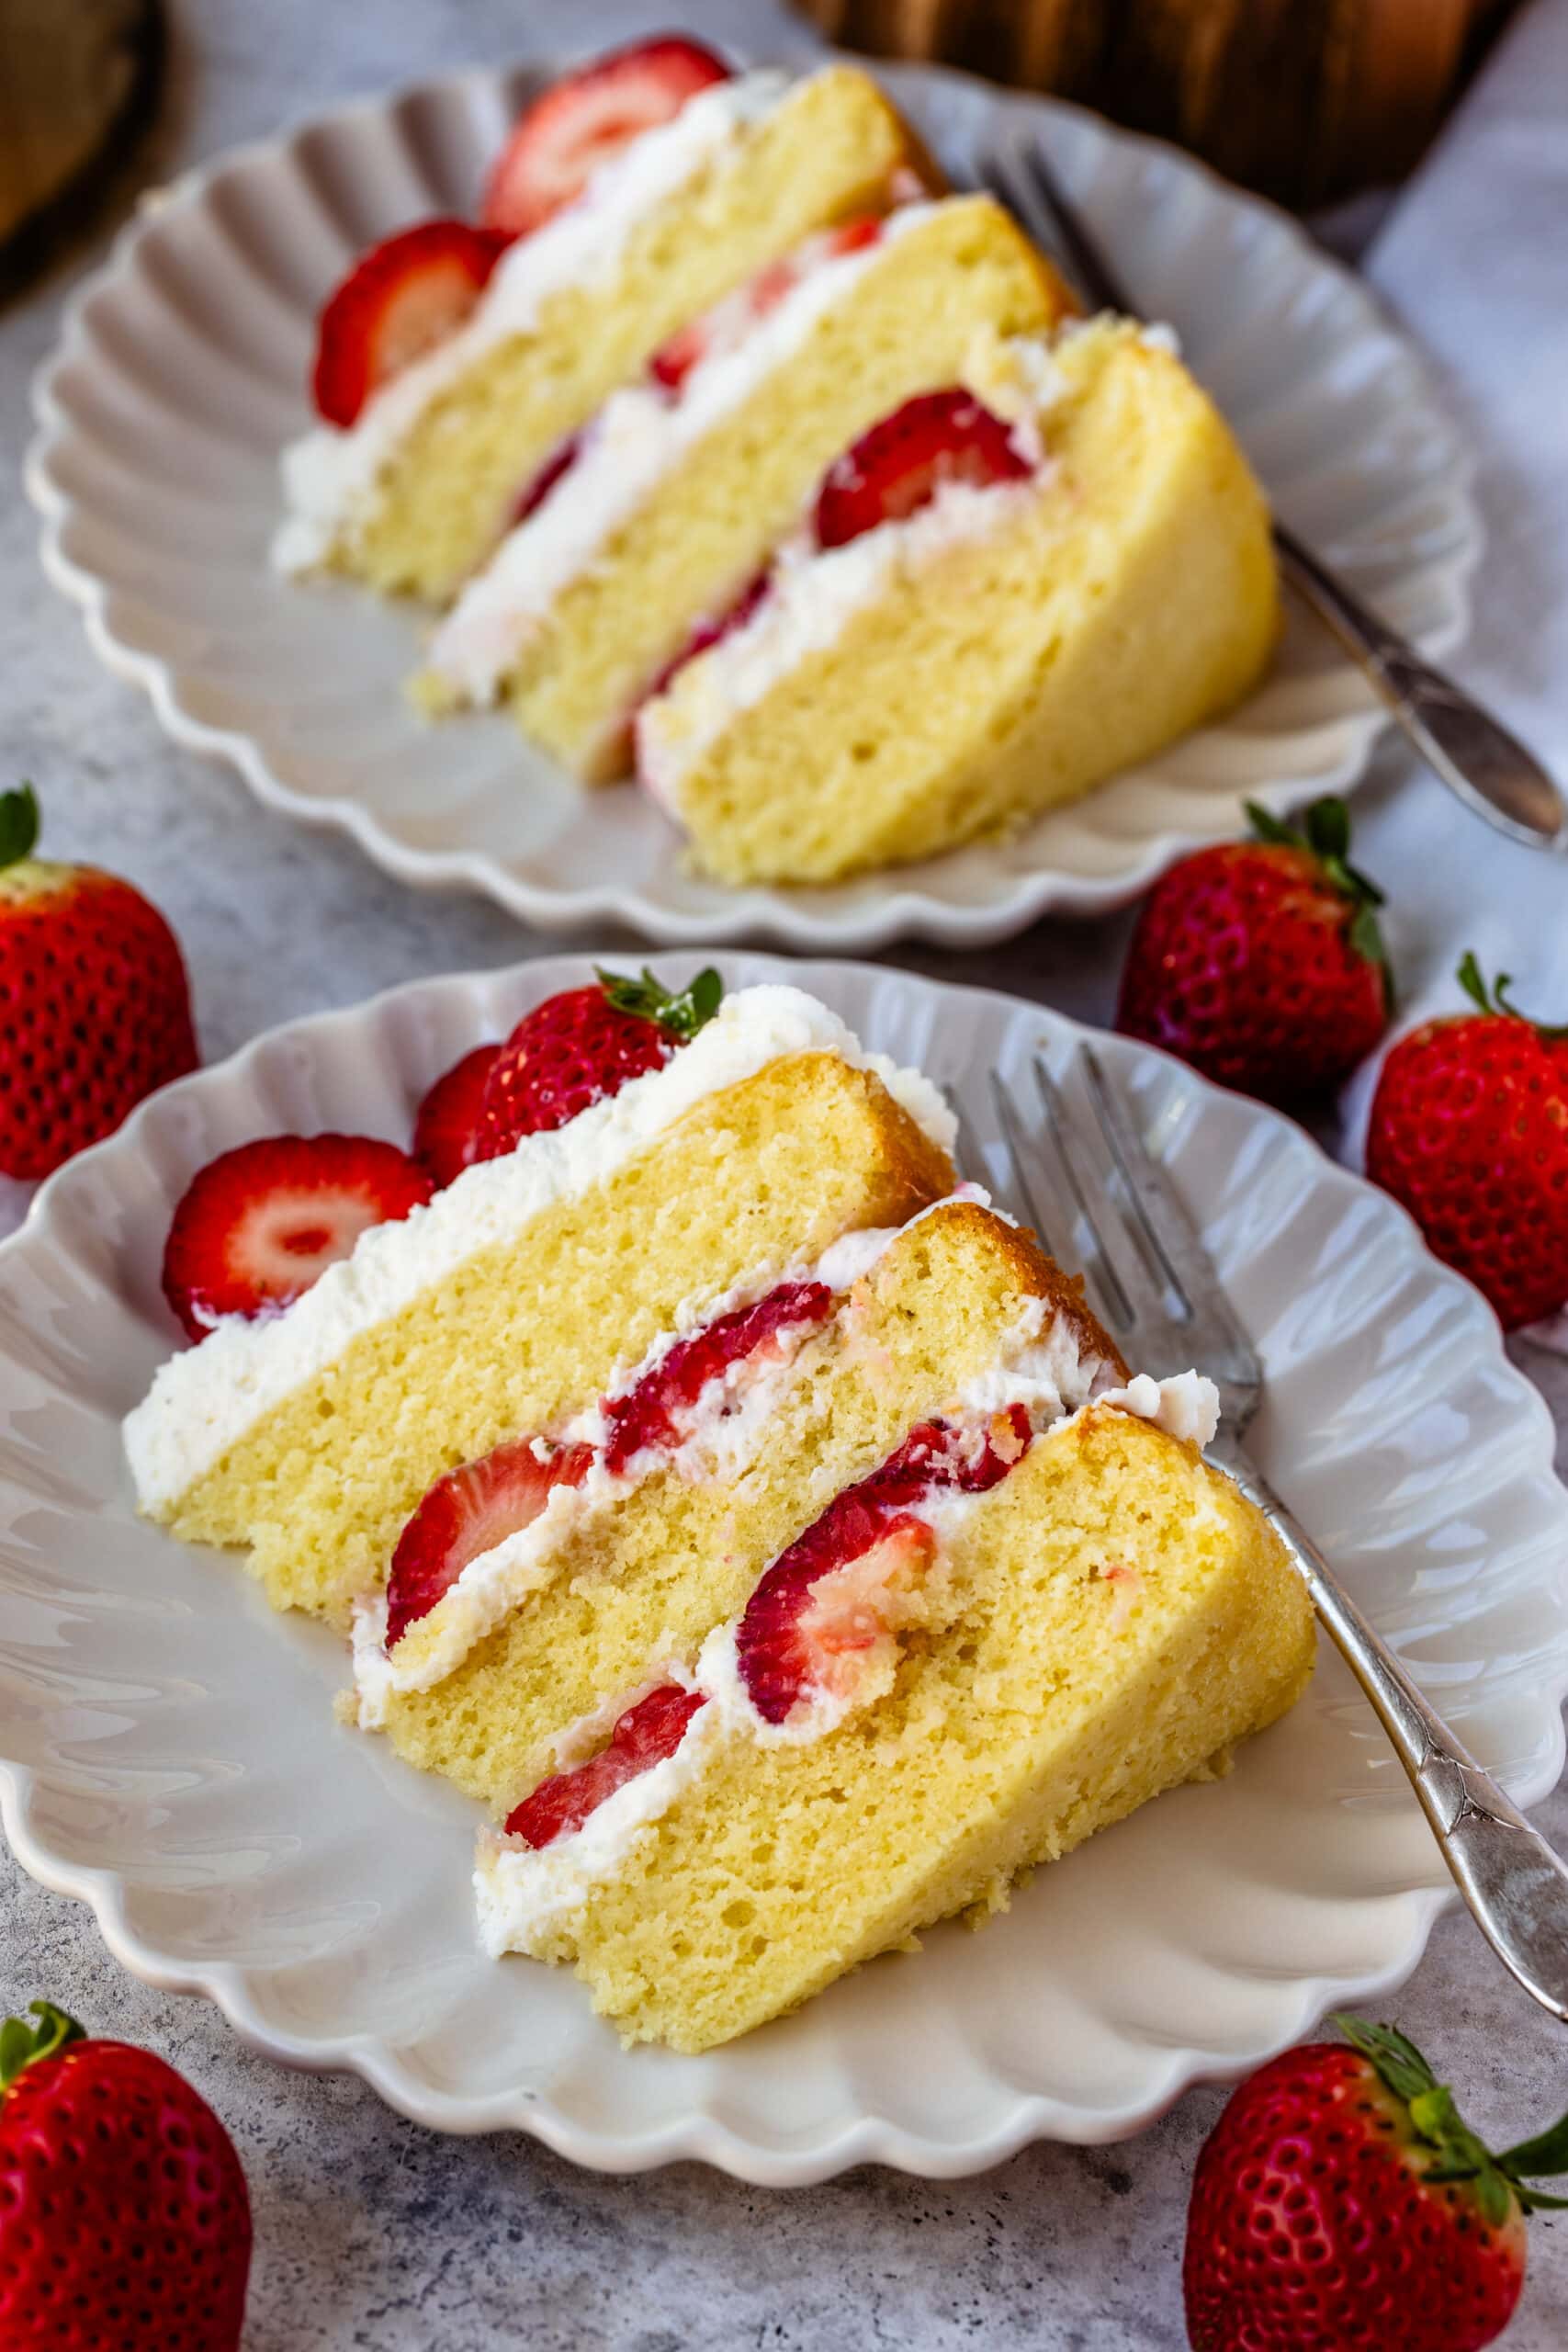
This Strawberry Shortcake Cake is a delicious take on the strawberry shortcake dessert. Creamy and light whipped cream, and sliced fresh strawberries, sandwiched between layers of fluffy vanilla cake. This is a simple and easy cake to make, the results are beyond stunning and delightful.

Strawberry Shortcake Cake is a light cake, perfect for spring and summer months, but can be served anytime of the year, specially if you can find nice fresh strawberries.
I will show you step-by-step how to make this delicious cake.
This post may contain affiliate links. I earn a commission from qualified purchases. Please read our Privacy policy here.
Strawberry Shortcake Cake Recipe
All the ingredient amounts are below on the page. Here you will find instructions with photos and more tips to help you make this recipe successfully.
Let’s start by making the Vanilla Cake batter.
Beat the butter, oil, and sugar in a large mixing bowl for two minutes, until the mixture is light and fluffy in color.
Add the eggs, one at a time, waiting for one egg to be incorporated before adding the next one. Make sure to scrape the bowl in between additions.
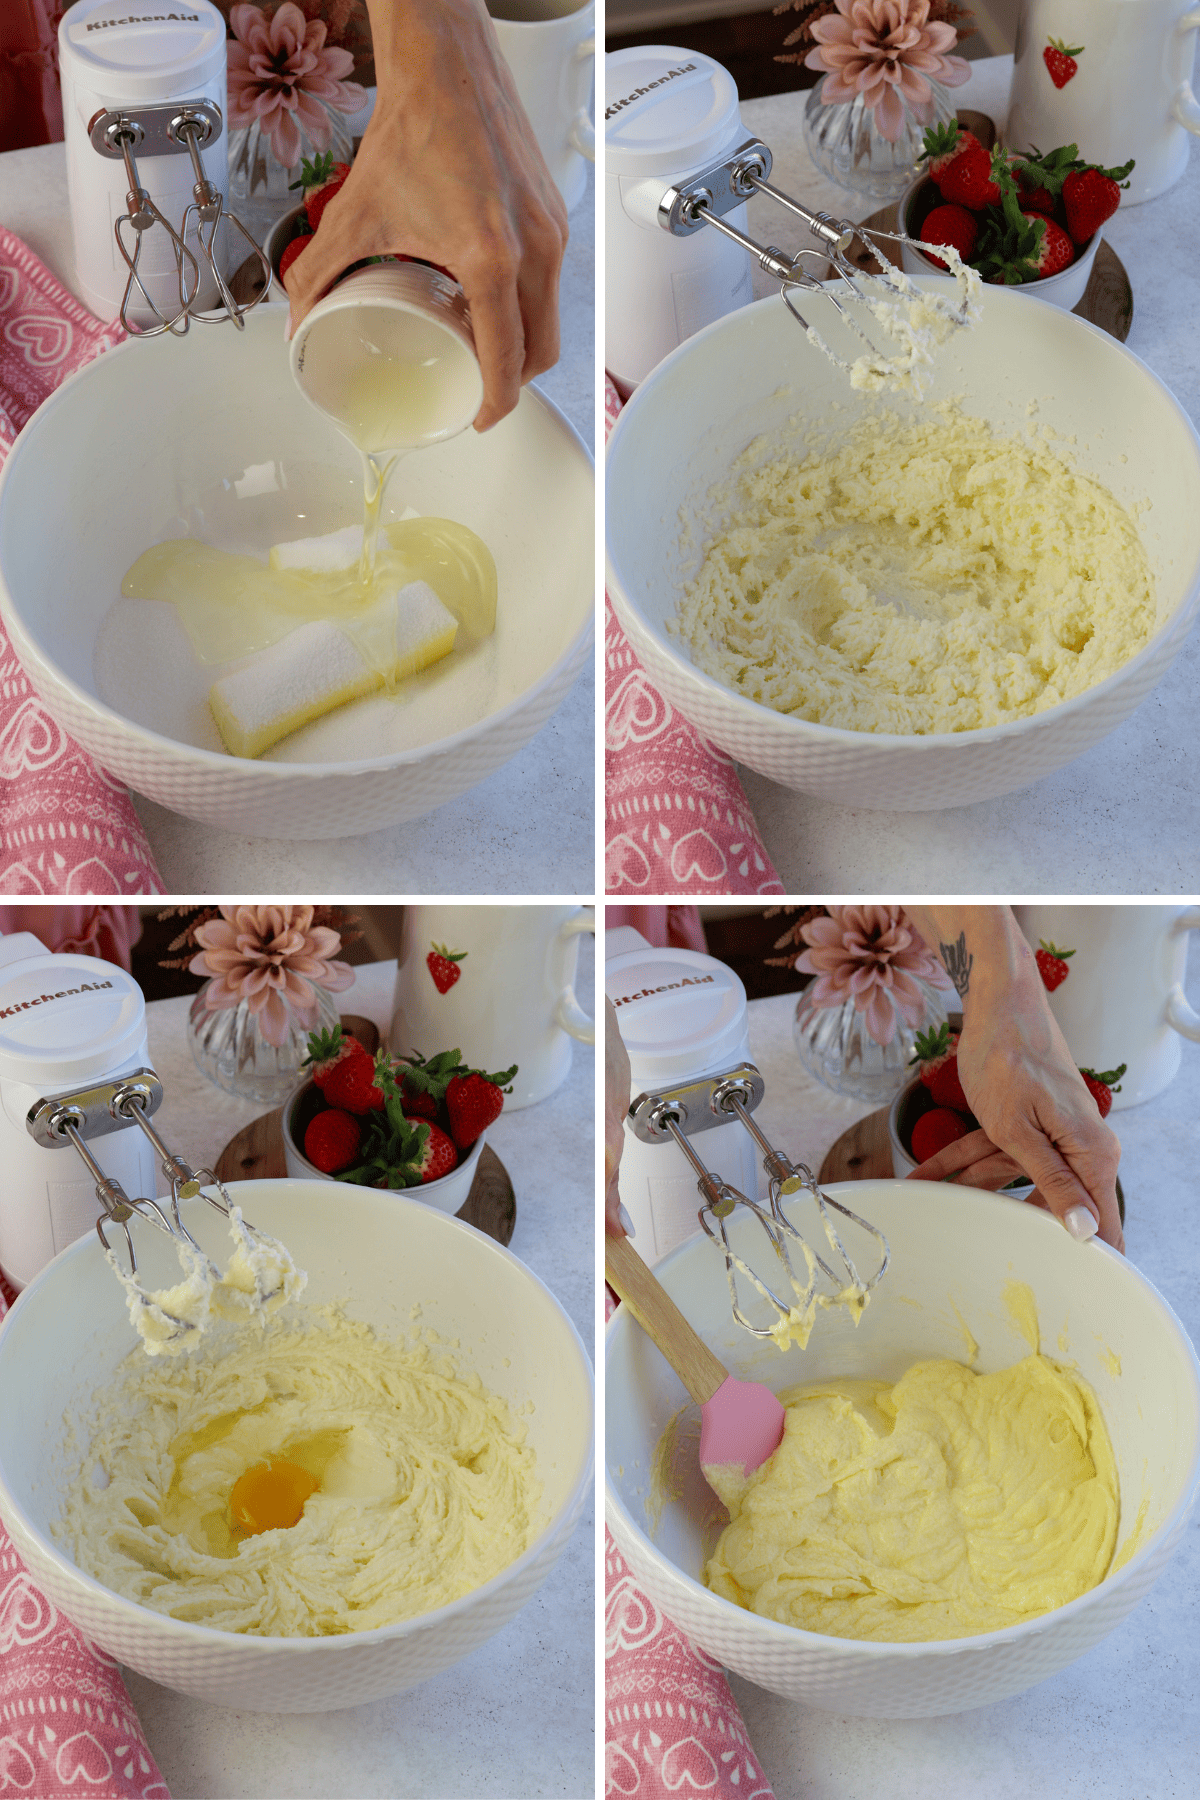
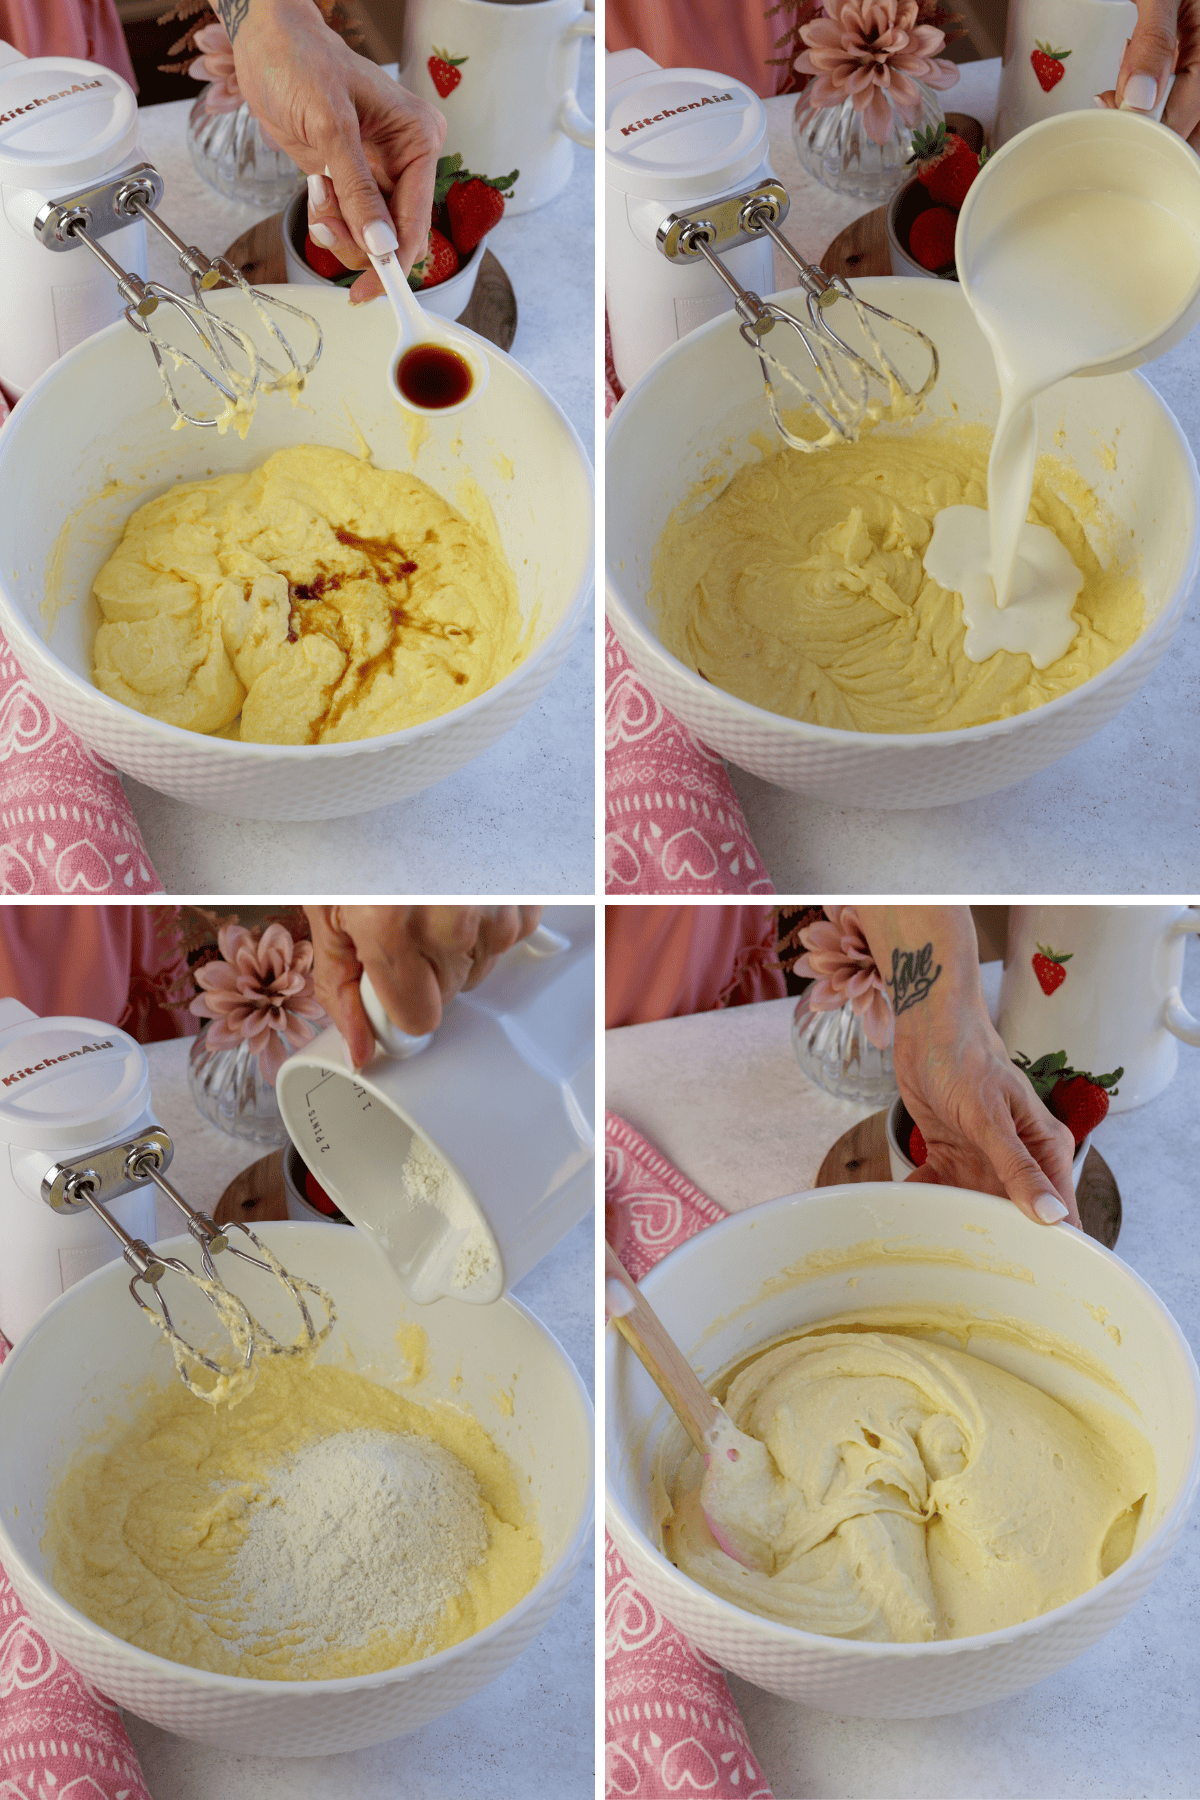
Add the vanilla and mix to combine. Pour one third of the buttermilk in the bowl. If you don’t have buttermilk, there are substitutions you can make instead, you can find them below on the page.
Add one third of the dry ingredients to the bowl. The dry ingredient mixture consists of flour, baking powder, baking soda, and salt. Mix on low to combine.
Once you start adding the flour ingredients, you don’t want to over mix the batter. Mix just enough to combine. Also scrape the bowl with a spatula, to help the batter get incorporated.
Continue to add the buttermilk and flour, in thirds, alternating them. Finish by adding the final amount of the flour mixture. Stir to combine, and you can fold with a spatula at the end, to prevent the batter from being over mixed with the electric mixer.
The batter should be smooth.
Baking
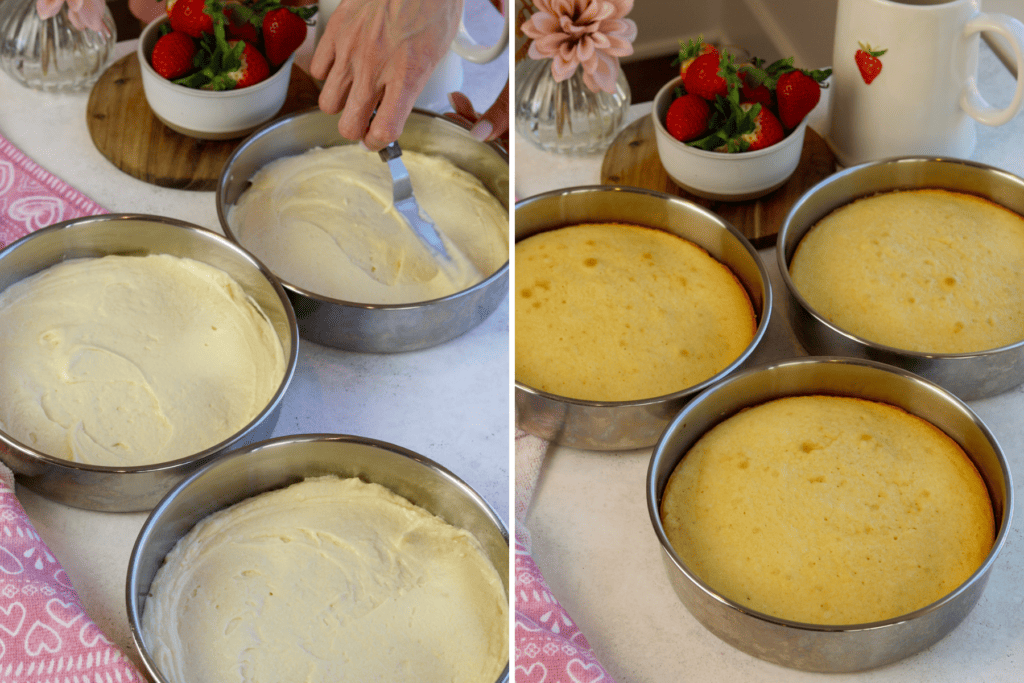
Divide the batter between three 8-inch cake pans, greased, and lined with parchment paper.
Bake in the pre-heated oven for about 30 minutes. It can take a bit longer, or less time, depending on your oven. I bake this cake at 350ºF on a conventional oven. If your oven is convection, use a 325ºF temperature, and you will possibly have to bake for less time, so start checking at 25 minutes.
The cake is done baking when a toothpick inserted into the cake comes off clean.
Let the cakes cool down for 10 minutes in the pan. Then flip them over onto a wire rack, and let them cool down completely before assembling and frosting.
Strawberries
You will need fresh strawberries for the recipe.
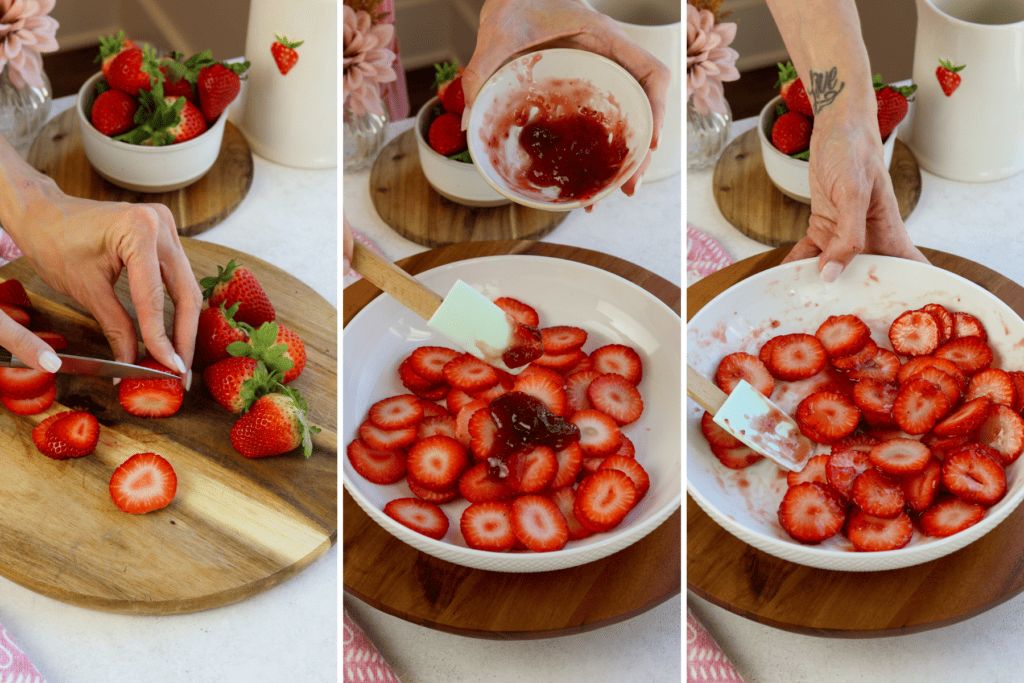
Wash the strawberries, then slice them into 1/8th of an inch thick slices.
I like to mix the strawberries with a couple tablespoons of strawberries preserves or jam, that helps them not become wilted, specially if storing the cake in the fridge for a few days.
If the jam you are using is too thick, or the jelly type, you can dissolve it with a few drops of water. But don’t add too much water, because once the jam is mixed with the strawberries, that will already make them release water, and you don’t want them to be too watery.
You can also keep the strawberries fresh, without mixing with jam, and just use them as is to assemble the cake.
Whipped Cream Frosting
To make this Whipped Cream Frosting, I chose to add cream cheese to the recipe. The cream cheese makes the frosting more stable. Whipped cream by itself is not stable, and tends to deflate, or become watery after some time.
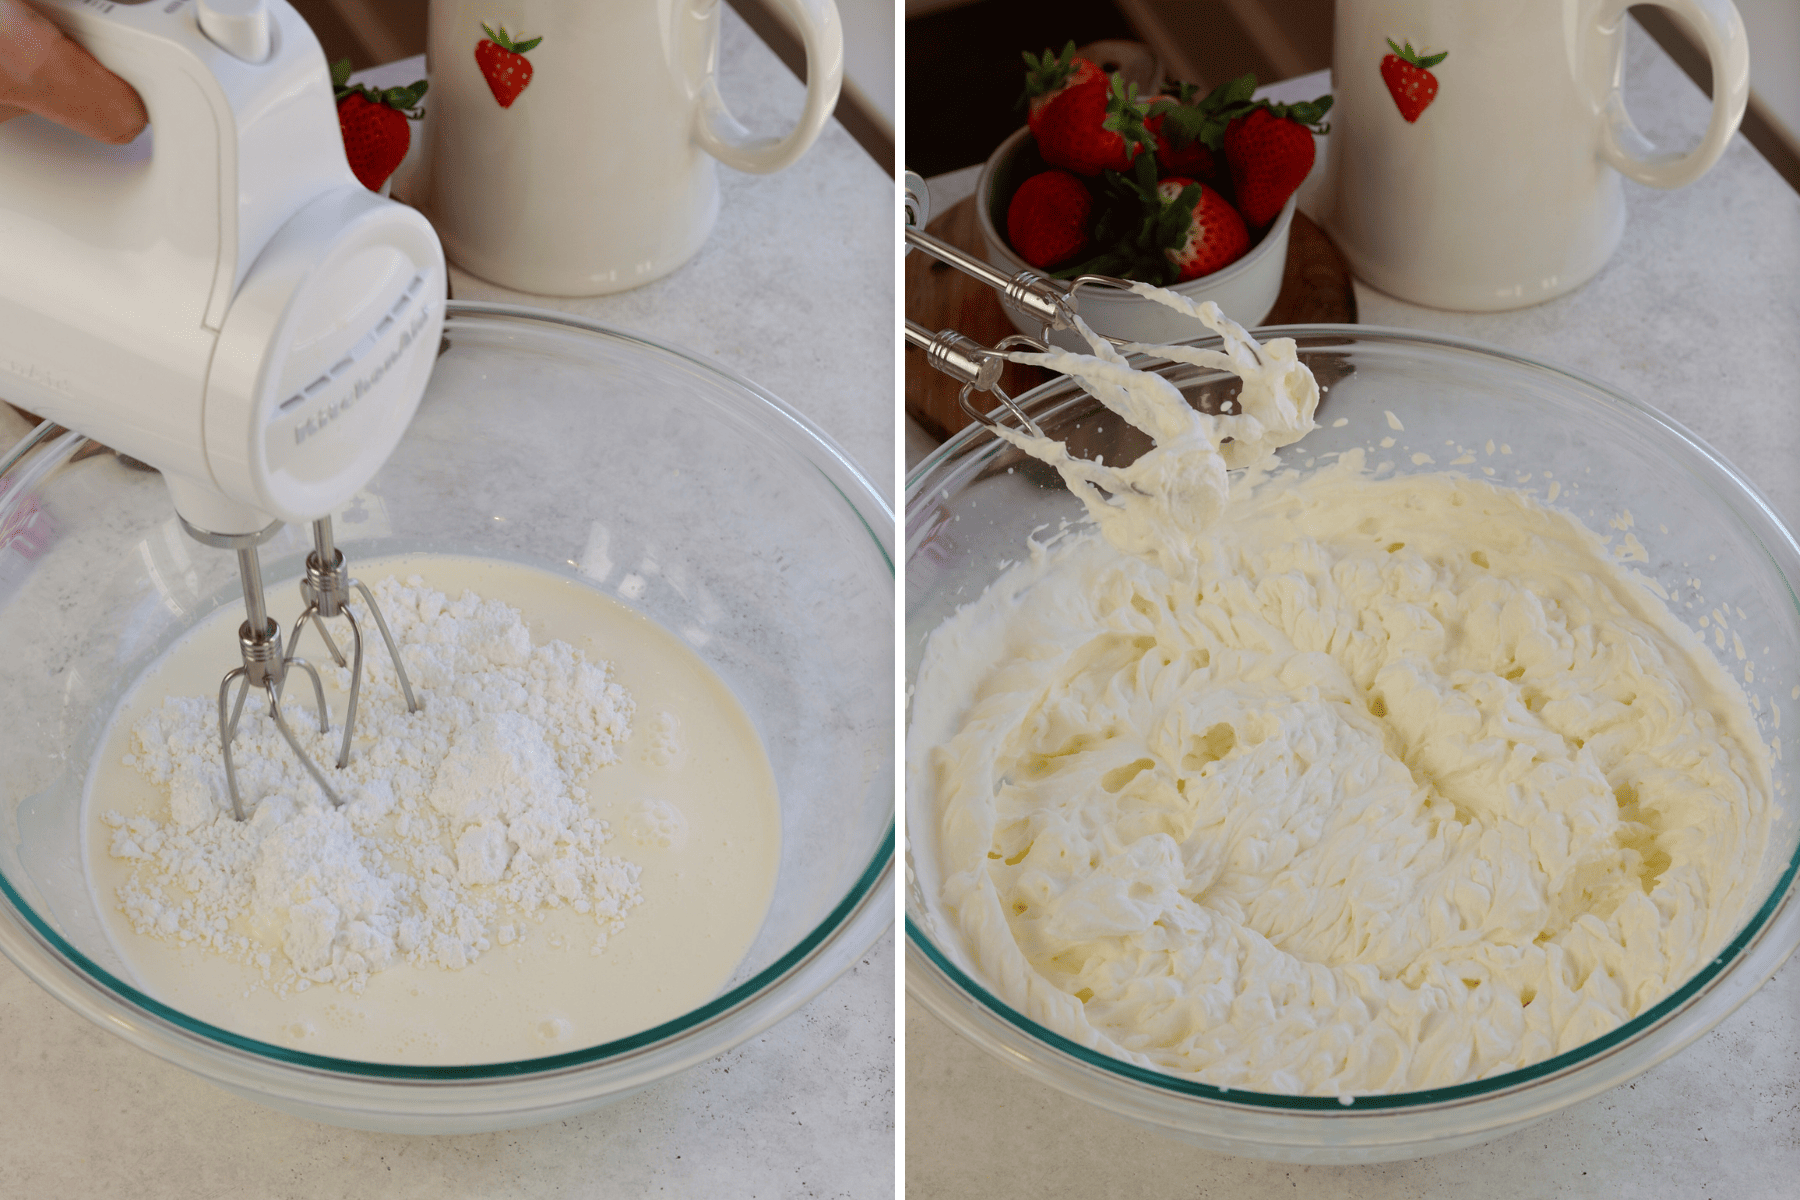
Whip the cream cheese with half of the powdered sugar for one minute. Add the vanilla extract and mix to combine.

In another bowl, whip the heavy cream with the remaining sugar for about 3 minutes at medium-high speed, until stiff peaks are formed.
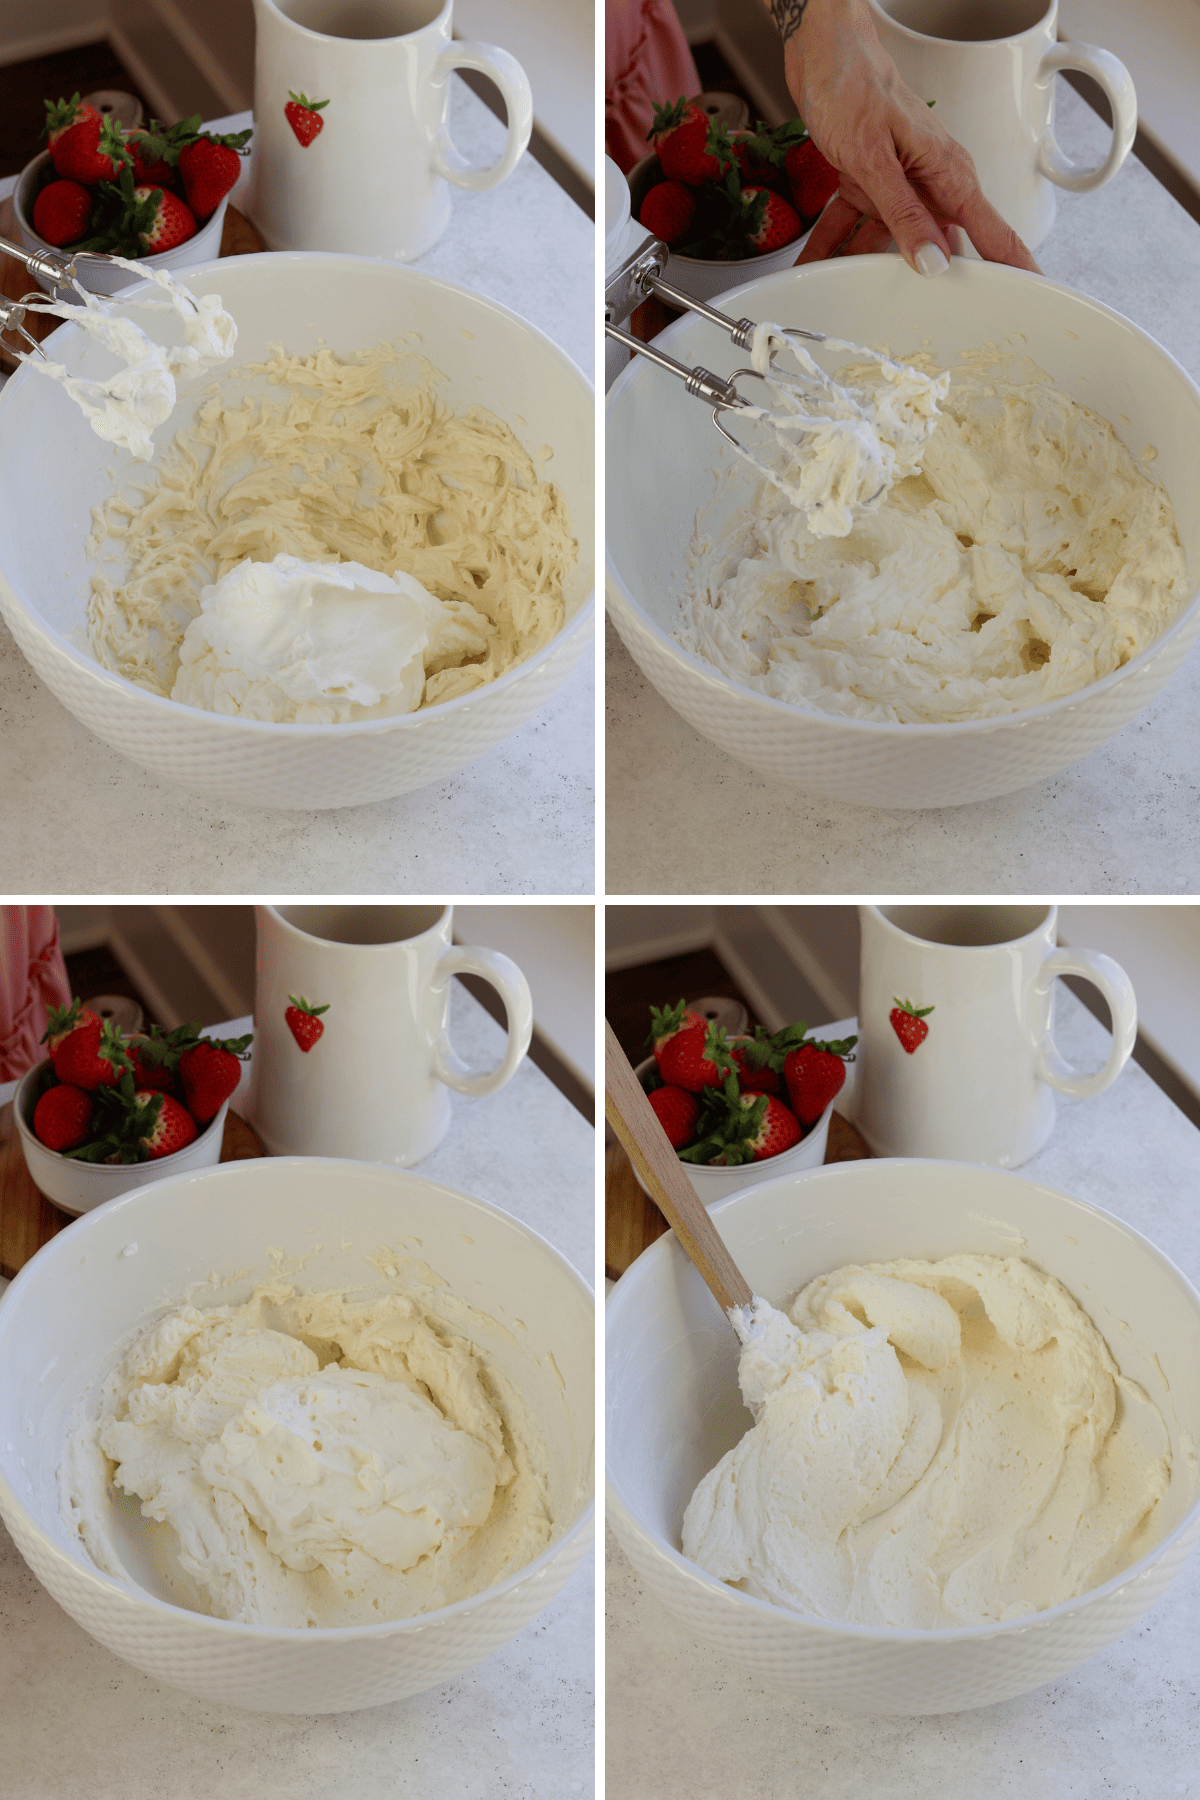
Add one third of the whipped heavy cream to the cream cheese mixture. Mix with the electric mixer on low speed, or with a spatula to combine.
After the first addition, you want to fold with a spatula to avoid deflating the batter or over whipping the mixture.
Continue to add the whipped cream to the bowl, folding gently to combine.
If you don’t want to use cream cheese, you can stabilize the whipped cream with gelatin. To do that, you will need 3 cups of heavy cream instead of 1 1/2. Dissolve 1 tbsp of unflavored gelatin in 3 tbsp of water, microwave for 10 second increments, stirring, until the mixture is melted together. Let it cool down. Start whipping the cream with 3/4 cup of powdered sugar, and pour the cooled dissolved gelatin in slowly when the cream is almost at stiff peaks.
I much prefer the taste and consistency of the stabilized cream made with cream cheese, but the gelatin method can be an alternative if you don’t have cream cheese or simply don’t want to use it.
To assemble the cake
To assemble the cake, place a cake layer on top of a cake plate.
Pipe or spread the whipped cream on top. I am using a tip 4B to do that, you can use a round piping tip, or even just spread the cream with a spatula instead.
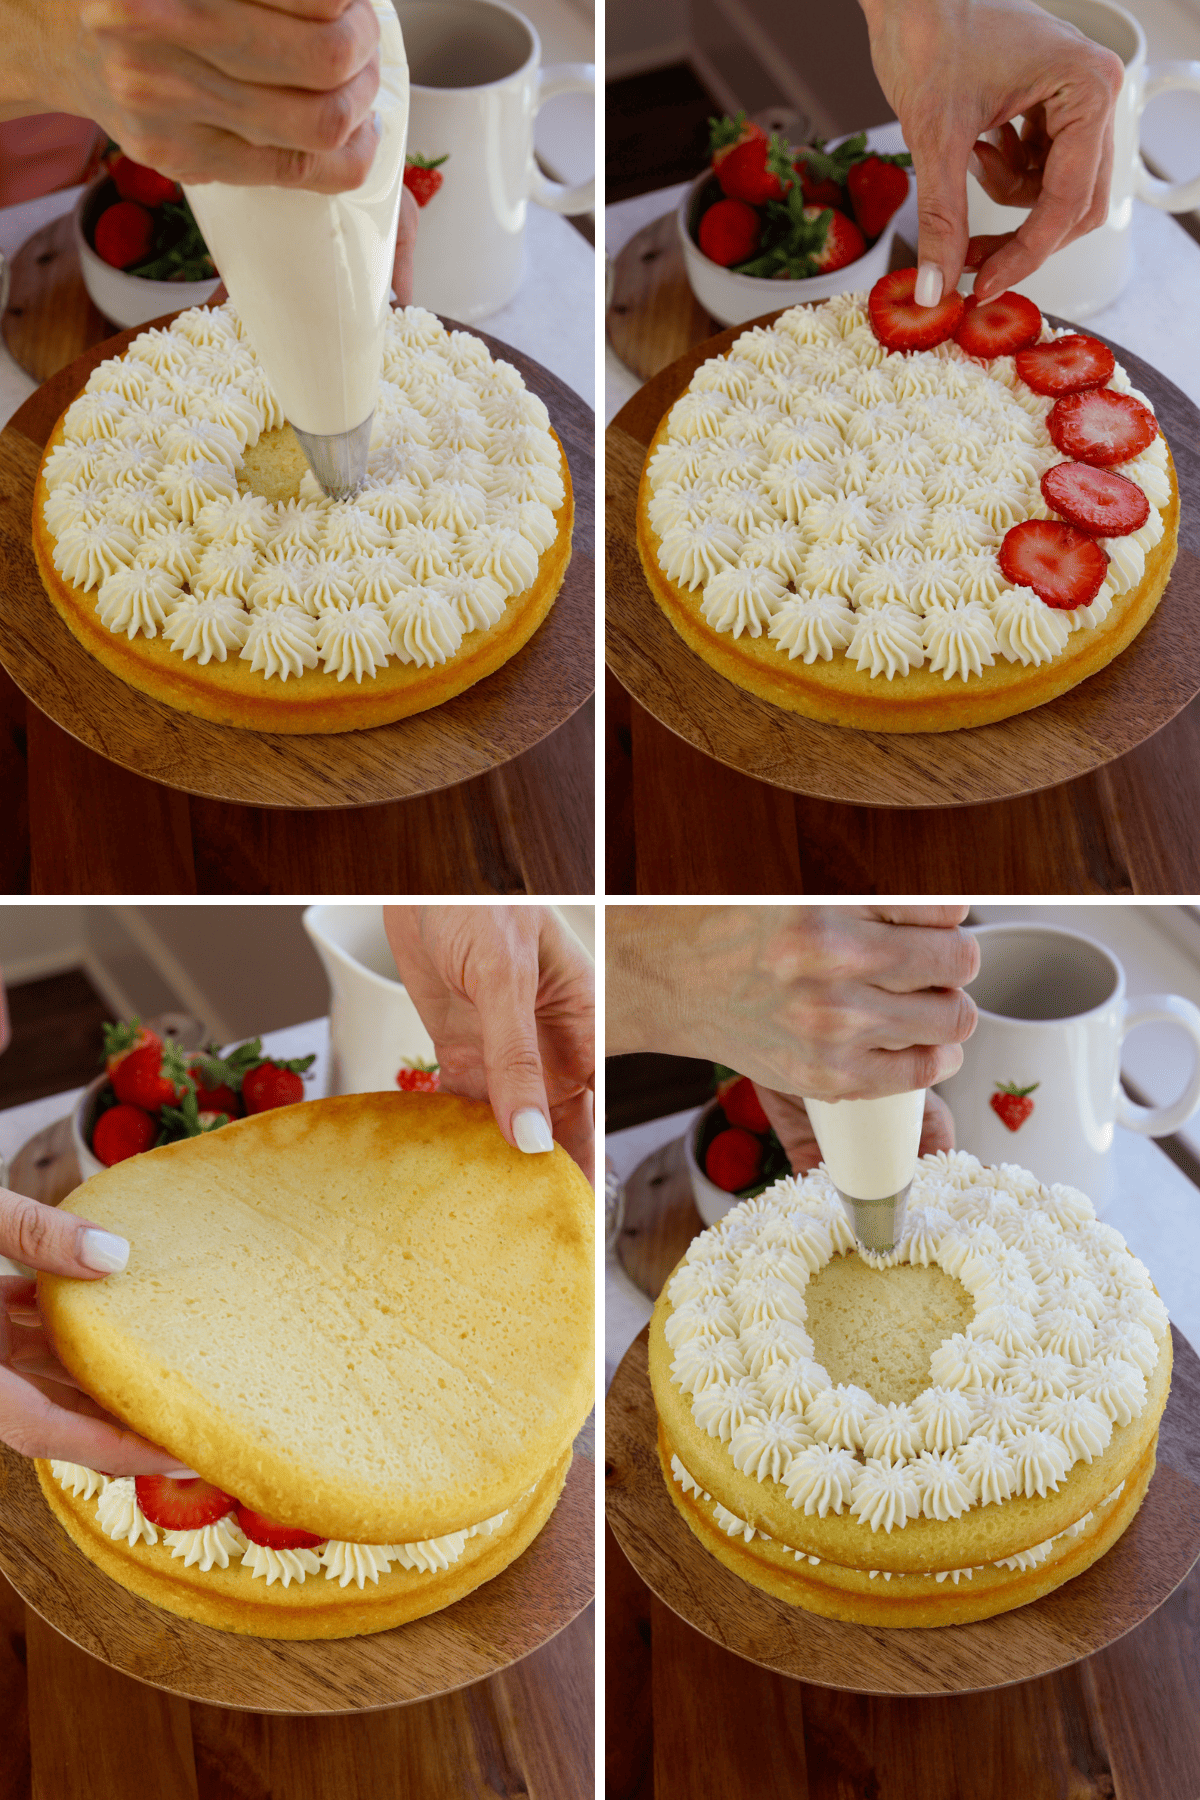
Arrange the strawberries on top, making sure it’s an even layer. The strawberries will have released water, but you don’t want the excess liquid to go in the cake, so make sure to give the strawberry slices a few taps or a little shake before adding them on top of the cream.
Place another cake layer on top of the strawberries.
Pipe or spread more whipped cream on top. Arrange more strawberries on top.
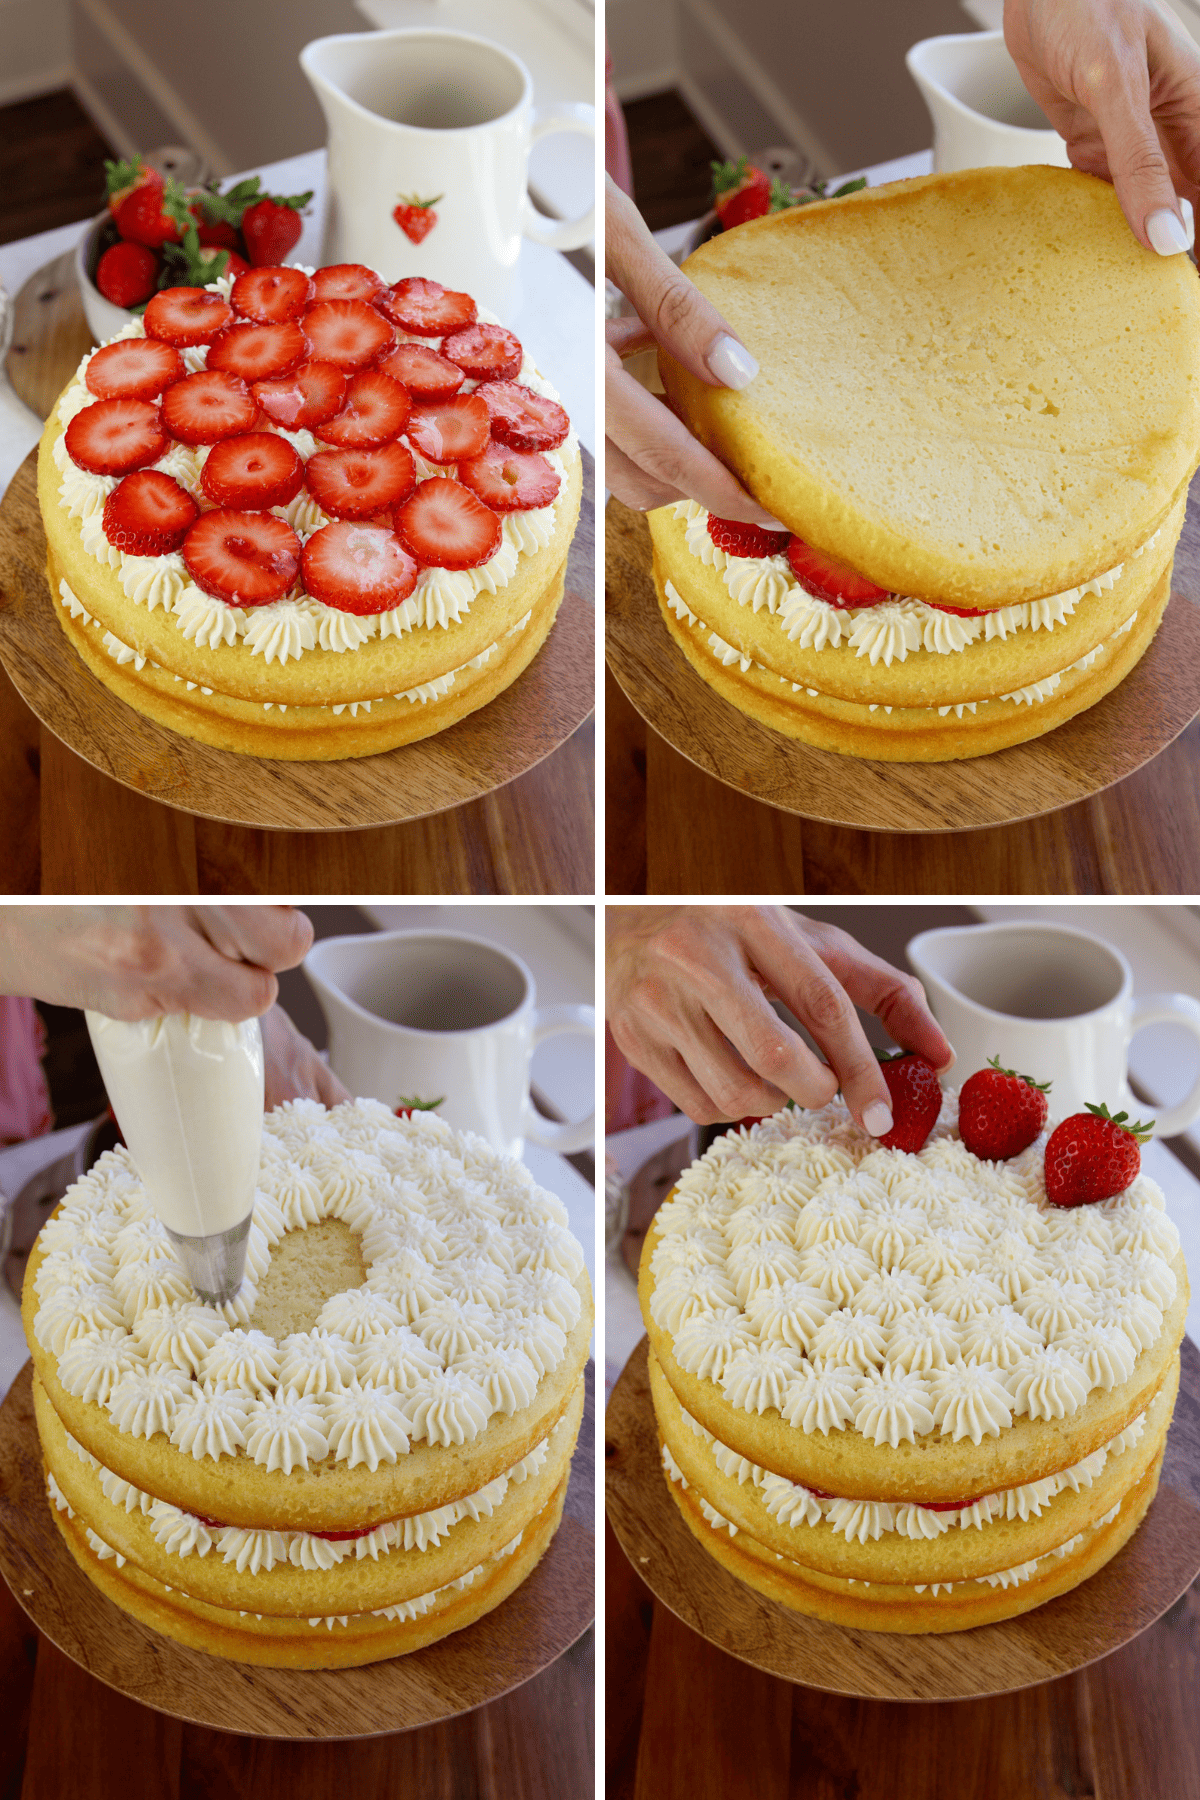
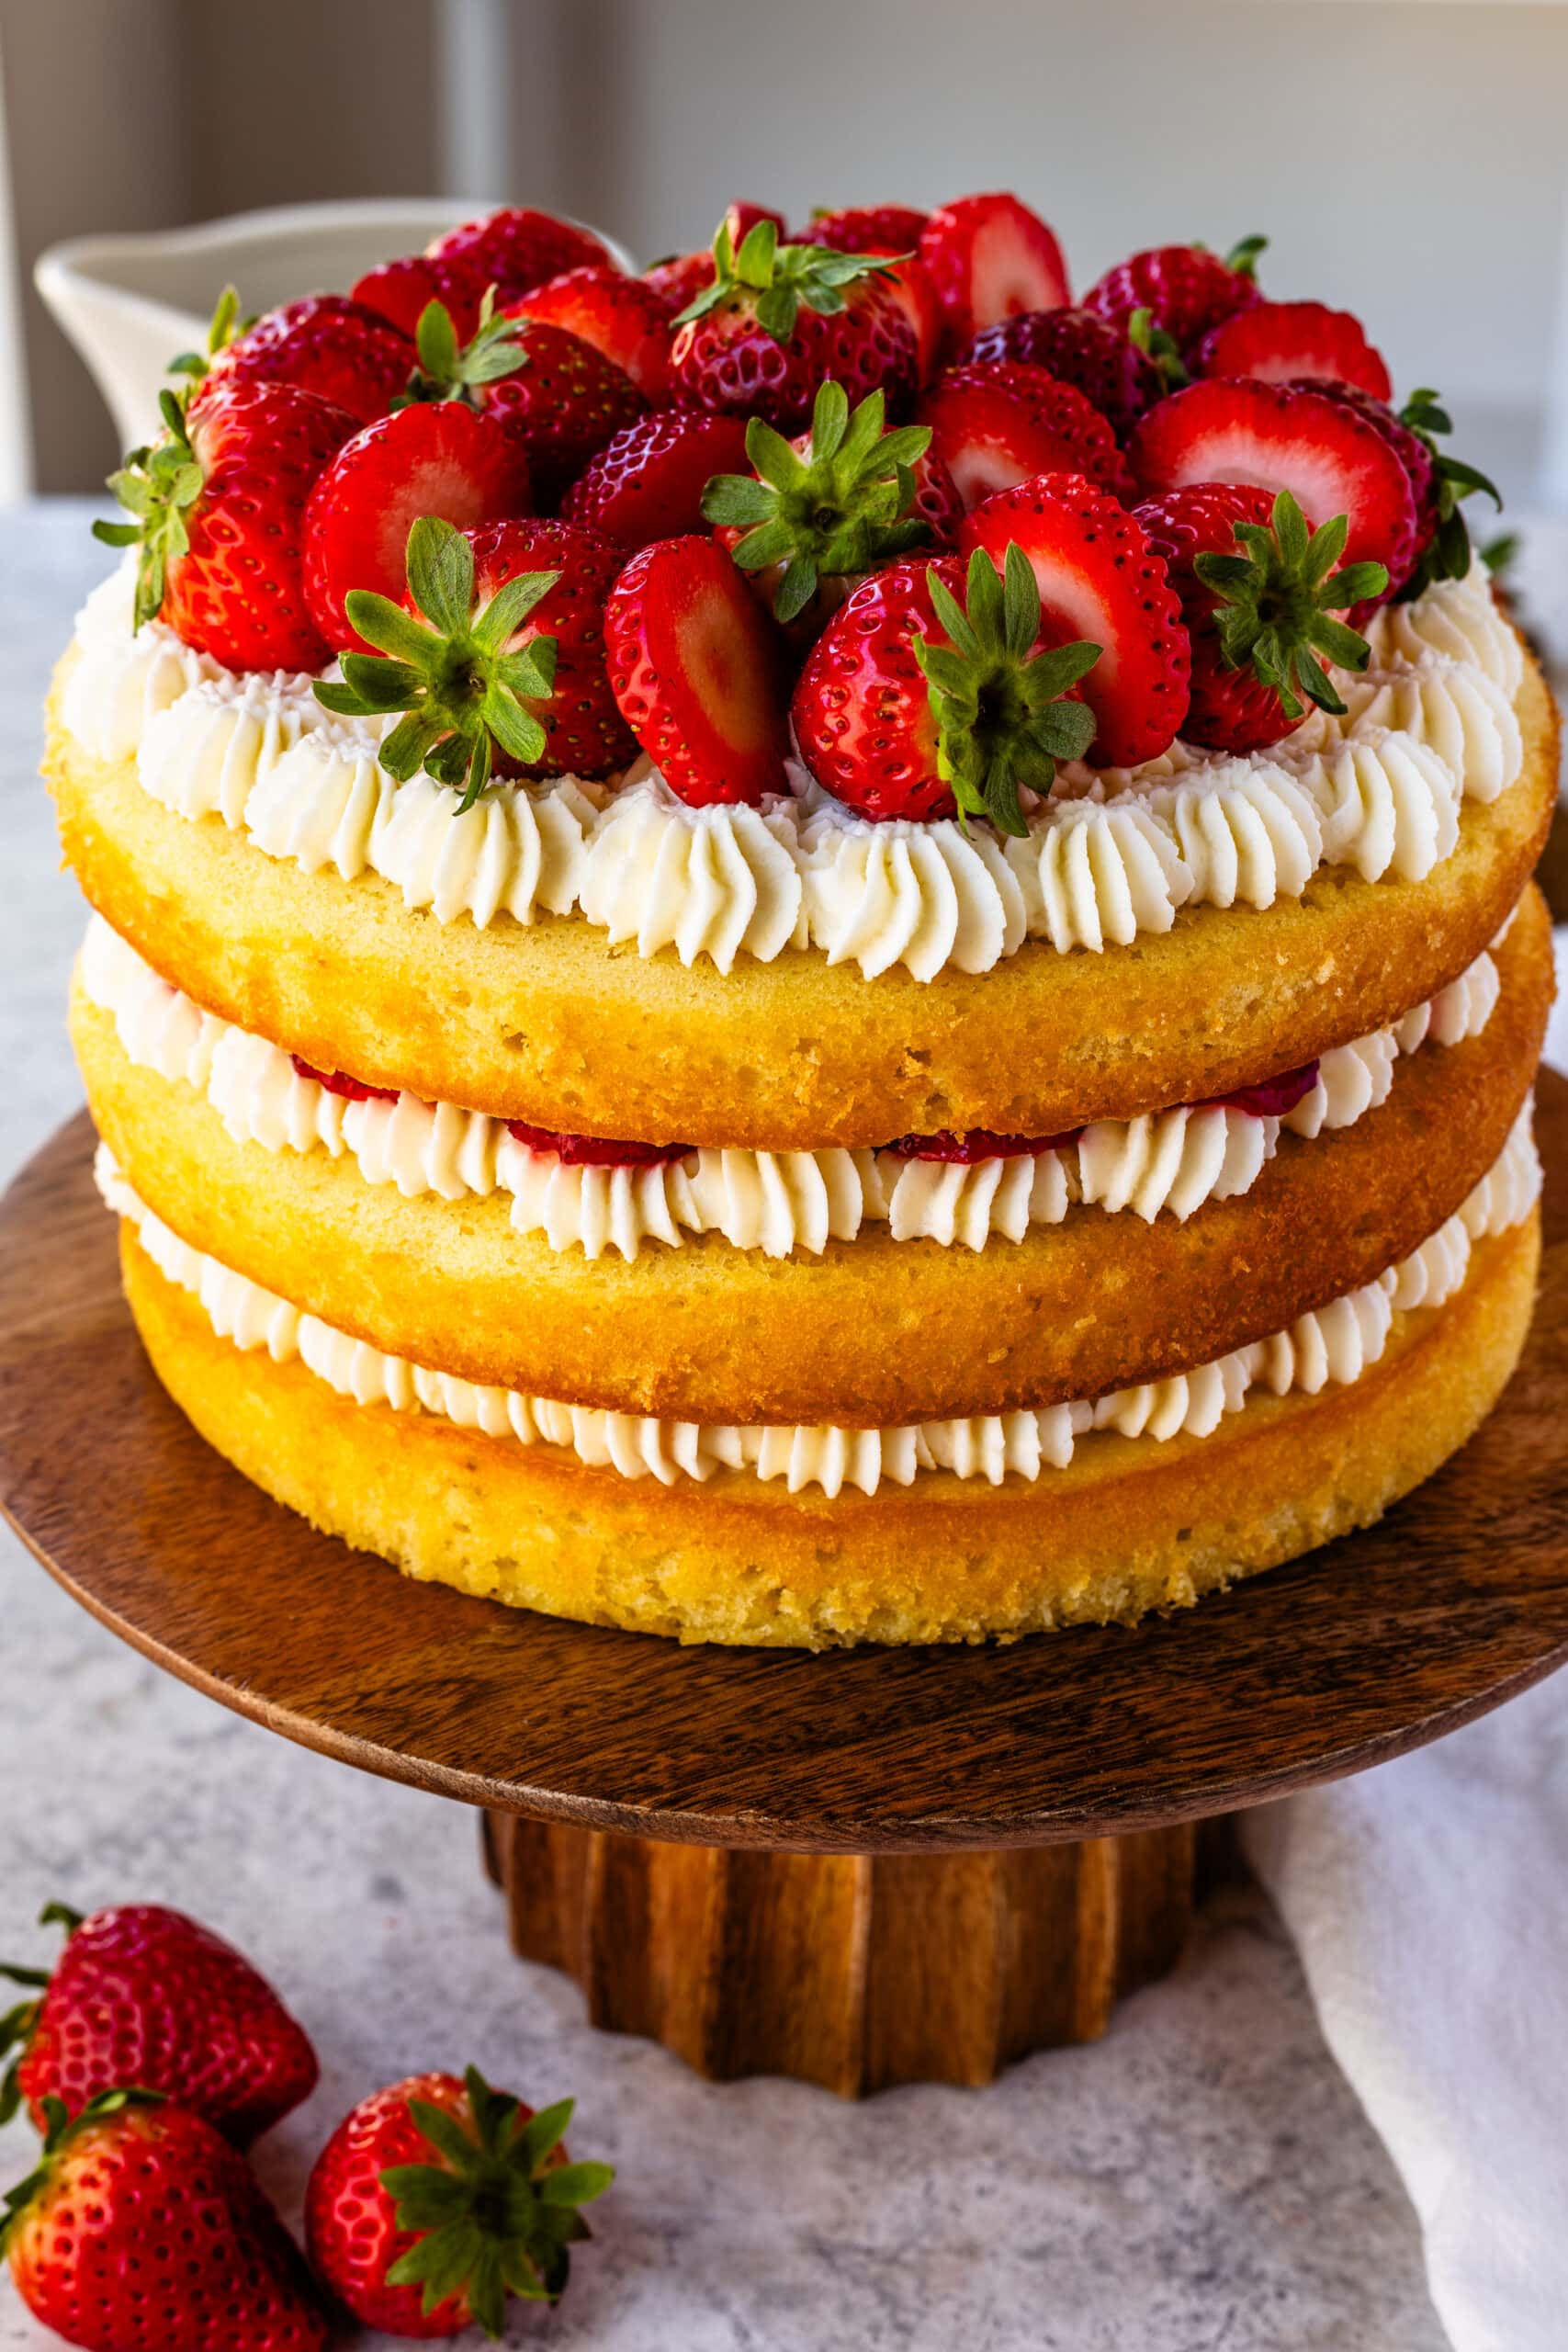
Finish with a final cake layer, topped with more cream.
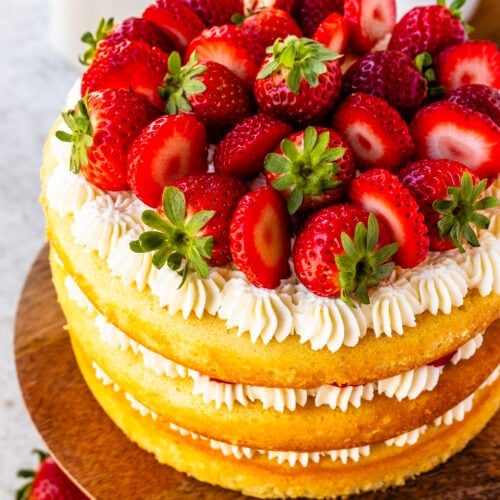
You can top the cake with fresh strawberries if desired.
Serving and storage
I like to serve this cake immediately after assembling it. The fresher, the better.
If transporting this cake, you may consider wrapping it in acetate, so the layers don’t slide over.
Store any leftover cake in an airtight container in the fridge for up to 2 days. I don’t recommend freezing this cake.
You can freeze the individual cake layers, wrapped in plastic tightly. Remove the cake layers from the freezer a couple of hours before you have to assemble the cake. Then assemble and serve. If the cake is not completely thawed yet, let it sit for another hour at room temperature or in the fridge. You can also thaw the cake layers in the fridge overnight, then the next day, simply remove them from the fridge and assemble the cake.
Variations
You can make this cake with any other berries you love, such as raspberries, blueberries, blackberries. Other fruits you can use are cherries, canned peaches, or sliced mangoes. Those fruits would also go very well with the flavor of the whipped cream and vanilla cake.
You can also make this recipe into cupcakes. To do that, cut the recipe in half to obtain about 16 cupcakes. The cupcakes will take about 20 minutes to bake.
Tips for making Strawberry Shortcake Cake
- Don’t over mix the ingredients once the flour has been added to the cake batter.
- Make sure to scrape the bowl several times in between adding and mixing the ingredients.
- If possible, use the gram measurements instead of cups, it will provide much better results because gram measurements are way more reliable than cup measurements.
- Only make the whipped cream once you are ready to assemble the cake. The whipped cream can start to deflate if it sits in the bowl. It does hold up pretty well once piped.
- This is a very light and fluffy cake, if you are transporting it somewhere, wrap it in acetate to avoid the cake slices from sliding around.

If you liked this recipe, here are some more recipes you may enjoy:
- Almond Raspberry Cake
- Strawberry Nutella Cake
- Pistachio Raspberry Cake
- Lemon Blackberry Cake
- Passionfruit Cake
- Pineapple Strawberry Cake
Watch Video

Strawberry Shortcake Cake
Ingredients
Vanilla Cake
- 2 1/2 cups all-purpose flour 324 grams
- 1 1/2 tsp baking powder
- 1/4 tsp baking soda
- 1/4 tsp salt
- 3/4 cup unsalted butter room temperature (169 grams)
- 1/4 cup vegetable oil 60 ml
- 1 1/2 cup granulated sugar 300 grams
- 4 large eggs room temperature
- 1 tbsp pure vanilla extract
- 1 1/4 cup buttermilk 300 ml
Strawberries
- 3 cups sliced strawberries about 450 grams
- 2 tbsp strawberry preserves or strawberry jam
Whipped Cream
- 3/4 cup cream cheese room temperature (170 grams)
- 2/3 cup powdered sugar 82 grams, divided
- 1 1/2 cups heavy whipping cream 360 ml
- 2 tsp vanilla extract
Instructions
Vanilla Cake
- Pre-heat the oven to 350ºF. Grease and line 3 8” cake pans with parchment paper.
- In a bowl, whisk together the flour, baking powder, baking soda, and salt. Set aside.
- In a large bowl, or in the bowl of a stand mixer, add the butter, oil, and sugar. Beat the ingredients together for two minutes, until the mixture is fluffy and light in color. If using a stand mixer, use the paddle attachment, or you can just use a hand mixer.
- Add the eggs, one at a time, mixing one egg completely until incorporated before adding the next one.
- Remember to scrape the bowl in between mixing.
- Add the vanilla and mix to combine.
- Add one third of the buttermilk to the bowl with the batter, mix on low to combine.
- Next, add one third of the dry ingredient mixture. Mix on low speed.
- Add another third of the buttermilk and mix.
- Follow by another third of the flour mixture, mix to combine.
- Add the remaining buttermilk, and mix. Finish with the remaining flour, add it to the bowl and mix on low.
- You can finish by folding with a spatula, to avoid over mixing the batter.
- Divide the batter between the prepared cake pans.
- Bake in the pre-heated oven for about 30 minutes, until a toothpick inserted into the cake comes off clean.
- Remove the cake from the oven. After 10 minutes, flip the cake onto a cooling rack or plate. Let the cake cool down completely. If you aren’t assembling the cake on the same day, wrap the completely cooled down cake in plastic wrap, and place in the fridge, or freezer.
Strawberries
- Slice the strawberries about 1/8th of an inch thick. Place them in a bowl. Add the preserves to the bowl and mix to combine.
- If the strawberry jam you are using is the thick kind, or the jelly kind, you can dissolve it with a few drops of water so it’s easy to mix it with the strawberries. Set it aside.
Whipped Cream
- Make the whipped cream when you are ready to frost the cake. Don’t let the whipped cream sit for too long in the bowl, as it will start to deflate. It will hold well once piped.
- Whip the cream cheese with half of the powdered sugar with an electric mixer for one minute, add the vanilla, whip for another 30 seconds and mix to combine.
- The cream cheese helps stabilize the whipped cream.
- In another bowl, whip the heavy cream with the remaining powdered sugar for 3 to 4 minutes, at medium-high speed, until stiff peaks form.
- Add one third of the whipped heavy cream to the bowl with the whipped cream cheese, mix on low with the mixer or by hand, to combine. Add another third of the whipped cream to the bowl and fold. At this point, the mixture will be very light and fluffy, and you don’t want to deflate it too much, so fold delicately, making sure the ingredients get mixed in together.
- Once that’s incorporated, add the remaining whipped cream, and fold gently to combine.
- Place in a piping bag fitted with the tip of your choice. I used a tip 4B. Alternatively, you don’t have to pipe the cream, you can spread it on the cake with a spoon or spatula.
To assemble
- Place one cake layer on a cake plate. If the cake has a dome on top, use a knife to level it and cut the excess off.
- Pipe or spread some of the Whipped Cream on top of the cake layer.
- Arrange the sliced strawberries on top, on an even layer. The sliced strawberries mixed with the jam may have a lot of liquid on the bowl, you can gently tap them to remove any excess liquid. You don’t want to put all that liquid on the cake, because it will melt the whipped cream, and make the cake slide.
- Top with another cake layer. Repeat the process of spreading or piping whipped cream on top, followed by a layer of arranged strawberries.
- Place another cake layer on top.
- Top the cake with more cream, and you can decorate it with fresh strawberries.
Storage
- Store the cake in the fridge for up to 2 days. Place any leftovers in an air tight container.
I’ve done this cake and it was a great hit, can I make this recipe as a sheet pan cake for a larger crowd? Will it work if I double the recipe?
Yes! This recipe can be baked as a sheet cake. A single batch will fit a 9×13-inch pan nicely. Keep in mind that baking times will be different than the layer cake version. Start checking for doneness a little earlier than you think, and bake until a toothpick inserted in the center comes out clean or with a few moist crumbs.
If you’d like to serve a larger crowd, you can double the recipe and bake it in a half-sheet pan (approximately 13×18 inches).
Can the batter be made like your orange budnt cake? I’ve made both the orange bundt and this strawberry shortcake and absolutely love them so I thought a mix of both would be incredibly delicious.
Hi Sofia! I’m so glad you love them! You certainly can! You might have a bit more batter, so don’t overfill the pans, but you can bake the remaining batter in cupcake tins or a couple of small ramekins 🙂
Can you use a different type of oil instead of vegetable oil?
Thanks!
sure!
I am planning on making this for Father’s Day. I would love to know how long this cake can sit before being served. Thank you.
It can stay out for about 30 minutes to an hour. If the whipped cream sits out too long it can soften and deflate.
Would this work using 2 – 9″ pans?
Yes it will work, if you think the pans are too full, maybe bake some of the batter into a couple of cupcakes. But it will be just about right.
Could you use cake flour instead of all purpose
Can this make two 8 inch
You’ll have leftover batter, you can bake it into cupcakes.
Que bolo delicioso! É muito lindo! 🤩 😍🥰