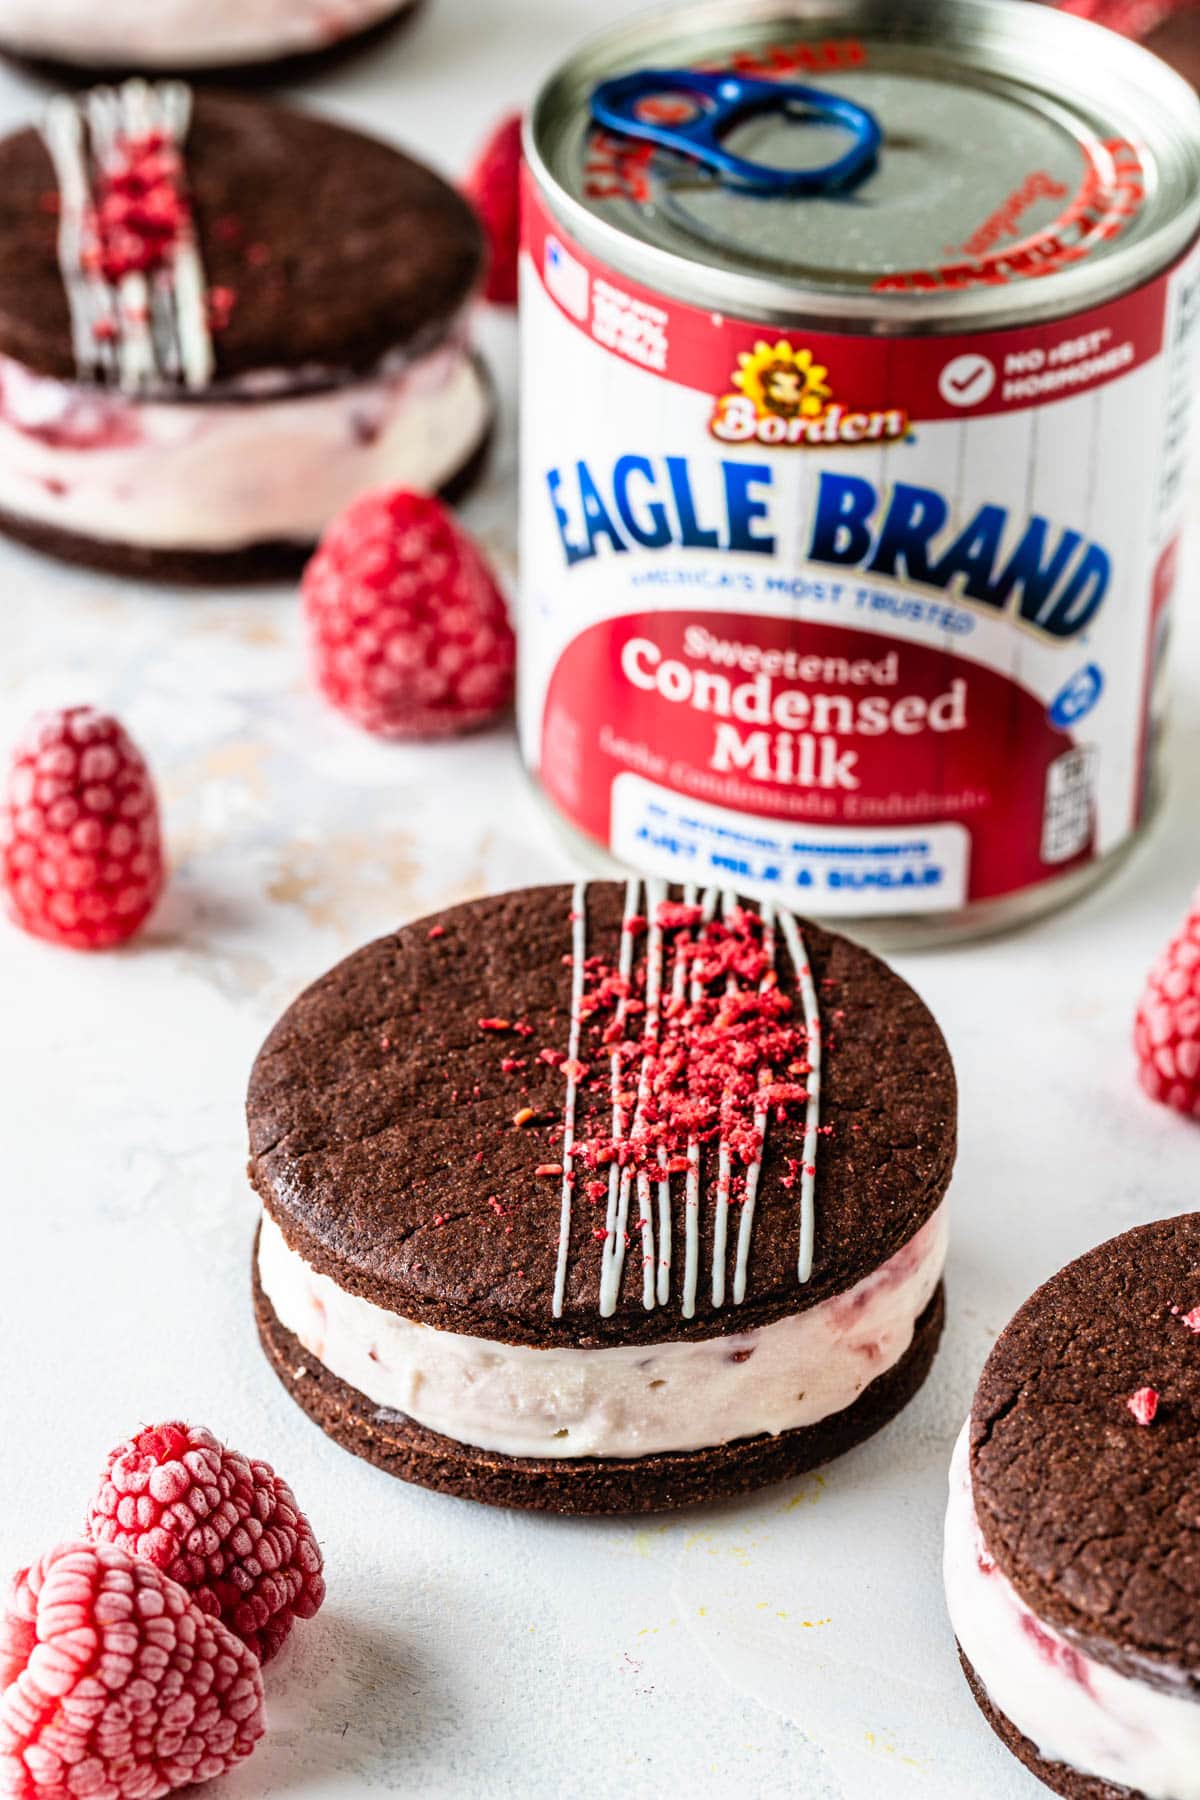
Chocolate Raspberry Ice Cream Sandwiches
Hello friends! This is a recipe I always reach for during the hot, summer months, especially here in Florida. And today is no different, so let’s make these delicious Chocolate Raspberry Ice Cream Sandwiches. They are rich without feeling heavy, bright without being sharp, and especially good when frozen. These chocolate raspberry ice cream bars are the dessert I make when I want something cold, satisfying, and not overly complicated—something that actually feels refreshing.

This recipe delivers exactly what I want from a frozen treat: deep chocolate flavor, a punch of raspberry, and a texture that holds its shape without turning icy. It’s simple, reliable, and one of those recipes that disappears fast once it’s in the freezer.
Why I Love These Ice Cream Bars
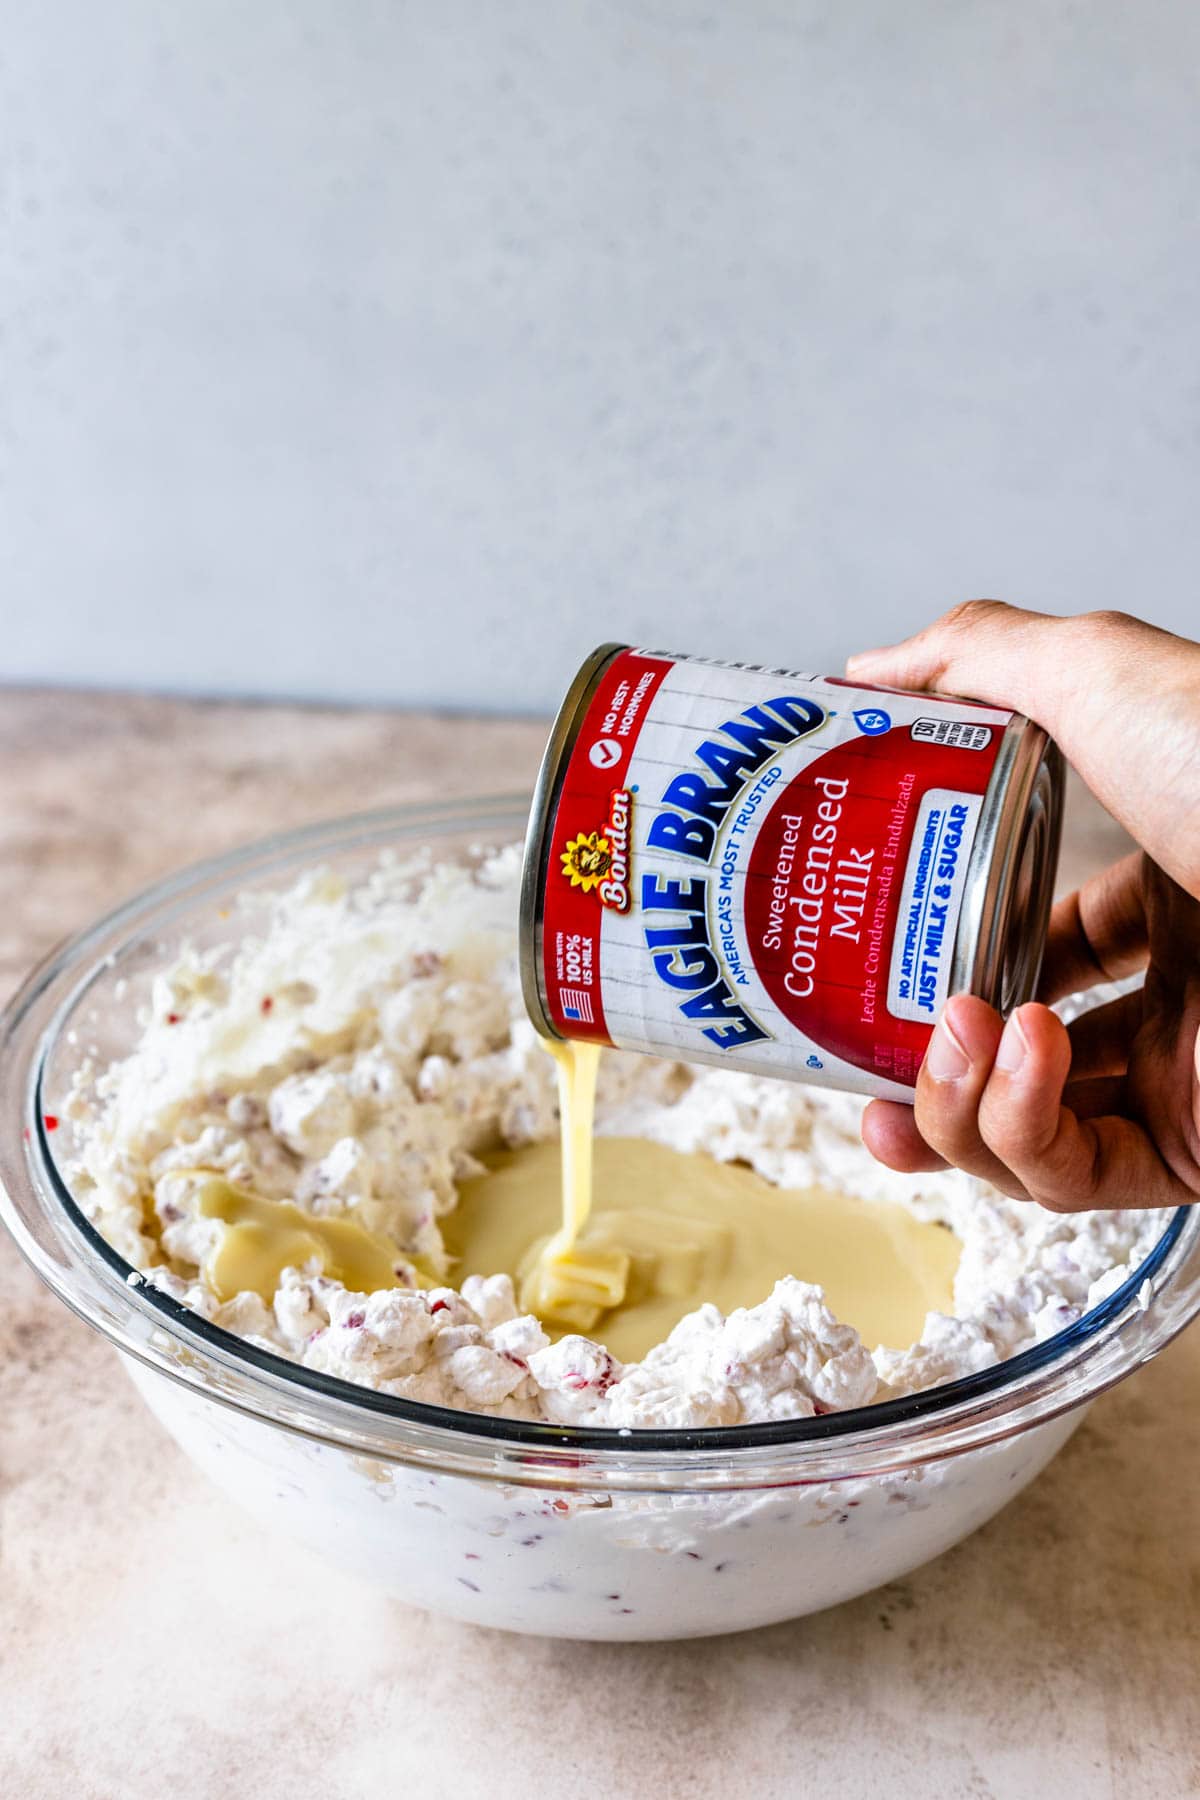
These chocolate raspberry ice cream bars are a summer staple in our house, and they’re one of those treats my son gets genuinely excited about every time I make them. He loves helping with the cookies, sneaking tastes of the dough, and—most importantly—being first in line once the sandwiches are frozen. The ice cream itself comes together in just five minutes using sweetened condensed milk, and after an overnight freeze, it sets up perfectly creamy and sliceable. You can absolutely use store-bought cookies to make things easier, but I like to use my own homemade chocolate sugar cookie recipe. They are soft, rich, and sturdy enough to hold everything together without falling apart.
This post may contain affiliate links. I earn a commission from qualified purchases. Please read our Privacy policy here.
Key Ingredients For This Recipe
Sweetened condensed milk – Creates a smooth, creamy ice cream base without an ice cream machine and comes together in minutes.
Chocolate sugar cookies – My go-to cookie recipe; soft, rich, and sturdy enough to hold the ice cream without cracking.
Raspberry – Adds brightness and contrast, cutting through the richness of the chocolate and cream.
White chocolate (optional) – Adds a subtle sweetness and makes the bars feel finished when drizzled on top.
Freeze-dried raspberries (optional) – Bring crunch, color, and an extra pop of raspberry flavor without adding moisture.
How to Make Chocolate Raspberry Ice Cream Bars
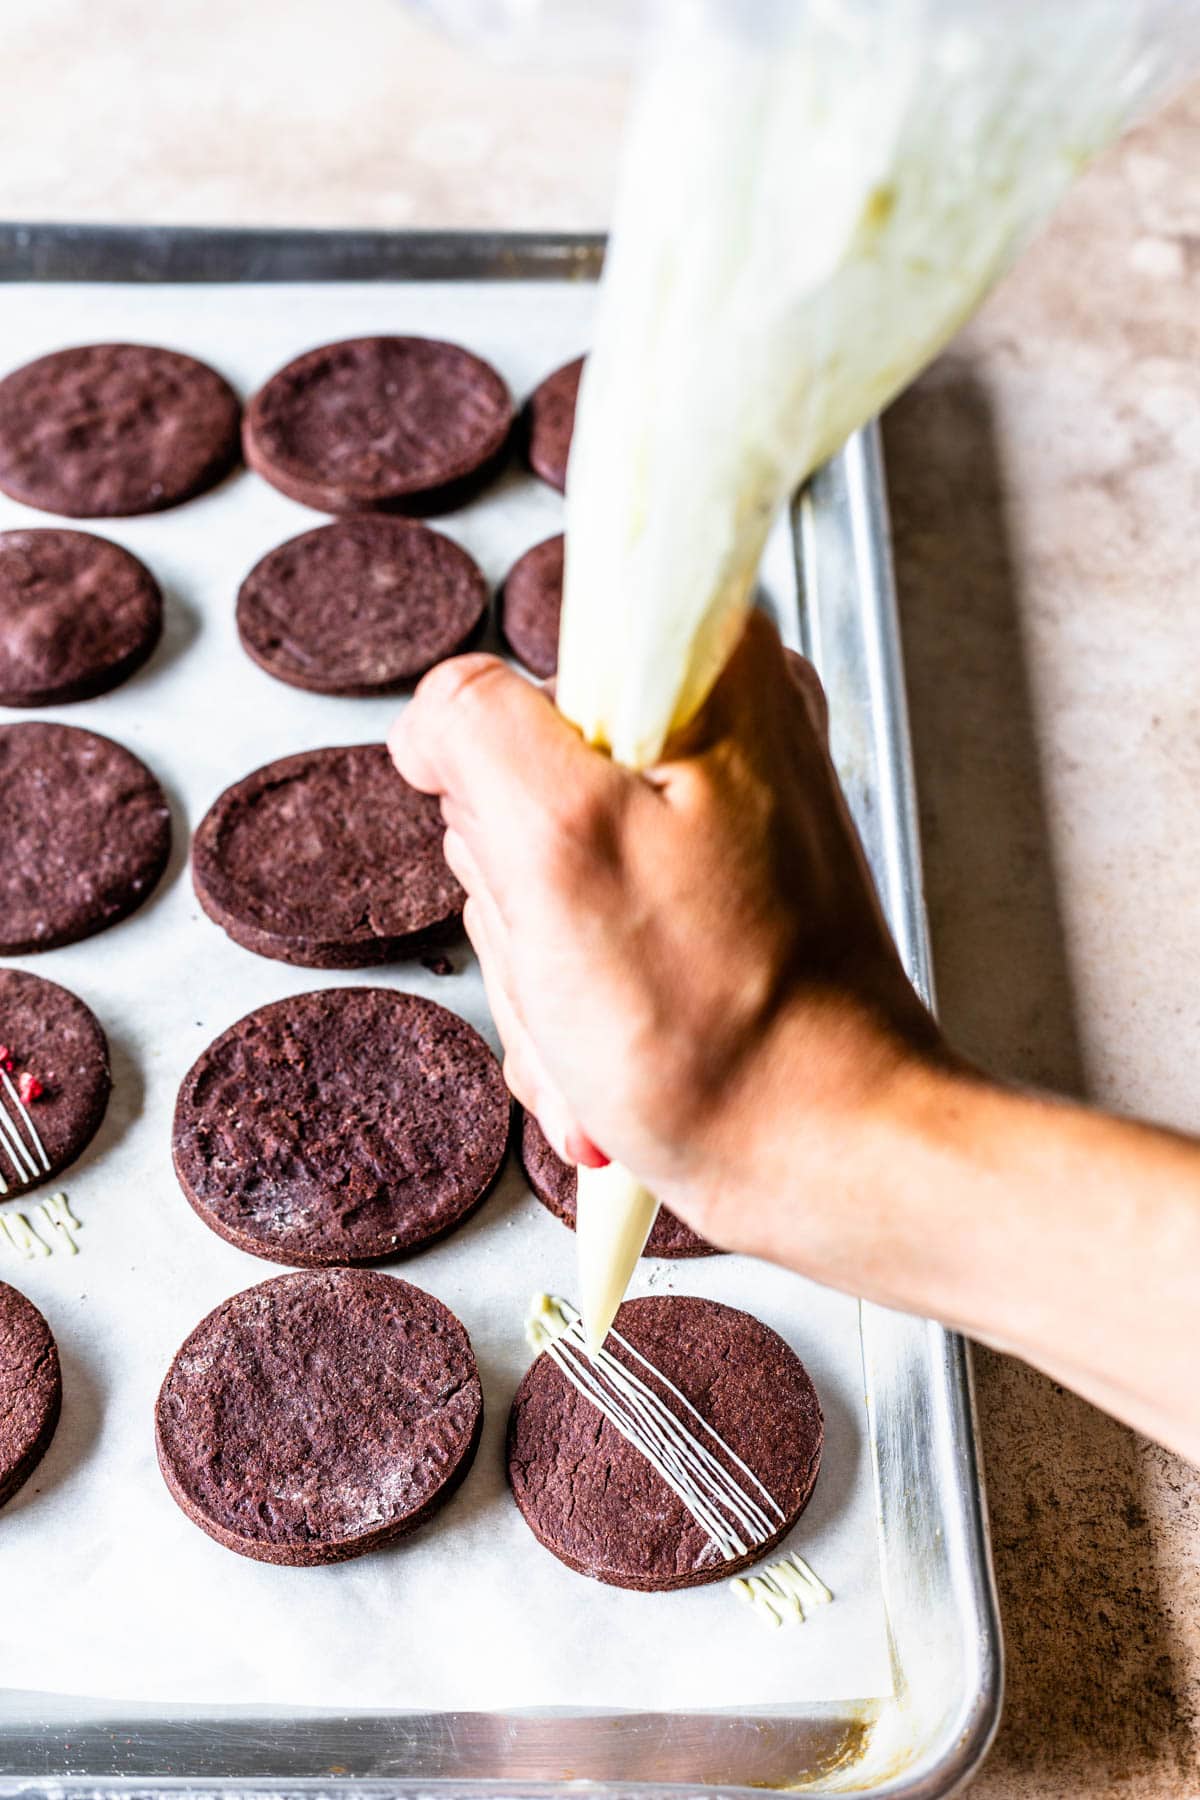
This recipe is basically two parts: make the no-churn raspberry ice cream, then sandwich it between chocolate sugar cookies. The white chocolate decorating (above) is optional, but it’s my favorite little finishing touch—especially if you’re serving these to kids or bringing them to a summer get-together. Full instructions are in the recipe card below!
Step 1: Make the No-Churn Raspberry Ice Cream
Whip the heavy cream until stiff peaks form. This step gives the ice cream its light, creamy texture, so I make sure the cream is properly whipped before moving on.
Add the sweetened condensed milk and raspberry preserves, then gently fold until fully combined and streaky with raspberry.
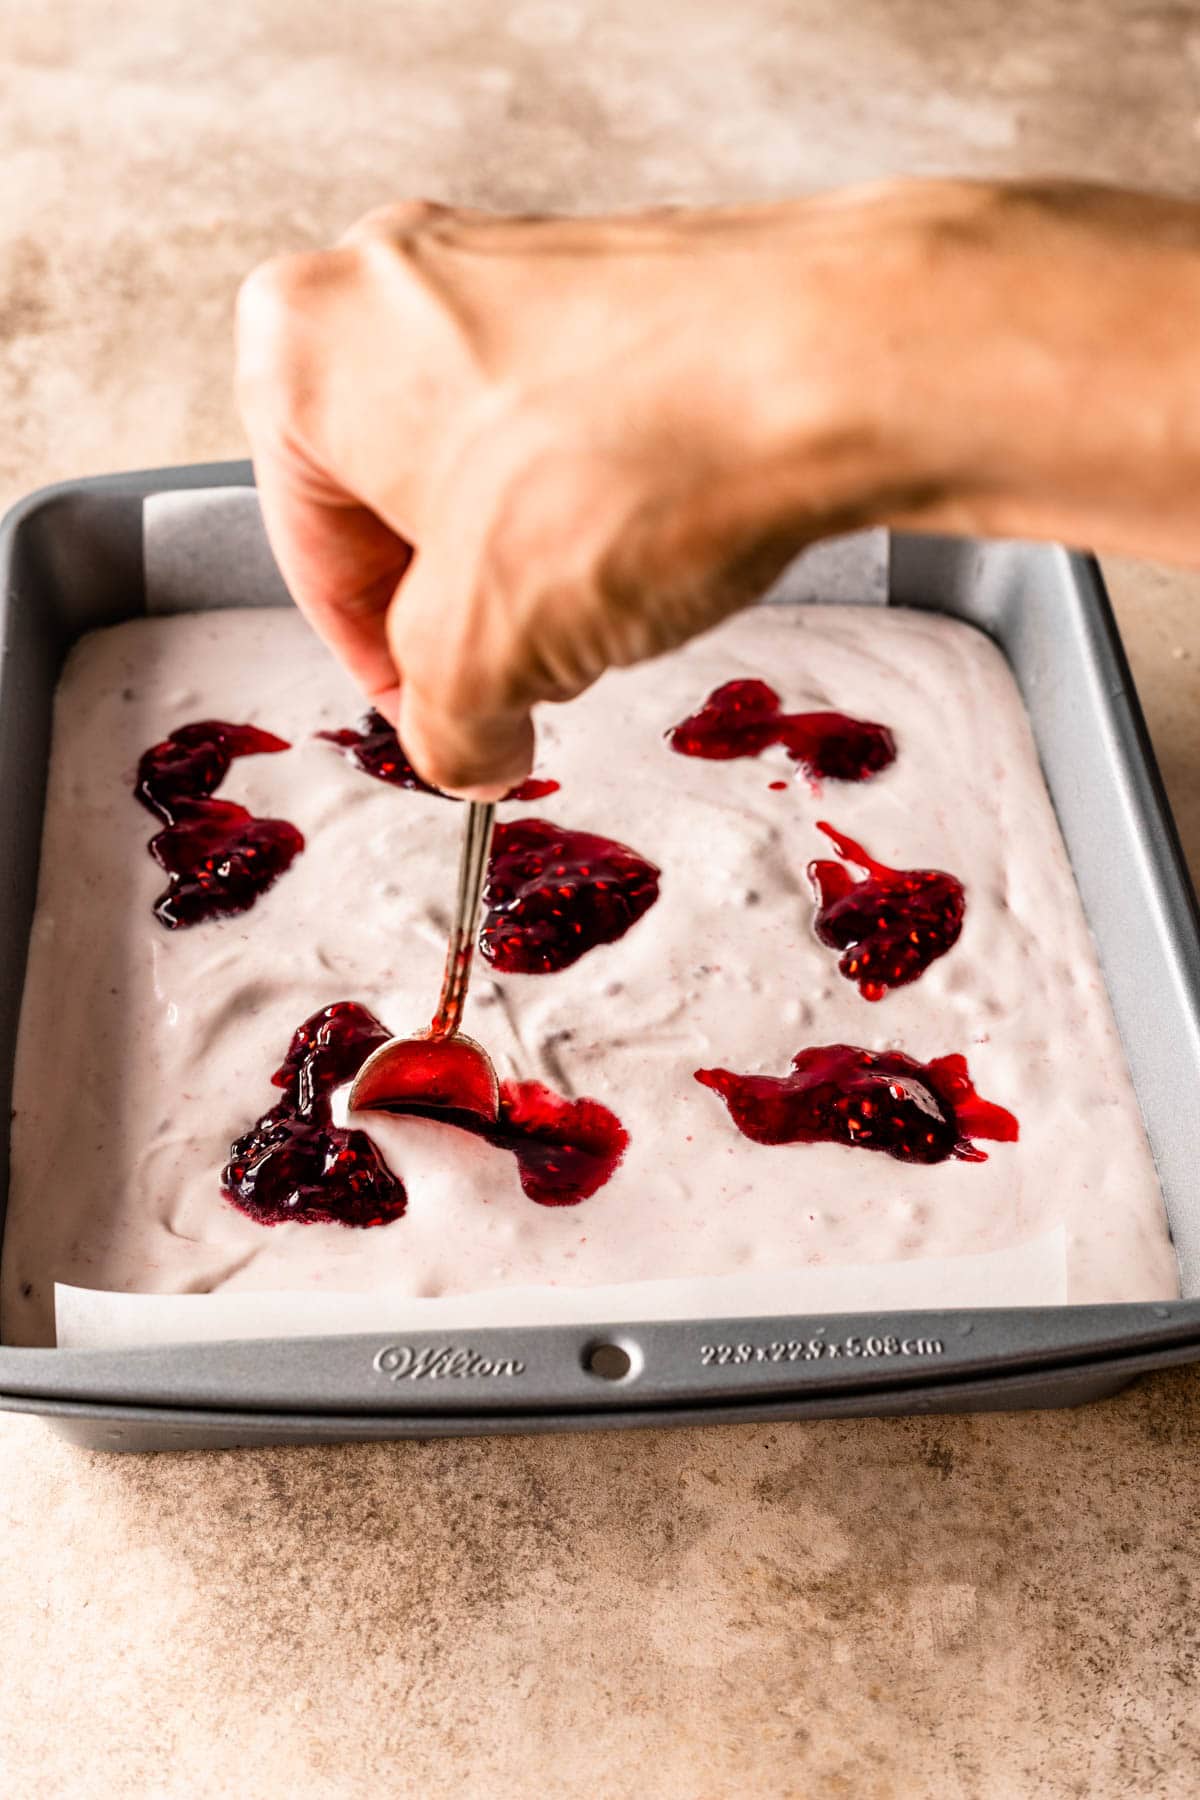
Step 2: Swirl and Freeze
Pour the ice cream into a 9×9-inch pan and smooth the top. Spoon additional raspberry preserves over the surface and gently swirl them in with a knife or spoon, keeping the swirls loose.
Freeze for at least 8 hours, or preferably overnight, until completely firm.
Step 3: Make the Chocolate Sugar Cookies
While the ice cream is freezing, prepare the chocolate sugar cookies. Follow the instructions on that page. I like to bake them slightly on the softer side so they sandwich well without cracking, and almost suction to the ice cream. Use a 2.5-inch round cutter to cut uniform circles. I use the same cutter for the ice cream later so everything lines up cleanly.
Once baked, let the cookies cool completely.
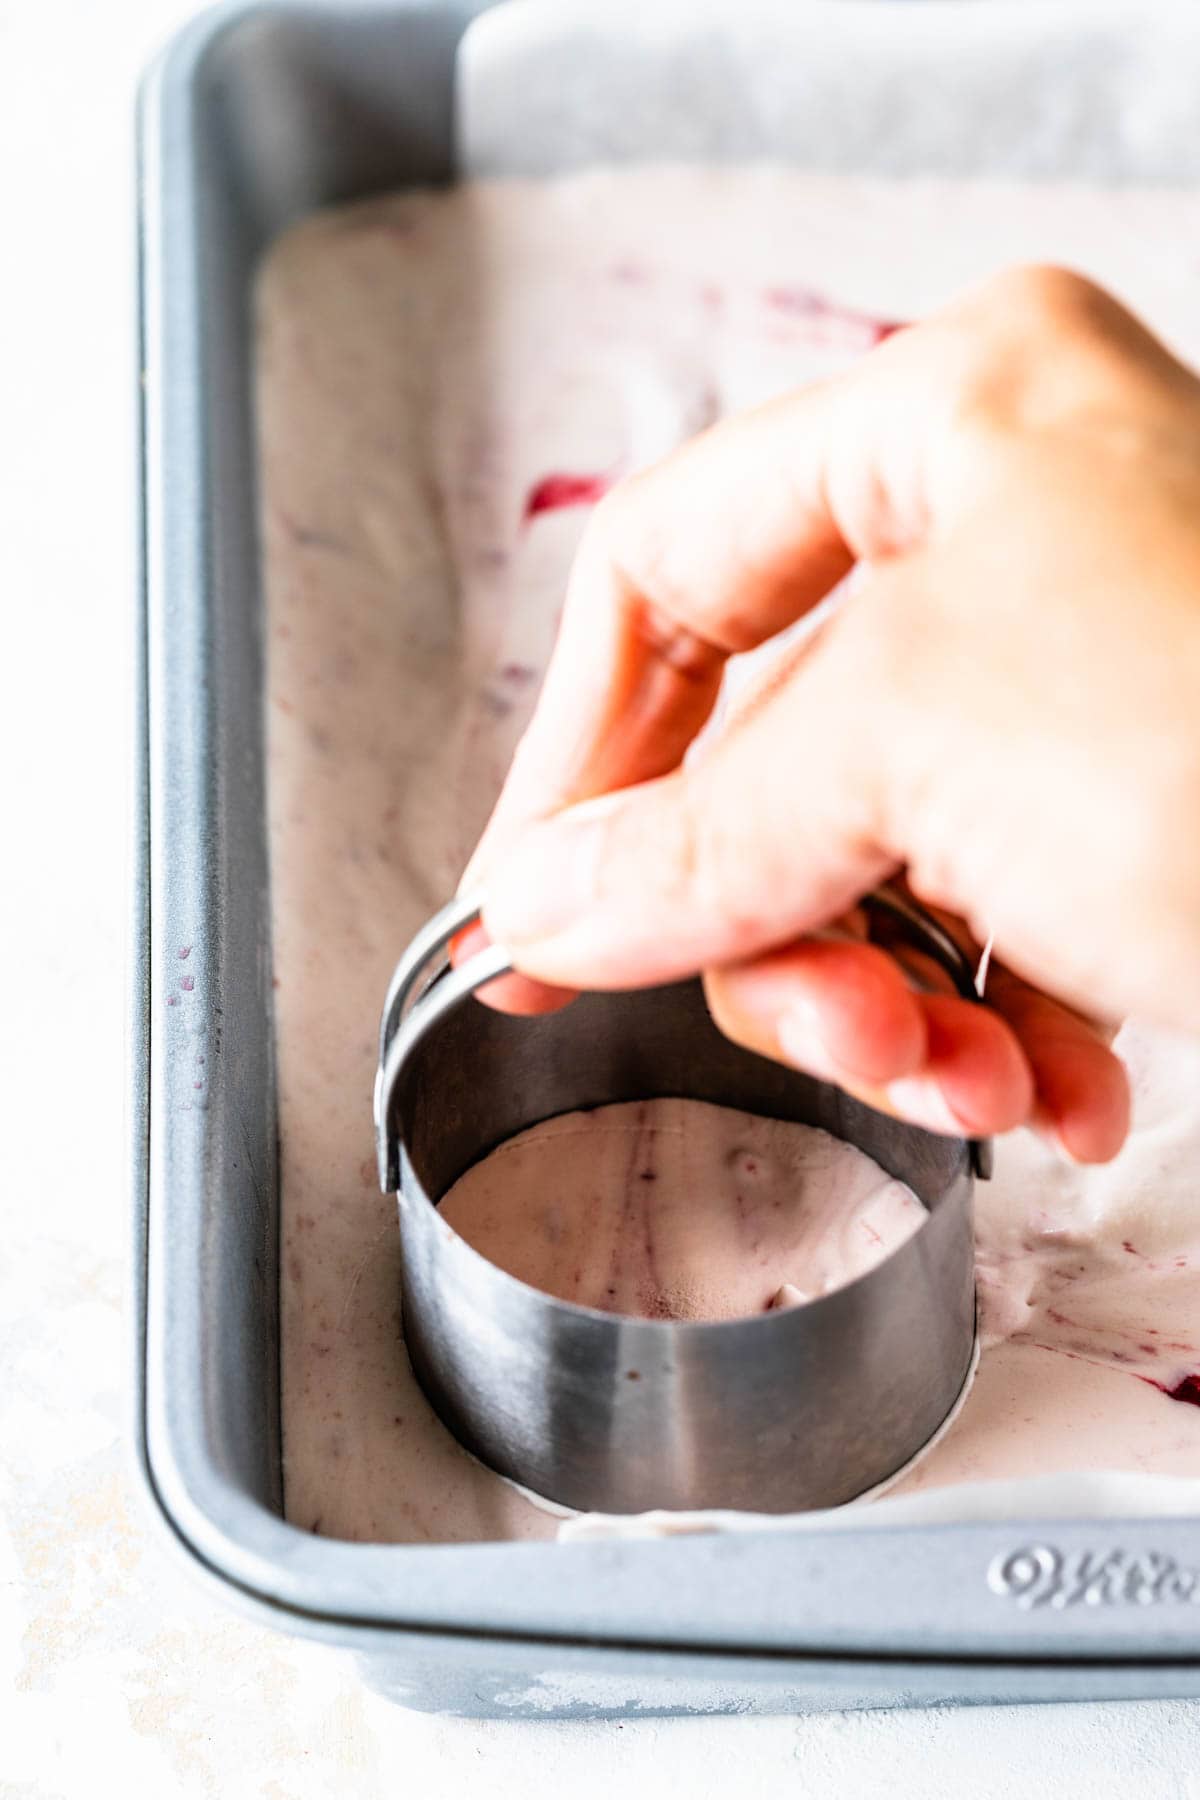
Step 4: Cut the Ice Cream and Assemble
Remove the ice cream from the freezer and let it sit for a minute or two, just until it’s easy to cut.
Use the same 2.5-inch cutter to cut rounds of ice cream. Place one ice cream round between two cookies and press very gently to secure. Using this size cutter, I usually get about 10 ice cream sandwiches.
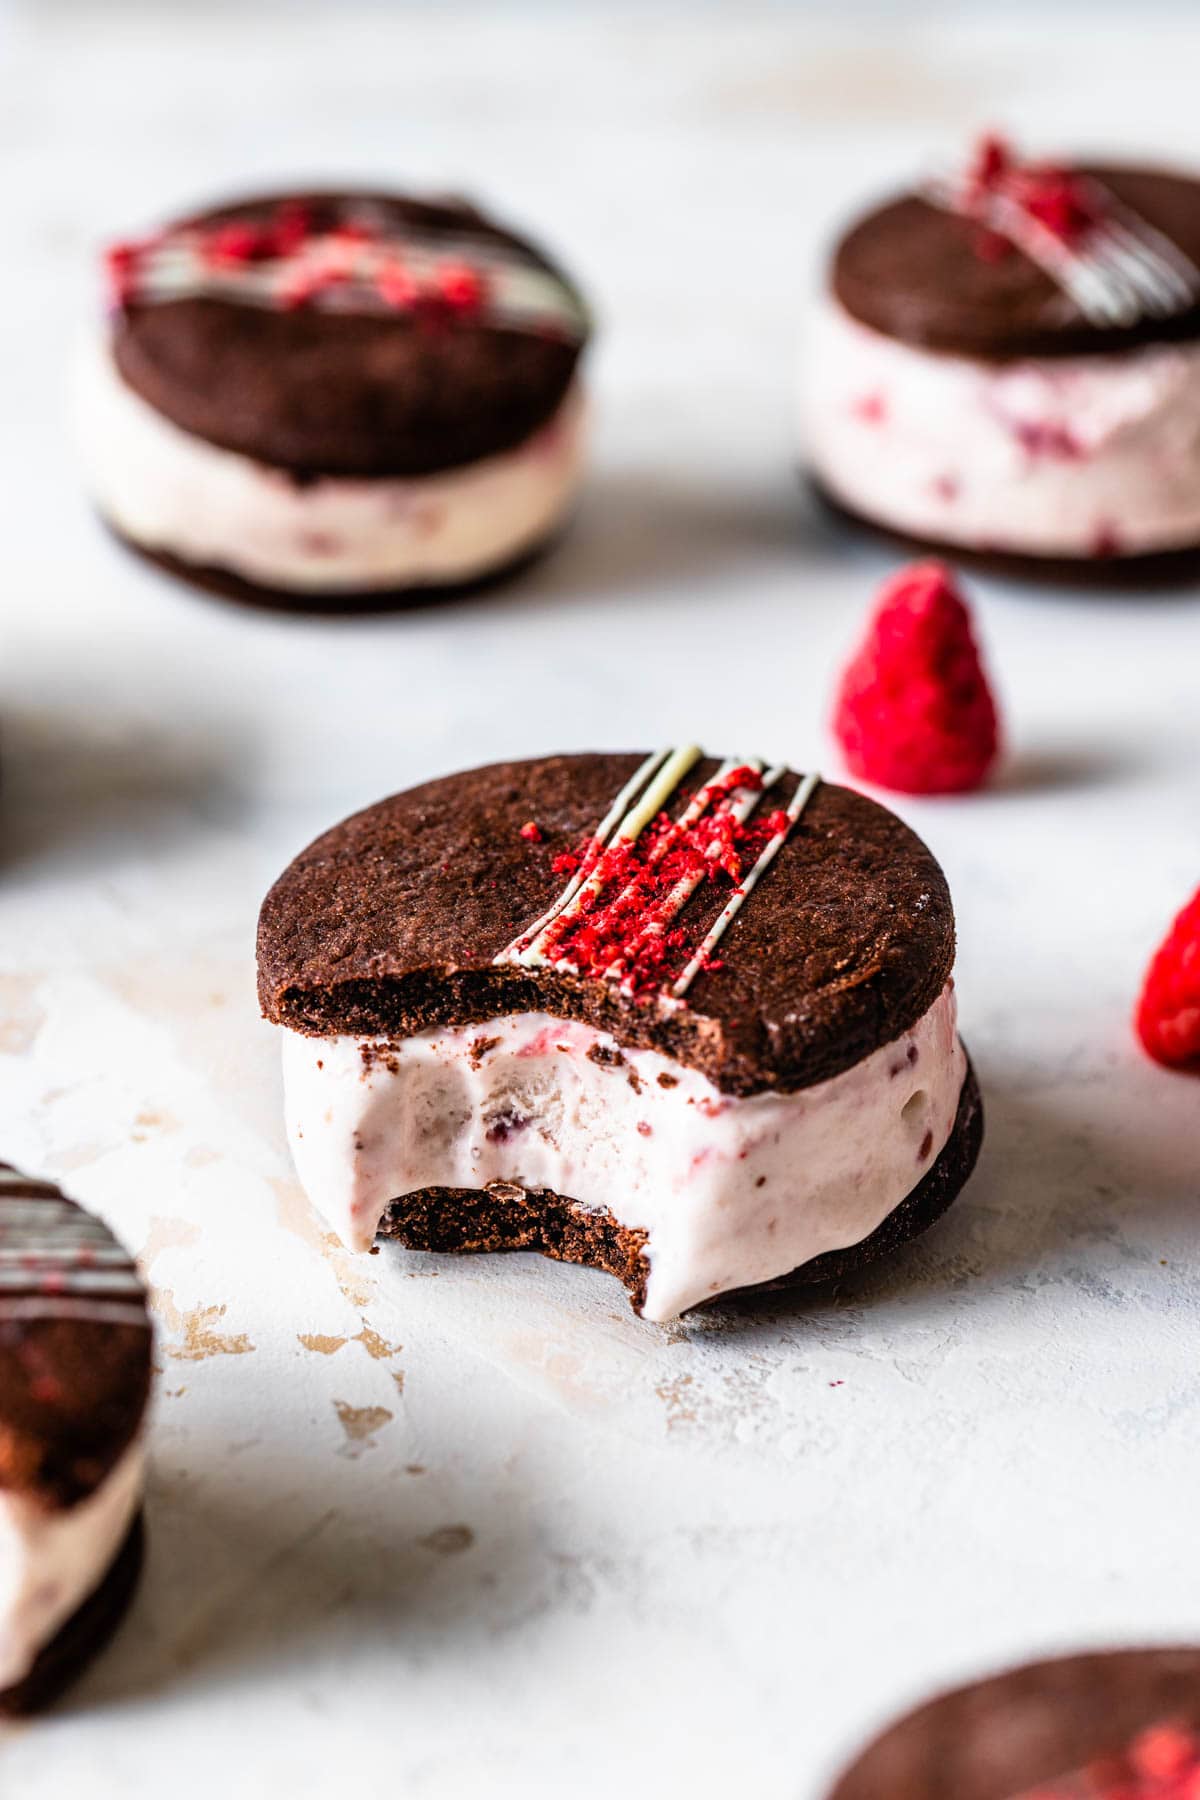
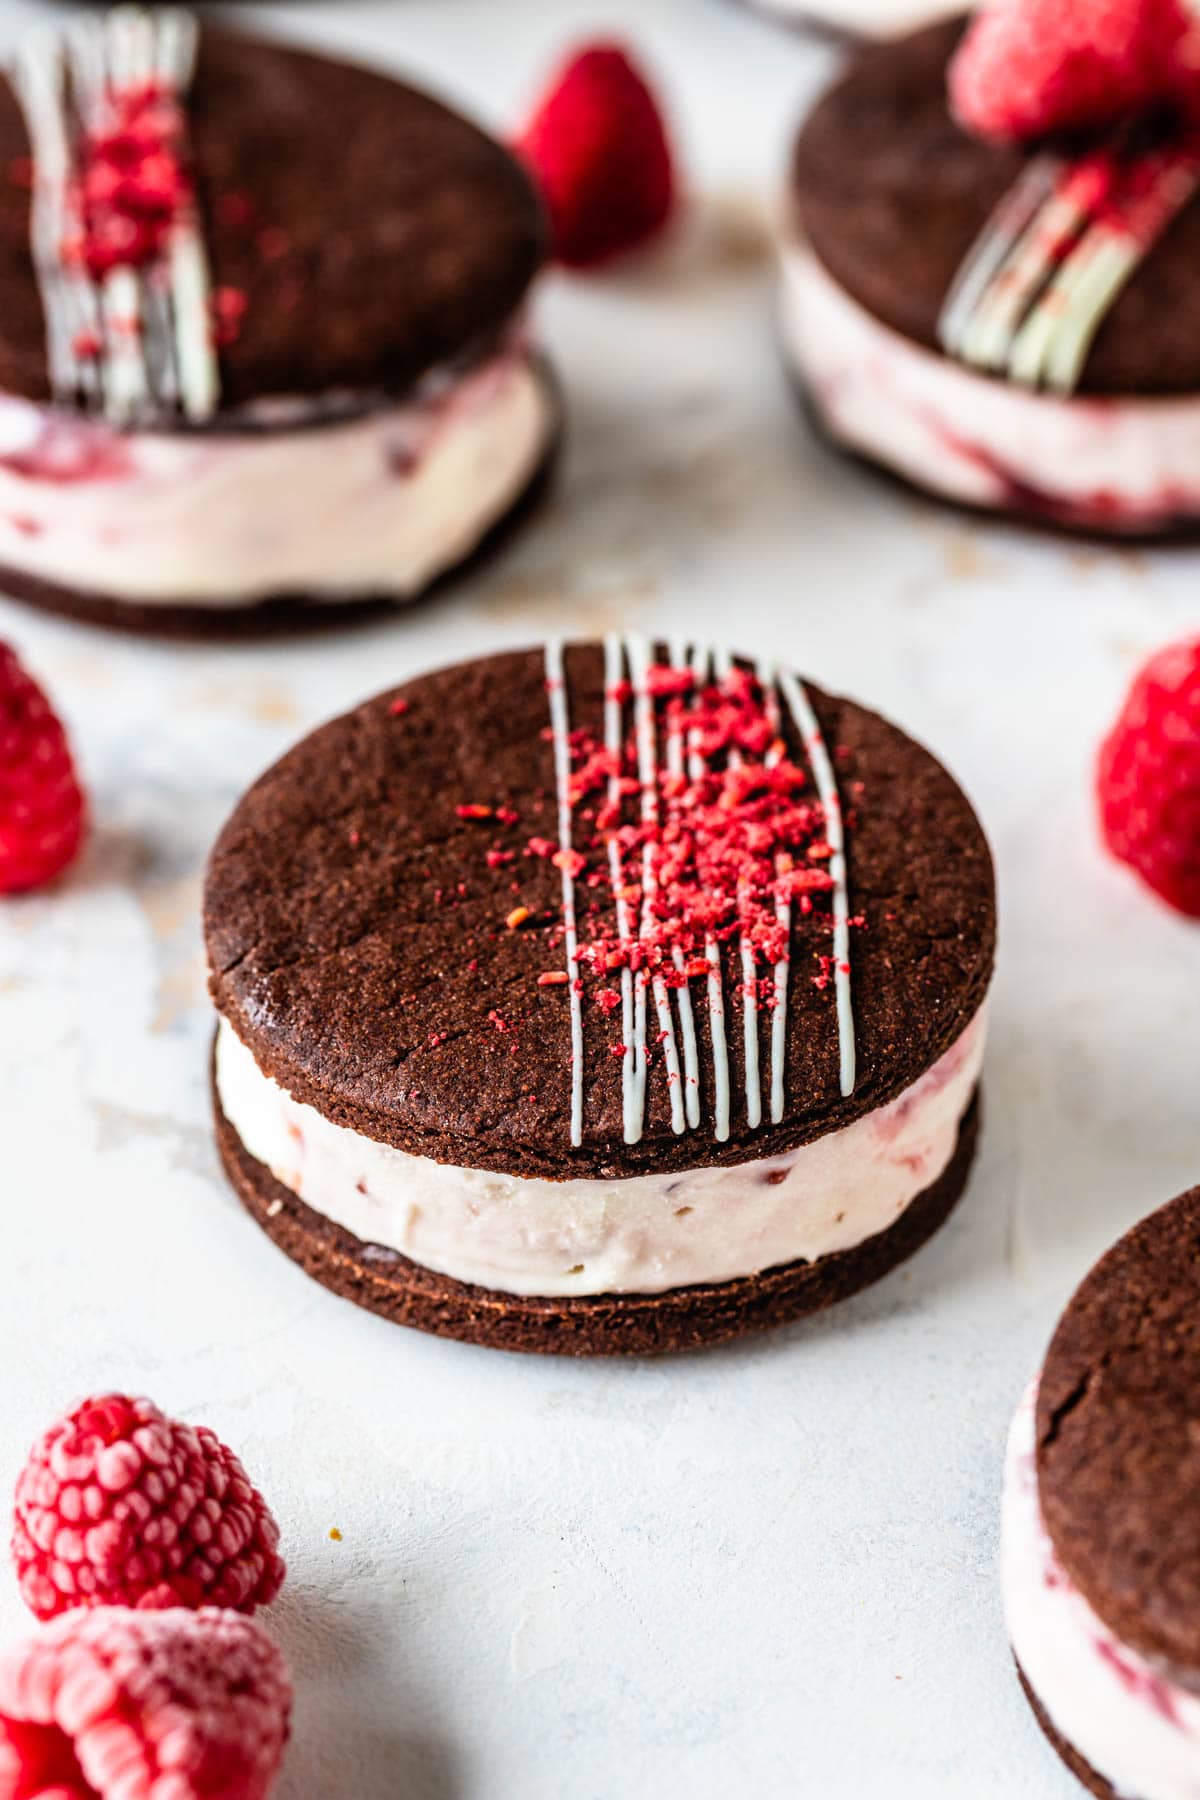
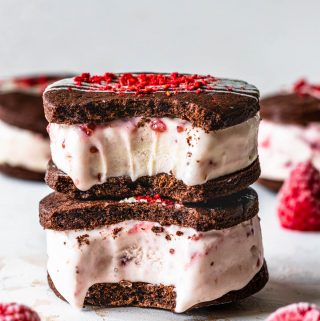
Step 5: Decorate (Optional, but Cute)
Drizzle the tops with melted white chocolate and sprinkle with freeze-dried raspberries if desired. This step is optional, but it adds a fun, finished look with very little effort.
Serve or Store
Serve immediately, or place the sandwiches in a freezer-safe container and store in the freezer until ready to enjoy.
Expert Tips for These Ice Cream Sandwiches
Nailing these ice cream sandwiches can be tricky, so keep reading for some tips!
- Make sure the ice cream has frozen all the way, so it’s not melting.
- Don’t over bake the cookies, because if you do so, the cookies will be tough and hard as they get frozen.
- Don’t make the cookies too thick either, that might make it hard to bite through them.
More Sweetened Condensed Milk Recipes
I am a BIG fan of sweetened condensed milk. It delivers consistent sweetness, richness, and structure all in one, with zero guesswork. It’s especially good at creating smooth, creamy textures without diluting flavor, which makes it invaluable in no-bake and frozen desserts. Try out some of my favorite recipes that use this sweet treat: No-Bake Blueberry Pie, Caramel Fudge, No-Bake Flan, or No-Bake White Chocolate Cheesecake.
FAQs
Yes. Once assembled, they keep very well in the freezer for up to 2 weeks when stored in an airtight container.
This usually means it hasn’t frozen long enough. For clean cuts, freeze the ice cream overnight and let it sit at room temperature for just 1–2 minutes before cutting.
Absolutely. Choose a soft, sturdy cookie so it doesn’t crack once frozen or become too hard to bite into.
Yes. They’re purely decorative and optional—the ice cream sandwiches are just as delicious without them.

Chocolate Raspberry Ice Cream Sandwiches
Ingredients
No-churn Raspberry Ice Cream
- 2 cups heavy cream 473 ml
- 1 14 oz can sweetened condensed milk
- 2/3 cup raspberry preserve or jam
Chocolate Cookies
- 1 1/4 cups all-purpose flour 5.6 oz, 158 grams
- 1/2 cup cocoa powder 1.76 oz, 50 grams
- 3/4 tsp baking powder
- 1/4 tsp fine sea salt
- 1/2 cup unsalted butter room temperature (4 oz, 113 grams)
- 3/4 cup granulated sugar 5.29 oz, 150 grams
- 1 large egg
- 1 tsp vanilla extract
Instructions
No-churn Raspberry Ice Cream
- Place a 9×9” pan in the freezer for at least 30 minutes.
- Whip the heavy cream on medium high speed until it achieves stiff peaks, for about 2 minutes.
- Once the heavy cream has reached stiff peaks, add 1/3 cup of raspberry preserves, and the can of Eagle Brand® Sweetened Condensed milk to the bowl.
- Fold the ingredients with a spatula to combine.
- Line the bottom of the chilled pan with a piece of parchment paper. Pour the mixture on the bottom of the chilled pan.
- Spoon the remaining 1/3 cup of raspberry jam on top of the ice cream, and use a knife or a spoon to swirl it around, creating a swirl effect.
- Place the ice cream in the freezer overnight, or for at least 8 hours.
Chocolate Sugar Cookies
- Sift the flour, cocoa powder, baking powder, and salt together in a bowl. Set aside.
- Cream the butter with an electric mixer for 2 minutes. Add the sugar to the butter and cream for another minute until creamy.
- Add the egg and beat for another few seconds until combined.
- Add the vanilla and mix.
- Lastly, add sifted dry ingredients to the mixture and fold with a spatula to combine until a dough forms.
- If the dough feels dry, add a teaspoon or so of milk or water to help it come together.
- Transfer dough to the counter, form it into a ball, wrap it with plastic wrap, flatten it into a disk, and place it in the fridge for 3 hours.
- When it’s time to bake, remove the dough from the fridge.
- Pre-heat the oven to 350ºF.
- Divide the dough into 4 parts, work with one part at a time, leaving the other parts covered meanwhile.
- Sprinkle very little flour on the counter and start rolling out the dough. If you wish, you can roll out the dough between two sheets of wax paper, so you avoid using too much flour and making the dough dry.
- Roll out the dough to about 1/4” thick. Use a cutter to cut cookie shapes. I used a 2.5” round cutter, and was able to obtain around 22 cookies.
- Place them in a baking sheet lined with parchment paper or silicone mat.
- And meanwhile start rolling the other portions of the dough and cutting cookie shapes.
- Bake the cookies for about 8 to 10 minutes. They will look set, but they should still look soft in the tray. As they cool down they will harden up and get firm.
- You don’t want to over bake the cookies so they aren’t hard and tough when you try to eat them with the ice cream.
To assemble
- I drizzled melted white chocolate and melted chocolate on top of the cookies, and topped with freeze dried raspberries to decorate. This is an optional step.
- Use a cutter the same diameter as the cookies and cut rounds of ice cream, place between two cookies.
- You can make the sandwiches beforehand and keep them in the freezer. Or make them right before eating the cookies.
- If you plan on making the sandwiches ahead, I really recommend making the cookies as soft as possible, and not over baking them at all, or they will be tough.
- These cookies are also perfect if baked right because they won’t get soggy in the freezer.
- After assembling the sandwiches, place them immediately in the freezer for a few hours if you aren’t planning on serving them right away.