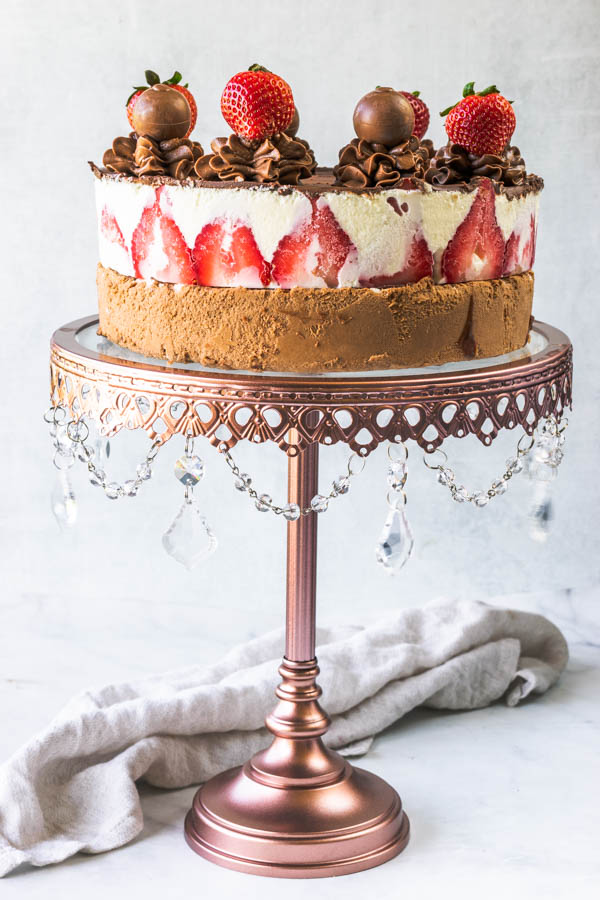
Mousse Cake
Today is my mom’s birthday, and I made this Mousse Cake to celebrate the wonderful woman that my mom is!
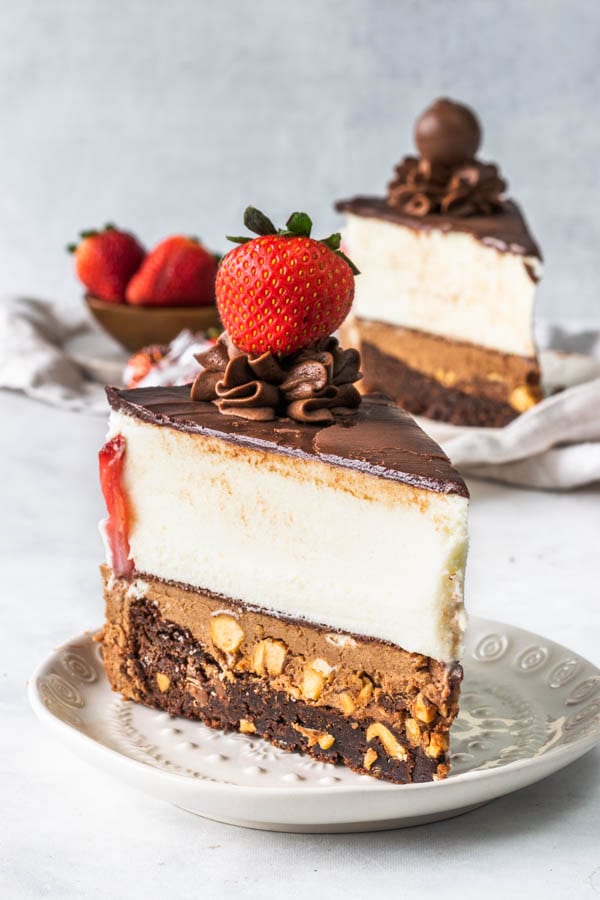
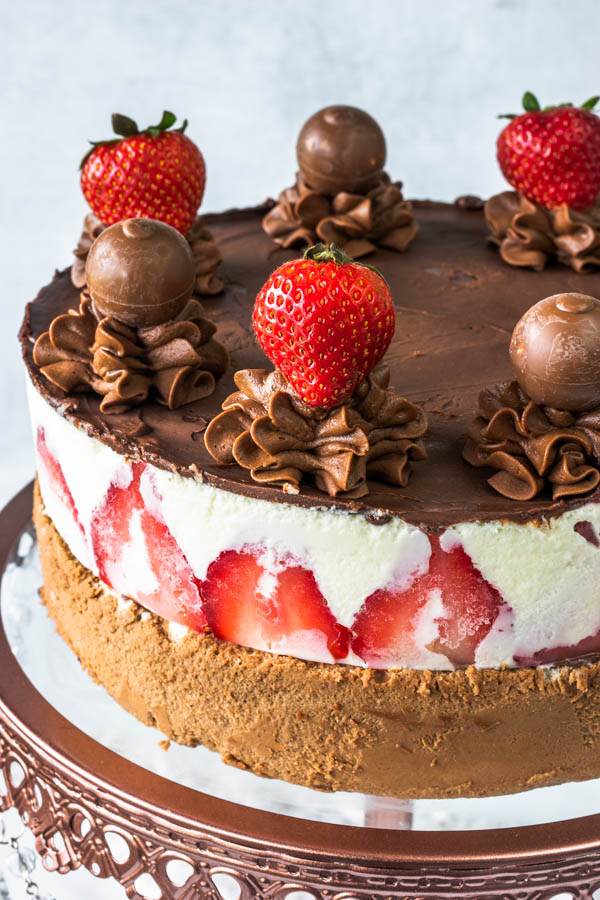
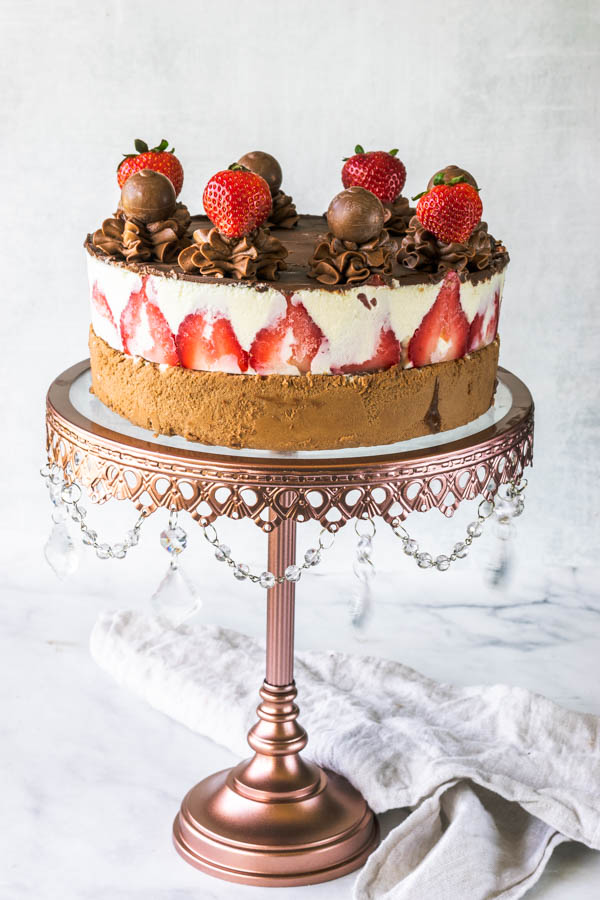
The Mousse Cake is made out of a hazelnut mousse with brownie in the middle. The second layer is a white chocolate mousse surrounded by strawberries. Topped with ganache, Lindt chocolate truffles, and strawberries.
My mom seriously deserve this cake. The only thing is that she can’t really enjoy it, since she is in Brazil and I’m in the USA. So what’s the point in making my mom a cake she can’t eat? To make her drool across the Americas? Or perhaps to use it as an excuse to make and then eat Mousse Cake?
This post may contain affiliate links. I earn a commission from qualified purchases. Please read our Privacy policy here.
I’ll leave you wondering, but I will say this one thing, food is just such an emotional and powerful way of connecting, that even a cake, made for someone that can’t enjoy it, signifies an act of love, devotion. And most of all, it’s a way for me to celebrate with my son, the birthday of his vovó.
And now you get to celebrate with us also, because you are here, reading this post, maybe thinking about making this recipe. And if you are, I will tell you, you are in for a real treat, my friend!
So, let’s go over this Mousse Cake and learn how to make it!
I would say this is an intermediate recipe. Very easy, but lots of waiting, and little steps. It can be very simple if you just get organized before you get going and start making this.

First, you are going to need a 9″ silicone pan. Or a couple. You could make it on a 8″ one, but I think you might have leftover batter that won’t fit in the pan, which then I suggest you pour some of that mousse in small cups, and keep them in the fridge for a mousse treat to be eaten with a spoon! Yum!!!
I used the blue pan in the following kit I got on Amazon.
You are going to need two of those for this cake, unless you own a very tall pan (like 4 inches high). I couldn’t find such tall pan, if anyone can please let me know!
So they have kits on amazon that sell a set of two of these pans, which might be better for you if you don’t need the smaller size pans that come in the kit above.
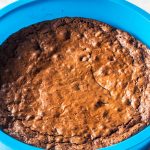
Anyway, start by making the brownie. Let it cool and chill in the fridge.
Then, make the Hazelnut Mousse.
This hazelnut mousse is very adaptable. You can even omit the hazelnuts if you want to.
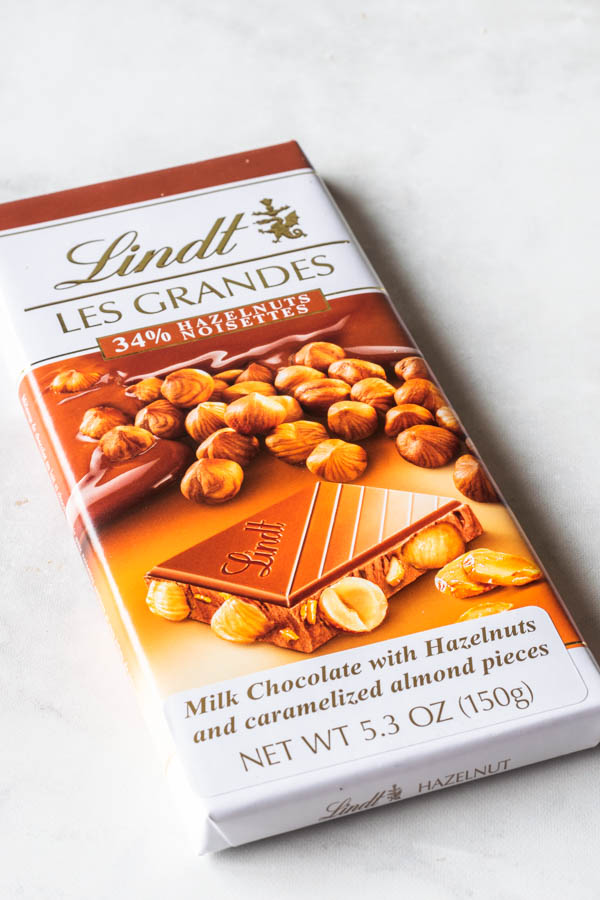
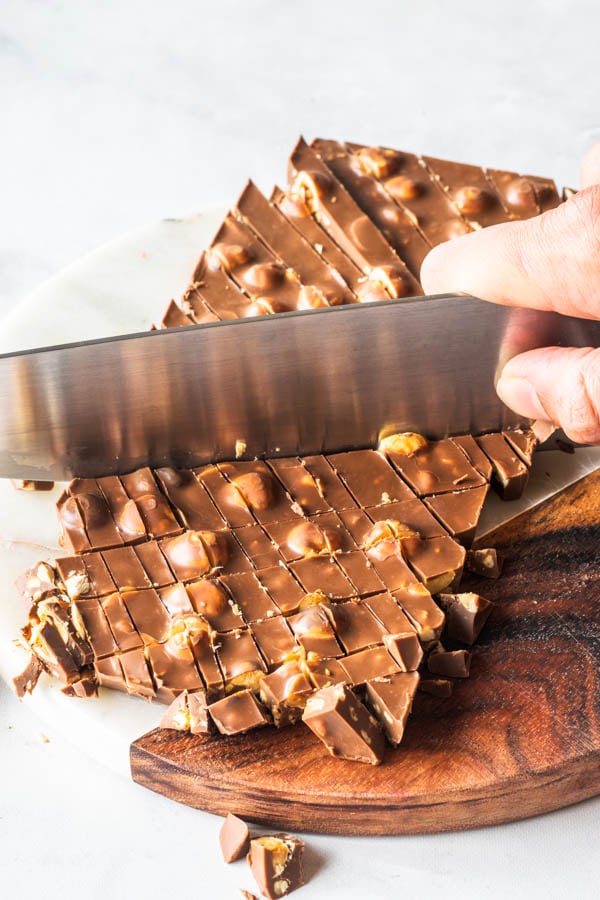
I used Lindt Milk Hazelnut Chocolate to make this. You don’t have to use this chocolate. You can use any chocolate, with or without nuts, and even add nuts in case you still want nuts in the mousse but couldn’t get this Lindt chocolate. But honestly, this is the best chocolate bar in the whole world. It’s my mom’s favorite, which is why is being featured in this cake.
Check out instructions below in the recipe on how to substitute for other types of chocolate in the Hazelnut Mousse.
After you make the mousse, place the brownie inside the silicone pan.

And then you can pour the hazelnut mousse over it.
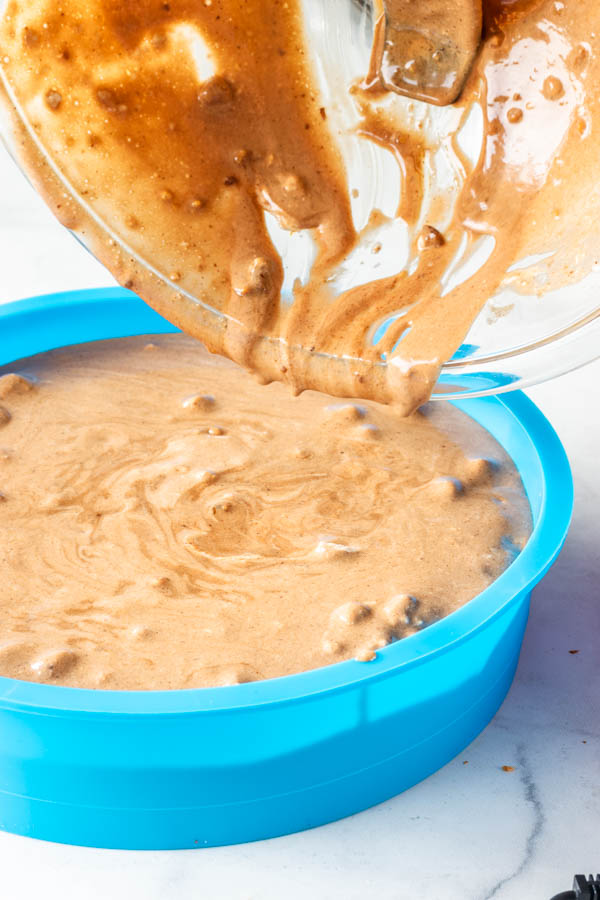
Leave it in the freezer for 6 hours or overnight to firm up.
This is why it’s nice having more than one of these silicone pans when making this Mousse Cake, because at this point, I had to wait for my mousse to be ready to be taken out of the pan, so I could make the white chocolate mousse in it.
When you make the White chocolate mousse, I suggest using this technique with the strawberries up the sides of the pan, so it gives the cake a pretty effect of the strawberries around the mousse layer.

Thinly slice the strawberries, which will make it easier for the slices of strawberries to bend in the circle pan, and attach to the sides.
Add the white chocolate mousse on top.

And from here on, just wait a little bit, until the cake is ready to be assembled.
I have included the recipes for the chocolate frosting and the ganache that go on top of the cake down below. You can skip the chocolate frosting on top of the Mousse Cake, I did it for decoration, I thought it looked so pretty!
Tips for making this Mousse Cake.
- Fold whipped cream into the mousse gently, and in 3 parts.
- Place silicone pans over a baking sheet so you can easily move it to the freezer and you have a sturdy surface for the silicone pan, which will be super wobbly.
- Tap the pans with the mousse cake against the counter to release air bubbles after you poured it onto the silicone pan.
- Keep the cake refrigerated after you are done assembling it, no need to keep it in the freezer. I simply instruct to put the mousse cakes in the silicone pan in the freezer so they are easy to remove from the pans.

If you like this recipe, here are some other recipes you might enjoy:
- Cherry Macarons
- Creme Brulee Pie
- Strawberry Rhubarb Galette
- Chocolate Strawberry Cupcakes
- Strawberry Cupcakes
- Dulce de leche Bars
- Kinder Bueno Cake
- Almond Strawberry Cake
- Chocolate Strawberry Cake
- Flan Cake
- Smores Cake
- Birthday Sprinkles Cake
And here is my post for my mom’s birthday last year and the cake I made for here was a Strawberry Rhubarb Almond Cake.
It was funny reading that post, because even though it was written exactly 1 year ago, I am such a different person, it feels like I am decades different, and not just 12 months different.
I went through a powerful transformation last year, if you read my stuff, you probably heard about it here and there. And I won’t go into details today since this post is already huge lol. But what I want to say is that life is awesome, and deserves to be celebrated, and so does my beautiful mom! So cheers to her, to this blissful Universe, and of course, cheers to Mousse Cake.

Thanks for reading! Have a happy day!

Mousse Cake
Ingredients
Brownie
- 1/4 cup unsalted butter room temperature (4 tablespoons, 2 ounces, 56 grams)
- 2 tablespoons oil canola, avocado, or any vegetable oil
- 1 cup granulated sugar 7 oz, 200 grams
- 2 large eggs room temperature
- 1/2 cup all-purpose flour 2.25 oz, 63 grams
- 1/3 cup unsweetened cocoa powder
- 1 teaspoon espresso powder
- 1/2 teaspoon baking powder
- 1/4 teaspoon fine sea salt
- 1/2 cup chopped chocolate* Note 1
Hazelnut Mousse
- 2 teaspoons powdered gelatin about 7 grams, 0.24 oz, 1 sachet
- 3 tablespoons cold water
- 1 1/3 cups heavy cream divided
- 5 oz chopped chocolate or chocolate chips (about 3/4 cup, 141 grams)** (Note 2)
- 1/3 cup hazelnut paste recipe for the easy paste below or you can sub nutella*** (Note 3)
White Chocolate Mousse
- 4 teaspoons gelatin powder about 14 grams, 0.49 oz, 2 sachets
- 6 tablespoons cold water
- 10 oz chopped white chocolate about 1 1/2 cups, 283 grams
- 2 tablespoons powdered sugar
- 2 2/3 cup heavy cream divided
Chocolate Ganache
- 4 ounces chocolate chopped, or chocolate chips (2/3 cup chocolate chips, 113 grams)
- 1/2 cup heavy cream
Quick Chocolate Buttercream (optional to pipe on top of the cake)
- 4 tablespoons unsalted butter 2 oz, 56 grams
- 1/4 cup cocoa powder
- 2 1/2 cup powdered sugar
- 1/2 teaspoon vanilla extract
To assemble
- Strawberries
- Chocolate Truffles
Instructions
Brownie
- Prepare a 8” baking pan and spray it with non-stick spray, and line the bottom and sides with parchment paper, or grease the pan with butter and flour. Set aside.
- Pre-heat oven to 350F.
- Mix butter and oil in the bowl of a stand mixer. Whisk briefly to combine. Add sugar and keep mixing until ingredients come together. Add eggs, one at a time, mixing one egg entirely before adding the next one.
- Sift flour, cocoa powder, espresso powder, baking powder, and salt together. Add to the mixture. Mix with a spatula to fold ingredients. Add chopped chocolate and nuts (if using – read note 1).
- Pour batter onto pan. Bake for 20-30 minutes. A toothpick should come out clean when inserted in the cake.
- Set it aside to cool completely. Store it in the refrigerator until it’s time to assemble the cake. You want the brownie to be cold for the assembly.
Hazelnut Mousse
- Add powdered gelatin to cold water. Mix to combine. Set it aside to let it bloom for 5-10 minutes.
- Place chocolate and hazelnut paste (or nutella, or any hazelnut spread) in a heat proof bowl. Set aside.
- Add 1/3 cup of the heavy cream to a small saucepan. Bring to a slight boil over medium heat.
- As soon as you see it coming to a boil, turn the heat off.
- Add gelatin to the hot heavy cream. Whisk until the gelatin has melted entirely.
- Pour hot cream mixture over chocolate and hazelnut paste. Mix until the chocolate has melted completely. If necessary pop the bowl in the microwave for a few seconds, mixing in between, until the chocolate has melted.
- Set aside to cool slightly.
- Pour the remaining 1 cup of heavy cream in the bowl of an electric mixer. Whip on high until the cream has stiff peaks. It will take about 2 minutes.
 Add the cream in three parts to the mousse, and fold carefully with a spatula. Once combined, add the second part, fold. And then, add the rest of the whipped cream. Fold until the mixture is smooth.

To assemble Hazelnut Mousse
- Place the brownie in the bottom of a 9” silicone round pan on top of a baking sheet, to provide a sturdy base for the silicone pan.
- Pour mousse over brownie. Tap the baking sheet a few times against the counter to release air bubbles.
- Place it in the freezer for 6 hours, or overnight.

White Chocolate Mousse
- Mix gelatin powder with cold water. Let it sit so the gelatin will bloom. Meanwhile place the white chocolate in a heat proof bowl.
- Place 2/3 cup of heavy cream in a small sauce pan. Bring it to a boil over medium heat. Turn off the heat. Add gelatin mixture to the hot cream, whisk until melted. Pour hot cream and gelatin over white chocolate. Let mixture sit for 1 minute. Start stirring to combine. If the white chocolate doesn’t melt entirely after a while stirring, place it in the microwave for a few second intervals, stirring in between, until the chocolate is melted.
- Whip 2 cups of heavy cream with 2 tablespoons of powdered sugar in the bowl of an electric mixer. Whip on high for 1-2 minutes until stiff peaks form.
- In three parts, mix the whipped cream in the mousse. Add 1/3 of it to the white chocolate. Fold carefully until combined. Add another 1/3 of the mixture. Fold until combined. Add the remaining whipped cream. Fold until completely incorporated.
To assemble White Chocolate Mousse
- Thinly slice some strawberries and place them on the sides of the silicone pan.
- Then pour the mousse over. Tap the pan a few times so the air bubbles will be released.
- Place it in the freezer for 6 hours, or overnight.


Ganache
- Place chopped chocolate, or chocolate chips in a heat proof bowl.
- Heat cream in a small saucepan until hot and bubbly. Turn heat off. Pour it over chocolate. Let it sit for 30 seconds. Whisk until chocolate has melted entirely.
- Let it cool to room temperature.
Quick chocolate buttercream
- Place butter, sifted powdered sugar, sifted cocoa powder, and vanilla in the bowl of an electric mixer. Stir on low until all ingredients are combined. Raise speed and cream on medium high until creamy. Add milk if necessary, if the mixture is too dry or stiff.
- Place it in a piping bag so you can pipe on top of your cake.
To assemble Cake
- Remove both cakes from the silicone pan. Place the white chocolate mousse cake on top of the hazelnut mousse. Top with ganache.
- You can also top it with the simple chocolate buttercream, strawberries, and chocolate truffles.
Storage
- This cake will keep well in the fridge for up to 5 days.
Notes
**Note 2 – Use any chocolate you would like. Again, I used the Hazelnut Lindt chocolate bar, which is milk chocolate with hazelnuts. You can use milk chocolate, semi-sweet, or dark, according to your preference. Also, you can add about 1/4 cup of chopped hazelnuts to the mousse if you want to add nuts to it but don’t have access to this chocolate bar.
***Note 3 – For the Hazelnut Paste, you will need 1/2 cup of hazelnuts and 3 tablespoons of chocolate chips. Simply add 1/2 cup of hazelnuts to a small blender cup. Process until the hazelnuts are very finely ground turning into a paste, about 5 minutes. Time will vary depending on your food processor. Once the hazelnuts are ground, you can mix them with 3 tablespoons of chocolate chips. Mix until combined. The hazelnuts should be warm enough to melt the chocolate chips. If not, you can place the mixture in the microwave and stir until melted and turned into a paste (a delicious paste, by the way, I won’t judge if you want to eat it with a spoon). If you don’t want to do this, you can use Nutella or another hazelnut spread instead.
****Note 4- If you have a very tall 9” silicone pan, you don’t have to make the two mousses separate. You can make the chocolate mousse on the bottom, and then once it’s frozen and solid, you can pour the white chocolate mousse right on top of it. Just freeze both together and wait for them to be solid. Then you can remove from the pan.
May I use aluminum cake pans instead of silicone?
you could, just might be hard to un-mould the cake
Looks delicious and I would like to try it.
One question
Under the instructions for the mousse, step 5 says to mix the gelatin into “cold” heavy cream. How will the gelatin melt? Should it be melted into the hot heavy cream?
Thanks in advance!
ooops sorry about that, it meant to say hot lol I fixed it for you.
Sensacional esse bolo, a cada receita eu fico ainda mais seu fã!!!!!!!!!!
Ai que pai lindo eu tenho!!