Funfetti Cake
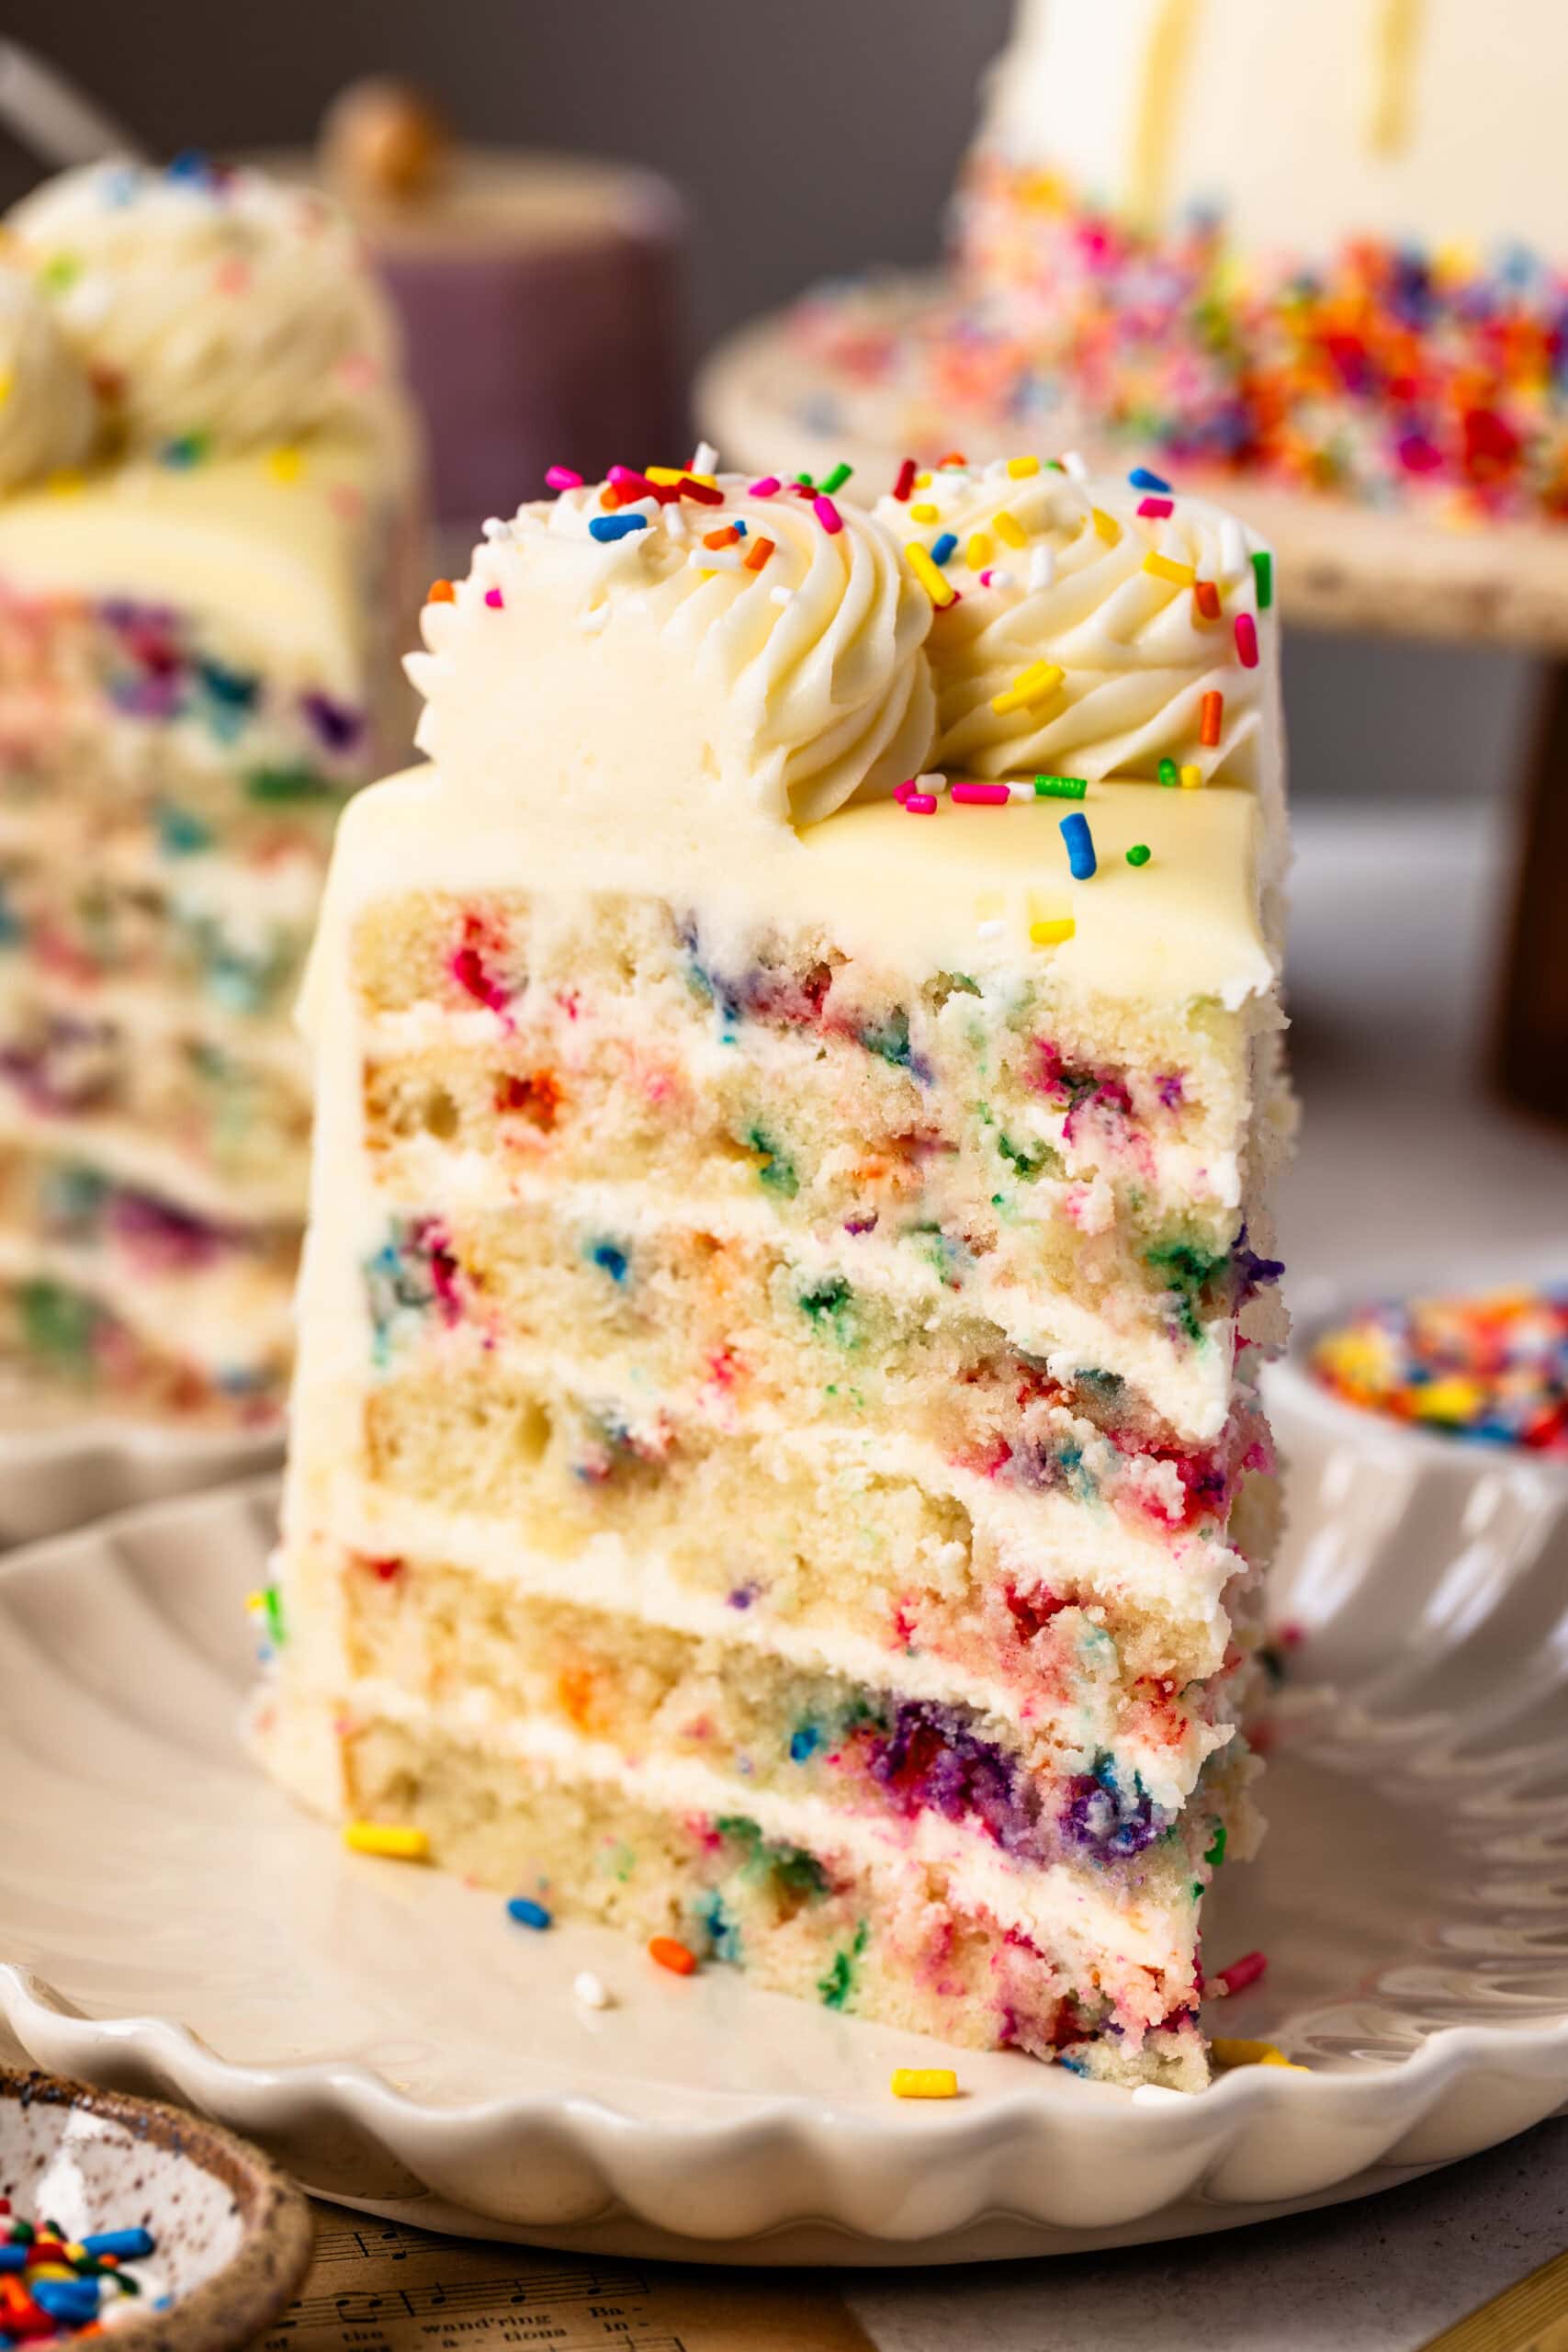
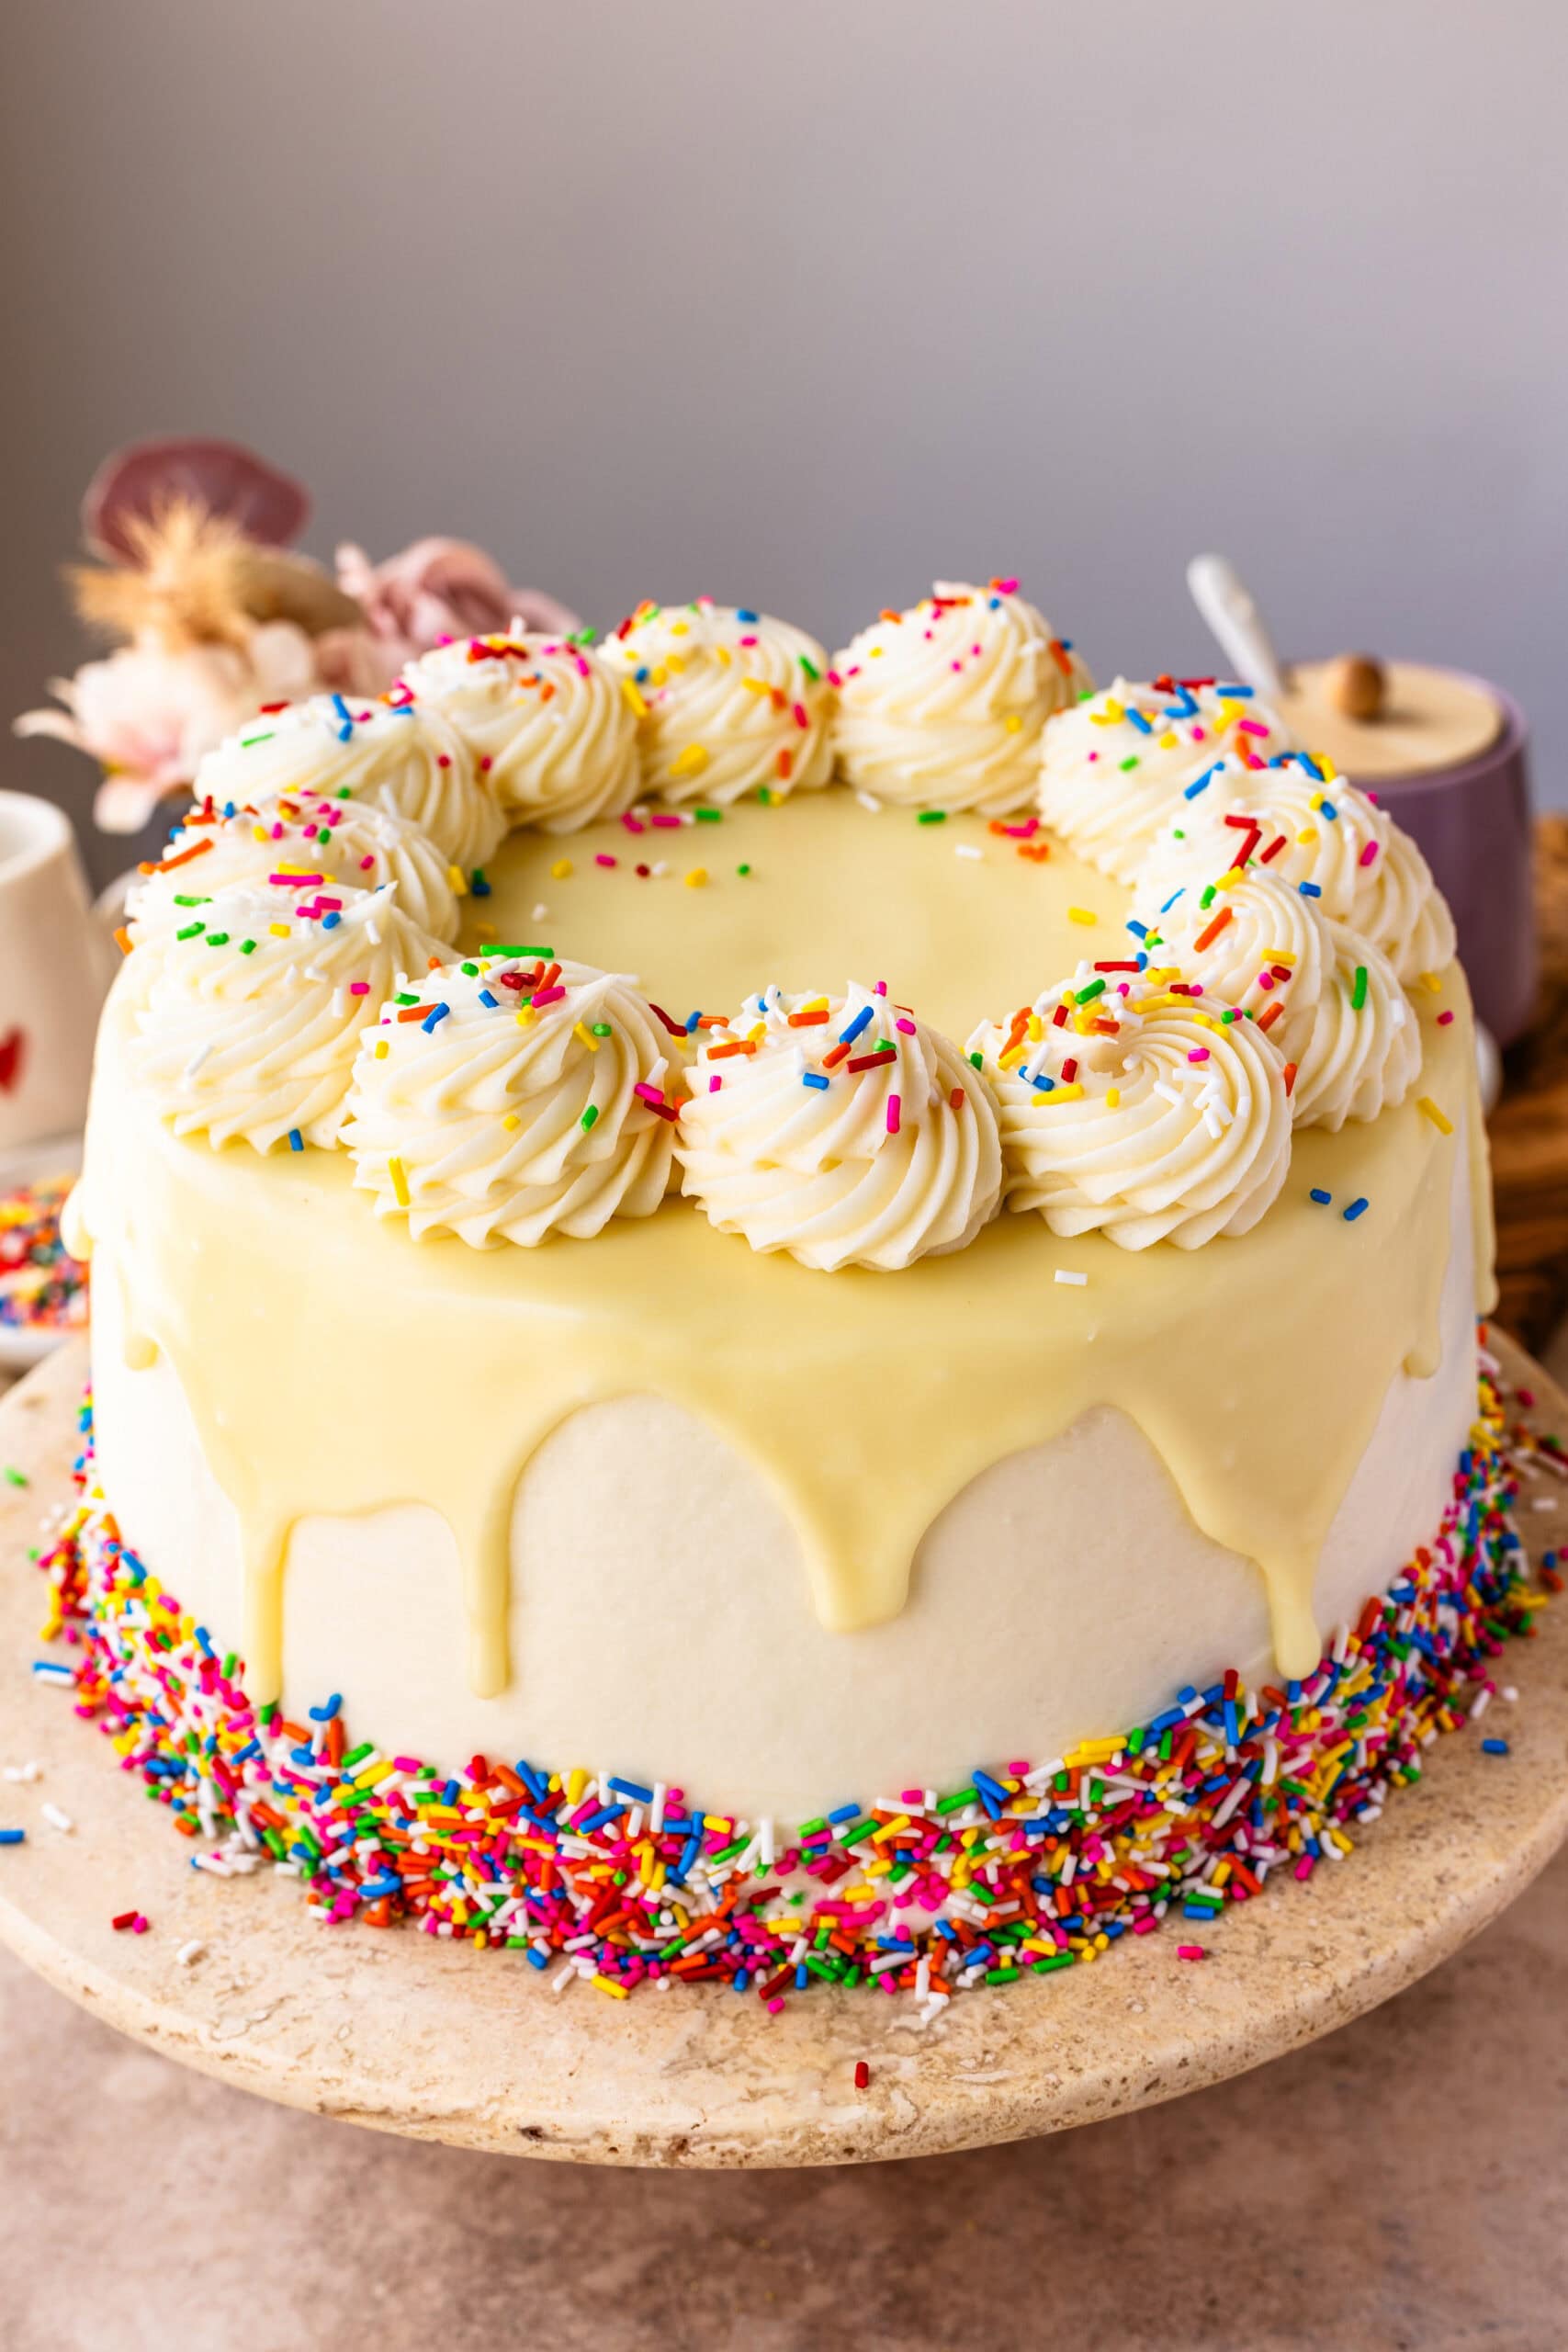
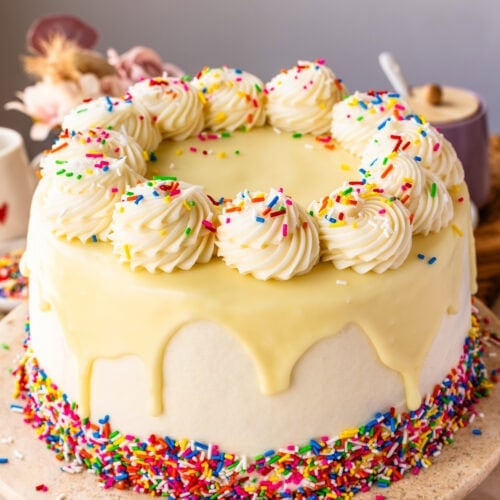
I set out to create the ultimate funfetti cake. Thin, delicate layers of vanilla cake and frosting, finished with a white chocolate ganache and a shower of sprinkles. It’s incredibly indulgent, packed with vanilla flavor, and melts in your mouth like a soft, velvety dream.
Here’s why I love this cake so much!
I’ve tested a lot of sprinkle/funfetti cakes over time. I even have a Funfetti Cookie and Funfetti Cheesecake recipe. The biggest difference always comes down to structure and balance. This version keeps the layers soft and light, with a cream cheese frosting that adds just enough tang to offset the sweetness. It’s the combination that makes the whole cake feel more refined instead of overly sugary.
- The crumb is soft and velvety, not dense
- The layers stay light even with multiple tiers
- The frosting is balanced and not overly sweet
- The sprinkles stay intact without bleeding into the batter
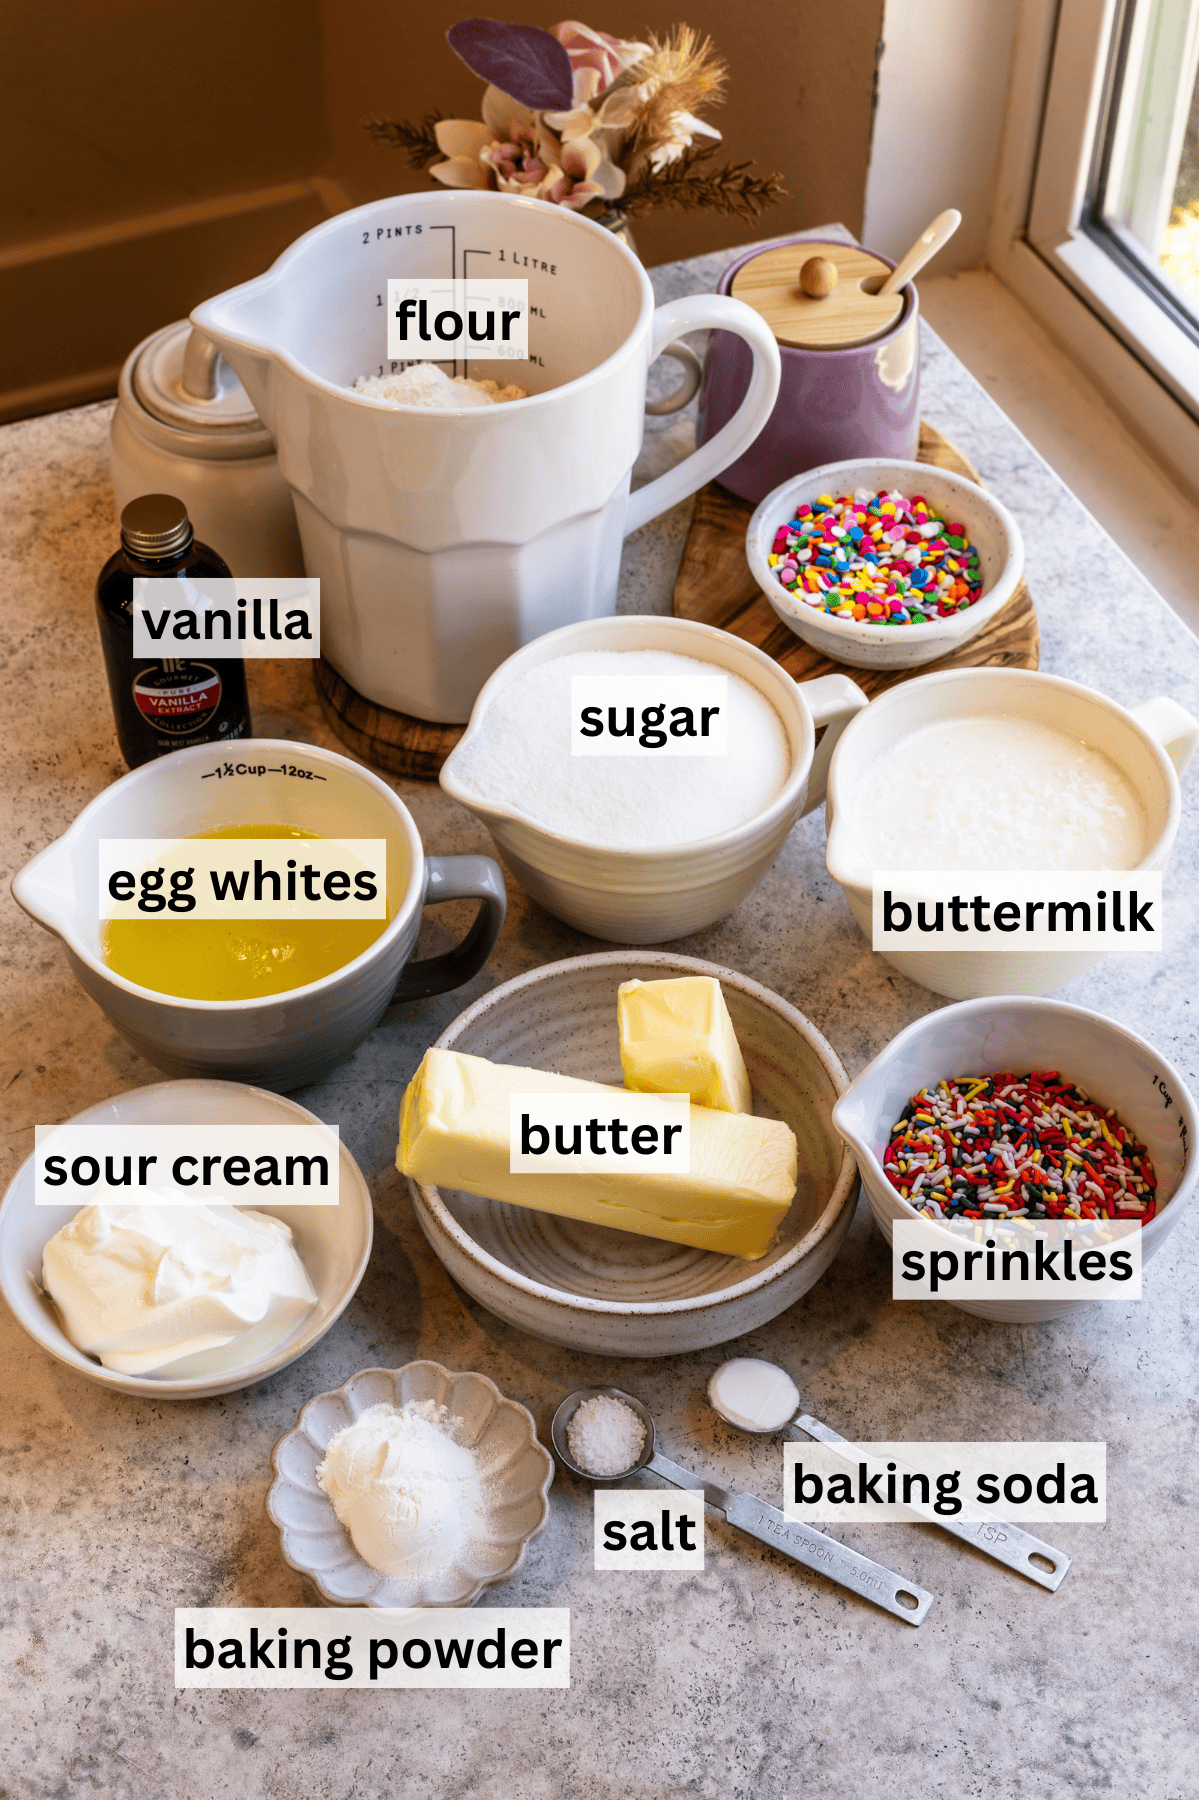
Key Ingredients & Why I Use Them
- Sprinkles (jimmies only) I always use jimmies. Nonpareils bleed into the batter and affect both texture and color—I’ve tested it enough times to avoid them completely now.
- Butter + oil balance (if applicable to your final version) This keeps the flavor rich while still maintaining a soft crumb.
- Egg whites: They lighten the structure and keep the cake from feeling too heavy.
- Sour cream: This is one of the ingredients I don’t skip—it adds moisture and improves texture significantly.
- Buttermilk: Helps tenderize the crumb and gives a slight tang that balances the sweetness.
How to Make Funfetti Cake
This cake has a lot of layers, but don’t worry, it’s easier to make than it seems! I’ll also help you step by step the whole way. For full ingredient amounts, check the recipe card below.
This post may contain affiliate links. I earn a commission from qualified purchases. Please read our Privacy policy here.
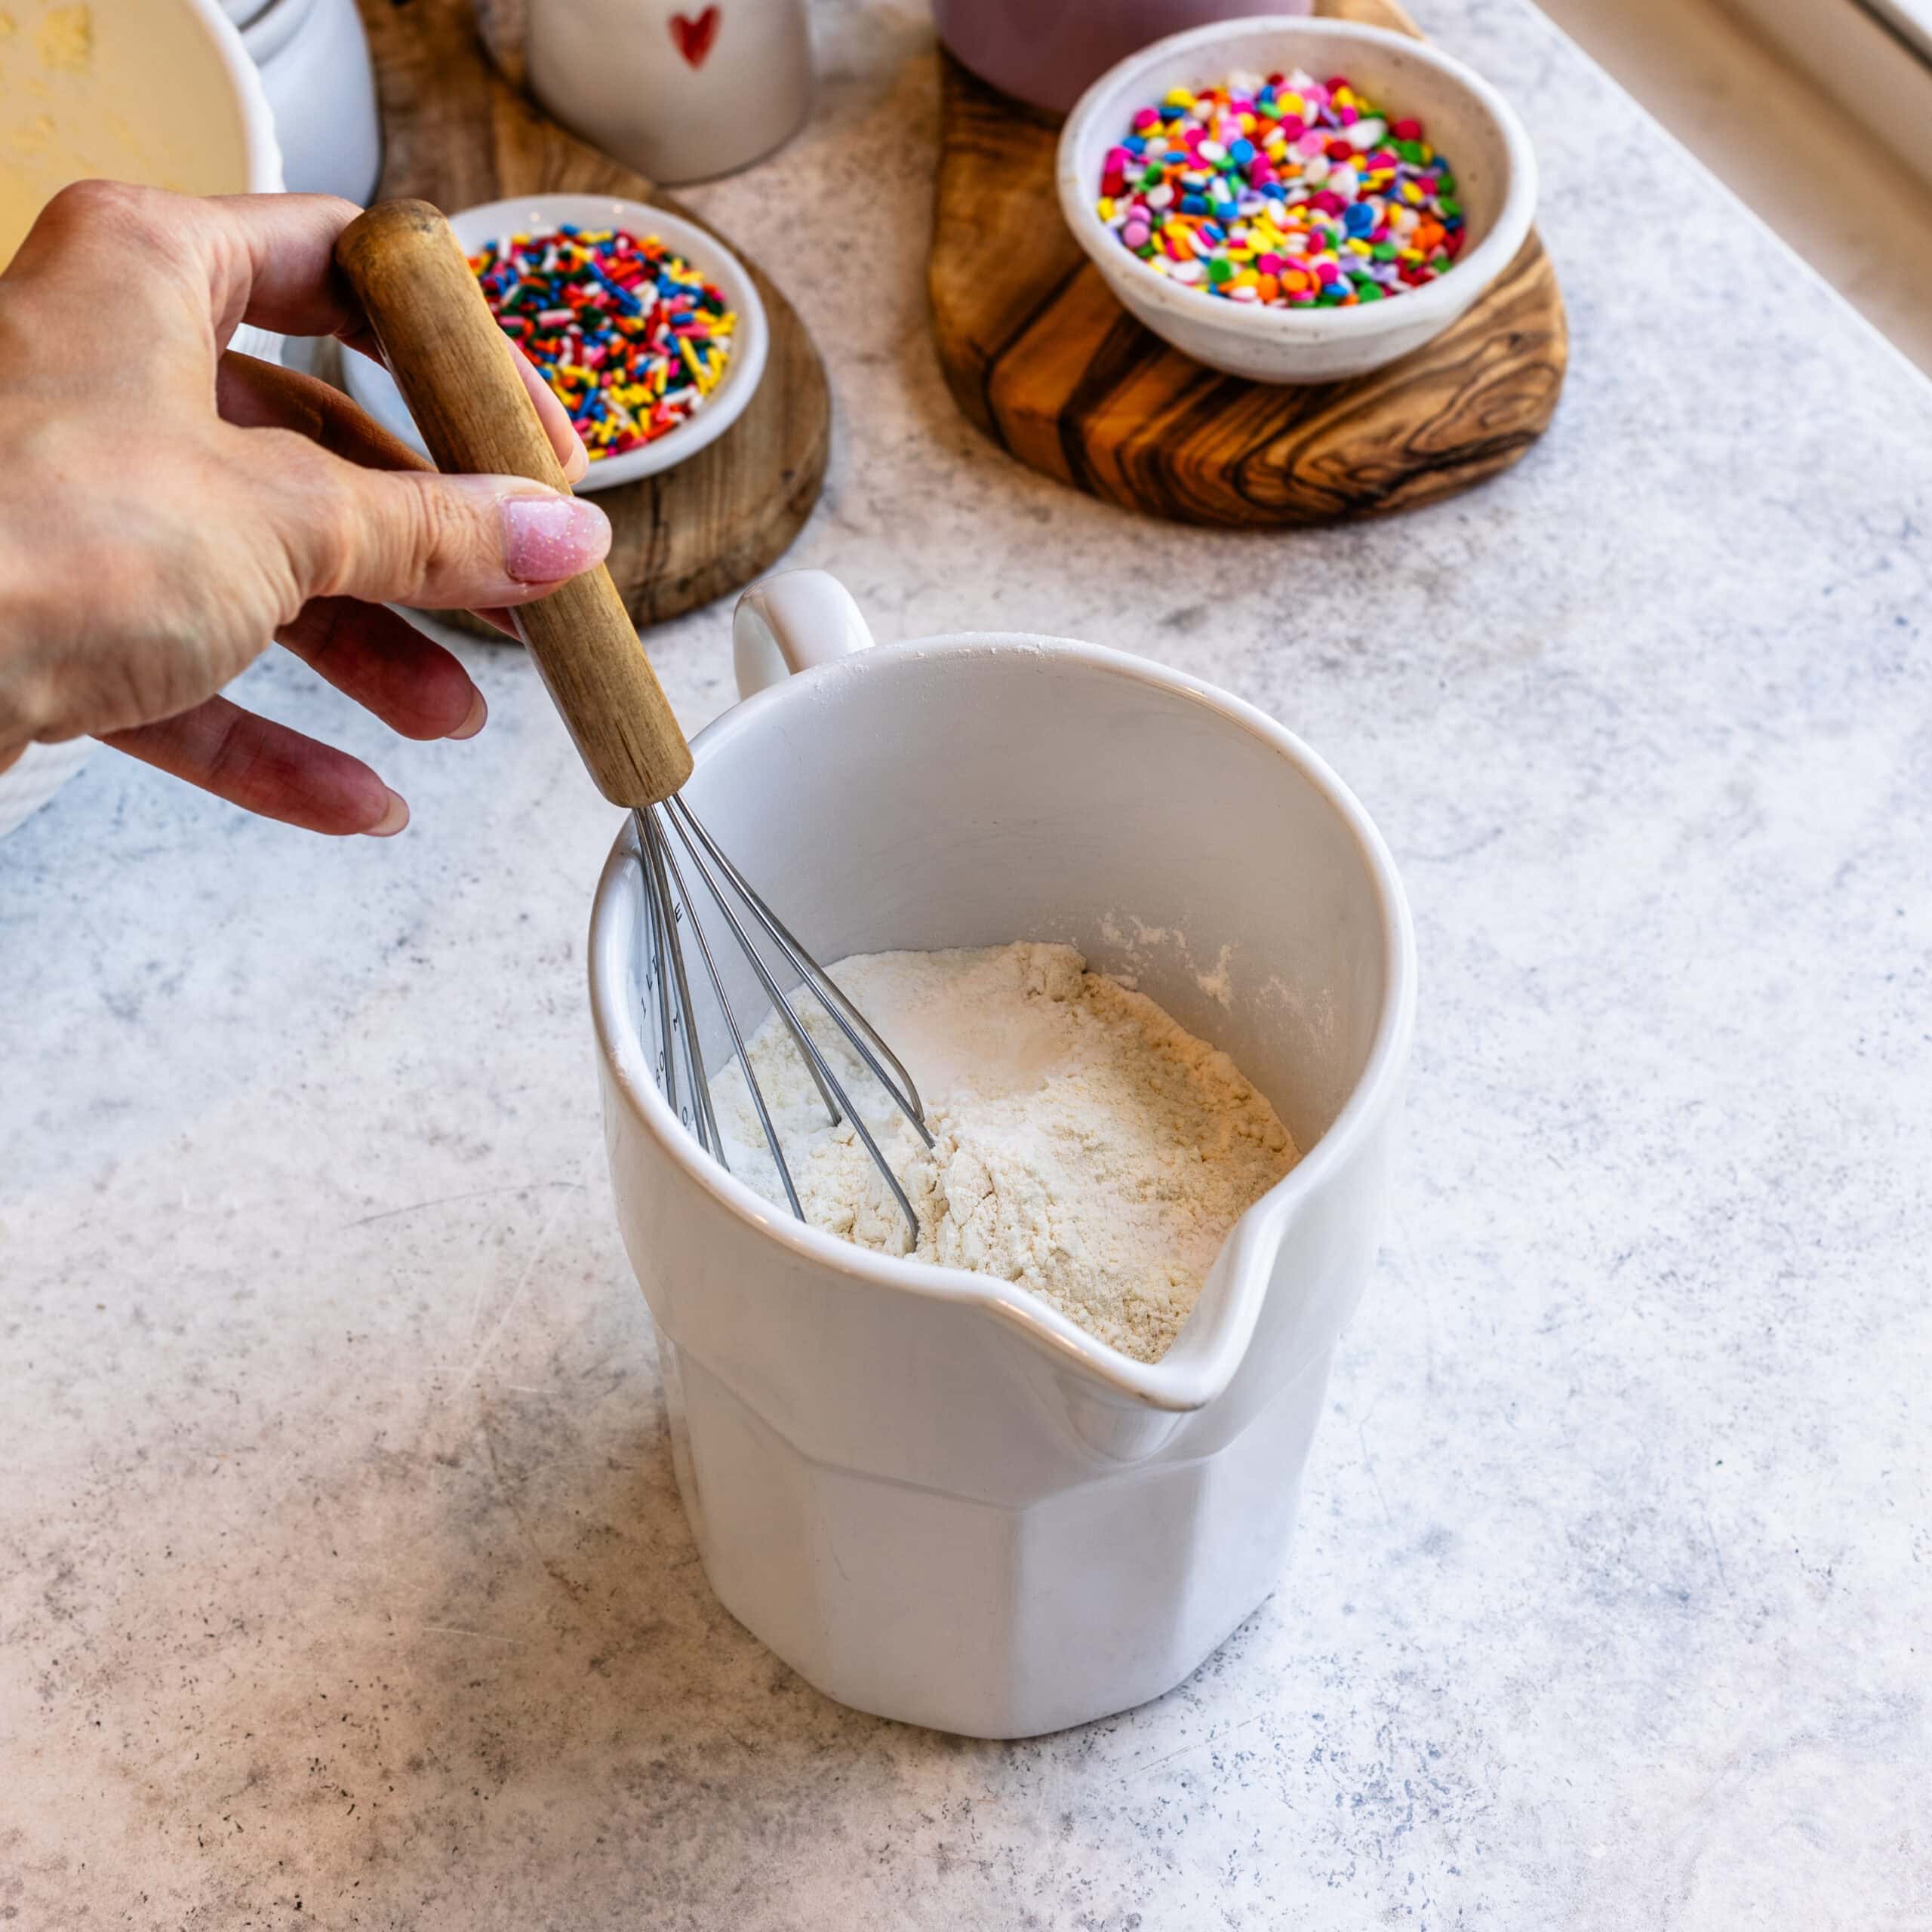
Step 1: Prep and mix the dry ingredients
Preheat the oven to 350°F (175°C). Then I grease my cake pans and line the bottoms with parchment. I also lightly grease the parchment so nothing sticks.
Then mix together the flour, baking powder, baking soda, and salt in a bowl and set aside.
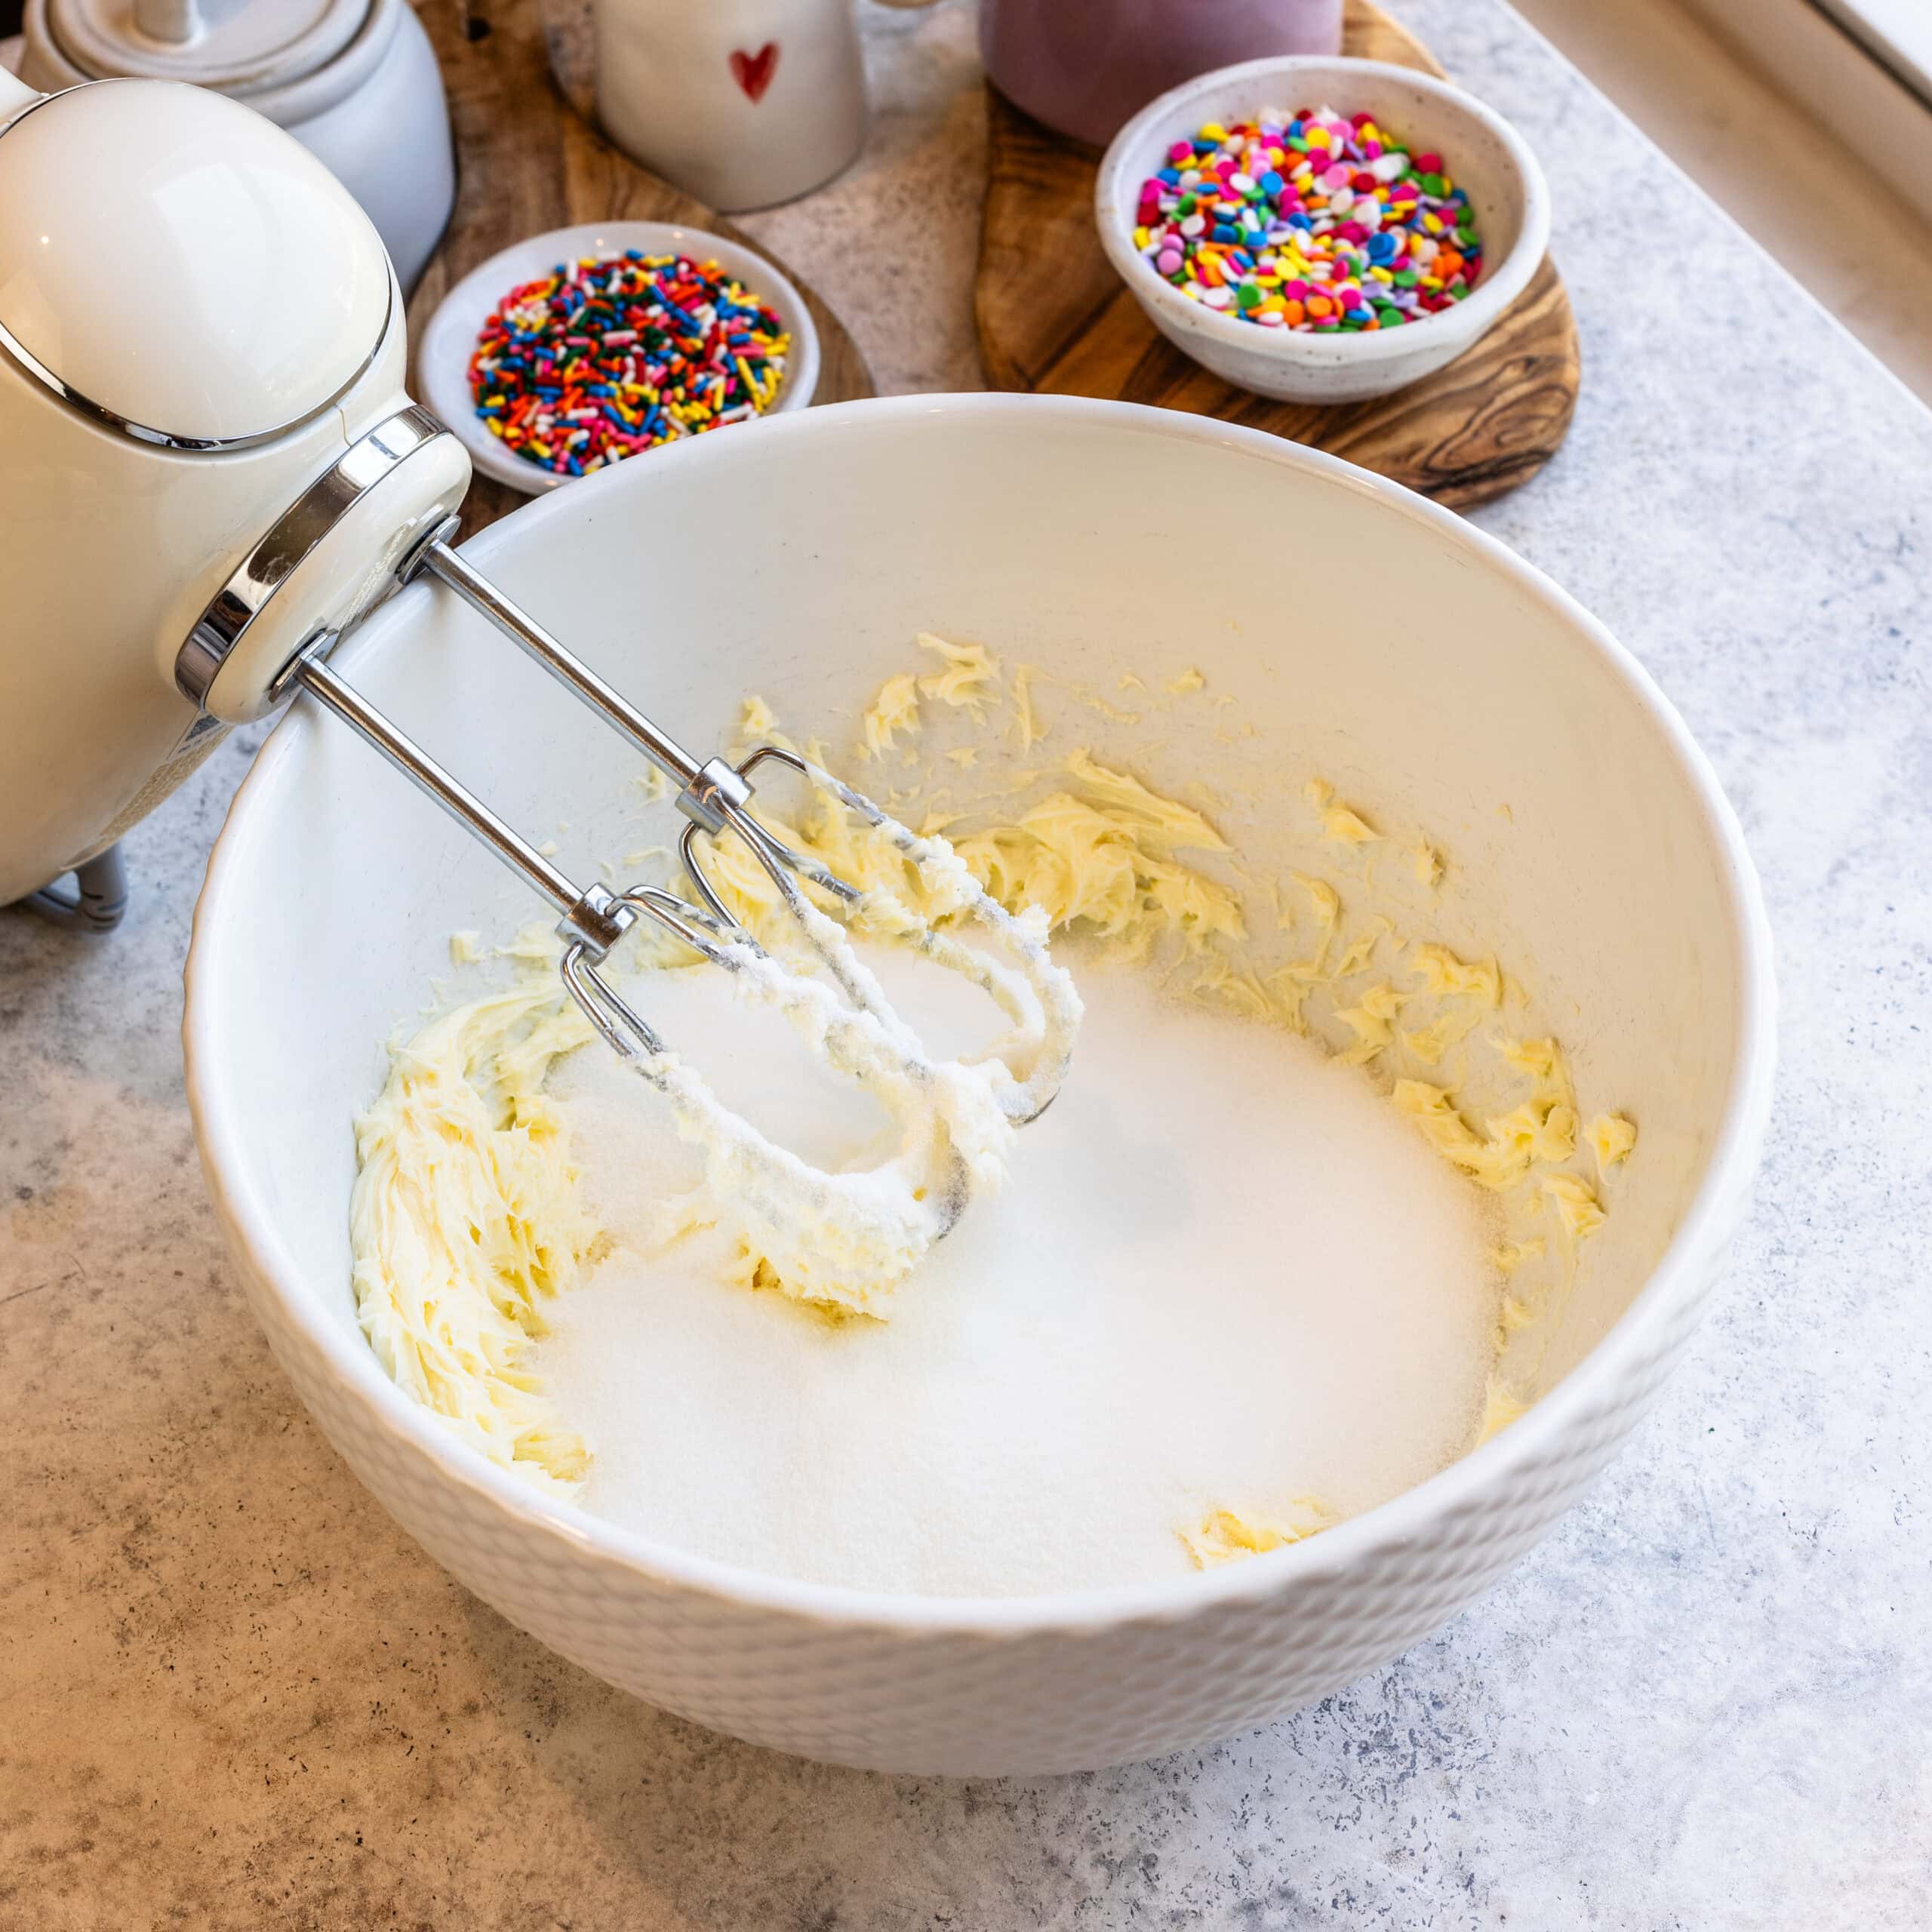
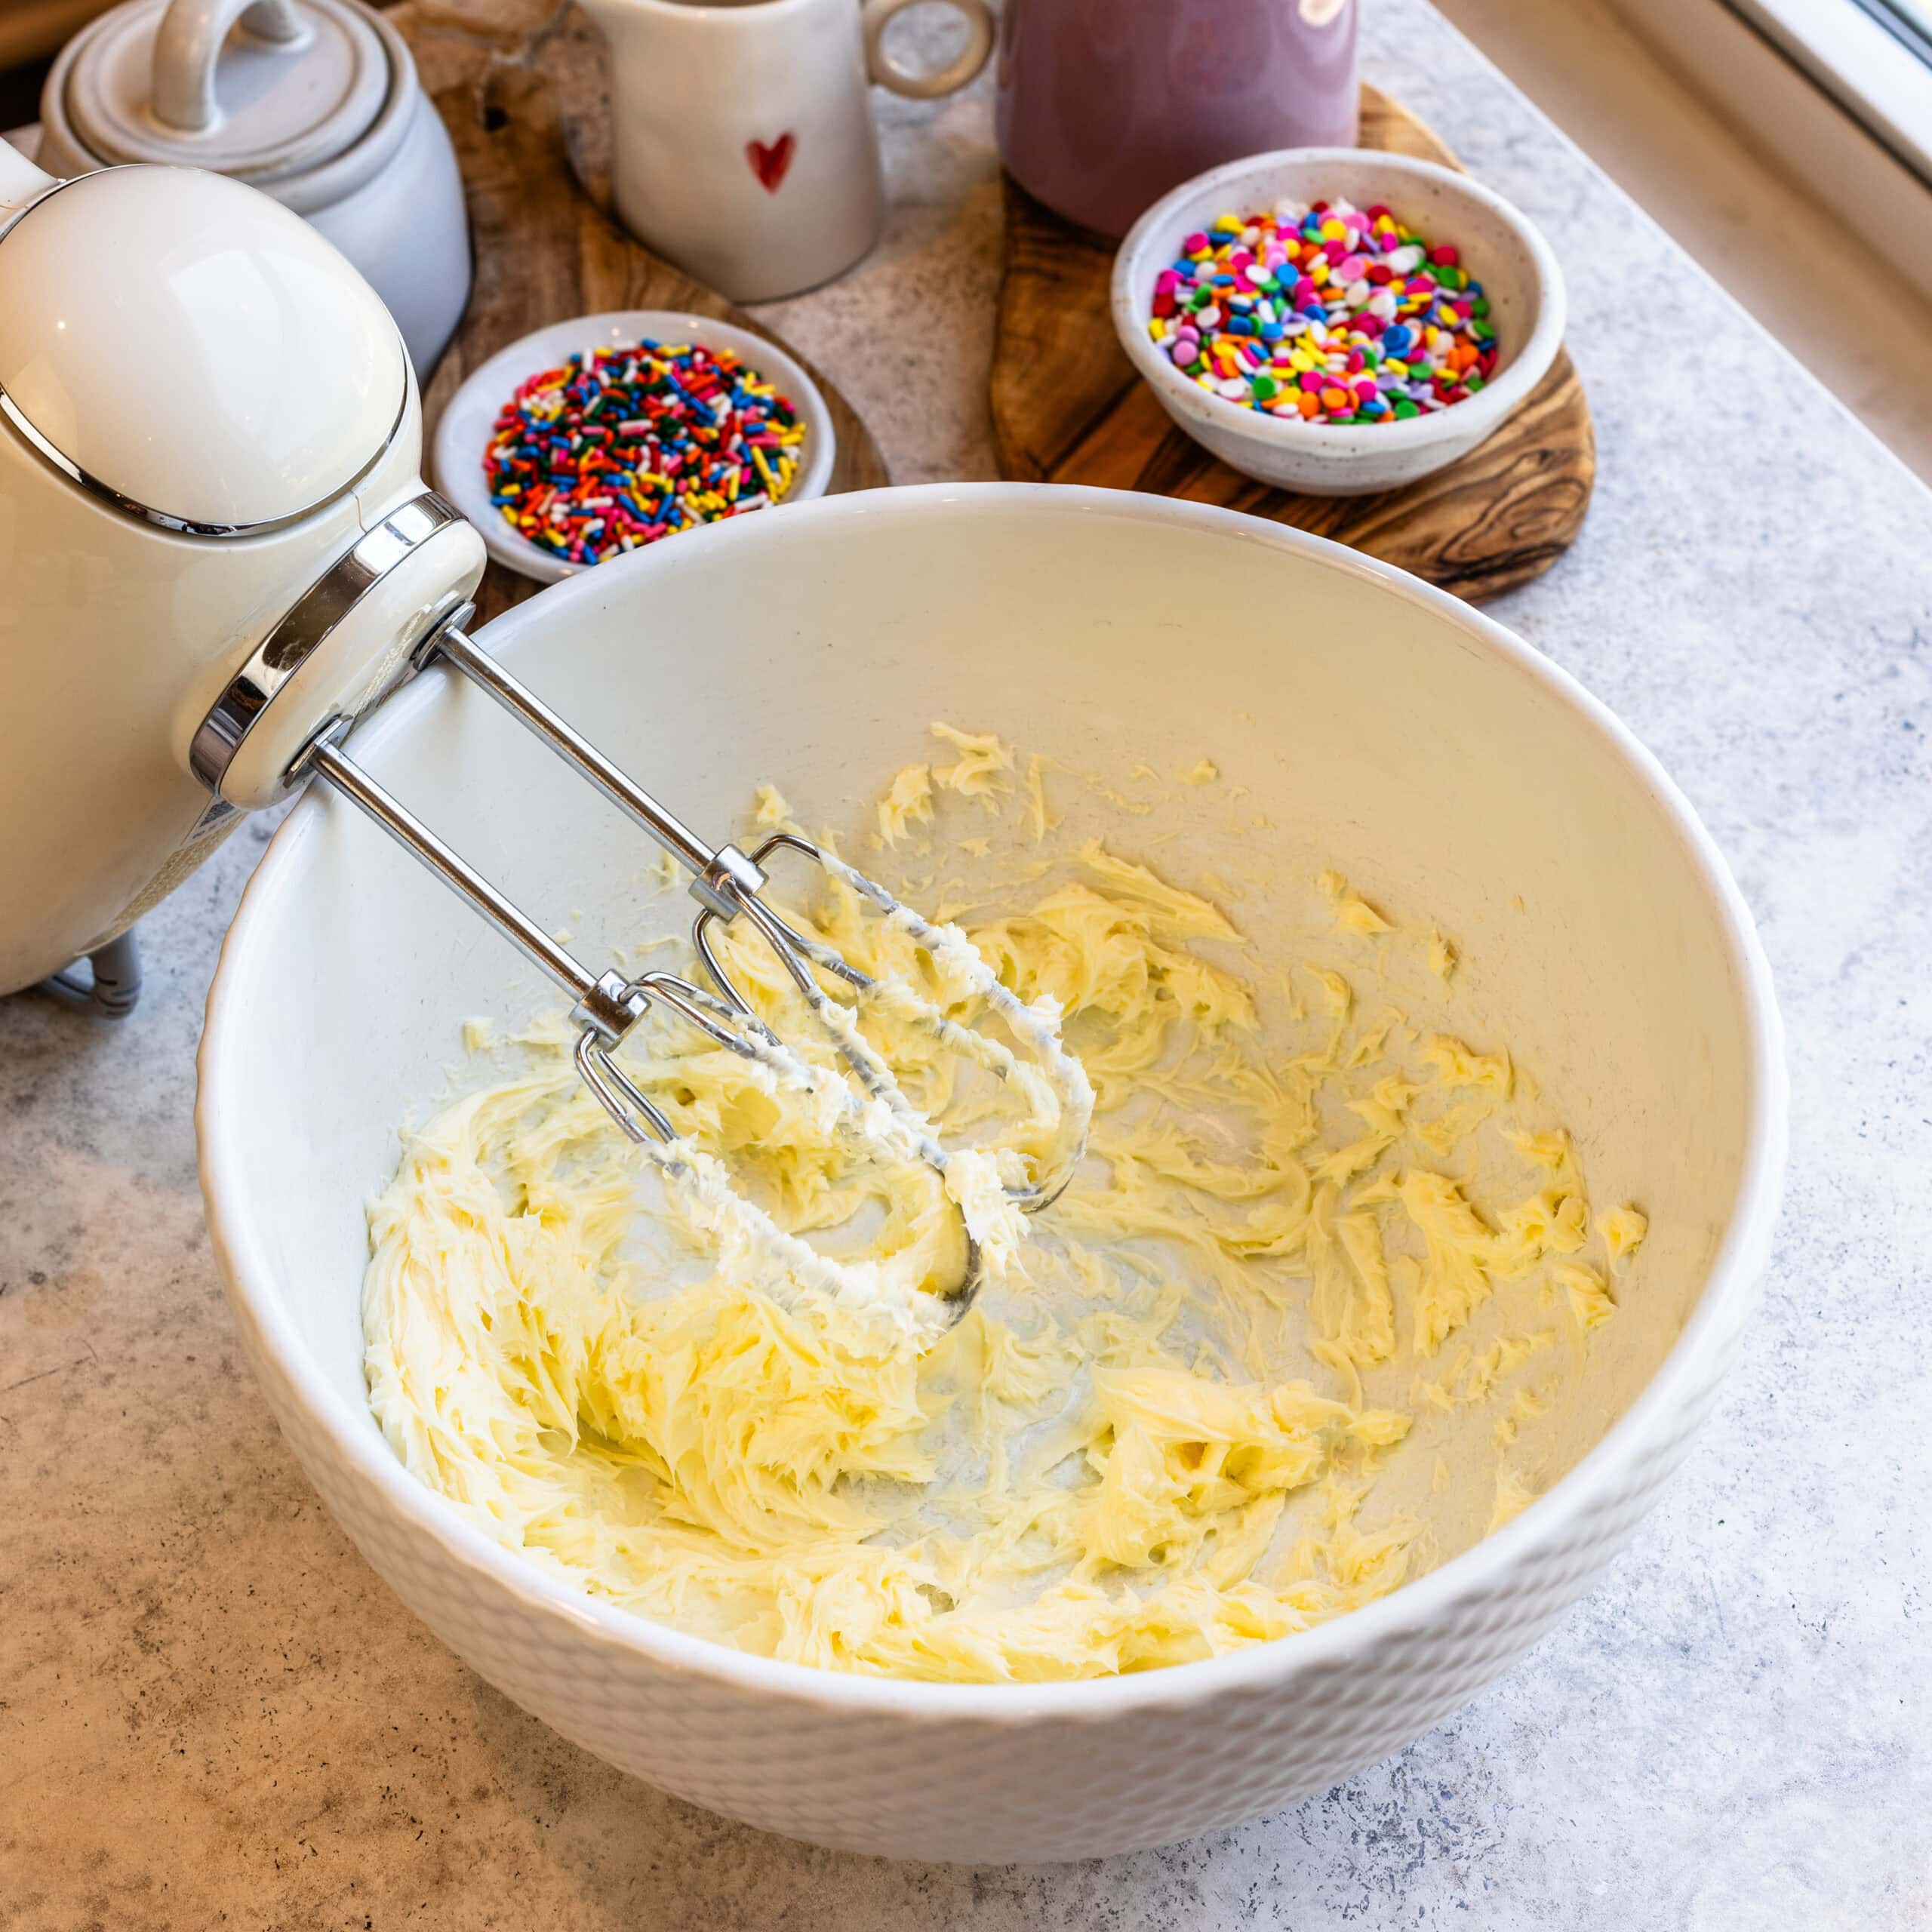
Step 2: Cream the butter and sugar
This is the secret behind this cake. In a large mixing bowl or in a stand mixer, beat the butter until creamy. Then add the sugar and mix for a couple of minutes until it’s lighter and slightly fluffy. This step helps with structure, so I don’t rush it.
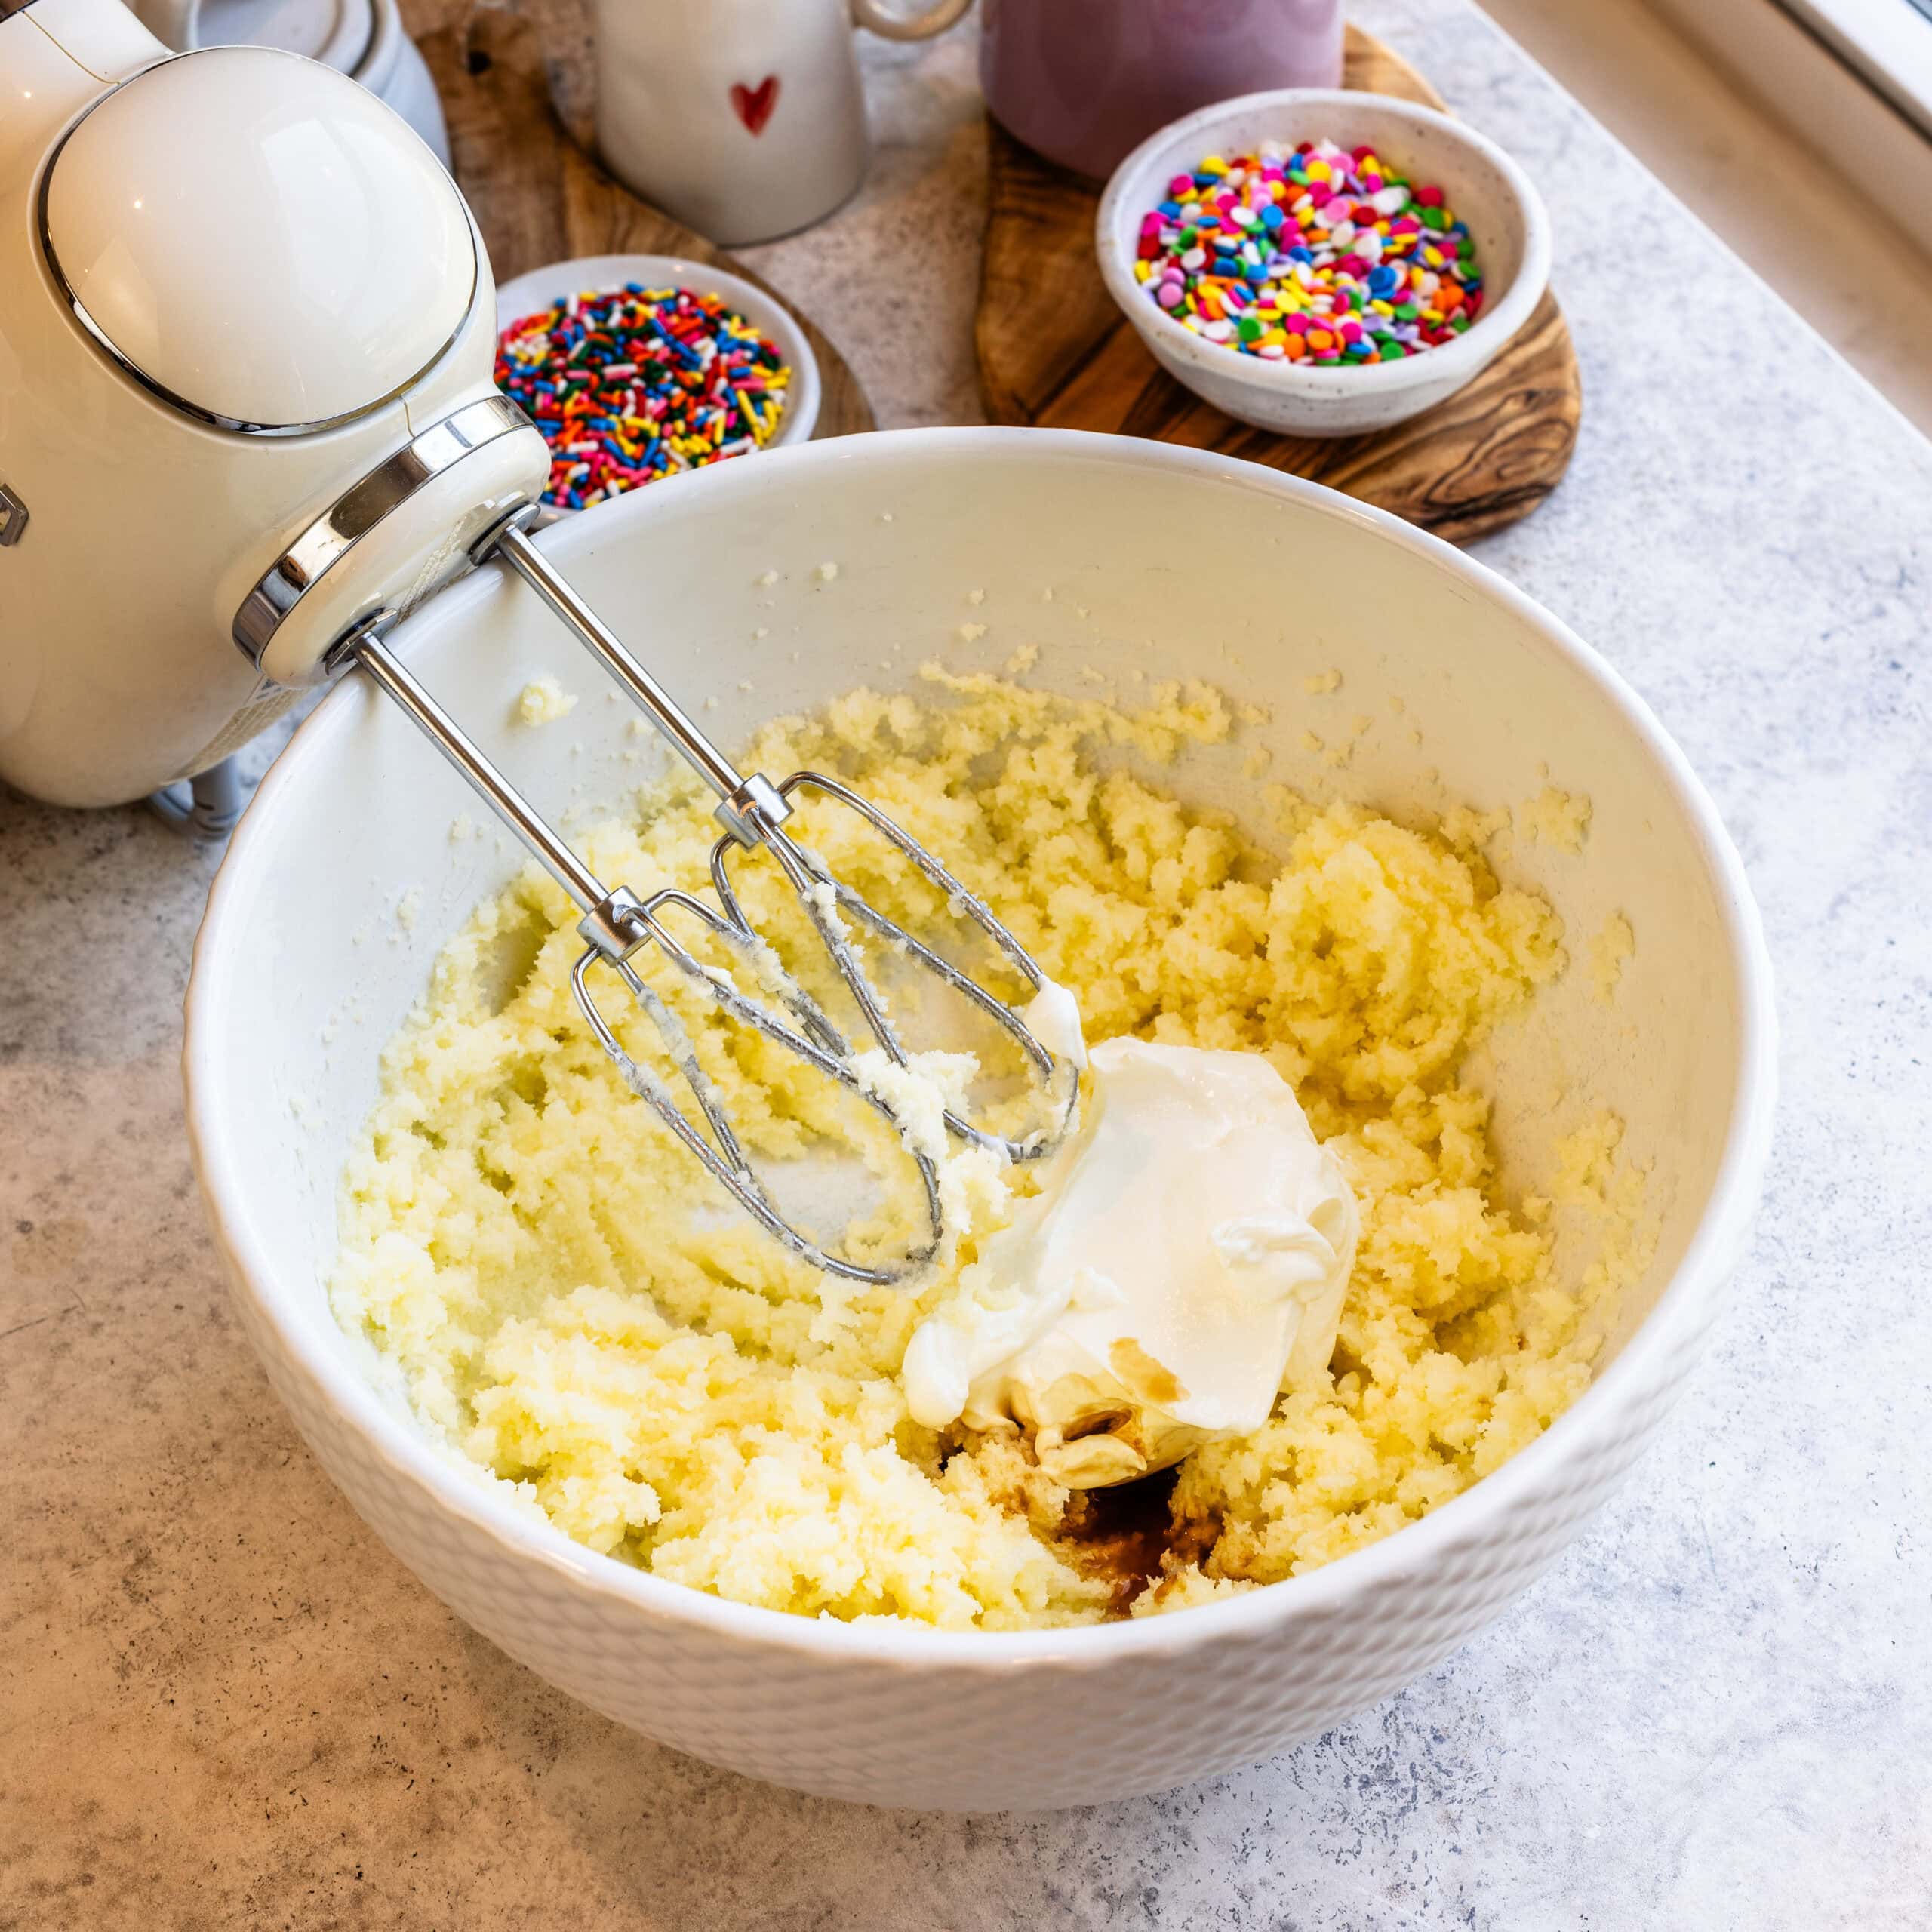
Step 3: Add sour cream and vanilla
Whip in the sour cream and vanilla until smooth.
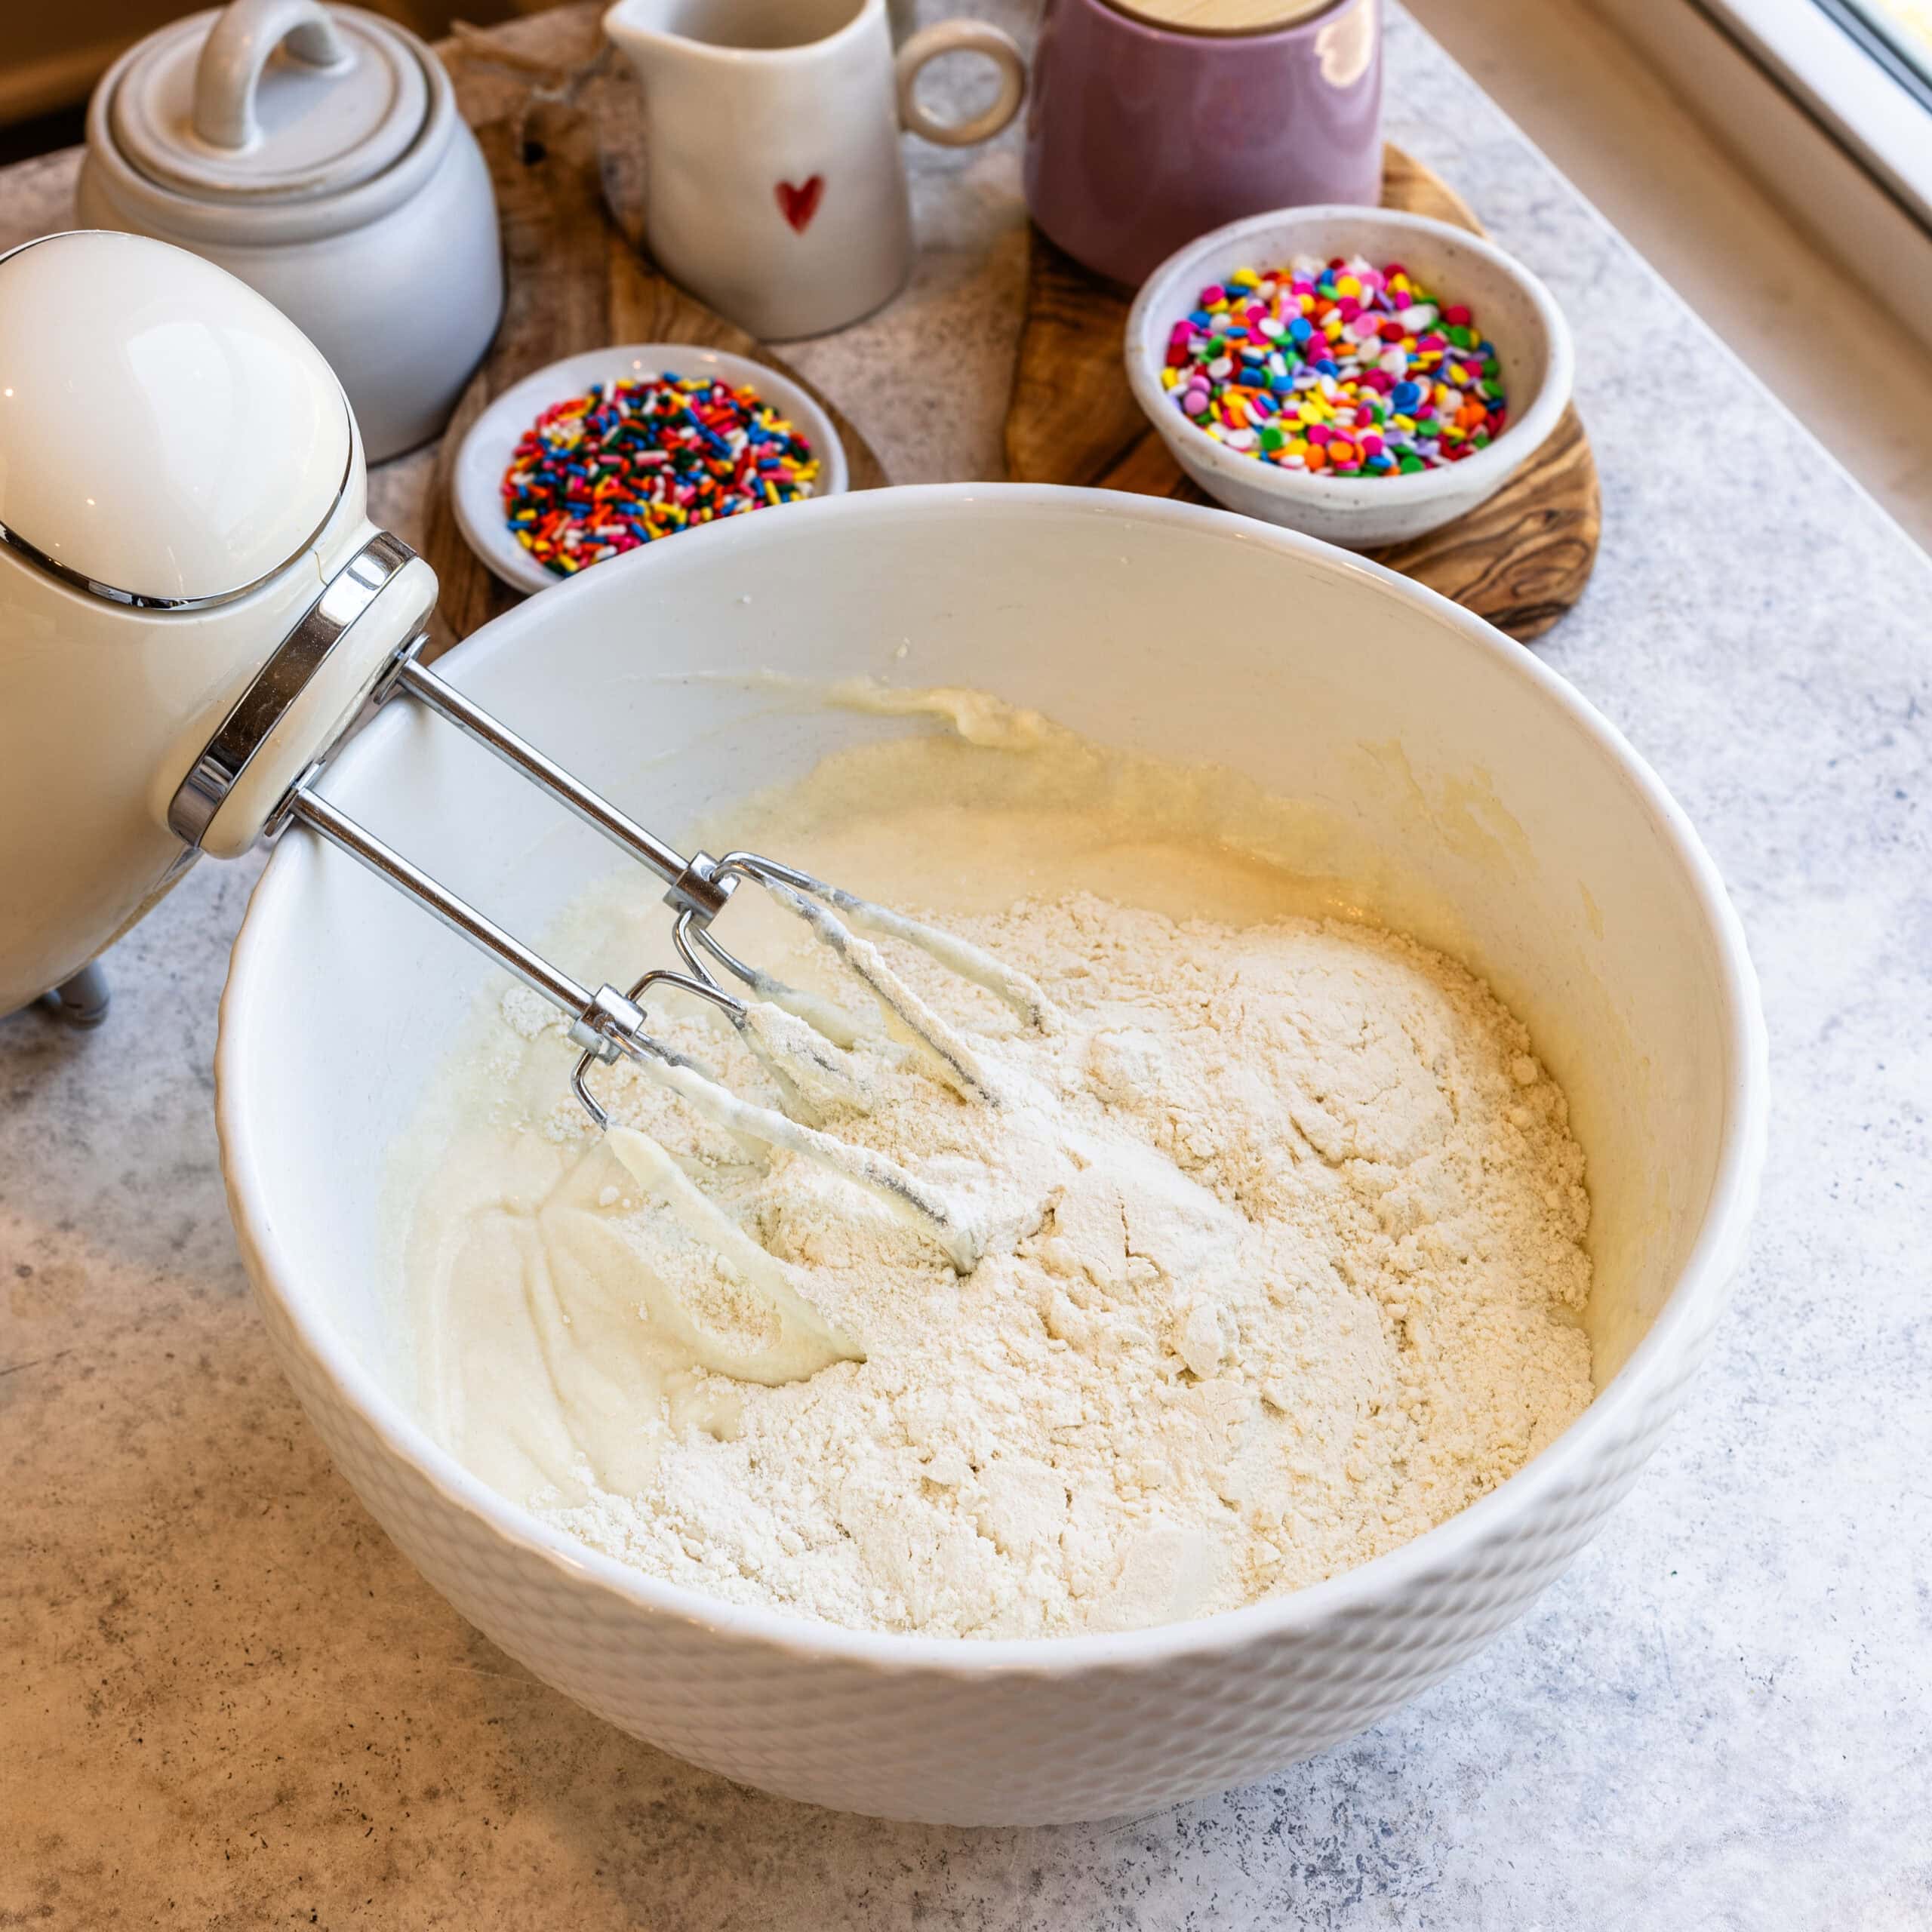
Step 4: Alternate the dry ingredients & buttermilk
I add the dry ingredients and buttermilk in alternating additions, so I don’t overmix. I mix just until combined each time, and I stop as soon as everything comes together. This prevents the cake from getting too tough.
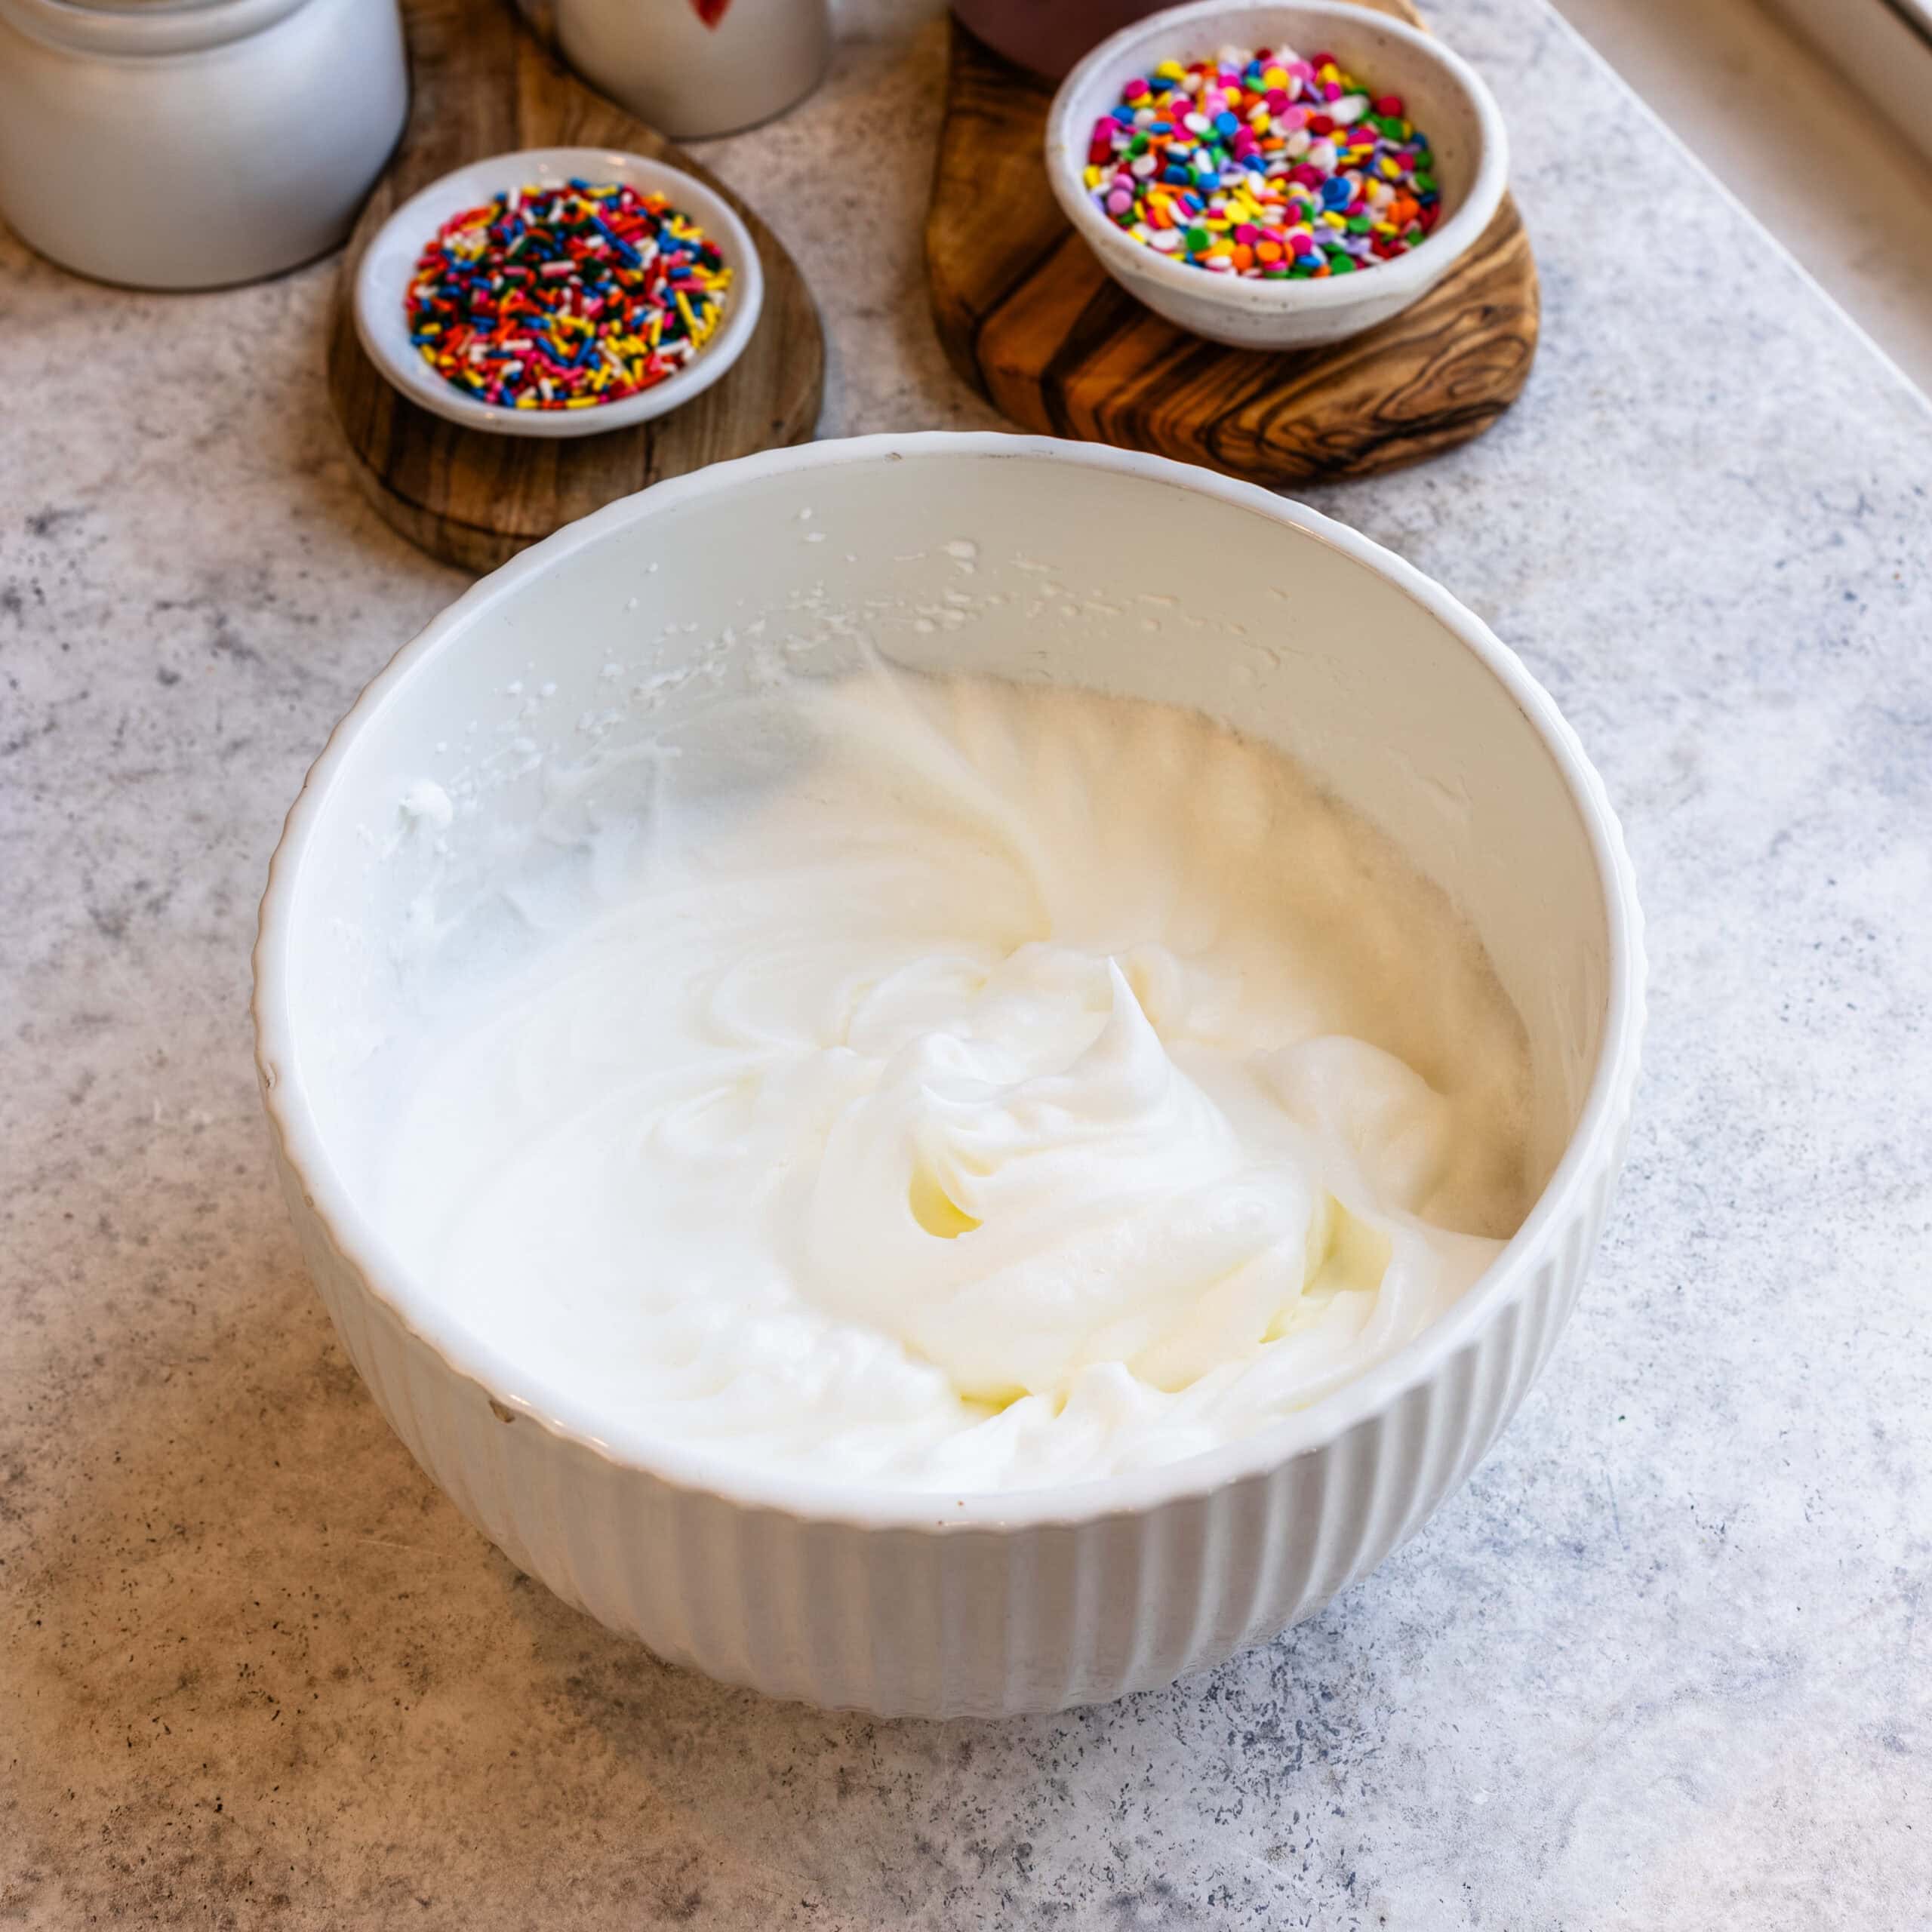
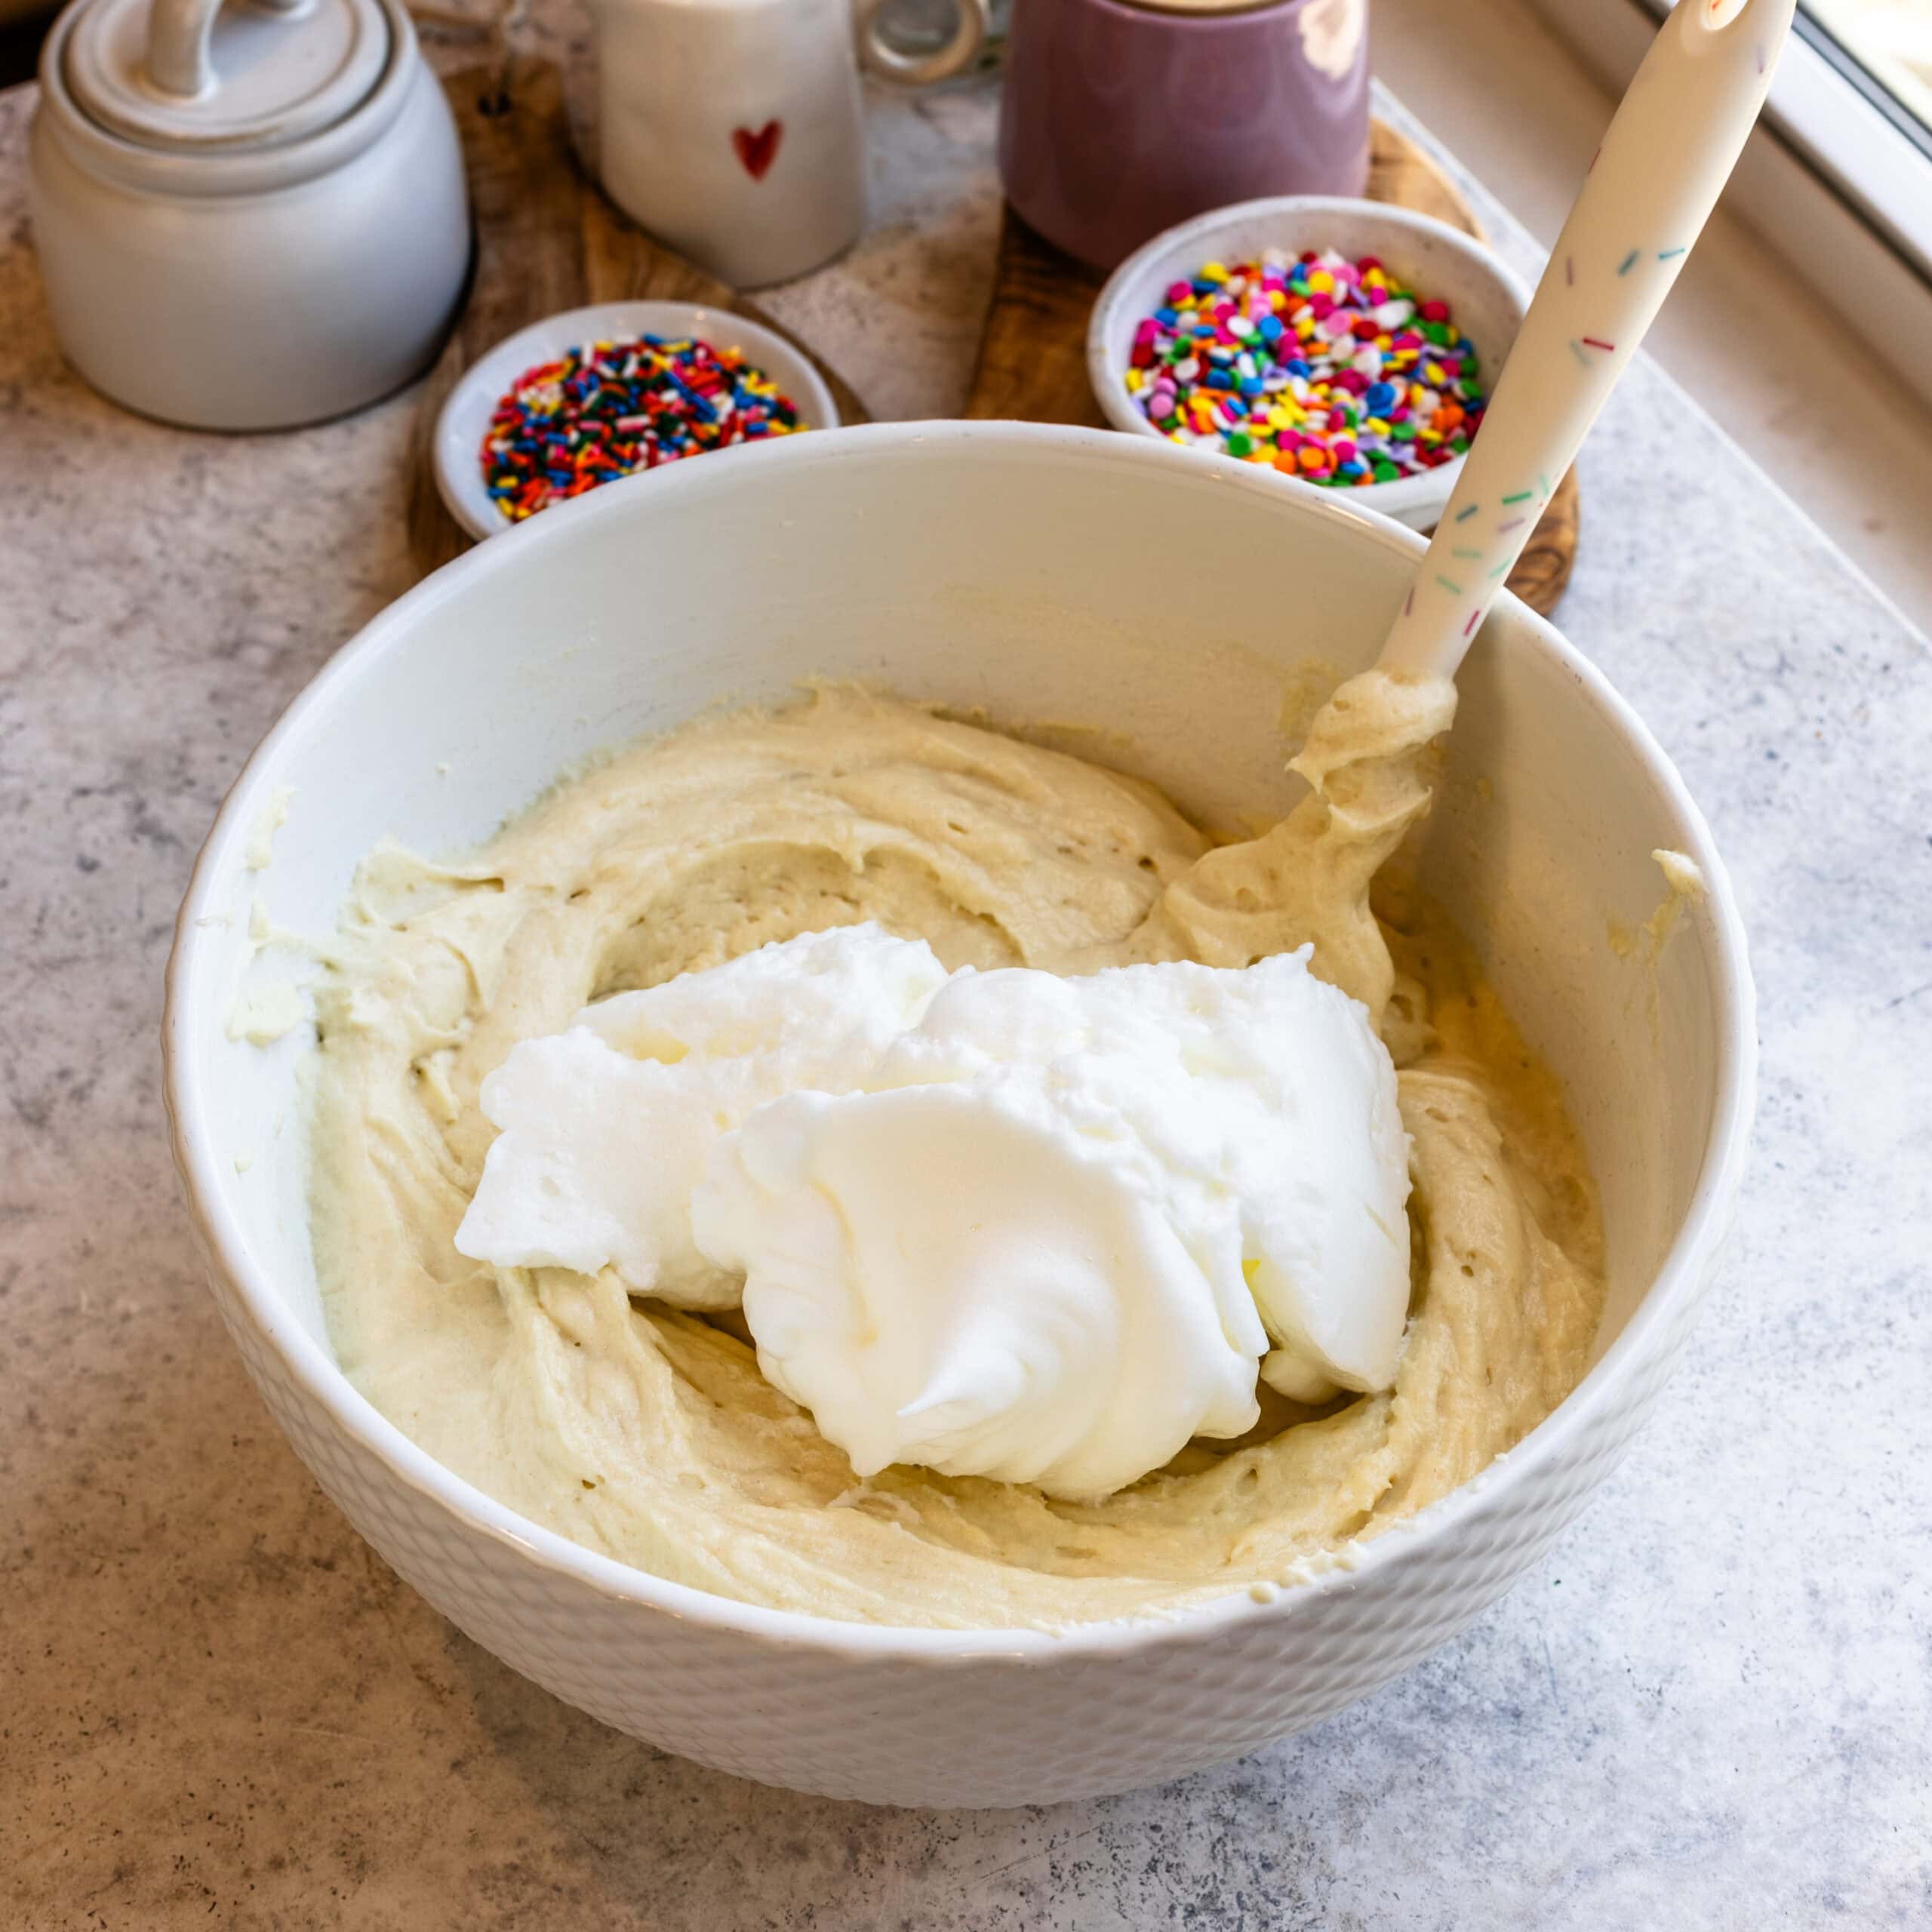
Step 5: Whip the egg whites
In a separate bowl, I whip the egg whites to stiff peaks.
Step 6: Gently fold into the cake batter
Then I fold the egg whites into the batter in thirds. I go gently here—this is what keeps the cake light instead of dense.
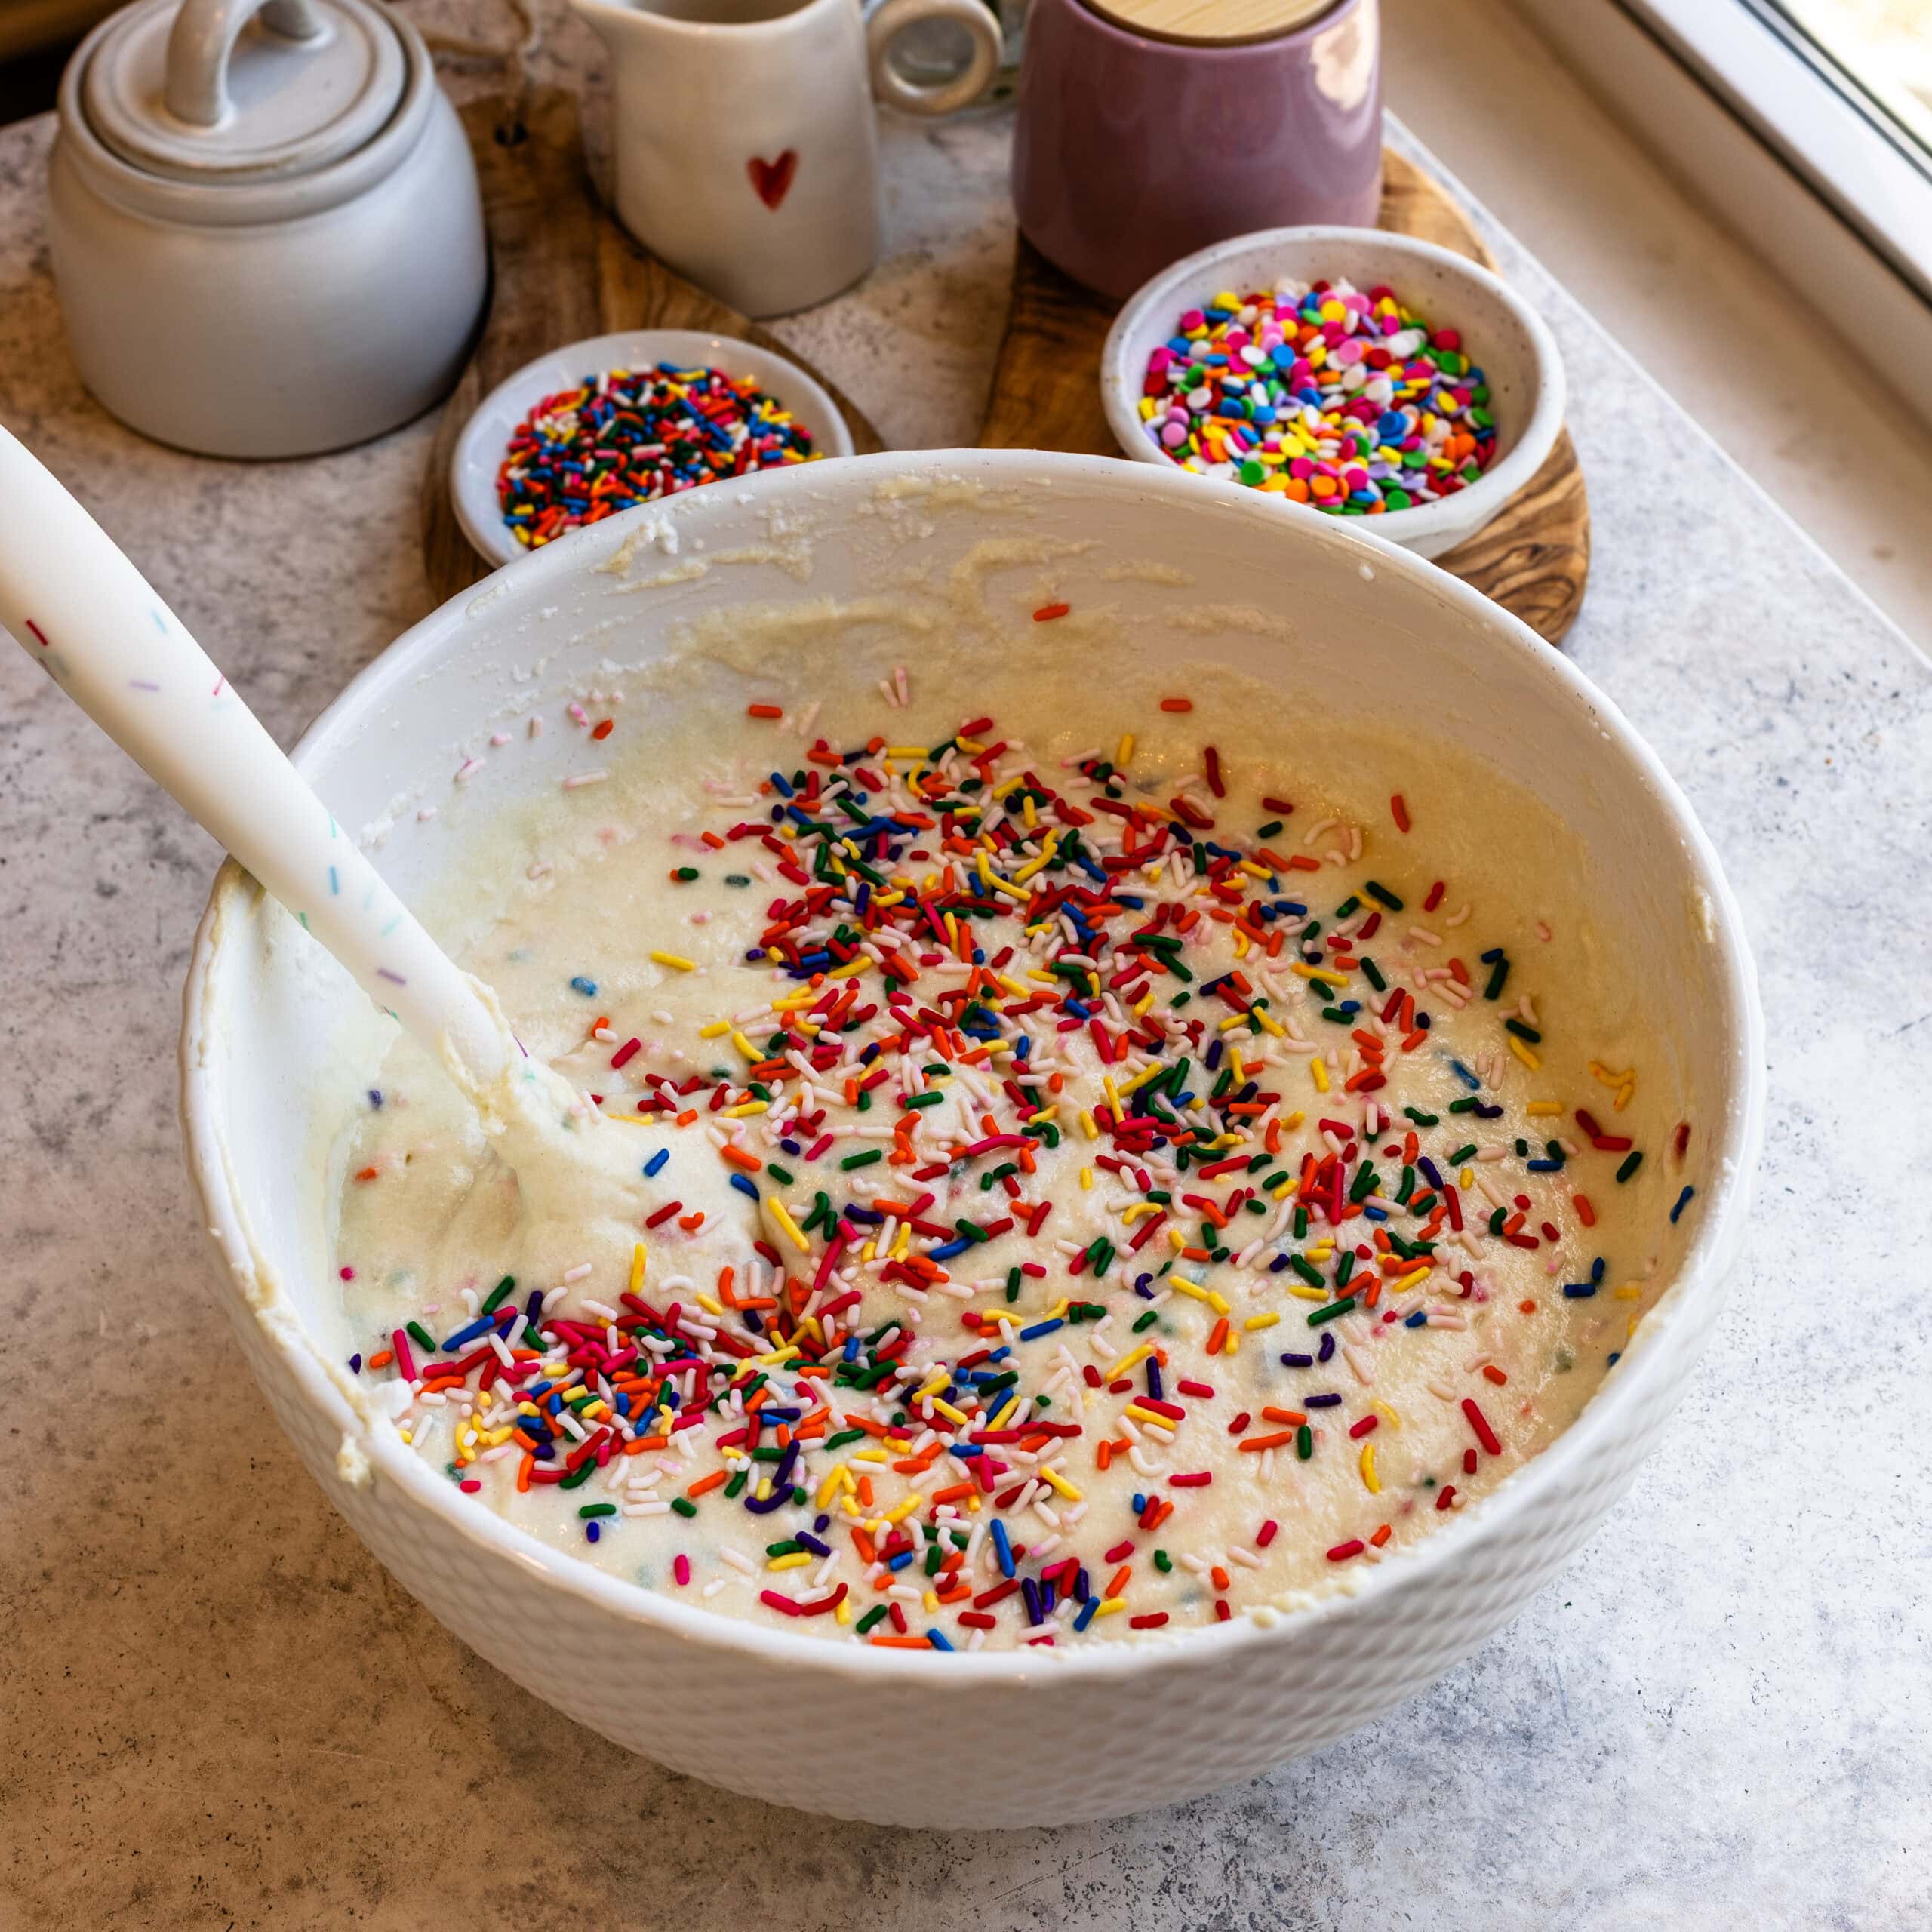
Step 7: Fold in the Sprinkles
I fold in the sprinkles at the very end, using a spatula. Again, be careful not to overmix the batter.
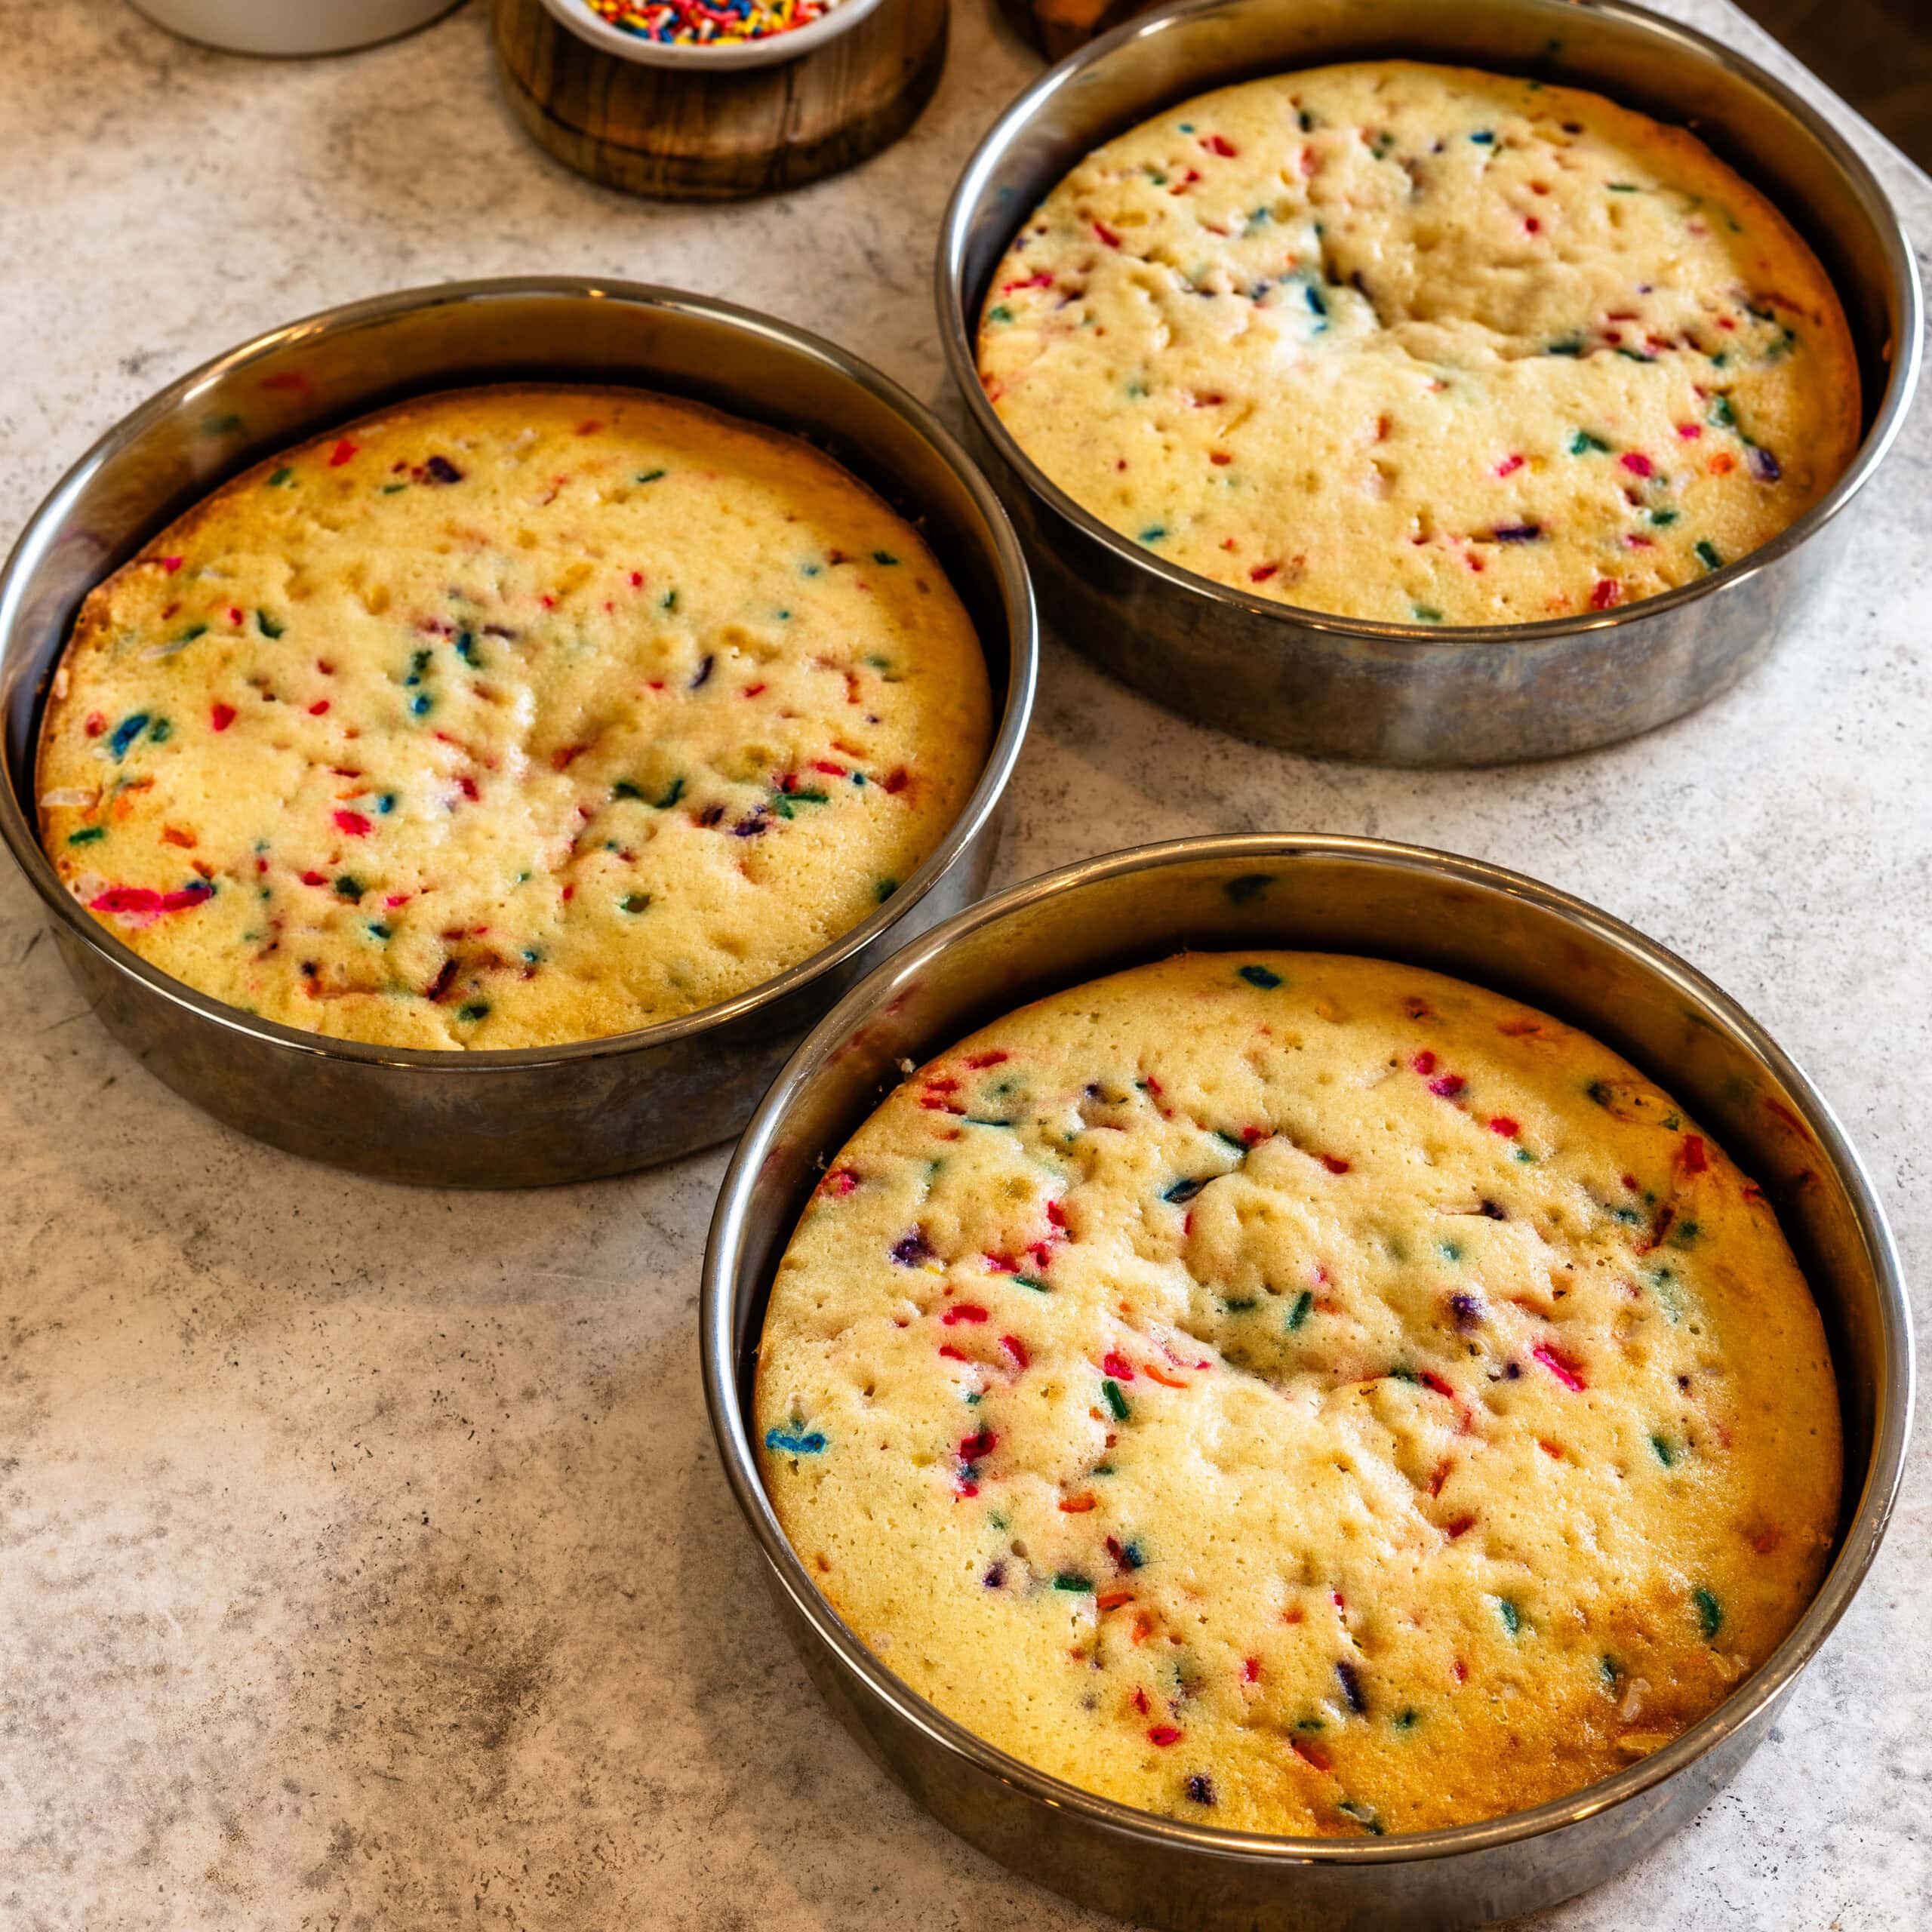
Step 8: Add to the pans and bake!
I divide the batter evenly between the three pans and bake for 18–22 minutes, until the tops spring back and a toothpick comes out clean or with a few crumbs.
Then I let them cool in the pan for about 10–15 minutes before turning them out.
Step 9: Make the cream cheese frosting
While the cakes cool, I make the frosting. I beat the butter first for about a minute, then add the cream cheese and beat until the mixture is smooth and creamy, usually 2 to 3 minutes.
Next, I add the powdered sugar gradually on low speed so it doesn’t go everywhere. Once it’s incorporated, I increase the speed and beat until smooth.
Then I add the heavy cream and vanilla and beat again until the frosting is light, fluffy, and easy to spread. If it feels too thick, I add a little more cream. If it’s too soft, I add a bit more powdered sugar.
Step 10: Assemble the cake
For many of my cakes, I like to brush a layer of simple syrup over the cake layers before frosting. This keeps the cake moist and gives it a really nice texture. To make it, I bring equal parts sugar and water to a boil, then let it cool before using. See the recipe card for more detailed instructions.
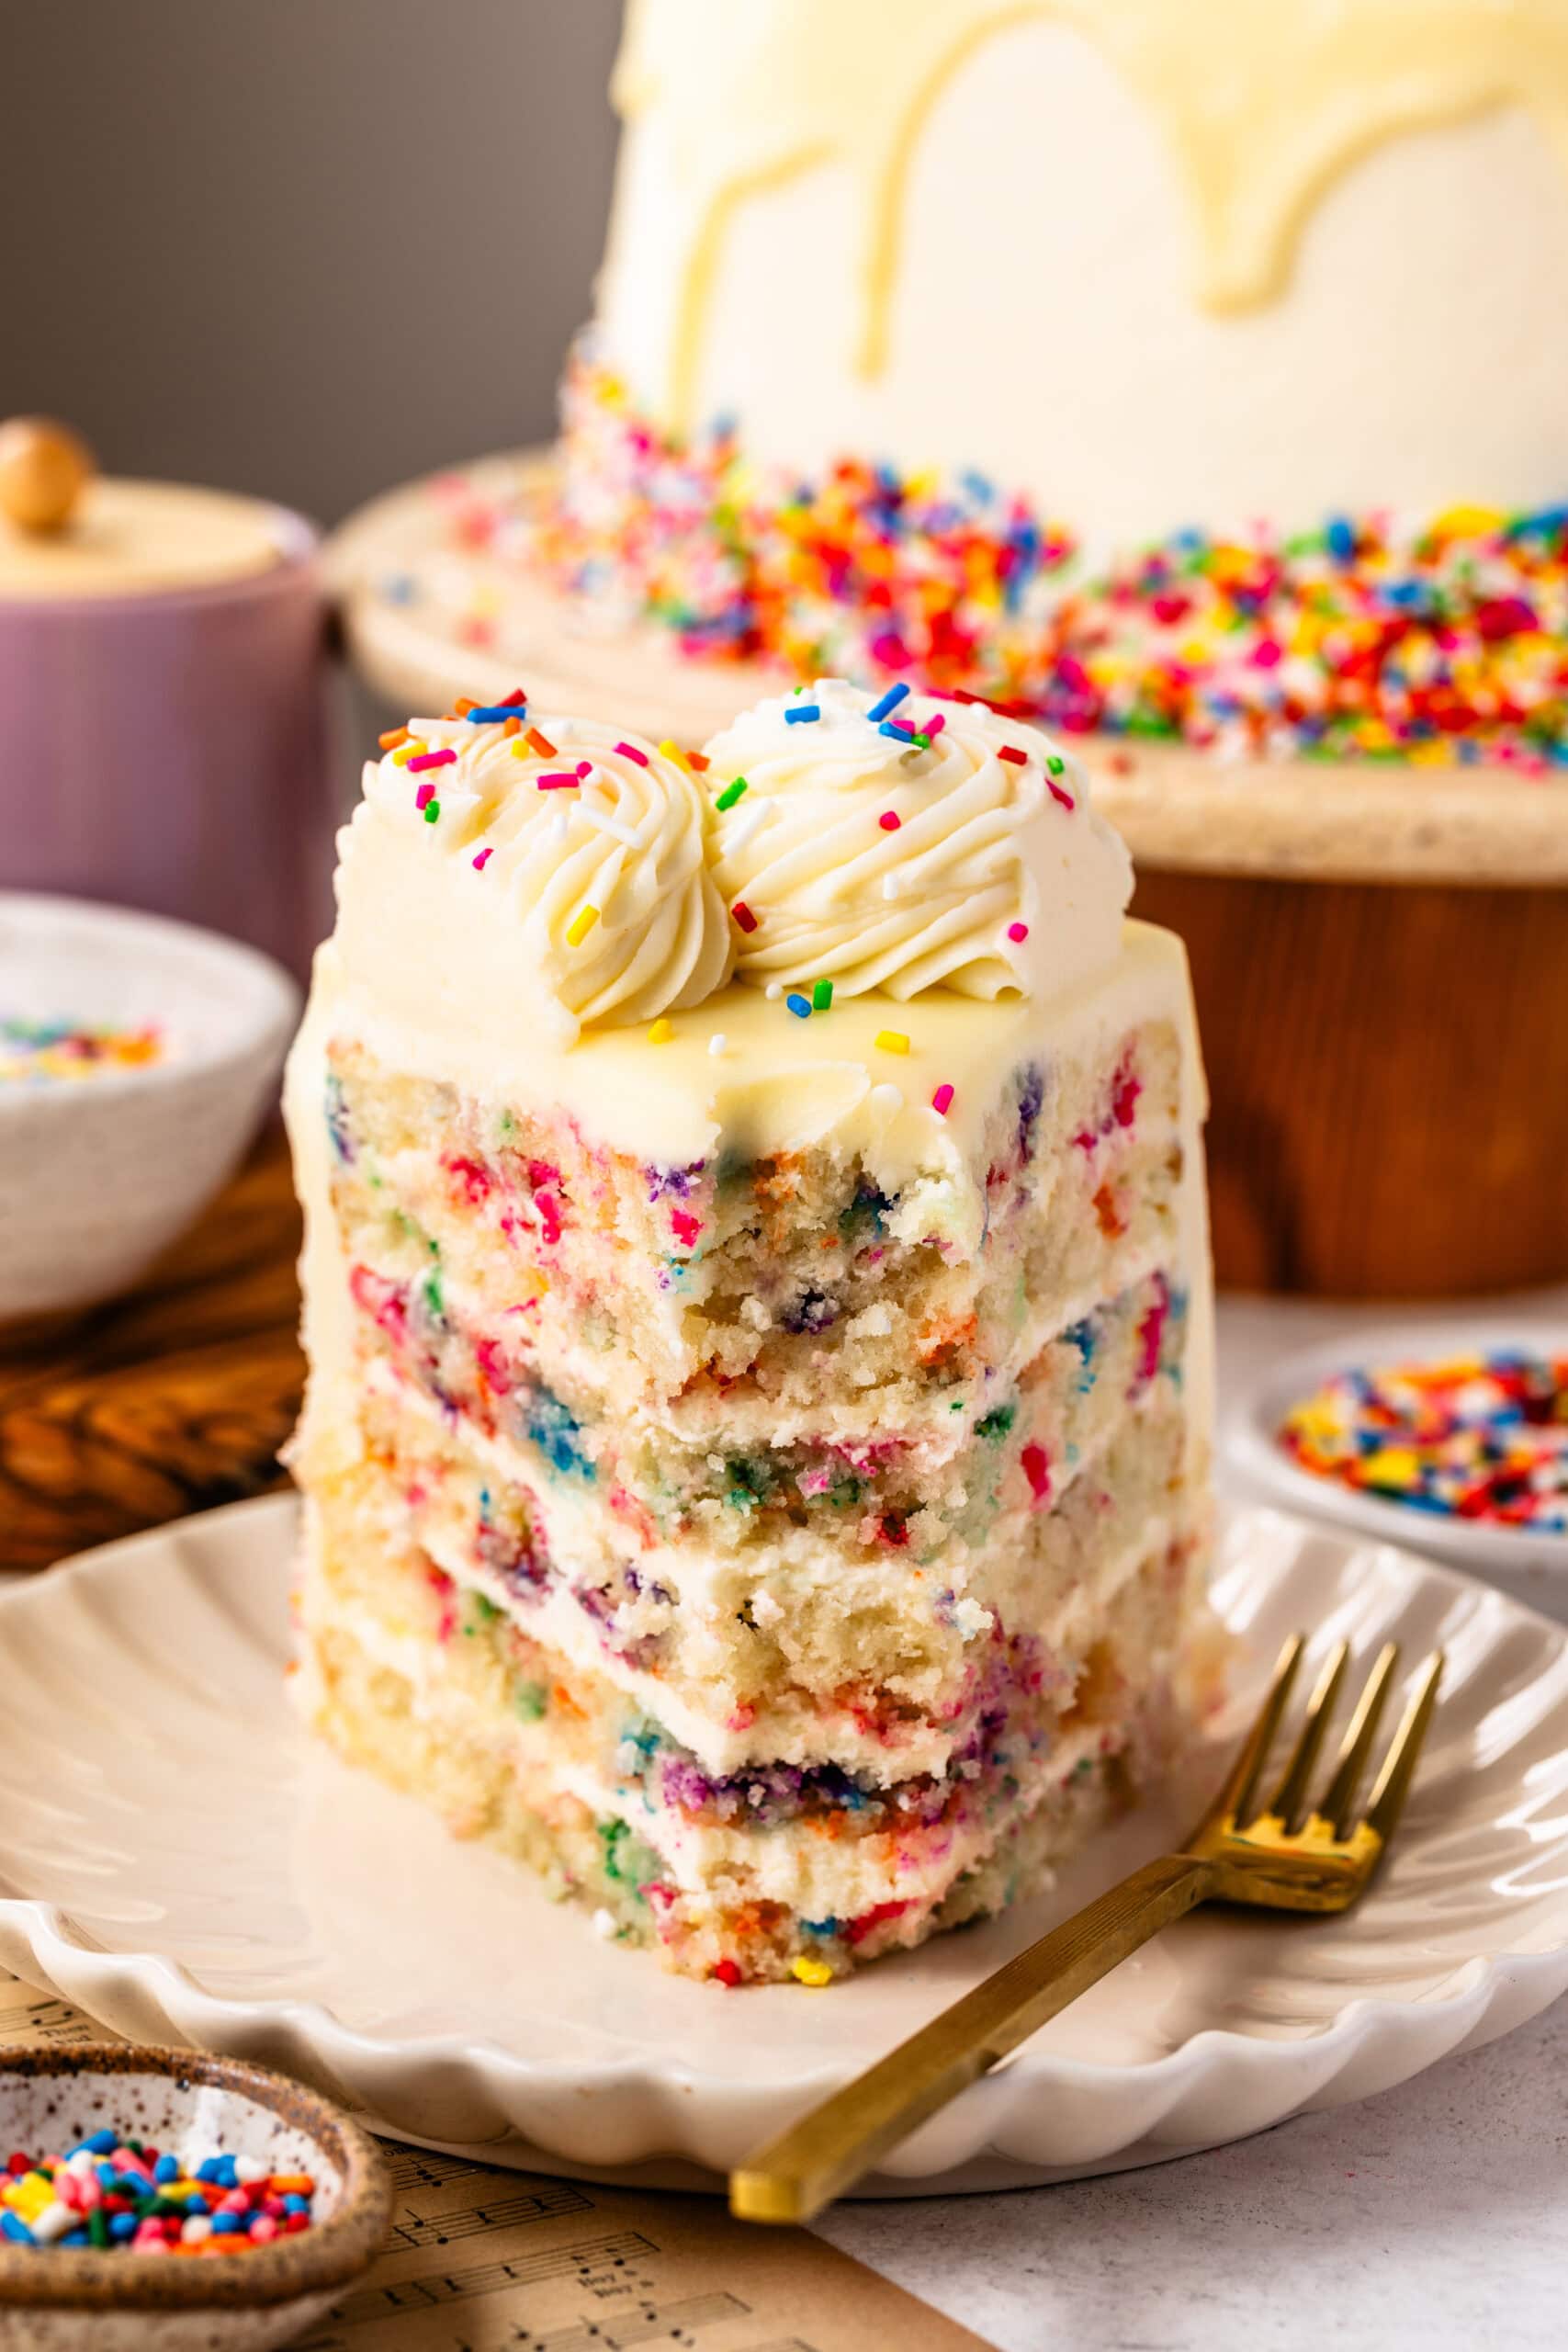
Now, to form the layers. I want this cake to be 6 layers, so once the cake layers are completely cool, I slice them in half horizontally. Or you can leave them as 3 layers.
I place one layer on the cake board, brush the simple syrup, then spread frosting on top, and repeat with the remaining layers.
Then I apply a thin crumb coat all over the cake and chill it for 20 to 30 minutes so everything sets.
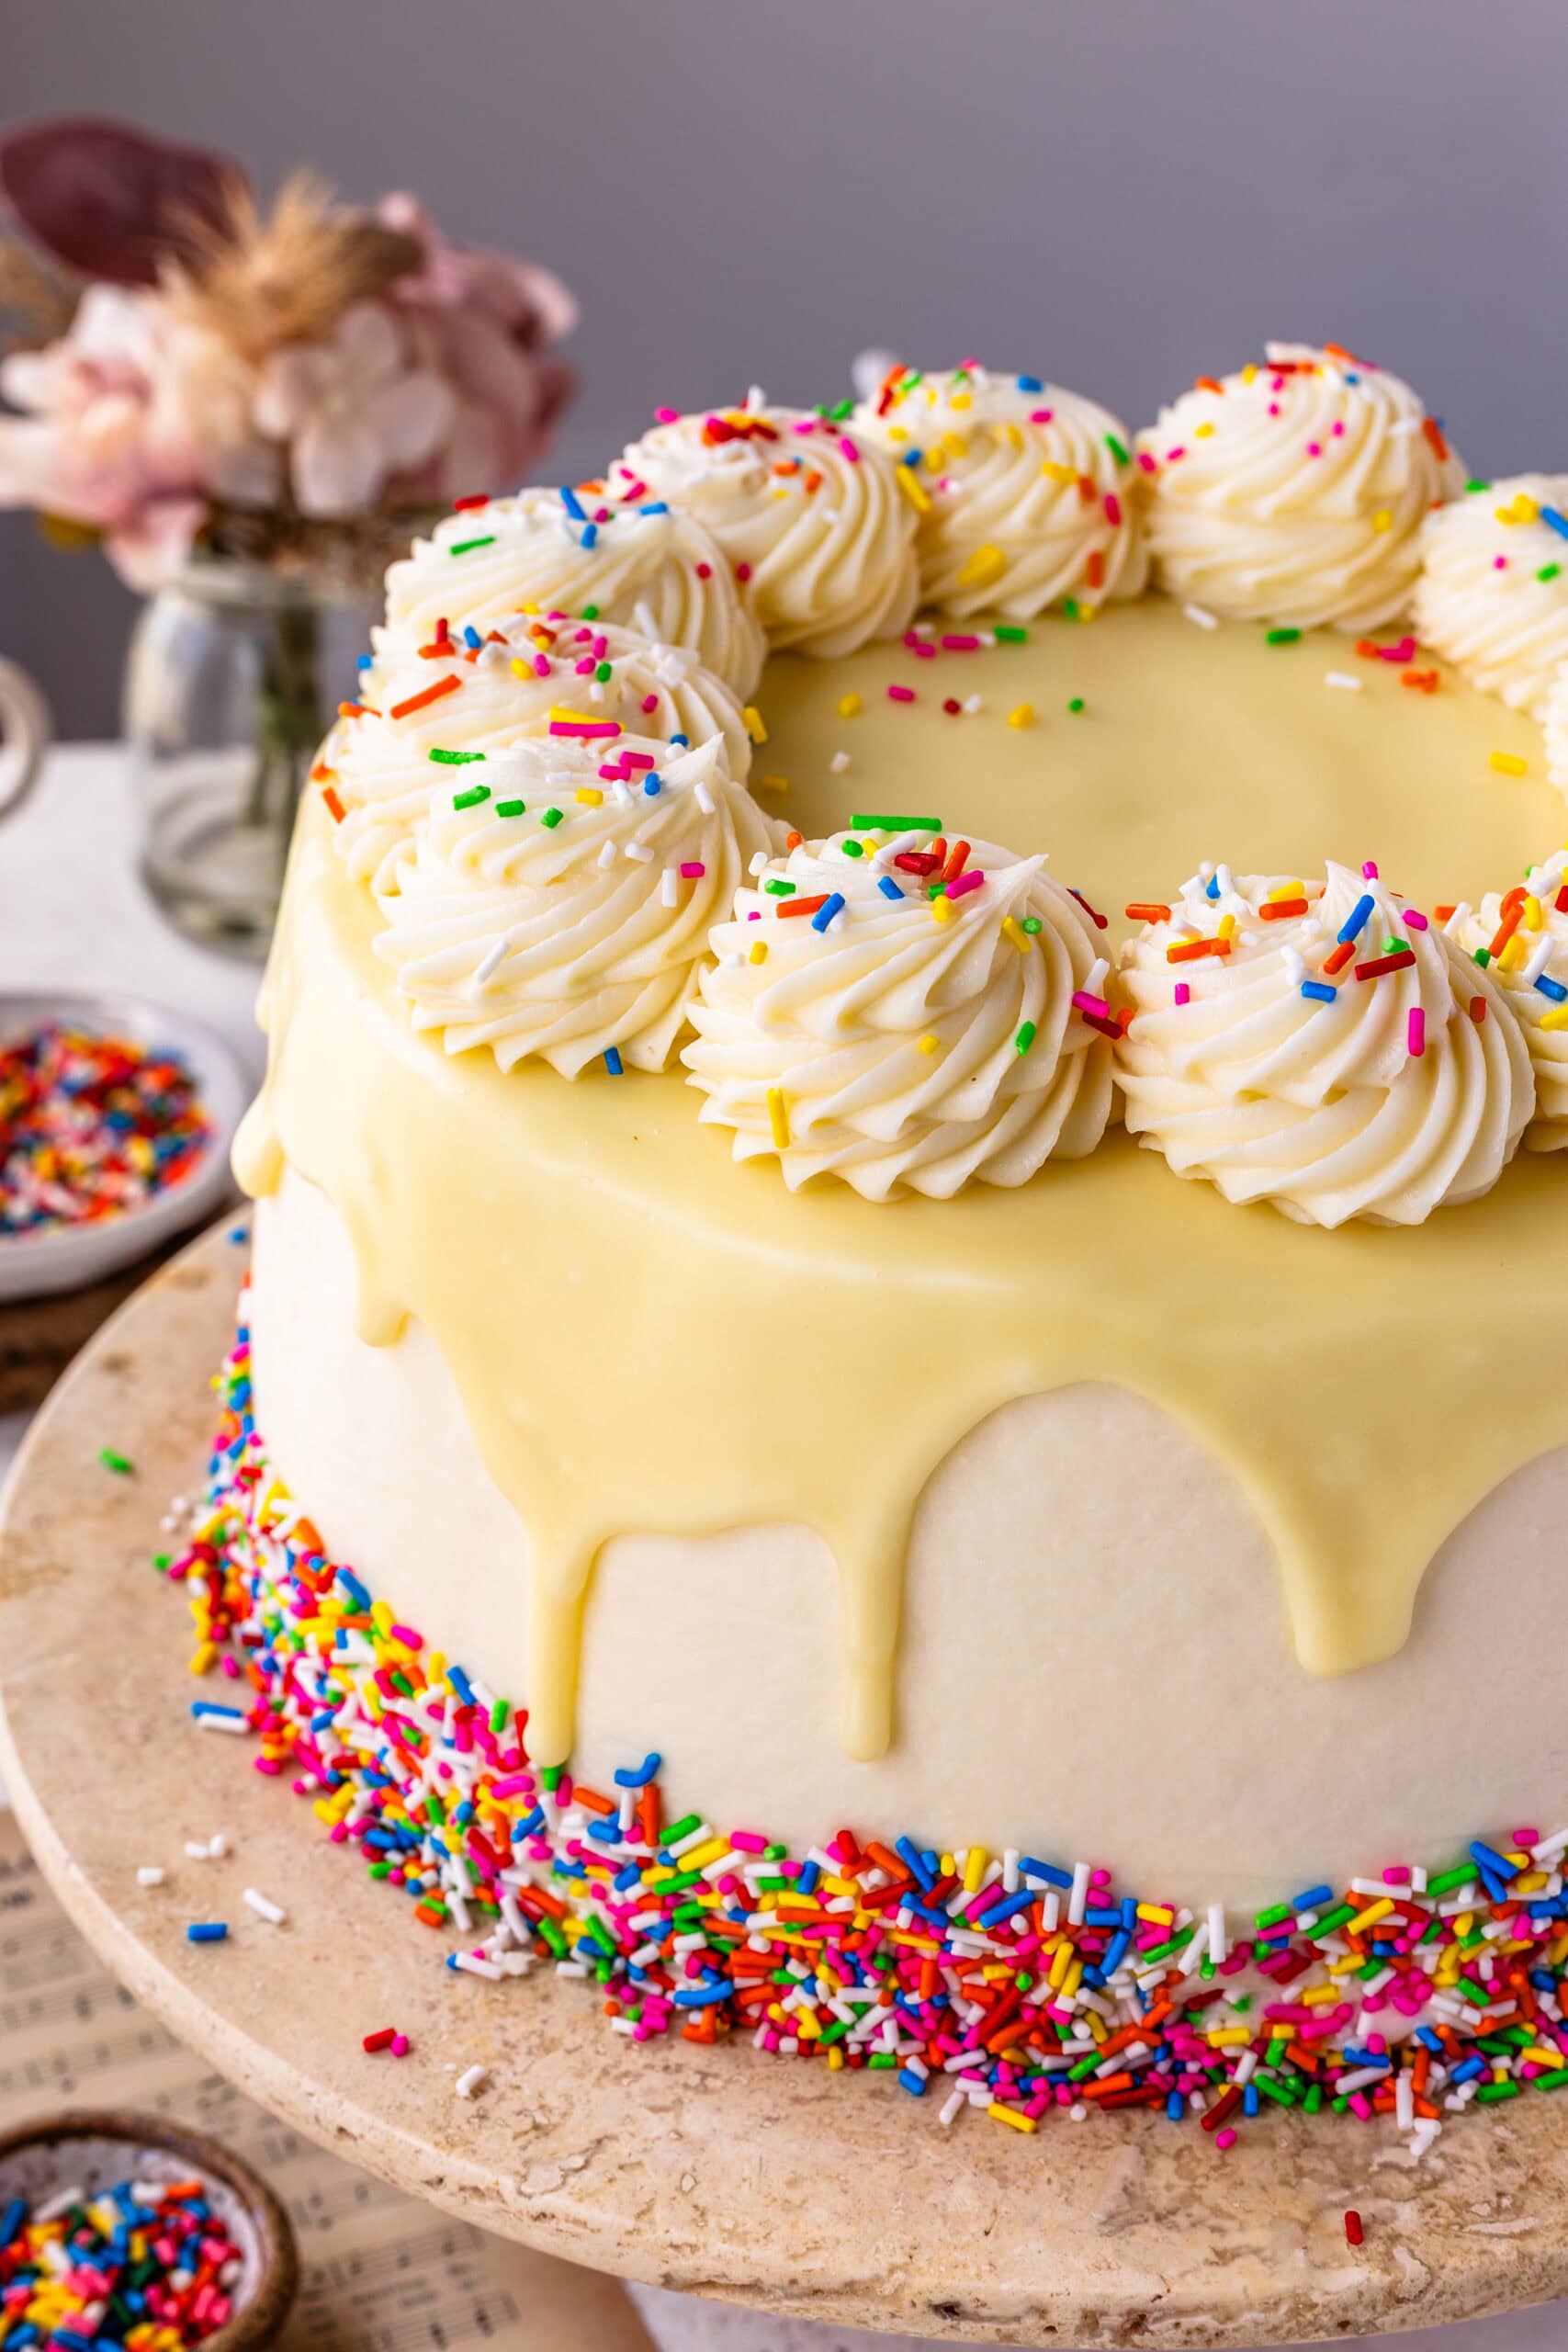
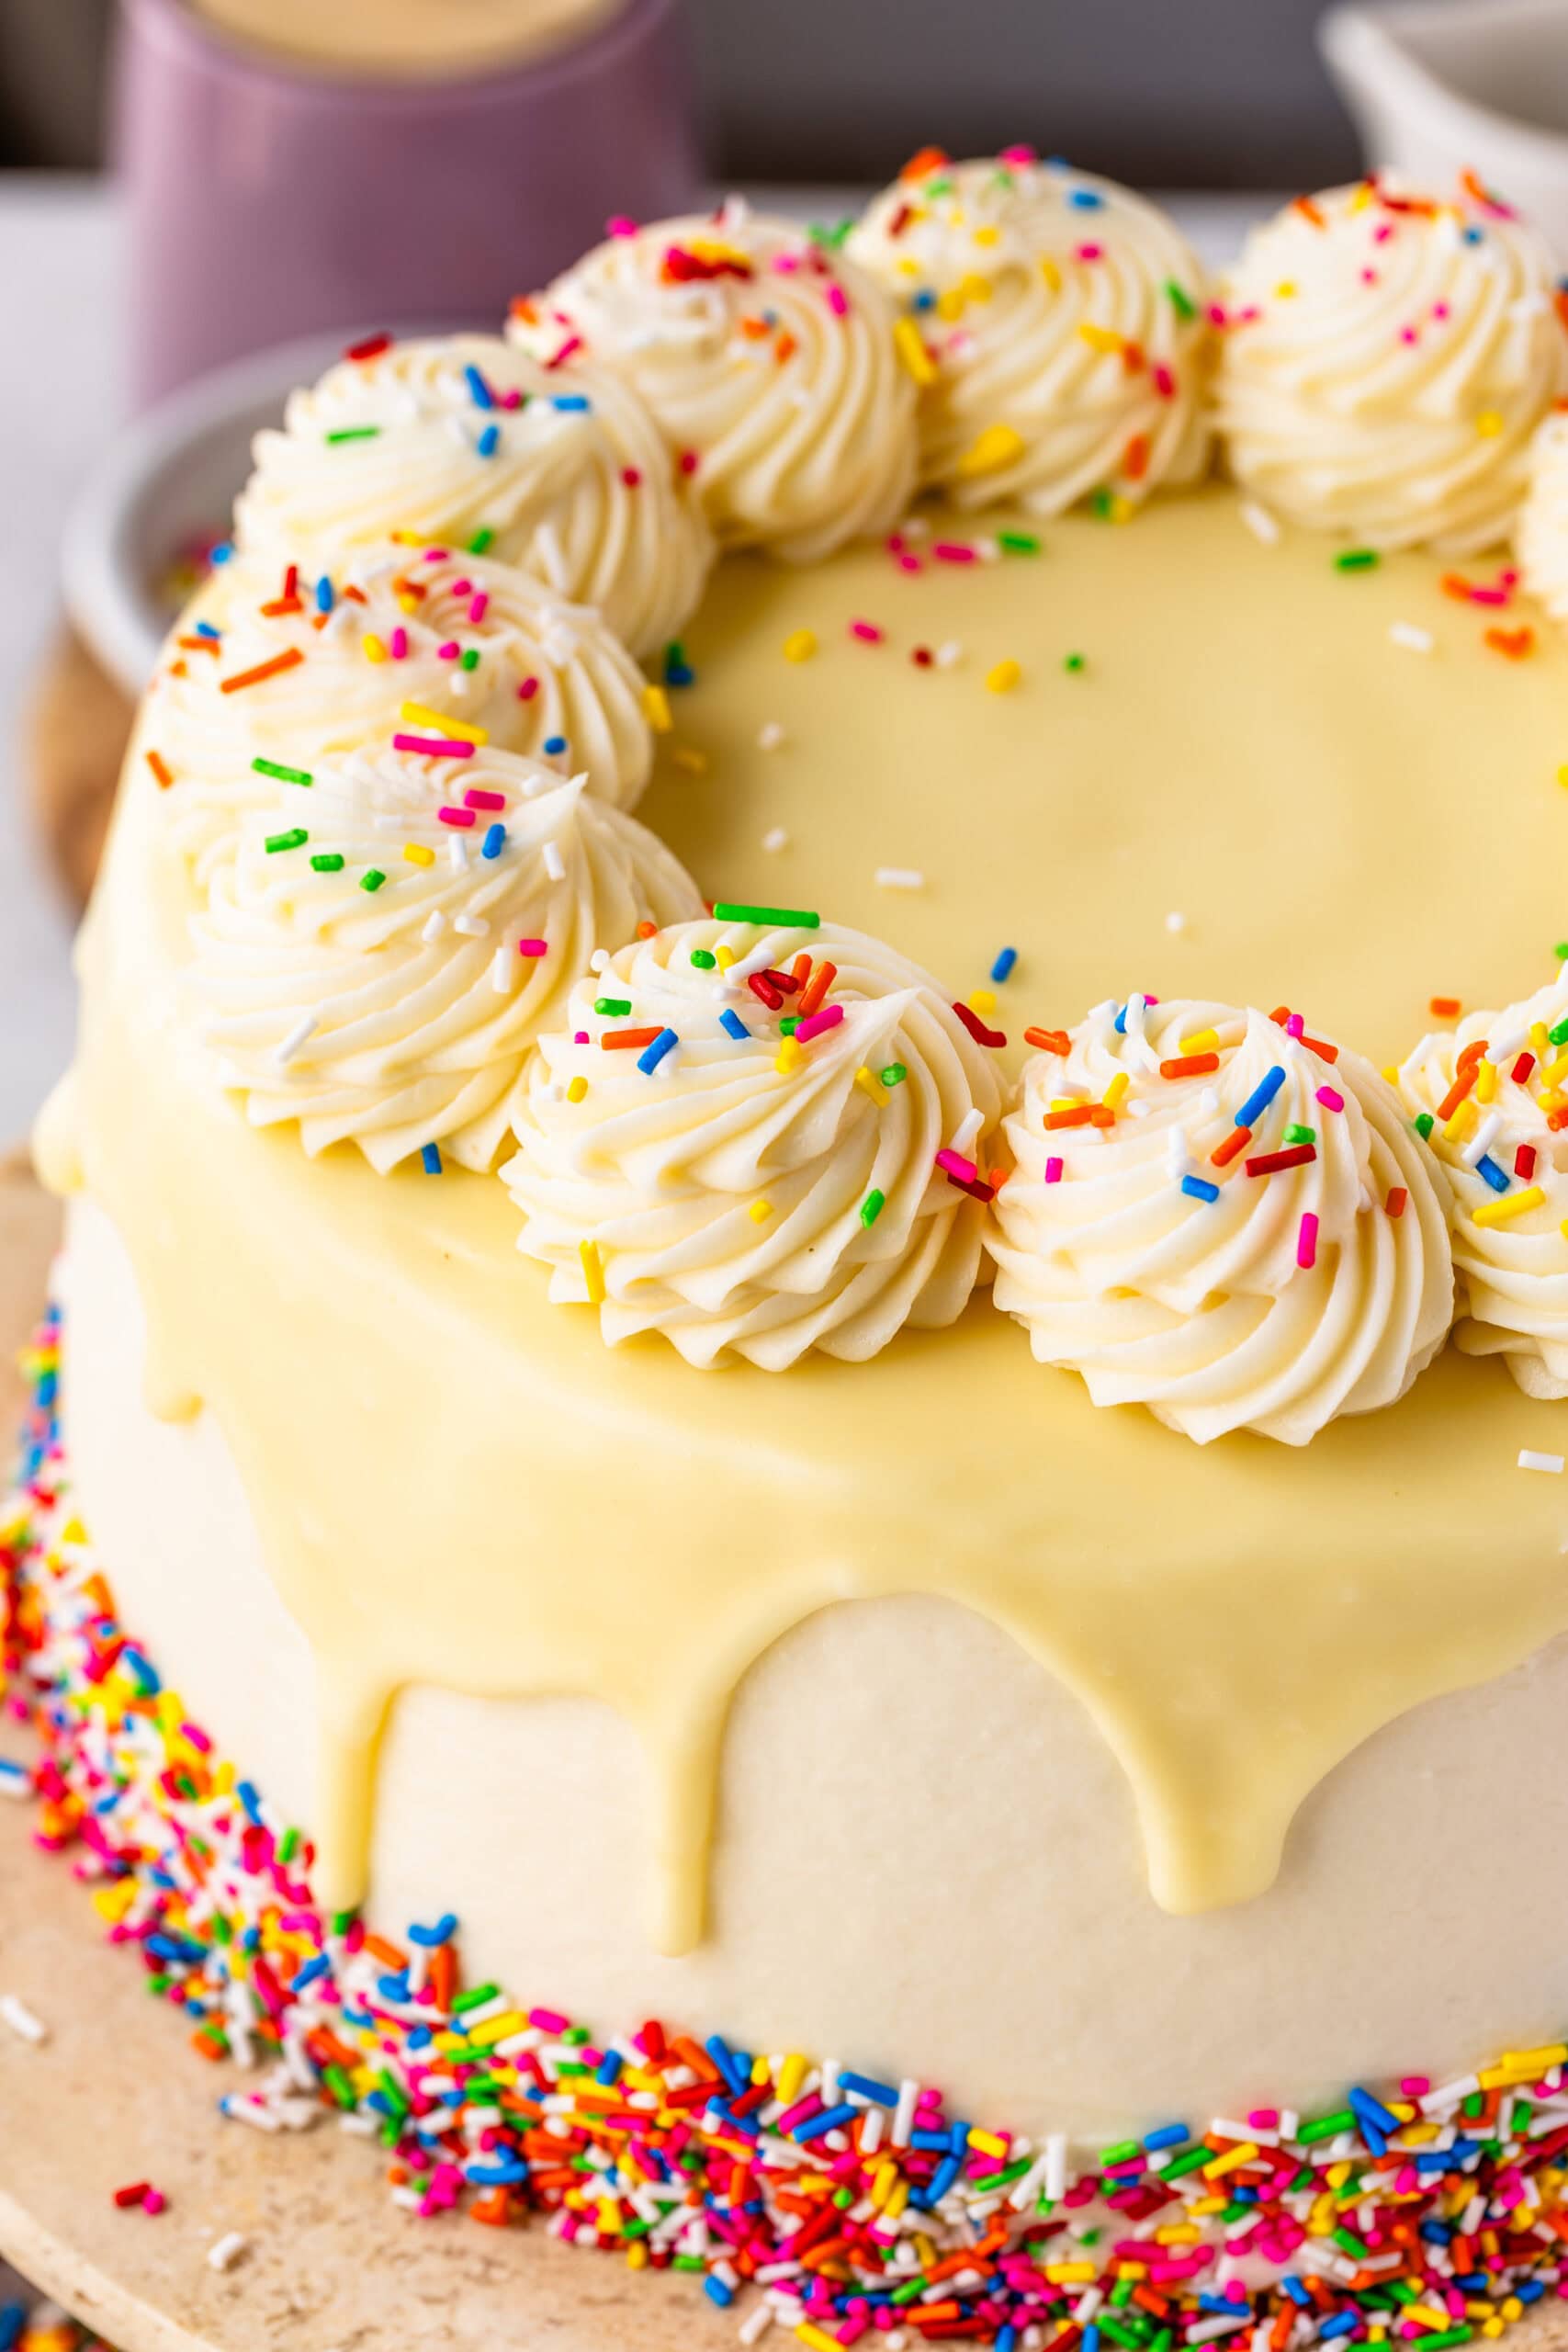
After that, I add the final coat of frosting and smooth the top and sides. I like to press sprinkles around the bottom edge before chilling it again for another 20 to 30 minutes.

Step 11: Make the ganache and finish
Heat the cream until hot, either in the microwave or on the stove. Then pour it over the white chocolate in a bowl. After letting it sit for a minute, stir until smooth. If needed, I microwave it in very short intervals, stirring in between. Let cool for about 15 minutes, until it thickens slightly but is still pourable.
To finish the cake, pour the ganache over the top and let it drip naturally down the sides. Then I usually chill the cake for 15 to 20 minutes to set the ganache.
Finally, I pipe swirls with the remaining frosting and finish with more sprinkles on top! Now it’s ready for a birthday surprise!
Baking Tips
A few things matter more than they seem…
- Use jimmies, not nonpareils: This is the biggest one. Nonpareils bleed and ruin the texture.
- Don’t overmix the batter: This is what keeps the crumb soft.
- Fold the egg whites gently: That air is what gives you a light cake.
- Use simple syrup if you want a softer result: I almost always do. I use this method in all my bundt cakes and so many other cakes!
Storage / Make Ahead
I store this cake in the fridge for up to 4–5 days, especially if using a cream-based frosting. Before serving, I let it sit at room temperature for about 20–30 minutes so the texture softens.
You can also freeze the layers ahead of time and assemble later.
Variations I sometimes make
- Skip the 6-layer version and make it a simple 3-layer cake
- Add a cheesecake layer if I want something more indulgent or just try my Funfetti Cheesecake
- Use a whipped cream frosting instead of a heavier buttercream. Or make it chocolatey with chocolate frosting.
- Keep it minimal and finish with just a light sprinkle coating.
- Turn it into an ice cream cake using this recipe!
FAQ
This usually comes down to the type of sprinkles. Nonpareils (the tiny balls) dissolve as soon as they hit moisture, which causes the color to bleed into the batter. I always use jimmies for this reason—they hold their shape and keep the cake looking clean. Also, fold them in gently at the very end to avoid overmixing the color.
Yes, and I actually prefer it that way. You can bake the layers a day ahead, wrap them well, and assemble the next day. The cake slices cleaner once it’s had time to rest, and the texture stays soft. If fully assembled, just keep it in the fridge and bring it to room temperature before serving so the frosting softens.
It’s optional, but I almost always use it—especially for layered cakes like this. It adds moisture and helps the cake stay soft even after refrigeration. If you skip it, the cake will still be good, just slightly less tender. It’s a small step that makes a noticeable difference.
Yes, this batter works well for cupcakes. Just skip whipping the egg whites separately if you want to simplify (they’ll still be good, just slightly less airy), and bake for about 15–18 minutes. Keep an eye on them—they bake faster than full cake layers.
More Birthday Recipes
If you’re planning a birthday and want a few options, I always like to have a couple different styles to choose from. A funfetti ice cream cake is great if you want something a little more playful and cold, while a classic chocolate birthday cake is always a safe, crowd-pleasing choice. If you’re leaning more fruit-forward, an almond raspberry cake feels a bit more elevated but still celebratory. And if you want something simple but just as satisfying, a vanilla cupcake with frosting and sprinkles is hard to beat—especially for smaller gatherings or when you don’t want to deal with slicing a full cake.
If you make this cake, I’d love to hear how it turns out. Feel free to leave a comment or tag me if you share it—I always enjoy seeing your versions.
Funfetti Cake
Ingredients
- 2½ cups all-purpose flour 300g
- 2 tsp baking powder
- ½ tsp baking soda
- ½ tsp salt
- 10 tbsp unsalted butter 142g
- 1⅓ cups granulated sugar 260g
- ⅓ cup sour cream 80g
- ¾ cup buttermilk 180ml
- 2 tsp vanilla extract
- 5 large egg whites
- ¾ cup rainbow sprinkles (jimmies) 120g
Cream Cheese Vanilla Frosting
- 2 cups cream cheese 450g
- 1½ cups butter 340g
- 7½ cups powdered sugar 937g
- 2½ tbsp heavy cream 37 ml
- 2½ tsp vanilla extract
White Chocolate Ganache
- 4 oz white chocolate, finely chopped 170g
- 65 g heavy cream
Instructions
Funfetti Cake Layers
- Preheat the oven to 350°F (175°C).
- Prepare three 8-inch round cake pans by greasing them with butter or oil, then line the bottoms with parchment paper. Lightly grease the parchment as well.
- In a medium bowl, whisk together the flour, baking powder, baking soda, and salt. Set aside.
- In a large bowl, beat the butter for thirty seconds. Add the sugar and beat on medium speed for 2-3 minutes, until light and fluffy.
- Add the sour cream and mix to combine. Then mix in the vanilla extract.
- Add one third of the dry ingredient mixture to the bowl. Stir to combine.
- Add half of the buttermilk. Stir. Follow with another third of the dry ingredient mixture. Mix. Scrape the sides of the bowl.
- Add the remaining buttermilk, and mix to combine.
- Add the rest of the dry ingredients and stir.
- Set the batter aside.
- In a separate bowl, whip the egg whites with clean beaters, until the egg whites reach stiff peaks, which can take 3 to 4 minutes. If you flip the bowl over, the whites shouldn’t slide off.
- Once they achieve this stage, stop whipping.
- Add one third of the whipped whites to the bowl. Fold gently.
- Follow with another third of whipped whites. Fold.
- Add the remaining whites and fold.
- Finish by adding the sprinkles, then gently fold in them using a spatula.
- Divide the batter evenly between the three prepared pans and smooth the tops.
- Alternatively, you can divide the batter between six pans if you prefer thinner layers and want to skip slicing later. If using three pans, you can slice each cake in half once cooled to create a 6-layer cake. Or, keep them whole for a classic 3-layer cake.
- If you don’t have six pans, it’s perfectly fine to let the remaining batter rest, covered, at room temperature while the first layers bake.
Bake
- Bake for 18–22 minutes, or until the tops spring back lightly and a toothpick inserted in the center comes out clean or with a few crumbs.
- Let the cakes cool in the pans for 10–15 minutes, then turn them out onto a wire rack, peel off the parchment, and allow them to cool completely before frosting.
Cream Cheese Vanilla Frosting
- If you are only making a 3-layer cake, see notes below. If you are making 6-layers, continue as below.
- ln a large bowl, beat the butter for one minute. Add the cream cheese and beat for about 2–3 minutes, until smooth and creamy.
- Add the powdered sugar gradually, about 1–2 cups at a time, mixing on low speed to avoid a sugar cloud. Once incorporated, increase speed to medium and beat until smooth.
- Pour in the heavy cream and vanilla extract, and beat for another 1–2 minutes, until light, fluffy, and spreadable.
- If needed, adjust the consistency: Add a bit more cream (1 tbsp at a time) for a softer frosting. Or add more powdered sugar for a thicker frosting.
- Use immediately or store covered in the refrigerator. Before using, let it sit at room temperature and rewhip until smooth.
Assembly
- If you want the cake to be extra moist, make a simple syrup with equal parts sugar and water on the stove. Once the sugar dissolves, it's ready. This step is optional.
- Once the cake layers have cooled completely, you can slice each layer in half horizontally if you baked three layers and want a 6-layer cake. Otherwise, keep them as is for a 3-layer cake.
- Place one cake layer on your serving plate or cake board. Brush with simple syrup. Spread a layer of frosting on top, using an offset spatula. The frosting can be as thick as the cake layer or slightly thinner.
- Top with another cake layer and repeat, stacking and frosting each layer until all layers are assembled.
- Apply a thin crumb coat (a light layer of frosting all over the cake to trap crumbs). Smooth it out as evenly as possible, then refrigerate the cake for about 20–30 minutes until the frosting is set.
- Remove the cake from the fridge and apply a thicker, final coat of frosting, smoothing the sides and top.
- Press handfuls of sprinkles to the sides of the cake along the bottom.
- Return the cake to the fridge for another 20–30 minutes to firm up.
White Chocolate Ganache
- Heat the heavy cream until hot. Pour over white chocolate in a bowl.
- Let sit 1 minute, then stir until smooth. If it’s not melting completely, place in the microwave for 5 to 10 second intervals, stirring in between until completely melted.
- Cool until slightly thickened but still pourable. It usually takes me about 15 minutes of cooling to achieve a nice pouring consistency.
- If the ganache gets too thick, microwave for literally three to five second intervals, stirring in between.
- Pour the ganache over the top of the cake, letting it drip naturally down the sides. You can use an offset spatula or spoon to drag the ganache to the edges.
- Place the cake back in the fridge for about 15–20 minutes to set the ganache.
- Transfer the remaining frosting to a piping bag fitted with a 4B tip, and pipe swirls on top of the cake.
- Finish with a generous sprinkle of funfetti sprinkles over the top.
Camila,
Em relação ao óleo: 200ml, 200 gr? Ou 1/2 xícara? Porque meia xícara dá bem menos do que 200 gr. Qual usar? Achei muito óleo e pensei que talvez seja erro de digitação. Quero muito fazer mas estou com esta dúvida!
Obrigada!
Esta certa! Foi um erro! 120 ml, 1/2 xicara mesmo. Essa receita esta sendo atualizada esse fim de semana por uma bem melhor. Desculpe!
Obrigada , Camila!!! 🌷
I am going to attempt to make this beautiful cake for my daughter for her birthday. I just have a silly question i think. For the amounts of each ingredient, is it either or? for example: 56 grams unsalted butter room temperature (1/4 cup, 2 oz). Does this mean i need 56 grams of butter which is equal to 1/4 cup? is the 2oz additional or is that the equivalent of 1/4 cup?
the coma is what is throwing me off because it seems like it is saying i need 1/4 cup plus 2 oz.
Thank you!!!
Sorry, not plus, it’s just the equivalent measurement in another unit.
Hope she loves the cake!!!
This cake is so beautiful!
Can you tell me where you purchased that beautiful cake stand?
I think tjmaxx
What a lovely birthday cake, Camila. It is almost too beautiful to be eaten. I think I would just take all the truffles and I’m done;)
ahah thats pretty much what I did!
this is seriously adorable and fun I would love to have someone make me a cake like this. As soon as I saw it , this made me smile from ear to ear.
Claudia, you’re always so sweet!
What a delicious way to celebrate! Sprinkles are always so fun and I don’t even mind if the colour of them gets in the batter – the more colour the better 😉 Hope you had a wonderful birthday, Camila 🙂
Thank you Dawn, you’re the best!!
Wow, this cake is CUTE.CUTE.CUTE. I love all the colorful sprinkles! I would love to make this for my daughter I bet she would adore it.
Thank you I am so glad you like my sprinkles cake!!
Starting August with a bang with this recipe!!!! Just subscribed to your newsletter (Don’t know why I hadn’t already?)
ohhh! maybe because my newsletter was set up wrong before!! Thank you Patrick!! Have a happy August!!
Esse é o tipo de bolo que comemos com os olhos, a dedicação nos detalhes que você tem é que faz toda diferença, parabéns por mais essa obra prima!!!!!
Muito obrigada pai! Te amo!