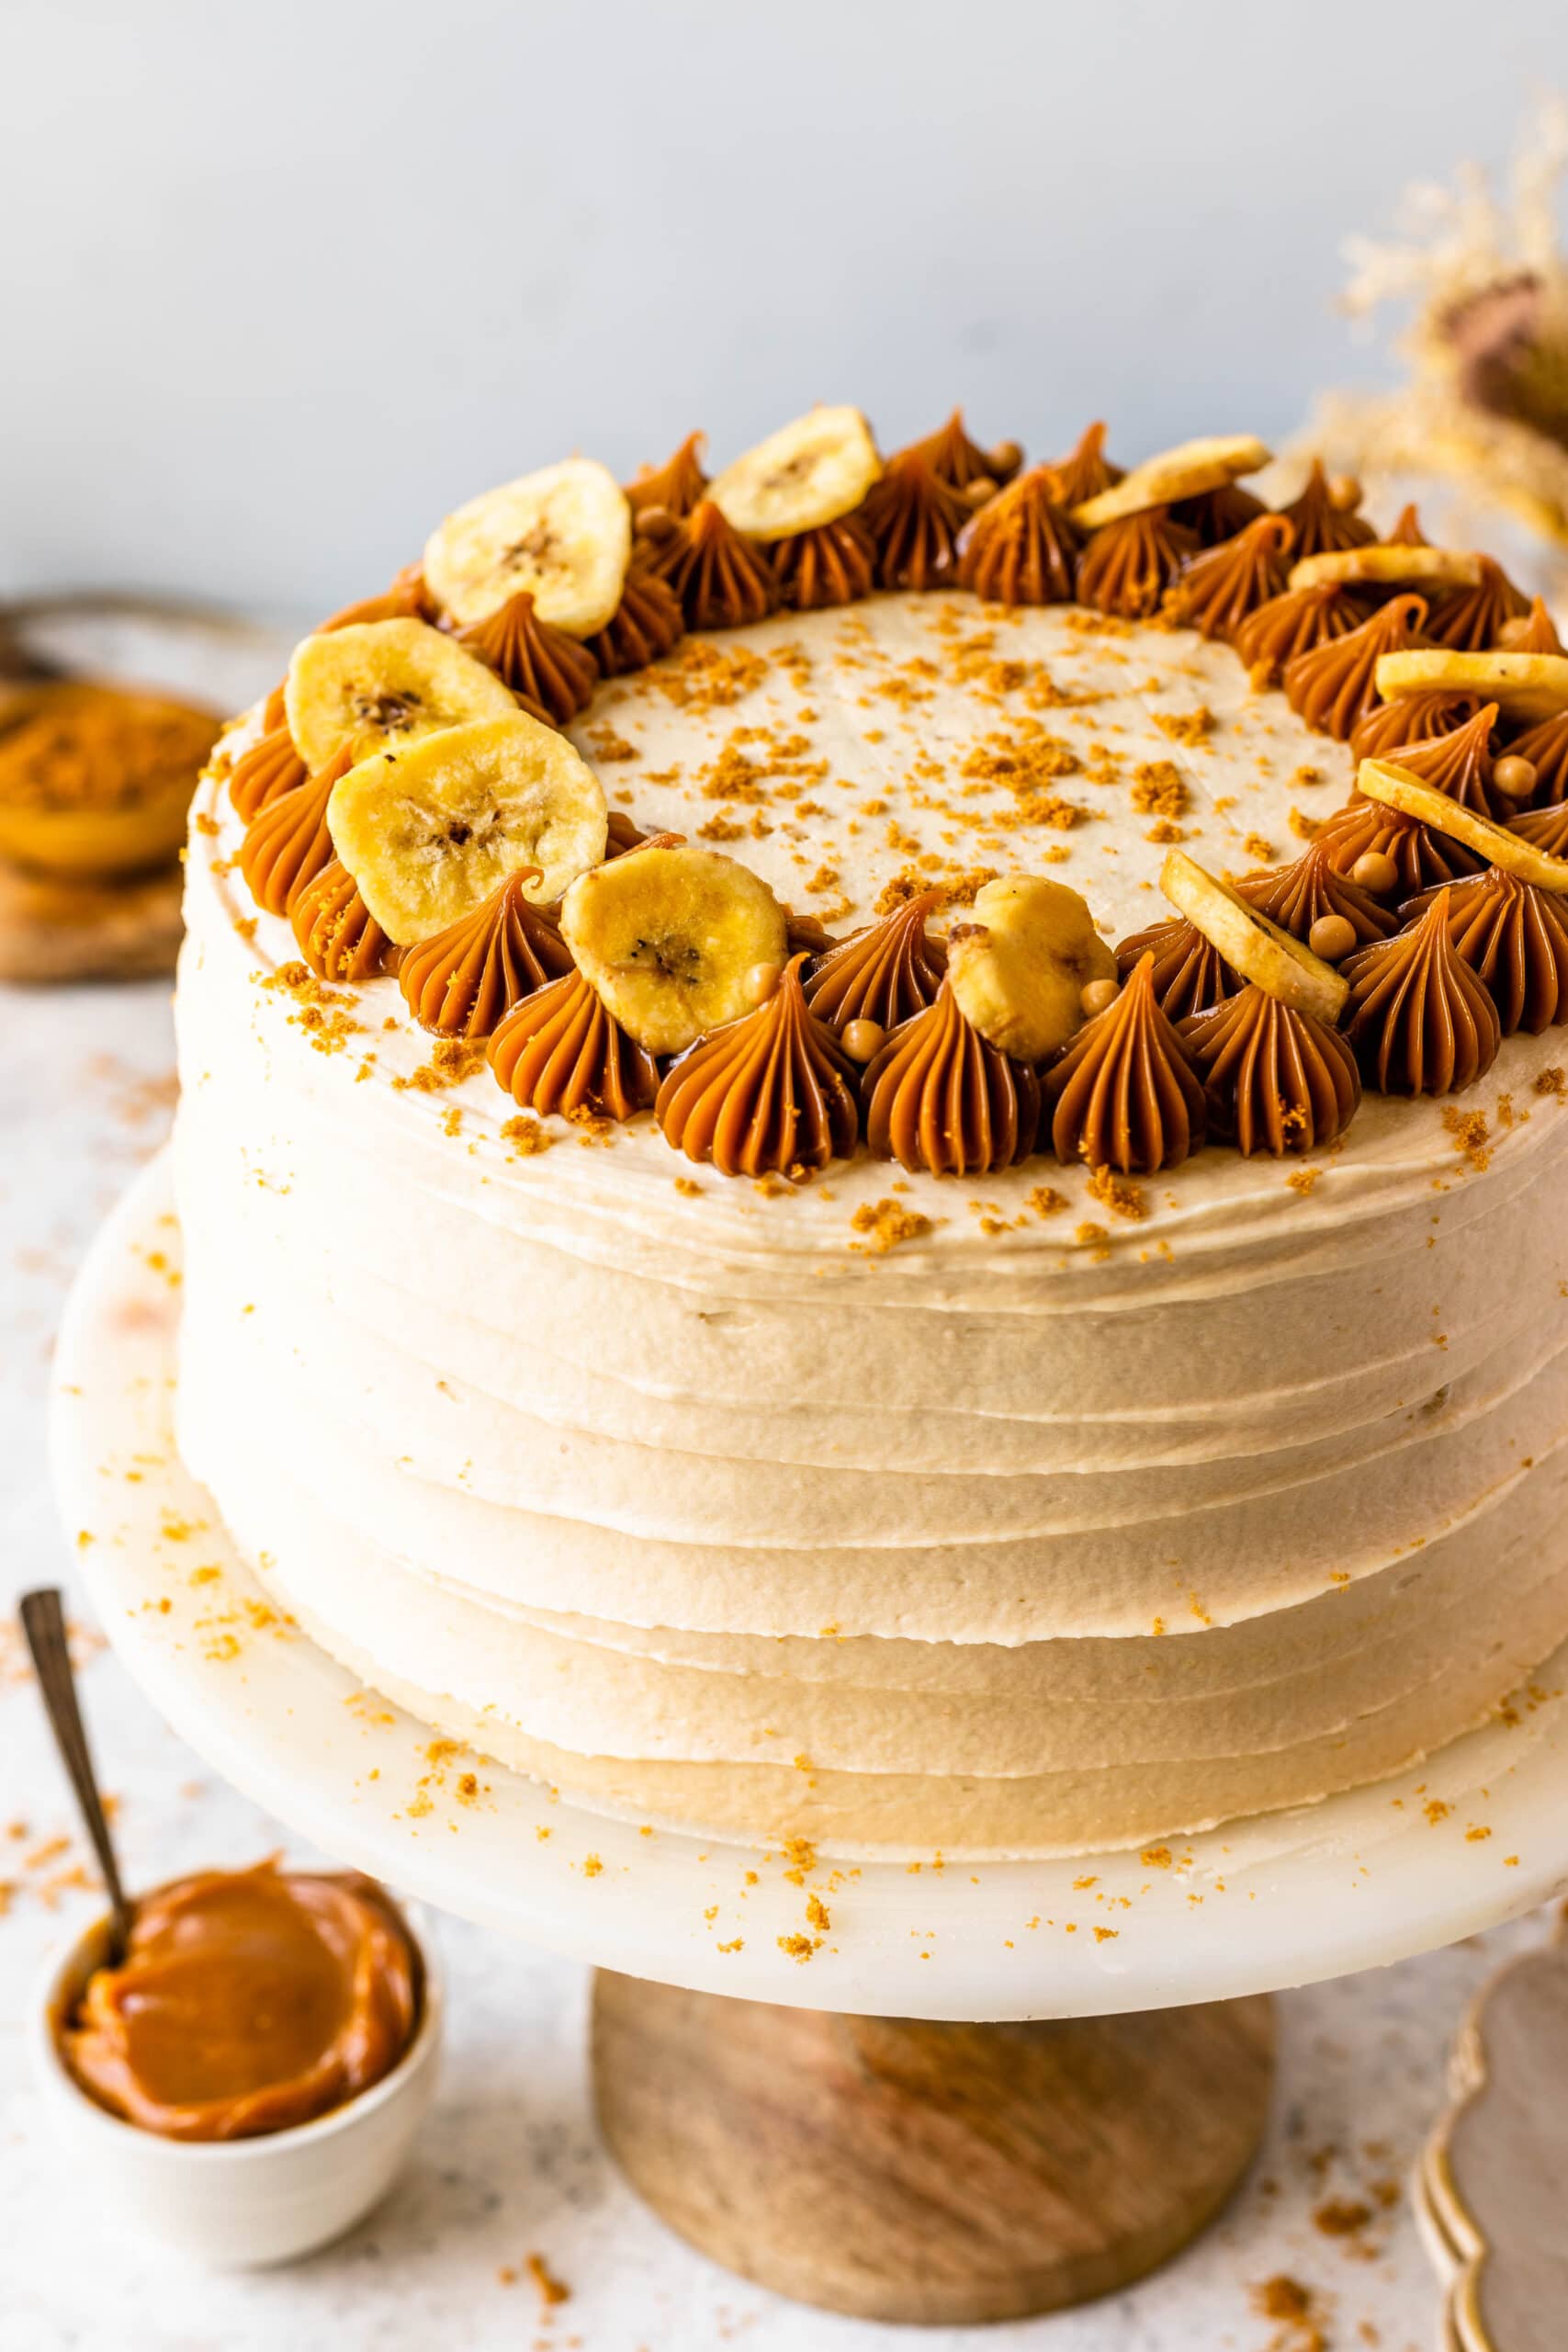
Banoffee Cake
I’ve been working on a banana cake that actually holds up as a layer cake, not just something that tastes good but falls apart when stacked. This version is soft, stable, and pairs really well with dulce de leche without getting too heavy.
It’s the kind of cake I make when I want something familiar but a little more put together than banana bread.
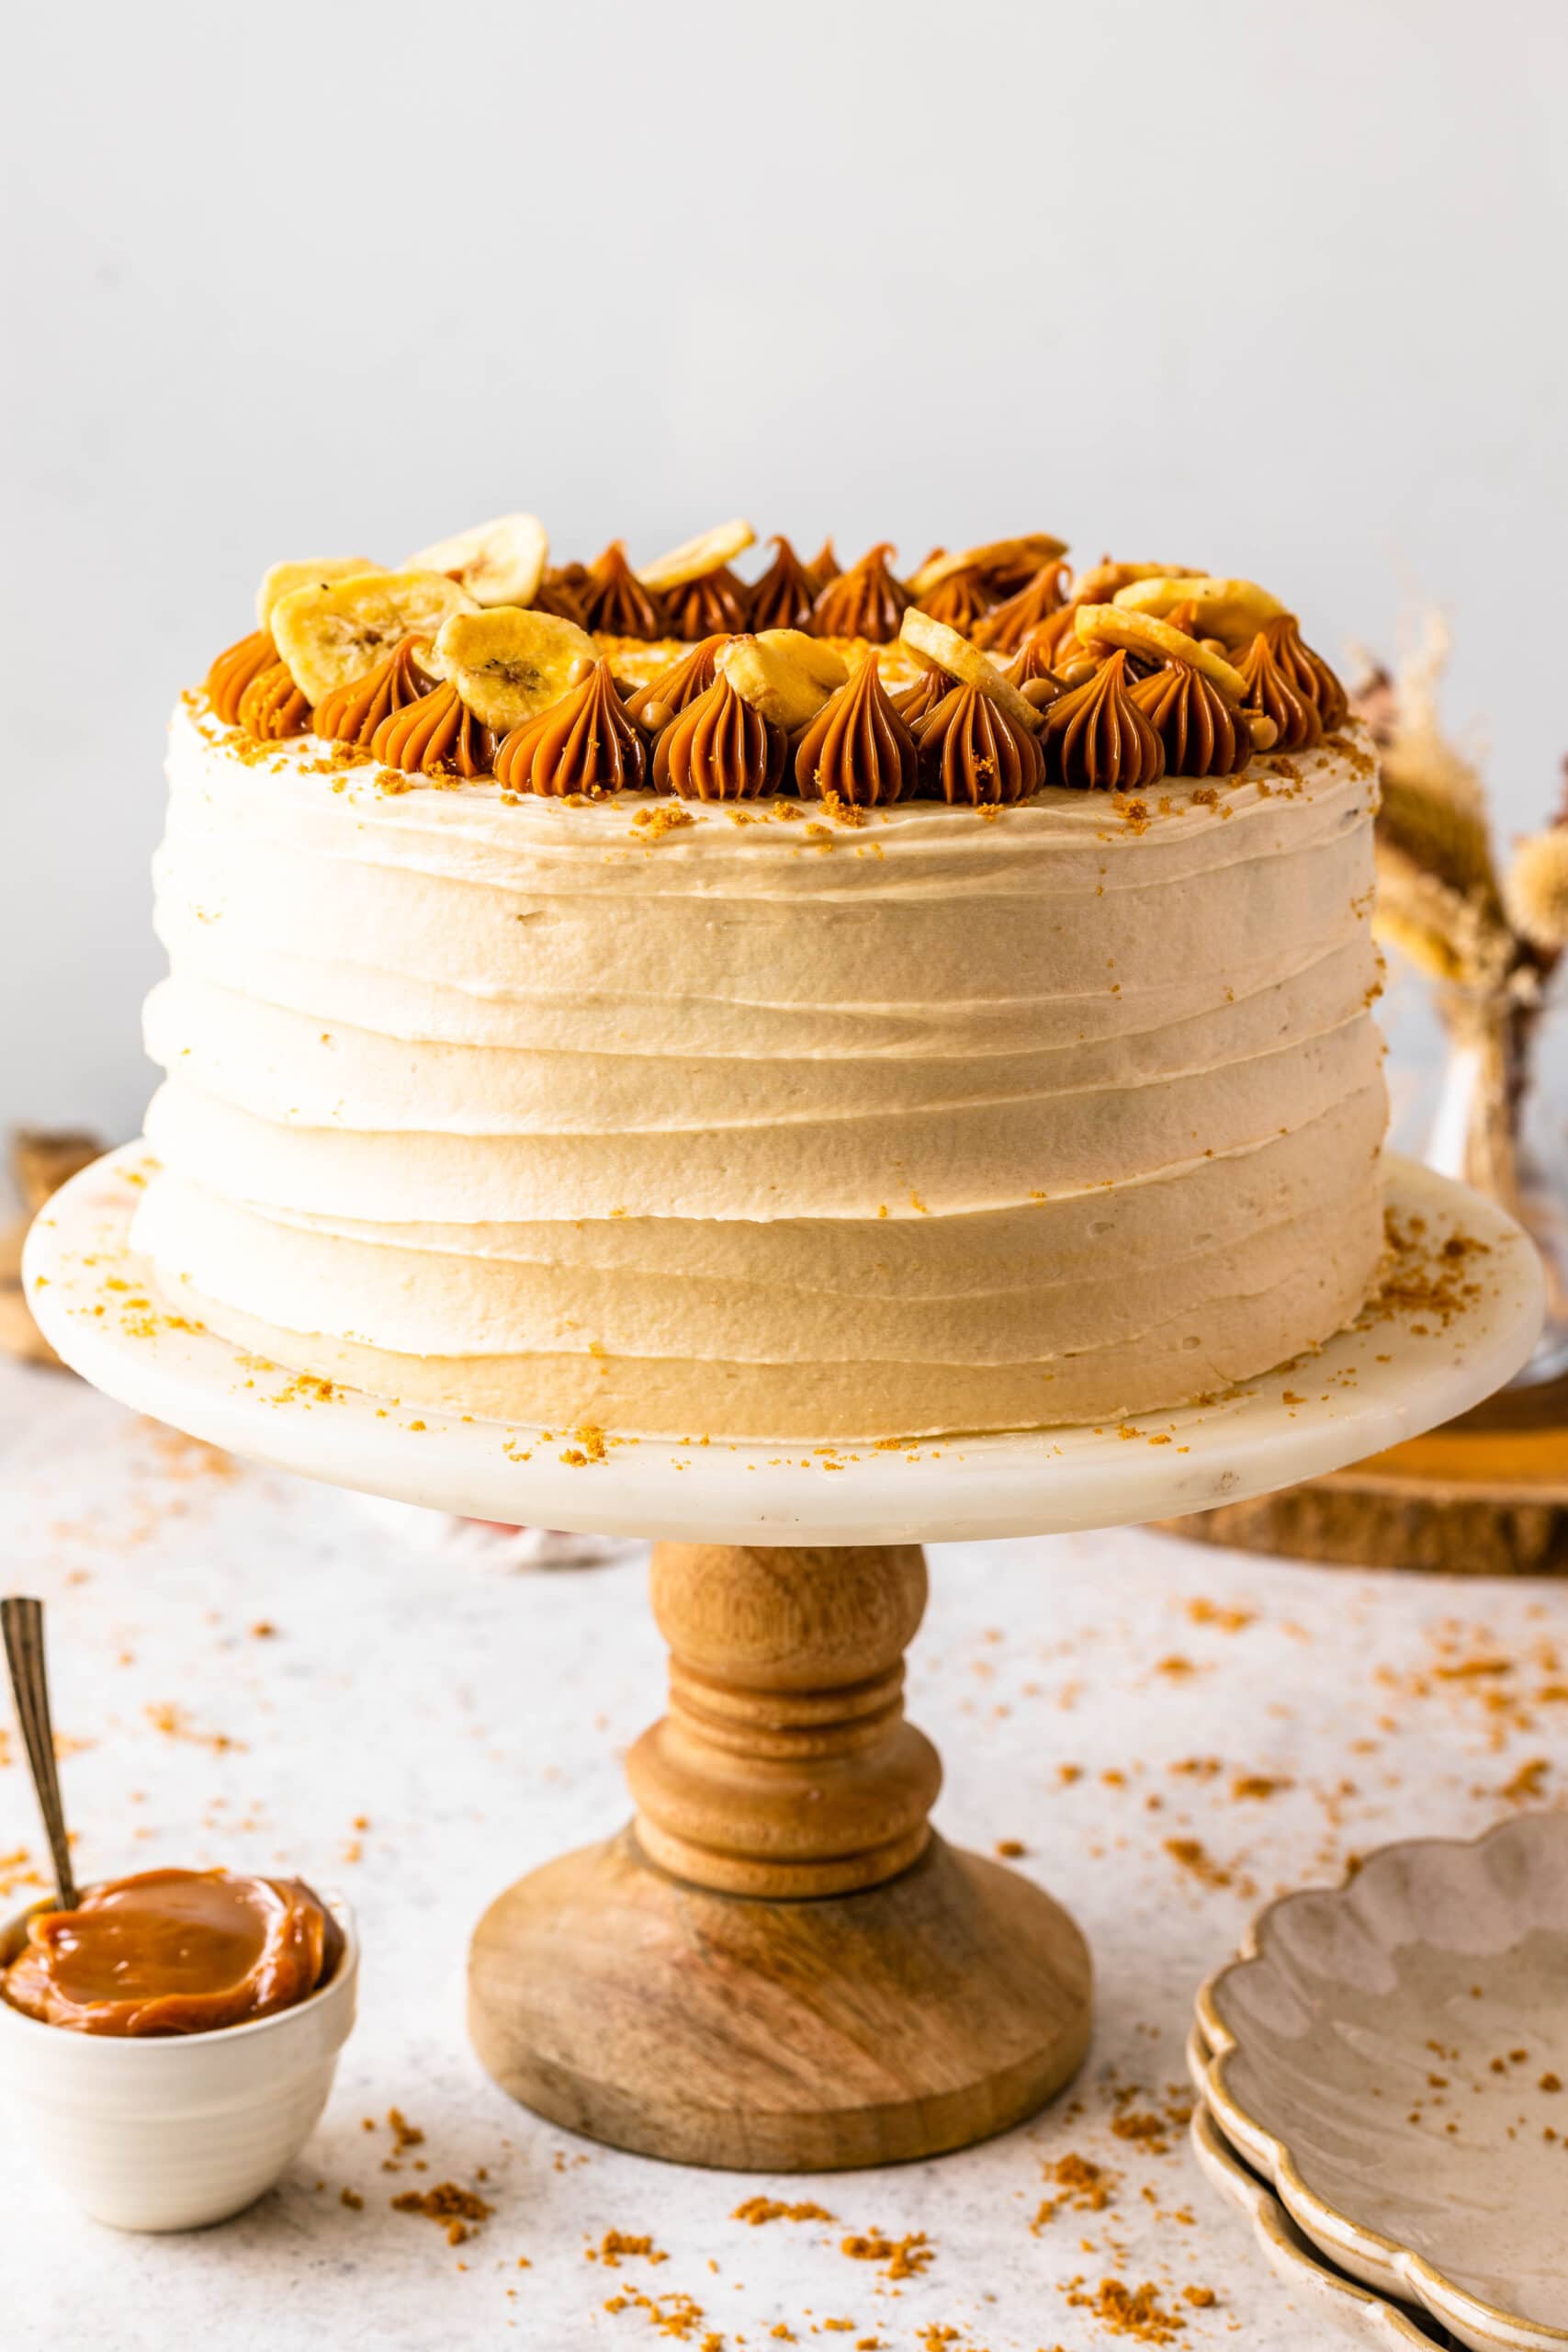
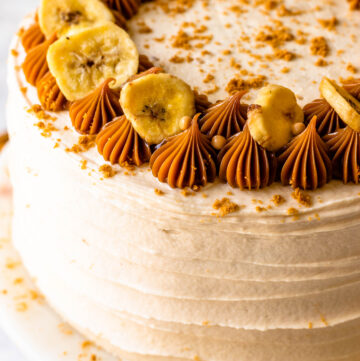
Banoffee is the mixture of banana and toffee, and it’s a heavenly combo! For the toffee part, it’s often used thick caramel, toffee sauce, or dulce de leche. Dulce de leche is my favorite, so that’s what I am using. If you like Banoffee Pie, you will definitely love this cake.
This post may contain affiliate links. I earn a commission from qualified purchases. Please read our Privacy policy here.
You’re going to love this cake because…
- The banana layers are soft but sturdy enough to stack
- Dulce de leche adds sweetness without overpowering the banana
- The cream cheese frosting balances everything with a slight tang
- It slices cleanly, even with the banana filling
- It holds up really well for making ahead
Key Ingredients & Why I Use Them
Very ripe bananas: I always wait until they’re heavily spotted. That’s where the flavor and moisture come from.
Butter + oil: I use both. Butter brings flavor, and oil keeps the crumb soft even after chilling.
Brown sugar + granulated sugar: The brown sugar adds depth and moisture, while the granulated keeps the structure lighter.
Buttermilk + sour cream: I like this combination because it keeps the cake tender without making it too delicate. I’ve tested versions with just one, and this works better.
Dulce de leche: This is the main flavor element. I use it in both the filling and frosting. If you’ve made my Dulce de Leche Chocolate Cake, it’s the same idea here.
Cream cheese frosting base: I prefer this over a traditional buttercream here. It cuts the sweetness and works better with banana.
How to Make Banoffee Cake
The full recipe is below, but here’s exactly how I make it step by step.
Step 1: Make the banana cake layers
Start by preheating the oven and preparing three 8-inch cake pans.
I mash the bananas in a small bowl first so I can see the consistency. They should be smooth but not completely liquid.
In a separate bowl, I whisk together the dry ingredients: flour, baking soda, baking powder, cinnamon, and salt.
Then I cream the butter, oil, and sugars in another bowl with a hand mixer until combined. It doesn’t need to be overly fluffy—just smooth. Add the eggs one at a time, followed by the vanilla.
Then I alternate adding the dry ingredients with the buttermilk and sour cream. I stop mixing as soon as everything is incorporated. This step matters more than it seems—overmixing will make the cake dense. Fold in the mashed bananas at the end.
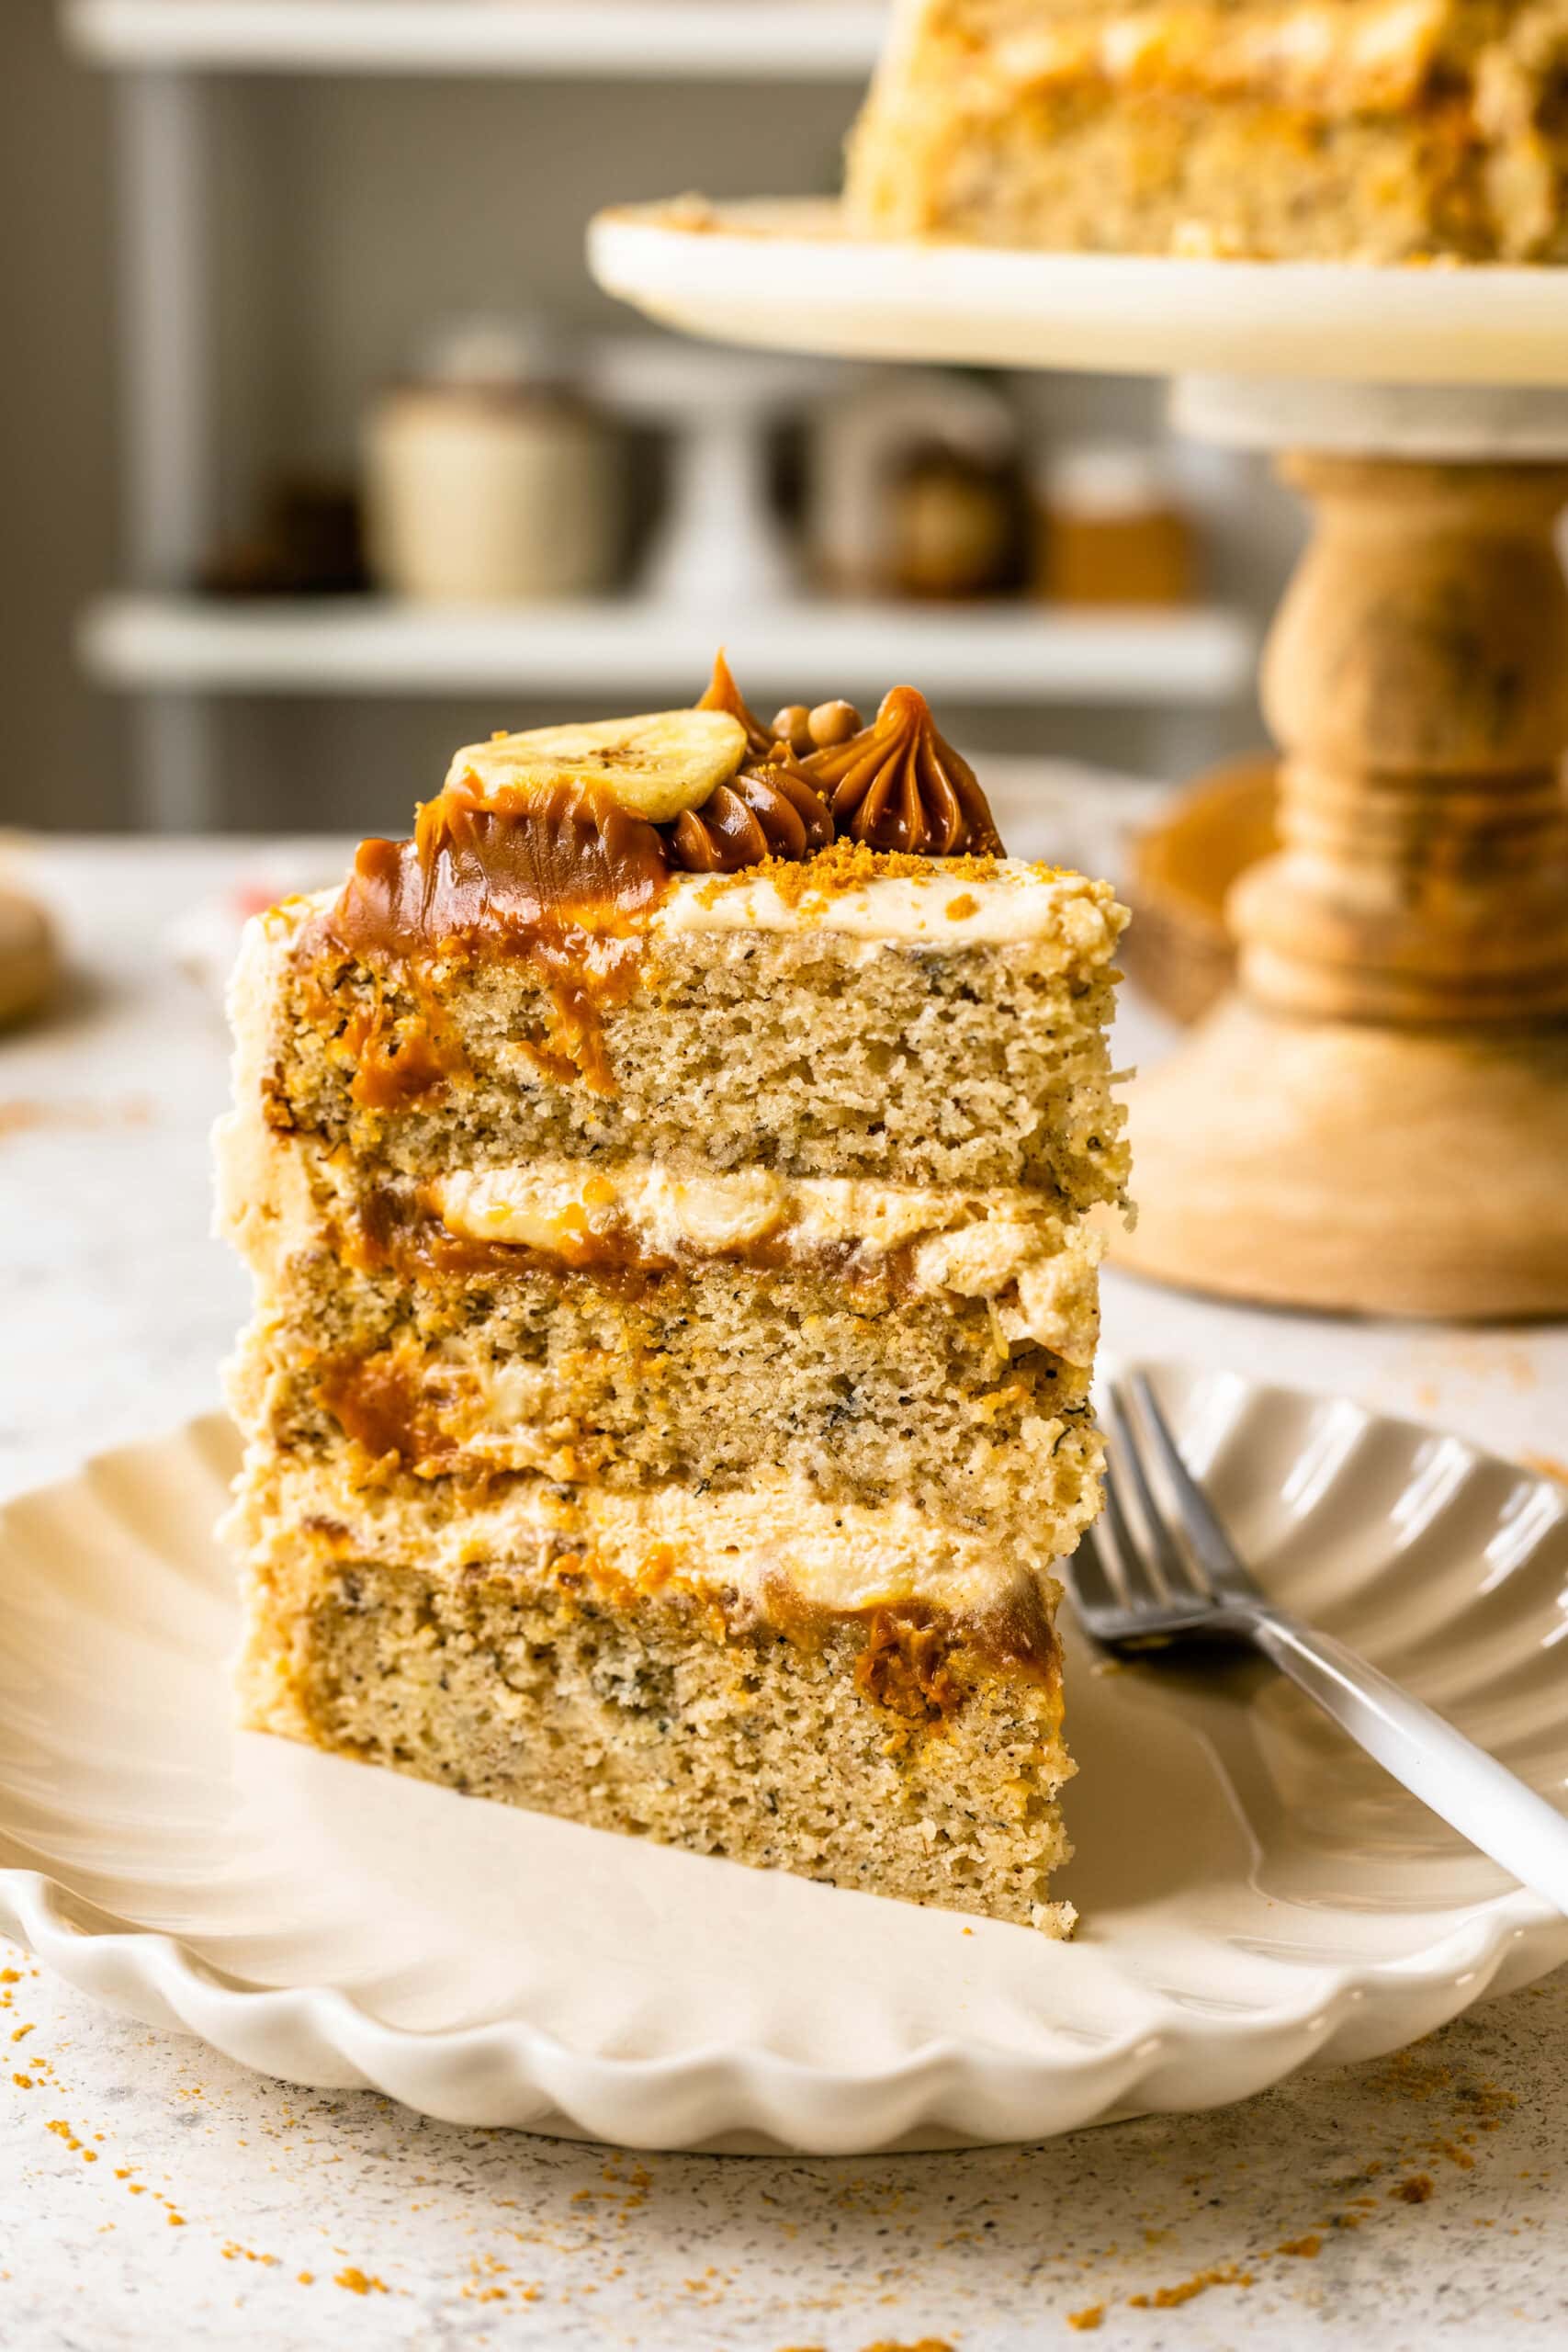
Divide the batter evenly between the pans and bake until a toothpick comes out clean and the tops spring back lightly when touched. Let the layers cool completely before assembling.
Step 2: Prepare the filling
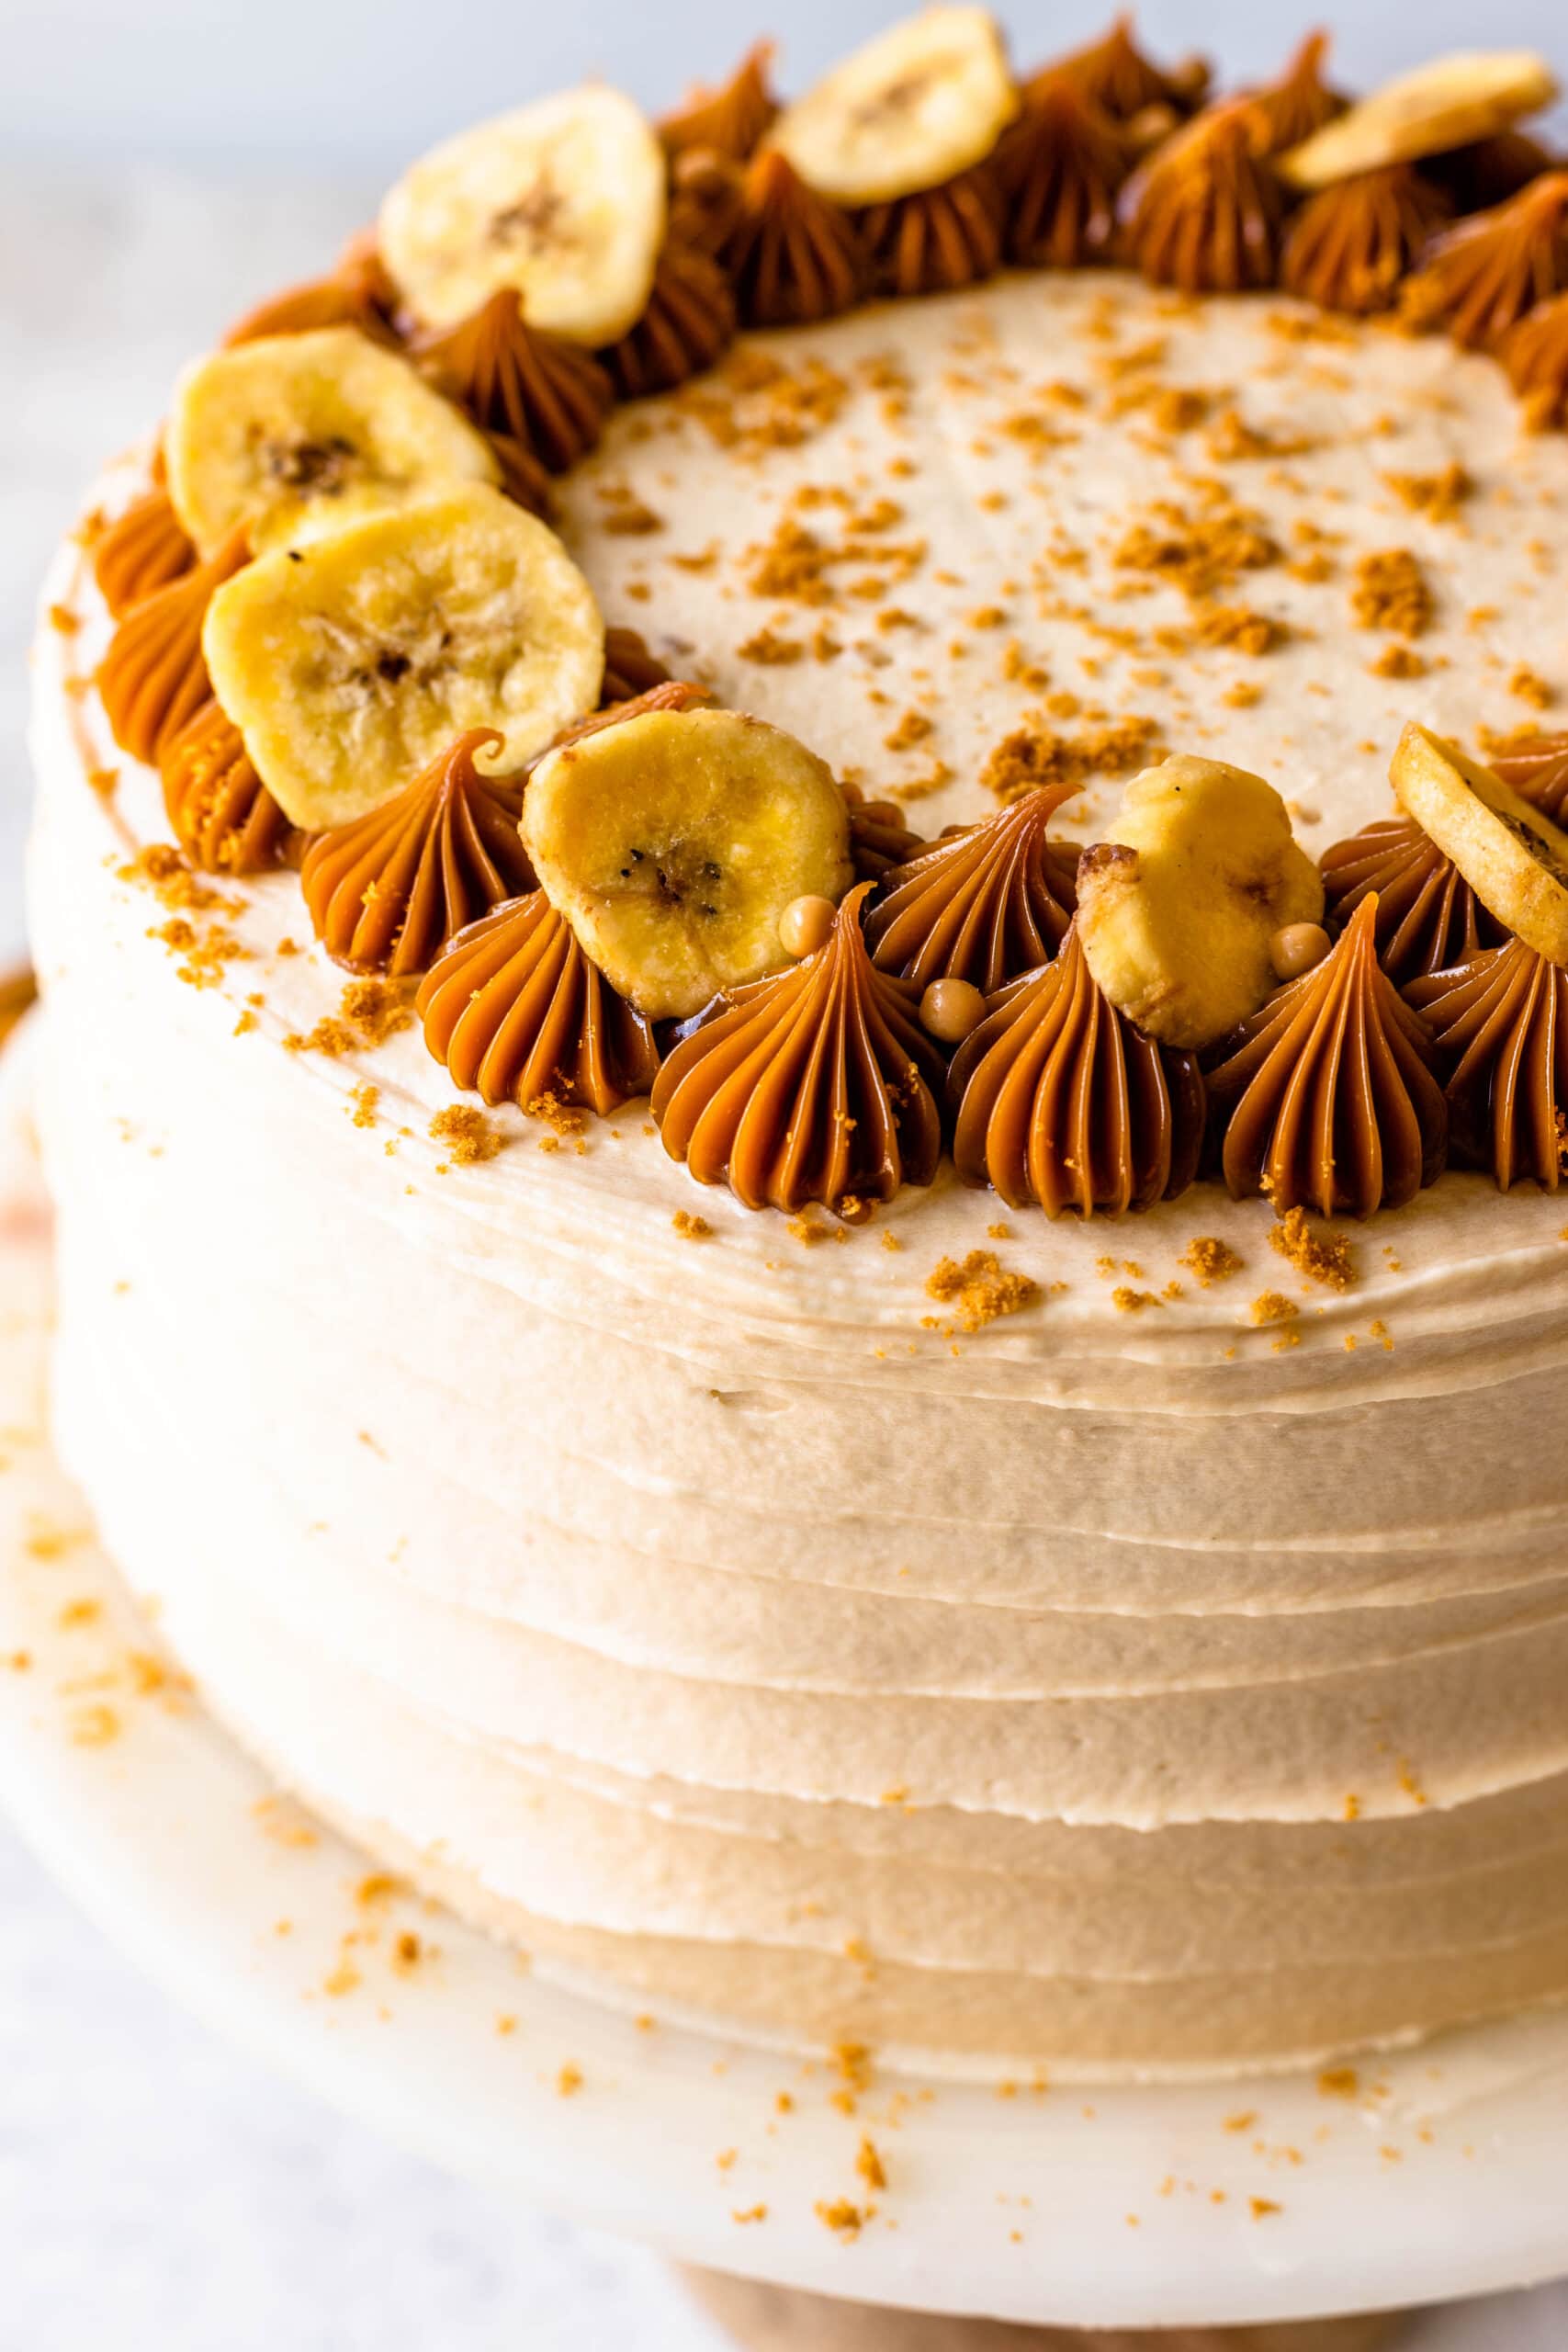
To fill the cake, I used dulce de leche and fresh banana slices.
My favorite way to make dulce de leche at home is using the instant pot, or pressure cooker method, which you can find here. You can also use the stove top method, the slow cooker method, or the oven method. All of these methods are going to use a can of sweetened condensed milk to make dulce de leche. If making your own, you will need two cans of sweetened condensed milk.
And here is a Dulce de Leche Guide with everything you need to know about Dulce de Leche, including my favorite brands to try.
Make sure to slice the bananas thinly.
Step 3: Make the frosting
The frosting is a dulce de leche cream cheese buttercream.
I beat the butter and cream cheese until smooth, then add the dulce de leche, powdered sugar, and vanilla.
It should be creamy but slightly soft. This frosting isn’t as firm as a traditional buttercream, which is why chilling between steps helps.
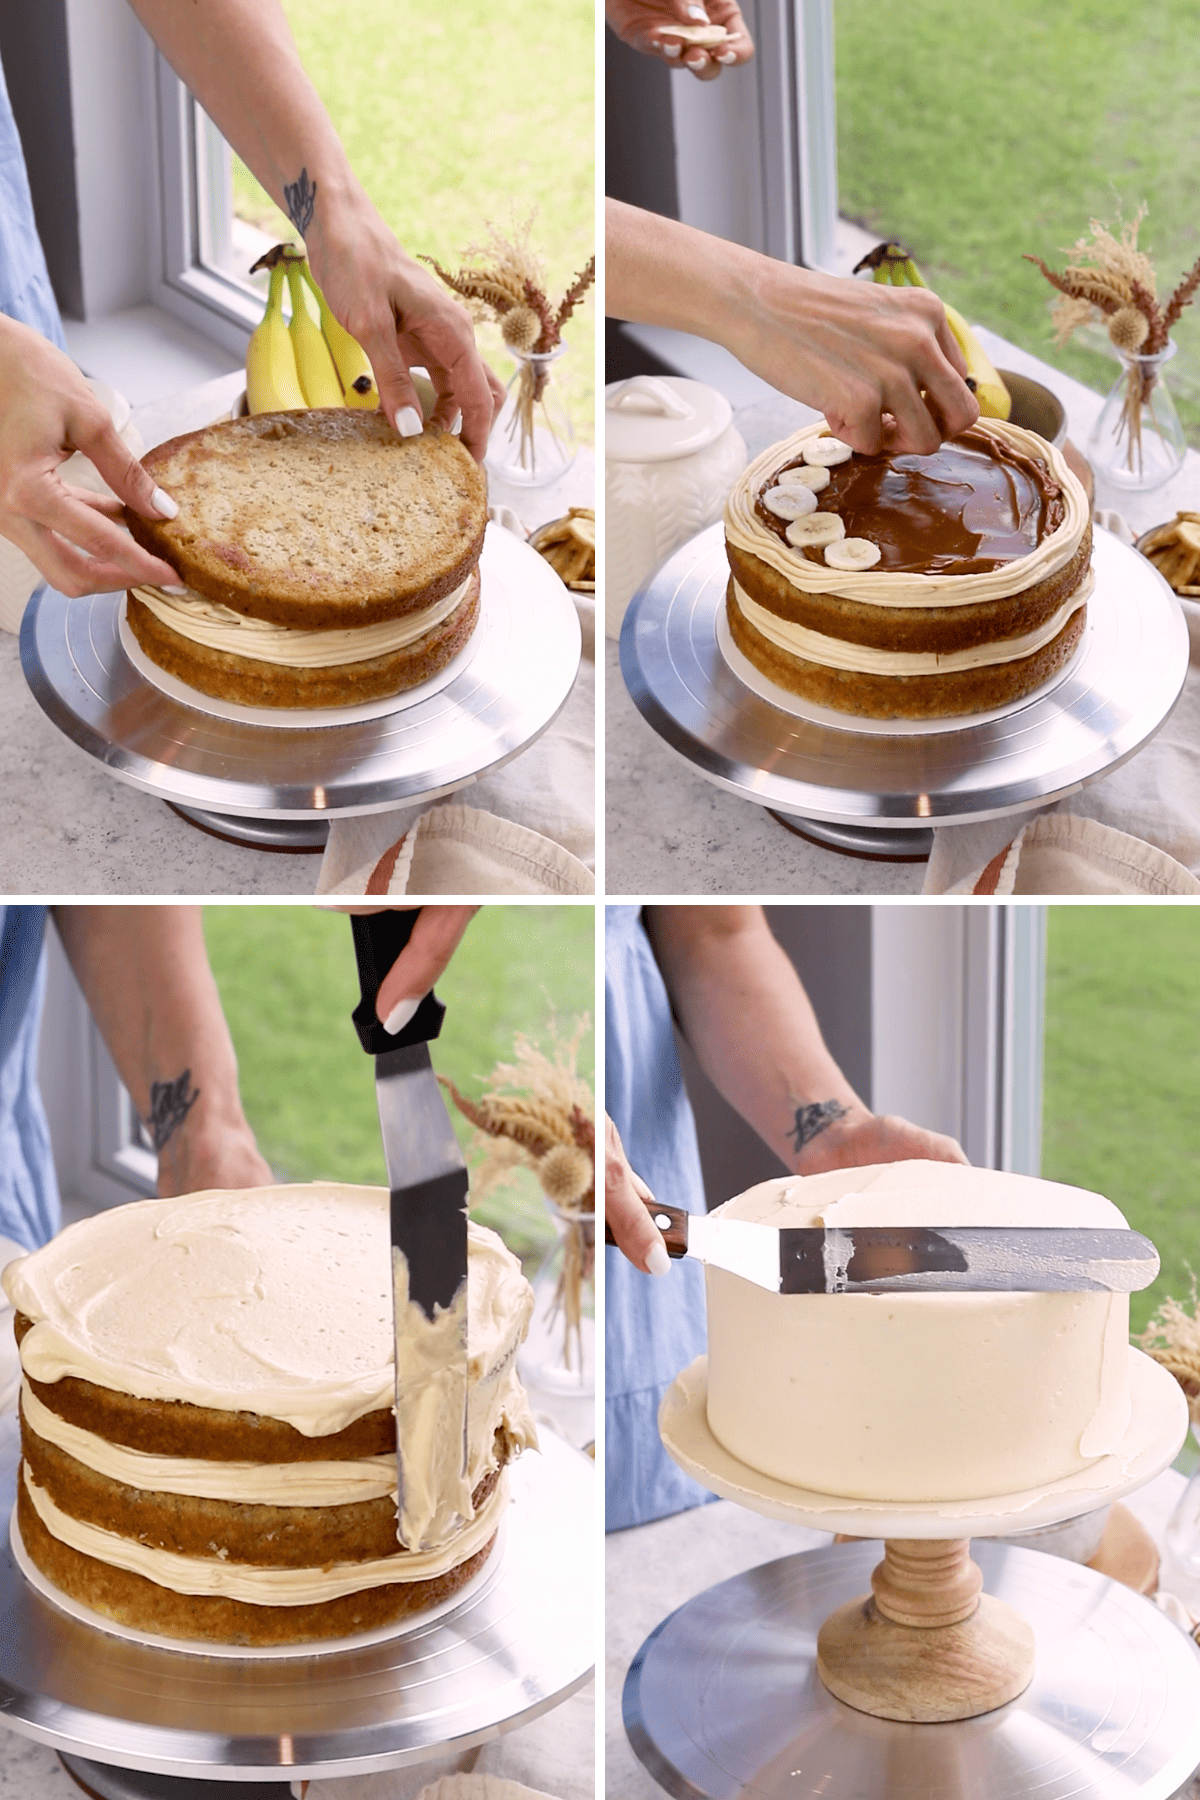
Step 4: Assemble the cake
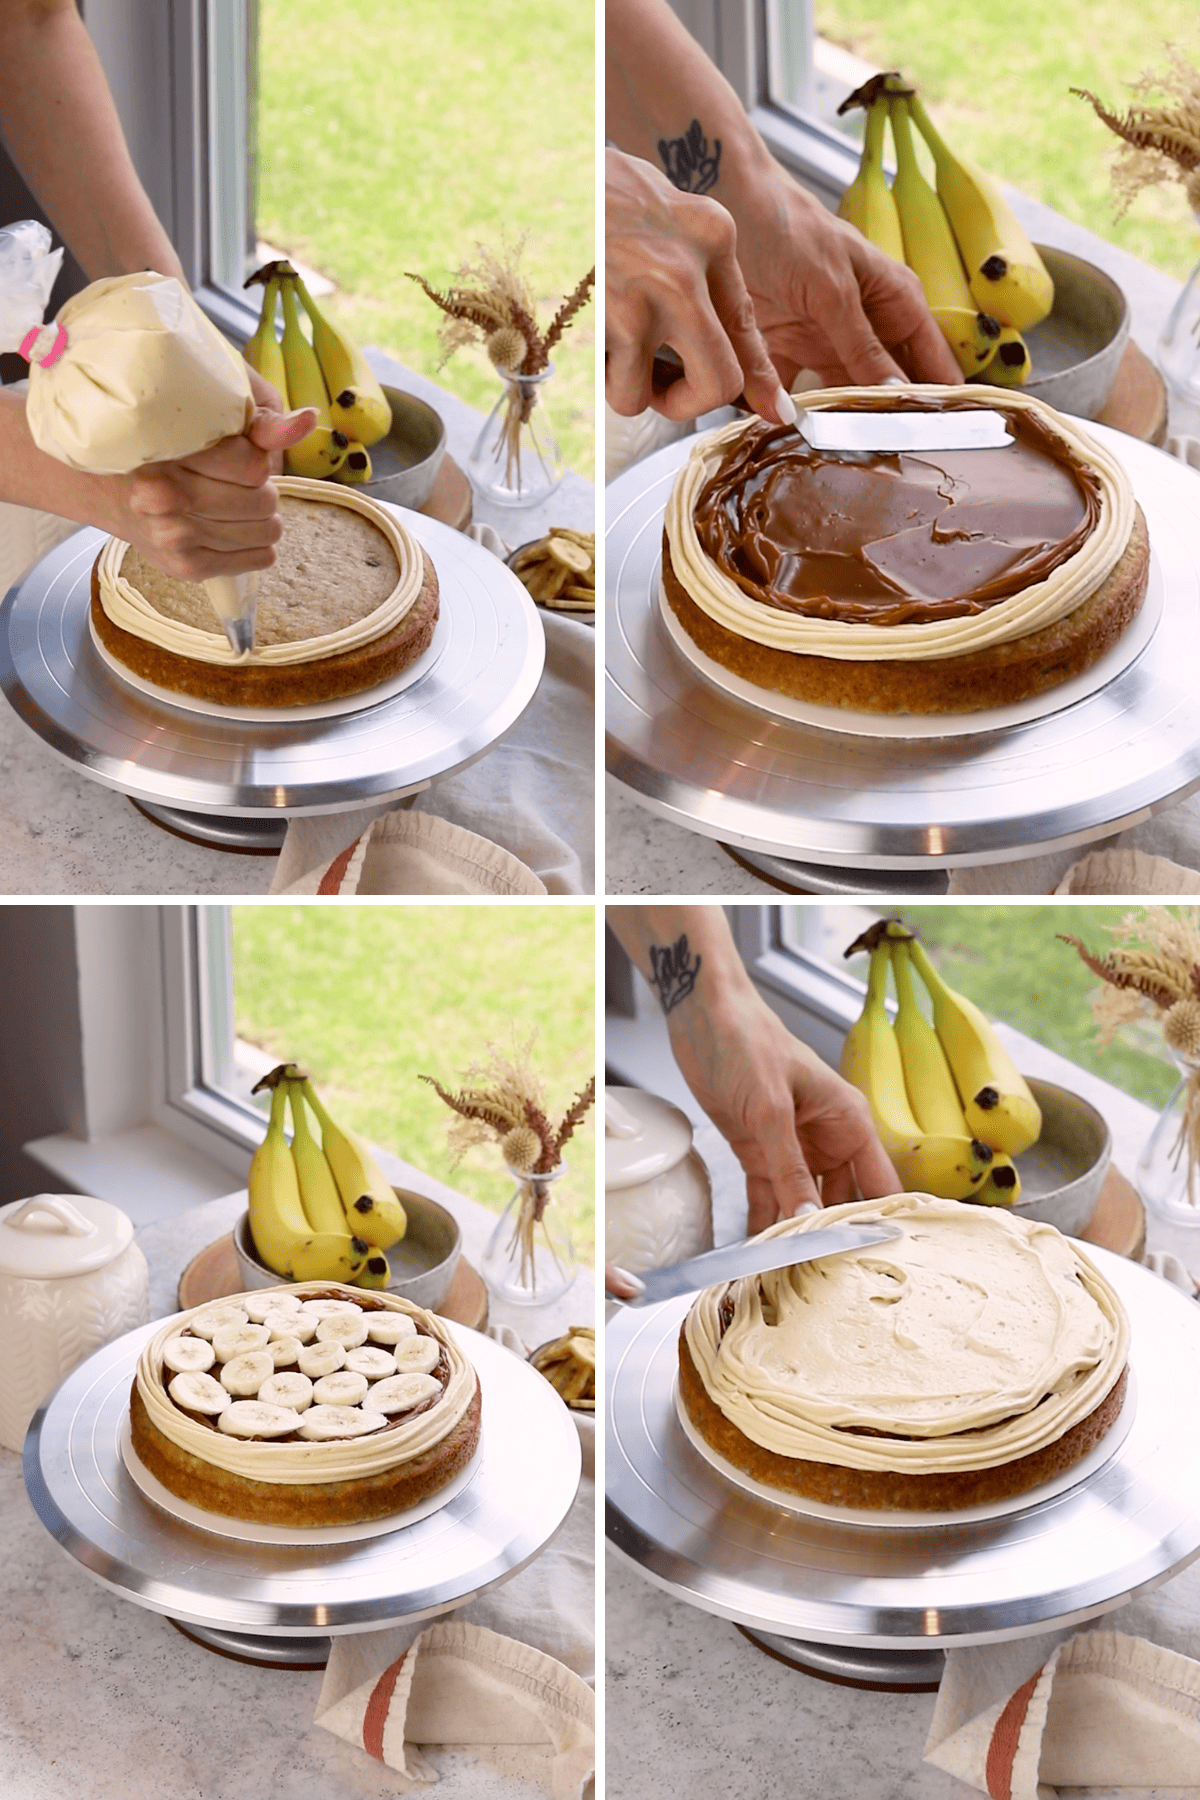
Place the first cake layer on your board.
I pipe a ring of frosting around the edge to hold the filling in place, then spread dulce de leche in the center.
Add a layer of sliced bananas, then a thin layer of frosting.
Repeat with the next layers.
Step 5: Continue assembling
Repeat with the next layers.
Once stacked, I apply a thin crumb coat and chill the cake for about 20 minutes. This step makes a big difference when working with this softer frosting.
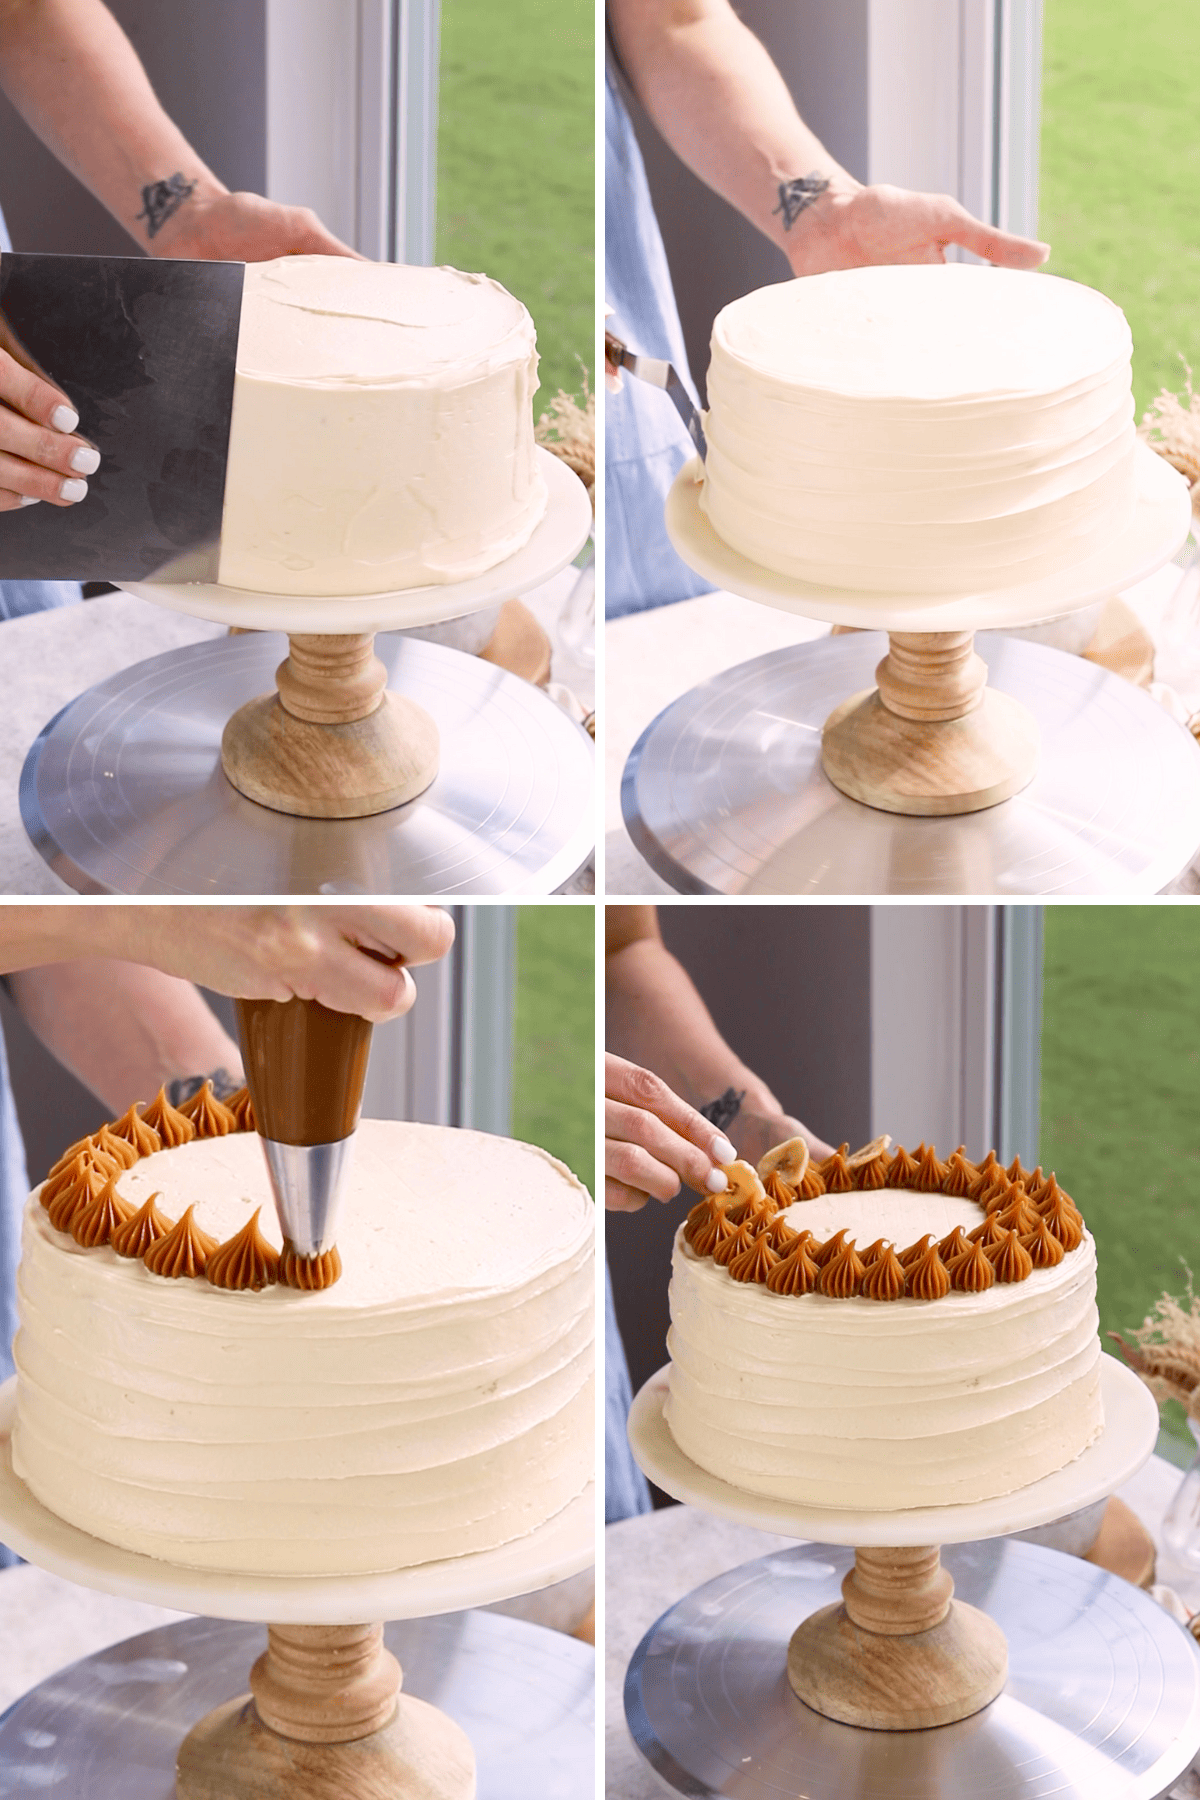
Step 6: Chill & Frost
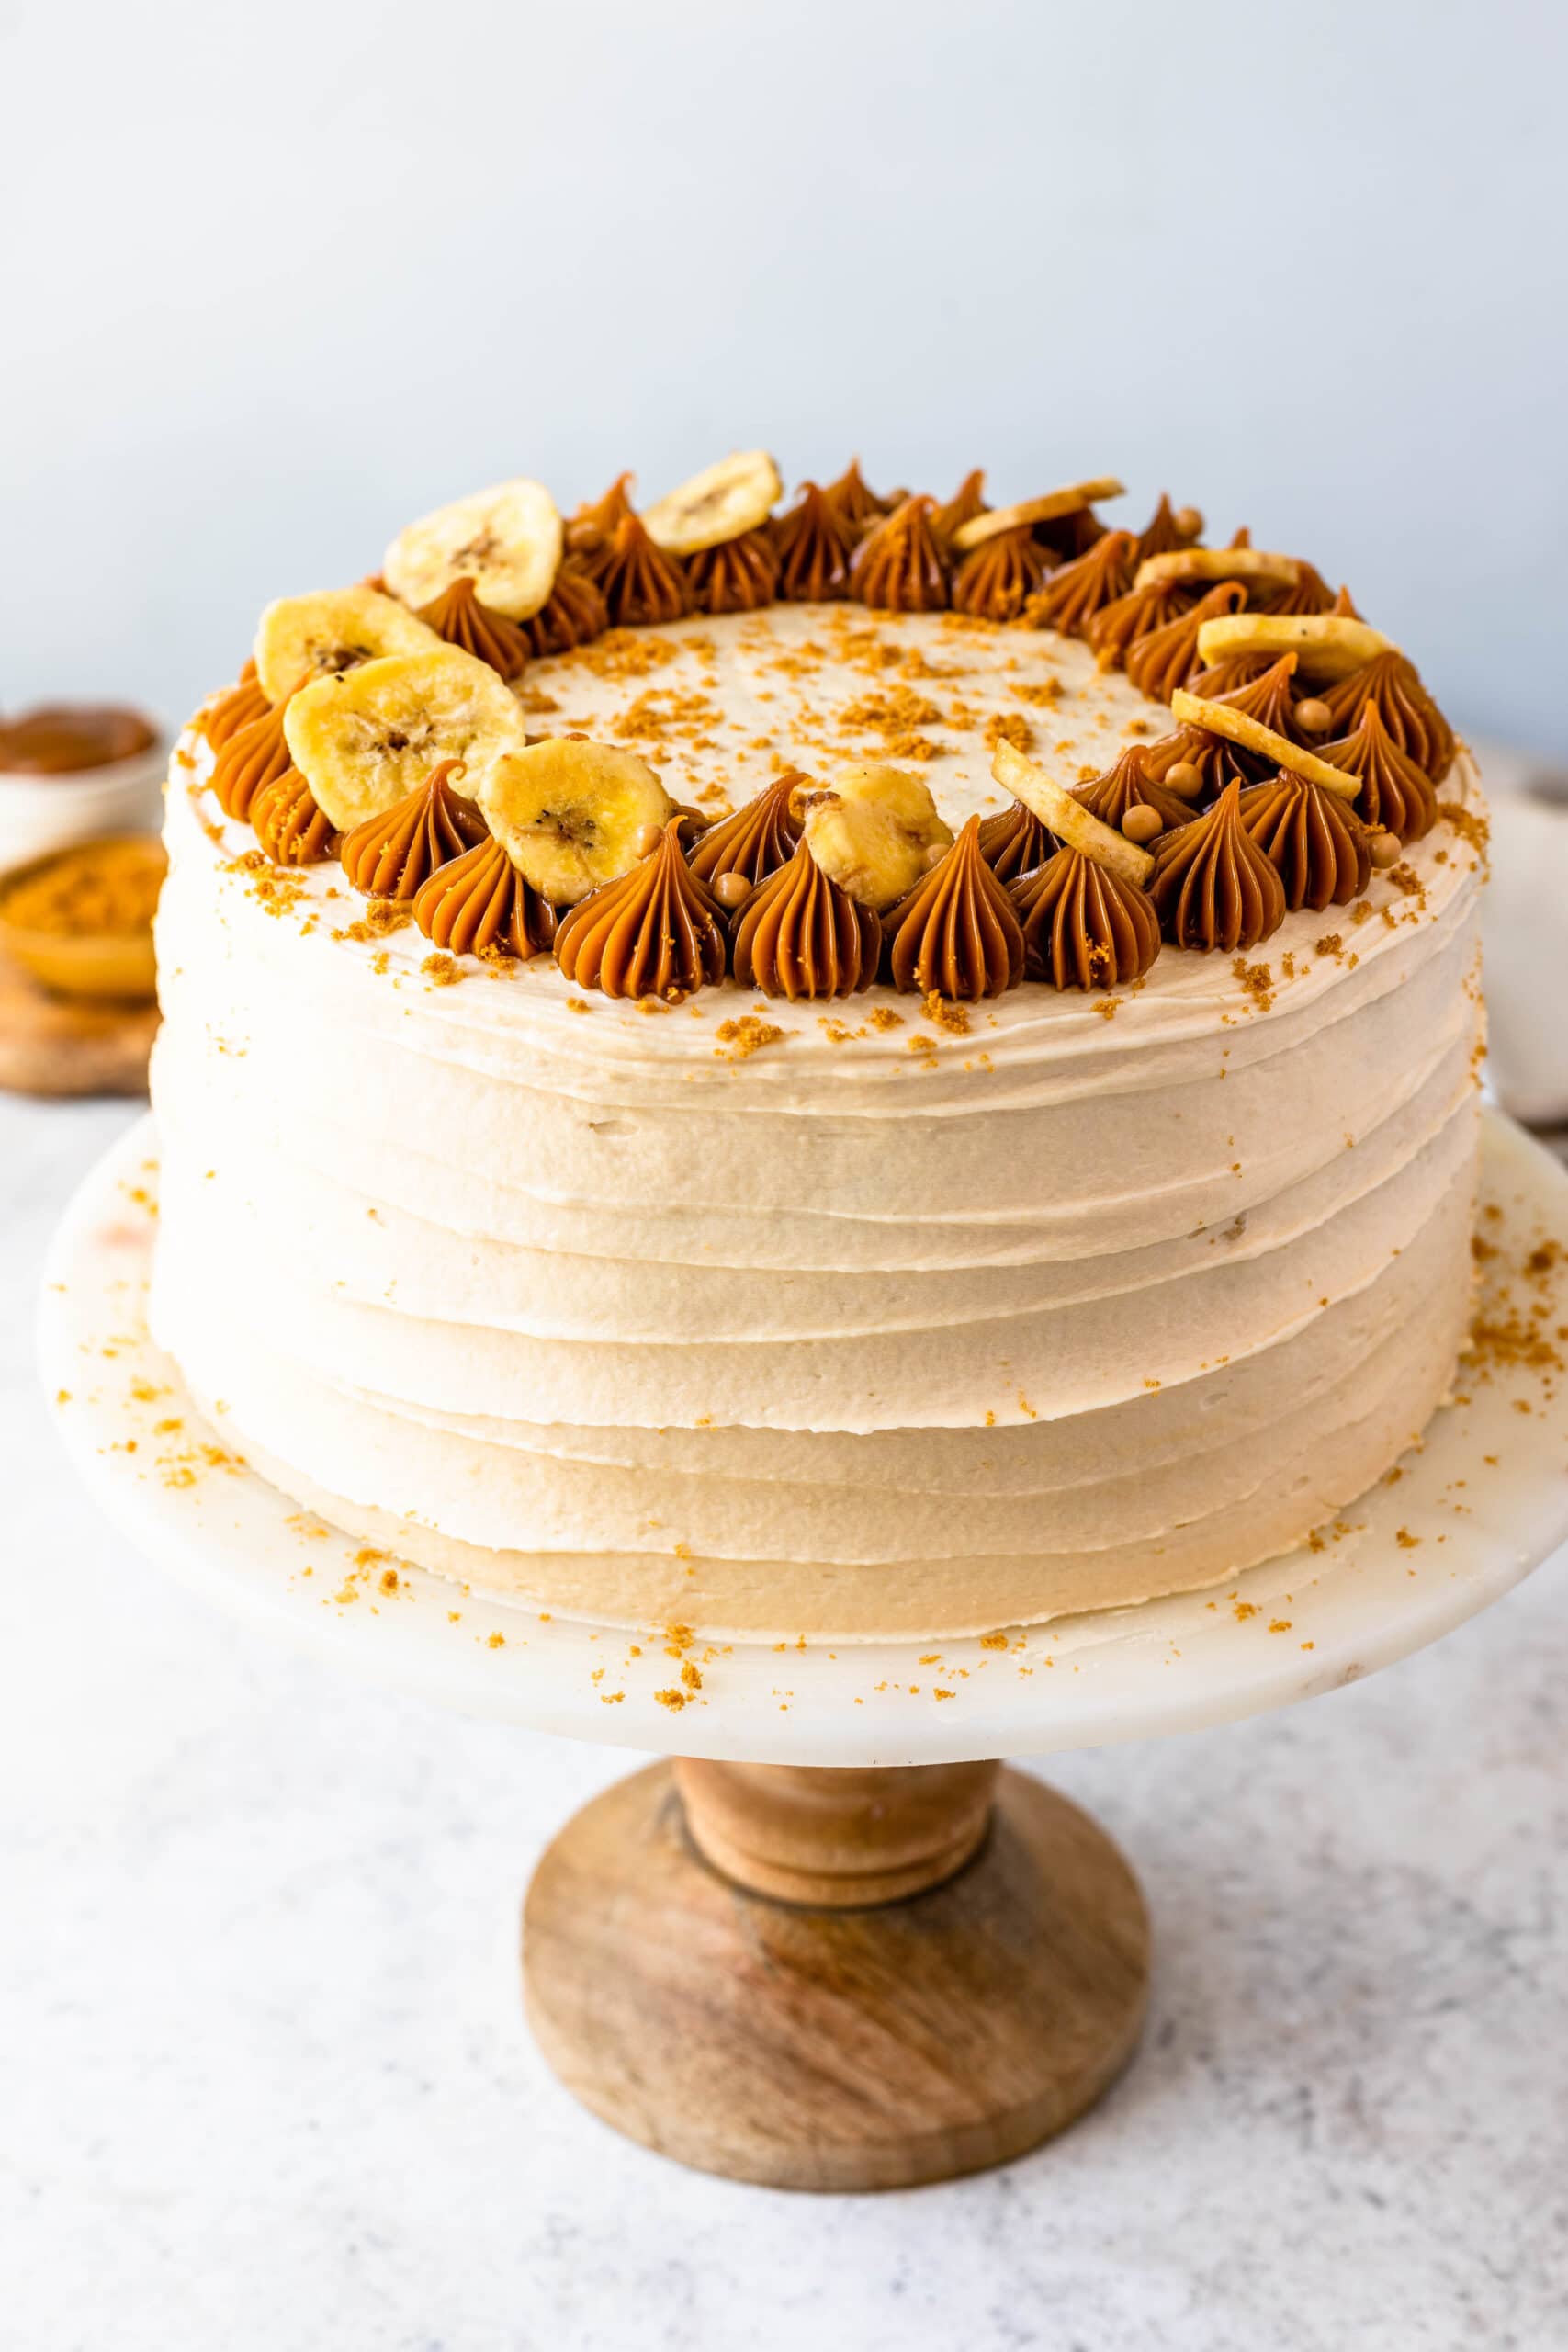
After chilling, I frost the cake fully. I usually go for a slightly textured finish because this frosting doesn’t smooth as sharply as others—and honestly, I prefer the look.
A few important tips before you start
This is where small details make a big difference:
- Use very ripe bananas—this affects both flavor and texture
- Keep your ingredients at room temperature so the batter mixes evenly
- Don’t overmix once the flour is added
- Bake just until done—overbaking dries the cake quickly
- Chill between frosting steps to make assembly easier
Variations for this Banoffee Cake
When I made this cake a couple of months ago, I decorated it totally differently. I actually made a chocolate ganache for the top, and kept the cake decorated with just the crumb coat of the Dulce de Leche Cream Cheese Frosting. And I decorated the top with some macarons filled with dulce de leche. See below!

There are a few ways I switch this up depending on what I want:
- Use caramel sauce instead of dulce de leche for a slightly lighter flavor
- Frost with whipped cream instead of buttercream for a softer finish
- Add a chocolate ganache drip (similar to what I do on my Walnut Chocolate Cake)
- Top with crushed cookies or caramel crispearls for texture
Storage & Make Ahead
I usually keep this cake in the fridge because of the frosting and banana filling.
- You can bake the layers a day ahead and assemble later
- It keeps well for 3–4 days
- I let slices sit at room temperature for about 20 minutes before serving
FAQ
Yes. I actually prefer making it the day before so everything settles properly.
Most likely overmixed after adding the flour, or the bananas were too wet.
Yes. I wrap them well and freeze for up to 1 month.
You can, but the bake time will change. Thicker layers will need more time.
More Recipes You May Like
If you liked this cake, you might also enjoy my Dulce de Leche Cake, which leans more into the caramel flavor without the banana, or the Dulce de Leche Chocolate Cake for something richer and more chocolate-forward. For a no-bake option, I always come back to Chocotorta—it has that same dulce de leche flavor but in a much simpler format. I also just made a brand new Vegan Banoffee Pie, you should check out!

Final Thoughts
If you make this, I’d love to hear how it turned out. Leave a comment or tag me on Instagram so I can see it.
Banoffee Cake
Ingredients
Banana Cake
- 2 large bananas 200 grams or 3/4 cup mashed
- 3 cups all-purpose flour 382 grams
- 1 tsp baking soda
- 1 tsp baking powder
- 1 tsp cinnamon powder
- 1/2 tsp salt
- 1/2 cup unsalted butter softened (113 grams)
- 1/4 cup vegetable oil 60 ml
- 1 cup granulated sugar 200 grams
- 1/3 cup brown sugar 66 grams
- 3 large eggs
- 1 tsp vanilla extract
- 1/2 cup sour cream 120 grams
- 1 cup buttermilk 240 ml
Dulce de Leche Cream Cheese Frosting
- 1 cup unsalted butter 226 grams
- 1/2 cup cream cheese 113 grams
- 1/2 cup dulce de leche 148 grams
- 4 cups powdered sugar 500 grams
- 2 tsp vanilla extract
Filling and assembly
- 1 1/2 cups dulce de leche
- 2 large bananas
Instructions
Banana Cake
- Pre-heat the oven to 350ºF. Grease 3 8-inch round cake pans, line the bottom with a parchment paper round, grease the parchment paper.
- Mash the bananas. Set aside.
- Mix the flour, baking soda, baking powder, cinnamon, and salt together. Set aside.
- In the bowl of a stand mixer using the paddle attachment, or simply a hand mixer, beat the butter, oil, sugar and brown sugar together for 4 minutes until the mixture is fluffy.
- Add the eggs one at a time, beating one egg until completely incorporated before adding the next egg.
- Add the vanilla and mix.
- Add the sour cream and mashed bananas. Mix to combine.
- Add half of the flour mixture and stir.
- Follow by the buttermilk. Mix until incorporated.
- Add the remaining flour and stir to combine. Don’t over mix the batter.
- Divide the batter between the pans and bake in the pre-heated oven for about 25 minutes, or until a toothpick comes out clean once inserted in the cakes. You can also test by touching the top of a cake and it should spring back.
- Let the cakes cool down for 10 minutes and then remove them to a cooling rack.
- Let the cakes cool down completely before frosting.
- If not frosting on the same day, wrap the cakes in plastic wrap individually and refrigerate or freeze them.
Dulce de Leche Frosting
- Beat the butter and cream cheese for 4 minutes until creamy and fluffy. Add the dulce de leche and beat for one minute.
- Add the powdered sugar to the bowl and vanilla extract. Mix on low until the powdered sugar is incorporated, raise the speed to medium-high and beat for another 2 minutes. If the frosting is dry, add a bit of milk or heavy cream to thin it out, and if the frosting is too thin, add a bit more powdered sugar to make it thicker.
To assemble
- Place some of the Dulce de Leche Frosting in a piping bag.
- Slice the bananas thinly.
- Place a cake layer on the serving plate or cake board on top of a turntable.
- Pipe a ring of Dulce de Leche Frosting around the edges of the cake layer.
- Spread about 1/2 cup of dulce de leche in the center. Top with sliced bananas.
- Pipe a bit more frosting on top and spread it with a spatula.
- Place another cake layer on top.
- Pipe a ring of Dulce de Leche Frosting around the edges of the cake layer, followed by the dulce de leche in the center and sliced bananas.
- Top with more frosting and spread with a spatula. Then place another cake layer on top.
Crumb Coat
- Now it’s time to do a crumb coat, which means you will spread some frosting on top and around the sides of the cake in order to seal the crumbs in. Use an offset spatula to spread the frosting on top and on the sides of the cake, and use a bench scraper to smooth the sides by placing it perpendicular to the side of the cake, applying very light pressure as you spin the turntable around.
- Once this thin layer of frosting is smooth, place the cake in the fridge for about 20 minutes.
- Keep the remaining Dulce de Leche Frosting covered meanwhile so it doesn’t dry out.
- Remove the cake from the fridge, and spread a thicker layer of frosting around the cake and on the top.
- Use a bench scraper to smooth it out, and use an offset spatula at a 15 degree angle swiping the top of the cake towards you to smooth the edges.
- Place some dulce de leche in a piping bag fitted with the tip of choice, I used a 4B. Pipe some dulce de leche on top of the cake and top with some dried banana slices.
- I also sprinkled some caramel crispearls on top of the dulce de leche, and crumbled Biscoff cookies on top.
Storage
- Store the cake in the fridge for up to 3 days. Always keep the cake covered in a container once you cut it.
- You can also store it in the freezer for up to 2 months. To freeze the cake slices, simply cover them with plastic wrap tightly and place inside an air-tight container or freezer bags.
Hi! I’ll be making this next week – if I freeze the sponge after baking- do I need to defrost before piping or should I frost whilst frozen? Keen to keep it moist !!
Freezing is the best way to keep it moist. Freeze after baking, You can wrap the cake still warm in plastic. helps keep the moisture. Freeze it. Then what I do when I freeze cake layers, I take it out of the freezer like thirty minutes or so before I’m ready to assemble the cake. You can even defrost it fully if you want. More tricks to keep it moist: brush the cake layers with a simple syrup while you are assembling. I do this for almost every cake I make now. Bring 150 grams of sugar and 150 grams of water to a boil together. Once it comes to a boil and the sugar melts, turn the heat off. Let the syrup cool down (you can make a big batch and keep it indefinitely in your fridge-as long as you dont get cake crumbs in it). Then brush onto the cake layers as you’re assembling. Trust me, it makes the cake stay SO moist everyone will be like: wow! this is the moistest cake I’ve ever had lol!!!
Let me know if you have any more questions about the freezing or the syrup, I’d love to help.
I can’t wait to make this recipe but I do have a question. How do you keep the bananas from turning brown on top? Or do you had them last min before serving?
Those were dried bananas on top, so they don’t turn brown and make a pretty delicious decoration 🙂
Delicious! I made a 2/3 batch of the cake layers (by weight) for a two layer version and it worked great. I especially loved the dulce de leches & bananas as the filling!
I am going to make this cake soon. I am confused by the notes and recipe for making the dulce de leche.
The cake recipe says under the Notes to use two cans of sweetened condensed milk, yet the recipe for making it on the stove top says only one can.
What am I missing between the two recipes?
Thanks much. Looking forward to making this cake and the homemade dulce de leche.
Just because they are different recipes. Each can of sweetened condensed milk will make about 1 1/3 cups of dulce de leche.
Hi! Can I make the cake layers ahead of time? If so, do they need to be stored in the fridge or just well covered at room temperature?
If I am using them the very next day, I keep them in the fridge, wrapped in plastic wrap tightly.
If I am using them in two days or further, I freeze them wrapped in plastic wrap also.
First of all. Wow!! I made this cake and it’s a 10/10!!! I want to make it again, but in cupcakes. How would I adjust time/temp?
You can use this cupcake recipe, which is so similar https://www.piesandtacos.combanana-creme-brulee-cupcakes/ and makes an amazing banana cupcake and it’s already all adjusted for it. And then make the frosting of this recipe regularly as you would, I think the amount of frosting will be just right for about 12-14 cupcakes.
Que delícia 😋 😋 😋 ficou linda!!! Parabéns!!