Dulce de Leche Chocolate Cake
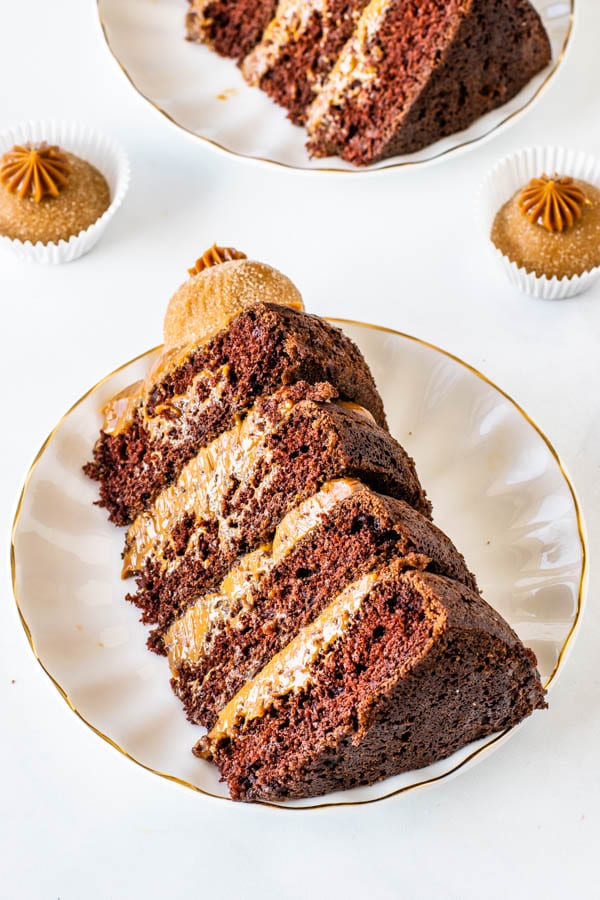
Hello friends! Today I bring to you a very special recipe! Dulce de Leche Chocolate Cake. Moist layers of chocolate cake filled with rich and decadent dulce de leche. Certainly a very indulgent dessert!
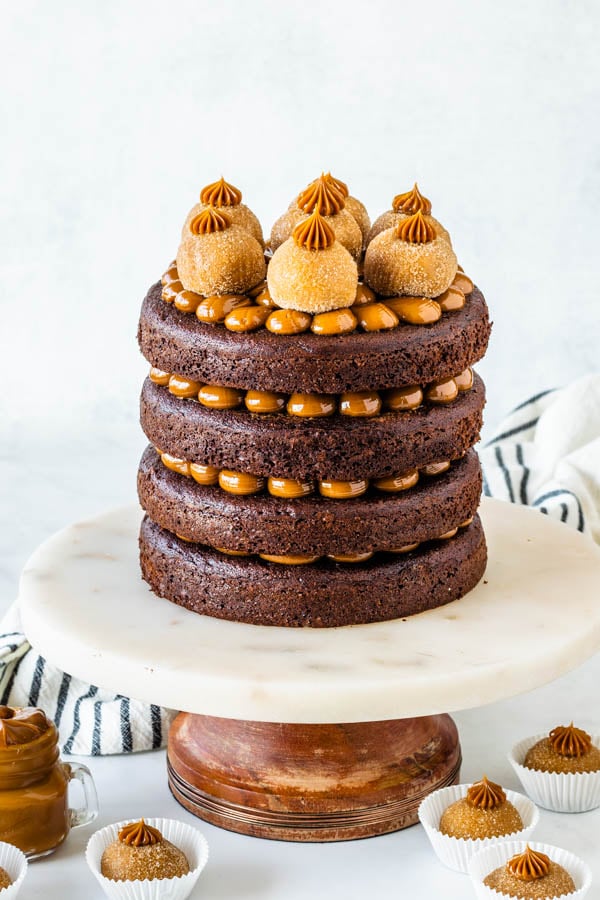
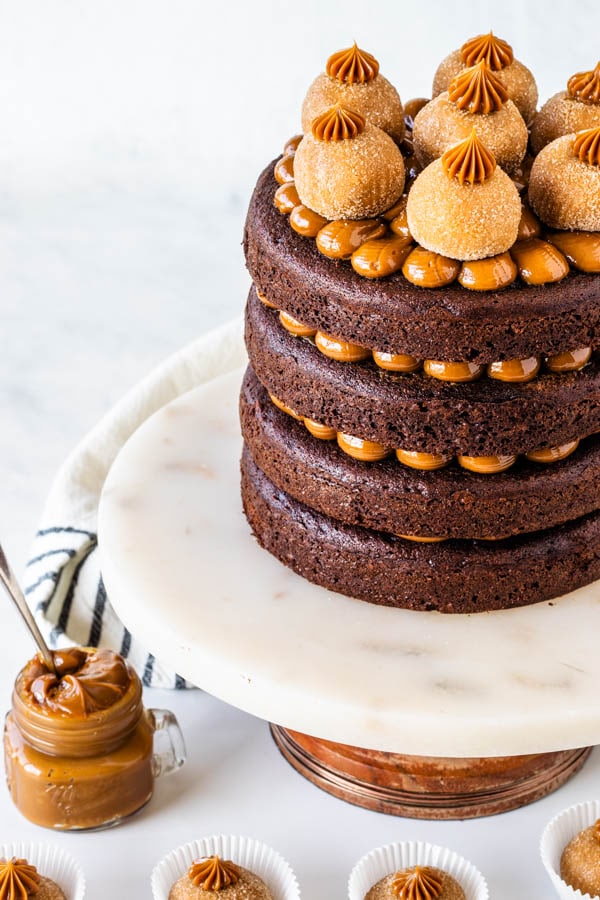
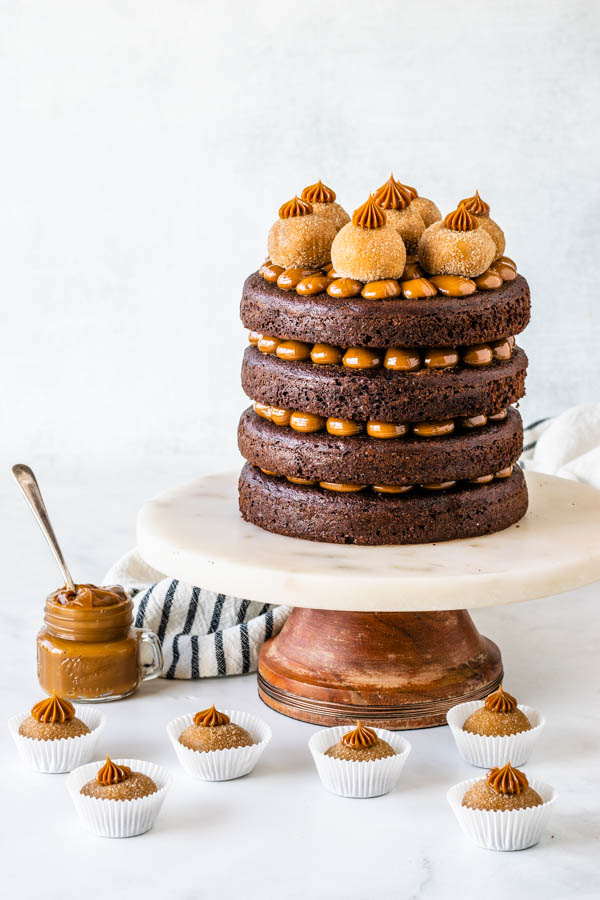
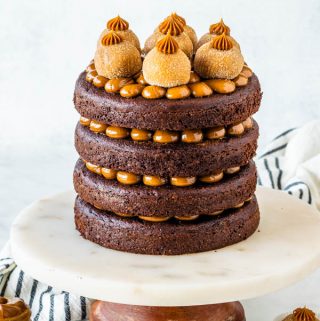
This Dulce de Leche Chocolate Cake is also topped with the most delicious Dulce de Leche Fudge truffles (Churros Truffles). They are super easy to make, and absolutely impossible to resist.
Actually this cake looks pretty similar to my Dulce de Leche Cake, which is made out of Vanilla cake layers, filled with Dulce de Leche, and covered in Dulce de Leche Cream Cheese Frosting. And topped with Dulce de Leche Donuts, which look at lot like the truffles in today’s cake.
This post may contain affiliate links. I earn a commission from qualified purchases. Please read our Privacy policy here.
So I guess you can say those cakes are cousins, or siblings. Or you could say this is the chocolate version of the classic one!
I made this Dulce de Leche Chocolate Cake to celebrate my sister Marina’s birthday! She is 3 years older than me, she was my first friend in the world, and remains my best one to this day!
Even though this cake looks impressive (if I do say so myself), it’s pretty easy to make. Specially because it doesn’t even involve making any frosting.
I think that the dulce de leche and chocolate cake combination is already enough delicious, and I did not miss any frosting at all in this super rich and marvelous cake.
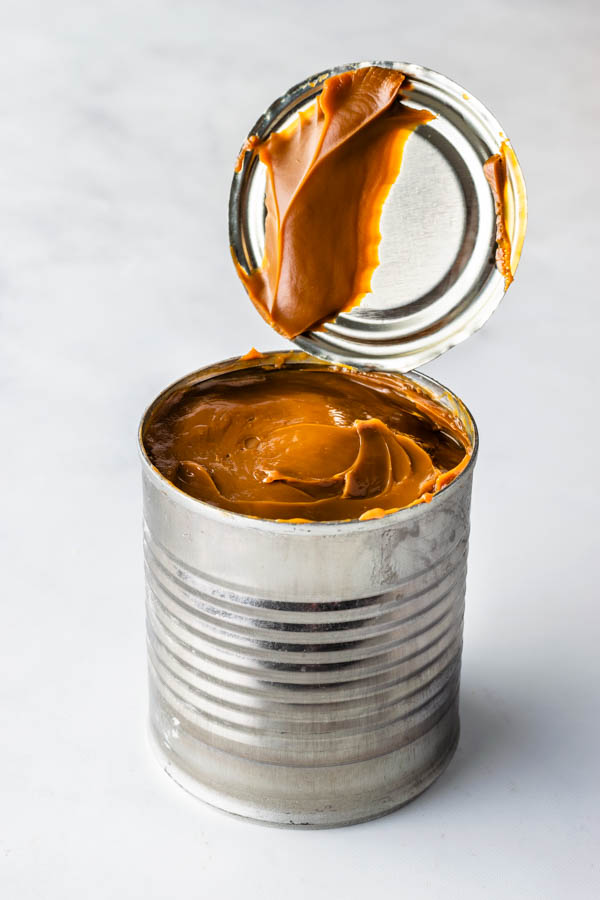
And you can make the dulce de leche yourself, or you can purchase it online, or at a store.
Making dulce de leche at home is pretty easy, and I will show you how to do it with just one ingredient: a can of condensed milk.
How to make Homemade Dulce de Leche
There are a few options when it comes to making dulce de leche at home.
- Oven method– Open the condensed milk can, pour it in a small oven-proof pan, and cover it with foil. Place the pan in a bigger roasting pan. Fill the roasting pan with water to create a water bath and bake the condensed milk in 350ºF oven for about 2-3 hours, stirring in between.
- Stove top– You can either use a pressure cooker, or a regular pot to make Dulce de Leche in the stove top. And both are going to use an unopened can of condensed milk.
- Pressure cooker– Place the sealed can of condensed milk in a pressure cooker full of water, covering the can by at least 2 inches. Cook under high pressure for 35 minutes. Let the pressure release naturally and let the can cool completely before opening it.
- Regular pot– Place the sealed can of condensed milk in a large pot full of water. Boil the sealed can for about 2 1/2 hours, making sure the can is always submerged in water, which means you may have to pour more water in the pan during the boiling time. And again, let the can cool completely before opening it.
Always make sure the can cools down before you open it. And then leave it in the fridge for a few hours before using so that the dulce de leche will be cold and have the proper texture.
If you don’t feel like making your own dulce de leche, that’s understandable, and there are plenty of amazing brands out there you can purchase from!
Here are some suggestions:
Ps. Havanna is my FAVORITE!
Anyway, find a dulce de leche that is creamy and will hold the piping well.
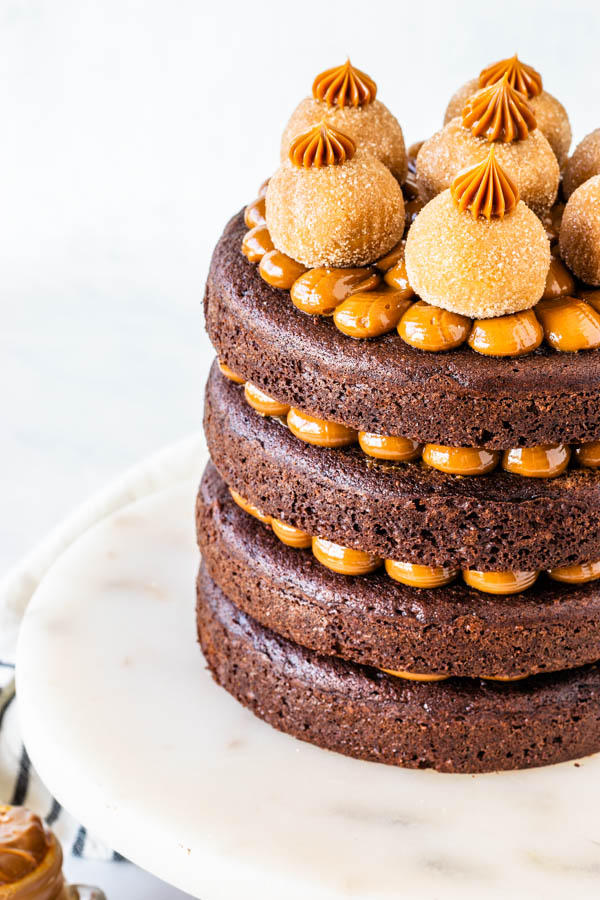
And when you fill the cake, you can either spread the dulce de leche between the layers using a spoon or a spatula, or place the dulce de leche in a piping bag, and pipe little dollops, or petals like I did on mine.
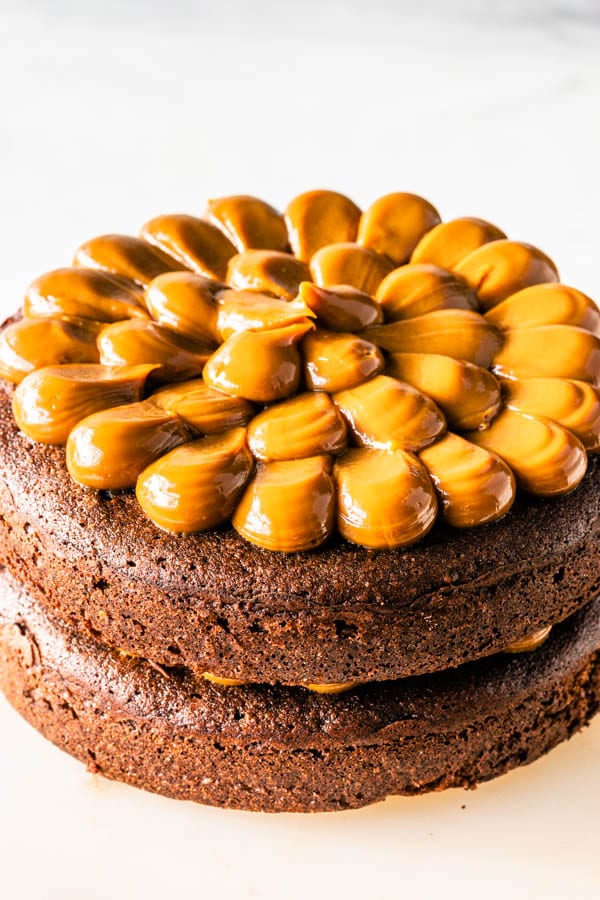
I used about 1/2 cup of dulce de leche per layer, slightly shy from 1/2 cup. But if you are making the dulce de leche from scratch, make at least 2 cans of condensed milk.
And if you are planning on making the Dulce de Leche Fudge truffles (recipe coming tomorrow) for the top, make that 3 cans.
If you know me already, then you know that this Dulce de Leche Chocolate Cake is not my first dulce de leche recipe here on the blog. I am the biggest dulce de leche fan. Growing up in Brazil, you practically see dulce de leche everywhere, and it has always been one of my favorite things.
And my sister’s too, which is why she requested a dulce de leche cake for her birthday.
Here are some other Dulce de Leche desserts you might enjoy:
- Alfajores
- Dulce de Leche Cake
- Chocotorta
- Chocolate Dulce de Leche Cheesecake Pie
- Dulce de Leche Bars
- Dulce de Leche Cookies
- Dulce de Leche Cupcakes
And many more!!
Also make sure to check out some of my special Layer Cakes. If you would like to make this naked Dulce de Leche Chocolate Cake into a frosted cake, feel free to use any other frosting such as a simple buttercream, or any of the ones I mention below in the recipe, that could be a great addition to this cake.
And as always, thank you so much for reading my blog! It means the world to me! Hope you enjoyed today’s recipe! And I will leave you with a drool worthy slice of this magical cake!

Dulce de Leche Chocolate Cake
Ingredients
Chocolate Cake
- 1 1/2 cups all-purpose flour 183 grams, 5.4 oz
- 1/3 cup unsweetened cocoa powder 39 grams, 1.38 oz
- 1/2 tsp espresso powder optional
- 1 1/2 teaspoon baking powder
- 1 teaspoon baking soda
- 3/4 teaspoon fine sea salt
- 1/2 cup unsalted butter room temperature 113 grams, 4 oz
- 1 cups sugar 200 grams, 7 oz
- 2 eggs
- 2 teaspoons vanilla extract
- 2/3 cup milk 157 ml
- 2/3 cup hot brewed coffee read notes* 157 ml
Dulce de Leche
- 2-14 oz cans of condensed milk to make dulce de leche
- Or about 2 cups of store-bought dulce de leche
Instructions
Chocolate Cake
- This recipe makes for 4-6” round cakes, or 2-8” round cakes.
- Pre-heat oven to 350Fº.
- Butter 4-6″ cake pans and place a parchment paper circle in the bottom of pans. Butter parchment. You can also use spray oil instead. Set aside.
- Sift together the flour, cocoa powder, baking powder, baking soda, salt, and espresso powder, if using it instead of the coffee. Set aside.
- Cream the butter at medium-high speed for 1 minute.
- Add sugar slowly, cream for another 2 minutes.
- Add eggs to the mixture, one at a time, scraping the bowl in between and making sure the first egg is incorporated before adding the second one.
- Add vanilla extract and mix.
- Slowly add milk, mix to combine.
- Pour dry ingredients over wet mixture.
- Fold with a spatula slowly, until ingredients are just combined.
- If you see big clumps of cocoa powder, you can use the whisk to try to gently smooth the batter out.
- Once batter is incorporated, pour hot coffee in the bowl. Whisk until combined.
- Pour batter evenly onto baking pans.
- Bake in pre-heated oven for 15-20 min. After the 12 minute mark, keep checking regularly, because you don’t want to burn your cakes or over bake them. Remove them from the oven once a toothpick comes our clean once inserted in the cake.
- Once you remove it from the oven, wait 10 minutes, flip cakes onto a cookie cooling rack and let cakes cool.
- Once cool, wrap each layer individually in plastic wrap and refrigerate until ready to use. I like to leave my layers in the fridge for quite a bit so they can firm up and make it easier to assemble and decorate the cake.
Dulce de Leche
- You can use pre-made dulce de leche, or make it at home. To make dulce de leche at home, you take many different approaches. Check the post above to read 3 different approaches on how to make dulce de leche from a can of condensed milk.
- My favorite way to make dulce de leche starts with an unopened can of condensed milk. Place sealed can in a pressure cooker with enough water to cover it plus at least 2 inches.
- Then, bring the water to a boil and cook under pressure for 35 minutes.
- Let pressure release naturally and let can and water cool down all the way before removing and opening the can. You can cook 2 cans at the same time.
- When you open the can, it will be a thick darkened caramel inside.
- Place contents in a container and put it in the fridge until cold and firm.
To assemble
- Place one cake layer on a cake stand, or serving plate. Place the dulce de leche in a piping bag, pipe dollops of dulce de leche around the edges of the cake and all the way to the middle of the layer.
- Top with another layer. Repeat this until you are done with the cake layers.
- Finish with a piping of dulce de leche on top.
- I made Dulce de Leche Fudge Truffles to put on top of the cake.
Storage
- Keep the cake refrigerated, preferably covered so it doesn’t dry out, for up to 4 days.
Hi Camila
Would I need to double recipe for 4 layer 8-inch and 1.5 for a 3 layer
8-inch? My niece has requested this delicious looking cake for her 40th birthday next month. Thanks
Yes I would double for 4 layers, and to make 3 layers, you definitely make 1.5x of the recipe. You can use the measurements for the chocolate layers from this other recipe for example: https://www.piesandtacos.com/german-chocolate-cake/ and then continue with the dulce de leche from this one.
Thank you so much! Appreciate your quick response 😊 I will use the measurements for the cake layers as suggested.
Hi Camila, just to be clear…should I make the German chocolate cake as is since it’s already an 8 inch 3 layer cake or do I need to 1.5 the German chocolate cake recipe? I need to make the cake tomorrow. Thank you.
You don’t say how much espresso powder to use
1/2 tsp. sorry, fixed it! thanks
Can I double this recipe to make a 9-10” cake
yes
Hi there, I couldn’t help but notice that you say to leave this cake in the firdge until ready to use as it is an oil based cake and so this will be easier to work with when cool. However, the recipe says butter, not oil. Am I missing something here? 🙈xx
You’re absolutely right!! I had copied that bottom instruction from my oil based chocolate cake lol! my mistake!! Thanks for pointing out. It’s been fixed!!!
One day I need to make one of your layer cakes! They are soooo stunning!
Além de ter ficado fantástico, esse bolo tem um significado importante pra mim, obrigado Ca!!!!!!
A nossa Marina merece! 🥰