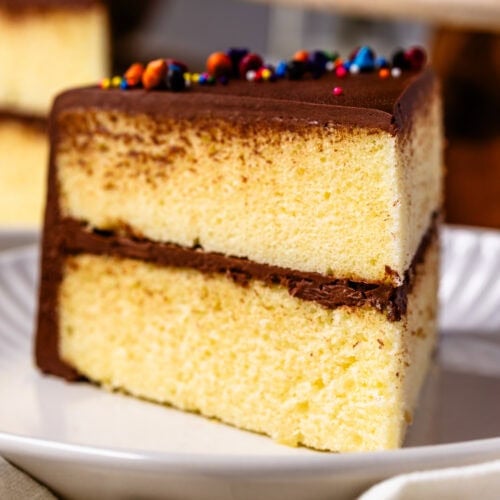
Yellow Cake Recipe
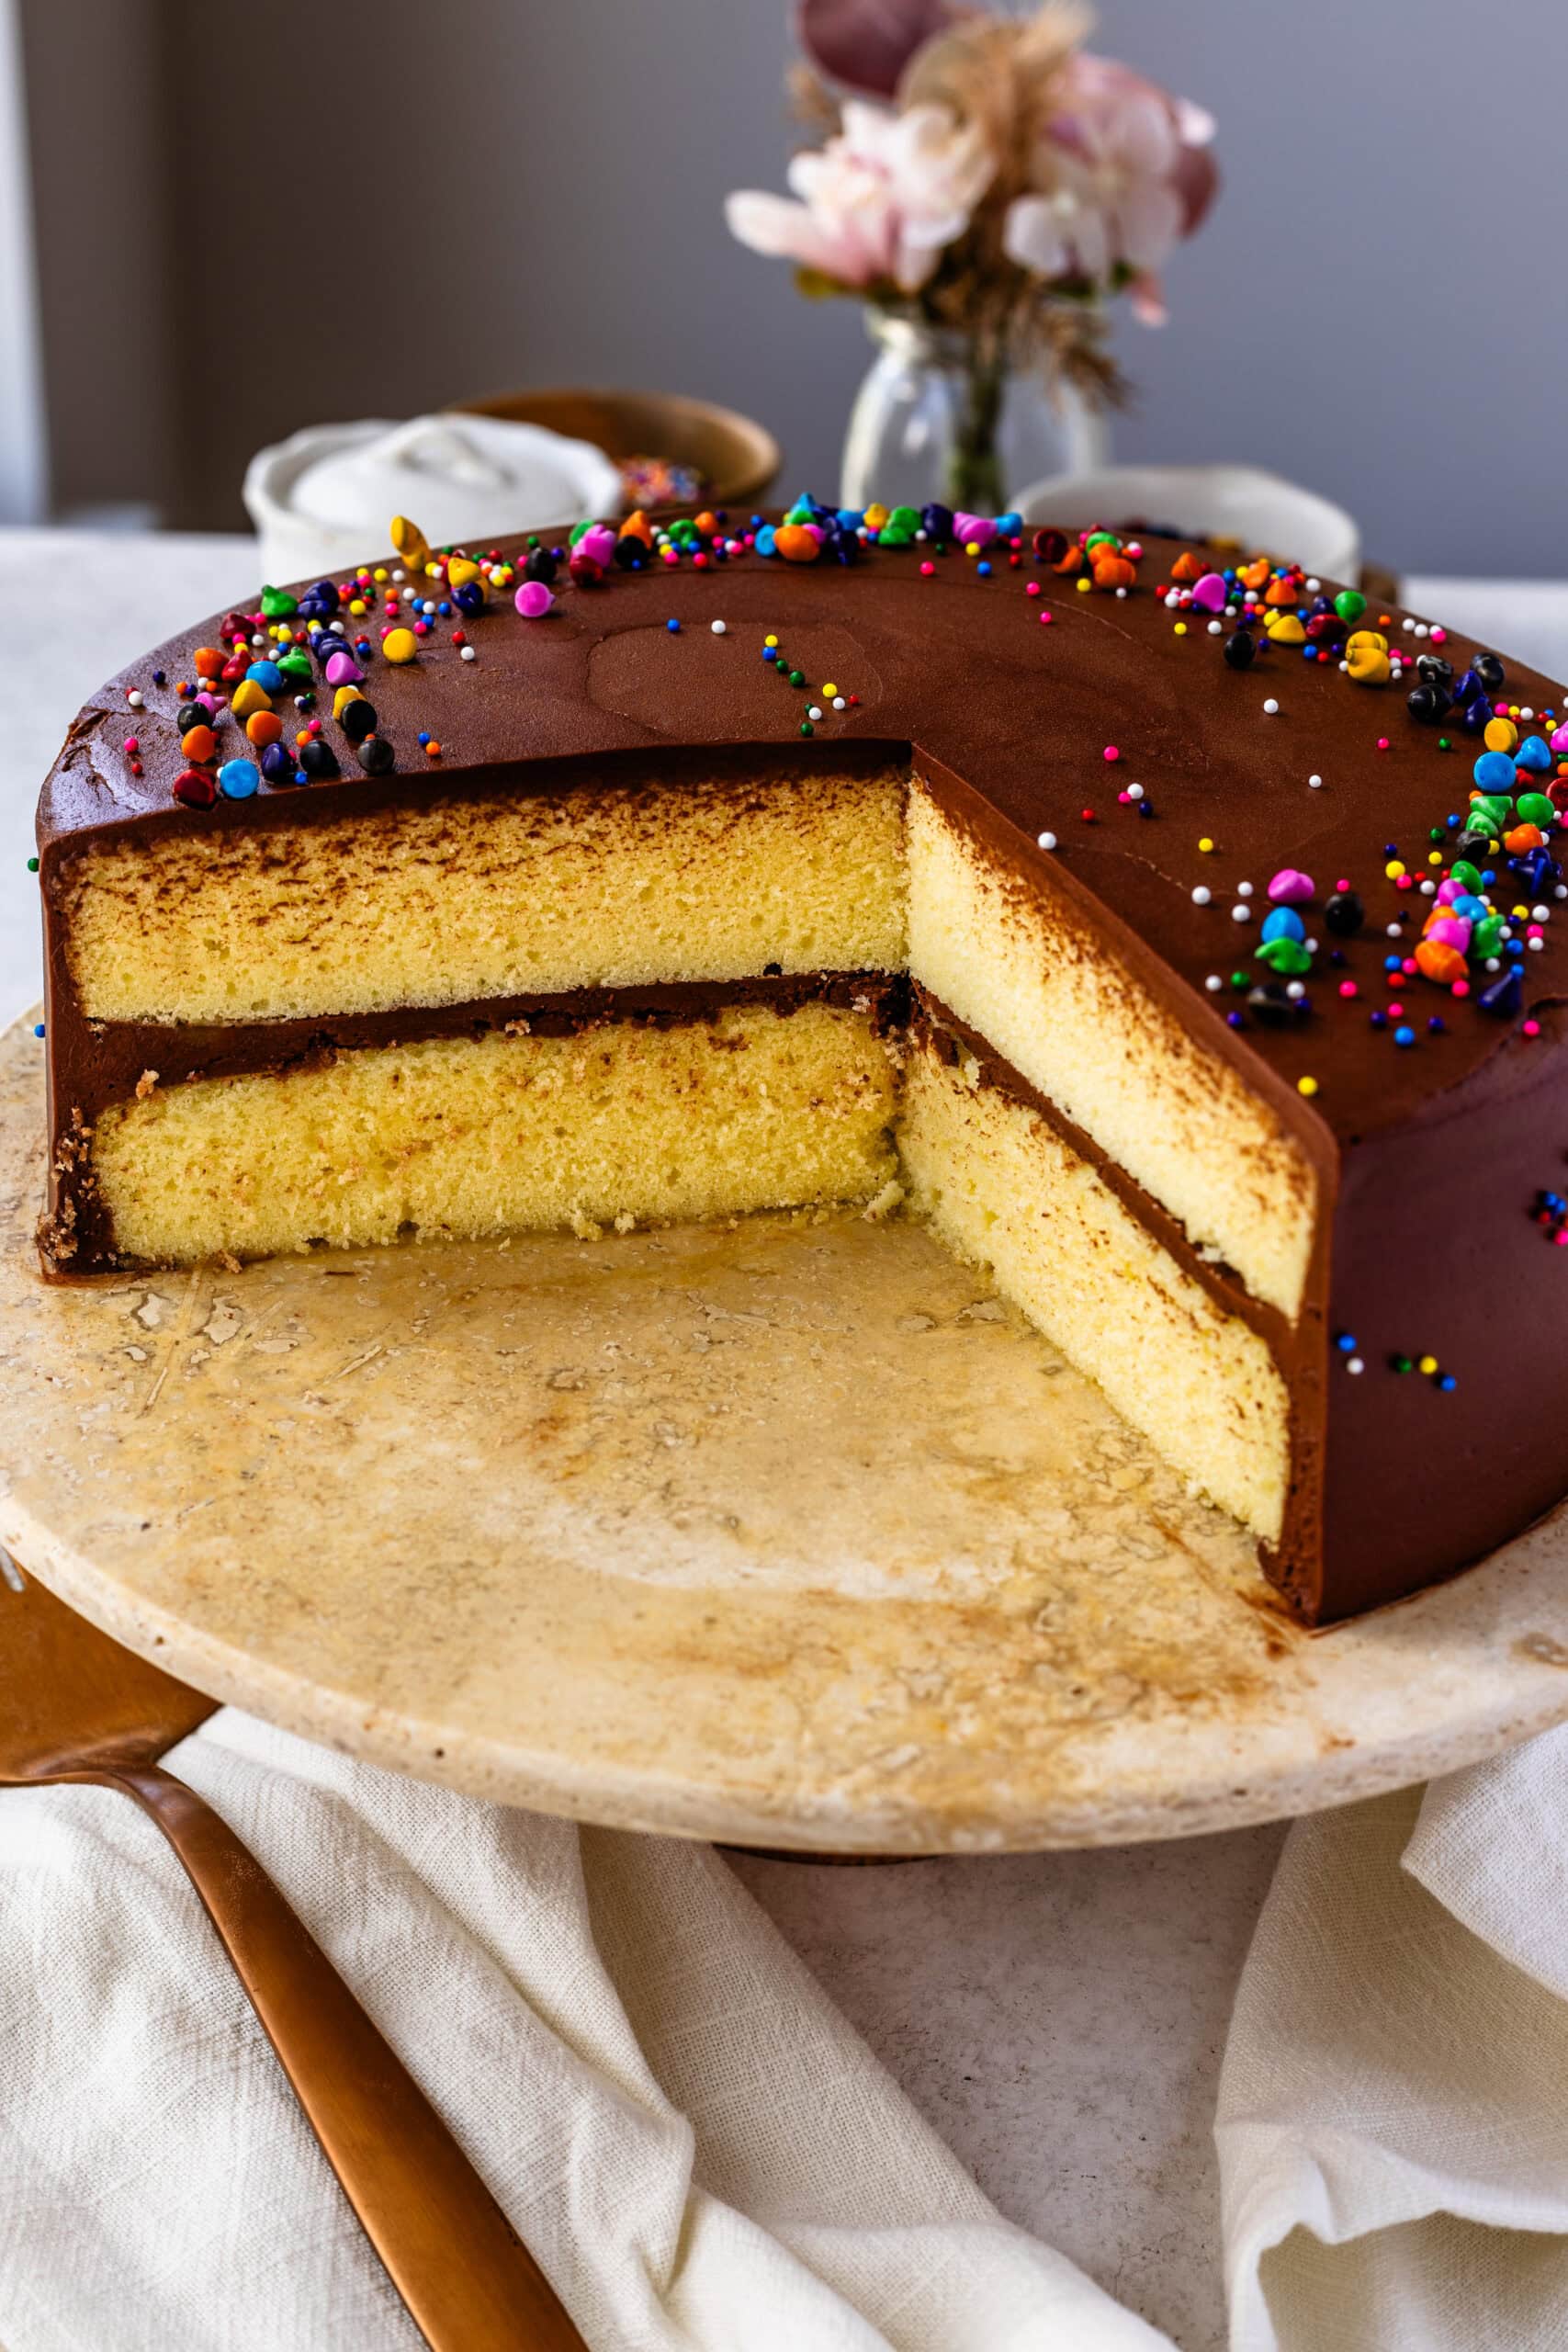
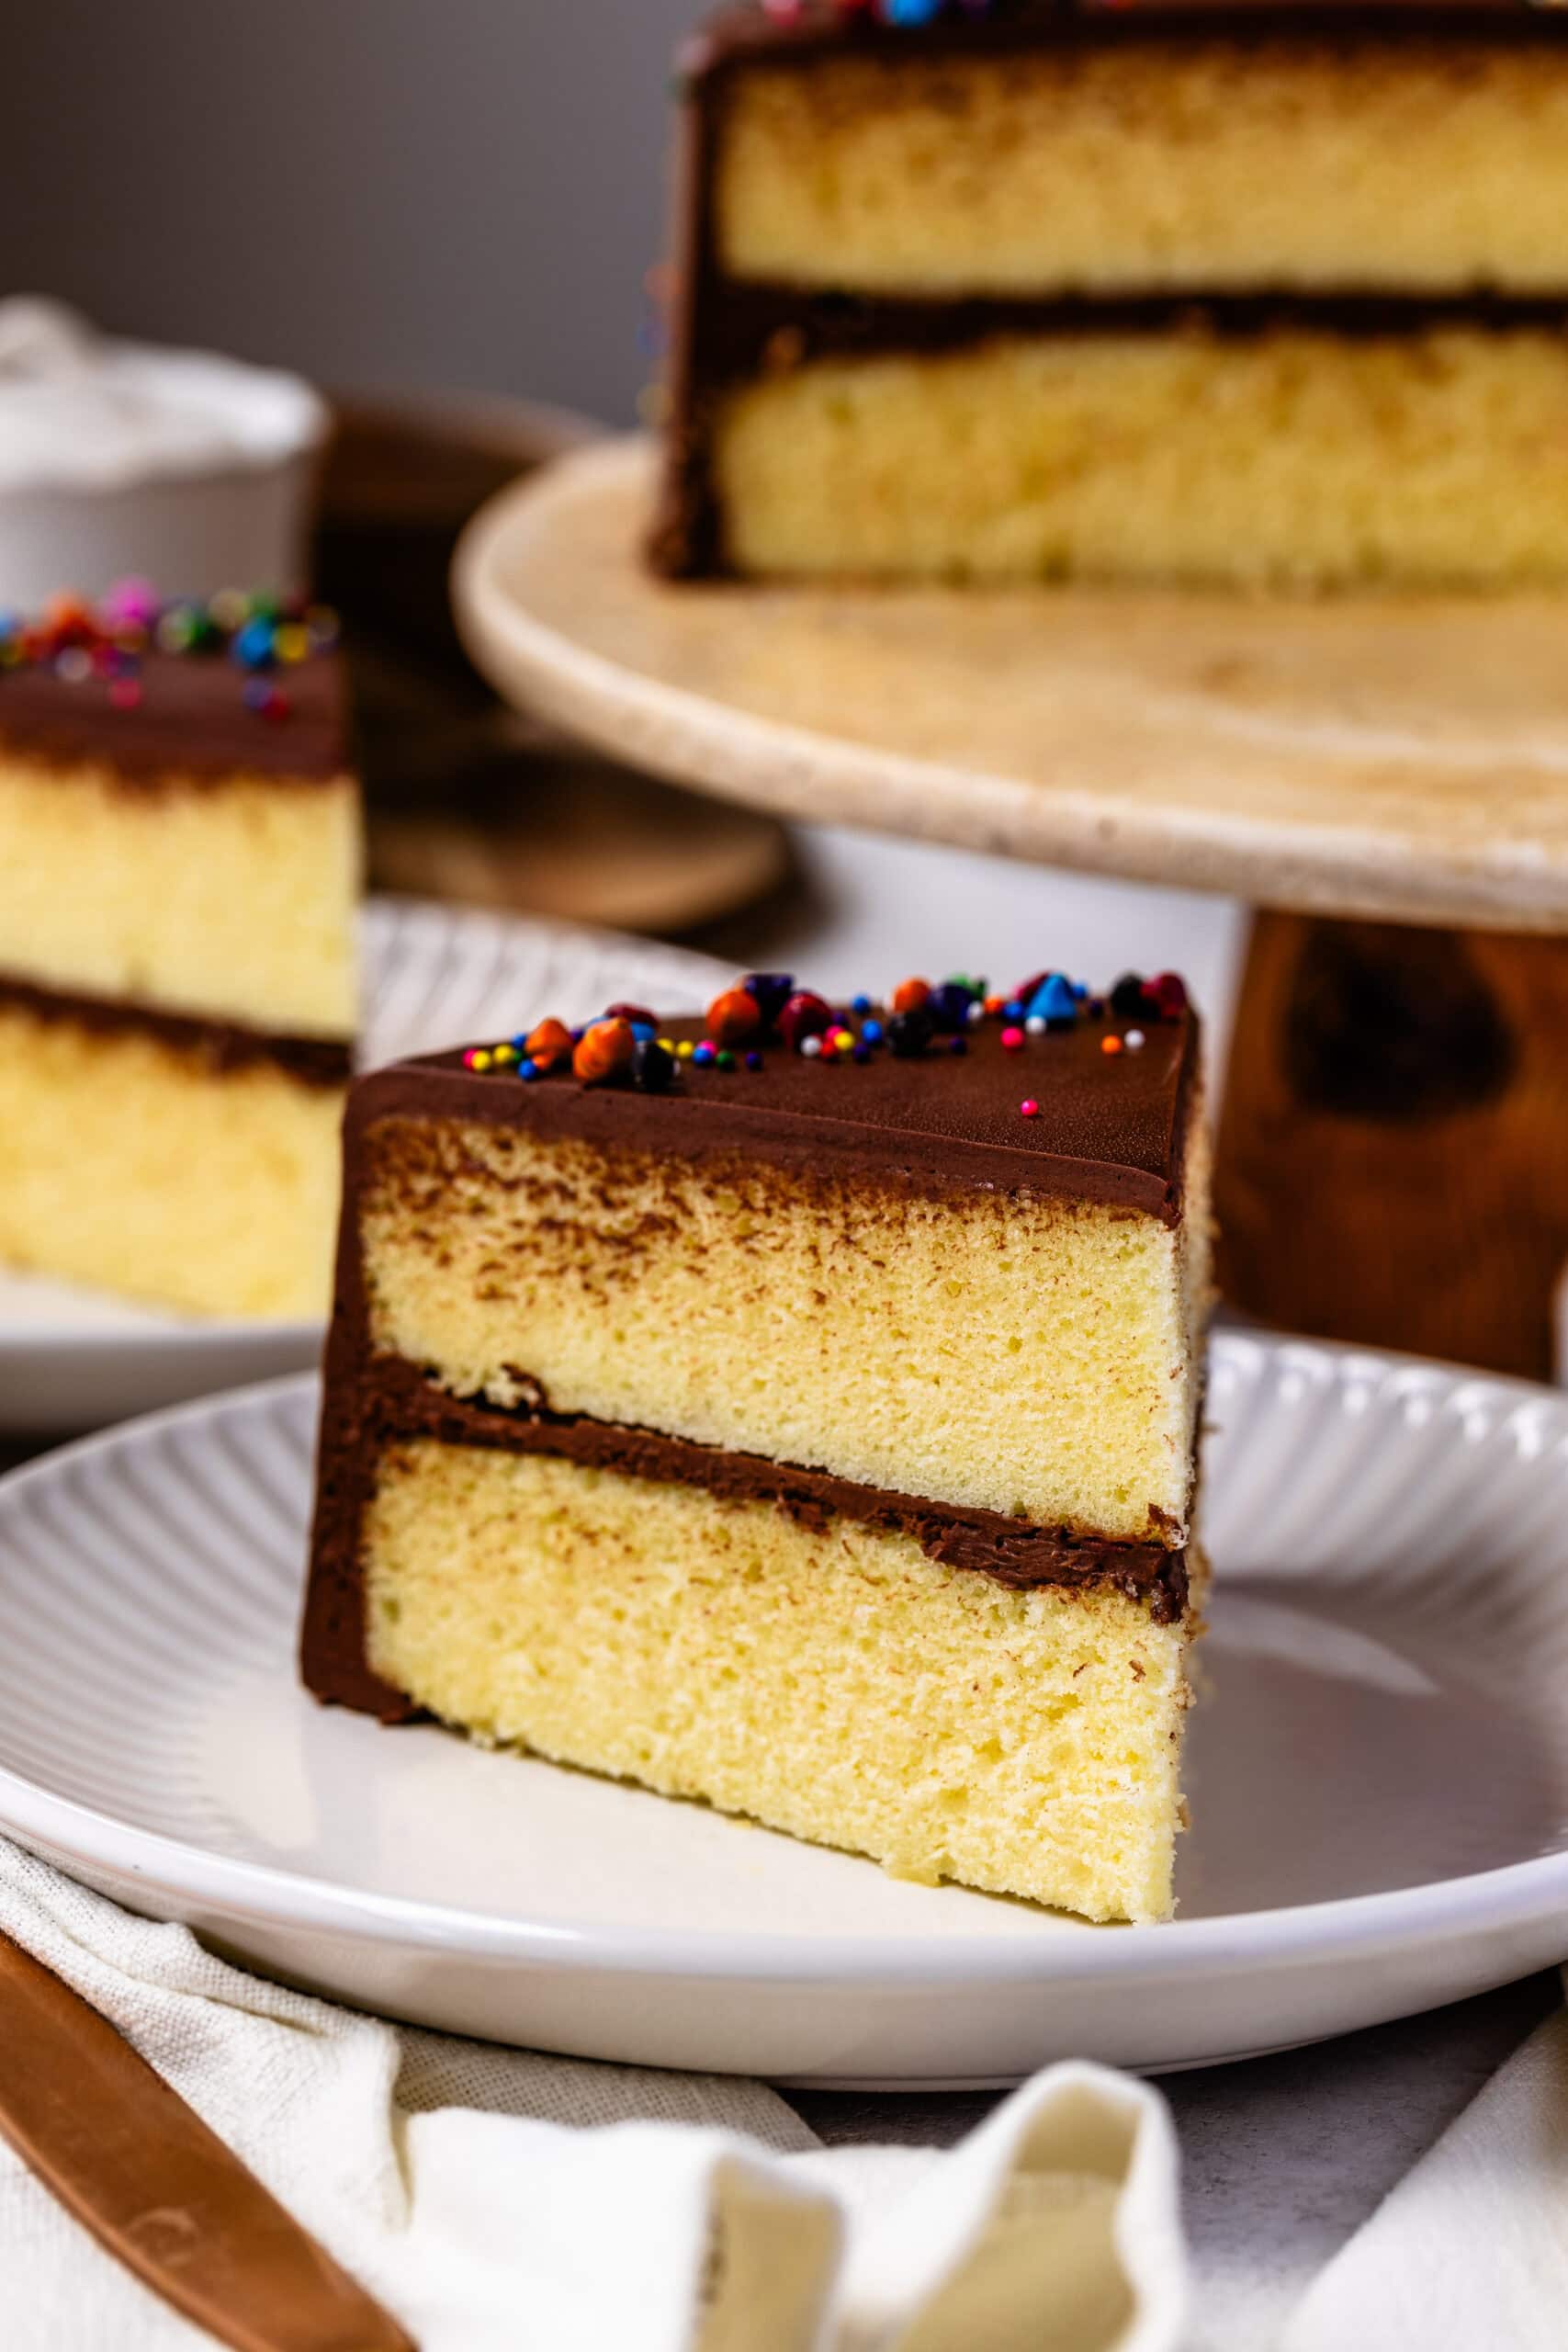
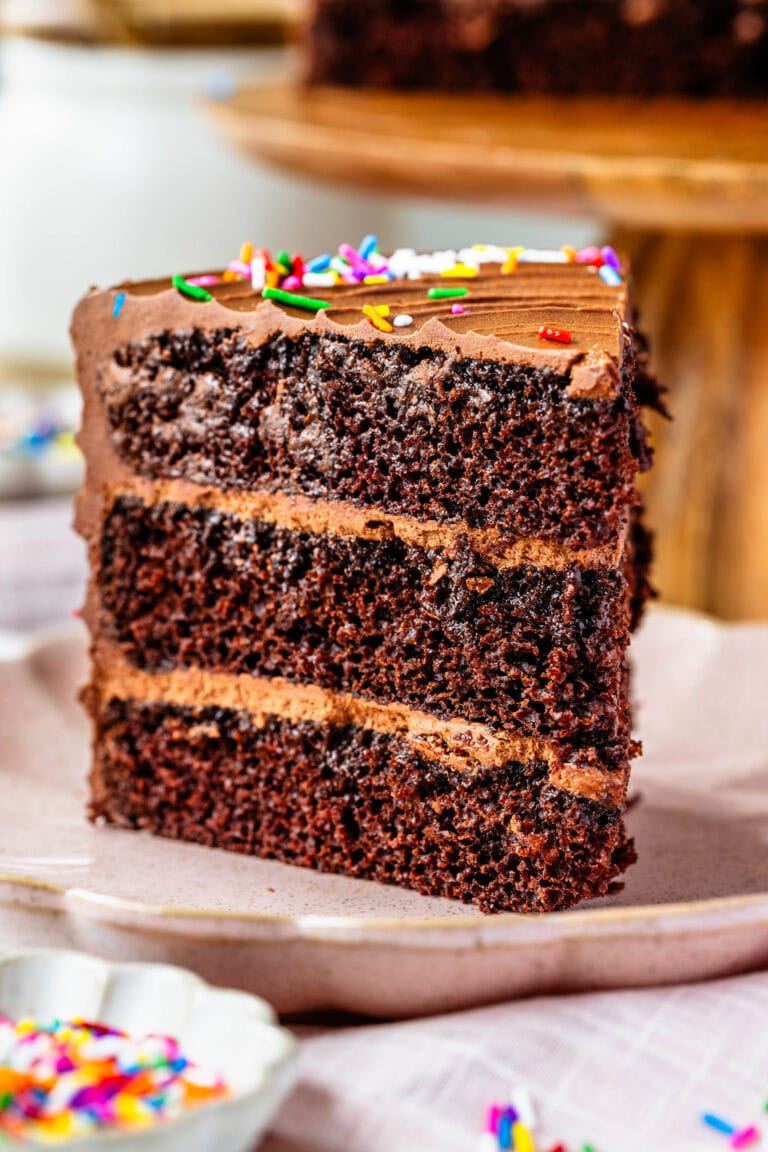
Hello friends! This new recipe is the best! This Yellow Cake is a classic and its cake layers have a buttery texture and rich flavor. Then the layers are filled and frosted with a decadent Chocolate Fudge Frosting. This scratch-made cake is a perfect base for a variety of flavors and frosting. Perfect for birthday cakes or special occasions, go wild with creativity!
The Best Yellow Cake Recipe
This Yellow Cake is incredibly versatile and can easily be adapted to suit any occasion. Its tender, buttery layers provide the perfect canvas for a wide variety of frostings and fillings, allowing you to experiment with flavors and decorations. Whether you’re scaling up the recipe to create a stunning sheet cake for a wedding or simply making a small batch for a cozy family birthday, this cake adapts beautifully. Its reliable structure and delightful taste make it a go-to choice for all kinds of celebrations.
In this post, I’ll guide you through each step to ensure your creation is as stunning as it is delicious. Below the instructions you can find the ingredient amounts!
This post may contain affiliate links. I earn a commission from qualified purchases. Please read our Privacy policy here.
Make the Cake Batter
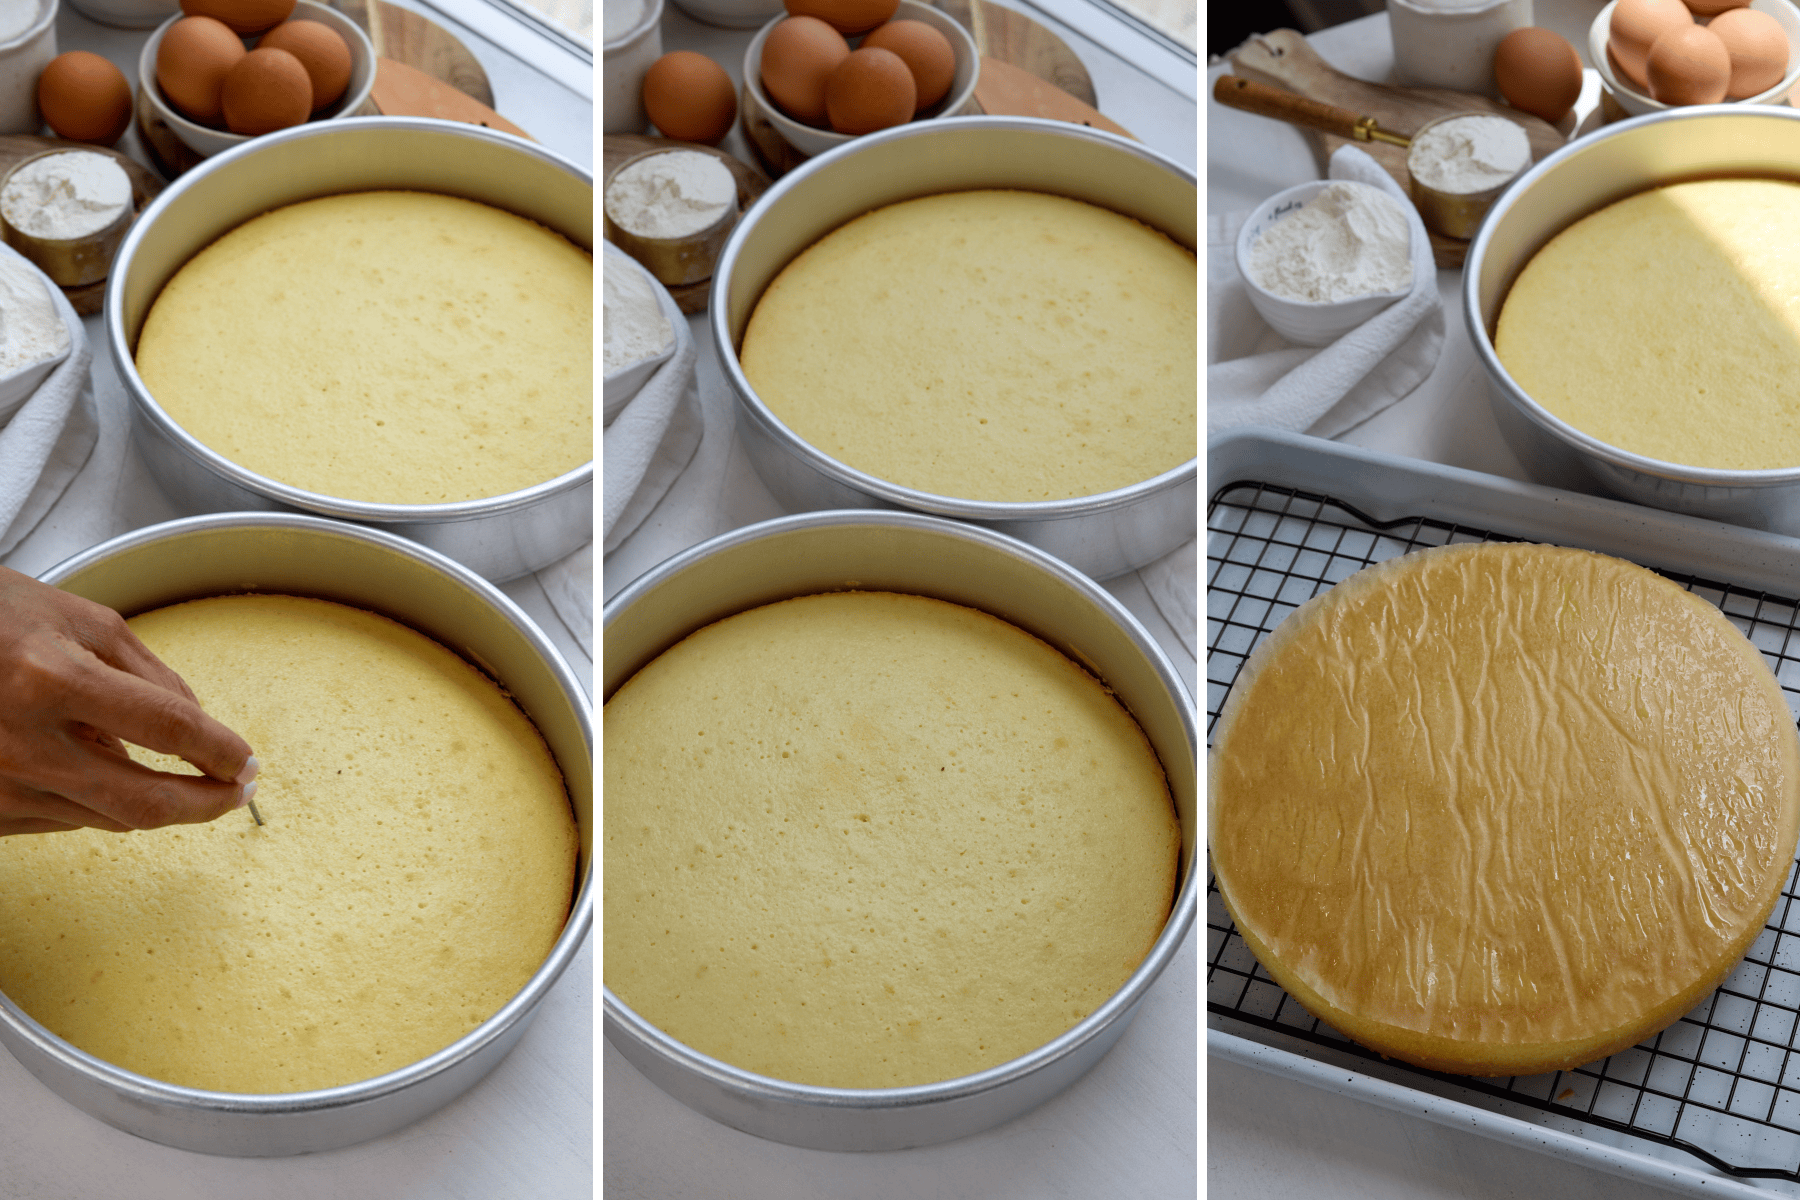
Begin by preheating your oven to 350ºF and preparing two 9-inch cake pans by greasing and lining them with parchment paper or using a cooking spray.
In this recipe, we’re using cake flour instead of all-purpose flour as it’s more delicate in structure. Combine all the dry ingredients—cake flour, baking powder, baking soda, and 1/4 teaspoon salt—in a bowl, whisk together and set aside.
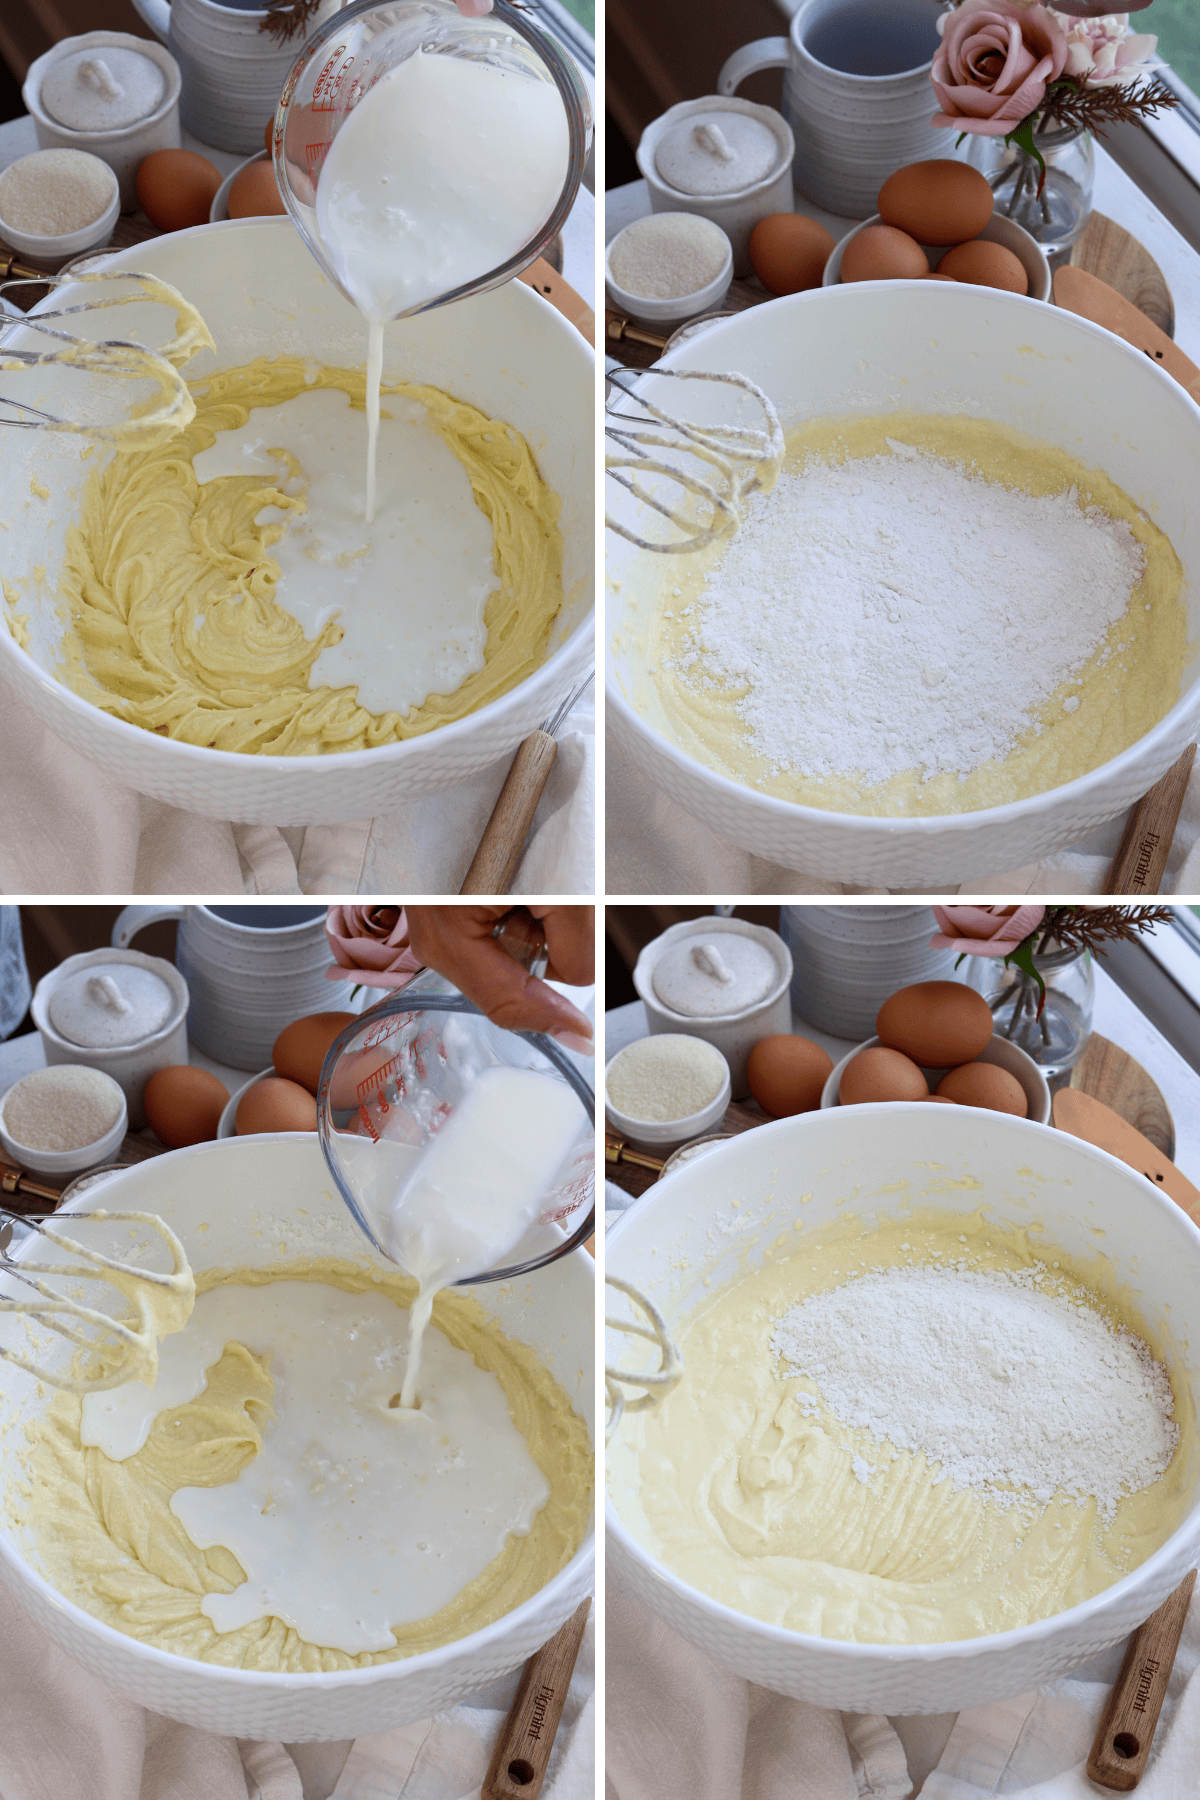
In a large bowl, beat butter for one minute. Add the sugar and the oil and beat for two minutes, until the mixture is fluffy and light with an electric hand mixer on medium-high speed. This process incorporates air into the batter, ensuring a light and tender crumb.
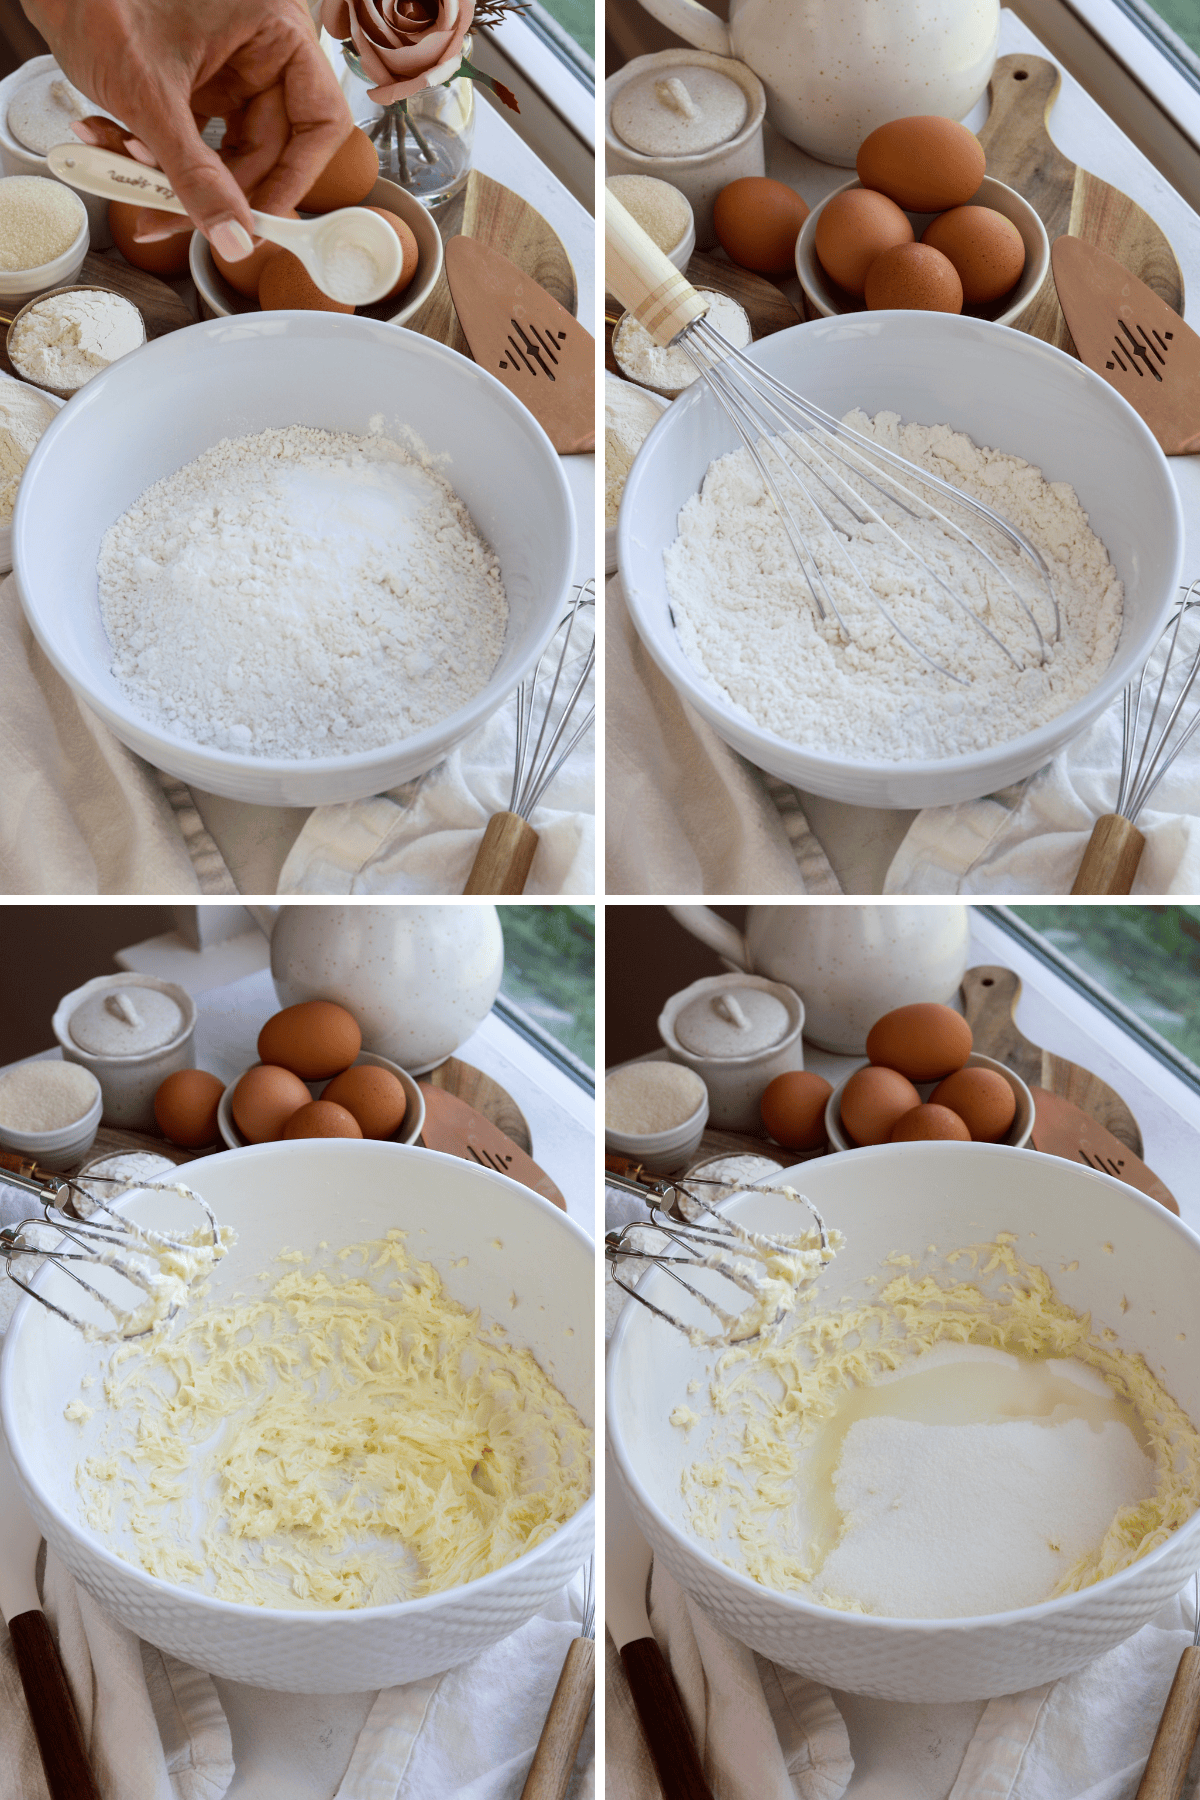
Add the eggs and yolks one at a time, mixing well after each addition. This gradual incorporation helps maintain the batter’s structure. Add the vanilla extract for a touch of sweetness and depth of flavor.
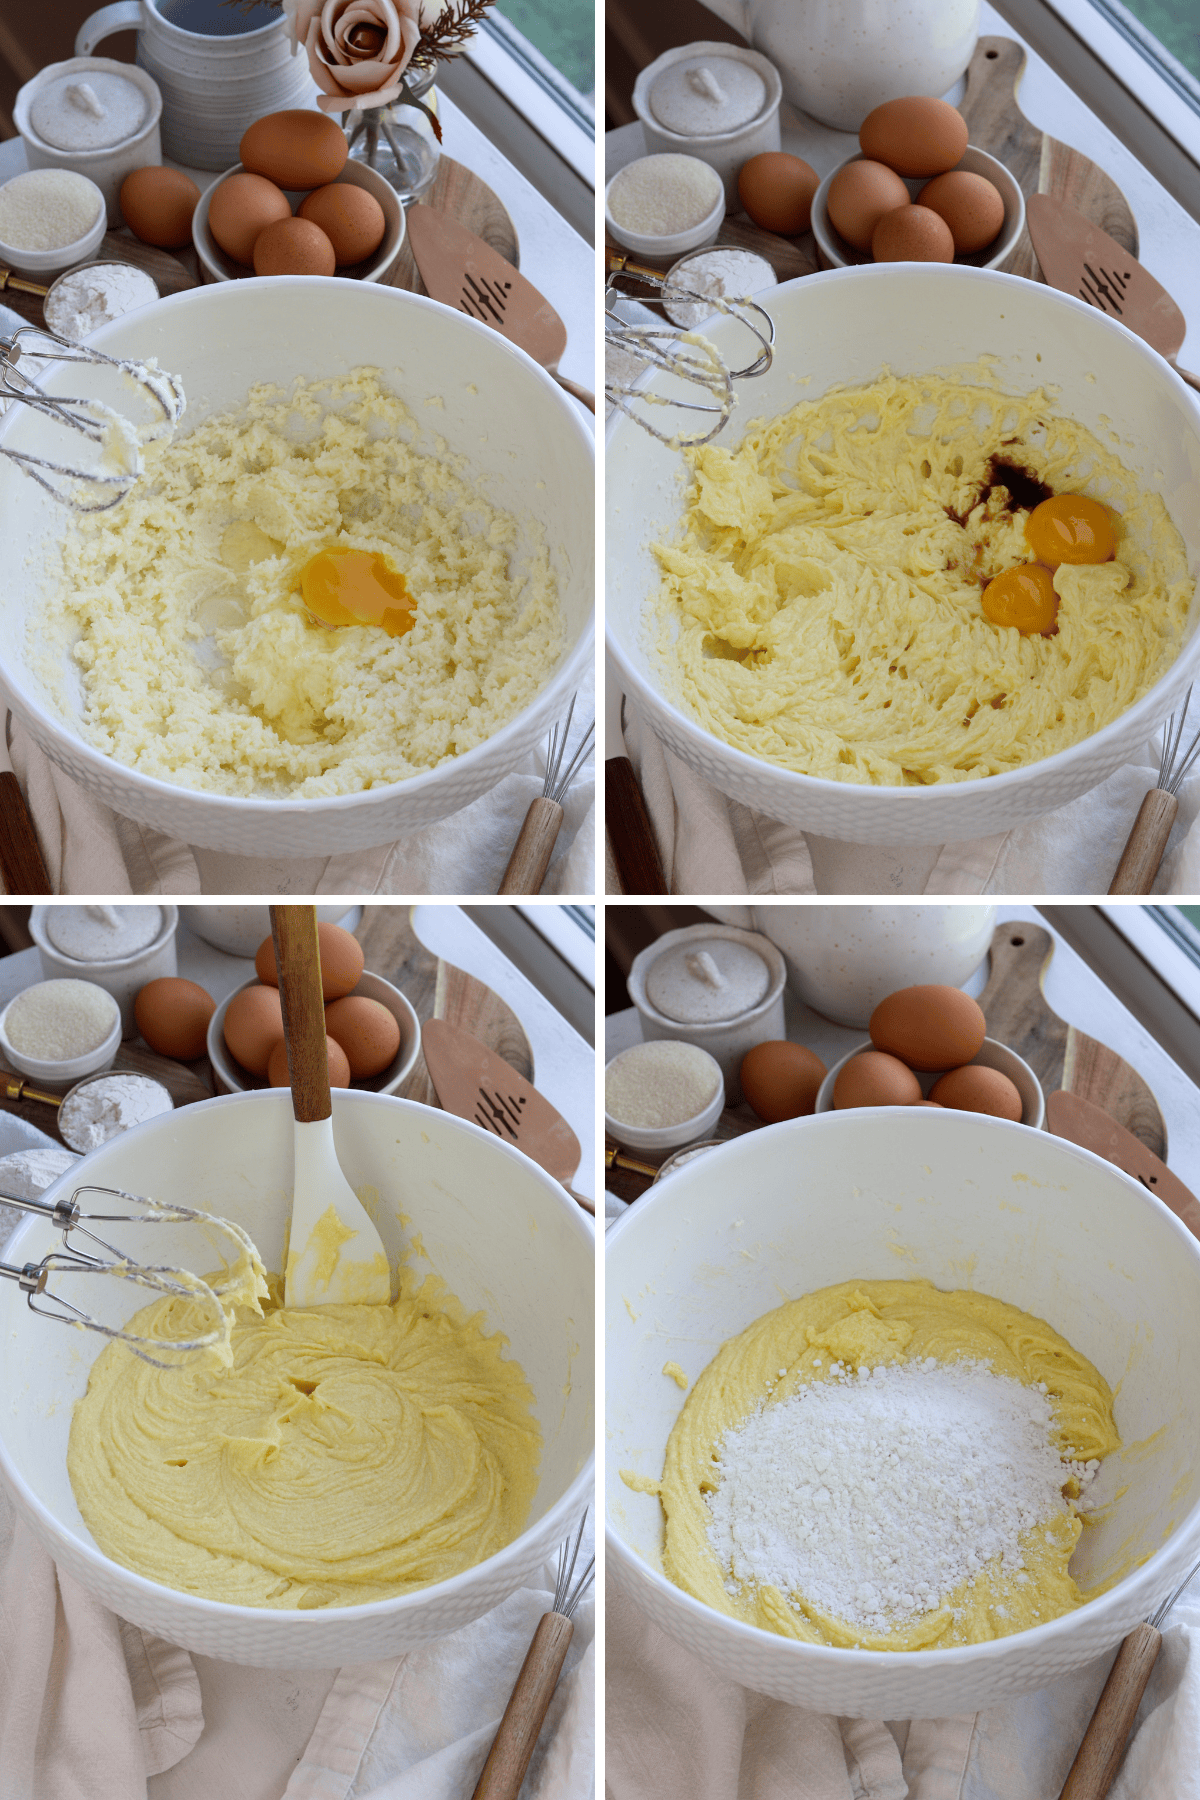
Alternate adding the buttermilk and dry ingredients to the batter, starting and ending with the dry ingredients. You will add 1/3 of the flour mixture, followed by half of the buttermilk, then another third of the flour mixture, followed by the other half of the buttermilk, and finally the remaining flour.
This method ensures a smooth, lump-free batter.
Baking the Cake
Divide the batter and pour evenly between the prepared pans. Then bake for 35 to 40 minutes, or until a toothpick inserted into the center comes out clean. Allow the cakes to cool in the pans for 10 minutes before transferring them to a cooling rack. If you’re not assembling the cake immediately, wrap the cooled cakes in plastic wrap and freeze them to maintain their moisture.
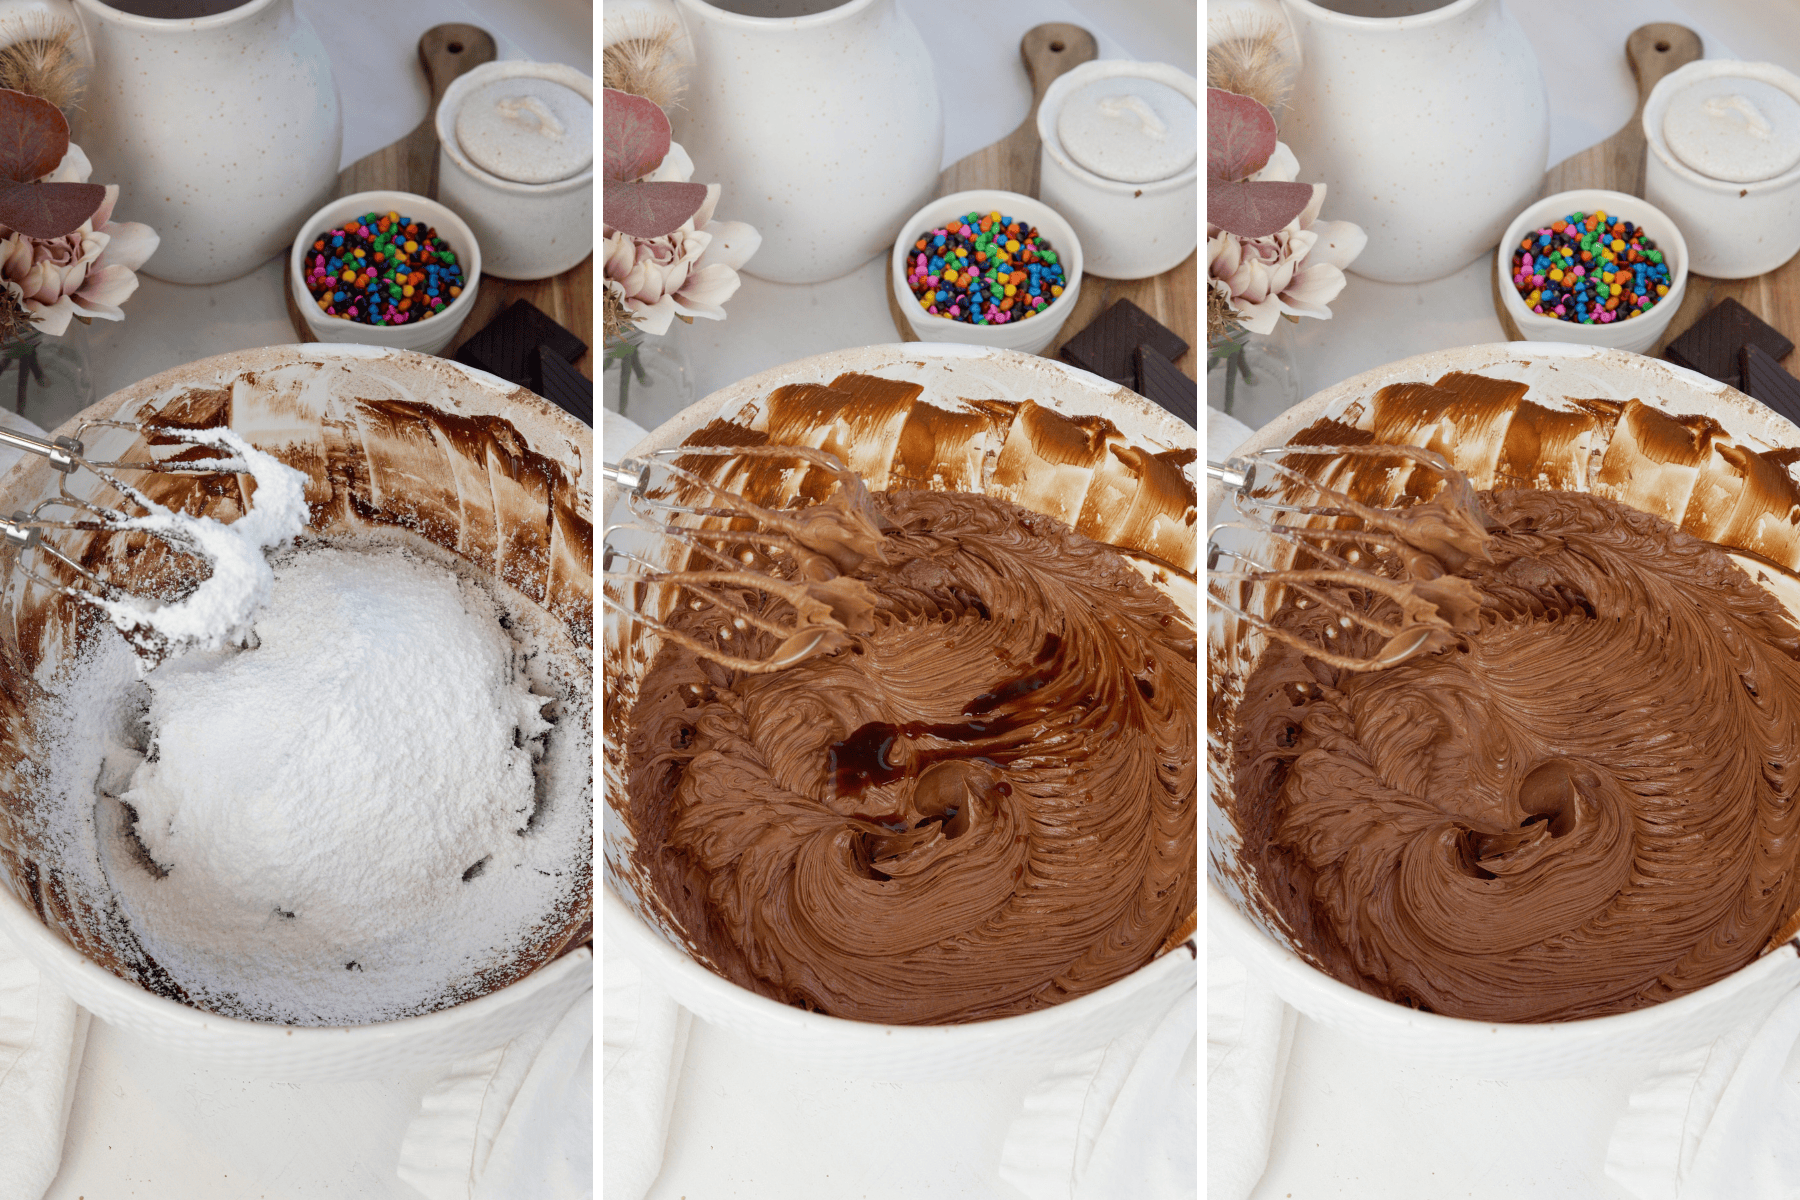
Make the Chocolate Fudge Frosting
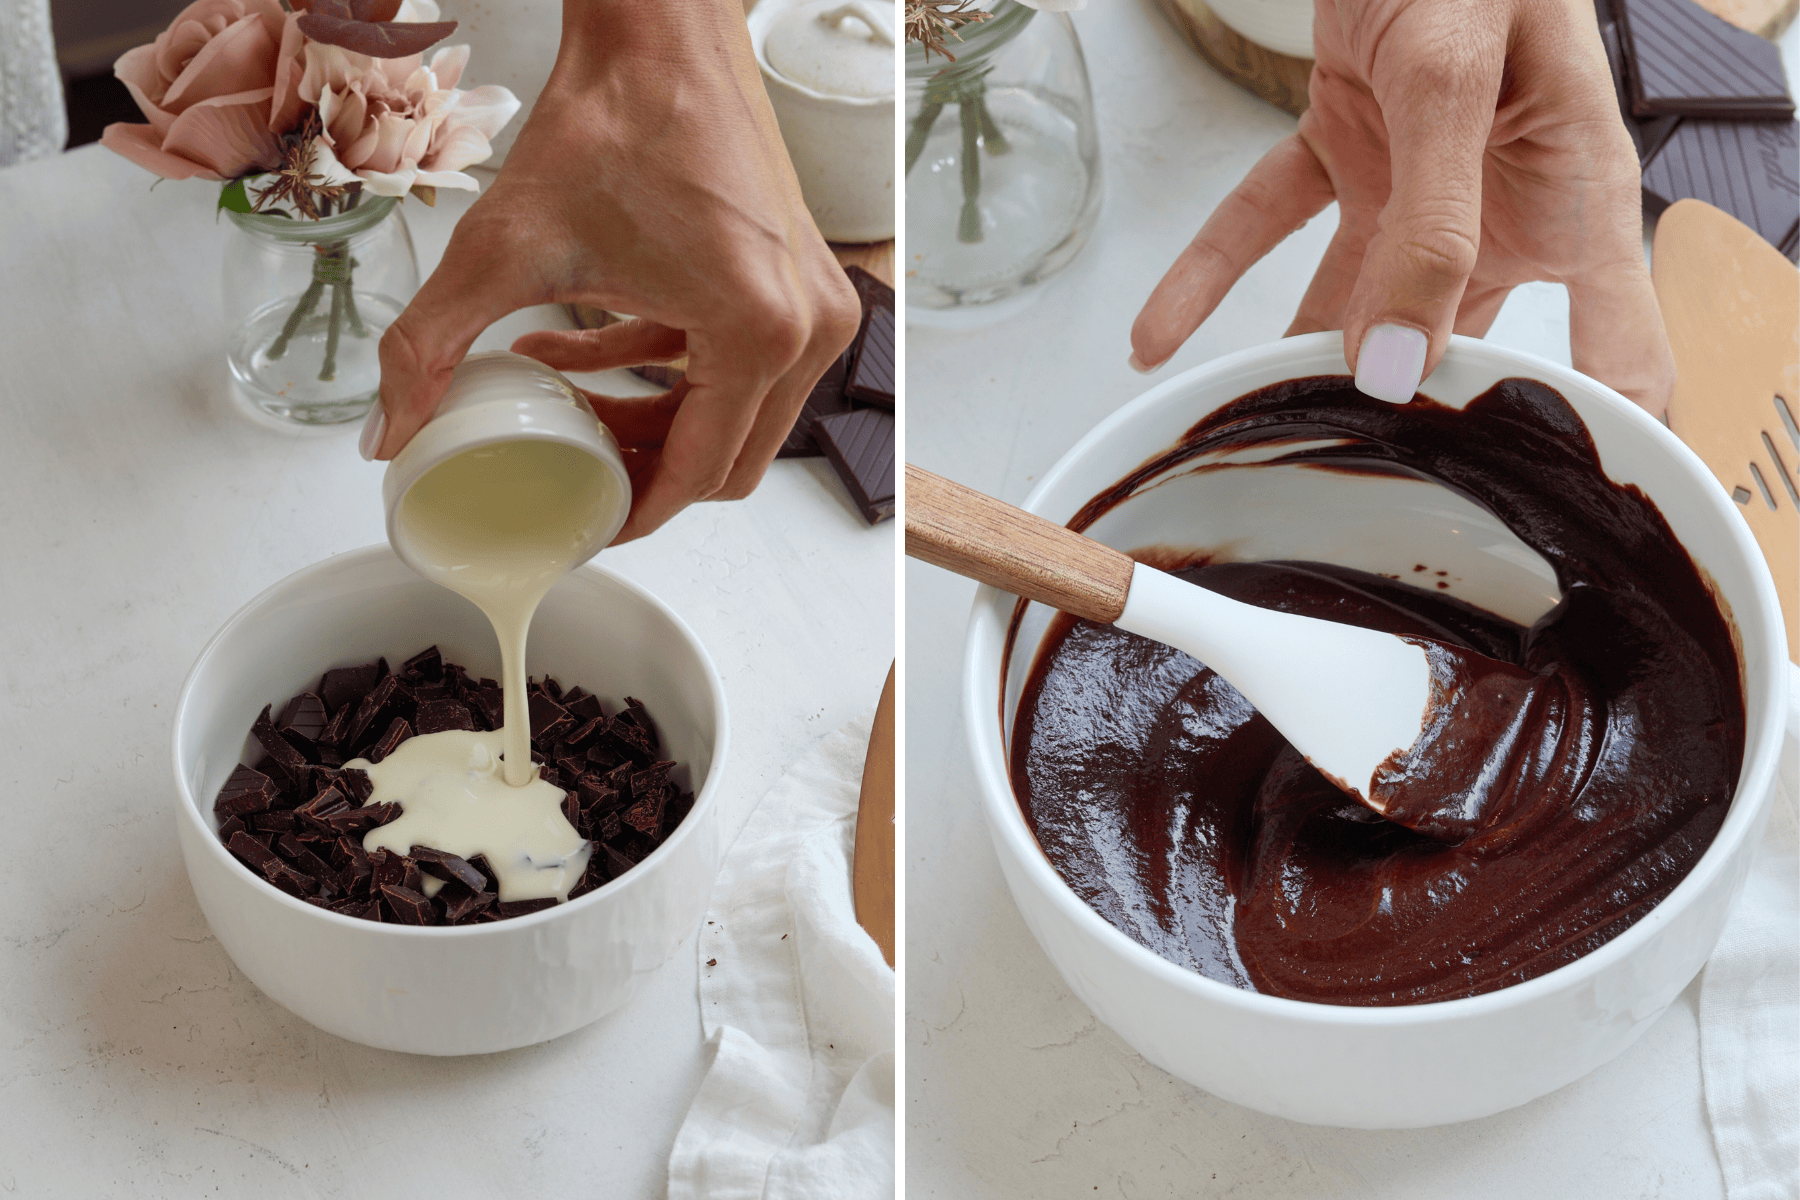
For the frosting, melt the chopped chocolate and heavy cream together in the microwave, stirring until smooth. Allow the mixture to cool.
In a separate bowl, beat the butter until fluffy and creamy. Sift half of the powdered sugar and cocoa powder into the bowl with the butter, then add the melted chocolate mixture and vanilla extract. Mix on low speed until the ingredients are combined.
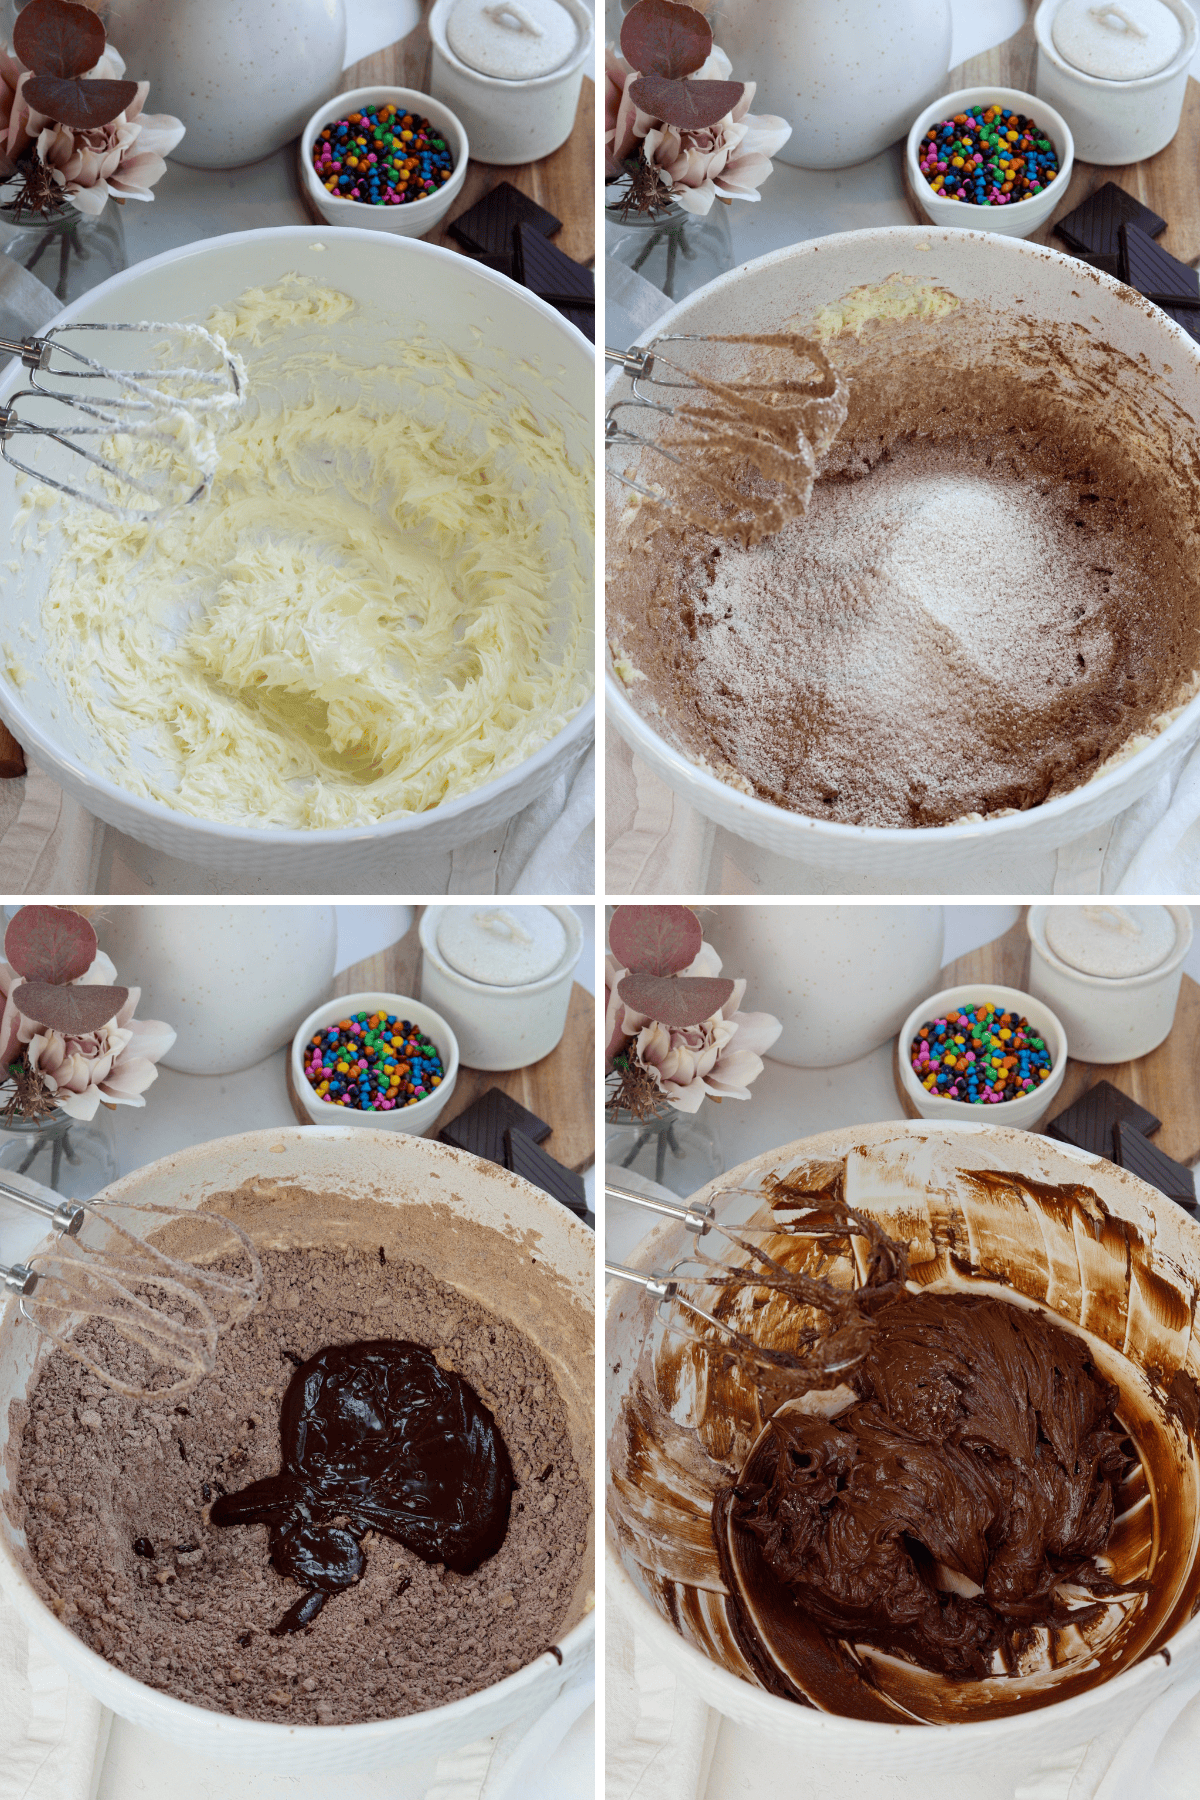
Add the remaining powdered sugar and mix on low speed. Raise the speed to medium-high and beat for another minute.
Then add the vanilla and mix again until the frosting is smooth.
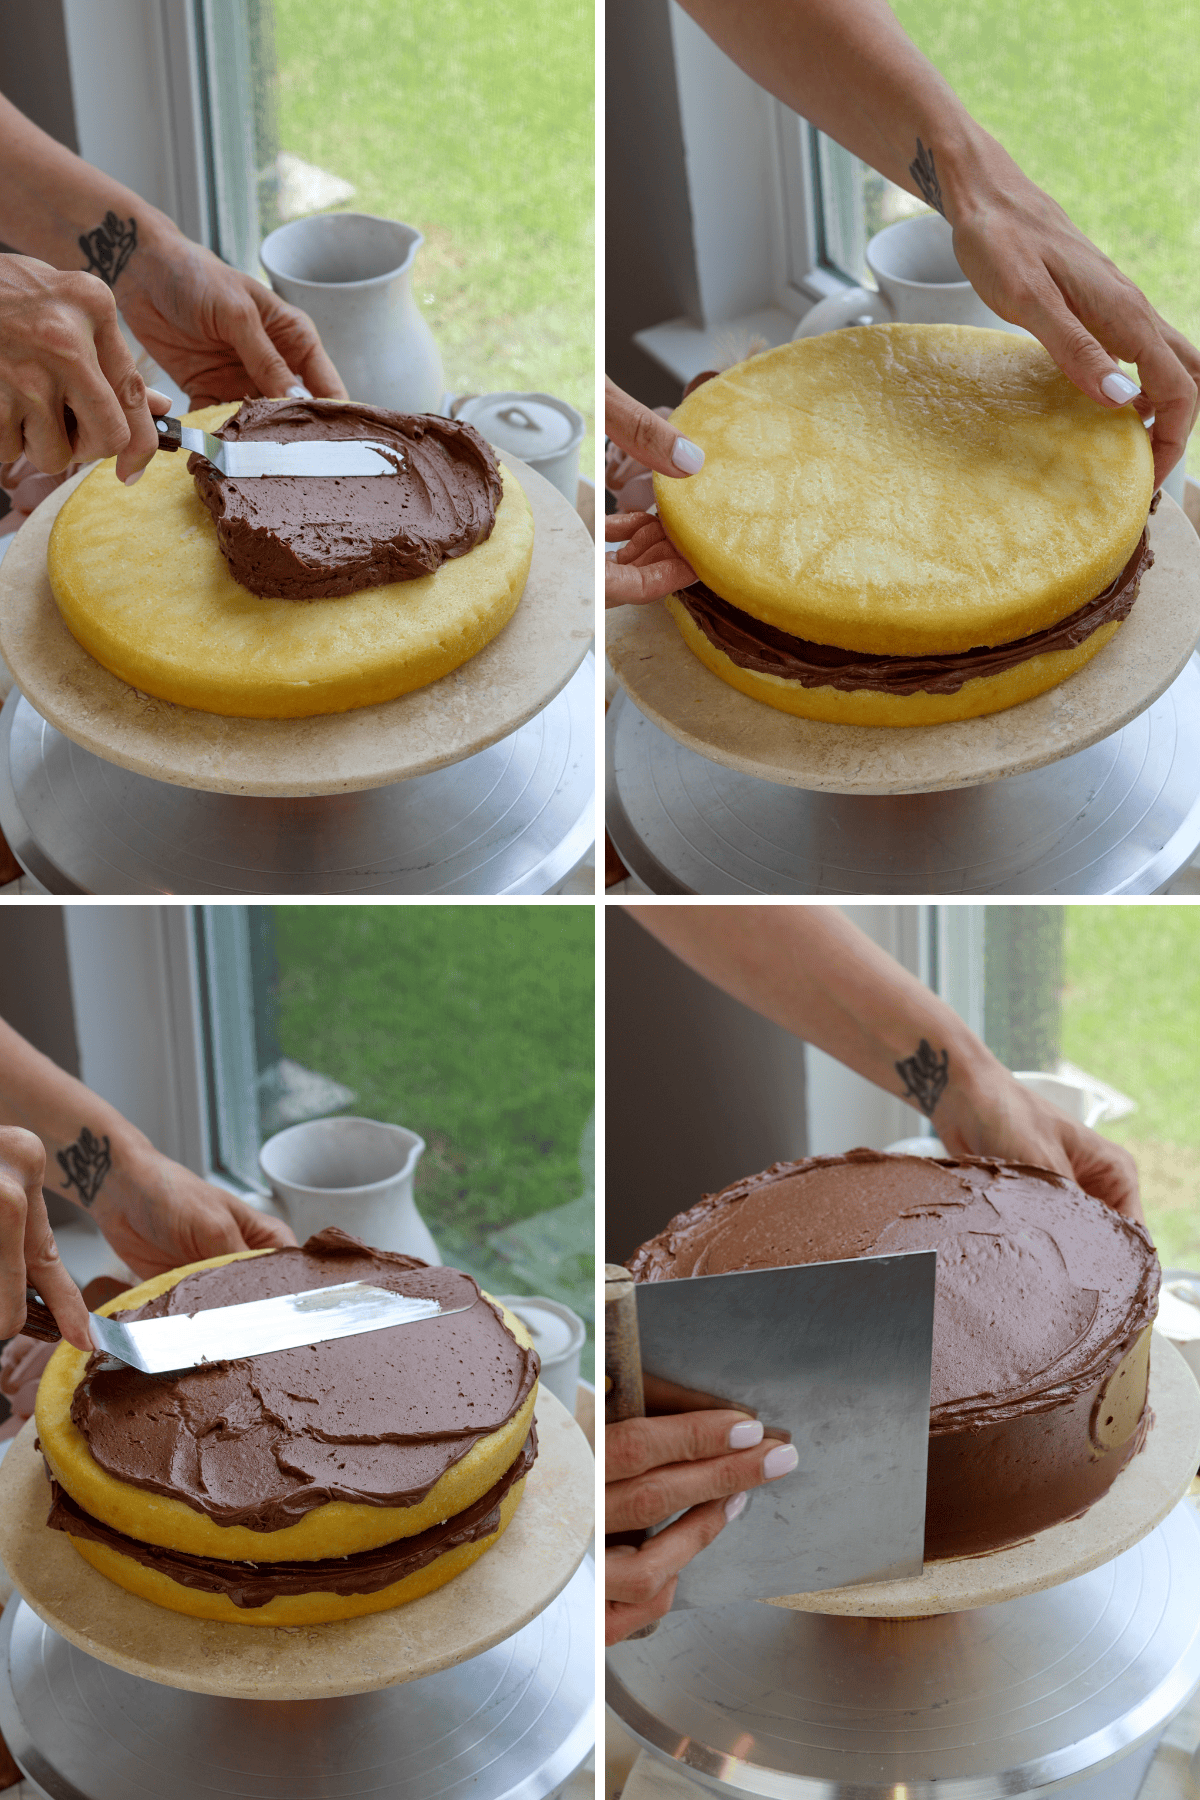
Assembling the Cake
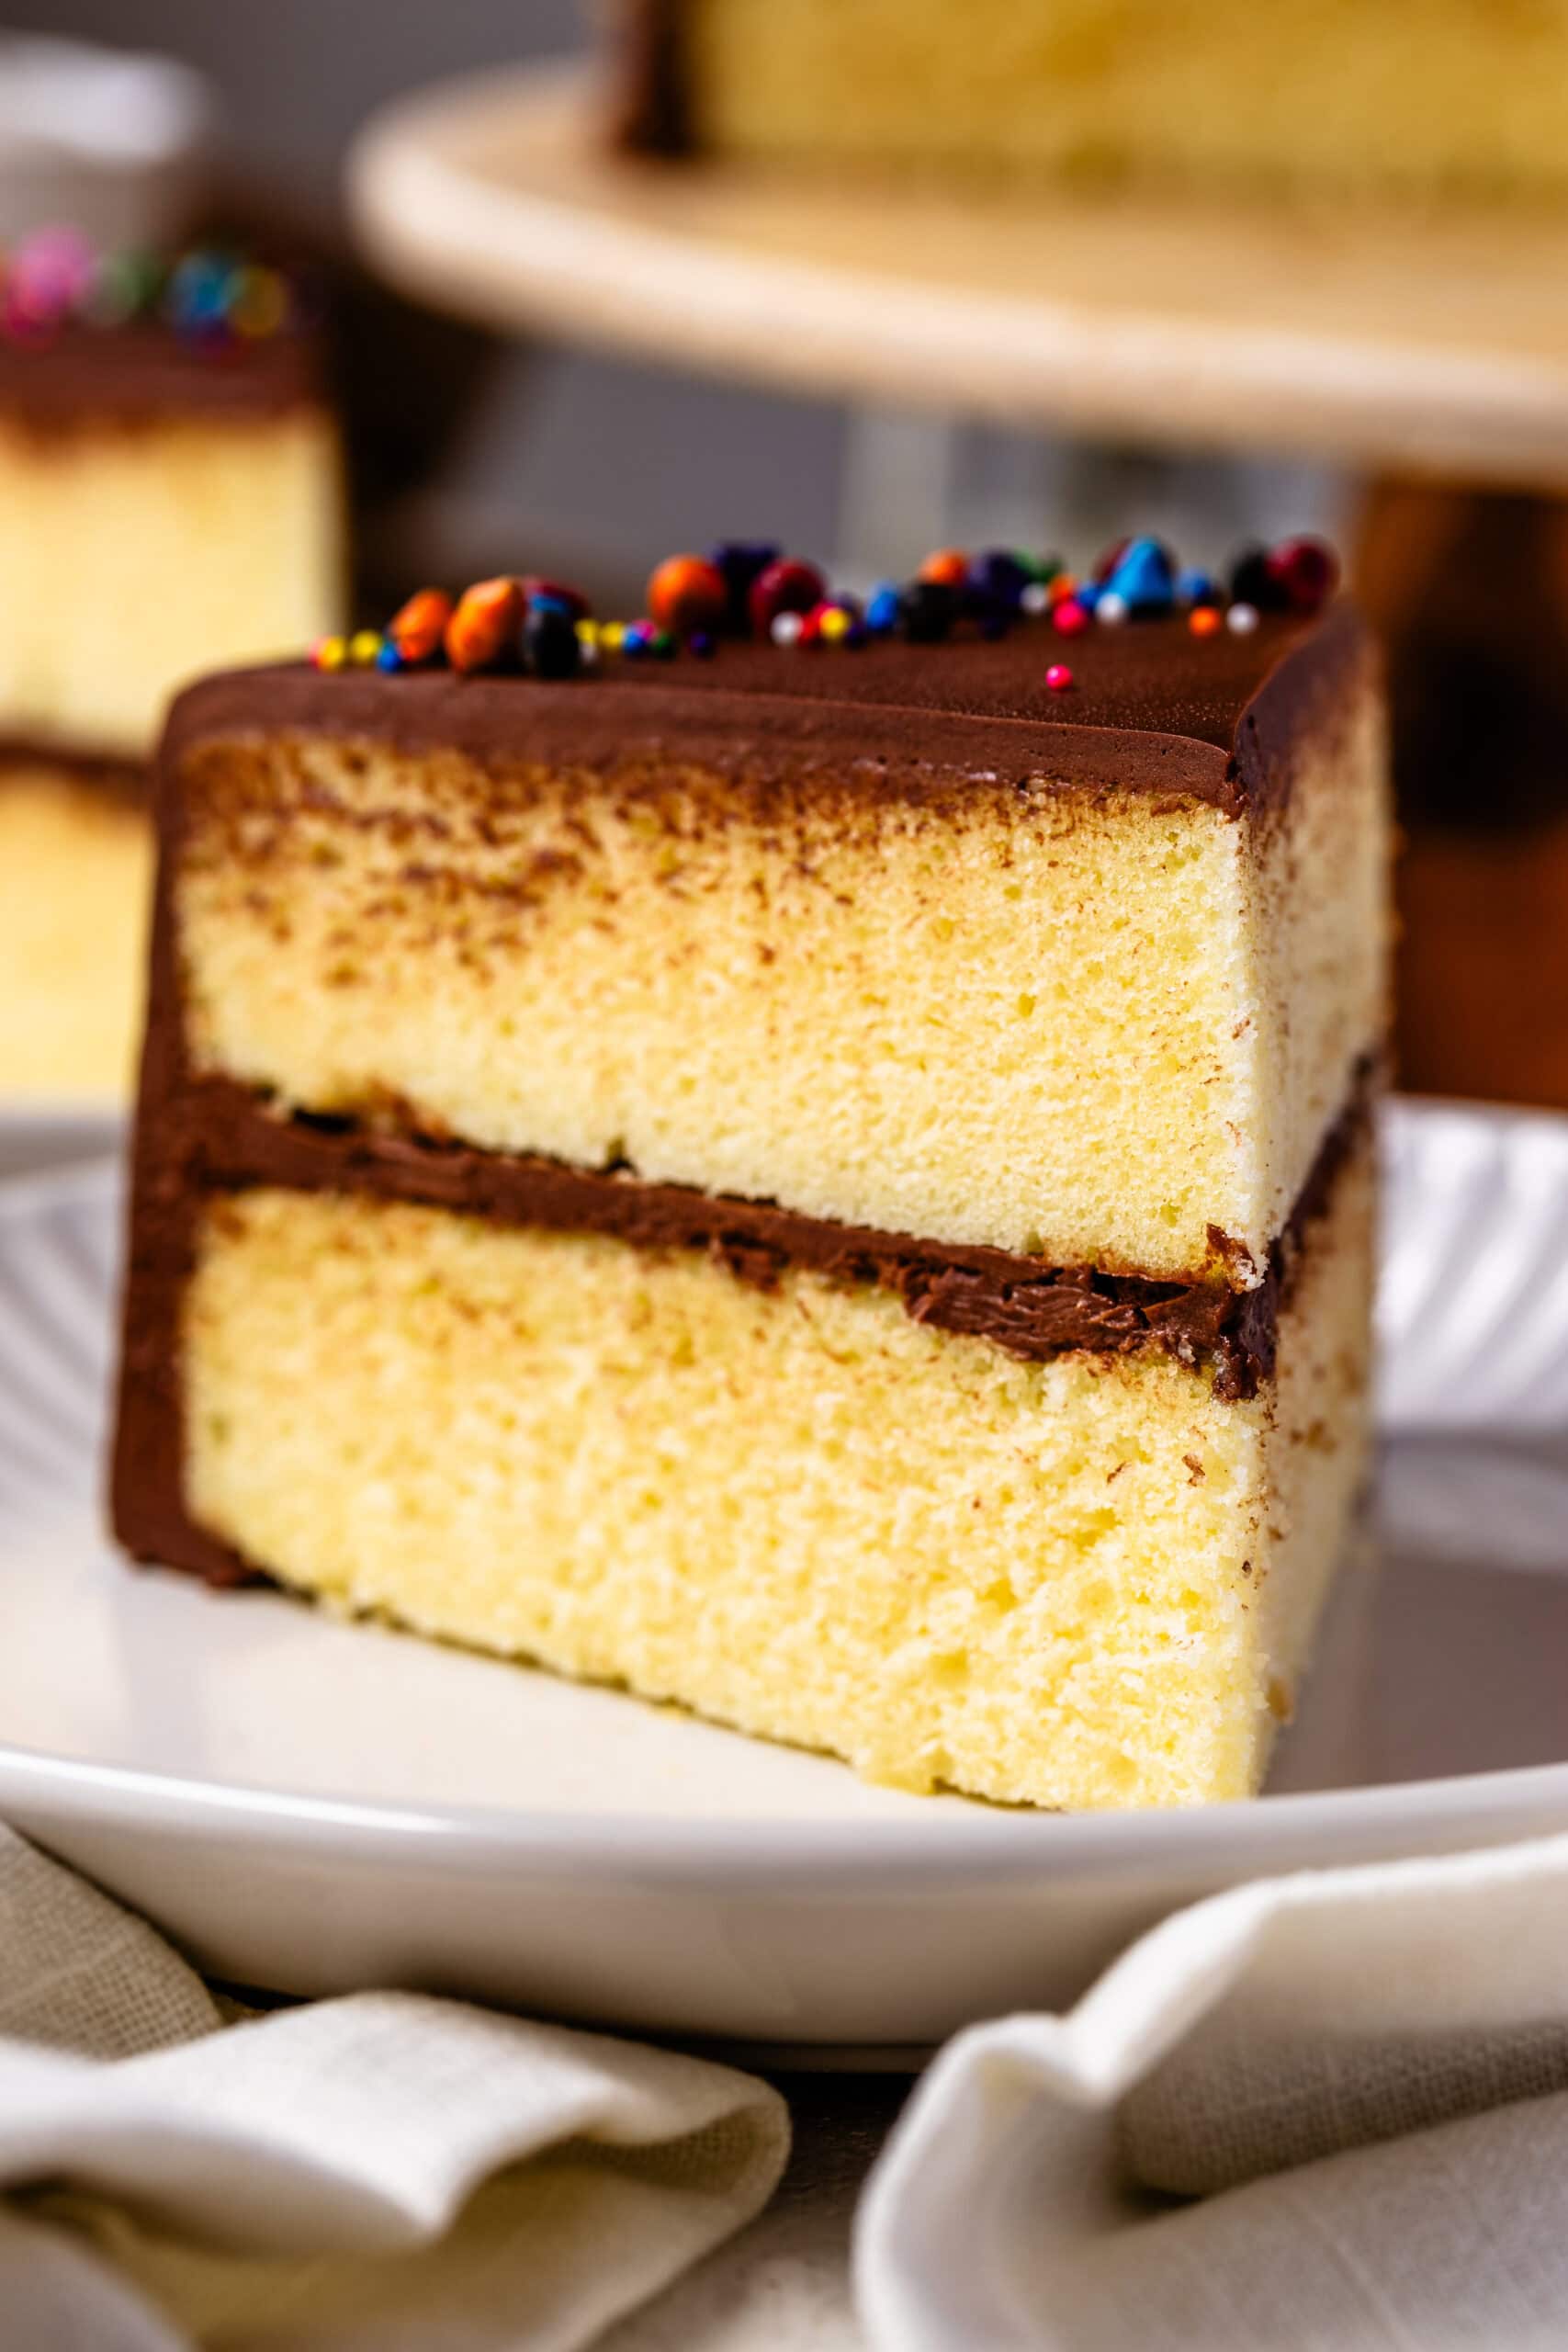
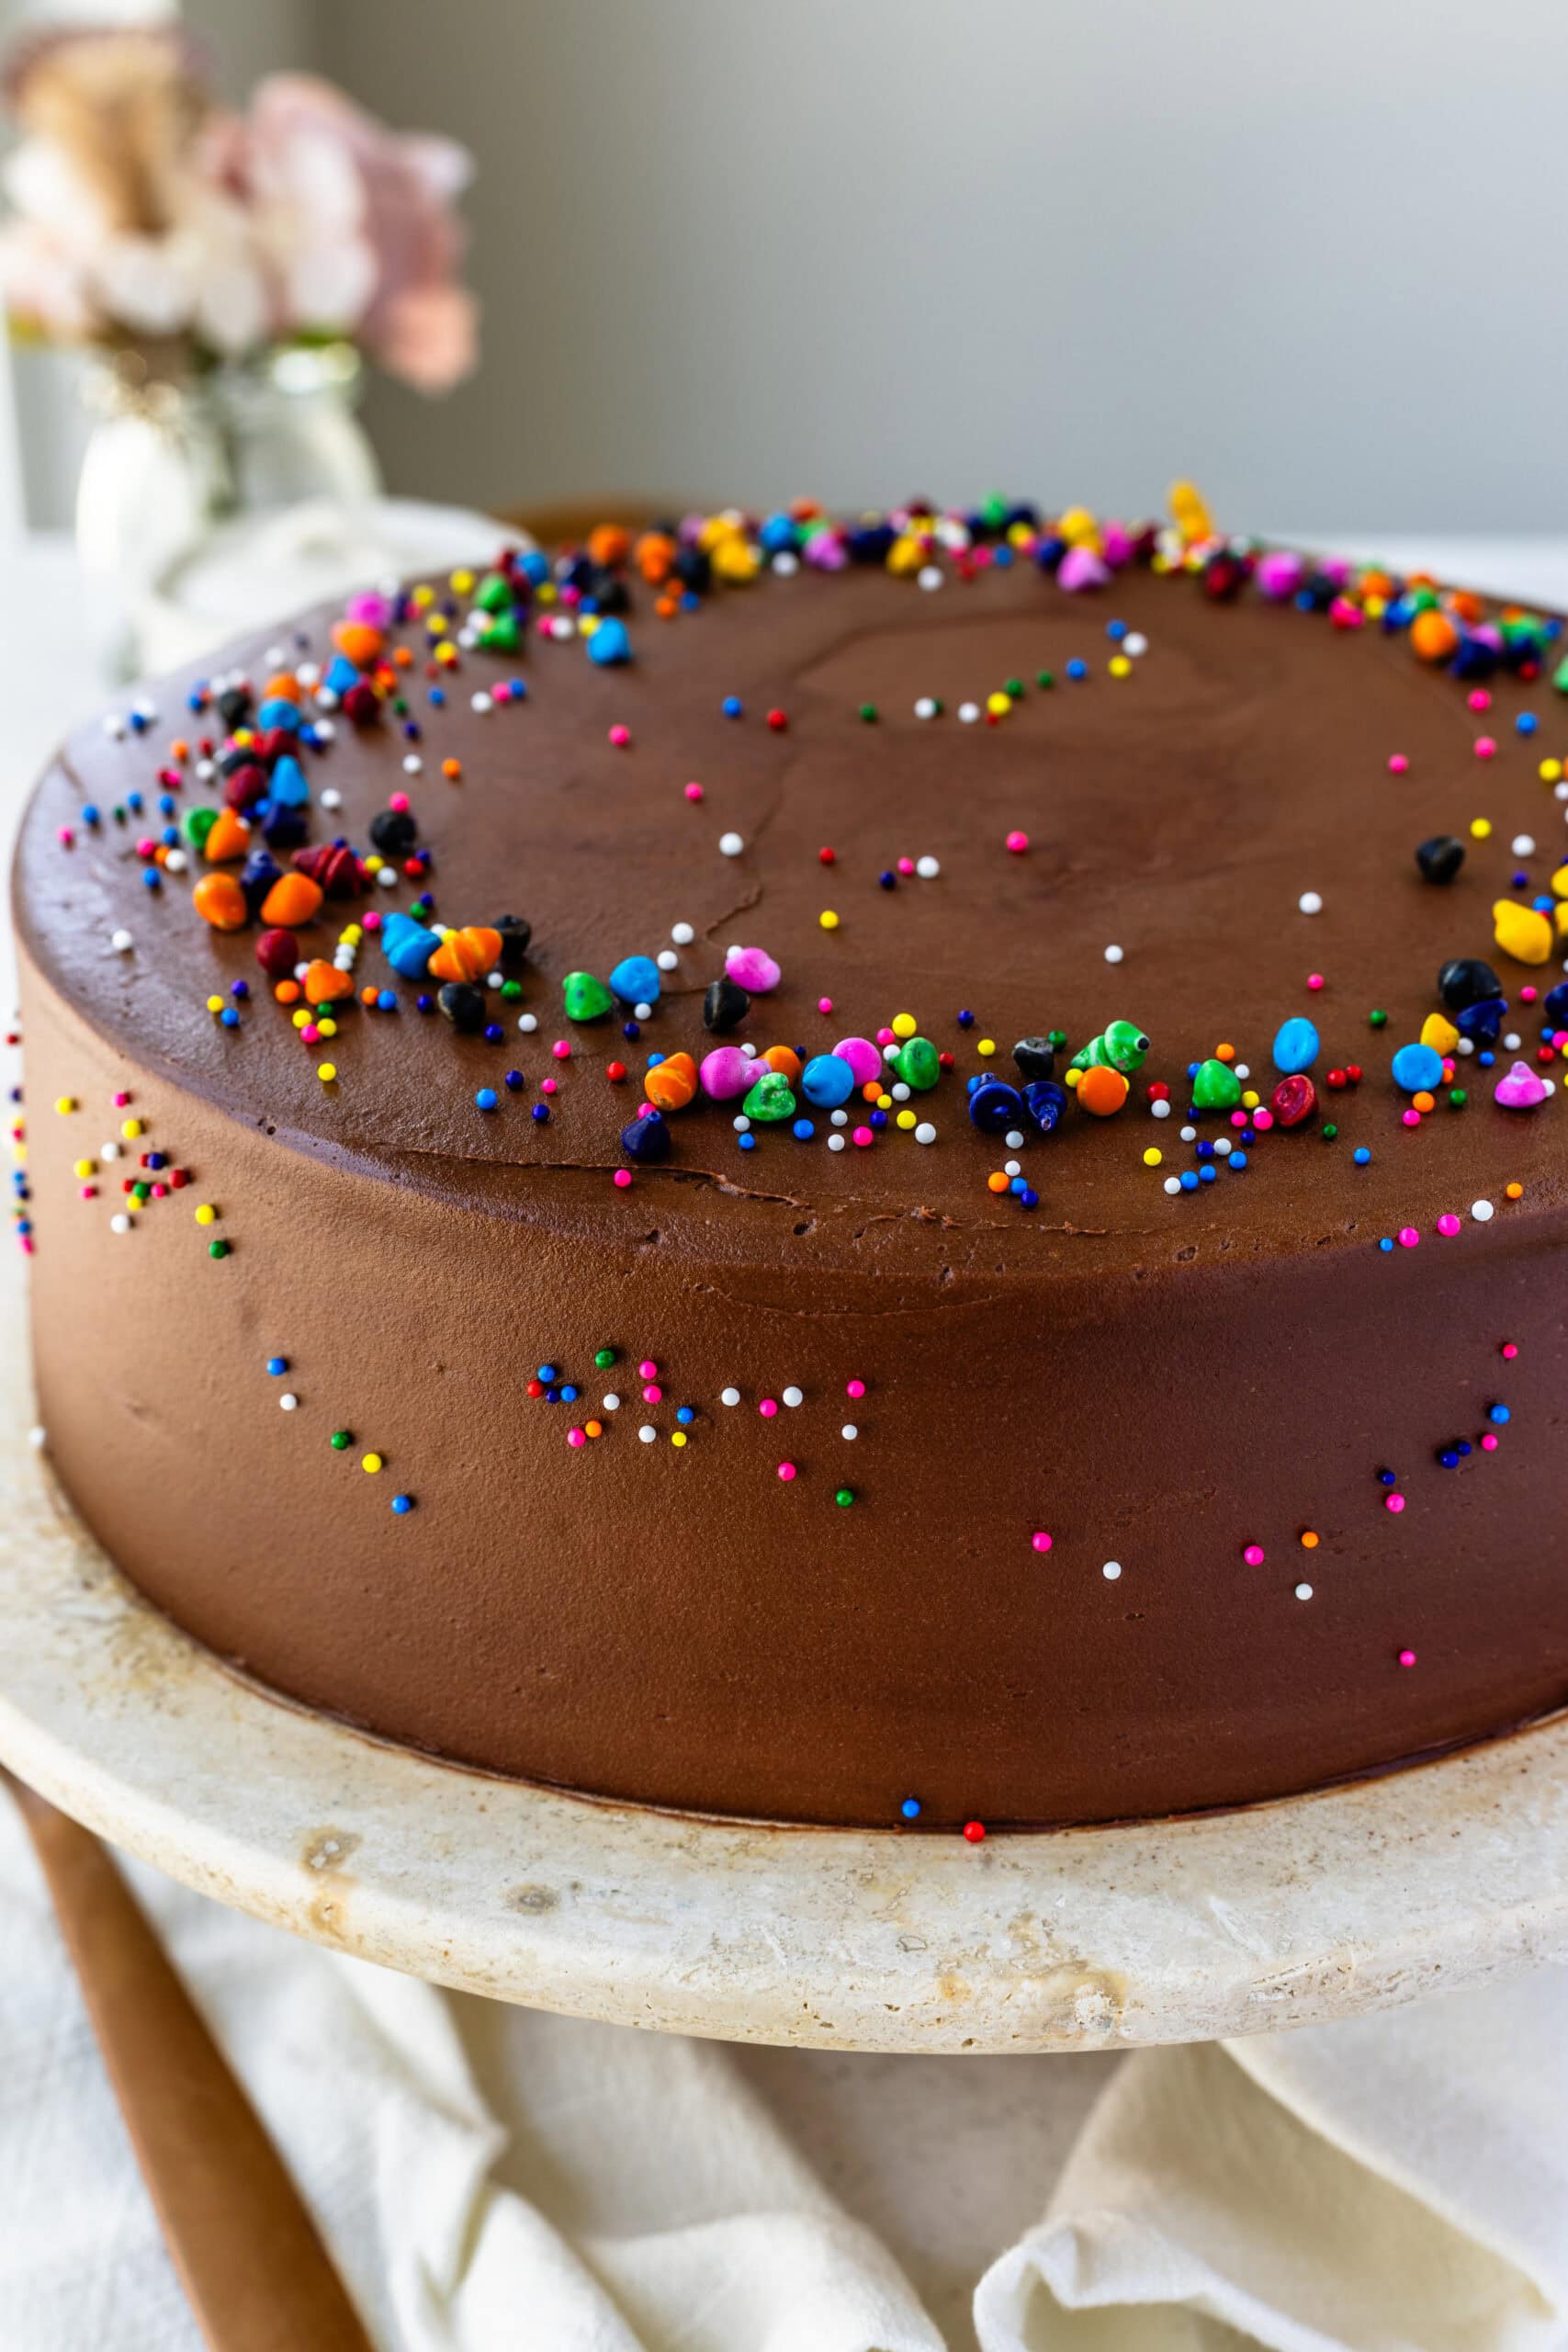
To assemble the cake, place one cake layer on a cake plate and spread a thick layer of frosting on top using an offset spatula. Place the second cake layer on top and frost the top and sides of the cake, smoothing the frosting with an offset spatula or a cake smoothing tool. Add sprinkles on top if desired for an extra touch of fun.
Storage
If you aren’t assembling the cake layers the same day, wrap them in plastic wrap and place them in the freezer instead of the fridge. The fridge tends to make the cakes dry, while in the freezer they will maintain their moisture. Remove the cakes from the freezer about 30 minutes before assembling and decorating.
Once frosted, the assembled cake can be stored in an airtight container at room temperature for up to 2 days, or in the refrigerator for up to 5 days. If you choose to refrigerate the cake, let it come to room temperature before serving for the best flavor and texture.
Why You’ll Love This Yellow Cake
You will delight in the rich, buttery layers of this cake paired with the creamy, decadent chocolate fudge frosting. This Yellow Cake is not only a visual masterpiece but also a delicious treat that embodies sophistication and flavor. Perfect for any occasion, it’s sure to impress and satisfy your cravings for something extraordinary.
Tips and Tricks
- Use Room Temperature Ingredients: Ensure that butter, eggs, and buttermilk are at room temperature before making the cake. This helps the batter mix more evenly.
- Use Quality Chocolate: Use good quality chocolate for the frosting. Milk chocolate, semi-sweet, or dark chocolate can be used based on your preference.
- Freezer Storage: If not assembling the cake layers the same day, wrap them in plastic wrap and freeze. This helps maintain the cake’s moisture.
Variations
- Different Frostings: Try different frostings to create unique flavors.
- Add Fruit: Incorporate fresh fruit between the layers for added texture and taste.
- Give it a Citrus Punch: Add the zest of some lemons into the cake batter for a citrus zing!
- Make It Gluten-Free: Use a 1:1 gluten-free flour substitute.

If you like this recipe…you’ll love these other ones!
- Cream Cheese Pound Cake
- Crème Brûlée Cheesecake
- Strawberry Cake
- Easy Tres Leches Cake
- Cannoli Cheesecake
I’d love to hear what you think! I love hearing feedback about my recipes, so please let me know if you make it and tell me what you think! You can share photos with me on Instagram or Facebook!
Yellow Cake
Ingredients
Yellow Cake
- 2 1/2 cups cake flour 258 grams
- 1 1/2 tsp baking powder
- 1/4 tsp baking soda
- 1/4 tsp salt
- 3/4 cup unsalted butter 169 grams, room temperature
- 2 tbsp vegetable oil 30 ml
- 1 1/2 cup granulated sugar 300 grams
- 3 large eggs room temperature
- 2 large egg yolks room temperature
- 1 tbsp pure vanilla extract
- 1 1/4 cup buttermilk 300 ml
Chocolate Fudge Frosting
- 1/2 cup chopped chocolate 85 grams
- 1/4 cup heavy cream 60 ml
- 1 cup unsalted butter 226 grams
- 1/2 cup unsweetened cocoa powder 64 grams
- 2 cups powdered sugar 250 grams
- 1 tsp vanilla extract
Instructions
Yellow Cake
- Pre-heat the oven to 350ºF. Grease and line 2 9” cake pans with parchment paper.
- In a bowl, whisk together the cake flour, baking powder, baking soda, and salt. Set aside.
- In a large bowl, or in the bowl of a stand mixer, beat the butter for 1 minute on medium speed. Add the sugar and the oil. Beat the ingredients together for two minutes, until the mixture is fluffy and light in color. If using a stand mixer, use the paddle attachment, or you can just use a hand mixer.
- Add the eggs and yolks, one at a time, mixing one egg completely until incorporated before adding the next one.
- Remember to scrape the bowl in between mixing.
- Add the vanilla, and mix to combine.
- Add one third of the buttermilk to the bowl with the batter, mix on low to combine.
- Next, add one third of the dry ingredient mixture. Mix on low speed.
- Add another third of the buttermilk and mix.
- Follow by another third of the flour mixture, mix to combine.
- Add the remaining buttermilk, and mix. Finish with the remaining flour, add it to the bowl and mix on low.
- You can finish by folding with a spatula, to avoid over mixing the batter.
- Divide the batter between the prepared cake pans.
- Bake in the pre-heated oven for 35 to 40 minutes, until a toothpick inserted into the cake comes off clean.
- Remove the cake from the oven. After 10 minutes, flip the cake onto a cooling rack or plate. Let the cake cool down completely. If you aren’t assembling the cake on the same day, wrap the completely cooled down cake in plastic wrap, and place in the freezer.
Chocolate Fudge Frosting
- Place the chopped chocolate in a microwave safe bowl along with the heavy cream. Microwave for 15 second and stir. If the chocolate still needs to melt, microwave for a few second increments, stirring in between, just until the chocolate has melted. Let the mixture cool down for about 10 minutes.
- Beat the butter with a mixer for a couple of minutes until fluffy and creamy.
- Sift half of the powdered sugar and cocoa powder into the bowl with the butter.
- Add the melted and cooled down chocolate.
- Mix on low until the ingredients have incorporated. Raise the speed to medium high and beat for one minute. Scrape the bowl as needed.
- Add the remaining powdered sugar and mix to combine on low speed. Raise the speed to medium high and beat for another minute.
- Add the vanilla and mix.
- The frosting should be creamy and smooth.
To Decorate
- To assemble the cake, place a cake layer on top of a cake plate.
- Spread some frosting on top of the cake using an offset spatula, making a smooth thick layer of frosting.
- Top with another cake layer.
- Use an offset spatula to spread the frosting on top, and all over the sides of the cake.
- Use a cake smoothing tool or a bench scraper to smooth out the sides of the cake as you spin the cake around on a turntable. If you don’t have a turntable, simply smooth out the sides using the offset spatula.
- Top the cake with sprinkles if desired.
I am not sure if it was asked already as I didn’t see anything to that effect. Can I use all purpose flour or does it have to be cake flour?
You can use all-purpose flour for sure. if you want to, substitute a couple tablespoons for cornstarch. But should be just fine with only all-purpose flour too.
Do you think I’ll need to adjust for high altitude? And what would you suggest differently?
High-altitude adjustments for this yellow cake recipe will help counteract the effects of lower air pressure, which can cause cakes to rise too quickly and then collapse. Here’s how to modify it:
Reduce leavening agents: Decrease the baking powder to 1 teaspoon (from 1 ½ tsp) and the baking soda to ⅛ teaspoon (from ¼ tsp). This prevents over-expansion and collapse.
Increase flour: Add 2 extra tablespoons of cake flour to strengthen the structure.
Reduce sugar: Decrease sugar to 1 ⅓ cups (266g) to prevent excess tenderness and sinking.
Increase liquid: Add 1 extra tablespoon of buttermilk to maintain moisture.
Adjust oven temperature: Increase the baking temperature by 10 degrees.
Reduce baking time: Start checking for doneness at 30 minutes instead of 35-40 minutes.
Mix carefully: Avoid over beating the batter to reduce excess air, which can cause uneven rising.
Can I make my own buttermilk for this cake or should I buy the buttermilk?
Either way works, I often times make my own.
Would you recommend using this recipe for cupcakes? Looks absolutely delicious 🙂
sure I dont see why not.