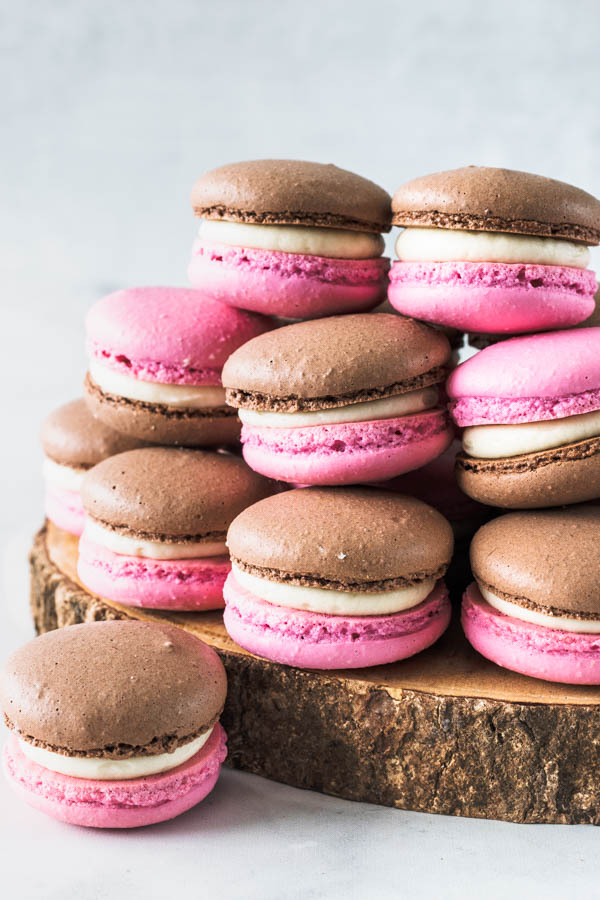
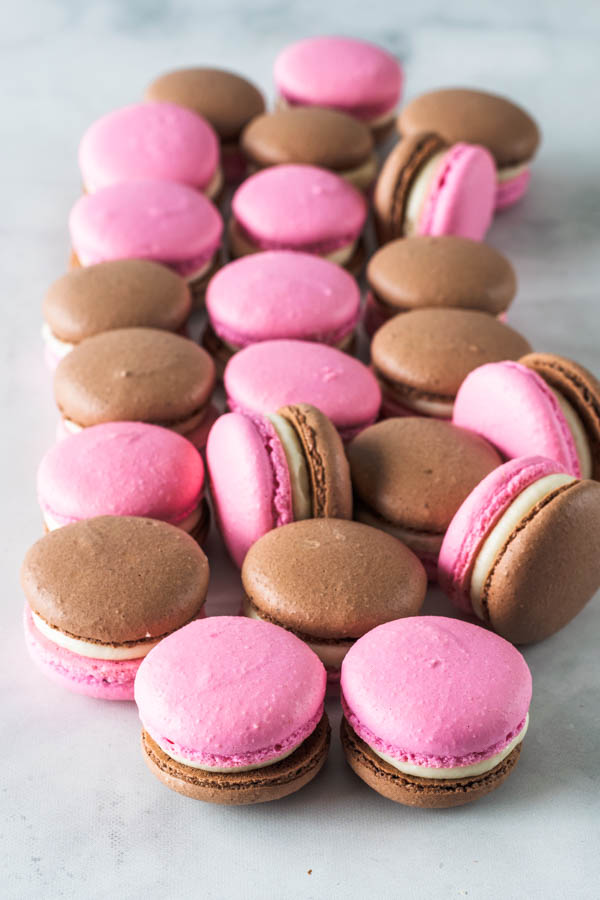
Neapolitan Macarons
Hello friends! Today we are making these Neapolitan Macarons. Plus I have some exciting news!
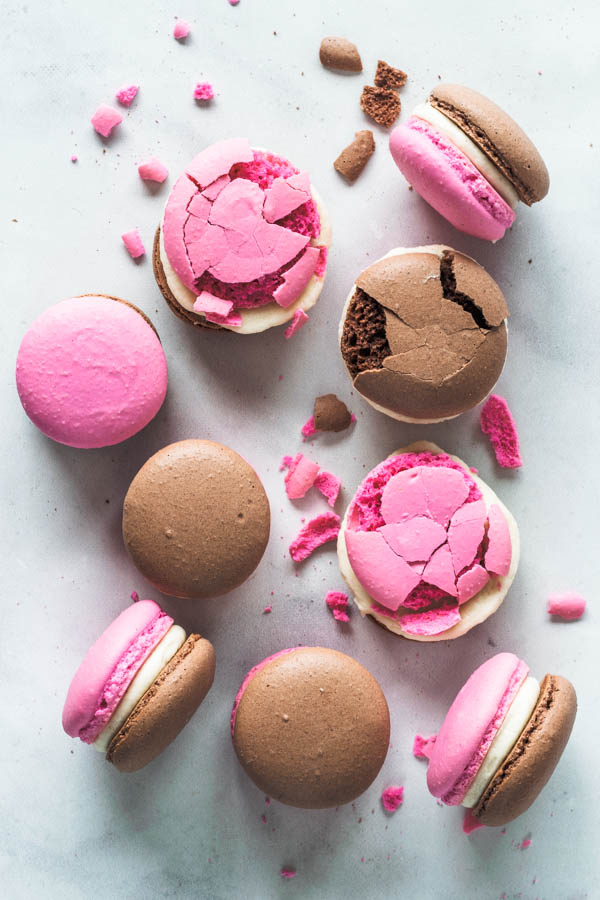
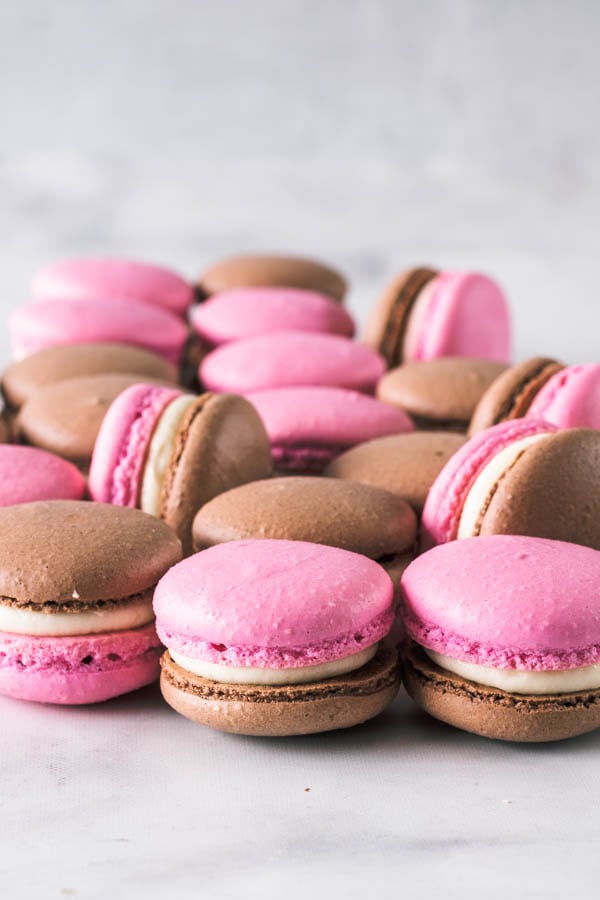
The picture above is a result of my backdrop falling on top of my Neapolitan macarons as I was trying to move my table up. But I liked the way the macarons looked when they got cracked, so they deserved a shot.
To make these Neapolitan Macarons, I just made one recipe for the shells.
This post may contain affiliate links. I earn a commission from qualified purchases. Please read our Privacy policy here.
Right after I mixed the meringue with the dry ingredients, I quickly brought them together, and when they were just incorporated, I split the batter into two different bowls.
To one bowl, I added some cocoa powder (or you could use brown food coloring, instead). And to the other bowl, I added the pink food coloring.
Now, you can fold both batters until the macaronage is done.
Macaronage is the act of combining the meringue, and the dry ingredients together, folding them until the perfect consistency to pipe the macarons.
How to know when to stop folding macaron batter?
It’s very important that you are able to recognize when to stop folding the macaron batter.
And you will get better and better at recognizing this stage once you’ve practiced enough.
Here are 3 tips to help you identify when to stop folding the macarons.
First tip to recognize when to stop folding macarons
Recognize the “molten lava” stage.
This is where the macaron batter will resemble molten lava, as lots of bloggers like to describe. It means the batter is thick, flowing slowly, just like… well, just like molten lava, I guess.
Since I don’t deal a whole lot with molten lava, and this seems like a difficult way to identify when your macaron batter is ready to stop folding, because there’s a large range of time where the batter will be resembling… molten lava.
Second tip to recognize when to stop folding macarons
Well, anyway, once you’ve recognized the batter is slowly flowing, and very thick (or molten lava like), time to start testing those number 8s.
If you know what I am talking about, is because you’ve read other blogs out there (or even my own other recipes) that describe this as being another indicator that you should stop folding.
What that means is that you will grab a bunch of batter with a spatula and lift it up at 90 degree angle, hovering above the bowl, at the same time, start to circle the spatula and form 8-figures with the flowing batter.
If you are able to make several 8-figures, means your batter is probably ready at this point.
But wait, there’s one more important step to help you identify when to stop folding macaron batter.
Third tip to recognize when to stop folding macarons
Ok, here’s my last tip.
Once you’ve recognized the batter is resembling molten lava (just embrace the term), and once you were able to draw about a bunch of 8-figures with your flowing batter, you can perform the third test.
Grab a teaspoon and spoon some batter onto your parchment paper or silicon mat being used to make your macarons.
Then, watch how the batter behaves in the next couple minutes.
- If the batter starts springing back, and slowly incorporating, and spreading out, your batter is good to go.
- If the batter spreads out too much, is too runny, and loses shape, your macaron batter has been over folded. There’s really no fix for this issue besides starting over.
- If the batter doesn’t spread out, and remains with a point, or a tip, means your batter needs to be folded longer. Simply fold the batter a couple more times, and test again. Don’t go crazy folding away. One or two folds at this point can make a world of difference.

I hope you loved today’s recipe, and macaron tips! I am just so excited to be able to share my tips and recipes with everyone, and it brings me all the joy in the world when someone shares one of Pies and Tacos recipe they’ve made!
Besides sharing these tips here today, and working on my ebook to be able to help you more in the future, I have a huge list of macaron recipes on my blog, and also lots of resources.
If you are new to making macarons, check out my Matcha Macarons post, where I go over some main tips and techniques. On my Raspberry Macarons post, I talk about Almond Flour, brands, sifting methods, etc. On my Espresso Macarons post, I answer common questions about making macarons. On my Lemon Macarons post, I talk about macaron shelf life and storage. Check them out! And also, there are tones of other resources online that can help you.
If you liked these Neapolitan Macarons, you’ll also like the following ones:
- Toffee Macarons
- Samoa Cookie Macarons
- Pomegranate Macarons
- Blackberry Macarons
- Brigadeiro Macarons
- Chocolate Macarons
- S’mores Macarons
- Red Velvet Macarons
I hope you check them out, or many of the other macaron recipes I have on my blog.


Neapolitan Macarons
Ingredients
Neapolitan Macarons Shells
Macaron Shells
- 100 grams egg whites
- 100 grams granulated sugar
- 105 grams almond flour
- 105 grams powdered sugar
- 1/2 tbsp cocoa powder
- Food coloring pink, brown
Cream Cheese Frosting*
- 1/4 cup cream cheese softened 56 grams, 2 oz
- 1/4 cup butter softened 56 grams, 2 oz
- 1 cup powdered sugar 127 grams 4.5 oz
- 1 tsp vanilla extract
Instructions
Macaron Shells
- Before you start, get all of the ingredients ready. Prepare two large piping bags, fitted with a large round tip.
- Line two baking sheets with parchment paper or silicone mat.
- Measure out all of the ingredients.
- Sift the powdered sugar and almond flour together. Set aside.
- Place the egg whites and granulated sugar in a heat proof bowl or in a double boiler. Over a pan of barely simmering water, whisk the whites and sugar until frothy and the sugar is completely melted. It will take a couple of minutes. You can test by touching the mixture between your fingers, and if you feel any sugar granules just keep whisking the mixture over the water bath.
- Make sure the bottom of the bowl isn’t touching the simmering water.
- Transfer the mixture to the bowl of a stand mixer.
- With the whisk attachment, start whisking mixture on low for about 30 seconds, then gradually start increasing speed to medium. Whisk on medium for one to two minutes, until the mixture is white and starting to become fluffy. Raise the speed to high for a few minutes until stiff peaks are formed. Best way to check this is to keep your eye on the whites. Once they get glossy and you start seeing streaks formed by the whisk, it might be time to stop.
- Whisk until stiff peaks have formed. When you pull your whip up, the peak should be stiff and shooting straight up, with possibly a slight bend at the top, but not bending to the side.
- Pour the powdered sugar and almond flour into stiff whites.
- Start folding gently forming a letter J with a spatula until the batter is just incorporated, but not ready yet.
- Split the batter into two bowls as soon as the batter comes together, you don’t want to have folded too much at this point, because once you add the cocoa powder or the pink coloring, you will have to fold more in order to get those ingredients incorporated.
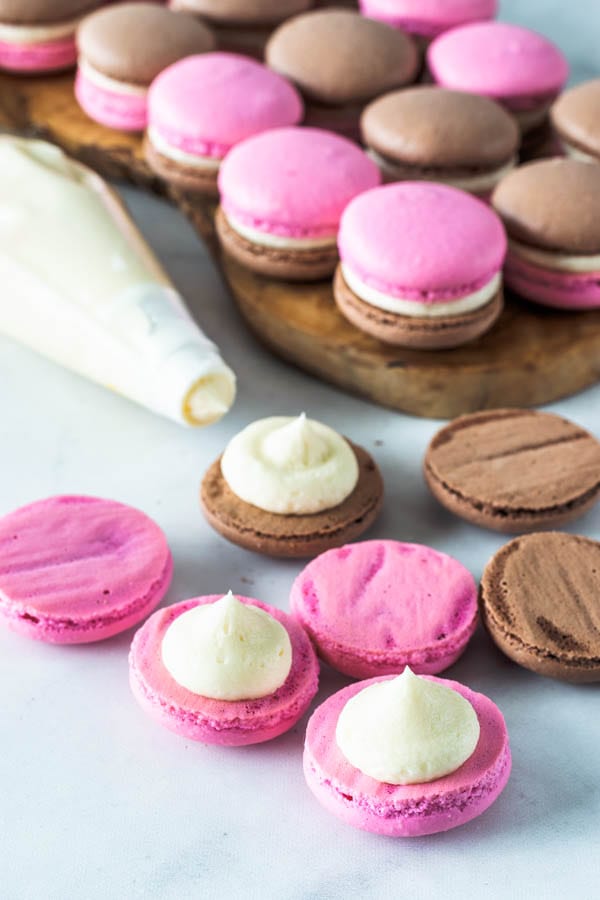
- To one bowl, add sifted cocoa powder, and to the other bowl add some of the pink coloring.
- Work with one batter at a time, and keep the other batter covered while you do the macaronage in first one.
- How to know when to stop folding the batter: It’s time to stop folding when the batter is glossy and has a thick and flowing consistency. There are several ways to test this.
- First, pick up some batter with the spatula and try to draw a figure 8 with the batter that is dripping off the spatula. If you can form several 8 figures without the batter breaking up, that’s one indication that it might be ready.
- There’s another test you can do. I call it the Teaspoon test.
- Grab a teaspoon of batter and spoon onto the parchment paper or silicon mat. Wait a minute to see how it behaves.If the batter stays stiff, forming a point and doesn’t spread out, fold a little bit more, about 3 folds. Test again. Once the batter spreads out a bit and starts to look glossy and smooth on top, on the parchment paper/silicone mat, it means it's ready.
- You don’t want your batter to be too runny either. So be careful not to overmix. It’s always best to undermix and test several times until the proper consistency has been achieved.
- When you hold the spatula with batter on top of the bowl and the batter falls off the spatula slowly but effortlessly the batter is ready. The batter will keep flowing off the spatula non-stop, but not too quickly. Transfer the batter to the piping bag.
- Place the piping bag directly 90 degrees over the center of each macaron template. Apply gentle pressure and carefully pipe for about 3 seconds, and then quickly pull the bag up twisting slightly.
- Once you’ve piped as many 1 1/2” circles as you could, bang the trays against the counter a few times each. This will release air bubbles that are in the batter and prevent the macaron shells from cracking.
- Let the trays sit for a while so the shells will dry out a little bit. I usually leave about 20-40 minutes, depending on how humid the day is. You’ll know they’re ready when you gently touch the surface of a macaron and it seems dry.
- Pre-heat the oven to 300°F.
- Bake one tray at a time.
- Bake for 5 minutes, rotate tray.
- Bake for 5 more minutes. Rotate again.
- I bake each tray for about 15 to 20 minutes.
- When baked, the macarons will have a deeper color and formed feet. If you try to move a macaron, it shouldn’t feel jiggly. If the macaron is still jiggly, keep baking.
- Remove from the oven and bake the other tray.
- Let the macarons cool down before proceeding with the filling.
Cream Cheese Frosting
- Cream the butter and cream cheese at medium speed in the bowl of an electric mixer for about 1 minute. With the mixer off, add all of the powdered sugar in.
- On low speed, beat the sugar, butter and cream cheese together. Once they are incorporated, turn speed to medium and cream for 1-2 minutes until very fluffy. Add vanilla in, beat for a another 30-45 seconds.
- If the frosting seems too thick, add a teaspoon of milk to thin it out. If it seems too thin, add a bit more sifted powdered sugar to make it stiffer.
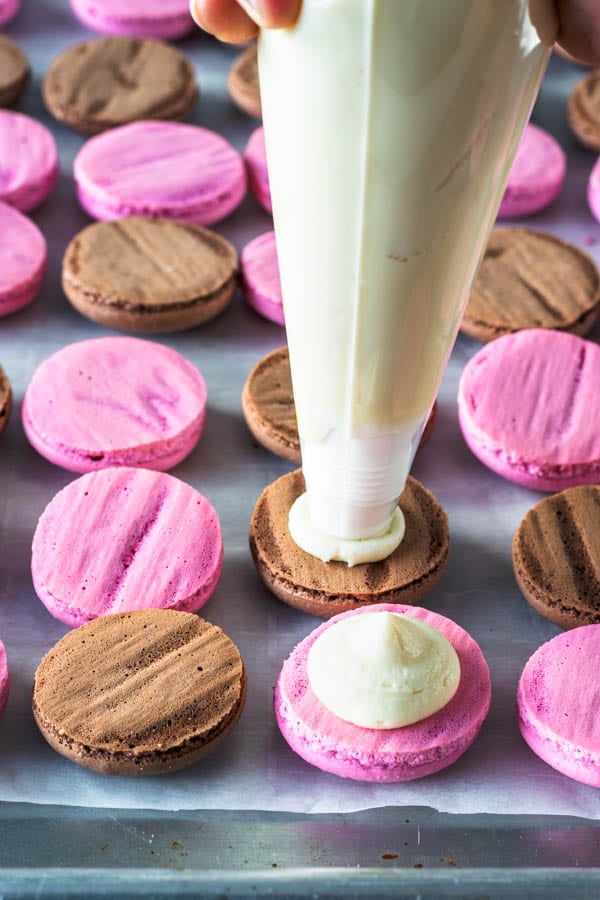
To assemble
- Pipe some of the buttercream on top of a macaron shell and top it with another shell.
Storage
- Store macarons in the fridge for up to 5 days, and in the freezer for up to 2 months, in an airtight container.
Hi, I’ve just started making macarons about three months ago (totally fell in love with the task of making them) and I now have consistent results with your recipes and with the help of your wonderfully detailed trouble shooting posts! I’m so so thankful for you and your creative macaron ideas!
I was wondering if it would be possible to add 1/2 TBS strawberry powder to the pink batter like you did with the cocoa powder?
here is my full post on adding freeze dried fruit to macaron shells https://www.piesandtacos.comstrawberry-macaron-shells/
So excited to try this recipe!! Will the 1/2 tablespoon of Cocoa powder be enough to color the macarons?
yes, I dont believe I added any food coloring to this particular batter, but it depends also on the brand of cocoa you are using. If it’s not deep enough you can add brown food coloring.
Your recipes are better than ones I got in Pari s at the cooking school!! PLEASE
let us know when your e-book is available. As soon as IRA available!
Thank
Linda Wood
You are truly a macaron genius and these are the cutest. Love those colours together.
Well, Cami, I am not surprised the least bit about your Ebook. I knew, it was a matter of time. I can’t wait to see it and learn a thing or two about baking Congratulations. Wishing you lots of success my friend. You’ve worked very hard for this 🧡
You’re such a sweet friend. Thank you Gina!!
Esses Macarons ficaram magníficos e me fizeram lembrar do sorvete concorde da yopa que eu comprava quando era muito criança…. boas lembranças!!!!!! Muito especiais esses Macarons!!!!!!
Ahhh que legal!!! Me inspirei no sorvete tambem!! 🙂