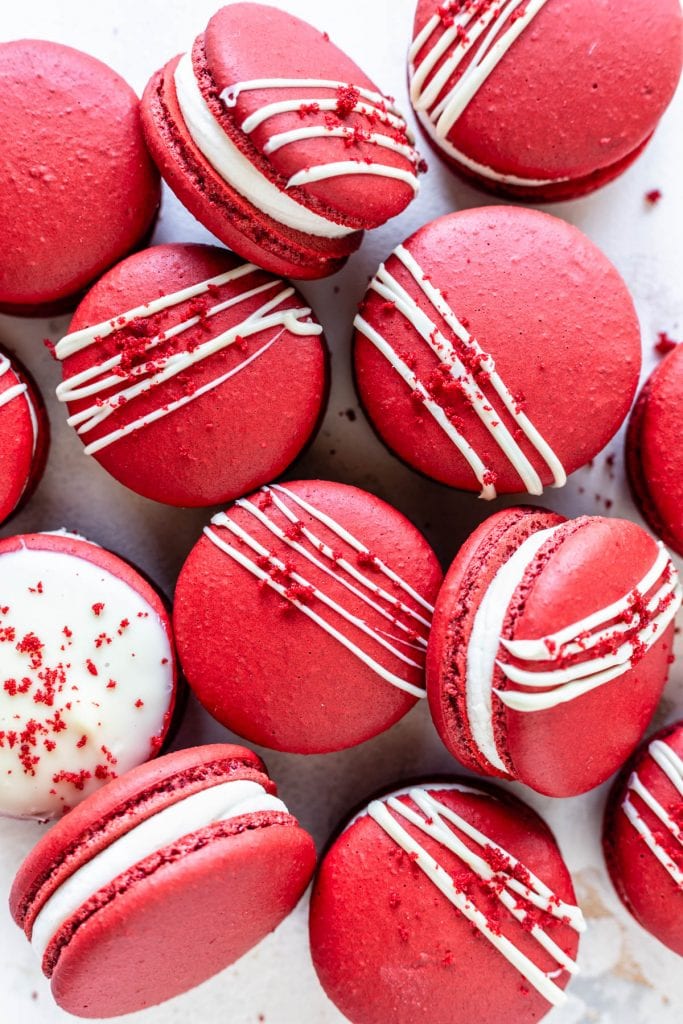
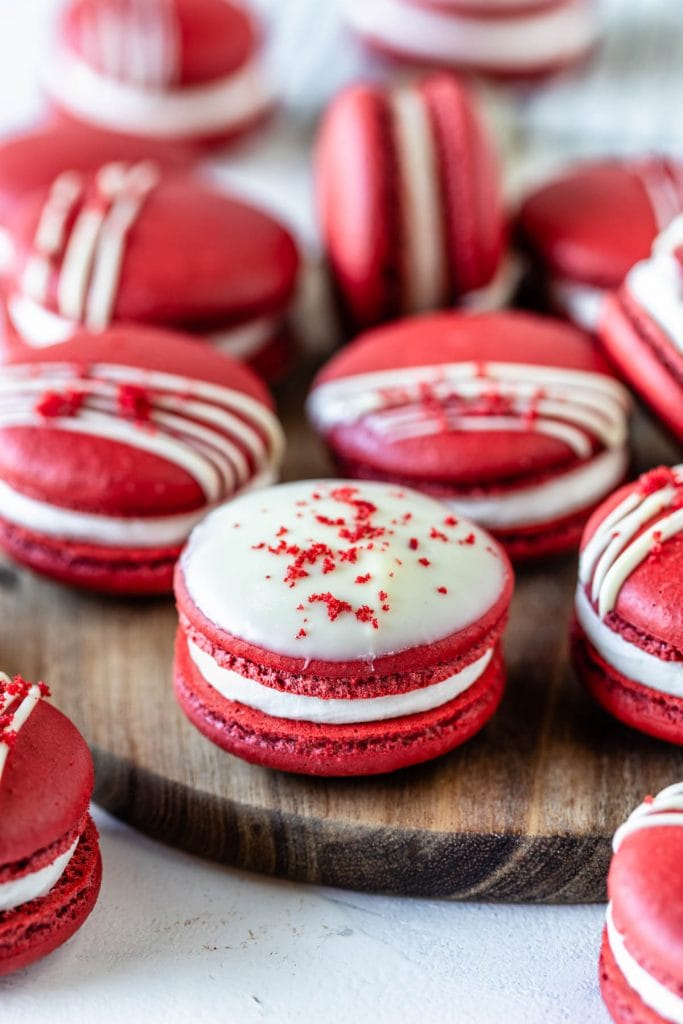
Red Velvet Macarons
Hello friends! Today we are making a super requested macaron flavor: Red Velvet! These Red Velvet Macarons are filled with Red Velvet Cake and Cream Cheese Frosting!
Also make sure to watch the video on this page, and also on Youtube, which shows you exactly how to make each step of this macaron recipe! These Red Velvet Macarons were certainly one of my favorites that I’ve made this year! Hope you enjoy them!
I will start by talking about the color of these Red Velvet Macarons!
This post may contain affiliate links. I earn a commission from qualified purchases. Please read our Privacy policy here.
You will need a lot of food coloring! A lot! You may have to add from 1 to 2 tbsp of food coloring.
If you are a beginner macaron baker, I always recommend going easy on the food coloring. It can be very tricky to bake macarons with so much food coloring in them.
First because sometimes, as we continue to add food coloring in order to achieve the color we desire, we keep mixing the batter, and sometimes even more than necessary, and end up with an over mixed batter.
The second reason is because when you add food coloring is the same as adding liquid to the batter, even if using the gel food coloring which I recommend. And that will make the batter more runny, wetter, and you may encounter problems when trying to dry the macarons, and later on when baking them.
So my recommendations are:
- Use GEL food coloring. Don’t use water based food coloring. And also be careful with powder colorings as well, as they may contain ingredients which affect the macaron batter.
- And don’t over mix the batter, be cautious, as the batter will naturally be “wetter”, and if you continue to add food coloring in order to achieve the desired intensity, you may end up over mixing.
Below are my food coloring recommendations.
Now that we’ve covered the food coloring, which is probably the trickiest part of this Red Velvet Macaron recipe, let’s talk about the filling.
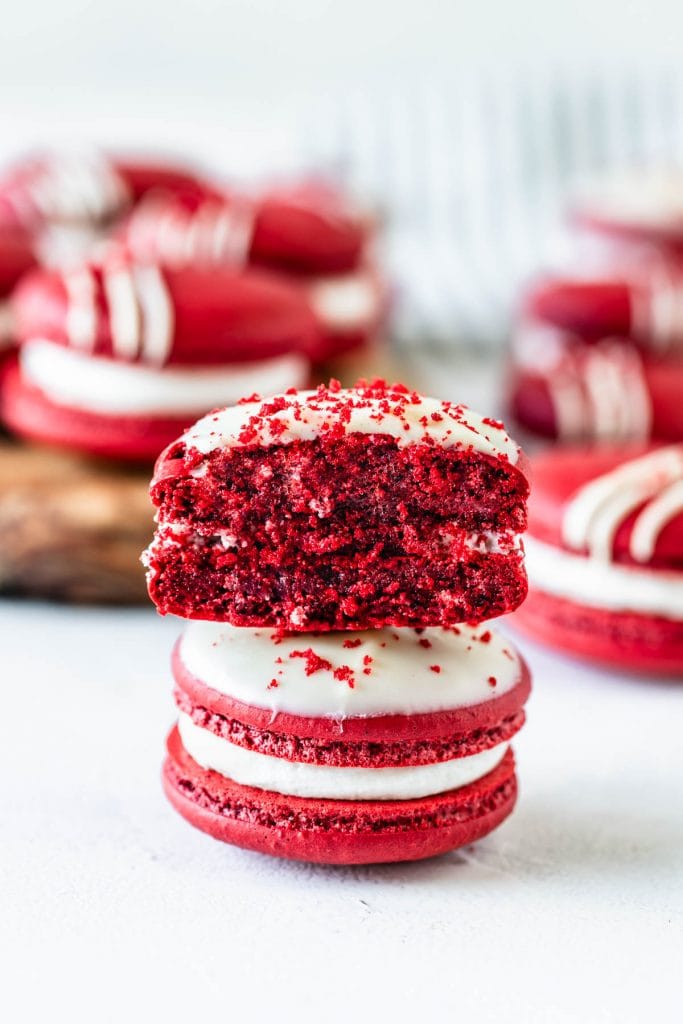
For the Red Velvet Macaron filling, I’ve decided to make a cake and frosting type of filling. I’ve done this before on my Carrot Cake Macarons, and Brownie Macarons, and it was an absolute success both times!
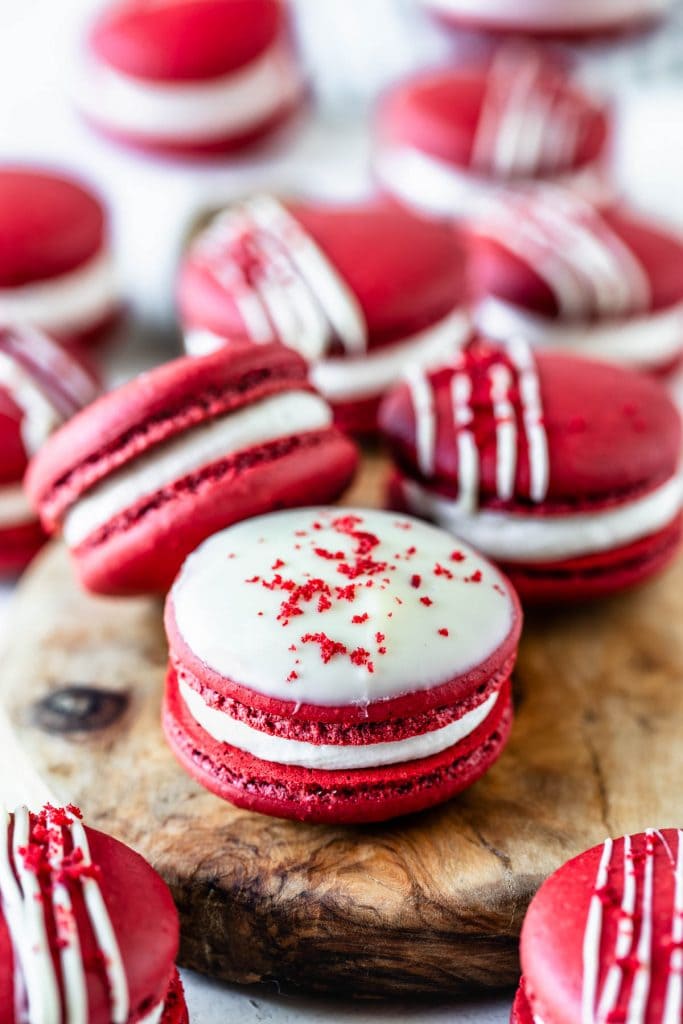
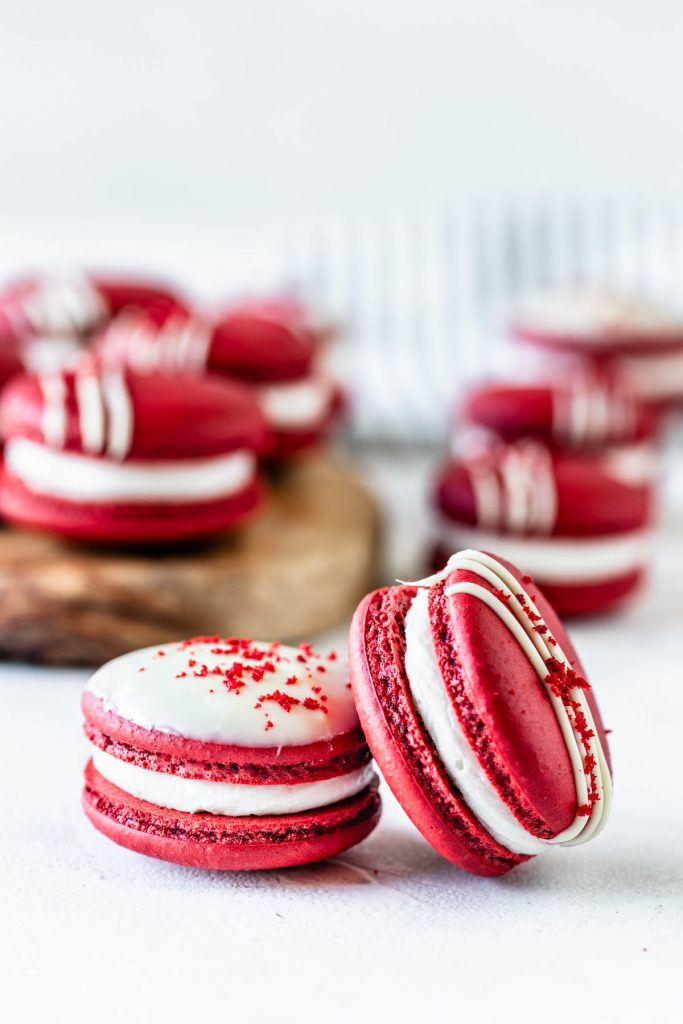
And it wasn’t any different with the Red Velvet Macarons! The cake is moist, soft, and fluffy, and goes perfectly with the tangy Cream Cheese Frosting, and the slightly crunchy shells.
Watch the video on this page or on Youtube, to watch how I made these macarons, and how I filled them.
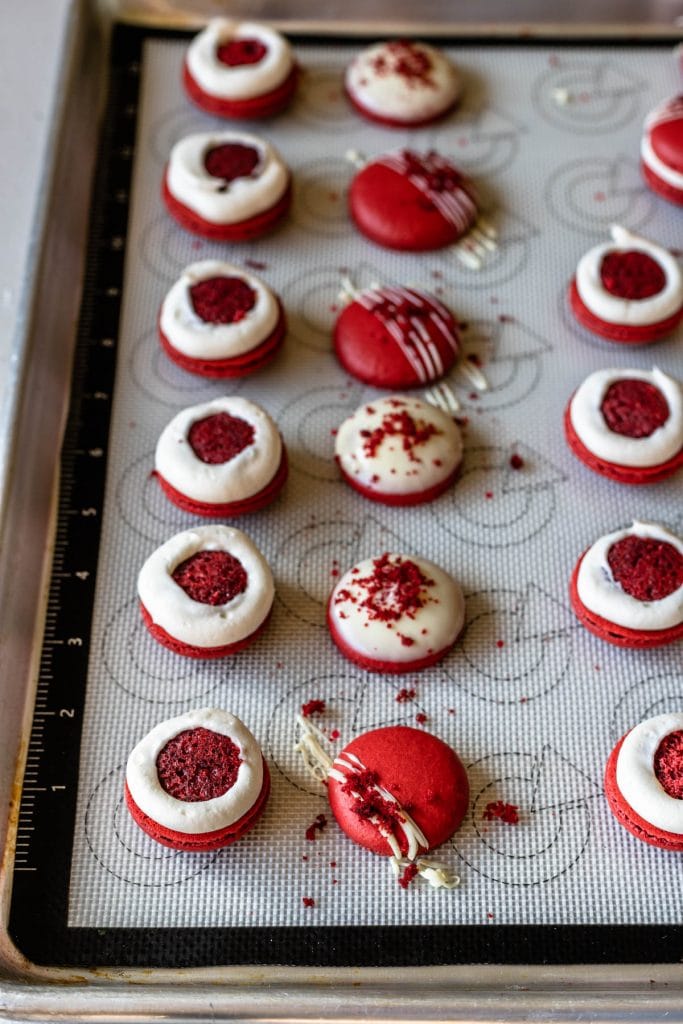
First you place a circle of cake in the center of a bottom shell, then pipe the frosting around it, making sure the Cream Cheese Frosting is higher or at least the same height as the cake, so the top shell will be able to stick.
And while we are talking about the cake, just a reminder. I have made the cake for the filling in a 10×15″ jelly roll pan. If you don’t have one of those, that’s fine. You can bake the cake on a baking sheet, since the batter is thick, and you need the cake to be thin anyway, just spread the batter in the middle of the baking sheet.
Or you can bake the cake in a 9×13″ pan, and then slice the cake circles in half so they aren’t too tall when filling the macarons.
Another option is to halve the recipe for the cake, in which case I recommend using the weight measurements to do so.
If you enjoy this Red Velvet Macaron recipe, and if you like making macarons, I offer many resources, posts, videos, and over 80 macaron flavors on my blog and Youtube channel!
Click here to check out a list of all the macaron flavors.
Here are some macaron ideas you might enjoy:
- Chocolate Macarons
- Oreo Macarons
- Brownie Macarons
- Pistachio Macarons
- Nutella Macarons
- Lemon Macarons
- Caramel Chocolate Macarons
- Pomegranate Macarons
- Vanilla Bean Macarons
I hope you enjoyed these Red Velvet Macarons! Thanks for stopping by!
Please leave a review and comment below if you make this recipe! Thank you!

Red Velvet Macarons
Ingredients
Red Velvet Macaron Shells
- 100 grams egg whites 3.5 oz
- 100 grams white sugar 3.5 oz
- 105 grams almond flour 3.7 oz
- 100 grams powdered sugar 3.5 oz
- 7 grams cocoa powder 0.4 oz
- 1 tbsp red gel food coloring or add more for intense color
Red Velvet Cake
- 1/4 cup unsalted butter room temperature (56 grams, 2 oz)
- 1/4 cup vegetable oil or avocado oil, grapeseed, etc
- 3/4 cup granulated sugar 150 grams, 5.29 oz
- 1 large egg
- 1 tsp vanilla extract
- 14 grams red gel food coloring 0.5 oz, 1 tbsp
- 1 1/3 cup all-purpose flour 167 grams, 5.9 oz
- 2 tbsp cocoa powder 15 grams, 0.53 oz
- 1/2 tsp baking soda
- 1/4 tsp salt
- 2/3 cup buttermilk 156 ml
Cream Cheese Frosting
- 113 grams powdered sugar 1 cup, 4 oz
- 85 grams cream cheese softened 3 oz, 6 tbsp
- 42.5 grams unsalted butter softened 1.5 oz, 3 tbsp
- 1/4 teaspoon vanilla extract
To assemble
- 2 oz. white chocolate optional
Instructions
Red Velvet Macaron Shells
- Before you start, get all of the ingredients ready. Prepare a large piping bag, fitted with a large round tip (I use 0.5” diameter). Set aside.
- Line two baking sheets with parchment paper or silicone mat.
- I use a baking mat with the macaron template already in it. You can make your own or print it from the internet, and just place it under silicone mat, or parchment paper.
- Measure out all of the ingredients.
- Sift the powdered sugar, almond flour, and cocoa powder together. Set aside.
- Place the egg whites and granulated sugar in a heat proof bowl or in a double boiler. Over a pan of simmering water, whisk the whites and sugar until frothy and sugar completely melted. It will take a couple minutes. You can test by touching the mixture between your fingers, and if you feel any sugar granules just keep whisking mixture over the water bath.
- Make sure the bottom of the bowl isn’t touching the simmering water. You don’t want the egg whites to cook.
- Transfer the syrup to the bowl of a stand mixer.
- With the whisk attachment, start whisking the mixture on low for about 30 seconds, then gradually start increasing speed to medium. Whisk on medium for one to two minutes, until the mixture is white and starting to become fluffy.
- Raise the speed to medium-high, or high, depending on the power of the mixer you are using, and whip for a few minutes until stiff peaks are formed. Once the meringue get glossy and you start seeing streaks formed by the whisk, it might be time to stop.
- Whisk until stiff peaks have formed. The peaks should be shooting straight up, maybe the peaks can have a slight bent at the top, but they shouldn’t be soft, or bending down to the side.
- Pour the sifted powdered sugar, almond flour, and cocoa powder into stiff whites.
- Start folding gently forming a letter J with a spatula.
- Add the food coloring at this point. To achieve the bright red color you will need a lot of food coloring.
- It’s time to stop folding when the batter is glossy and has a thick and flowing consistency. There are several ways to test this.
- First, pick up some batter with the spatula and try to draw a figure 8 with the batter that is dripping off the spatula. If you can form several 8 figures without the batter breaking up, that’s one indication that it might be ready.
- There’s another test you can do. I call it the Teaspoon test.
- Grab a teaspoon of batter and spoon onto the parchment paper or silicon mat. Wait a minute to see how it behaves.
- If the batter stays stiff, forming a point and doesn’t spread out a bit, start folding a little bit more, about 3 folds.
- Test again.
- Once the batter spreads out a bit and starts to look glossy and smooth on top, on the parchment paper or baking mat, transfer my mixture to the piping bag.
- You don’t want your batter to be too runny either. So be careful not to over mix. It’s always best to under mix and test several times until the proper consistency has been achieved.
- This is a very important part about making macarons. The best way I can describe this stage being perfect is when you hold the spatula with batter on top of the bowl and the batter falls off the spatula slowly but effortlessly. The batter will keep flowing off the spatula non-stop, but not too quickly.
- Transfer the batter to a piping bag fitted with a round tip.
- Place the piping bag directly 90 degrees over the center of each macaron template. Apply gentle pressure and carefully pipe for about 3 seconds, and then pull the bag up.
- Once you’ve piped as many circles as you can, bang the trays against the counter a few times each. This will release air bubbles that are in the batter and prevent your macaron shells from cracking.
- Use a toothpick to gently poke any bubbles of air that may have formed on the surface of the macaron shells.
- Let the trays sit for a while so the shells will dry out a little bit. I usually leave about 20-40 minutes, depending on how humid the day is. You’ll know they’re ready when you gently touch the surface of a macaron and it seems dry.
- Pre-heat the oven to 300°F.
- Bake one tray at a time.
- Bake for 5 minutes, rotate tray.
- Bake each tray for a total of 18-20 minutes.
- When baked, the macarons will have a deeper color and formed feet. And they will be coming off the mat easily, and with a completely formed bottom.
- If you try to move a macaron and it feels jiggly, it needs to keep baking.
- Remove from the oven and bake the other tray.
- Let the macarons cool down before proceeding with the filling.
Red Velvet Cake
- Pre-heat the oven to 350ºF. Grease and line a jelly roll pan (10×15”-read the notes for substitution) with parchment paper, then grease the parchment as well. Or simply butter and flour the pan. Set aside.
- Cream the butter, oil, and granulated sugar in a bowl with an electric mixer for 2 minutes, until fluffy and lightened in color.
- Add the egg and mix to combine.
- Add the vanilla extract and the red gel food coloring, and mix until incorporated.
- In a separate bowl, whisk the flour, cocoa powder, baking soda, and salt together, and let’s add it to the batter in thirds, alternating with the buttermilk.
- Add 1/3 of the dry mixture to the batter. Mix until incorporated.
- Add 1/3 cup of buttermilk to the bowl. Mix until combined.
- Now add another 1/3 of the dry mixture to the batter.
- Mix, and then add the remaining 1/3 cup of buttermilk.
- Finally, finish with another addition of flour. Mix until incorporated.
- Pour the batter onto the prepared baking pan.
- Bake on the pre-heated oven for 15 to 20 minutes, or until a toothpick comes out clean when inserted in the cake.
- Remove and let it cool completely.
Cream Cheese Frosting
- Start by sifting the powdered sugar. Set it aside.
- Now, cream the softened cream cheese and butter together in the bowl of an electric mixer, for about 2 minutes, until light and fluffy.
- Add vanilla extract. Mix to combine.
- With the mixer off, add the powdered sugar to the bowl.
- Turn mixer on low to incorporate the powdered sugar with the cream cheese and butter.
- Once you see no streaks of dry powdered sugar, cream mixture on medium high for one minute.
- If the frosting is too runny, add more powdered sugar as needed. And if the frosting is too stiff, add a teaspoon of water or milk to thin it out.
- This frosting will store well in the fridge for up to 5 days, covered.
- Make sure to always leave the frosting covered. Cover the bowl with a lid or plastic wrap, because otherwise, the surface will dry out and get hard.
- Place the frosting in a piping bag fitted with the tip of choice. I used a round tip with 3/4” in diameter.
To assemble
- Melt the white chocolate and drizzle on top of the shells, or dip the shells in the melted chocolate. Top with red velvet cake crumbs if desired.
- Use a 1 inch round cookie cutter to cut cake circles.
- Place each cake circle on a bottom shell.
- Pipe the frosting around the edges of the cake circle. Make sure the frosting is as high, or higher than the cake height, or the top macaron shell won’t stick to the bottom one.
- Top each with a decorated shell.
Storage
- Store these macarons in the fridge for up to 5 days.
- You can freeze these macarons for up to 2 months in an air tight container.
Can you half this recipe?
Thanks,
Jacquelyn
certainly!
Hi Camila, I made the Red Velvet macarons over the weekend and they were amazing, everyone absolutely loved them!! I usually bake at Christmas time and have been making macarons for only a couple of months, your techniques and detailed instructions along with your videos have helped me to make the perfect macaron. I am excited to try your other recipes especially the Reese’s macaron. Thank you, thank you, thank you!
I am so glad to hear that thank you!!!
Love it! Turned out great. I had thought for the longest time that chocolate shells were my nemesis, I was also worried about trying something using so much food coloring but I did it!
yayyyy!!!!
Hummmmm…. muito gostoso!
Hi Camila, will the disc of cake help in the maturation of the macaron? And won’t the frosting make the shell soggy? Thanks