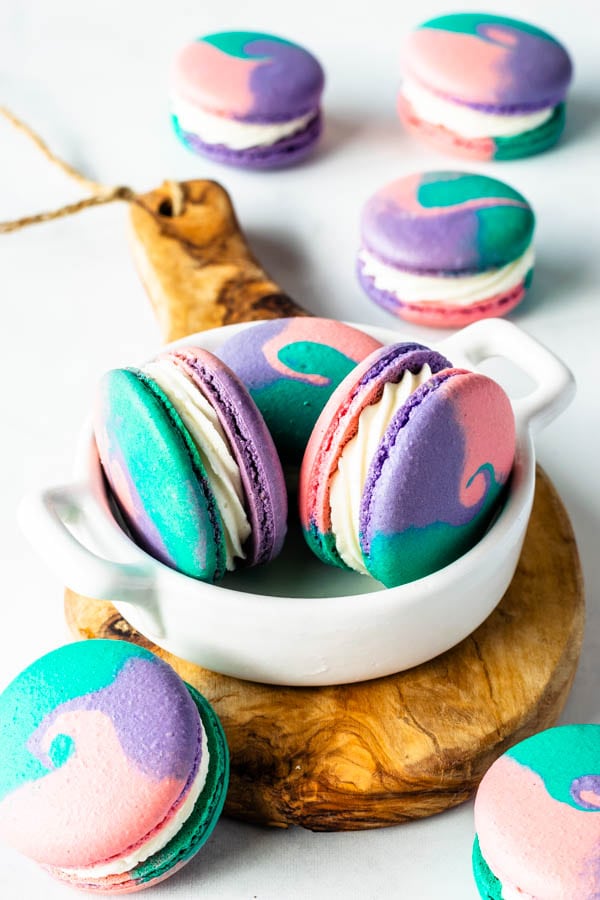
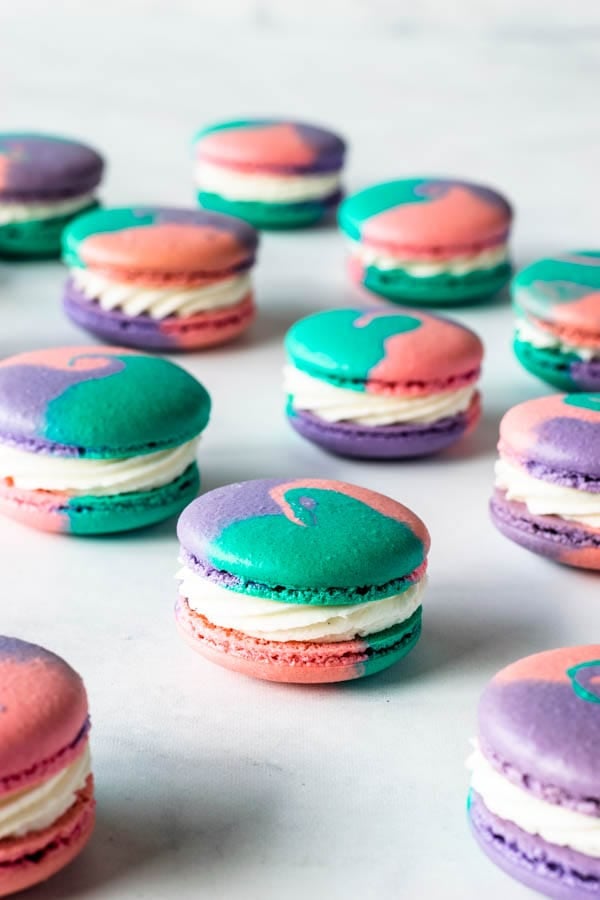
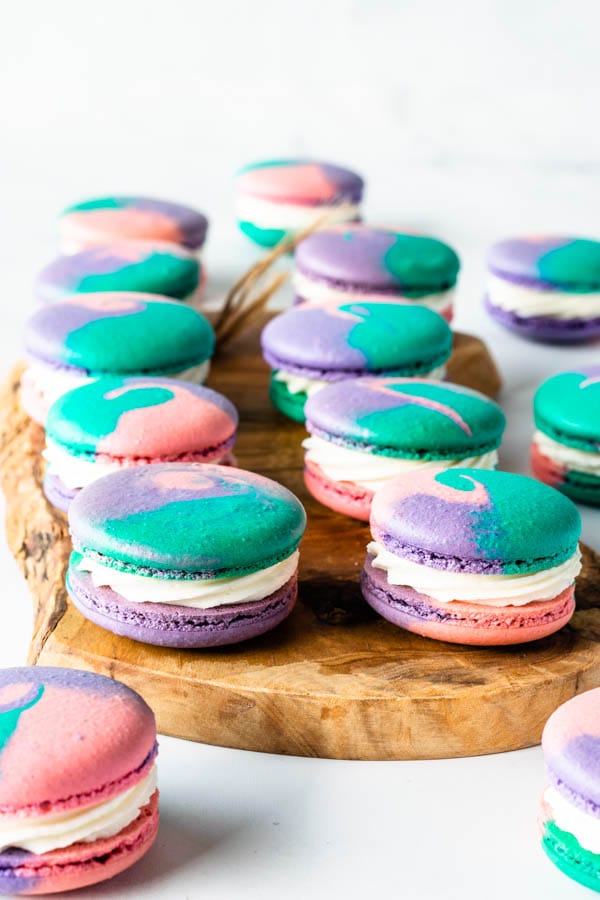
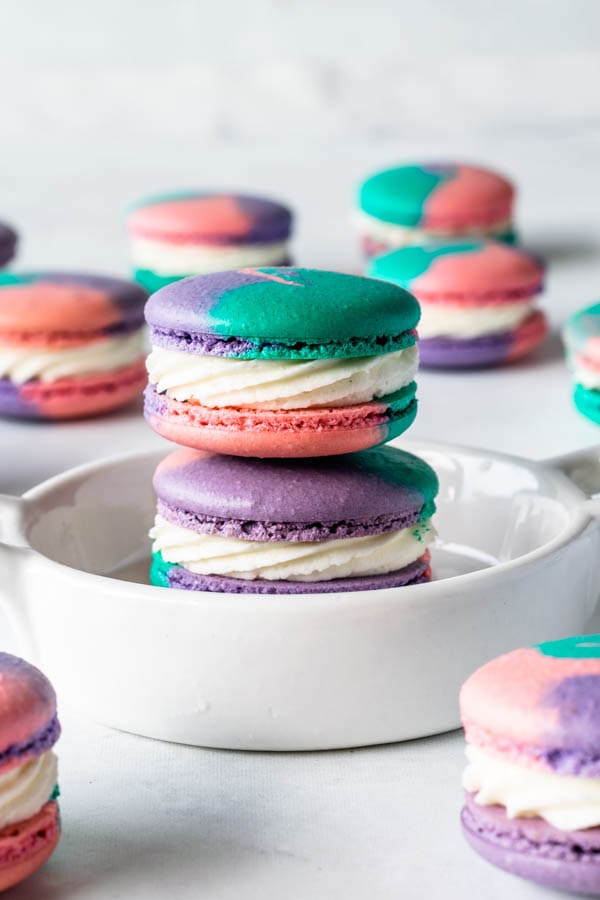
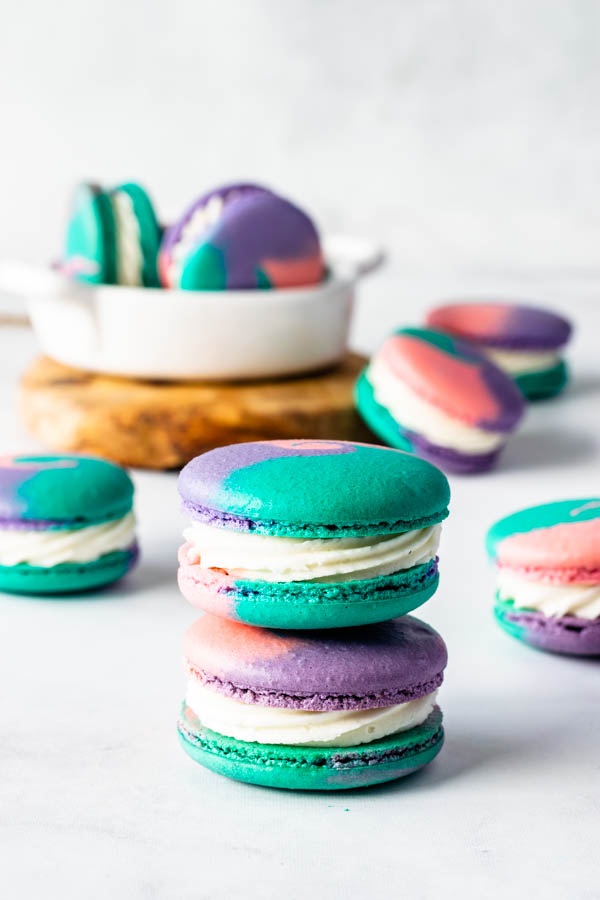
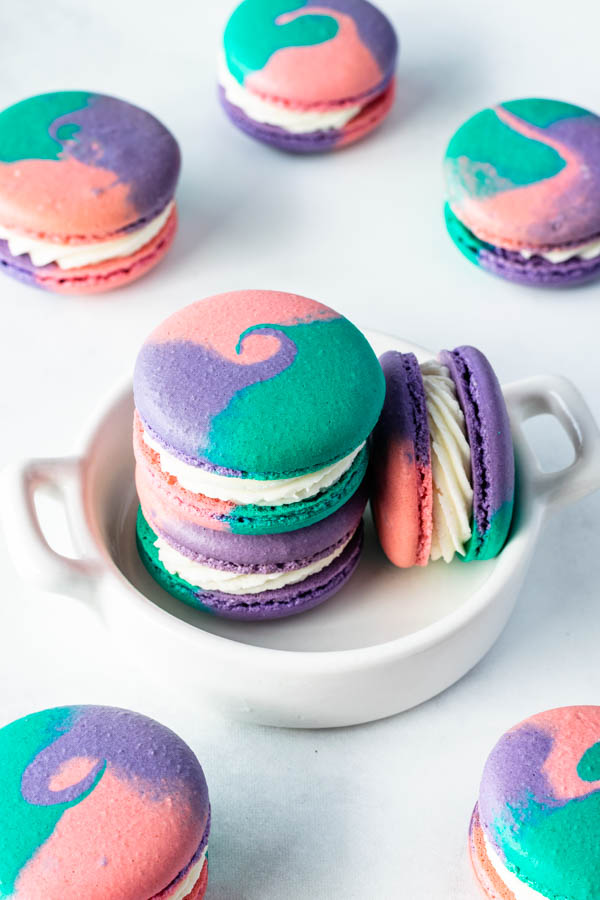
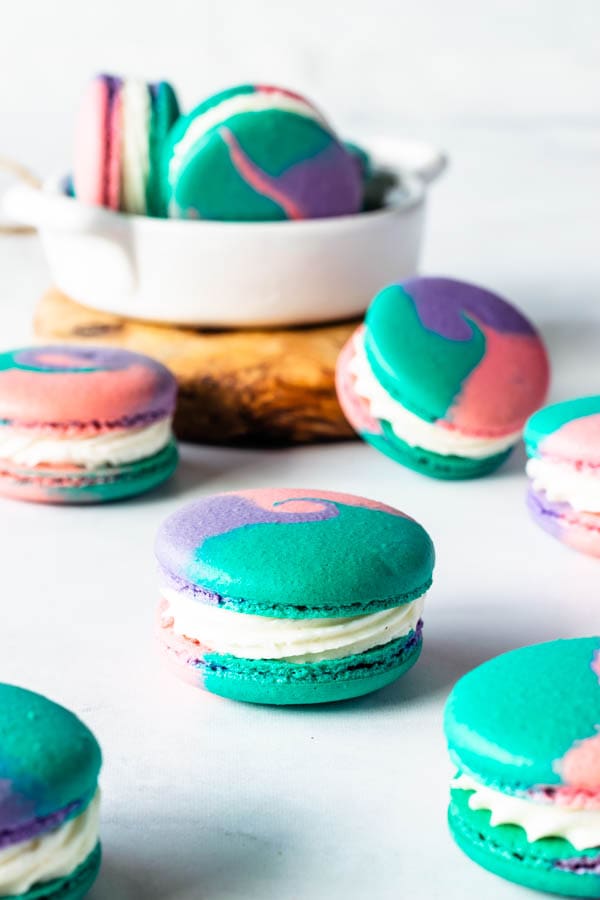
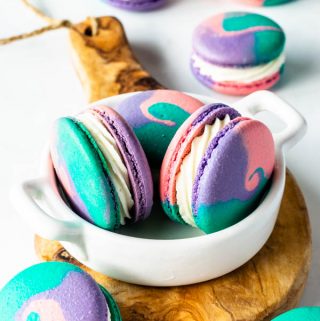
Multi-colored macaron shells (from one batch of macarons)
Hello macaron bakers! Today we are learning a special technique! Let’s learn how to make multi-colored macaron shells from one batch of macarons!
So I still want to make a video for this tutorial, but for now I will leave you with this blog post, full of pictures and a very detailed explanation below in the recipe card.
Making this fun multi-color macaron shells is easier than you think! The results are very beautiful, and you can use any colors you’d like!
This post may contain affiliate links. I earn a commission from qualified purchases. Please read our Privacy policy here.
For the filling, I made a simple vanilla buttercream, but you can make any filling you’d like. I have lots of ideas for macaron fillings HERE. Make sure to check out my macaron recipes, I have over 46 macaron recipes (and counting, probably more by the time you read this 😅).
Anyway, let’s get to it!
How to make multi-colored macaron shells from one batch of macarons
I am using the Swiss method to make my macarons (you can read more about the other methods here on my Matcha Macarons post).
With the Swiss method, you start by making a syrup of egg whites and sugar whisked together over a double boiler until the sugar melts. This syrup then gets poured into the bowl of the electric mixer, and whipped to stiff peaks.
Once you have achieved stiff peaks (Read more about how to achieve the perfect meringue here), add the sifted almond flour and powdered sugar to the meringue.
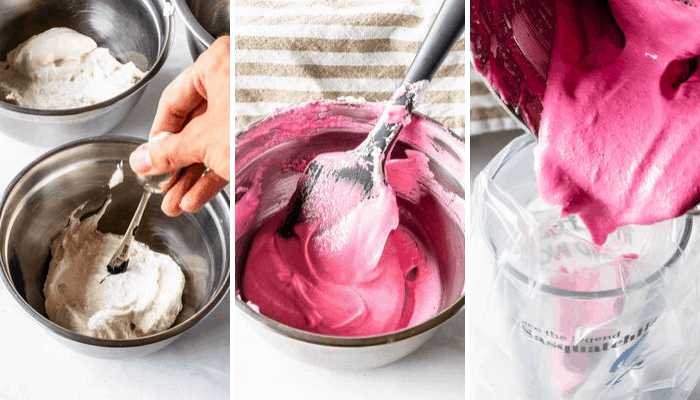
Fold the batter JUST until you see no more dry ingredients in. As soon as that happens, divide the batter into the amount of bowls you will need for the amount of colors you’ve chosen.
The first picture below is the batter folded just until incorporated. On the second picture I’ve divided the batter into 3 bowls, because I am making 3 different colors: teal, violet, and pink with a touch of red.
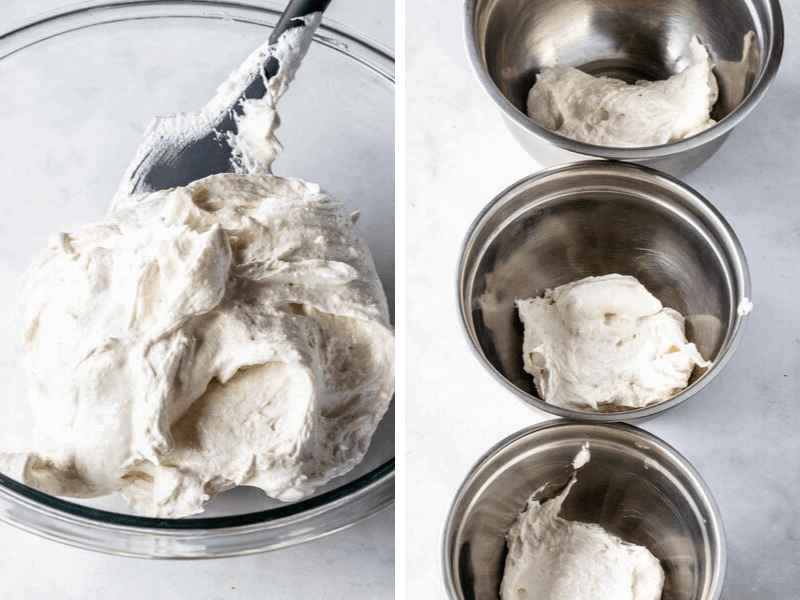
Once you’ve divided the batter between the bowls, make sure to cover the bowls you’re not working with, so the batter stays protected.
You want to work quickly here, so it will help to have all the colors, materials, spoons, spatulas, piping bags all set aside and ready to go.
I started with the pink color, and added a tiny touch of red to it.
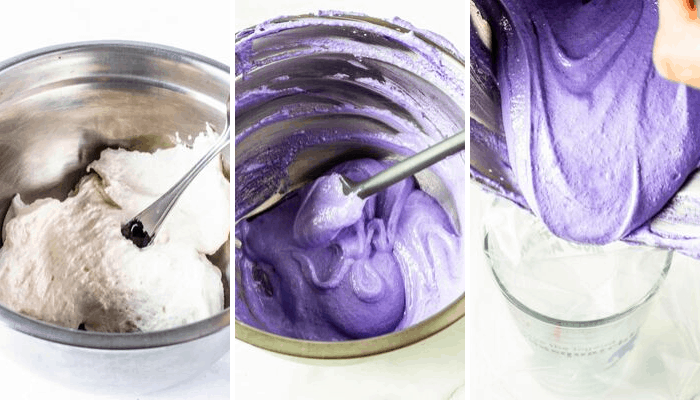
Now quickly move on to the next color. Violet was my second choice.
And then finally last color: teal.
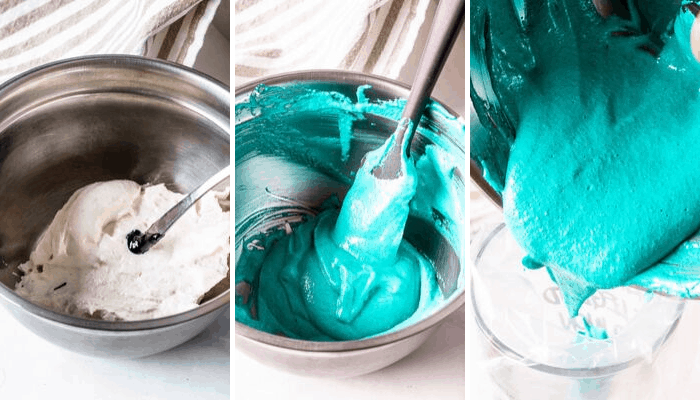
Remember to fold each batter until they are at the perfect consistency to be piped. I added a lot of information below on the recipe card on how to recognize when the batter should be done folding. But this is something that will come with practice too.
Remember you can use whatever colors you’d like, but make sure to use gel food coloring, and not water based ones.
I use Wilton Gel food coloring.
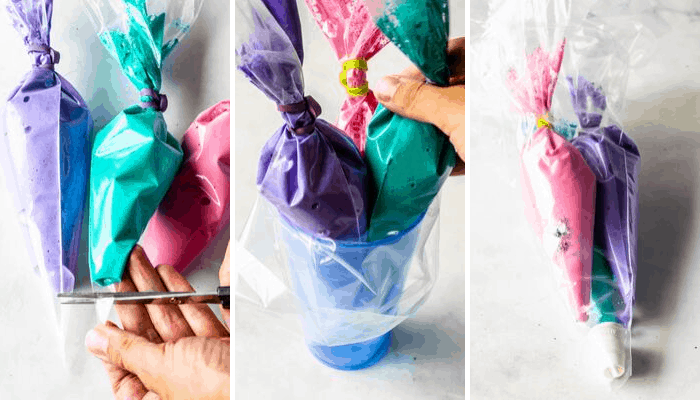
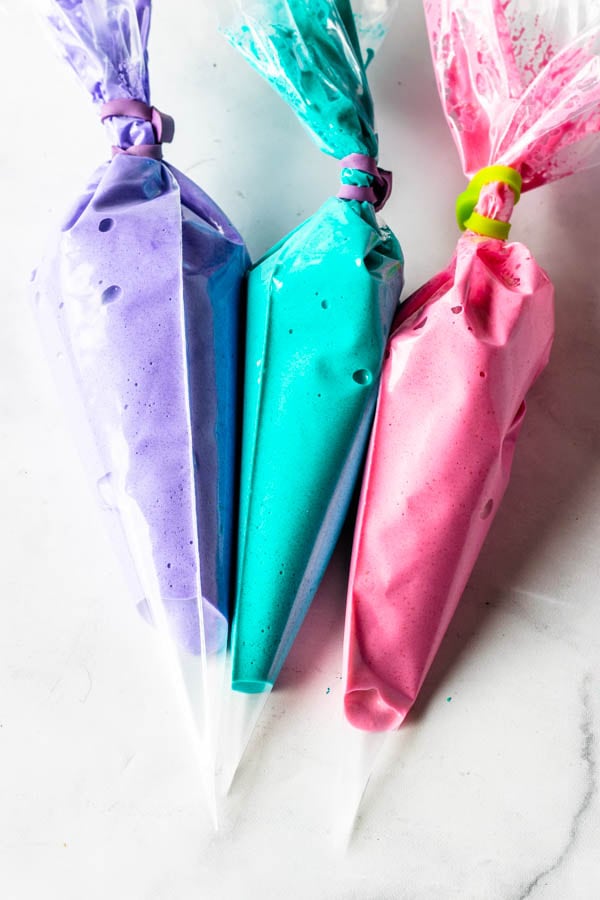
Snip the end of each piping bag with scissors. Quickly insert the piping bags inside of your large piping bag fitted with the round tip. It helps to place the piping bag in a cup like in the picture above.
Try to insert all piping bags at the same time, so they are all at the same height.
To pipe, make sure to apply equal pressure on all sides of the bag, so it’s dispensing the same amount of each different color batter at the same time.
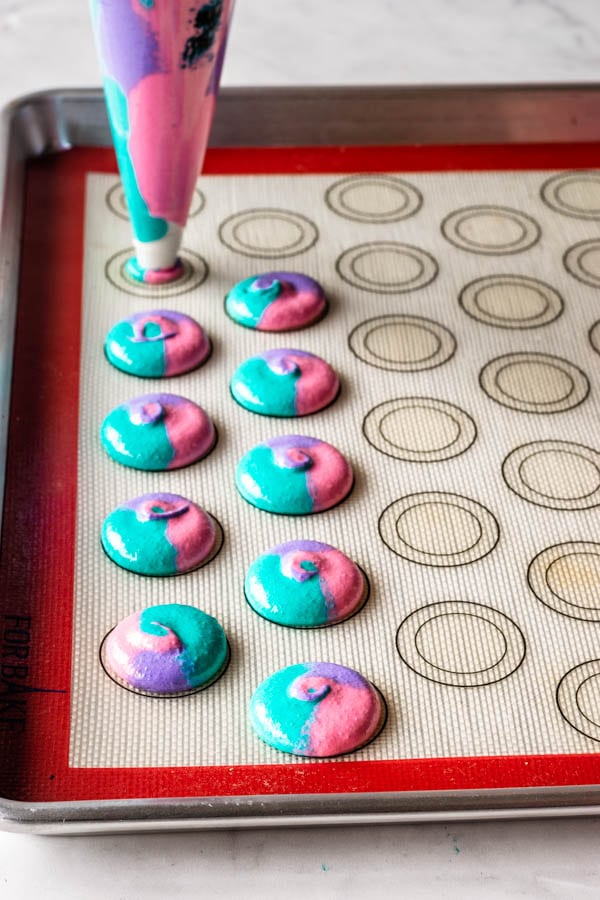
Make sure to slam your trays agains the counter, to release any trapped air bubbles. You can also use a toothpick to help pop any bubbles that might be at the surface of your shells.
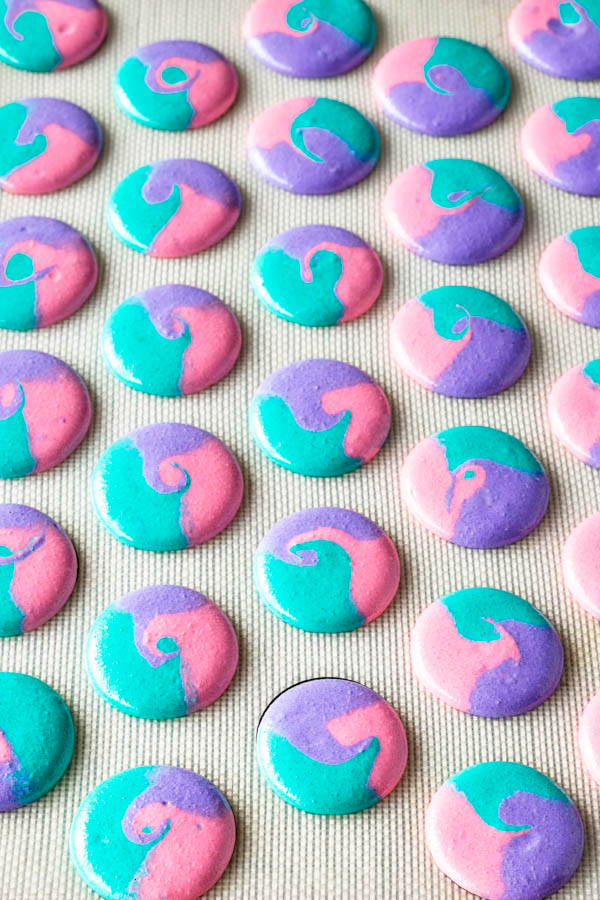
Once macaron shells are dry to the touch, you can get ready to bake them.
How long should I rest my macaron shells?
The answer is: it depends. It depends on the weather, on your recipe, the method you used, how many times you’ve folded.
During winter time, I only let my macarons rest for the amount of time that I pre-heat the oven. During summer time, sometimes I have to let my macarons rest for up to 1 hour, because it can get really humid where I live.
Make sure the macarons are dry to the touch. And also remember not to over-rest them, or they might even come out lopsided as a result.

Doesn’t seem so hard, does it! Making multi-colored macaron shells from one batch of macarons can be fun, practical, and turn into some beautiful results.
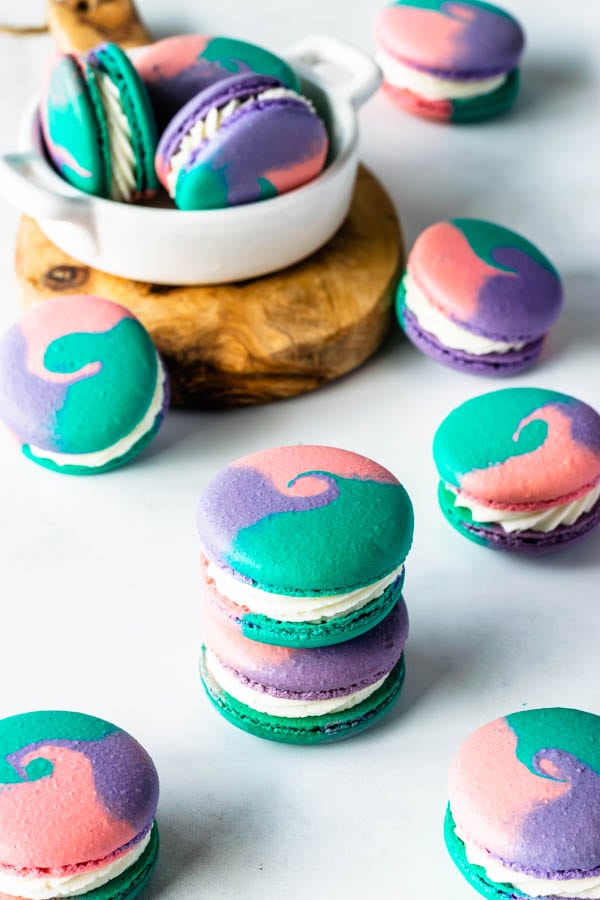
I was totally in love with my combo of colors. What combo would you make? If you try this, tag me on instagram, I always love seeing your creations.
I use a similar method with splitting the batter to make different colors on my M&M’s Macarons recipe, which also includes a video on how to make different color shells from one batch of macarons.
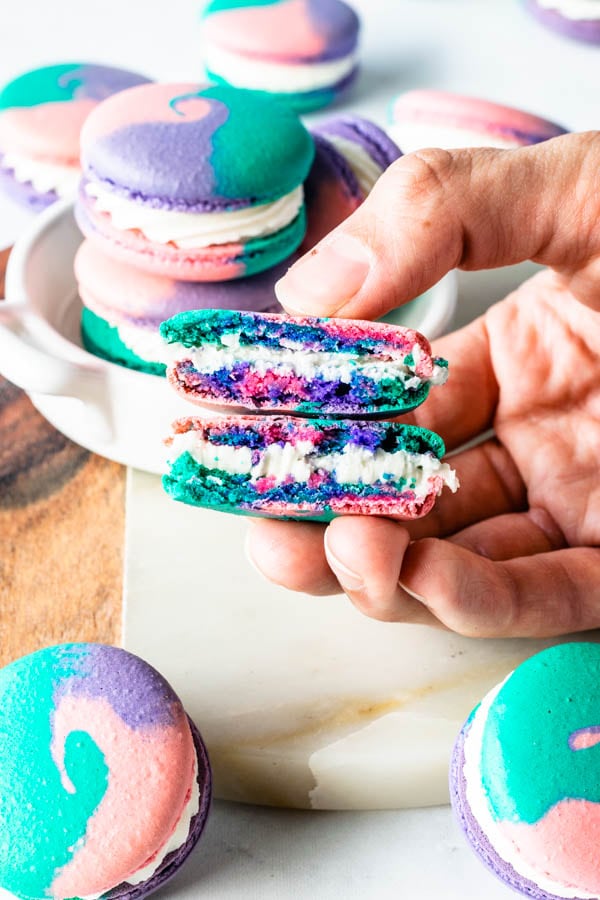
For the filling of these macarons I used a simple and quick vanilla buttercream, like I said. But you can use whatever filling you’d like.
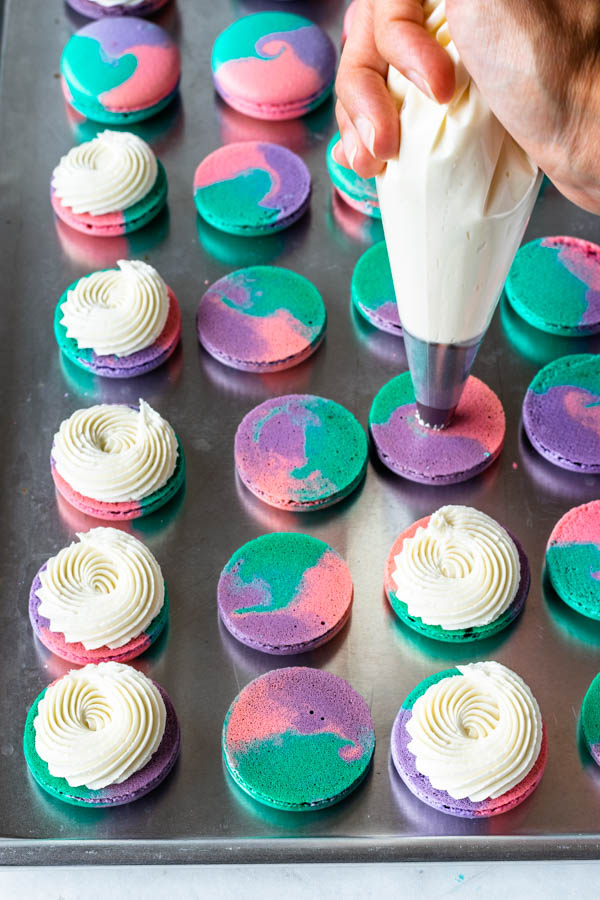
I used a Wilton 363 tip to pipe the filling in these macarons.
If you want some more macaron filling ideas, here are some you might like:
- Chocolate Macarons
- Strawberry Macarons
- French Vanilla Macarons
- Pecan Macarons
- Funfetti Macarons
- Blueberry Macarons
You can also subscribe to my Youtube channel if you’d like. I am starting to build stuff up over there. Slowly making videos for Youtube, and I will be focusing on videos of macarons from now on. I want to help you in your macaron journey.
Since I am still learning how to make and edit videos, it takes me a while to get a video out there, but slowly they are coming out. And I love to hear that they are being of help to some macaron bakers out there.
Whatever you do, just remember that this is part of a journey of mastering, and if you are interested in being a macaron master, I advise you to consume every single macaron content you come across, take what you love, experiment with what resonates, and leave behind what doesn’t work for you.
Thank you so much for reading my blog! I appreciate all your support! Have a fabulous day!
Click here to read more about how to make perfect macarons, and also some more macaron tips to help you on your macaron baking journey.
Multi-colored Macaron Shells
Ingredients
Macaron Shells
- 100 grams egg whites
- 100 grams white granulated sugar
- 105 grams almond flour
- 105 grams powdered sugar
- Food coloring I used the following colors: teal, violet, and pink with a touch of red
Vanilla Buttercream
- 2 cups confectioners’ sugar sifted 240 grams, 8.4 oz
- 6 tbsp unsalted butter softened 85 grams, 3 oz
- 1 tsp vanilla extract
- 1/2 -1 tbsp milk as necessary
Instructions
Macaron Shells
- Before you start, get all of your ingredients ready. Prepare a large piping bag, fitted with a large round tip. Set aside.
- Also set aside as many piping bags as the number of colors you’d like to color your shells. I used 3 different colors.
- Line two baking sheets with parchment paper or silicone mat.
- Measure out all of the ingredients.
- Sift the powdered sugar and almond flour together. Set aside.
- Place the egg whites and granulated sugar in a heat proof bowl or in a double boiler. Over a pan of simmering water, whisk the whites and sugar until frothy and sugar completely melted. It will take a couple minutes. You can test by touching the mixture between your fingers, and if you feel any sugar granules just keep whisking mixture over the water bath.
- Make sure the bottom of the bowl isn’t touching the simmering water.
- Transfer the mixture to the bowl of a stand mixer.
- With the whisk attachment, start whisking the mixture on low for about 30 seconds, then gradually start increasing speed to medium. Whisk on medium for one to two minutes, until mixture is white and starting to become fluffy. Raise speed to medium-high and finish whipping for a few more minutes until stiff peaks are formed. Best way to check this is to keep your eye on the whites. Once they get glossy and you start seeing streaks formed by the whisk, it might be time to stop.
- Pour the powdered sugar and almond flour into stiff whites.
- Start folding gently forming a letter J with a spatula.
- Fold just until you don’t see any streaks of dry ingredients any longer. Once that happens, you can split the batter between the number of bowls correspondent to the colors you want to use in your batter.
- I split my batter into 3 different bowls.
- Work quickly, with each color, one at a time, folding the batter until ready, then transferring it to a piping bag. Move on to the next color and do this until the entire batter is ready.
- It’s time to stop folding when the batter is glossy and has a thick and flowing consistency. There are several ways to test this.
- First, pick up some batter with the spatula and try to draw a figure 8 with the batter that is dripping off the spatula. If you can form several 8 figures without the batter breaking up, that’s one indication that it might be ready.
- There’s another test you can do. I call it the Teaspoon test.
- Grab a teaspoon of batter and spoon onto the parchment paper or silicon mat. Wait a minute to see how it behaves.
- If the batter stays stiff, forming a point and doesn’t spread out a bit, start folding a little bit more, about 3 folds.
- Test again.
- Once the batter spreads out a bit and starts to look glossy and smooth on top, on the parchment paper, transfer the mixture to the piping bag.
- You don’t want your batter to be too runny either. So be careful not to overmix. It’s always best to undermix and test several times until the proper consistency has been achieved.
- Transfer each color to one piping bag. Then cut the tip of each piping bag. And place them inside of a large piping bag fitted with a round tip.
- Applying equal pressure around the whole piping bag, start piping the macarons onto the baking sheet.
- Once you’ve piped as many circles as you could, bang the trays against the counter a few times each. This will release air bubbles that are in the batter and prevent the macaron shells from cracking.
- Let the trays sit for a while so the shells will dry out a little bit. I usually leave about 20-40 minutes, depending on how humid the day is. You’ll know they’re ready when you gently touch the surface of a macaron and it seems dry.
- Pre-heat the oven to 325F.
- Bake one tray at a time.
- Bake for 5 minutes, and rotate the tray.
- I bake each tray for a total of 15-20 minutes.
- When baked, the macarons will have a deeper color and formed feet. If you try to move a macaron, it shouldn’t feel jiggly. If the macaron is still jiggly, keep baking.
- Remove from the oven and bake the other tray.
- Let the macarons cool down before proceeding with the filling.
Vanilla Buttercream
- Cream the butter at medium speed in the bowl of an electric mixer for about 1 minute. With the mixer off, add all of the powdered sugar.
- On low speed, beat the sugar and butter together. Once they are incorporated, turn speed to medium and cream for 1-2 minutes until very fluffy.
- Add the vanilla beat for another 30-45 seconds.
- If necessary, add the milk. Only add 1/2 tablespoon of milk at first. Sometimes you may find that the consistency of the buttercream is already perfect and doesn’t need any more liquid. If the buttercream seems too stiff, add a bit more of milk as necessary. If the buttercream seems too runny, add more sifted powdered sugar until you obtain a firm, but smooth and creamy consistency.
- STORAGE: Store the buttercream in the fridge for up to 1 week.
To assemble
- Place the buttercream in a piping bag fitted with the tip of your choice.
- Pipe a dollop of buttercream in the middle of the bottom shells.
- Place top shell on top.
- Let macarons mature in the fridge overnight before serving.
Storage
- Macarons will store really well in the fridge for up to 1 week, or in the freezer for up to 2 months.
Can I use oil based coloring for the shells?
no, dont use oil based food coloring. the oil will break down the protein bonds in the meringue.
Hi Camila! Just browsing through and I notice how absolutely perfect your swirl macs look, and your others you have different ratios in the recipes. Is there something about this one that makes them so flippin’ beautiful?
my older recipes I used a bit less almond flour and powdered sugar than now.
Love these! How do you get the colour to come out so bright? It always looks bright when I pipe them but when they come out of the oven they have a brown dullness to them and basically no colour! Used the Wilton gel colourings too.
You need a lot of coloring. It will affect the consistency of the batter, drying time, etc…
So a couple of years ago I tried to make French macarons total FAIL. But this recipe is so awesome. I Added lemon juice and zest to make lemon shells and I make a strawberry purée Swiss meringue buttercream and it was so delicious. Great recipe. Stay safe!!
Thank you so much, Emma! That’s so nice to hear! They sound delicious!
Love your site..am using it now for my inspirations for macs. I’ve pretty much mastered the French method. I haven’t yet tried the Swiss method. Let me ask. Can you simply take any French recipe and apply the Swiss method to it or do you need a “Swiss” ratio of ingredients that is different from the French ratio of ingredients?. I typically use a 1:1.25:1.5:0.8 ratio for French – I see so much variation in ratios…..which ratios work best for you for both French and Swiss (if you use differing ratios for them)???
Also…I’ve tried using cartoned egg whites 3 times..once they worked…twice they did not…what’s your take on why they don’t seem to work? Because I hate having to crack those eggs!!!! I wonder how major producers of macarons manage to get their egg whites??? Any chance that you can email me back at gkboatman@gmail.com.
Will try your Swiss recipe tomorrow.
Oh..I”m about to leave my winter home in Ca and head to Ma for the summer where I have a convection oven…..can I use 2 baking sheets at a time when using the convection setting??? Interested in your experience.
Esses macarons são perfeitos pra servir na festa de crianças, muito legal!!!!!!
uau verdade mesmo!! obrigada pai!!!
Camila, these are adorable! I’m going to have to make these for my 7-year-old, these are all her favorite colors!!!
Awe thanks Amanda!!! These are some of my favorite colors too!!