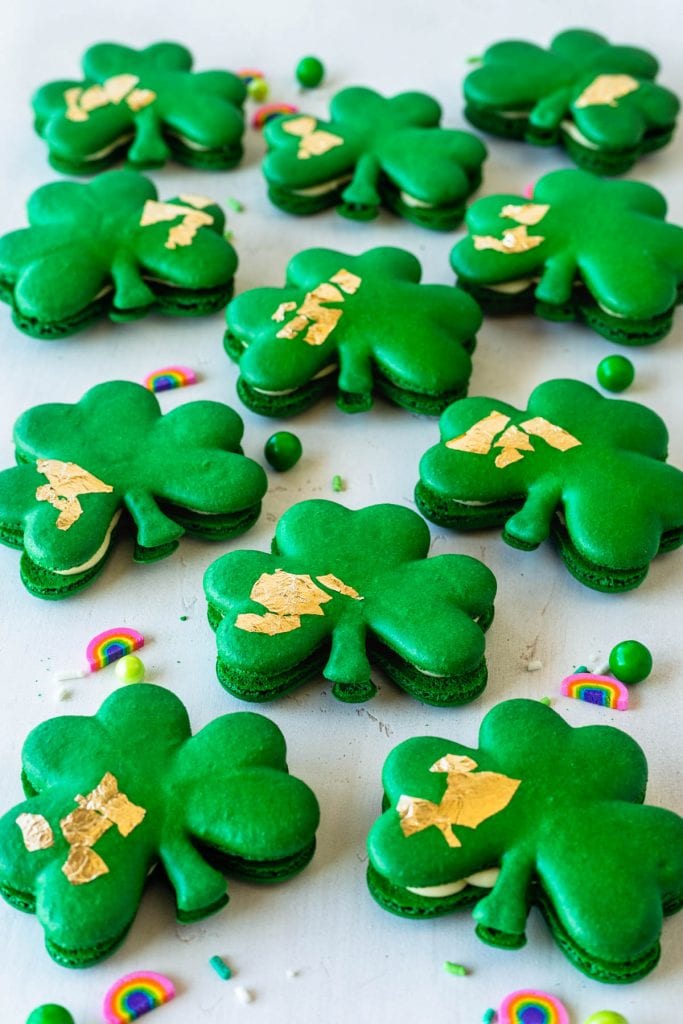
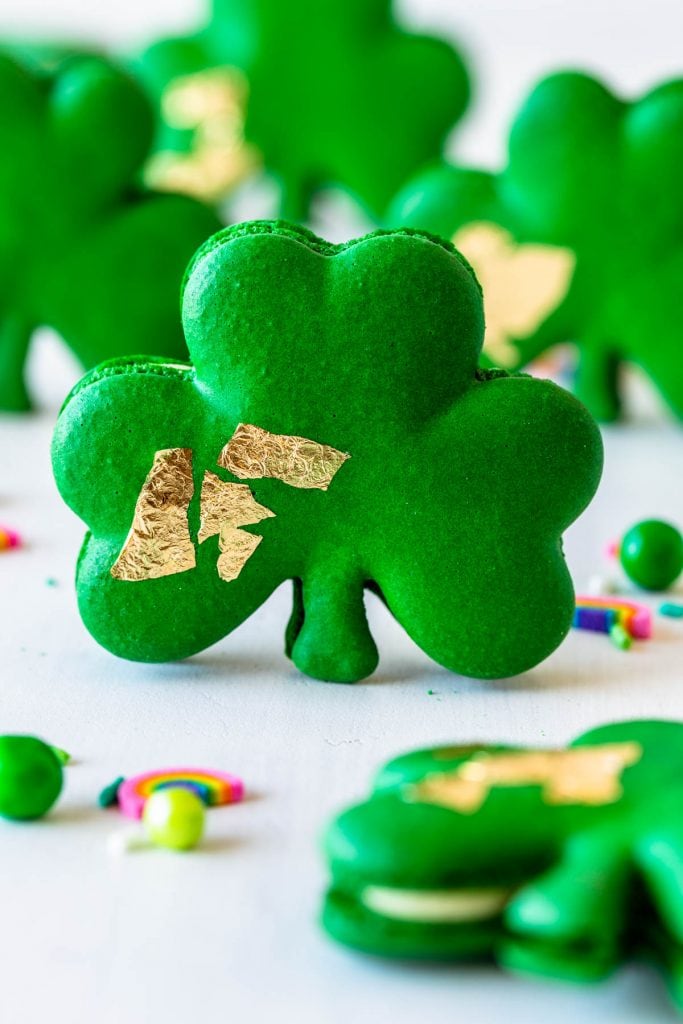
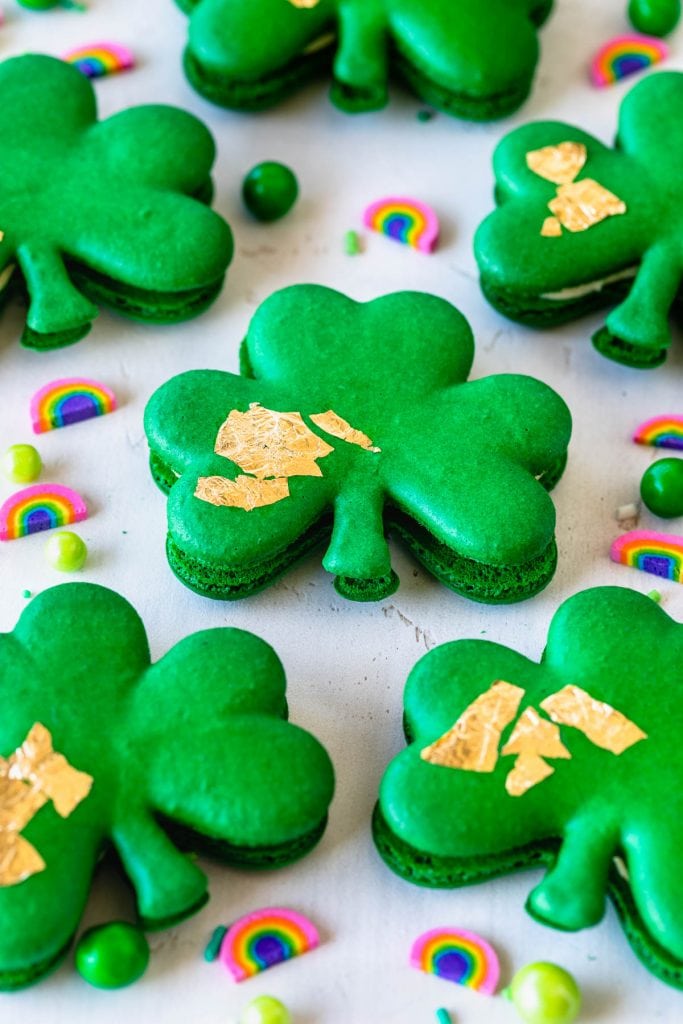
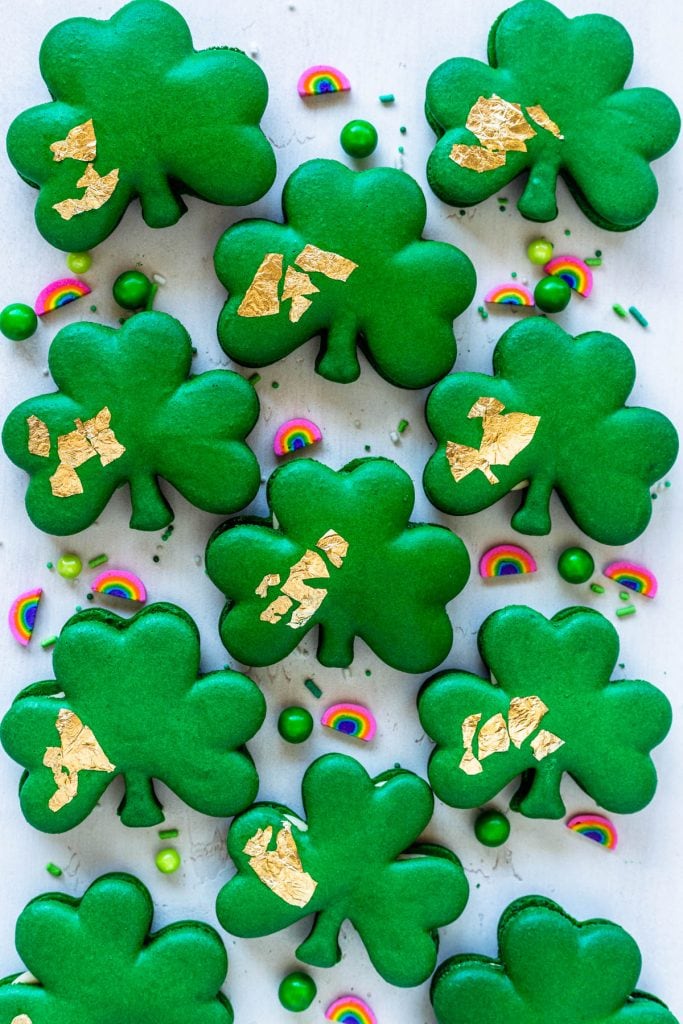
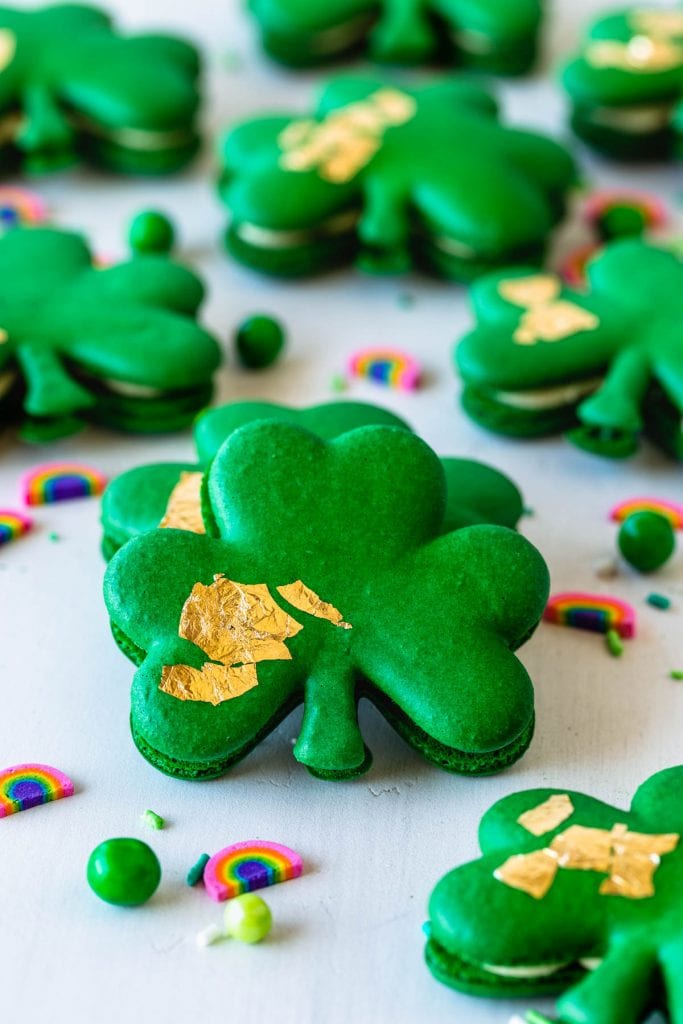
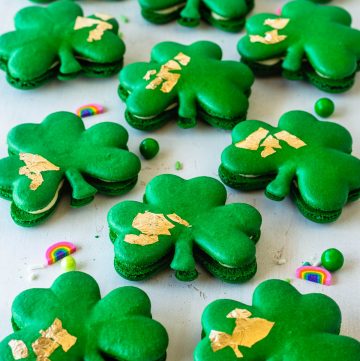
Shamrock Macarons
Hello friends! Today we are making these super fun Shamrock Macarons, they are perfect for St. Patrick’s Day!
These Shamrock Macarons are filled with a Baileys Ganache that is absolutely delicious! They are festive and really delicious, and will be the perfect compliment to your St. Patrick’s Day celebration!
Watch the video on YouTube or on this page to see how to make these Shamrock Macarons.
This post may contain affiliate links. I earn a commission from qualified purchases. Please read our Privacy policy here.
Shamrock Template
First things first, here is the Shamrock template. Download it, print it and place under your silicone mat or baking sheet, so you can pipe the shamrocks!
I actually made this template myself by adding a few hearts together, and then adding the stem base.
The shape turned out exactly what I was looking for.
How to pipe the Shamrock Macarons
First, I advise you strongly to watch the video on this page or on YouTube, which will show you how to pipe these Shamrock Macarons perfectly.
Videos give a lot of important visual information, that can be so helpful specially when making something tricky such as macarons.
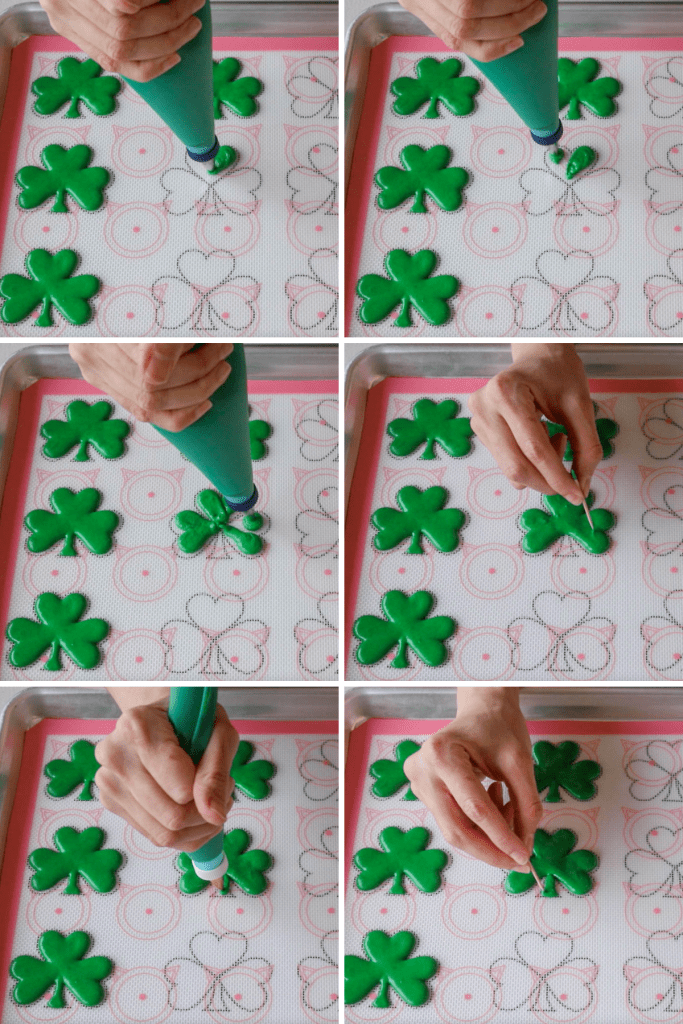
Piping Shamrock macarons is basically the same as piping hearts. Using a round Tip 8, start at the round part at the top of the shamrock leaf, and apply pressure as you slide the piping bag down to the center. Repeat with all the sections.
And then use a toothpick to smooth out the batter and pop any air bubbles.
Next, pipe the stem using the tip number 3. You will need a smaller tip for the stem, because it’s so small and thin.
After that use the toothpick again to smooth the surface and drag the batter to the outlines if necessary, as well as pop any air bubbles that might be on the shells.
Remember to tap the tray against the counter or against the palm of your hand, to help the batter smooth out.
Tips on making Shamrock Macarons
- Make sure the batter isn’t too thick, or when you use a toothpick to smooth out the surface, it will leave streaks and bumps, and the shell won’t be smooth.
- Add food coloring with caution. Make sure to use gel or powder, and if you are adding a lot of gel food coloring while macaronaging, in order to obtain the perfect color you are looking for, be careful to not get carried away and over fold the batter. (Read more about food coloring here)
- Macarons with shapes and lots of color might need longer rest before baking.
- Make sure to pipe the stem the same thickness as the leaves, if the stem is too thin, it will break later when you try to move the macaron.
I have a lot of St Patrick’s Themed Macarons coming out next week, I will remember to come here and post links to all those recipes.
Meanwhile, you can check out some of my green macarons:
- Guinness Macarons
- Pistachio Macarons
- Matcha Macarons
- Mint Chocolate Macarons
- Key Lime Macarons
- Pear Macarons
And if you want to become a pro at baking macarons, check out Macaron School, an awesome space where I share everything you need to know to learn how to make macarons, from tips and tricks, to troubleshooting guides, and much more!
Thank you so much for reading! If you make these tag me on instagram, I love seeing your creations!
Shamrock Macarons with Baileys Ganache
Ingredients
Macaron Shells
- 100 grams egg whites
- 100 grams white granulated sugar
- 105 grams almond flour
- 105 grams powdered sugar
- Leaf green food coloring
Baileys Ganache
- 250 grams white chocolate
- 38 grams Baileys Irish cream
- 32 grams heavy cream
- 1/4 tsp Jameson optional
Instructions
Macaron Shells
- Before you start, get all of the ingredients ready. Prepare two piping bags, fitted with round tips, I am using a tip number 3 for the stem and a tip number 8 to pipe the shamrock leaves. The stem is smaller and thinner than the leaves, so you will need a smaller tip for that.
- Line two baking sheets with parchment paper or silicone mat. Place the template under the mat.
- Measure out all of the ingredients.
- Sift the powdered sugar and almond flour together. Set it aside.
- Place a bowl over a pan with barely simmering water. Add the sugar and egg whites to the bowl and whisk the mixture until frothy and the sugar is completely melted. It will take a couple of minutes. You can test by touching the mixture between your fingers, and if you feel any sugar granules just keep whisking the mixture over the water bath.
- Make sure the bottom of the bowl isn’t touching the simmering water because you don’t want the whites to cook.
- Also, don’t overheat the sugar syrup, this may cause issues down the line, such as wrinkly macarons.
- Transfer the syrup to the bowl of a stand mixer.
- With the whisk attachment, start whisking mixture on low for about 30 seconds, then gradually start increasing speed to medium. Whisk on medium for one to two minutes, until the mixture is white and starting to become fluffy. Raise the speed to high, or medium-high and whisk for a few minutes until stiff peaks are formed. Best way to check this is to keep your eye on the whites. Once they get glossy and you start seeing streaks formed by the whisk, it might be time to stop.
- Whisk until stiff peaks have formed. When you pull your whip up, the peak should be stiff and shooting straight up, with possibly a slight bend at the top, but not bending down to the side.
- Pour the sifted powdered sugar and almond flour into the stiff meringue.
- Add the food coloring at this point, if using. I added some green leaf gel food coloring.
- Start folding gently forming a letter J with a spatula.
- How to know when to stop folding the batter: It’s time to stop folding when the batter is glossy and has a thick and flowing consistency. There are several ways to test this.
- First, pick up some batter with the spatula and try to draw a figure 8 with the batter that is dripping off the spatula. If you can form several 8 figures without the batter breaking up, that’s one indication that it might be ready.
- There’s another test you can do. I call it the Teaspoon test.
- Grab a teaspoon of batter and spoon onto the parchment paper or silicon mat. Wait a minute to see how it behaves.
- If the batter stays stiff, forming a point and doesn’t spread out, fold a little bit more, about 3 folds. Test again.
- Once the batter spreads out a bit and starts to look glossy and smooth on top, on the parchment paper or silicone mat, it’s ready.
- You don’t want your batter to be too runny either. So be careful not to overmix. It’s always best to undermix and test several times until the proper consistency has been achieved.
- When you hold the spatula with batter on top of the bowl and the batter falls off the spatula slowly but effortlessly the batter is ready. The batter will keep flowing off the spatula non-stop, but not too quickly.
- Transfer the batter to the piping bags, you will need less batter on the piping bag fitted with the tip number 3 since you will only be using that batter for the stem.
- Place the piping bag with the number 8 tip at one of the rounded parts of the shamrock leaf, and apply pressure as you move the piping bag towards the center. Move the piping bag to another rounded outer edge and repeat the motion. It’s a pretty similar motion to piping the hearts that I have taught you before. But this time you will pipe several hearts that will meet in the center.
- Now set the piping bag aside and grab the smaller tip one, and pipe the stem.
- Frequently tap the tray against the counter or against the palm of your hand, which will help the batter spread out.
- Use a toothpick to pop any air bubbles and also to drag the batter to the outer edges and smooth out any bumps.
- Let the trays sit for a while so the shells will dry out. I usually leave about 20-40 minutes, depending on how humid the day is. Since I added a lot of color to these shamrocks, I had to leave them resting for nearly one hour. You’ll know they’re ready when you gently touch the surface of a macaron and it seems dry.
- Pre-heat the oven to 300ºF.
- Bake one tray at a time.
- Bake for 5 minutes, rotate tray.
- Bake for 5 more minutes. Rotate again.
- I bake each tray for about 15 to 20 minutes.
- When baked, the macarons will have a deeper color and formed feet. If you try to move a macaron, it shouldn’t feel jiggly. If the macaron is still jiggly, keep baking.
- Remove from the oven and bake the other tray.
- Let the macarons cool down before proceeding with the filling.
Baileys Ganache
- Mix the baileys with the heavy cream, and heat in the microwave for 15 second intervals, until hot. Be careful so it doesn’t boil over.
- Pour the hot heavy cream and baileys over the white chocolate. Cover with a plate or with a towel and let it sit for 2 minutes.
- With a whisk gently stir the chocolate until completely melted.
- If the chocolate isn’t melting entirely place it in the microwave for 5 seconds at a time, stirring in between, until melted.
- Do NOT over heat the chocolate because it will separate and curdle.
- Do NOT use white chocolate chips from the store, those aren’t real white chocolate, and will not work well, causing you to waste ingredients and money. Look for white chocolate bars, or white callets by Callebaut or other brands that will tell you their chocolate has over 20% cocoa butter. Store bought white chips have additives, and lots of oils which makes them seize and separate when you try to melt them.
- Once the ganache has melted entirely, add a little bit of Jameson and stir to combine. Then, set it aside at room temperature to cool down.
- After about an hour or so, the ganache should be ok to use.
- If you place the ganache in the fridge, and it becomes too hard, you can always whip it with a mixer, the whipping will make the chocolate smooth and creamy, easy to pipe.
- If the ganache is too soft, that’s because you either used white chocolate that didn’t contain 20% cocoa butter in it, or you added too much liquid.
- The ganache will pipe best if it’s at room temperature, but the whipping trick will work as well in case you want to make it ahead and keep it in the fridge.
To assemble
- Place the ganache in a piping bag fitted with a small round tip.
- Pipe the ganache in each bottom shamrock shell.
- Top with another shell.
- Decorate the shamrocks with edible gold leaves if desired.
- Let them mature overnight before serving.
To store
- Store in the fridge for up to 7 days or in the freezer for 1 to 2 months.
Camila, suas receitas são maravilhosas. Spre fico esperando pela próxima. Adoro!!!
Wow these sound amazing! Does the egg white need to be aged or do the eggs need to be room temperature? I wasn’t sure since in your recipe you heat the egg with the sugar.
I dont age the egg whites, and I also don’t make sure its at room temperature precisely because of what you said about heating the egg whites and sugar over the double boiler.
My shells are brittle and break at the touch. What am I doing wrong?
maybe you over baked them? or too high oven temperature?
Hi Camila, I have a niggle I hope you can help me with. When I bake shapes, my macaron rise in the oven with great feet, then sink back down. Everything else is perfect- great density, shine, surface texture etc.. I rest them and the meringue seems to be a very good stiff.. I do add a pinch of cream of tartar to help with this.
When I bake circles, my feet are great and very stable & even. I even gave this issue from the same batch of macaronage. Ie: I get good feet on my circles and only teeny tiny ones on my shapes
??
You are so cleaver! The shamrocks are so neat!!!
my shapes also have smaller feet, it’s normal. Maybe rest a bit longer next time to see if it works.
Thank you so much for your advice! I’ll be sure to try that out! 🙂
Oh also, something else I just thought! Make sure to remove the paper from the bottom of the mat! I made shapes before where I forgot to remove the template from under the mat, and the feet were considerably smaller, probably because it was preventing the heat to give the macarons the appropriate lift.
Hehehe! YES! Omgosh.. had that woopsie late one night too. It was would destroying lol 😂
What gold leaf do you recommend?
i think the one I have here is from a brand called Gilding
Fantásticos!!!!!!!
Obrigada pai ☘️