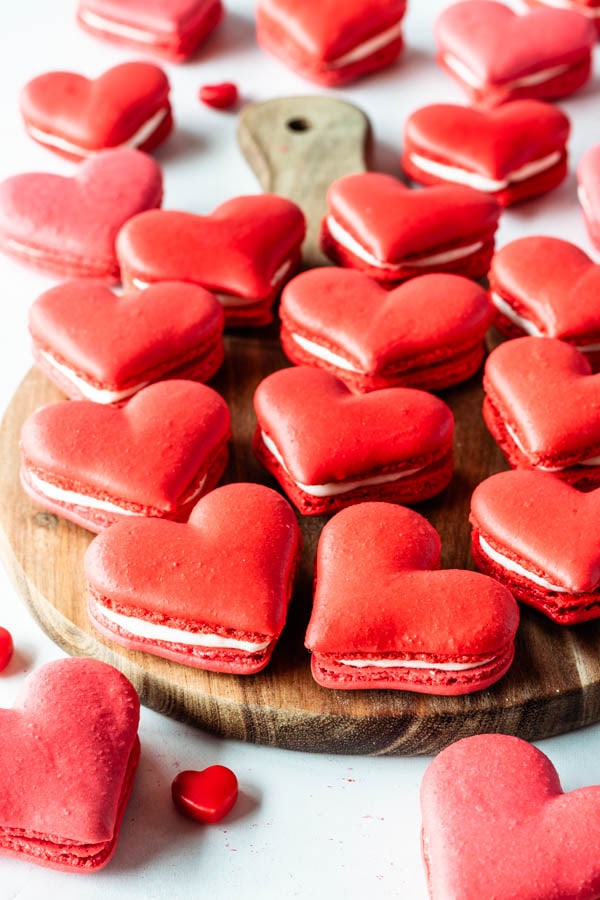
Heart Shaped Macarons (video + template)
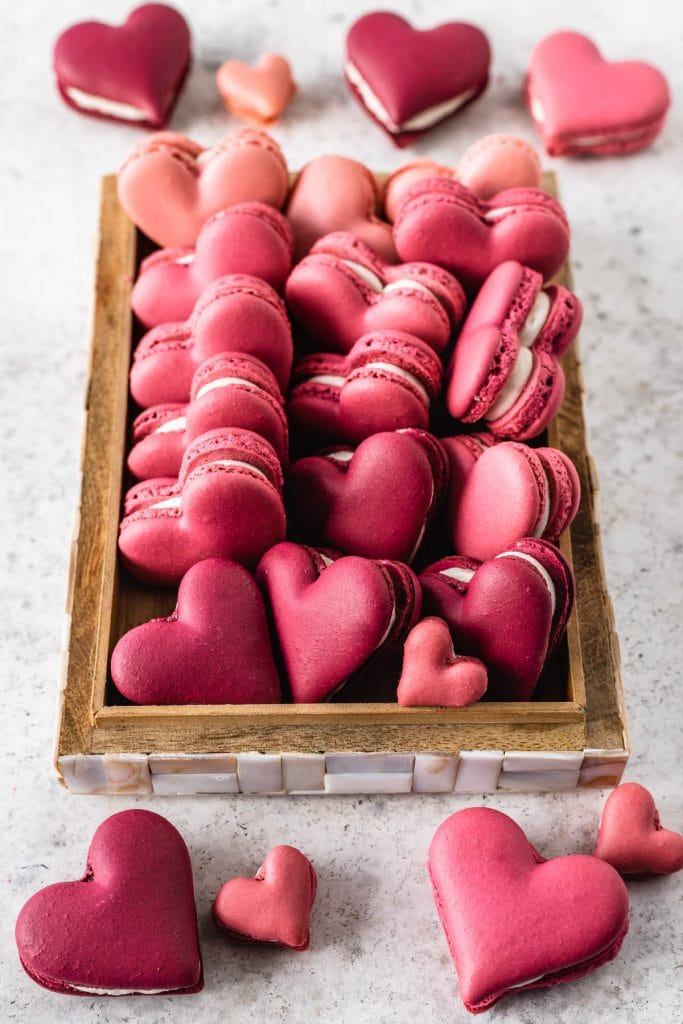
Hello friends! Today I will show you how to make these Heart Shaped Macarons! They are filled with Cream Cheese Frosting and an option of an Almond Buttercream filling recipe also.
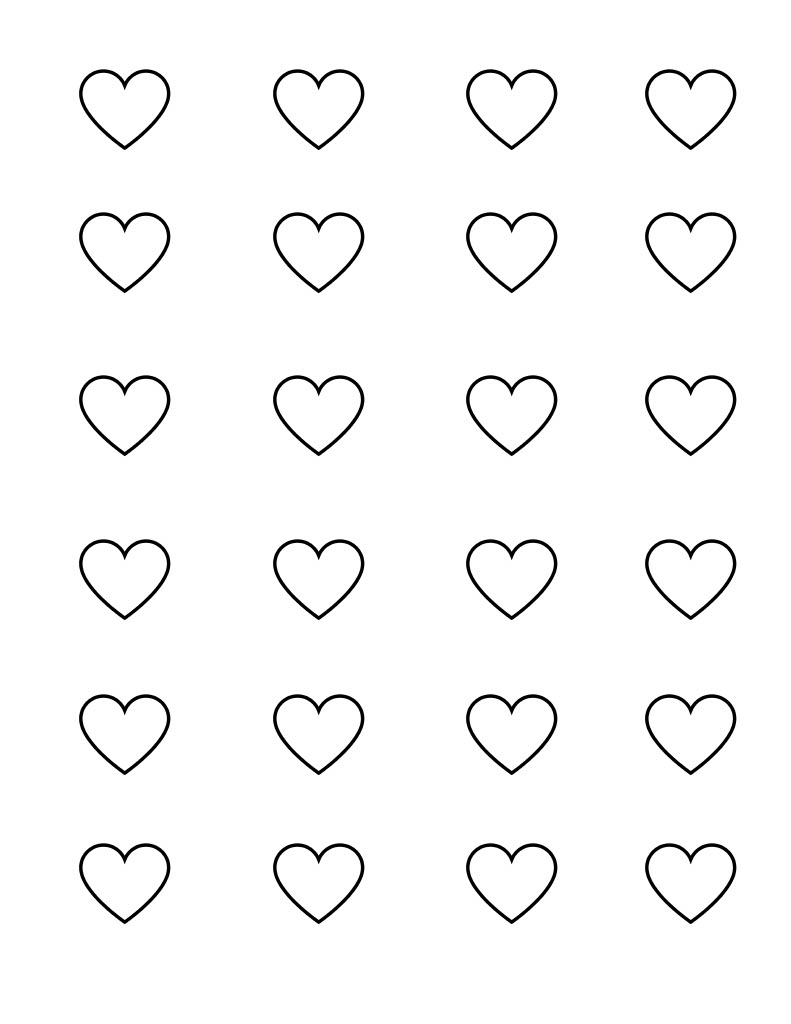
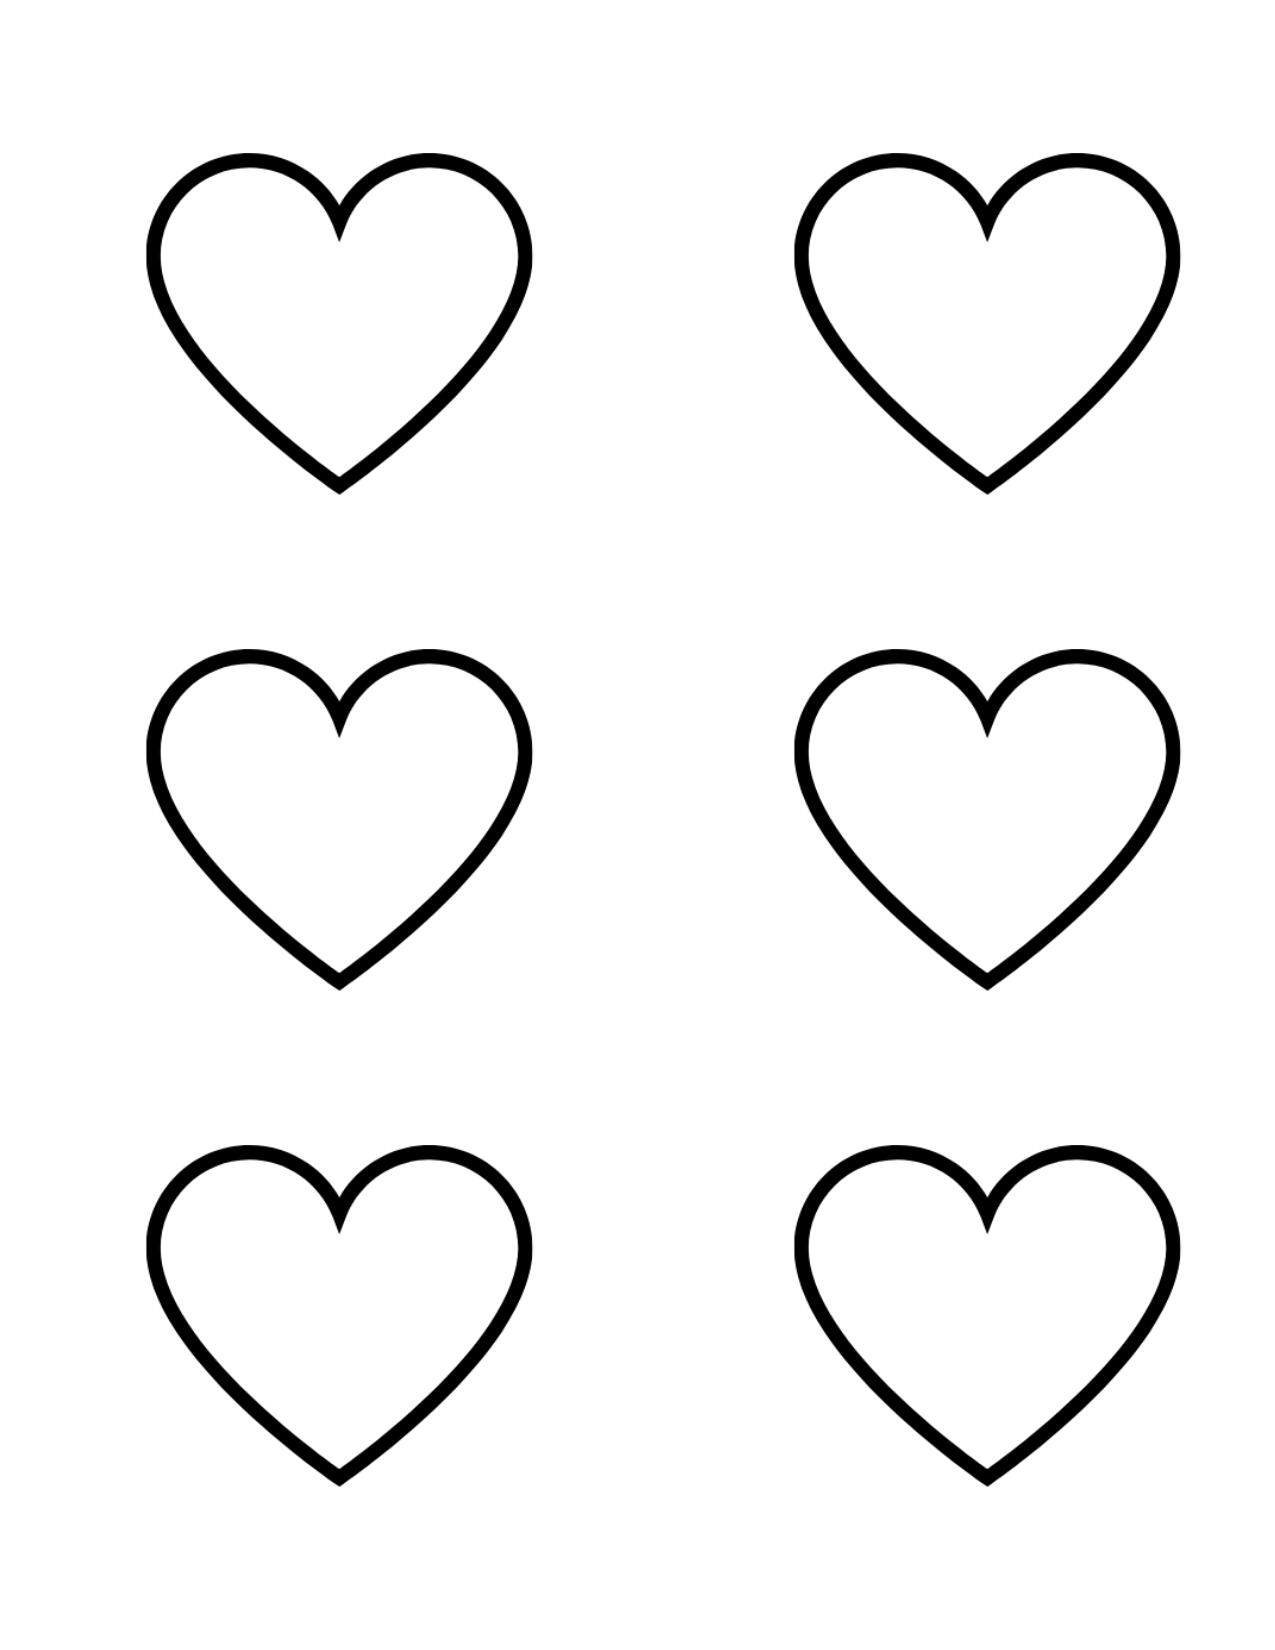
I have four different sizes of free heart macaron templates available for you to download below!
In this post you will find out everything you need to know about making Heart Macarons, how to decorate them, how to obtain the perfect shape with the pointy tip at the bottom, how to obtain a deep red or pink color, and much more!
This post may contain affiliate links. I earn a commission from qualified purchases. Please read our Privacy policy here.
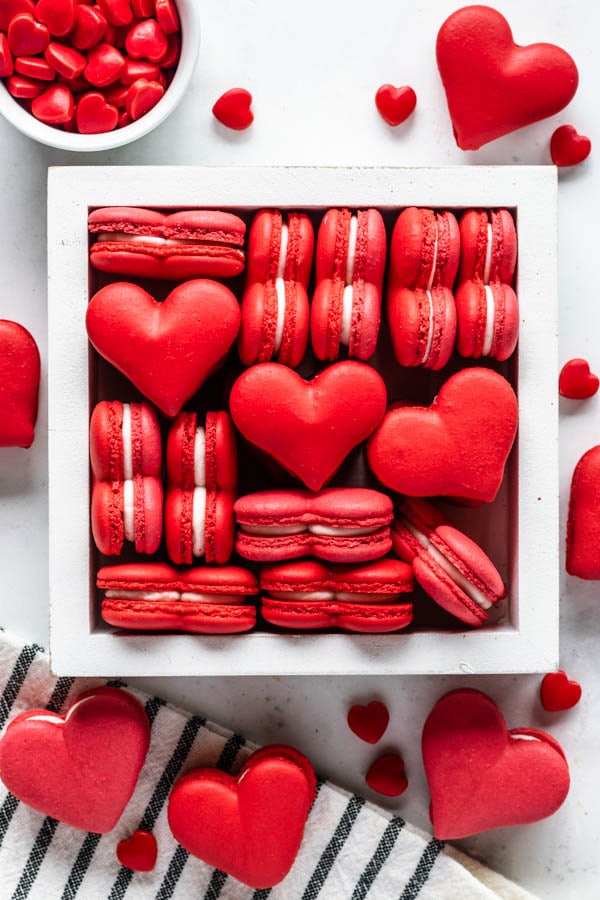
I am excited for Valentine’s Day and it shows! But these Heart Shaped Macarons are also perfect for Mother’s Day, Anniversary, Engagement Parties, and any other celebrations that involve love and hearts!
Heart Macaron Template
Here are the free heart macaron templates for you to download and print. Place it under your silicone mat, or parchment paper before piping the macarons.
The first template is for a mini heart macaron, measuring 1″ in width, the others measure about 1.5″, 2″, and 2.7″ in width. I used the 2.7″ heart macaron template to make these Heart Macarons Filled With Brownies, which were a big hit!
How to pipe heart macarons
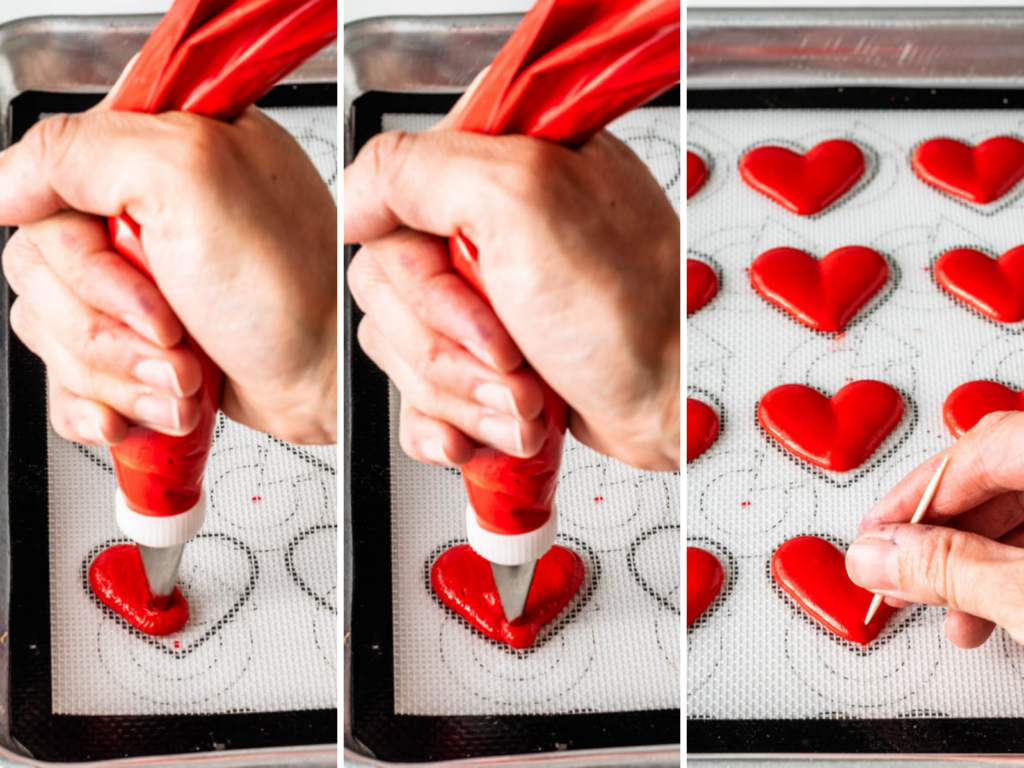
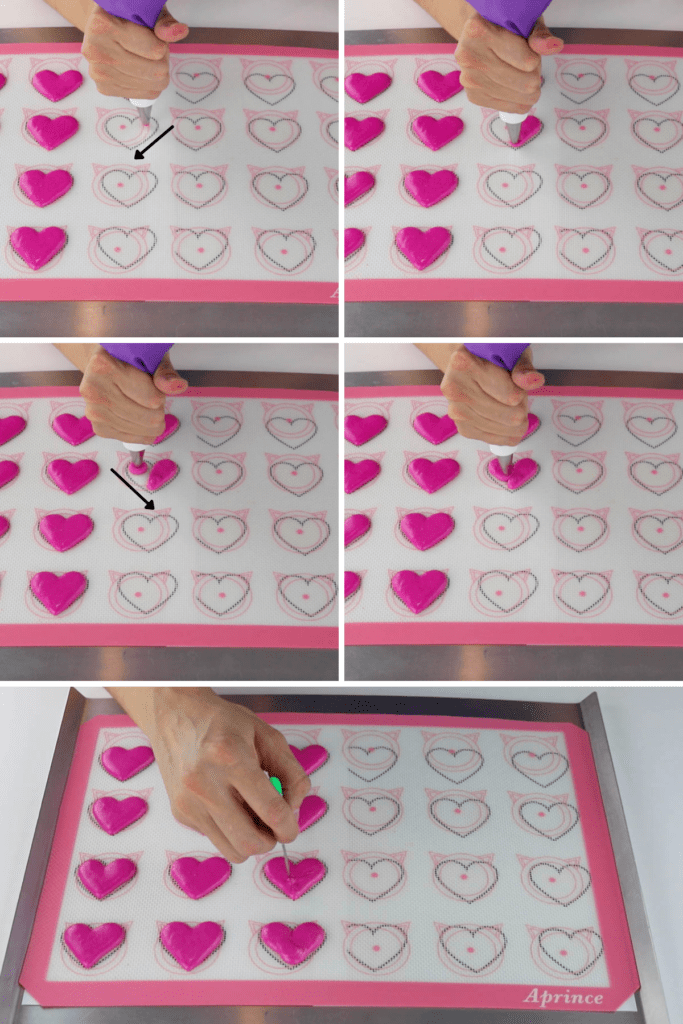
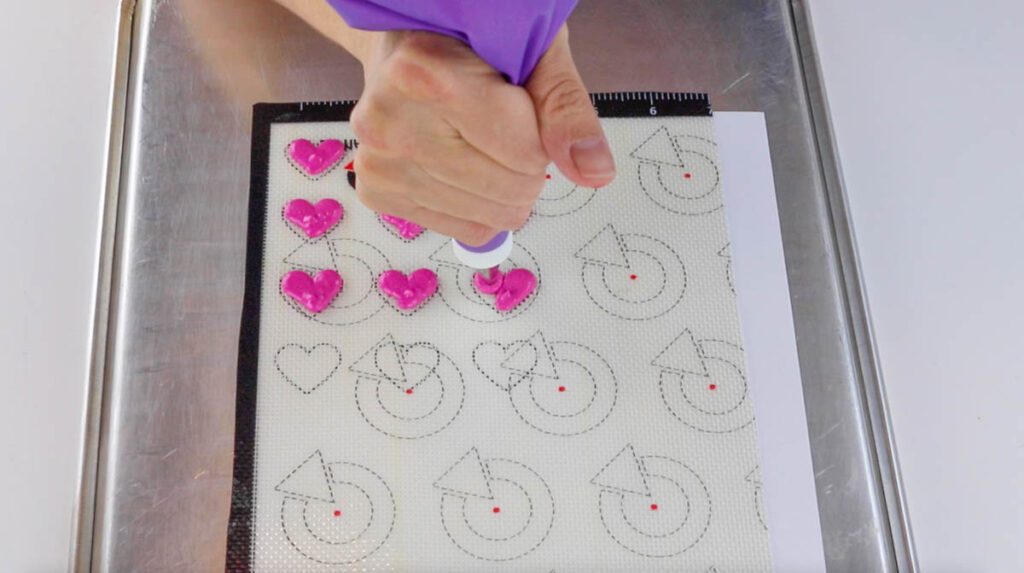
Start from the top left corner, and pipe a diagonal line to the center. For the templates size 2″ and 1.5″ I like using a tip number 8 or 10. For the larger template (2.7″) I like using a 12, and for the small 1″ template, I like using the tip number 3.
Apply more pressure at the top than at the bottom, because the bottom needs to be more narrow, and because the batters piped from both sides of the heart are going to converge at the bottom, and in order to obtain the pointy tip, you can’t have too much batter.
Then, move the piping bag up to the top right corner, and pipe a diagonal line to the center, meeting the first one.
And at the end, don’t forget the very important step of using a toothpick to spread the batter to the edges of the template.
Specially at the bottom, make sure to form a pointy end, because as the macarons bake, they will get rounded. So, if you want a nice heart shape, make a pointy edge at the bottom.
If you watch my video here on this page, or on my Youtube Channel, you can see exactly how I do this. Here’s another picture to show how to, see I want to make sure you’ve got all the best information you need so you can succeed at making beautiful hearts!
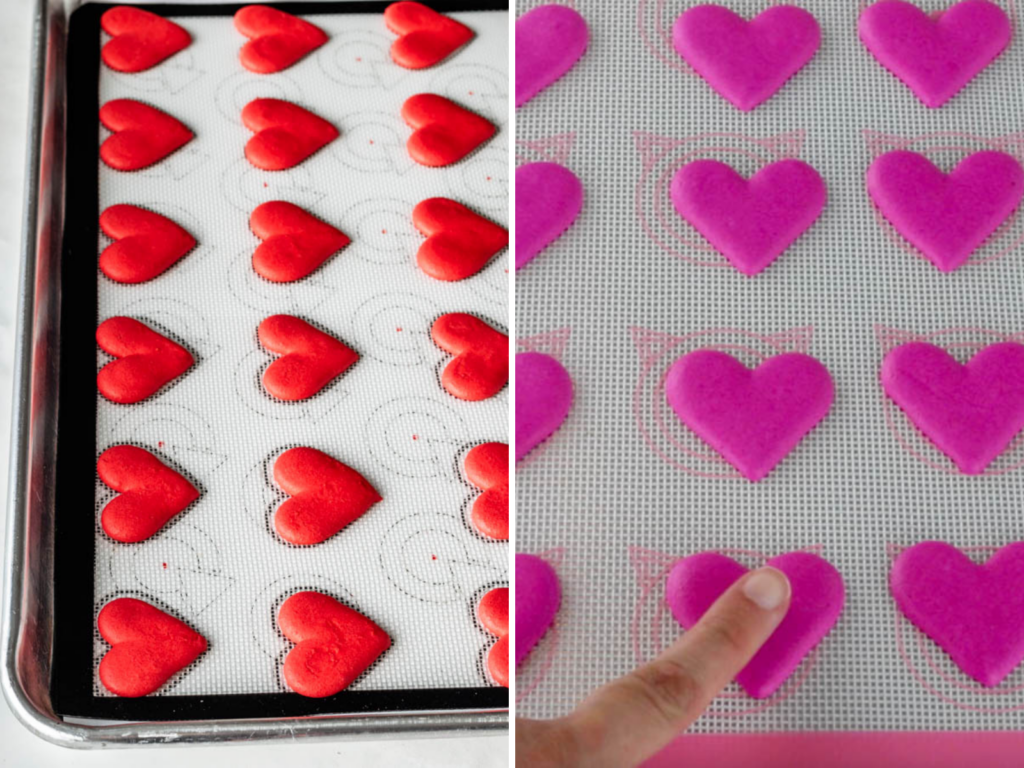
And remember to let the macarons rest thoroughly until dry before baking. Last time I made heart shaped macarons, it was a humid day, and even though I had the dehumidifier on, I still had to let them rest for over an hour.
Make sure to dry until you can touch a macaron with your fingers and they don’t stick, because like I said before, shapes need a longer resting time. And specially if you add a lot of food coloring, you definitely want to let those heart macarons rest thoroughly.
Also remember, time baking will vary depending on the size of the shells. The tiny 1″ macarons took me about 13 minutes to bake. Time baking will vary greatly depending on the type of oven you use. I bake mine on my large oven at 310ºF and on the countertop oven at 290ºF.
The regular size macarons, about 1.5 and 2 inches might take about 15 or 18 minutes to bake on the large oven, and 23 on the small countertop oven.
If the macarons are larger, they will take longer, and if they are smaller, they will take less time. Time baking will also depend on the type of tray you are using, whether your oven is convection, gas, or electric, between many other determining factors. It’s always a good idea to experiment with your oven to find out the optimal baking time and temperature.
Tips for making Heart Shaped Macarons
- Make sure to use a small round tip. If the tip is too large, it will be hard to form the shape narrow on the bottom. I used a Wilton 8 tip or a Wilton 10. If making the tiny 1″ macarons, you want to use a tip Wilton 3.
- Pipe a few macarons at a time, then use a toothpick to smooth out the batter to the edges of the heart template, and tap the trays against the counter or against the palm of your hand to help the batter spread out, and to help any more air bubbles to get released.
- Make sure to use the toothpick to form a pointy edge at the bottom of the heart shape, because as the macarons bake, the bottom will round up slightly. So if you want a nice defined heart shape, make sure to do this.
- Also make sure to rest the macarons for a long time, specially if they have a lot of food coloring. But just in general, shaped macarons require longer resting time, so they don’t crack or end up with no feet. I have been making macarons without resting on my countertop oven, the Ninja DT251 Foodi 10-in-1, however, when it comes to shapes, I am making sure to rest them thoroughly before baking, otherwise they do crack.
- Remove the templates from under the mat or parchment paper before baking, or that will cause smaller feet, that’s because the paper will offer another layer of protection against the heat, which will end up causing the tiny feet.
How to decorate Heart Macarons
Now let’s talk about the color and the decoration for the Heart Macarons.
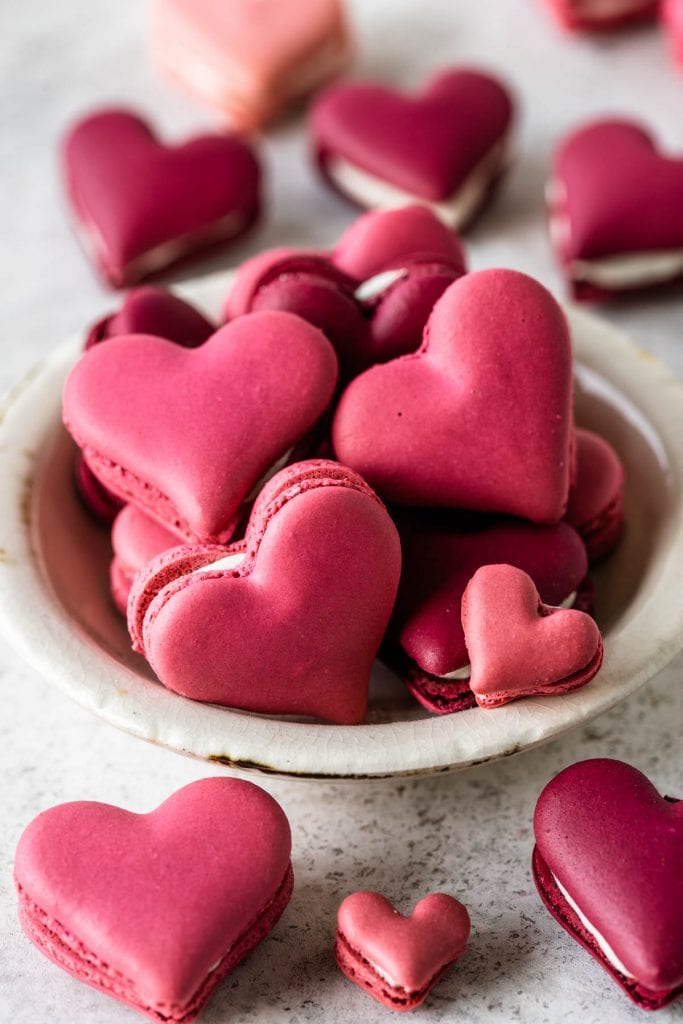
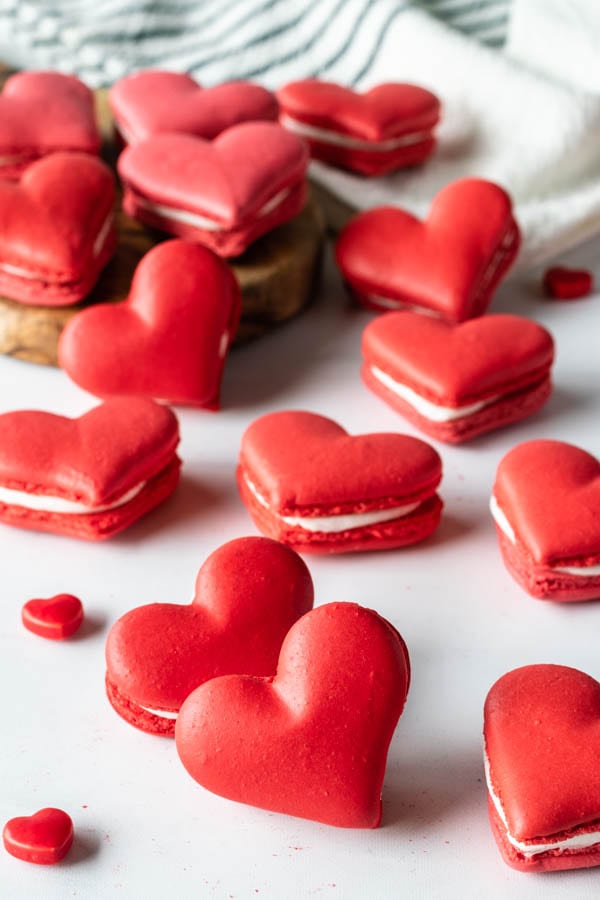
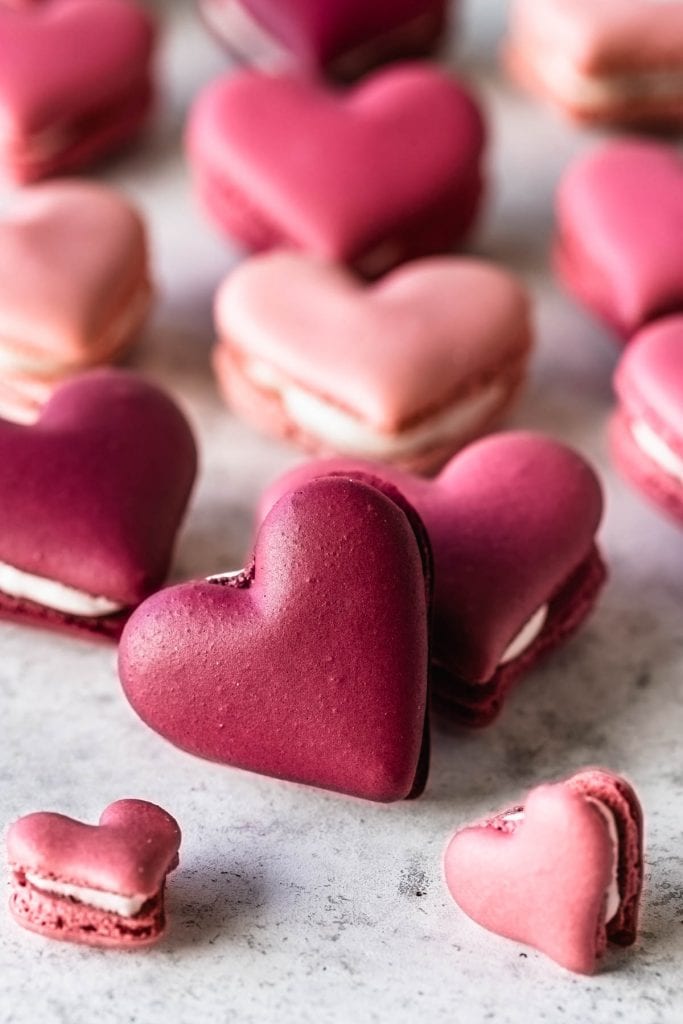
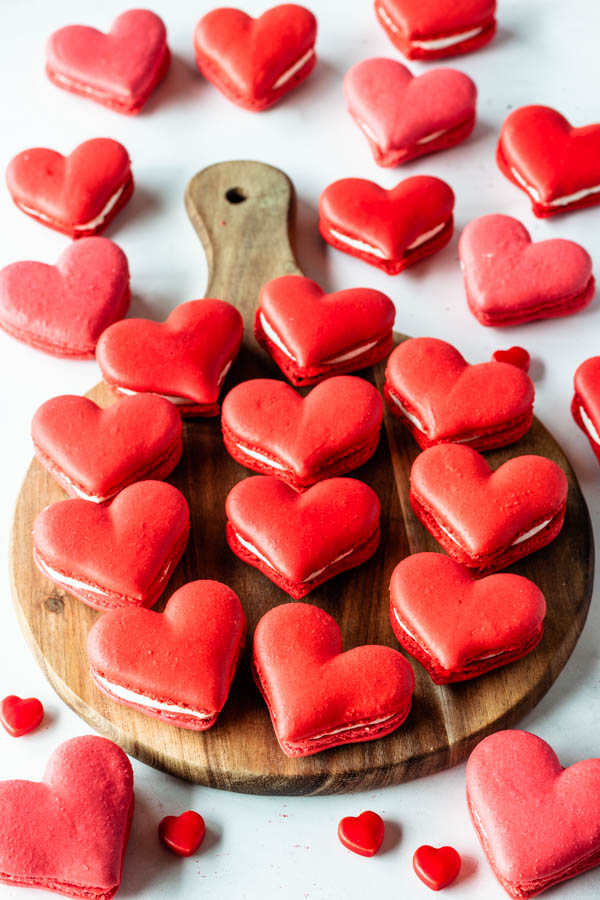
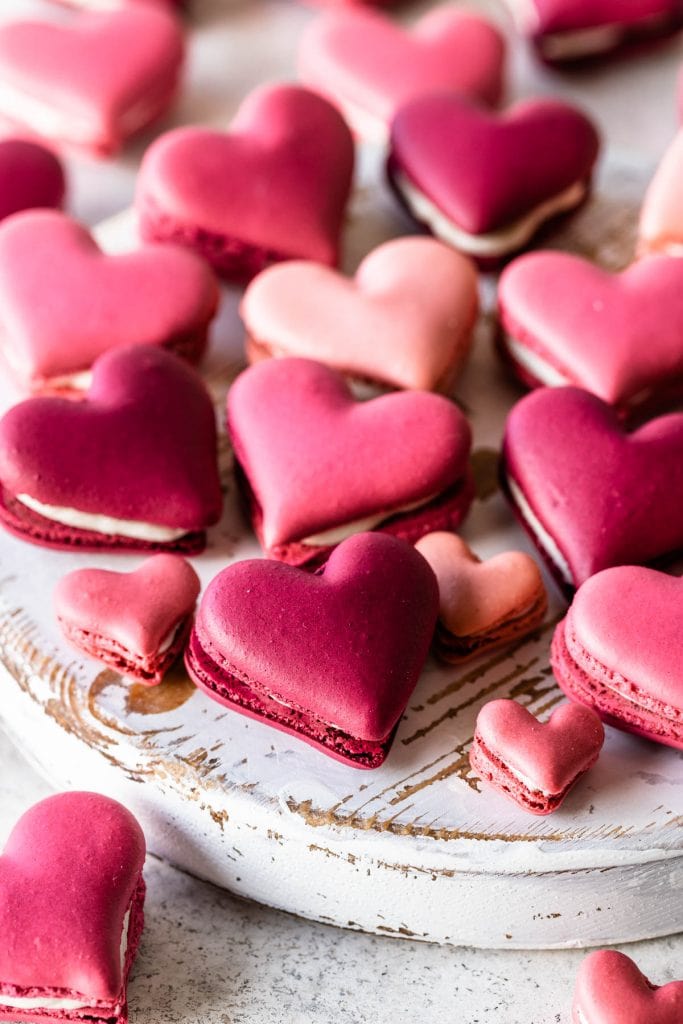
A simple deep dark red color will already make them beautiful, or a soft pink shell color too. But there are other ways to spruce up your heart macarons.
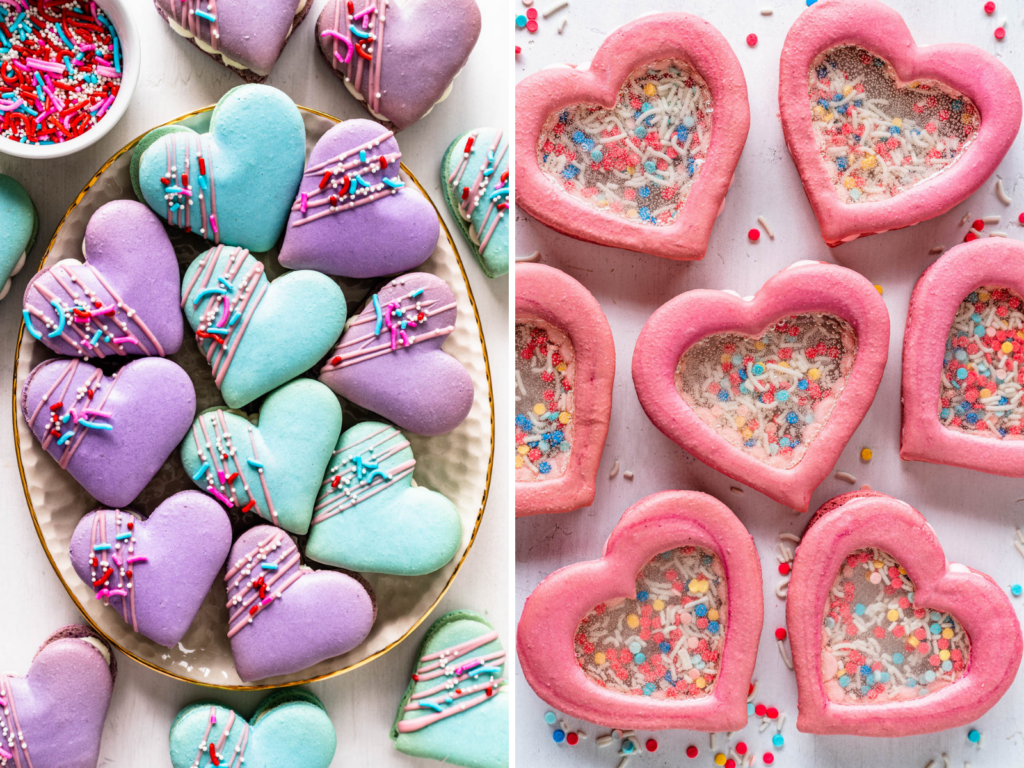
One easy way is with sprinkles, like I do on my Heart Macarons Filled with Brownies. Or you can take it up a notch and make them into Heart Shake Macarons. Both are pictured below.
Another option is to decorate them by airbrushing the shells! This is a really cool option. It’s best if the shells are white. I have done my Pride Macarons by airbrushing them with the colors of the rainbow.
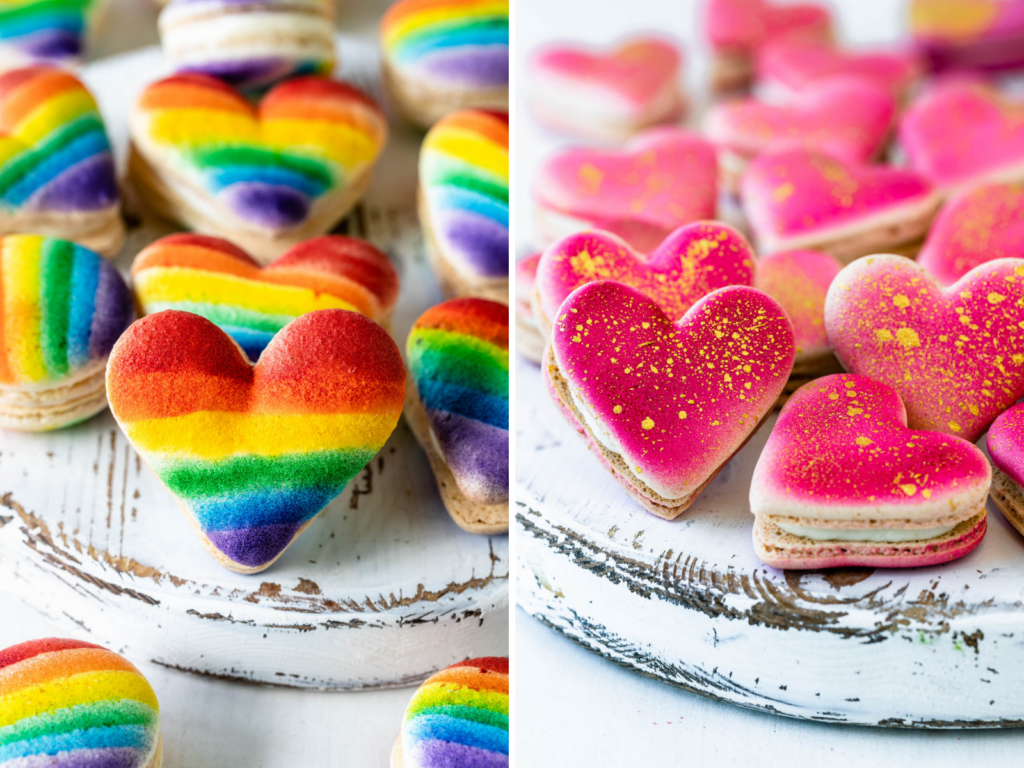
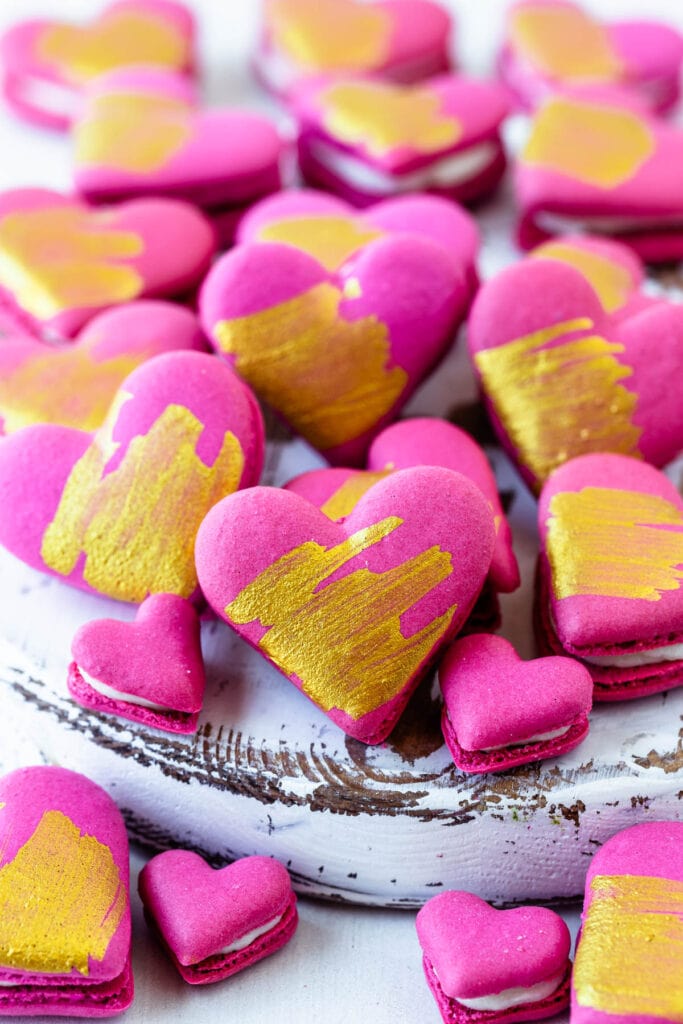
And another option is to airbrush them and then splattering the surface with golden luster dust dissolved in liquid, like you can see on the picture above.
When airbrushing the macarons, make sure to be quick, and not stay on the same spot for too long, or the shell will be soaked.
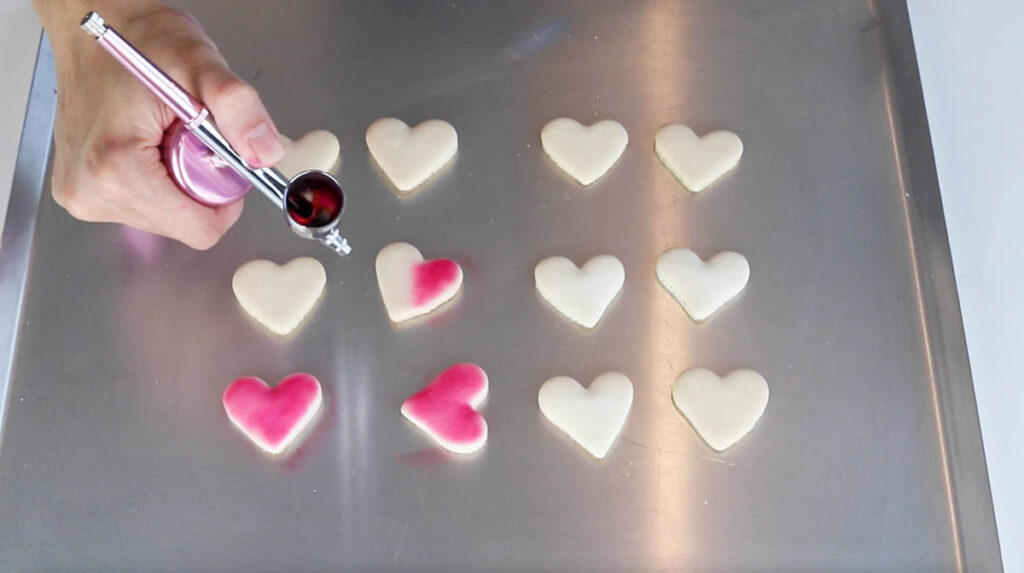
This is the airbrush machine that I use: Snefe Airbrush Kit, you can find it on Amazon, and the reason why I absolutely love it is because it is rechargeable, which means no wires getting in the way. I 100% recommend it!
Make sure to use airbrush food coloring, not just any food coloring. It can’t be liquid or gel, it has to be proper food coloring for airbrushing.
After airbrushing the shells, I also decided to sprinkle them with some gold luster dust dissolved in liquid. For the liquid, hear me out, I used vinegar, you heard! Vinegar! No taste in it whatsoever. I don’t keep alcohol at home, and it’s usually recommended to do the splatter with alcohol, because it evaporates faster without soaking the shell, like water would normally do.
So I decided to try with vinegar because why not. And it evaporated super fast, no soaking the shells, and also no taste of vinegar in sight.
After mixing the vinegar with the luster dust, flick it against a fork to create a splatter effect. You can watch the video on YouTube of me decorating these heart macarons with the airbrush machine and the gold splatter on top.
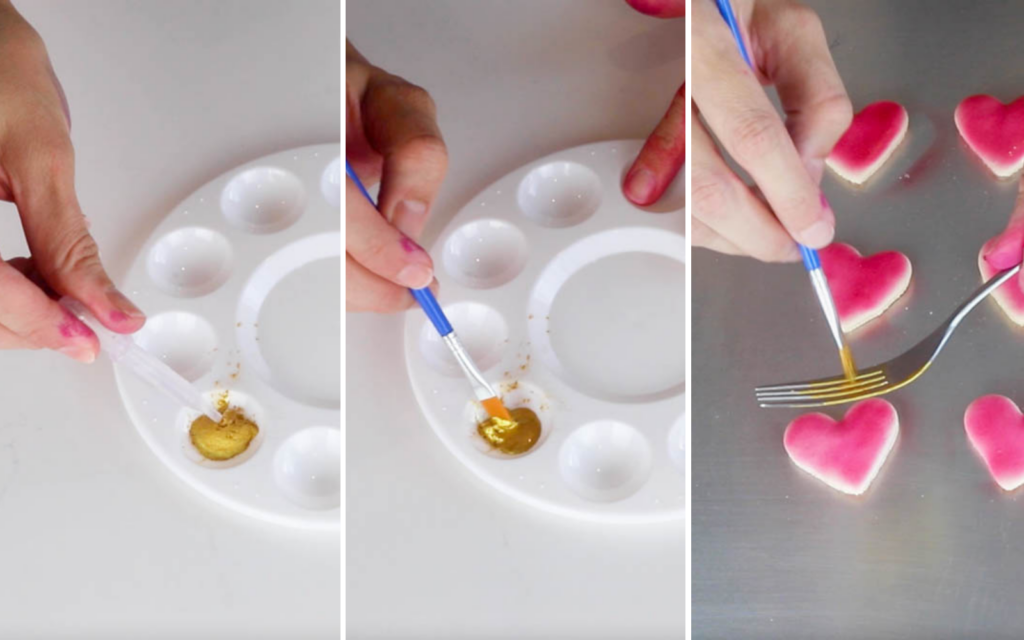
And for my final decoration idea, I simply brushed the pink macaron shells with the brush dipped in the golden luster dust dissolved in vinegar (which you can also dissolve in water or alcohol such as vodka).
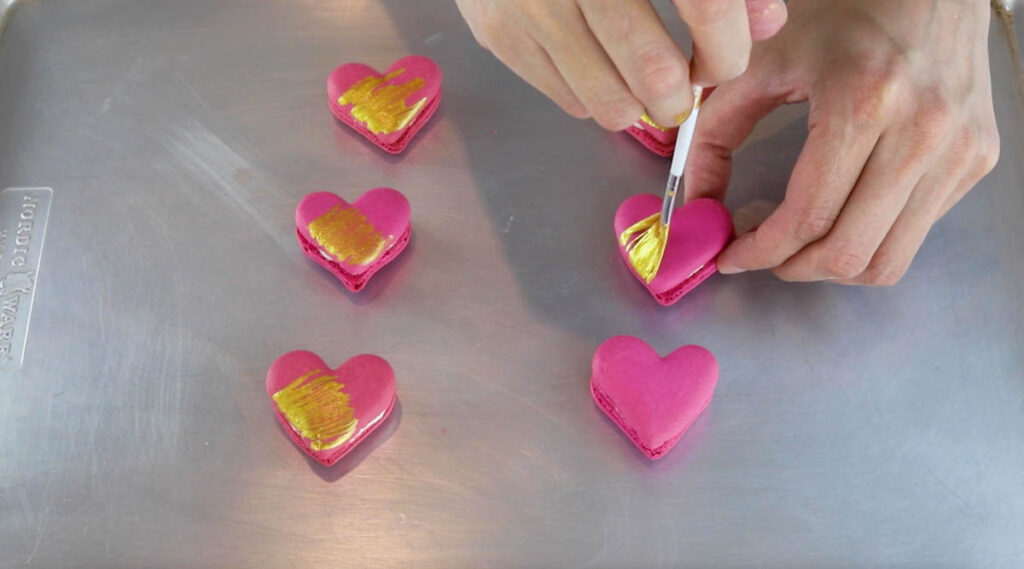
And this is the result below of the heart macarons decorated with the golden accents.
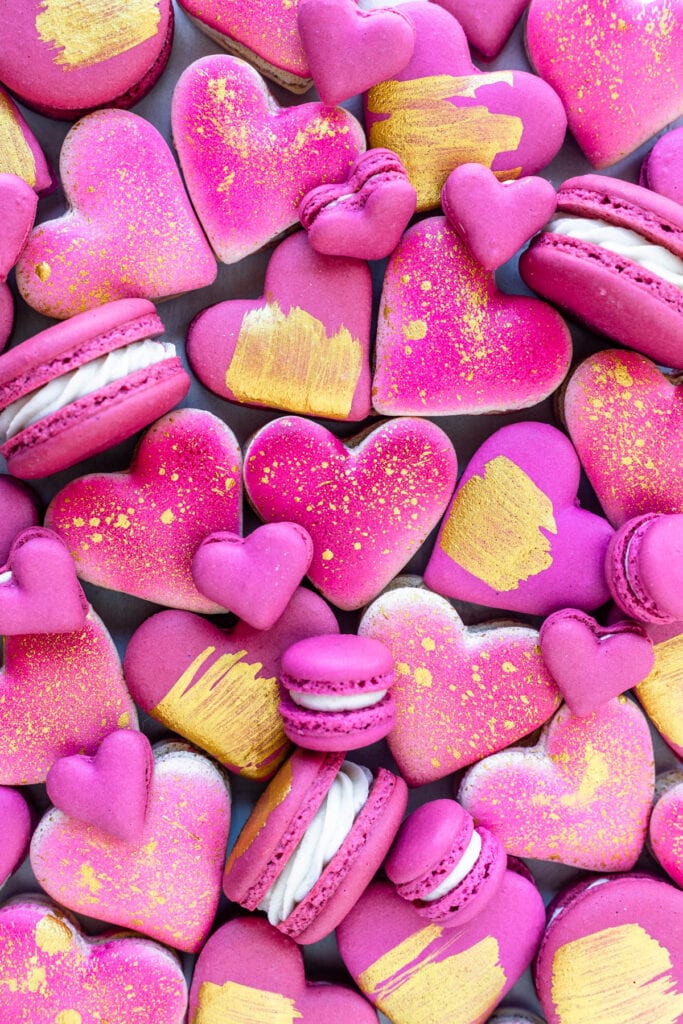
Which one is your favorite macaron decoration? Now let’s talk about the color. Often times, people want to make a deep red heart macaron, so I will teach you about how to achieve the most vibrant red color.
How to obtain the deep red color on the macarons
You will need food coloring, and possibly a lot of it.
I usually use AmeriColor gel food coloring. You can read more about food coloring here, I explain all about food coloring and macarons, and how to obtain deep vibrant colors.
If you are a beginner at making macarons, it’s not recommended to add too much food coloring to your batter.
I added about 2 teaspoons, maybe a little more to obtain the deep reds and pinks you see on the vibrant macarons in this page, I kept adding until I achieved the color I liked.
But the issue with doing that is that if you are a beginner, and you’re not very sure what the batter’s consistency is supposed to be, and you continue to add food coloring as you stir the batter, you may end up over mixing the batter. Also, it will definitely make the batter wetter and runnier, which can also confuse someone who isn’t very sure of what the batter is supposed to be like.
When you add a lot of gel food coloring, the batter’s consistency will be altered, you will need a longer resting time for sure. And that’s also true with shaped macarons, make sure to rest them a lot before baking, or they will end up cracking or coming out with no feet.
Another alternative is to use Master Elite powder food coloring by The Sugar Art. They require a smaller amount of food coloring (like 1/4 tsp of powder) to obtain a deeper color, but I found it that even when it comes to the deep red colors, I still need to supplement the color by adding some gel food coloring. Not to mention that the color of the powder food coloring takes longer to develop, which means it might be harder to tell what the final color will actually be as it will darken and deepen as the batter sits.
On the video located here on this page and also on YouTube, I also show you how to make different tones of burgundy from the same batter, to create an ombre effect on your hearts. And on this video I show how to make the beautiful golden decorations for the macarons.

Below I am giving you two different filling options: Cream Cheese Frosting and Almond Buttercream, I filled the golden sparkled macarons with the Almond Buttercream, you can see how they got made here on this video.
I have many ideas for Macarons fillings here on my blog. Go on my Macaron index to see so many macaron flavor ideas you can use to fill these Heart Shaped Macarons.
And here are some Macaron ideas you might enjoy:
- Raspberry White Chocolate Macarons
- Nutella Macarons
- Caramelized White Chocolate Macarons
- Chocolate Strawberry Macarons
- Champagne White Chocolate Macarons
- German Chocolate Macarons
- Funfetti Macarons
- French Vanilla Macarons
- Pistachio Macarons
- Cherry Macarons
- White Chocolate Macadamia Macarons
If you are learning to make macarons, check out my Macaron School, where I offer a lot of information, beginner tips, troubleshooting guides, the science behind making macarons, and other knowledge that I’ve learned over the past few years, and that I share with you so you can improve your own macarons!
Anyway, thank you so much for reading my blog! I hope you enjoyed learning how to make these Heart Shaped Macarons which are perfect for Valentine’s Day, Mother’s Day, Anniversary celebration, and any special occasion where love and hearts are involved!
Watch Video

Heart Shaped Macarons
Ingredients
Heart Macaron Shells
- 4 grams egg white powder optional read notes
- 100 grams egg whites
- 100 grams granulated sugar
- 105 grams almond flour
- 105 grams powdered sugar
- Red, pink, or burgundy food coloring
Cream Cheese Frosting
- 1 1/2 cups powdered sugar 191 grams
- 4 tbsp cream cheese, softened 56 grams
- 2 tbsp unsalted butter, softened 28 grams
- 1 tsp vanilla extract
- 1/2 -1 tbsp milk if necessary
Almond Buttercream
- 2 cups powdered sugar 250 grams
- 1/4 cup almond flour 24 grams
- 6 tbsp butter, softened 84 grams
- 1 tsp almond extract
- 1-2 tbsp milk if necessary
Instructions
Heart Macaron Shells
- Before you start, get all of the ingredients ready. Prepare one large piping bag, fitted with a round tip, I like to use a Wilton 8 or 10 to pipe hearts, you will need a small round tip. If you desire to make more colors from one batch, prepare as many bags as you will need later.
- Line two baking sheets with parchment paper or silicone mat.
- Measure out all of the ingredients. Sift the powdered sugar and almond flour. Set it aside.
- Whisk the sugar and the egg white powder (if using) in a bowl, and place it over a pan with barely simmering water. Add the egg whites to the sugar and whisk the mixture until frothy and the sugar is completely melted. It will take a couple of minutes. You can test by touching the mixture between your fingers, and if you feel any sugar granules just keep whisking the mixture over the water bath.
- Make sure the bottom of the bowl isn’t touching the simmering water because you don’t want the whites to cook.
- Also, don’t overheat the sugar syrup, this may cause issues down the line, such as wrinkly macarons.
- Transfer the syrup to the bowl of a stand mixer.
- With the whisk attachment, start whisking the syrup on low for about 30 seconds, then gradually start increasing speed to medium. Whisk on medium for one to two minutes, until the mixture is white and starting to become fluffy. Raise the speed to high, or medium-high and whisk for a few minutes until stiff peaks are formed. Best way to check this is to keep your eye on the whites. Once they get glossy and you start seeing streaks formed by the whisk, it might be time to stop.
- Whip until stiff peaks have formed. When you pull your whisk up, the peak should be stiff and shooting straight up, with possibly a slight bend at the top, but not bending down to the side. If you look on the bottom of the meringue collected by the whisk, it should have some soft but defined waves.
- Pour the sifted powdered sugar and almond flour into the stiff meringue.
- Start folding gently forming a letter J with a spatula.
- Add the food coloring at this point, if using. For the red macarons, I simply added red gel food coloring, you will need quite a bit of it to obtain a deep color, but if you are a beginner, it's not recommended to add a lot of food coloring, because it will greatly affect the consistency of the batter.
- How to know when to stop folding the batter: It’s time to stop folding when the batter is glossy and has a thick and flowing consistency. There are several ways to test this.
- First, pick up some batter with the spatula and try to draw a figure 8 with the batter that is dripping off the spatula. You should be able to draw several figure 8s with the batter that's falling off the spatula, and even after the batter breaks up, it should still continue to fall off the spatula slowly and effortlessly.
- There’s another test you can do. I call it the Teaspoon test.
- Grab a teaspoon of batter and spoon onto the parchment paper or silicon mat. Wait a minute to see how it behaves. If the batter stays stiff, forming a point and doesn’t spread out, fold a little bit more, about 3 folds. Test again.
- Once the batter spreads out a bit and starts to look glossy and smooth on top, on the parchment paper, it’s ready.
- You don’t want your batter to be too runny either. So be careful not to over-mix. It’s always best to under-mix and test several times until the proper consistency has been achieved.
- When you hold the spatula with batter on top of the bowl and the batter falls off the spatula slowly but effortlessly the batter is ready. The batter will keep flowing off the spatula non-stop, but not too quickly.
- Transfer the batter to the piping bag and tie the end with a bag tie, to avoid the batter from drying, and also from escaping through the top when you are piping.
Instructions to make more than one color out of the batch (Burgundy ombre macarons)
- Follow all instructions above up to the stiff meringue.
- Pour the sifted powdered sugar and almond flour into the stiff meringue.
- I also added a bit of burgundy food coloring to make a light pink batter, which will be the base batter.
- Start folding gently forming a letter J with a spatula.
- As soon as you see no more dry ingredients in the meringue, stop stirring. Divide the batter between four different bowls (or however many colors as you want to make).
- Work with one bowl at a time, leaving the other ones covered meanwhile.
- To the first batter add more burgundy food coloring and stir until the perfect consistency is achieved. The batter should be flowing slowly and effortlessly off the spatula, you should be able to pick up some batter with the spatula and draw several figure 8s with the batter that’s flowing, without having the batter break up. And even after the batter breaks up, it should still continue to flow off the spatula slowly.
- There are other cues to look for to see if the batter should be done folding, you can read them on the instructions above.
- Once the first batter achieves the perfect consistency, transfer it to one of the prepared piping bags. Secure the top with a tie, so the batter doesn’t scape while piping, and to keep the batter from drying out while you work with the remaining batters. Set the piping bag aside.
- Now, it’s time to work with the second batter. I added a different amount of burgundy food coloring to the second batter, to make it a different tone. After adding food coloring, stir until the perfect consistency is achieved, like I’ve explained above.
- Transfer the batter to another piping bag. And secure the top with a tie.
- Do this as many times as needed until you are done with all the batter.
Piping the heart macarons
- Place the piping bag at a 90 degree angle, at the top left side of the heart template. Apply pressure as you slide the bag down to the center in a diagonal, also make sure to release less batter at the bottom than at the top, because you need the batter at the bottom to be thinner in order to obtain a nice pointy tip.
- Now place the piping bag on the top right corner of the heart, and apply pressure as you slide the bag down to the center in a diagonal.
- After piping a few hearts, use a toothpick to help spread the batter to the edges of the heart template. Make sure to form a point at the bottom, because as they bake, the macarons will round up a little bit and if you don't form a define point at the bottom, your heart will have a rounded bottom.
- Tap the trays against the counter or against the palm of your hand to release any air bubbles.
- Let the trays sit for a while so the shells will dry out. Depending on the day, it might take over an hour to dry my shells. Drying time will also depend on the consistency of the meringue, on how much you've folded the batter, and on how much food coloring you've added.
- You’ll know they’re ready when you gently touch the surface of a macaron and it seems dry, and doesn't stick to your finger.
- Pre-heat the oven to 310ºF.
- Bake one tray at a time.
- Bake for 5 minutes, rotate tray. This step is not necessary, some people don't have to rotate the trays, this will depend on the heat distribution in your oven.
- I bake each tray for about 15 to 20 minutes.
- When baked, the macarons will have a deeper color and formed feet. If you try to move a macaron, it shouldn’t feel jiggly. If the macaron is still jiggly, keep baking.
- Remove from the oven and bake the other tray.
- Let the macarons cool down before proceeding with the filling.
Cream Cheese Frosting
- Sift the powdered sugar. Set aside.
- Add the cream cheese and butter to an electric mixer bowl. Cream on medium high speed for 2 minutes.
- Turn the mixer off and add the powdered sugar and vanilla extract to the bowl.
- Mix on low until the powdered sugar is incorporated.
- Raise the speed to medium high and cream for another minute until the mixture is creamy and fluffy. If the mixture is dry or stiff, add the milk to make the frosting come together. Start by adding the smaller amount of 1/2 tablespoon, and increase it and add a bit more as necessary. If the frosting is too runny, add more sifted powdered sugar.
Almond Buttercream
- Sift the almond flour and powdered sugar together. Set it aside.
- Beat the butter with a mixer, until creamy and fluffy for about 2 minutes.
- Add the powdered sugar and almond flour to the bowl and mix on low to combine. Add the almond extract. Raise the speed to medium high and mix for another minute or so.
- If the buttercream is too stiff you can add a little bit of milk or water to thin it out. Place the buttercream in a piping bag fitted with the tip of your choice.
To assemble
- Place the frosting in a piping bag fitted with a small piping tip. Pipe some frosting on top of half of the shells. Top with another shell.
- Let macarons mature in the fridge overnight before serving.
Decoration options
- You can airbrush the shells, I explain all about how to do it above on the post, or on this YouTube video. Make sure to not hover above the macaron for too long with the airbrush machine, or the macarons will turn out soggy and soaked with the coloring. Also make absolute sure to use airbrush food coloring not just any type of food coloring.
- You can mix some luster dust with a liquid, such as vinegar, water, or clear alcohol like vodka. I don't like using water too much because it doesn't evaporate fast enough and might make the shells soggy. The vinegar and the alcohol both evaporate fast, and don't leave any aftertaste.
- Once the luster dust has dissolved with the liquid, you can use a brush and deep it in the mixture, and strike it against a fork, to create a splatter effect on top of the shells, or you can simply paint on top of the shells with the brush.
- Another decorating option I've mentioned on the post above was to drizzle the shells with chocolate and place sprinkles on top.
Storage
- Store macarons in the fridge for up to 4 days, or in the freezer for up to 2 months, in an air tight container.
What is the almond buttercream for? It doesn’t mention it in the assembly instructions?
Just an option to fill the macarons
Hi Camila,
I just tried to make these macarons but they turned out to be fairly flat, with no feet and quite crispy. However, when I used the same batter and made the usual circles, they turned out much better (larger feet and not crispy throughout). I used a Wilton tip 8 and made the 2″ macarons. Is there anything you can suggest? Is it possible I didn’t have enough batter in the hearts?
Thanks,
SD
It’s hard to say without seeing them, but seems like you didn’t rest the batter enough before baking, you could have also piped not enough batter as you said, and over baked, which should be easy to do if the batter is not thick enough.
Just wanted to drop by and say thank you for your generosity in sharing your knowledge in what has got to be one the most complicated cookies I have ever heard of and tried! All the best!
Sudisha (Melbourne)
Thank you so much dear!
Hi, your macaroons look perfect, can I substitute peanut flour for almond flour? Thanks awaiting your reply
I have never done it but Nicole from Bake Toujours has. she has it on her youtube channel.
Hi Camila! I made these today! They are great!
That’s awesome to hear!!! Thank you so much!!!
Hi Camila! These look absolutely divine!! I recently saw your Youtube video tutorial for vegan raspberry macarons. Would there be any way to make this particular recipe vegan? Thank you so much.
Sri
I’ve never tried making shapes with the vegan batter since it’s a bit thicker.
So I feel like i was folding the batter for 30 mins and it didn’t get as smooth as yours. What gives?
It means there was something wrong with your meringue, or the measurement of the ingredients. It takes me about 5 minutes or less folding the batter.
Amazing!!!❤❤❤❤❤❤❤❤❤❤