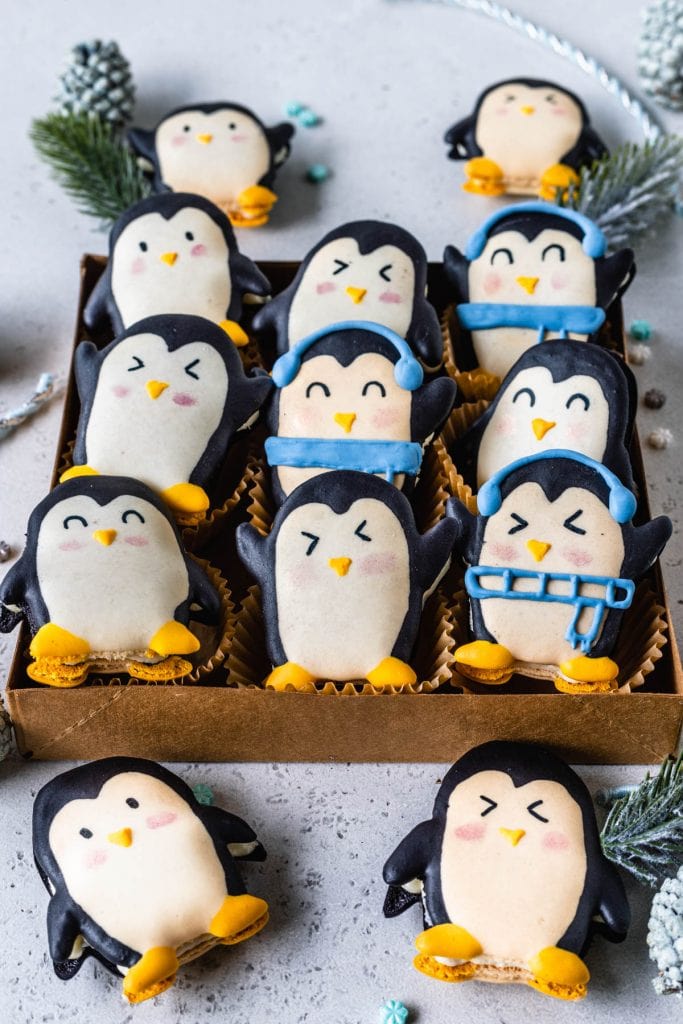
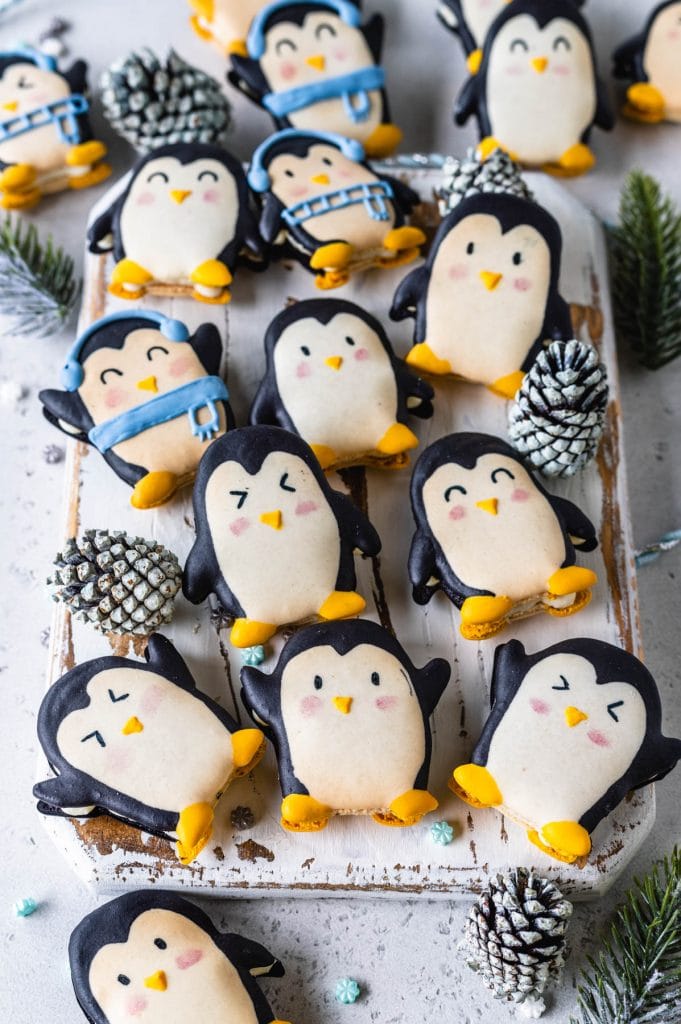
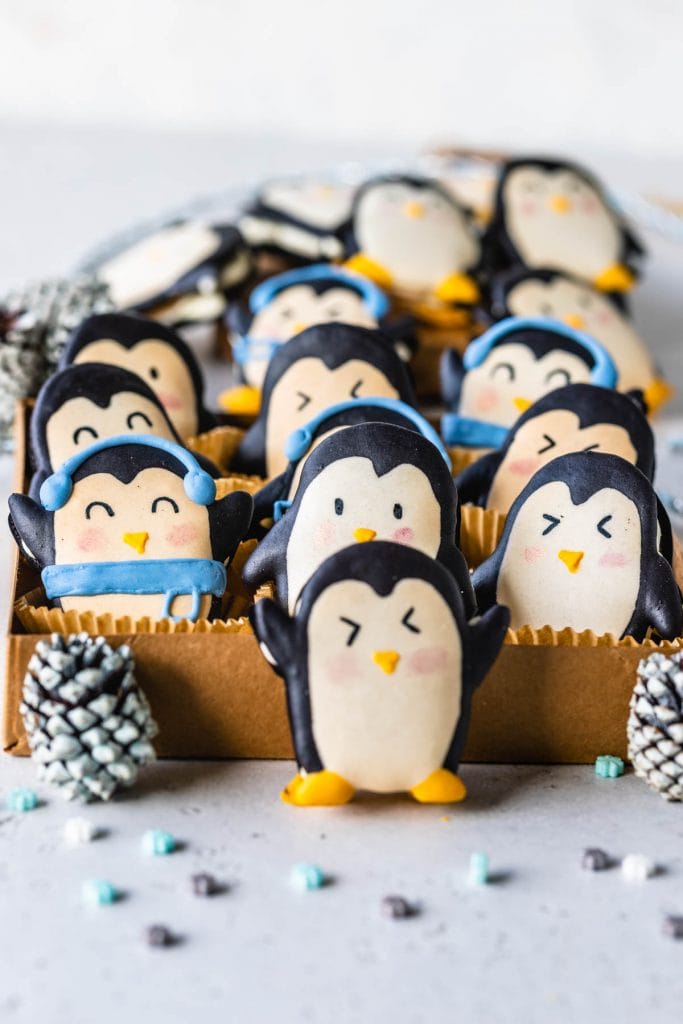
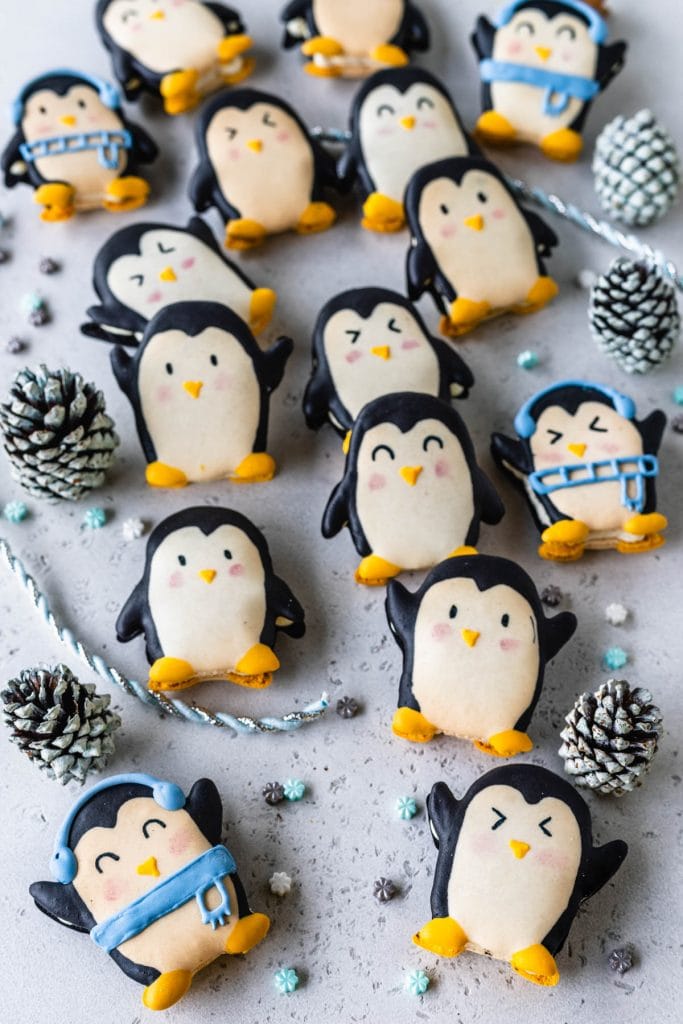
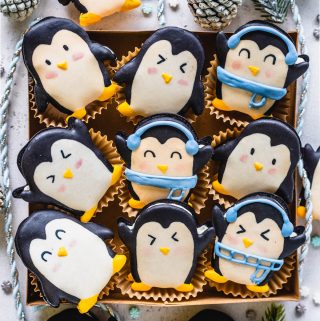
Penguin Macarons
Hello friends! Today we are making these super cute Penguin Macarons! They are filled with a White Chocolate Russian Buttercream!
Today’s post is sponsored by Eagle Brand® Sweetened Condensed Milk. All opinions are my own.
Make sure to watch the video on this page or on YouTube, showing you exactly how to make these penguin shaped macarons.
This post may contain affiliate links. I earn a commission from qualified purchases. Please read our Privacy policy here.
And down below check out the template which you can download, print, and place under your baking mat or parchment paper, to pipe the cute penguins!
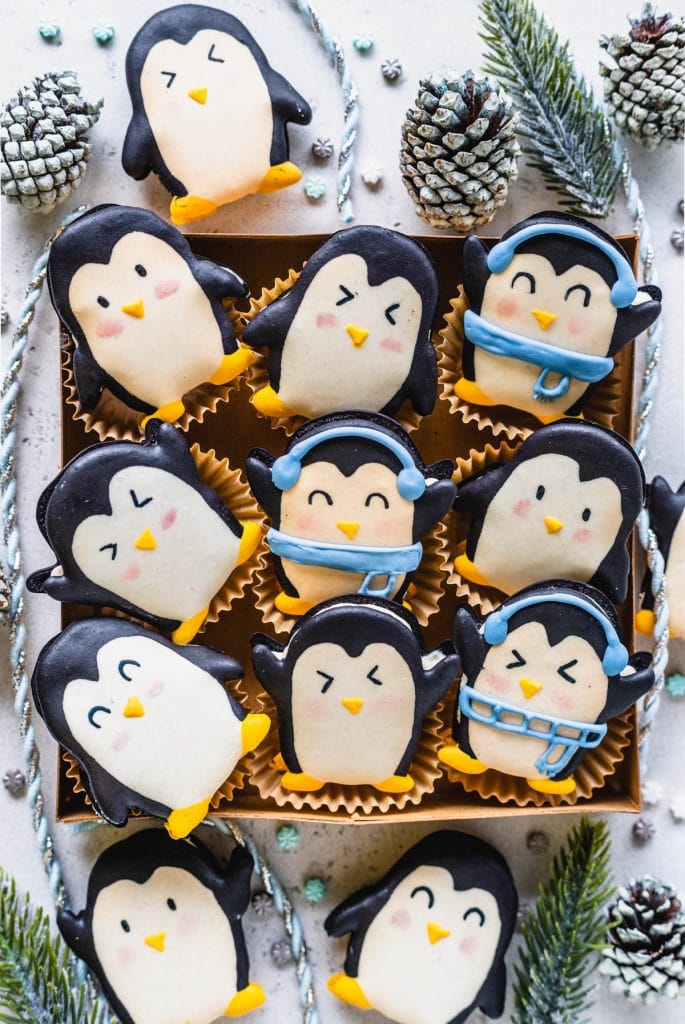
These Penguin Macarons are the perfect Christmas macarons! They are adorable.
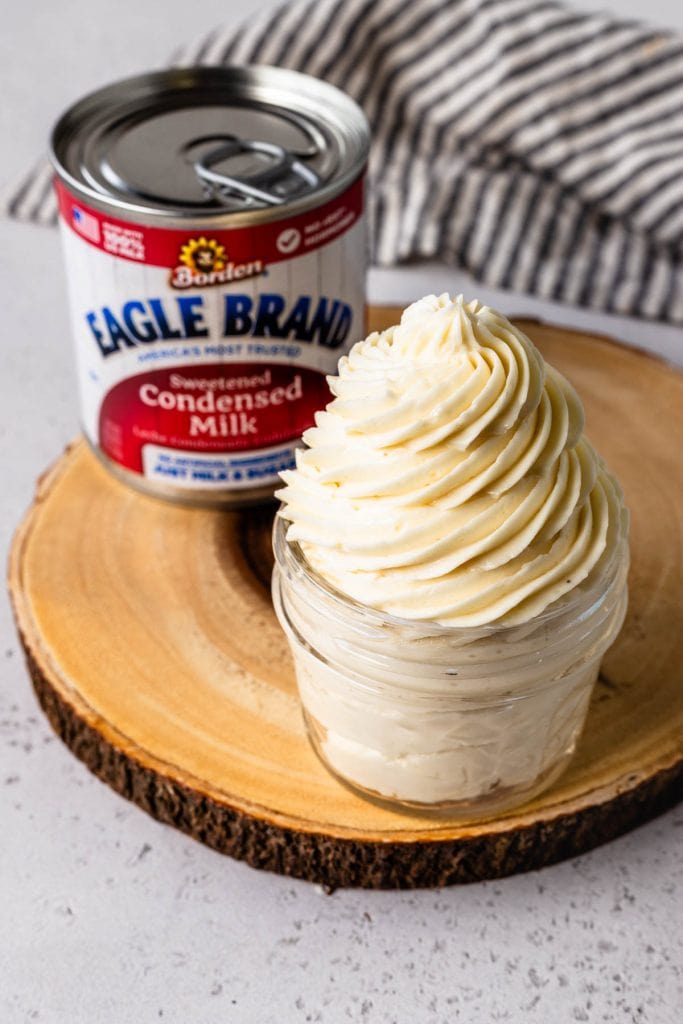
I decided to make these cute and festive macarons for a cookie exchange hosted by Eagle Brand®, so I made the most perfect White Chocolate Russian Buttercream filling for the macarons.
I’ve been making Russian Buttercream for cupcakes and cakes in the past few months, and I got an enormous amount of people asking me if they could fill macarons with Russian Buttercream.
The answer is: yes, you definitely can! Russian Buttercream, if made right, is perfect for frosting cakes, cupcakes, and of course, filling macarons as well!
Today we have a White Chocolate Russian Buttercream. I’ve made other variations, like Chocolate Russian Buttercream (for the Walnut Chocolate Cake, and Chocolate Cupcakes) and also Dulce de Leche Pumpkin Russian Buttercream for my Dulce de Leche Pumpkin Cupcakes (which was one of the best frostings I’ve ever tried btw!).
Russian Buttercream, as known as Condensed Milk Buttercream, or Condensed Milk Frosting, is extremely easy to make, it doesn’t require any powdered sugar, and is absolutely silky and delicious.
But there’s a trick! The trick lies in the butter temperature.
In a Facebook group the other day, a lot of people were claiming they could never get Russian Buttercream to firm up. And that is most certainly because the butter wasn’t at the proper temperature!
The butter must be at around 68 to 72 degrees Fahrenheit. I like to have my butter at around 65 to 67 degrees Fahrenheit, but if it’s any colder, it will make a lumpy buttercream.
Tips for making Russian Buttercream
- Make sure the butter is at around 68 degrees Fahrenheit. Soft butter will make soupy buttercream, and cold butter will make lumpy buttercream.
- Cream for a long time. When creaming the butter, you should spend about 5 to 7 minutes making sure it’s super fluffy. Then, after adding the sweetened condensed milk, you need to continue to whip until it becomes thick and creamy, which can take another few minutes.
- If adding any melted chocolate or caramel to the buttercream, make sure they are at room temperature. If they are even slightly warm, they will melt the butter in the frosting.
- In case the buttercream is soupy and not firming up, add the bowl to the fridge for 5 to 10 minutes, then remove it and then try whipping it. If it still doesn’t come together, repeat, put it in the fridge for 5 more minutes, and then whip it again.
- You can flavor this buttercream with pretty much anything, caramel, dulce de leche, pumpkin, espresso powder, extracts, zest, melted chocolate, cocoa powder, whatever comes to mind.
- The Russian Buttercream will also freeze wonderfully for up to 3 months. Before using let it thaw in the fridge, and before using, let it sit at room temperature and then whip it with the mixer to fluff it up.
When making the White Chocolate Russian Buttercream, make sure to use real white chocolate. It must contain at least 20% cocoa butter to be considered real white chocolate.
Most white chocolate chips from the store are not real white chocolate, and won’t work for this recipe. Those don’t melt well, and don’t taste great either.
You can purchase Callebaut Callets online. If you can’t find it, or don’t want to purchase it online, go for the white chocolate baking bars instead.
Now I am going to give you the penguin template. Simply download it, print it, and place under your baking mat or parchment paper to pipe the Penguin macarons.
Tips on how to make the Penguin Macarons
- Use smaller tips to pipe the shapes, specially the feet and the black part of the penguin, since these shapes are so thin and small. I used a #3 tip.
- If the batter is too thick, it won’t spread out nicely, and your shapes will be super bumpy.
- While piping, gently tap the tray a few times here and there to help the batter spread out, and also use a toothpick to help smooth out the batter and poke any air bubbles or pointy tips.
- I like to let intricate shaped macarons rest for quite a bit, specially when the colors are intense like the black on these penguins. My penguin macarons rested for about 1 hour.
- Since the shapes aren’t too thick, they might require less baking time than a regular round 1.75″ macaron.
- For the beak, I used Sally’s Baking Addiction royal icing recipe. You can also cut little triangles out of fondant. I had a bit of leftover icing, so I made scarves and ear muffs for some of the penguins.
And of course, make sure to watch the video on YouTube or here on this page to see exactly how I made these cute Penguin Macarons.
I absolutely love making Christmas macarons. Festive macarons are one of my favorite parts about the holiday season.
If you like these cute Penguin Macarons, here are some more of my best Christmas macarons:
- Gingerbread Macarons
- Peppermint Macarons
- Cranberry Macarons
- Eggnog Macarons
- Butterbeer Macarons
- Peppermint Macarons
- Pecan Turtle Macarons
- Cinnamon Roll Macarons
- Red Velvet Macarons
And on this post you can see my Christmas Macaron Box, and also my Christmas Cookie Box from last year, where I also have some macarons of course!
If you make these Penguin Macarons this holiday season, make sure to tag me on instagram, or leave a comment below! I love to see your creations and hear from you!
Thank you so much for reading!
Penguin Macarons
Ingredients
Macaron Shells
- 100 grams egg whites
- 100 grams granulated sugar
- 4 grams egg white powder optional, read notes
- 105 grams almond flour
- 105 grams powdered sugar
- Food coloring I used black and yellow with a touch of orange for the feet
White Chocolate Sweetened Condensed Milk Frosting
- 2/3 cup chopped white chocolate 113 grams
- 2 cups unsalted butter 453 grams
- 1-14 oz can of Eagle Brand® Sweetened Condensed Milk 396 grams
- 2 tsp vanilla extract
Instructions
Macaron Shells
- Before you start, get all of the ingredients ready. Prepare 3 piping bags fitted with piping tips. I used a number 3 for the black part of the body, a tip number 6 for the white part of the body, and a tip number 3 for the feet.
- Line two baking sheets with parchment paper or silicone mat.
- Have the printed out template ready to go.
- Measure out all of the ingredients.
- Sift the powdered sugar and almond flour together.
- Whisk the sugar and the egg white powder (if using) in a bowl, and place it over a pan with barely simmering water. Add the egg whites to the sugar and whisk the mixture until frothy and the sugar is completely melted. It will take a couple of minutes. You can test by touching the mixture between your fingers, and if you feel any sugar granules just keep whisking the mixture over the water bath.
- Make sure the bottom of the bowl isn’t touching the simmering water.
- Also, don’t overheat the sugar syrup, this may cause issues down the line, such as wrinkly macarons.
- Transfer the syrup to the bowl of a stand mixer.
- With the whisk attachment, start whisking the mixture on low for about 30 seconds, then gradually increase the speed to medium. Whisk on medium for one to two minutes, until the meringue is white and starting to become fluffy. Raise the speed to medium-high for a few minutes until stiff peaks are formed. Best way to check this is to keep your eye on the whites. Once they get glossy and you start seeing streaks formed by the whisk, it might be time to stop.
- Whisk until stiff peaks have formed. The peaks should be shooting straight up, not bent down to the side.
- Pour the sifted powdered sugar and almond flour into stiff whites.
- Fold the dry ingredients with the meringue until just incorporated. When you can’t see any more streaks of dry ingredients in the batter, separate the batter into three different bowls.
- First, I scooped about 1/3 cup of batter into one bowl to make the penguin feet, this batter would be colored yellow.
- Then, I split the remaining batter in half. One would be the black color, and the other the white.
- Work with one bowl at a time, and keep the remaining ones covered so they don’t dry out.
- Let’s begin by coloring the black batter. Add black food coloring to the batter (I used Super Black by Americolor), and then do the macaronage, folding until the proper consistency. Read below for tips on when to stop folding.
- Once you achieve the perfect consistency, transfer the batter to a piping bag with a small round tip, I used a tip #3 for the black color.
- Set that bag aside, making sure to keep the top covered, so the batter inside doesn’t dry out. I like to use bag ties to keep the batter secure in there.
- Move on to the white color batter. I didn’t add any food coloring, simply folded the batter until the perfect consistency.
- Transfer the batter to a piping bag fitted with a #6 piping tip.
- Move on to the final batter, the yellow colored batter for the feet. I used a couple of drops of yellow food coloring with a dab of orange. Do the same as before, add the food coloring, and fold until you achieve the perfect consistency. Then transfer it to a piping bag fitted with a #3 piping tip
- How to know when to stop folding the batter: It’s time to stop folding when the batter is glossy and has a thick and flowing consistency. There are several ways to test this.
- First, pick up some batter with the spatula and try to draw a figure 8 with the batter that is dripping off the spatula. If you can form several 8 figures without the batter breaking up, that’s one indication that it might be ready.
- There’s another test you can do. I call it the Teaspoon test.
- Grab a teaspoon of batter and spoon onto the parchment paper or silicon mat. Wait a minute to see how it behaves.
- If the batter stays stiff, forming a point and doesn’t spread out a bit, start folding a little bit more, about 3 folds.
- Test again.
- Once the batter spreads out a bit and starts to look glossy and smooth on top, it’s ready to go.
- You don’t want the batter to be too runny either. So be careful not to over mix. It’s always best to under mix and test several times until the proper consistency has been achieved.
- Pick up some batter with the spatula and hold it on top of the bowl, the batter should fall off the spatula slowly but effortlessly. The batter will continue to flow off the spatula non-stop, but not too quickly.
- Anyway, once all the batters are ready, begin piping.
- Pipe the black part of the body first by carefully following the template.
- Use a toothpick to smooth out the batter, and gently tap the bottom of the pan a couple of times to help the batter spread out throughout the piping process.
- Pipe the center of the body of the penguin with the white batter.
- Continue to use the toothpick to smooth out the batter and also continue to tap the tray gently to help the batter spread out and to release any air bubbles from the batter.
- Lastly, pipe the feet with the yellow batter.
- Use a toothpick to pop any air bubbles in the surface of the shells, and to smooth out any pointy tips.
- Let the trays sit for a while so the shells will dry out. I find it with shapes like these, specially when the colors required a lot of food coloring such as the black batter, that I have to let them rest for quite a bit of time. I let my penguins rest for about 1 hour. You’ll know they’re ready to be baked when you gently touch the surface of a macaron and it seems dry.
- Pre-heat the oven to 300ºF.
- Bake one tray at a time.
- Bake for 5 minutes, rotate tray.
- Bake for 5 more minutes. Rotate again.
- I baked each tray for 15 to 18 minutes total, covering with foil towards the end to help prevent the penguin belly to brown.
- When baked, the macarons will have a deeper color and formed feet. If you try to move a macaron, it shouldn’t feel jiggly. If the macaron is still jiggly, keep baking.
- Remove from the oven and bake the other tray.
- Let the macarons cool down before proceeding with the filling.
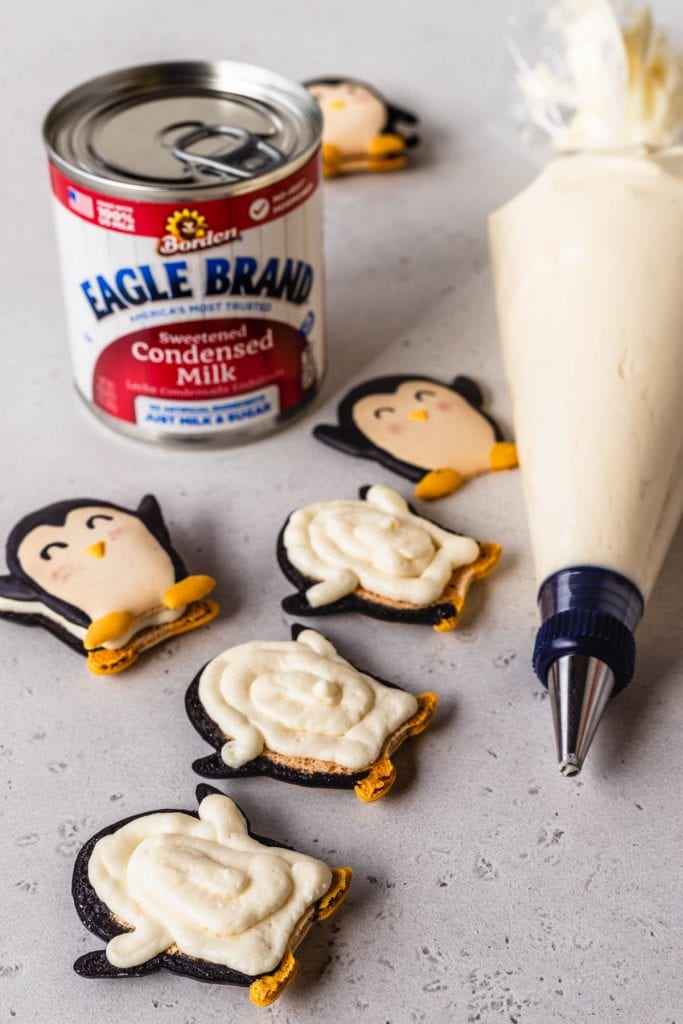
- After the macarons are cool, I used an Edible Ink Marker to draw the eyes on the penguins. Then I made the beaks out of yellow royal icing. I used Sally’s Baking Addiction recipe, you can also buy store-bought. And then I brushed a bit of rose luster dust on their little cheeks. I also had some leftover royal icing, so I drew scarfs and ear muffs in some of the penguins.
White Chocolate Sweetened Condensed Milk Frosting
- Start by melting the chocolate in a microwave bowl, at 20 second increments, stirring in between until all chocolate has melted. Set it aside to cool to room temperature.
- Next, make sure the butter is at the appropriate consistency, which should be at room temperature. The butter should have a nice shape, not be too soft, but not cold either. It’s ideal if the butter is from 68 to 72ºF.
- Cream the butter with an electric mixer, at medium-high speed, for 5 minutes.
- Turn the mixer off, add the condensed milk in. Cream with the mixer on medium speed for 1 minute until combined.
- Add melted, cooled, room temperature chocolate to the bowl, along with the vanilla.
- Cream until incorporated and smooth. Make sure to scrape down the sides and bottom of the bowl.
To assemble
- Pipe some of the frosting on each bottom penguin shell. Top with another penguin.
Storage
- Store the macarons in the fridge for up to 5 days, or in the freezer for 1 month.
- Leftover buttercream will store beautifully in the freezer for up to 3 months, or in the fridge for up to 2 weeks.
I could not find the template for the penguin. Please help!
It’s on the post. Type ctrl+F and then search for template. It is up there on the body of the post.
Amazing! What piping tip did you use for the penguins?
Ficaram fantásticos!!!!!