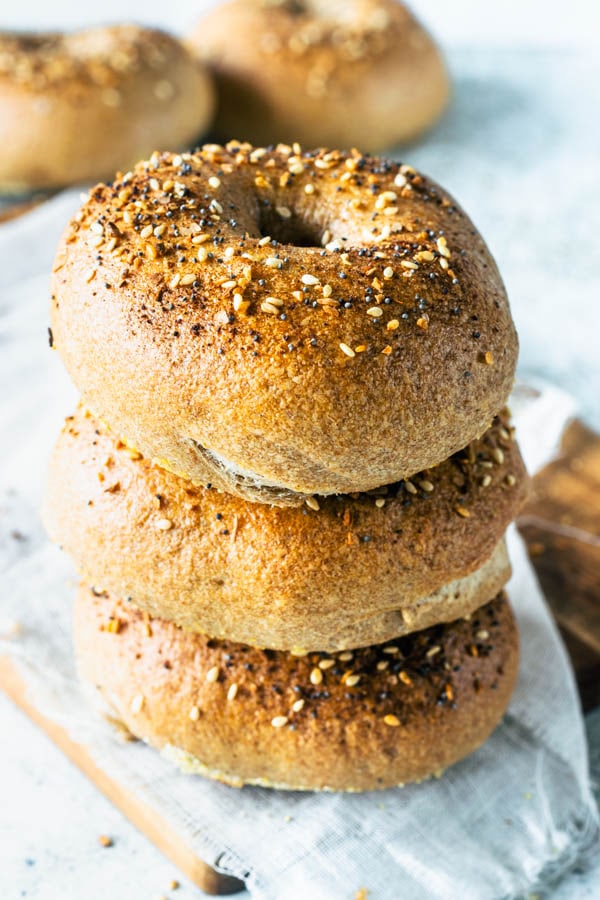
Homemade Sourdough Everything Bagels
I just posted a Bagel recipe the other day. My Sourdough Cinnamon Raisin Bagels. And today I am posting these Homemade Sourdough Everything Bagels.
The thing is that I just found the most perfect bagel recipe!
This post may contain affiliate links. I earn a commission from qualified purchases. Please read our Privacy policy here.
I didn’t really find it, more like I conquered it, after so many attempts over the years.
It’s not that I was making awful bagels. They just weren’t perfect. Or up to my standards.
But not anymore!
Because I nailed it this time!
You can check out some tips about making homemade bagels on my Cinnamon Raisin Bagels post.
After I posted that recipe, I made these bagels again, in the savory version.
We enjoyed them in sandwiches, and mainly avocado toasts.
Making homemade bagels is a work of love, specially sourdough bagels.
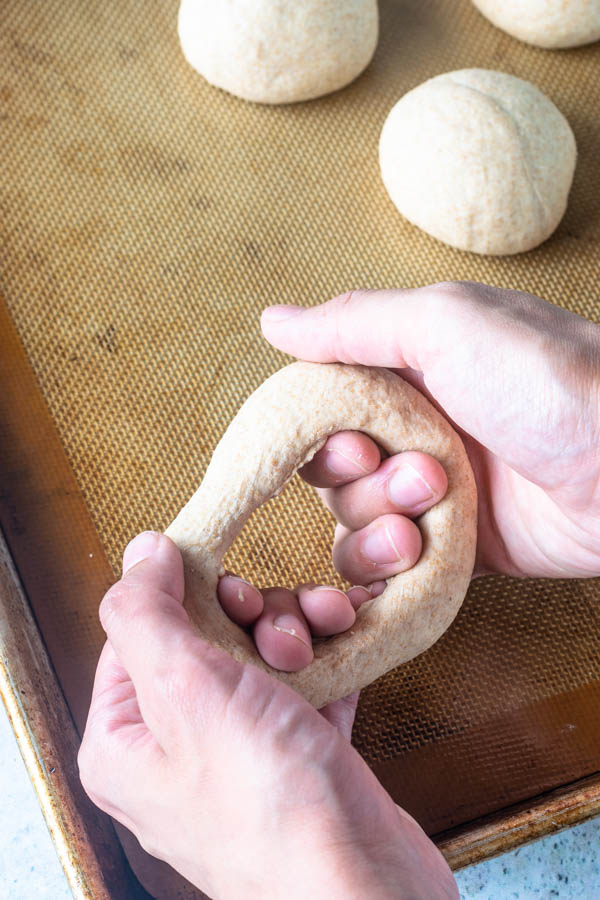
Shape the dough into perfectly round balls.

To shape the bagels, simply cut a hole in the middle of the bagels with your thumb. Stretch the hole gently, as you roll the bagel around in your hands, making sure to stretch the dough evenly on all sides.
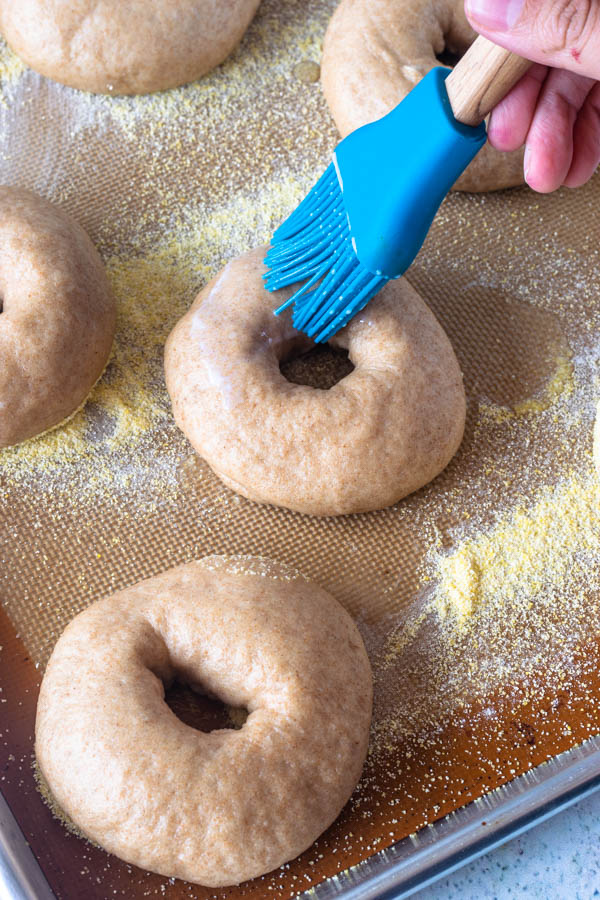
After letting the shaped bagels rise, brush it with milk.
Sprinkle bagels with seasoning. And you’re ready to bake.
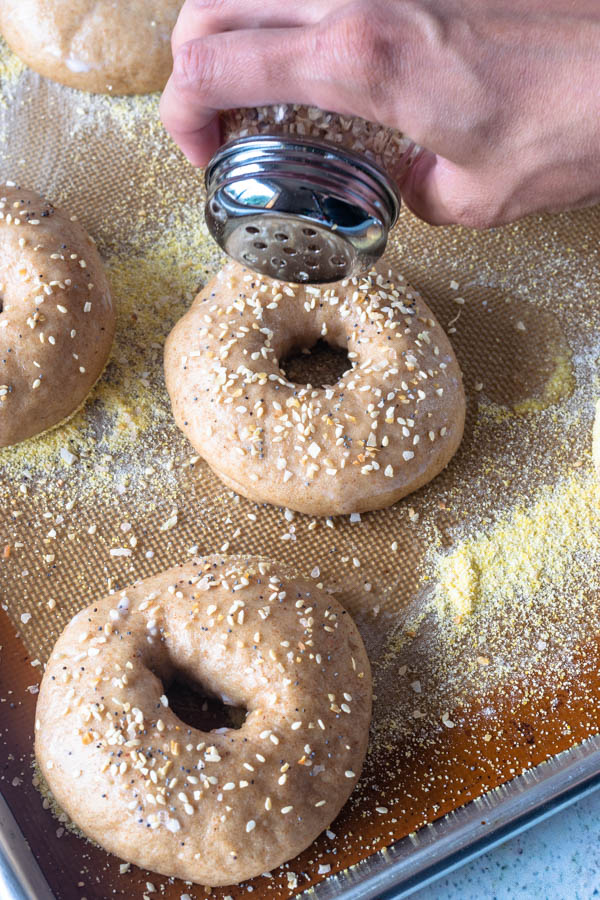
About the seasoning for the top, I just used a bunch of stuff I had in my pantry. And you should do the same. Don’t be strict and limited, you can add anything to your bagel seasoning.
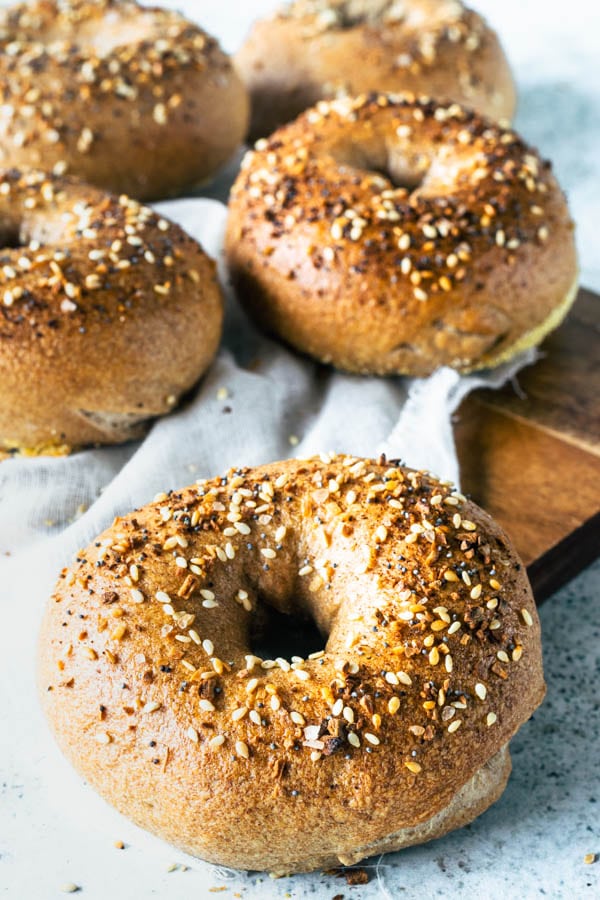
I used sesame seeds, poppy seeds, dried onions, dried garlic, coarse sea salt, and even some Za’atar I had in my spice cupboard. Za’atar is a tangy spice blend you will love, once you try it.
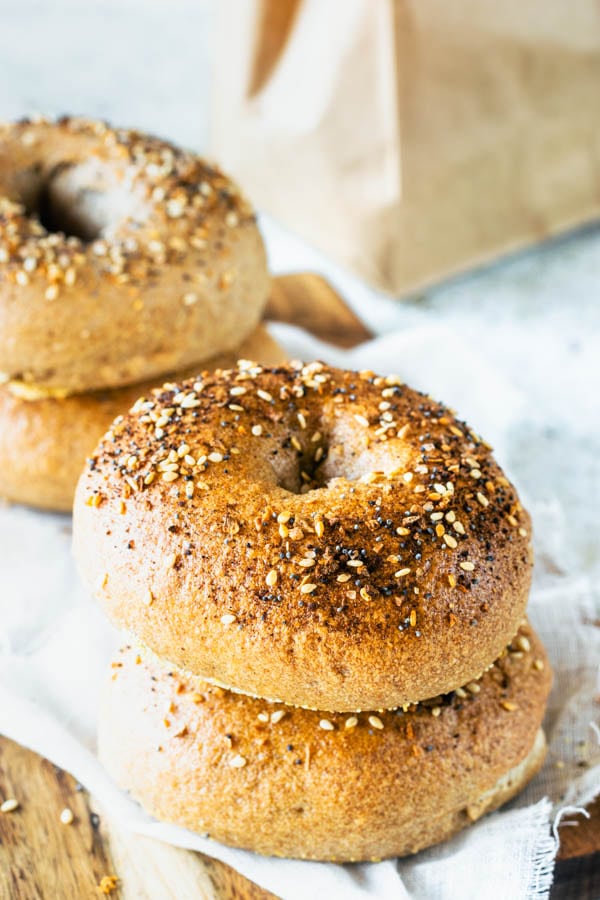
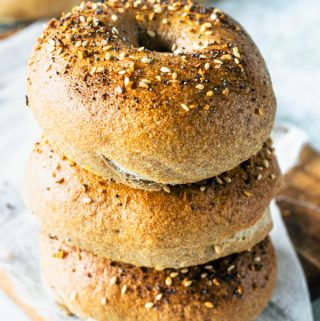
So, these bagels were super delicious! I hope you check out my recipes, and once again, my tips for making the perfect bagels can be found right on this post.
Check out that perfect crumb!!

And these bagels kept really well for a couple of days, actually. Bagels tend to get hard and tough after a day or so, however, on the third day, I had a bagel sandwich and they were still awesome!!
Remember you can also freeze the bagels, split or whole, in a zip loc bag for up to 2 months.
If you freeze the bagels cut in half, all you have to do when it’s bagel time, is to just pop these in the toaster, and that’s it. It will feel like you just went to the best bakery in town and grabbed some fresh bagels for breakfast!
If you like baking with sourdough, here are some other recipes you can check out.
Sourdough Everything Bagels
Ingredients
- 300 grams sourdough starter 1 1/2 cups, 10.6 oz.
- 295-350 grams warm water 90-100F (1 1/4 cup- 1 1/2 cup, 10-12 oz.)
- 1 tablespoon vegetable oil
- 1 tablespoon barley malt syrup or honey
- 2 1/2 teaspoons fine sea salt
- 3 cups all-purpose flour (13.5 oz, 382 grams)
- 3 cups whole wheat flour (13.5 oz, 382 grams)
- To boil bagels
- 1 tablespoon baking soda for boiling bagels
Topping
- 1/4 cup milk
Everything Bagel Seasoning
- 1 teaspoon sesame seeds
- 1 teaspoon poppy seeds
- 1 teaspoon dried onions
- 1 teaspoon dried garlic
- 1 teaspoon coarse sea salt I use Maldon
- 1 teaspoon Za’atar.
Instructions
- Start by mixing the sourdough starter, 1 1/4 cup of water, vegetable oil, malt syrup, sea salt, and flours together in a bowl.
- Mixture will seem extremely stiff. That’s ok. Just make sure all the flour is getting hydrated. If necessary, pour that remaining 1/4 cup of water in, if you see too much dry flour that won’t incorporate into the dough.
- Cover bowl with a damp towel and let dough sit for 10 minutes.
- Kneading: I would recommend a stand mixer to knead this dough. Or a lot of elbow grease.
- Bagel dough should be kneaded at least 7 minutes by machine, probably double by hand. And it’s a very stiff dough, so it’s not the easiest to knead.
- It’s very important that you knead this dough properly, so the bagels will have their proper texture and gluten development.
- At the end of kneading, dough should be smooth, but still pretty stiff and dense.
- Transfer dough to a lightly oiled bowl.
- Cover with a damp towel.
- Let it rise in a warm place for about 4 hours.
- If your place is cold, let it rise 5 hours.
- Transfer dough to the counter.
- I split mine into 100 g (3.5 oz.) pieces, and ended up with 14 pieces.
- Turn pieces into balls by rolling them against the counter, with your hand in a cup shape.
- Use the counter to push the dough against itself and turn into a perfect round.
- There are plenty of videos on youtube that show this technique properly. Very easy, and you’ll always end up with perfectly shaped rolls, bagels.
- Now that you’ve rolled all the pieces into balls, start by making a hole in the center of each ball with your finger. Expand the center out with your hands, by rotating the bagel as you shape the hole in the middle.
- Check pics above to see how I did it.
- Then, place bagels in 2 baking mat or parchment paper lined baking sheets.
- I put 7 bagels in each baking sheet.
- Cover both trays with a damp towel. Let them sit at room temperature for 1-2 hours.
- Once the dough is springing back as you touch it, means your bagels are ready to go.
- Pre-heat oven to 425F.
- Bring a large pot of water to a boil.
- Once water comes to a boil, add baking soda to the pot.
- Boil bagels in batches, being careful not to overcrowd the pan.
- You should boil bagels about 20 seconds on each side. I don’t like to boil them over 1 min total, or their crust might turn out too hard.
- Remove bagels with a slotted spoon after they have boiled about 20 seconds on each side.
- Place boiled bagels in a baking sheet, lined with parchment paper or a silicon mat, and sprinkled with semolina/cornmeal, if you’d like.
- Brush bagels with milk.
- Sprinkle with whatever seasoning of your preference. I used sesame seeds, poppy seeds, dried onions, dried garlic, coarse sea salt, and even some Za’atar I had in my spice cupboard. Za’atar is a tangy spice blend you will love, once you try it.
- I made a big batch of this seasoning to keep on my cupboard.
- I just keep it in a shaker, and shake on top of toasts and other savory goodies.
- After sprinkling your bagels with the seasoning, place trays in the oven.
- Bake for about 10 minutes. Rotate pans. Bake for another 5-15 minutes. It will really depend on your oven and what size bagels you decided to make.
- Once bagels have a deep golden color, remove them from the oven. Let them cool and enjoy them fresh. STORAGE: I like to enjoy the bagels when they are very fresh. That’s when they are the best. However, nothing wrong with leftover bagel toast in the morning. Keep bagels in an air-tight container for up to a couple of days, I wouldn’t go longer than that. You can also freeze them wrapped in foil and inside of a ziplock bag or freezer container for up to 2 months.
- For variations: For other variations, check out this Sourdough Cinnamon Raisin Bagels.
- For bagel topping ideas: Seeds (Sesame, poppy, flax, sunflower, fennel), cheese (asiago is a big favorite), coarse salt, spice blends.
Nutrition

Have made these a couple of times with each time better than the last. Made late afternoon, let dough proof on counter for a couple of hours then into the fridge until the next afternoon. Took dough out of fridge for about an hour, shaped & let proof at room temp (~20C/68F) for 4 hours. Perfect process for achieving super results. Best & easiest recipe ever. Thanks for sharing!
very nice thank you so much!!!!
Can I do a cold retardation overnight in the fridge after the final shaping into bagels? If so, do I still need to let them sit for 1-2 hours? And can I boil straight from the fridge? Or would they need to warm up first? Thanks.
You can, I’d let them sit on the counter for just maybe 20 minutes or so before boiling.
These are wonderful! My husband and I live in a NYC suburb and have excellent NY bagel places nearby. However, we’ve been living a hermit-like existence since the lockdowns began last March and haven’t ventured into a bagel shop (or had any bagels) for almost a year. These definitely hit the spot and would give our local bagel places a good run for their money! Can’t wait to have people over for a brunch (post-COVID) and serve these up!
Due to time/ingredient constraints, I varied from the original recipe in the following ways: I used mostly white flour (~4.5 Cups) with the remainder of bread flour that I had on hand (~1.5 Cups). I plan to try it with just bread flour next time. At step 21, after shaping the dough into bagel form, I left them in the fridge overnight (covered with plastic wrap). Instead of brushing them with milk, I used an egg wash (1 egg + 2 tsp water mixed together).
Brooke, I appreciate your comment! So happy that they have been working for you! Also love the adaptations! Thanks 🙂
Hi, I can’t wait to make these. Should you use active starter or sourdough discard.
The active starter!! Thank you Jasmine!! 🙂
I tried making these for the second time and ran into a problem… The first attempt they turned out perfectly but the second time they did not puff up like they did and should have last time. My starter is very active and I followed all steps and directions exactly but something went wrong and I don’t know what.
I have a question… so I tried making these for the second time and ran into a problem… The first attempt they turned out perfectly but the second time they did not puff up like they did and should have last time. My starter is very active and I followed all steps and directions exactly but something went wrong and I don’t know what.
Aw I am sorry this happened! Did you knead the dough properly? You mentioned the starter was active, have you done the floating test to make sure? Also, are you in a cold or warm place?
My first attempt turned out well. I used ½ bread flour and ½ whole wheat. The kneading was tough–the dough kept wrapping around the hook and then just turning around and around. They also got very dry when I was rolling them out–it’s very dry weather here. I solved that by spritzing the counter and the dough with water, that worked well. Next time I’ll try some flavorings.
Can I substitute malt with honey?
Yes you can!
I highly suggest putting rosemary and sea salt on top!
sounds wonderful! Thank you!
These bagels turn out so nice. Lighter than the store bought bagels but still the right texture. I followed in the instructions using the weight measurements rather than volume.
I am looking forward to making these again.
thank you so much!
Pretty sure this is going to be a fail for me. Measured all ingredients precisely, but dough was way too thin. Even added more AP and WW flour, but dough is definitely not stiff and dense. Bagels are shaped and rising, but they look really sad. Maybe my starter (100% saturation) was too thin? I’ll definitely see it through, as I’ve already gotten this far. But my expectations are extremely low at this point.