Cinnamon Toast Crunch Macarons (plus video)
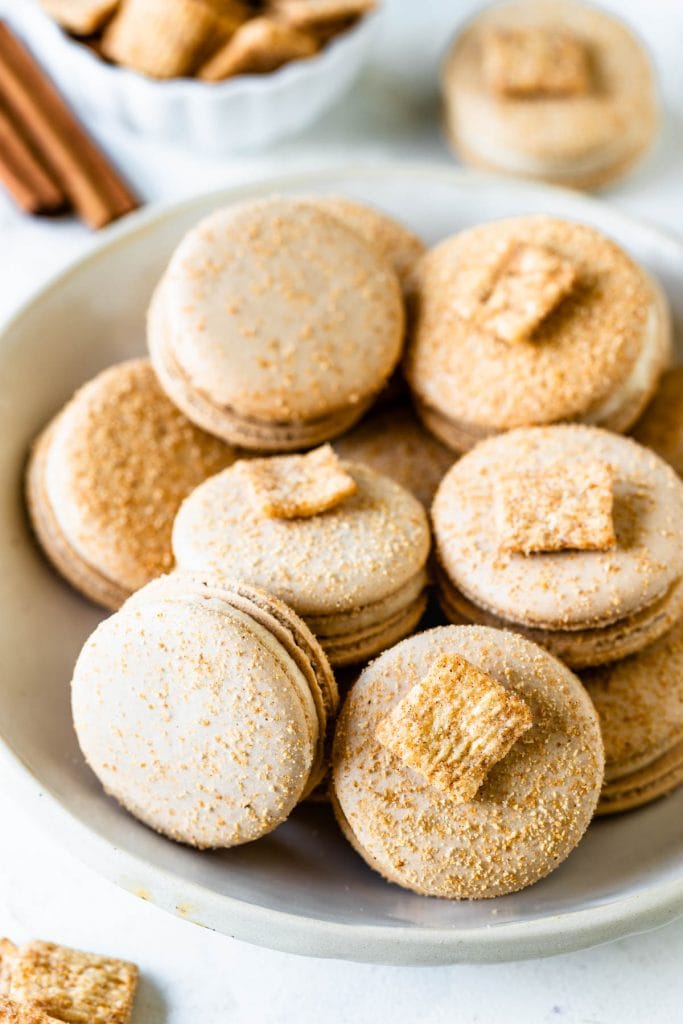
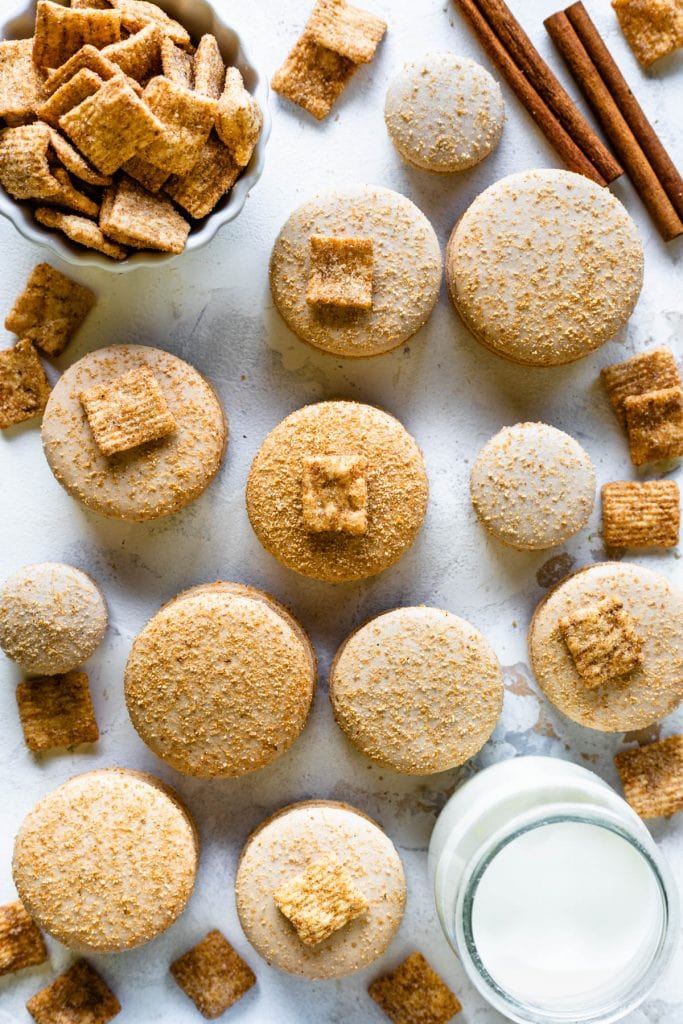
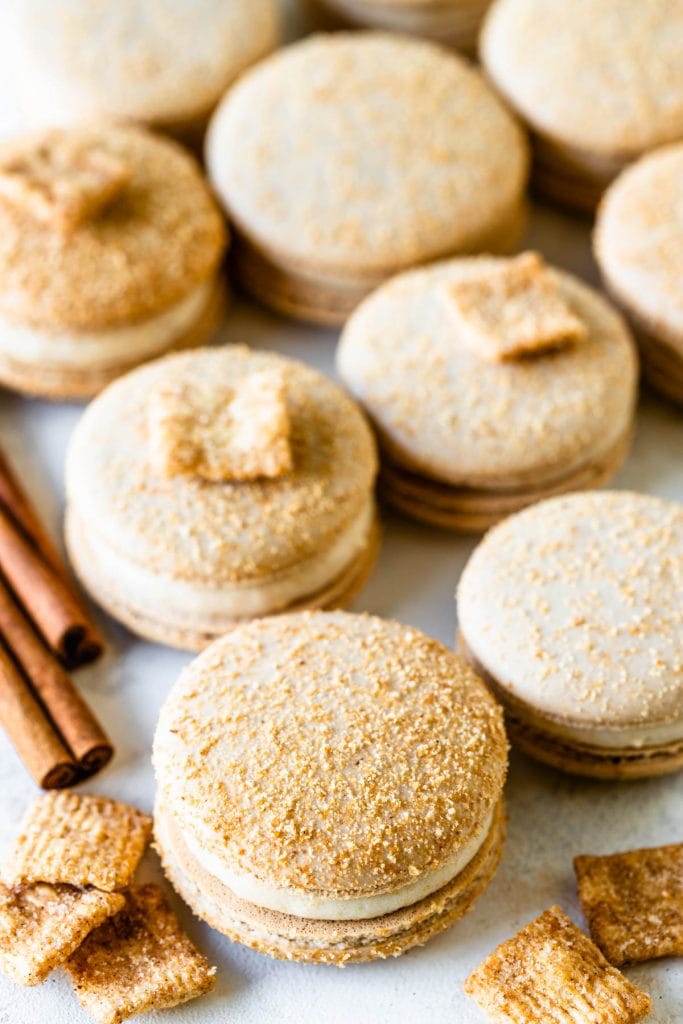
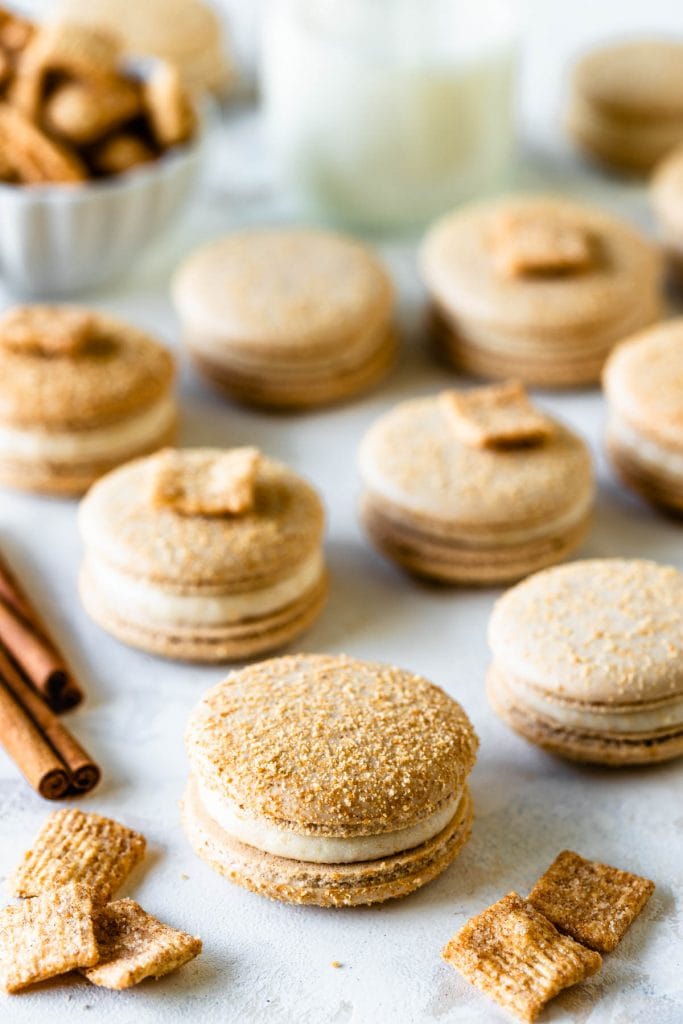
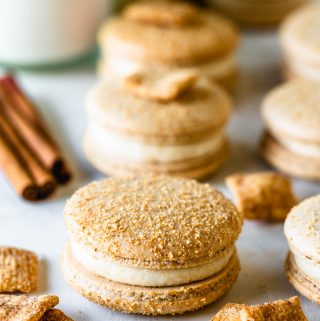
Hello friends! Today I am bringing a super fun and delicious recipe: Cinnamon Toast Crunch Macarons, aka Cereal Macarons! The macaron shells are dusted with Cinnamon Toast Crunch Powder, and are filled with Cinnamon Toast Crunch Buttercream!
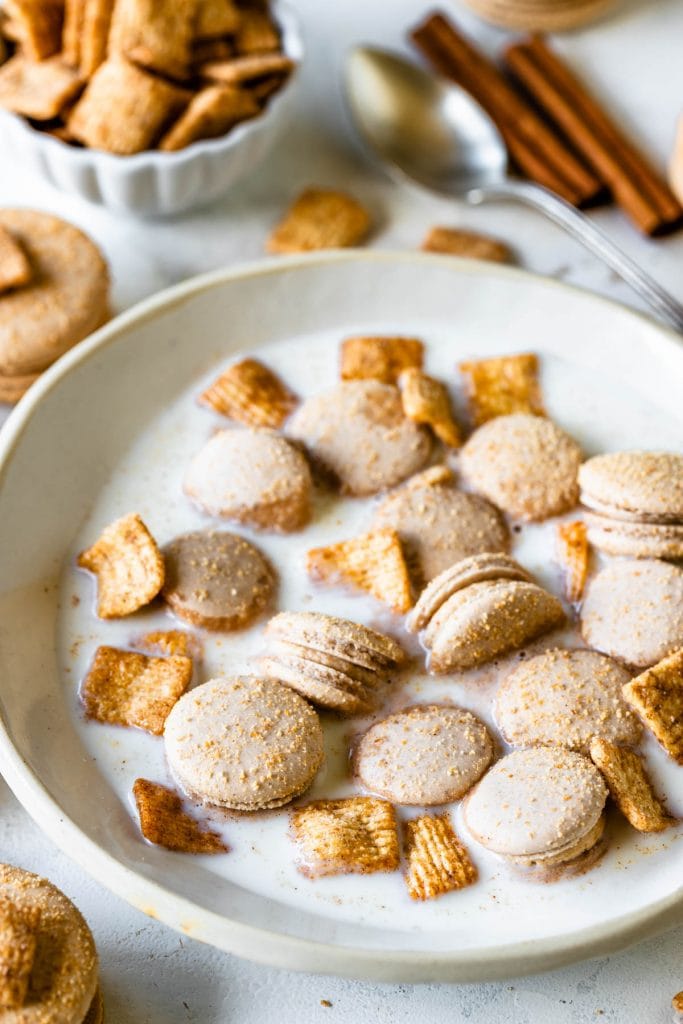
And guess what, I actually made these into cereal! As in I put them in a bowl with milk and ate them as cereal macarons! Check it out!
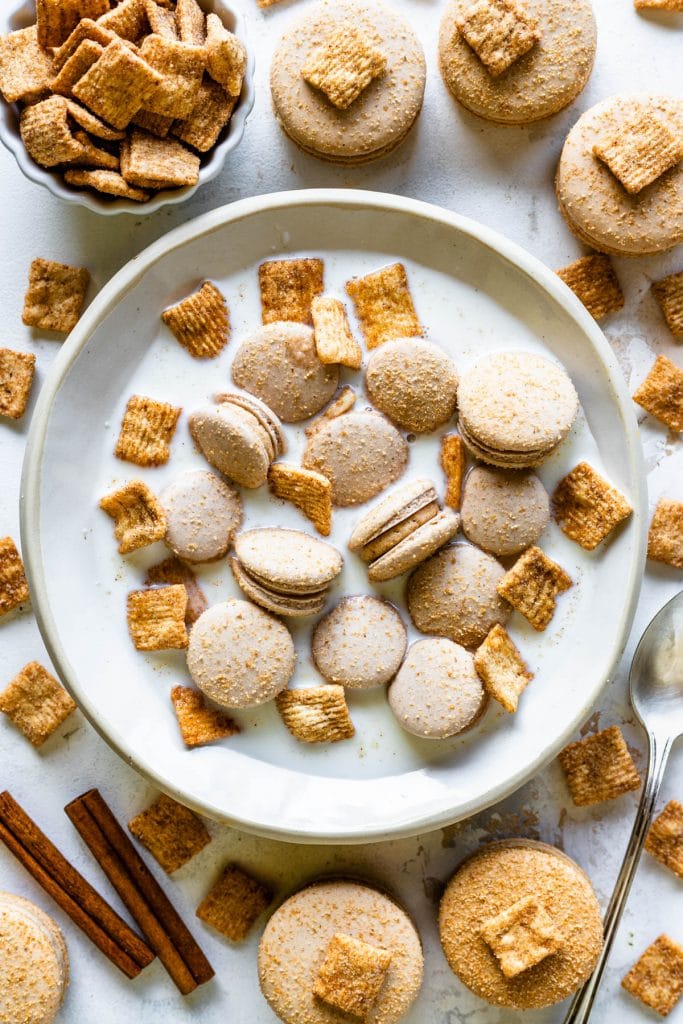
It was absolutely delicious! Tip number one: eat it quickly so the macarons don’t get soggy! But it was totally worth it.
This post may contain affiliate links. I earn a commission from qualified purchases. Please read our Privacy policy here.
When I made my cereal bowl, the Cinnamon Toast Crunch Macarons were straight out of the fridge, so they were very firm. Then I took a few shots with my camera, and then I ate the macarons. So it took a bit of time until I could dig in.
But if adding macarons to milk and eating cereal macarons isn’t your thing, you can still enjoy these Cinnamon Toast Crunch Macarons, because they taste exactly like the cereal itself.
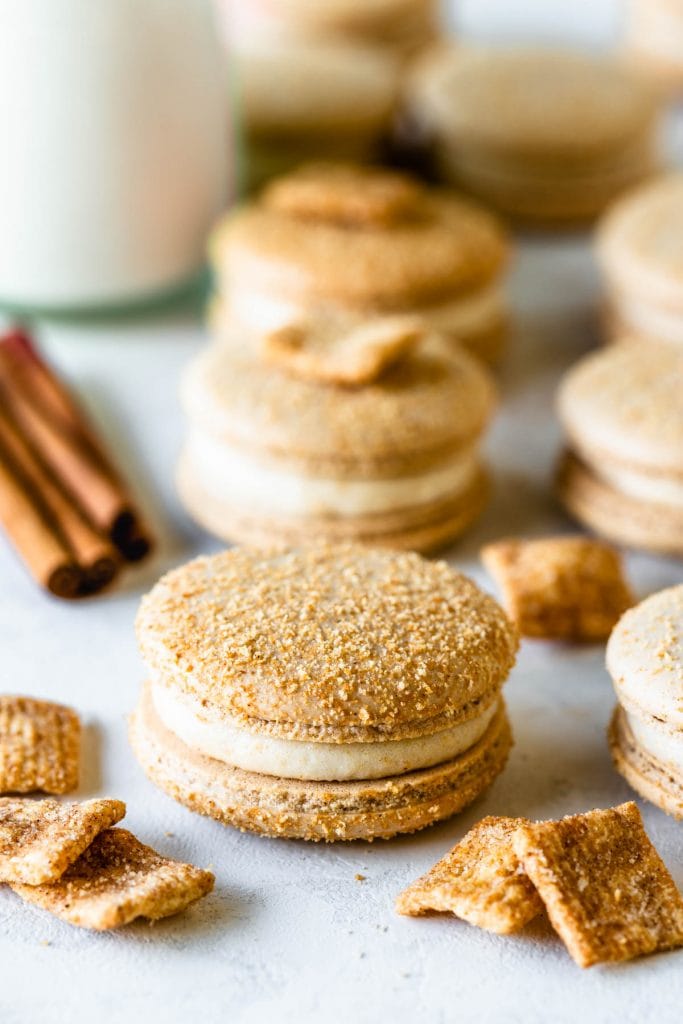
Of course, the shells and the filling are loaded with Cinnamon Toast Crunch flavor!
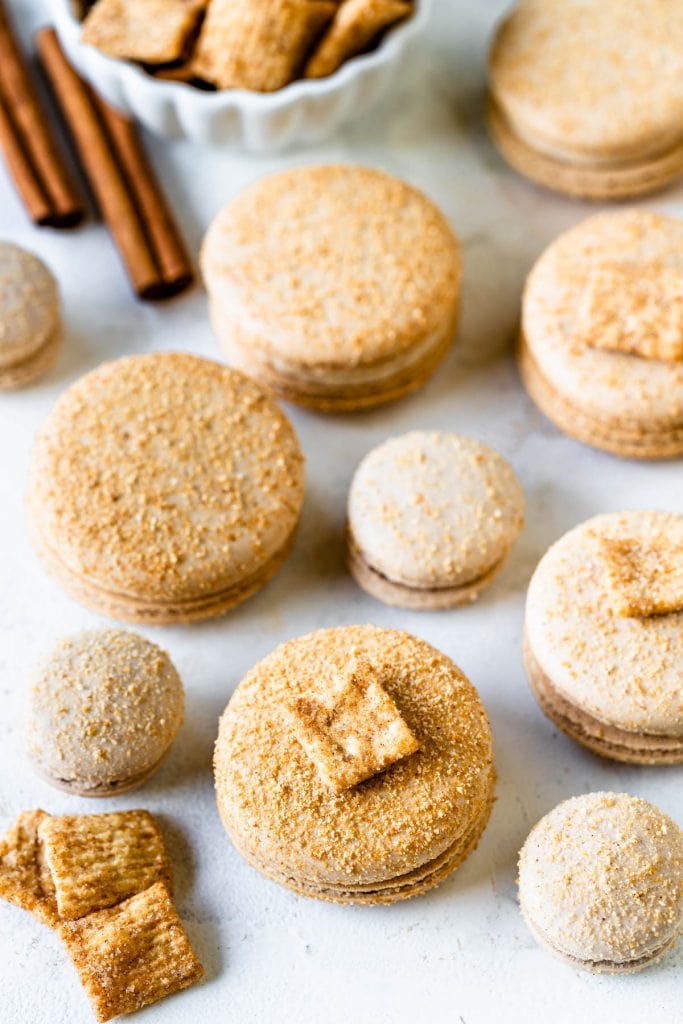
I placed some Cinnamon Toast Crunch cereal in the food processor and processed until a fine powder was formed. And then I sifted some of the powder over the piped shells, before baking.
Make sure to sift the cereal powder, because you want to get rid of any large pieces of cereal, as they might weigh down on the shells and make them crack.
Also, make sure to sprinkle the powder over the shells right after baking, before they get a chance to dry, or they won’t stick.
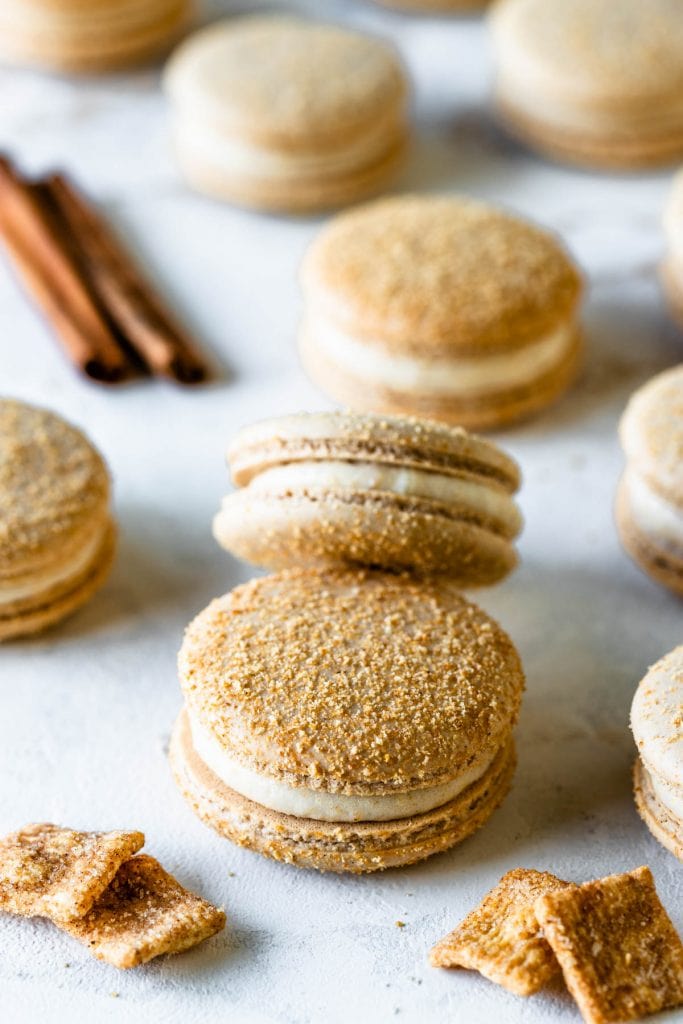
The shells baked with the cereal powder sprinkled on top develop a nice and subtle crunch, not to mention incredible flavor!
What’s your favorite cereal? Mine is Cinnamon Toast Crunch, which is of course why I decided this to be my first Cereal Macaron flavor. There are plenty of other cereals out there, so sometime I hope to make different kinds.
Meanwhile, let’s enjoy how epic these Cinnamon Toast Crunch Macarons are!
Make sure to watch the video on this page, or on Youtube, which will show you exactly how I made these cereal macarons!
And if you enjoy macaron recipes, I have over 80 flavors on the blog.
Check out all of my macaron posts by clicking here.
You will also find many macaron tips throughout all of my posts and videos.
When learning how to make macarons, it’s important to read, watch lots of videos, and specially practice constantly, to improve your skills.
If you like these Cinnamon Toast Crunch Macarons, here are some recipes you might also enjoy:
- Red Velvet Macarons
- S’mores Macarons
- Carrot Cake Macarons
- Peanut Butter Macarons
- Nutella Macarons
- Lemon Macarons
- Chocolate Macarons
- Honey Macarons
- Apple Macarons
- Earl Grey Macarons
- Chai Spice Macarons
- Pear Macarons
- Gingerbread Macarons
And on these posts you can get some tips on how to make macarons, or improve your macaron baking: How to make perfect macarons, and Macaron tips.
Here is some of the equipment I use to make macarons:
These are the baking sheets I use.
These are the piping bags I use.
These are the containers I use to store my macarons in the fridge or freezer.
Please make sure to have an oven thermometer! Such as this one.
Thanks for reading my blog! Please leave a comment below if you make my recipes! Also tag me on instagram! I love to see your creations!
Cinnamon Toast Crunch Macarons
Ingredients
Cinnamon Toast Crunch Powder
- 1 cup Cinnamon Toast Crunch cereal
Macaron Shells
- 100 grams egg whites 3.5 oz
- 100 grams granulated sugar 3.5 oz
- 105 grams almond flour 3.7 oz
- 105 grams powdered sugar 3.7 oz
- 2 grams cocoa powder for color
Cinnamon Toast Crunch Frosting
- 1/4 cup cream cheese softened 56 grams, 2 oz
- 2 tbsp unsalted butter softened 28 grams, 1 oz
- 1/3 cup powdered Cinnamon Toast Crunch
- 3/4 to 1 cup powdered sugar 93 grams, 3.28 oz
- 1/4 tsp cinnamon powder
- 1/2 tsp vanilla extract
Instructions
Cinnamon Toast Crunch Powder
- Place the cereal in a small food processor, and process it until powdered. You can sift the large pieces out, and return them to the food processor and process them a little longer to break them up into a finer powder. Set it aside.
Macaron Shells
- Before you start, get all of the ingredients ready. Prepare a large piping bag, fitted with a large round tip, I use a 1/2” diameter tip. Set aside.
- Line two baking sheets with parchment paper or silicone mat.
- I use a baking mat with the macaron template already in it. You can make your own or print it from the internet, and just place it under silicon mat, or parchment paper. I recommend using a silicon mat.
- Measure out all of the ingredients.
- Sift the powdered sugar, almond flour, and cocoa powder together. Set it aside.
- Place the egg whites and granulated sugar in a heat proof bowl or in a double boiler. Over a pan of barely simmering water, whisk the whites and sugar until frothy and the sugar is completely melted. It will take a couple of minutes. You can test by touching the mixture between your fingers, and if you feel any sugar granules just keep whisking the mixture over the water bath.
- Make sure the bottom of the bowl isn’t touching the simmering water because you don’t want the whites to cook.
- Also, don’t overheat the sugar syrup, this may cause issues down the line, such as wrinkly macarons.
- Transfer the syrup to the bowl of a stand mixer.
- With the whisk attachment, start whisking mixture on low for about 30 seconds, then gradually start increasing speed to medium. Whisk on medium for one to two minutes, until the mixture is white and starting to become fluffy. Raise the speed to high for a few minutes until stiff peaks are formed. Best way to check this is to keep your eye on the whites. Once they get glossy and you start seeing streaks formed by the whisk, it might be time to stop.
- Whisk until stiff peaks have formed. When you pull your whip up, the peak should be stiff and shooting straight up, with possibly a slight bend at the top, but not bending to the side.
- Pour the sifted powdered sugar and almond flour into the stiff meringue.
- Start folding gently forming a letter J with a spatula.
- Add the food coloring at this point, if using.
- How to know when to stop folding the batter: It’s time to stop folding when the batter is glossy and has a thick and flowing consistency. There are several ways to test this.
- First, pick up some batter with the spatula and try to draw a figure 8 with the batter that is dripping off the spatula. If you can form several 8 figures without the batter breaking up, that’s one indication that it might be ready.
- There’s another test you can do. I call it the Teaspoon test.
- Grab a teaspoon of batter and spoon onto the parchment paper or silicon mat. Wait a minute to see how it behaves.
- If the batter stays stiff, forming a point and doesn’t spread out, fold a little bit more, about 3 folds.
- Test again.
- Once the batter spreads out a bit and starts to look glossy and smooth on top, on the parchment paper, it's ready.
- You don’t want your batter to be too runny either. So be careful not to overmix. It’s always best to undermix and test several times until the proper consistency has been achieved.
- When you hold the spatula with batter on top of the bowl and the batter falls off the spatula slowly but effortlessly the batter is ready. The batter will keep flowing off the spatula non-stop, but not too quickly.
- Transfer the batter to the piping bag.
- Place the piping bag directly 90 degrees over the center of each macaron template. Apply gentle pressure and carefully pipe for about 3 seconds, and then quickly pull the bag up twisting slightly.
- I have also made small 1 inch macarons to make them a cute size for a cereal bowl.
- Once you’ve piped as many circles as you could, bang the trays against the counter a few times each. This will release air bubbles that are in the batter and prevent your macaron shells from cracking.
- Use a toothpick to pop any air bubbles in the surface of the shells.
- Before the macarons got a chance to dry, I sifted some of the cereal powder on on top of the shells. You want to make sure the powder you are sprinkling on top of the shells is sifted, because large pieces may weigh the shells down and cause cracks.
- Let the trays sit for a while so the shells will dry out a little bit. I usually leave about 20-40 minutes, depending on how humid the day is. You’ll know they’re ready when you gently touch the surface of a macaron and it seems dry.
- Pre-heat the oven to 300ºF. (However, if baking the mini 1 inch macarons, please reduce the oven temperature considerably. I had to bake the mini ones at 280ºF, so they wouldn’t crack.)
- Bake one tray at a time.
- Bake for 5 minutes, rotate tray.
- Bake for 5 more minutes. Rotate again.
- I bake each tray for about 15 to 20 minutes.
- When baked, the macarons will have a deeper color and formed feet. If you try to move a macaron, it shouldn’t feel jiggly. If the macaron is still jiggly, keep baking.
- Remove from the oven and bake the other tray.
- Let the macarons cool down before proceeding with the filling.
Cinnamon Toast Crunch Frosting
- Add the butter and cream cheese to a bowl, and cream with a mixer for about 2 minutes, until fluffy.
- Add 3/4 cup of powdered sugar, Cinnamon Toast Crunch powder, cinnamon, and vanilla, and mix on low until incorporated, then raise the speed to medium-high and beat until creamy.
- If the frosting is too stiff add one teaspoon of liquid (milk, or water) at a time, until you achieve a smooth consistency.
- And if the frosting seems too runny, add a bit more sifted powdered sugar, up to 1 cup as necessary to adjust the consistency.
To assemble
- Place the frosting in a piping bag. Pipe the filling on half of the shells. Top with another shell.
Storage
- Store these Cinnamon Toast Crunch Macarons in the fridge for 5 to 7 days, or in the freezer for up to 2 months, in an air tight container.
I made these macarons for a breakfast charcuterie board. They were a hit!!!!!
Hi Wendy that’s wonderful to hear!!! Thank you so much!! A breakfast charcuterie board sounds phenomenal!
My shells cracked. Everything else was fine, decent feet, full shells. Attribute it to the sifted powder on top.
Stumbled across this and seems like something fun to do (kiddos love that cereal). Anyway, any guidance on how much cereal is needed to make the 1 1/3 cup of powder? And thanks for putting grams on your measurements!
You’ll need 1 cup of the cereal, and then you’ll turn that into a powder, and use 1/3 of it for the frosting and use a bit of the leftover to sprinkle over the shells before they bake.
Tasty though mostly hollow with hardly any feet. The filling mix seemed a little gummy too. Regardless, everyone seemed to love them. So flavourful!
Your pictures looks really good. What camera do you use and what’s your setup? I saw your blog about it but I can find the page anymore. Thanks for your help
I use a canon 6D mark ii
I don’t have a blog post about my set up but I can make one sometime.
Love this Macs and my family loves them to. Thank you
Thank you so much Claudia!
Hi! Does the cream cheese filling make your macs softer than a buttercream or ganache filling? My cream cheese makes so moist. Help!
I don’t feel like it does. Have you tried adding more powdered sugar to your cream cheese to make it thicker, or use more butter in it? Or you can always brush some melted chocolate on the bottom of the shells, let it dry, and then fill the macarons, the melted chocolate will act like a seal to prevent the shells to get soggy.
Awesome tip! I will try the chocolate!! Thank you!!
Have you ever tried substituting some of the ground almonds/icing sugar for the cereal powder?
I haven’t tried doing that. I really feel like the powder on top, and also the powder in the filling were more than enough to give the taste of cinnamon toast crunch cereal 🙂
I’ve tried to make so many of your recipes and this is my absolute favorite!
I’m having issues with my baking, when I put in a full baking sheet (~24 cookies) in the oven I run into trouble—the center cookies over bake and the inside starts to elevate towards the top of the shell leaving me without a skin at the bottom of the cookie and the cookies towards the outside of the sheet tend to underbake. Do you suggest bringing down the oven temperature and baking for a longer time? I don’t have this problem if I only pipe 12 cookies in the center of the baking sheet but it takes so long to bake 4 different sheets.
So if some of the cookies are tending to underbake then I would definitely not lower the temperature.
Have you experimented with a different rack level position?
Also, have you experimented with turning the baking sheet upside down? Because this way the rims of the baking sheet aren’t in the way, and the heat can be distributed more evenly.
Do you rotate the trays around? Maybe place a couple of different oven thermometers in your oven, on the back, on the center, on the front, and then read the temperatures to see exactly what temperatures they are reading.
Let me know how it goes!!
Omg thank you! I brought the tray down to the lowest position and it baked all of them evenly. This will save me so much time! Thank you for your help 🙂
Love this recipe.
Thank you so much!! 🙂
What a great recipe! Who doesn’t love Cinnamon Crunch cereal?
Thank you Jeanette!!
Love love love to see all your recipes!! I have tried many they are all Spectacular!! Can’t wait to get your cookbook in my hands!!
thank you so much Kim! 🙂
Such a fun macaron idea! 😀
É perfeito que se fala??? Pois é assim que ficaram esses macarons, perfeitos!!!!!! Parabéns Ca!!!!!!!