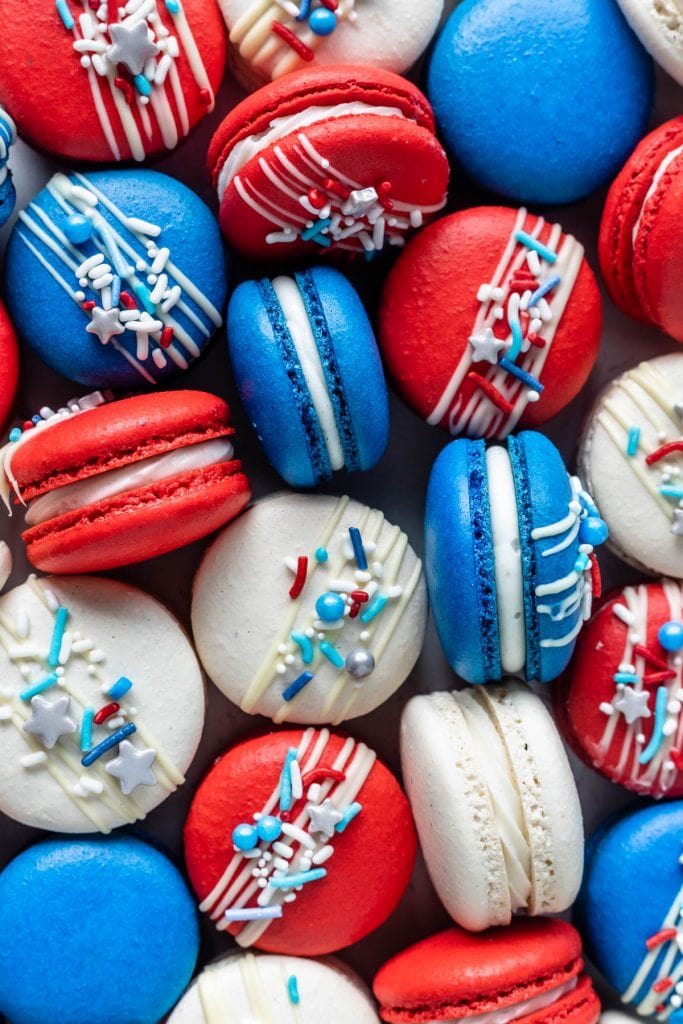
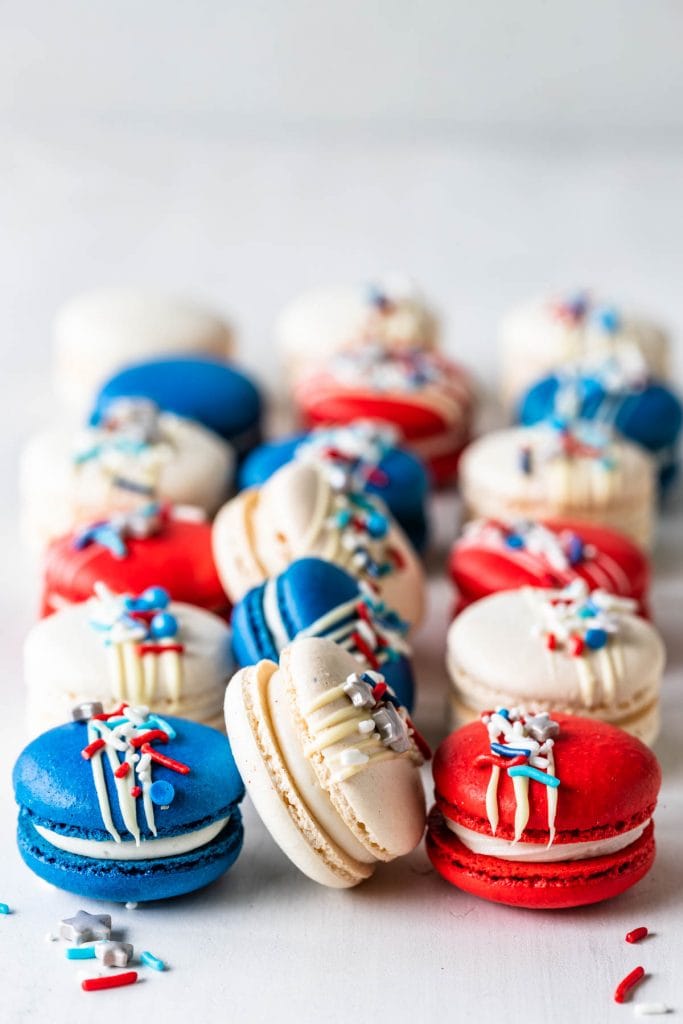
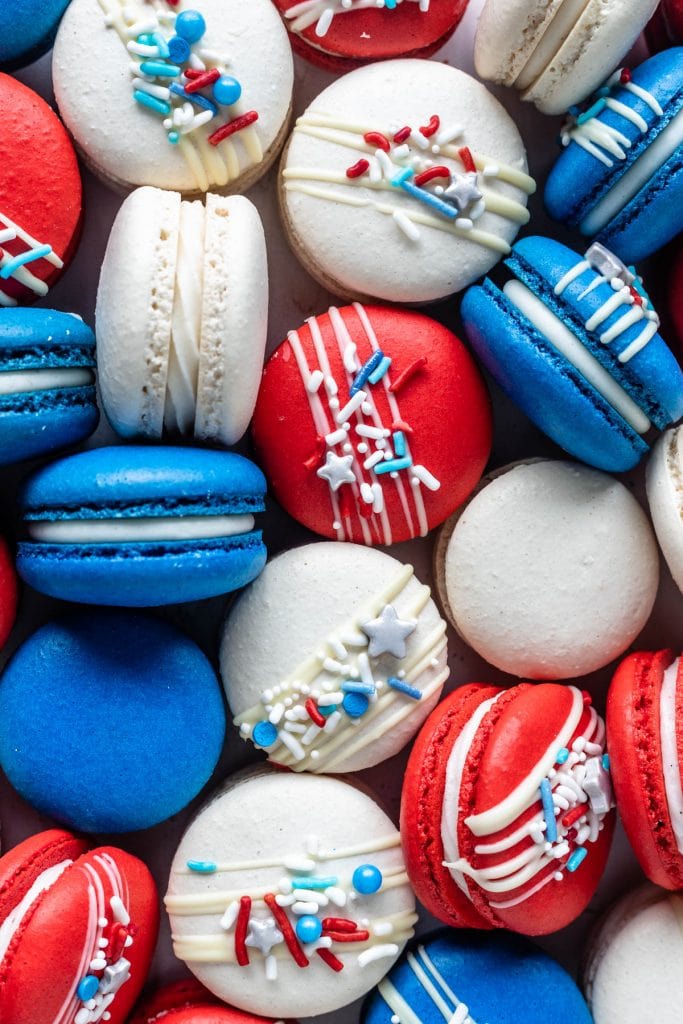
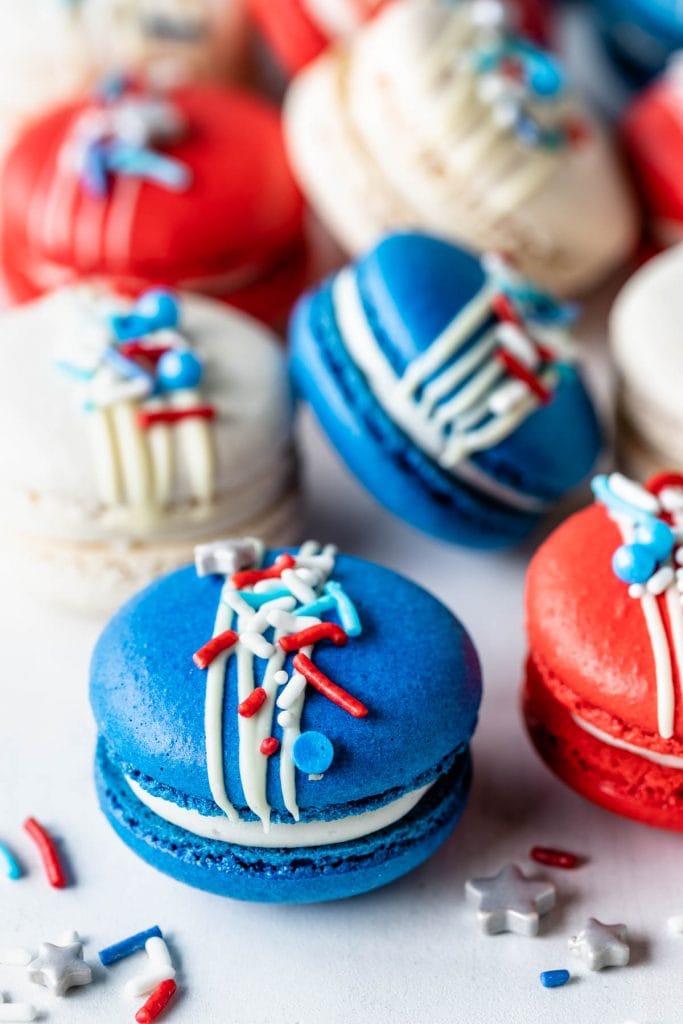
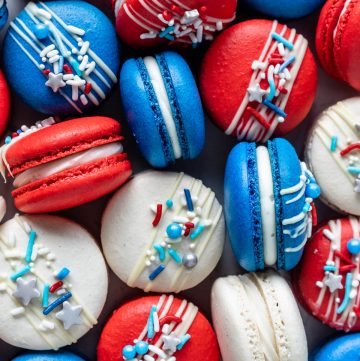
Red White and Blue Macarons
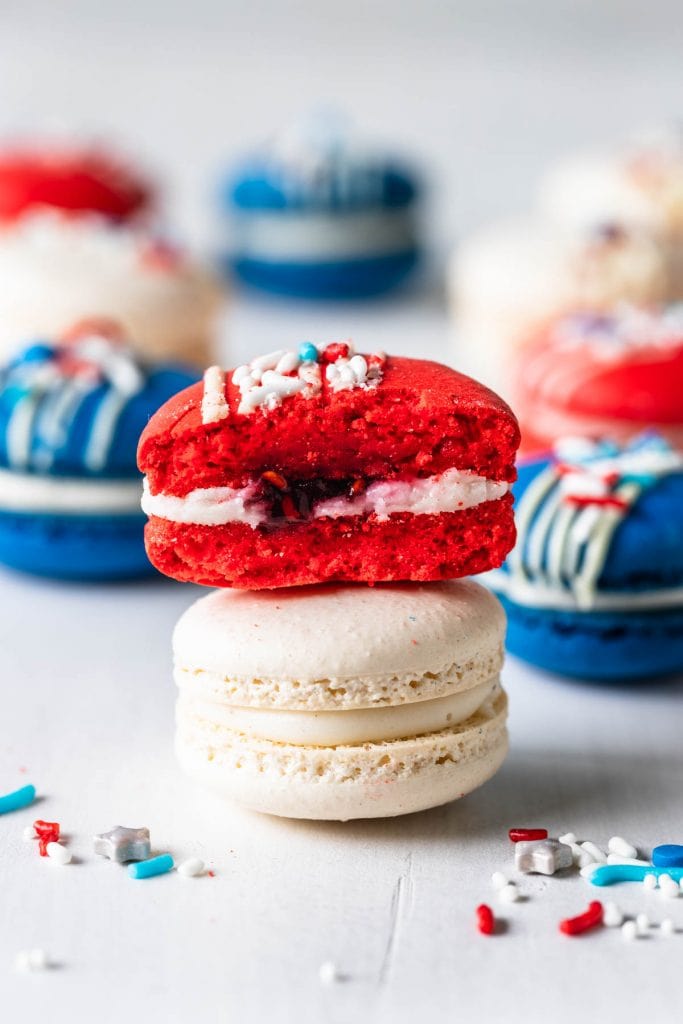
Hello friends! Today I will show you how to make Red White and Blue Macarons. These macarons are perfect to celebrate the 4th of July! They are filled with Cream Cheese Frosting and Raspberry Jam, but you can really use any filling you’d like.
I will teach you how to make the three colors, red, white, and blue out of the same batch of macarons!
Also make sure to watch the video on this page or on YouTube showing you exactly how to make these delicious beautiful macarons.
This post may contain affiliate links. I earn a commission from qualified purchases. Please read our Privacy policy here.
I actually made these Red White and Blue Macarons to celebrate the fact that I just got my American citizenship. If you have followed me for a while you probably know I’m Brazilian, and after 9 and a half years of being in the USA I just got my citizenship.
These Red White and Blue Macarons are perfect to celebrate America, these wonderful country for which I am so grateful!
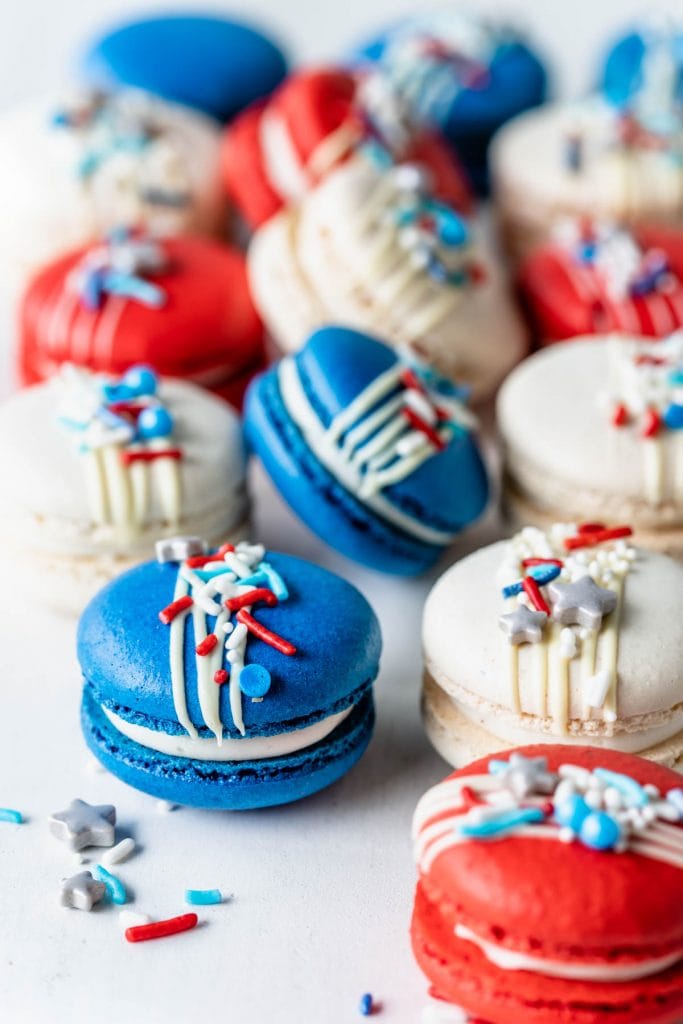
For the white shells, I used white powder food coloring by The Sugar Art (not sponsored, not affiliate). It does help make the shells super bright! I used about 1 tsp of powder.
If using other colors by The Sugar Art, go easy, use about 1/4 tsp, not a full tsp. It’s just that for the white and black colors you’ll end up needing more food coloring than for the rest of the colors. But I do recommend checking out The Sugar Art, since their colors are in concentrated powder form, which is great because it doesn’t add any extra moisture to the batter.
But my overall favorite food coloring is Americolor gel food coloring. I used Americolor gel food coloring for the red and blue color shells.
I discuss more about food coloring here.
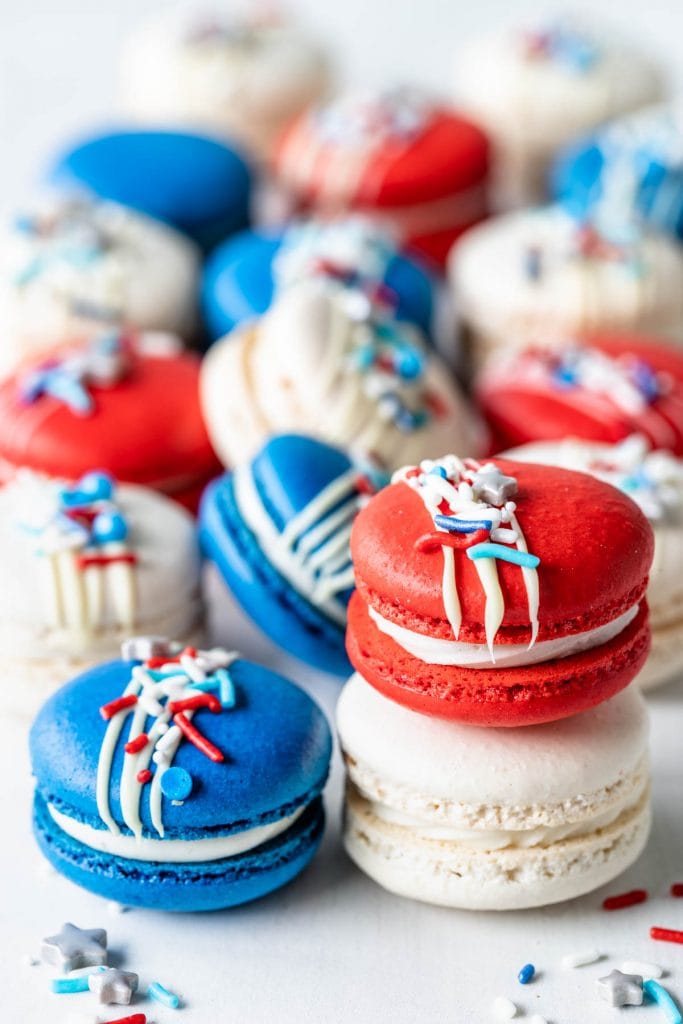
I don’t have a link for the sprinkles I used, because I combined several different sprinkles to make this. Since I didn’t have any patriotic sprinkles, I just combined a few blue, red, white sprinkles and some silver stars from various collections. It took me about 1 hour of picking sprinkles out with tweezers to combine them, but I find tasks like that quite relaxing.
If you want to fill these macarons with something else other than Cream Cheese Frosting and Raspberry Jam, I have over 100 recipes and ideas of what to fill your macarons with.
For my whole list of macaron recipes and flavors click here.
Here are some fillings that would be great:
- Creme Brûlée
- Lavender Ganache
- White Chocolate Russian Buttercream
- Fig and Cream Cheese
- Red Velvet
- Vanilla Bean
- Honey Cream Cheese
- Strawberry Rhubarb
- Earl Grey
If you want to improve your macaron game, I recommend you visit my page Macaron School where I explain everything about macarons, from troubleshooting guides to the science behind macarons and more!
I also recommend you watch my YouTube videos, and the videos from many other teachers that post their knowledge and tips on blog posts and videos, that will be really helpful on your journey.
Thank you so much for reading! If you make this recipe tag me on instagram or use the hashtag #piesandtacos. I love to see your creations!
Red White and Blue Macarons
Ingredients
Macaron Shells
- 4 grams egg white powder
- 100 grams white granulated sugar
- 100 grams egg whites
- 105 grams almond flour
- 105 grams powdered sugar
- A few drops of red blue gel food coloring, and white powder food coloring
Raspberry Jam
- 1 cup raspberries fresh or frozen 283 grams, 10 oz
- 1/4 cup maple syrup you can use granulated sugar or other sweetener instead
- 1 tbsp lemon juice
- 1 tbsp cornstarch
- 1 tbsp cold water
Cream Cheese Frosting
- 85 grams cream cheese softened 6 tbsp
- 42.5 grams unsalted butter softened 3 tbsp
- 125 grams powdered sugar
- 1/4 tsp vanilla extract or vanilla bean paste
Decoration
- 1/4 cup white chocolate 42 grams
- 1/4 cup sprinkles
Instructions
Macaron Shells
- Before you start, get all of the ingredients ready. Prepare three piping bags fitted with 1/4” piping tip.
- Line two baking sheets with parchment paper or silicone mat.
- Measure out all of the ingredients.
- Sift the powdered sugar and almond flour. Set it aside.
- Whisk the sugar and the egg white powder (if using) in a bowl, and place it over a pan with barely simmering water.
- Add the egg whites to the sugar and whisk the mixture until frothy and the sugar is completely melted. It will take a couple of minutes. You can test by touching the mixture between your fingers, and if you feel any sugar granules just keep whisking the mixture over the water bath.
- Make sure the bottom of the bowl isn’t touching the simmering water because you don’t want the whites to cook.
- Also, don’t overheat the sugar syrup, this may cause issues down the line, such as wrinkly macarons.
- Transfer the syrup to the bowl of a stand mixer.
- With the whisk attachment, start whisking the syrup on low for about 30 seconds, then gradually start increasing speed to medium. Whisk on medium for one to two minutes, until the mixture is white and starting to become fluffy. Raise the speed to medium-high and whisk for a few minutes until stiff peaks are formed. Best way to check this is to keep your eye on the whites. Once they get glossy and you start seeing streaks formed by the whisk, it might be time to stop.
- Whip until stiff peaks have formed. When you pull your whisk up, the peak should be stiff and shooting straight up, with possibly a slight bend at the top, but not bending down to the side.
- Pour the sifted powdered sugar and almond flour into the stiff meringue.
- Start folding gently forming a letter J with a spatula.
- Fold the dry ingredients with the meringue just until you see no more dry ingredients in the meringue.
- As soon as you see no more dry ingredients in the meringue, stop stirring. Divide the batter between three different bowls.
- Work with one bowl at a time, leaving the other ones covered meanwhile.
- To the first batter add white powder food coloring and stir until the perfect consistency is achieved. The batter should be flowing slowly and effortlessly off the spatula, you should be able to pick up some batter with the spatula and draw several figure 8s with the batter that’s flowing, without having the batter break up. And even after the batter breaks up, it should still continue to flow off the spatula slowly.
- There’s another test you can do. I call it the Teaspoon test.
- Grab a teaspoon of batter and spoon onto the parchment paper or silicon mat. Wait a minute to see how it behaves.
- If the batter stays stiff, forming a point and doesn’t spread out, fold a little bit more, about 3 folds.
- Test again.
- Once the batter spreads out a bit and starts to look glossy and smooth on top, on the parchment paper, it’s ready.
- You don’t want your batter to be too runny either. So be careful not to over mix. It’s always best to under mix and test several times until the proper consistency has been achieved.
- Once the first batter achieves the perfect consistency, transfer it to a piping bag. Secure the top with a tie, so the batter doesn’t scape while piping, and to keep the batter from drying out while you work with the remaining batter. Set the piping bag aside.
- Now, it’s time to work with the second batter. I colored the second batter red. After adding food coloring, stir until the perfect consistency is achieved, like I’ve explained above.
- Transfer the red batter to the piping bag. And secure the top with a tie.
- Now, it’s time to work with the last batter. I colored the third batter blue. After adding food coloring, stir until the perfect consistency is achieved, like I’ve explained above.
- Transfer the blue batter to a piping bag. And secure the top with a tie.
- Time to start piping! Position the piping bag over the center of the circle template, and start applying gentle pressure to release the batter. Then pull the bag up twisting slightly at the top.
- Once you’ve piped as many circles as you could, bang the trays against the counter.
- Use a toothpick to pop any air bubbles on the surface of the shells.
- Let the trays sit for a while so the shells will dry out a little bit. I usually leave about 20-40 minutes, depending on how humid the day is, how much food coloring you have added, and on the consistency of the batter. You’ll know the macarons are ready to be baked. when you gently touch the surface of a macaron and it seems dry, and doesn’t stick to your finger.
- Pre-heat the oven to 300ºF.
- Bake one tray at a time.
- Bake for 5 minutes, rotate the tray in the oven to bake evenly on all sides. And then continue baking.
- I bake each tray for about 15 to 20 minutes.
- When baked, the macarons will have a deeper color and formed feet. If you try to move a macaron, it shouldn’t feel jiggly. If the macaron is still jiggly, keep baking.
- Remove from the oven and bake the other tray.
- Let the macarons cool down before proceeding with the filling.
Raspberry Jam
- Mix the raspberries, sugar (or sweetener or choice) and lemon juice in a small pot. Bring to a boil over medium heat, cook, stirring, for about 5 minutes. Use the spoon to break up the raspberries as you stir.
- Mix the cornstarch and cold water in a small bowl.
- Once the raspberries have boiled and reduced a bit, add the cornstarch and water mixture to the pan.
- Bring back to a boil, stirring constantly, until mixture is thickened.
- Pour through a strainer, and keep on stirring the mixture to strain the jam. Make sure to press it through really well so you can get the most out of it, and just leave the seeds behind. If you like the seeds, just skip the straining. I never skip it but sometimes at the end I do add a tablespoon or so of seeds back to the jam for a bit of texture.
- Let the jam cool. Cover it with plastic wrap and place it in the fridge.
Cream Cheese Frosting
- Beat the softened cream cheese and butter together in the bowl of an electric mixer, for about 2 minutes, until light and fluffy. With the mixer off, add powdered sugar to the bowl.
- Turn mixer on low to incorporate the powdered sugar with the cream cheese and butter.
- Once you see no streaks of dry powdered sugar, beat mixture on medium high for one minute. Add vanilla extract. Mix to combine.
- If the frosting is too runny, add more powdered sugar as needed. And if the frosting is too stiff, add a teaspoon of water or milk to thin it out.
- This frosting will store well in the fridge for up to 5 days, covered.
- Make sure to always leave your frosting covered. Cover the bowl with a lid or plastic wrap, because otherwise, the surface will dry out and get hard.
To decorate
- Melt white chocolate and place it in a piping bag, snip the end with scissors.
- Drizzle the melted chocolate over the macaron shells, and place sprinkles on top.
To assemble
- Line a piping bag with a small round tip or a small star tip. Fill it with the cream cheese frosting.
- Once the macarons have cooled down, simply pipe a ring of cream cheese frosting around the edge of a bottom macaron, fill it up with about 1/2 teaspoon of raspberry jam. Top with another macaron cookie.
- Macarons are best after they’ve matured in the fridge for a day or more.
Storage
- Store the macarons in the fridge for up to 5 days, or in the freezer for up to 1 month.
Is egg white protein powder the same as egg white powder?
Not always. Egg white powder is simply dried egg whites, while some egg white protein powders are formulated as supplements and may contain added ingredients such as sweeteners, flavors, gums, or anti-caking agents. For baking macarons, I recommend using plain egg white powder with egg whites listed as the only ingredient.
Thank you – thats helpful to know! Do you know where I can buy some? I was looking all over on Amazon.
Buy the brand Judee’s on amazon. It’s what I use.
I really wish your ingredients were listed with American measurements rather than grams – I lose interest in a recipe when I have to take the time to convert all the grams into cups or spoons.
Congrats on your citizenship! 🇺🇸
You need a scale when making macarons because macarons require a lot of precision since there are so many elements to it. There are many variables when it comes to making macarons, so you want to reduce the variables that you have more control over such as measuring the ingredients. One cup of scooped sugar is not going to consistently weigh 200 grams for example. To keep recipes consistent, to help you achieve the best results, and to prevent you from wasting ingredients and time, it’s best to get a scale and weigh your ingredients instead, specially when making macarons.
Do we have to use powdered food coloring?
Thank you.
No you don’t, you can use gel.
Hello,
Can we use white gel color instead of powder?
Thank you.
you can, I just don’t find white gel to be as effective at keeping the shells white.
Hey there! I was wondering if there is a specific white powder food coloring that you use??
its titanium dioxide.
Just using red color gel made my macarons light pink when I baker them. How do I get that super bright red?
add a lot more food coloring
Made these and they turned out great except the food coloring turned my mouth blue and red! It that normal? Or did I do something wrong. I used wilton color right.
yes food coloring will definitely do that.
hi camila…. tried your recipe and it came out fantastic but can we reduce sugar content in it?
Not really, I explain in detail why here on this post https://www.piesandtacos.comsugar-role-in-macarons/
Awesome! I just discovered your site recently and recently made my first batch of macarons- they came out great!
Congratulations on your citizenship, and thank you for sharing so many of your awesome recipes!
Thank you so much!! I appreciate that!
Is there a way to make these with another type of flour?.
you can use sunflower seed flour, or even all purpose flour
Ficaram sensacionais!!!!!!