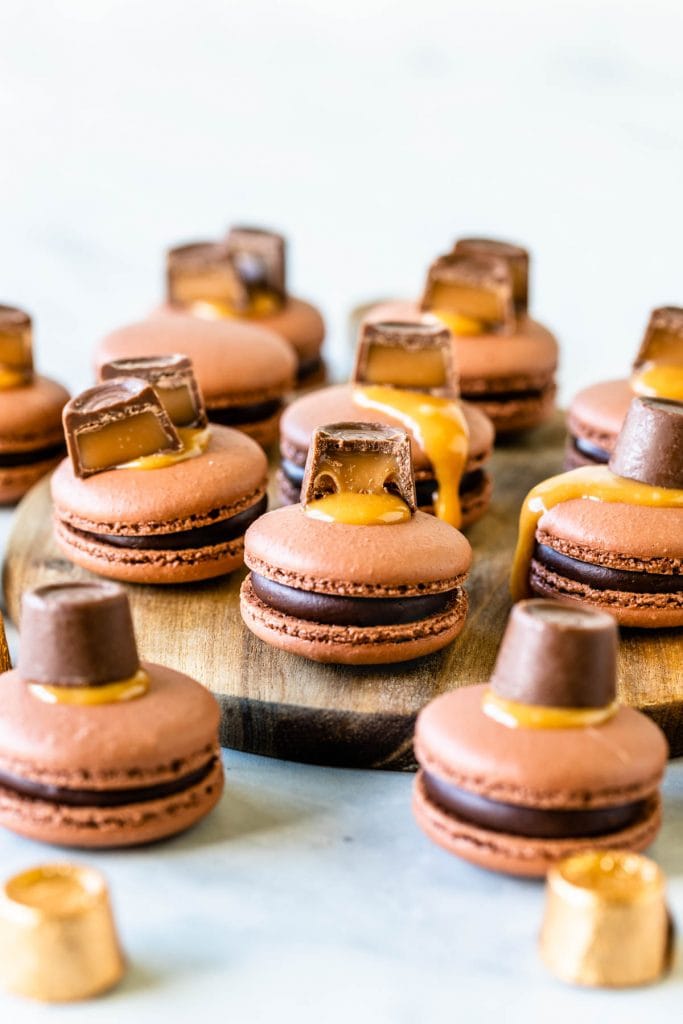
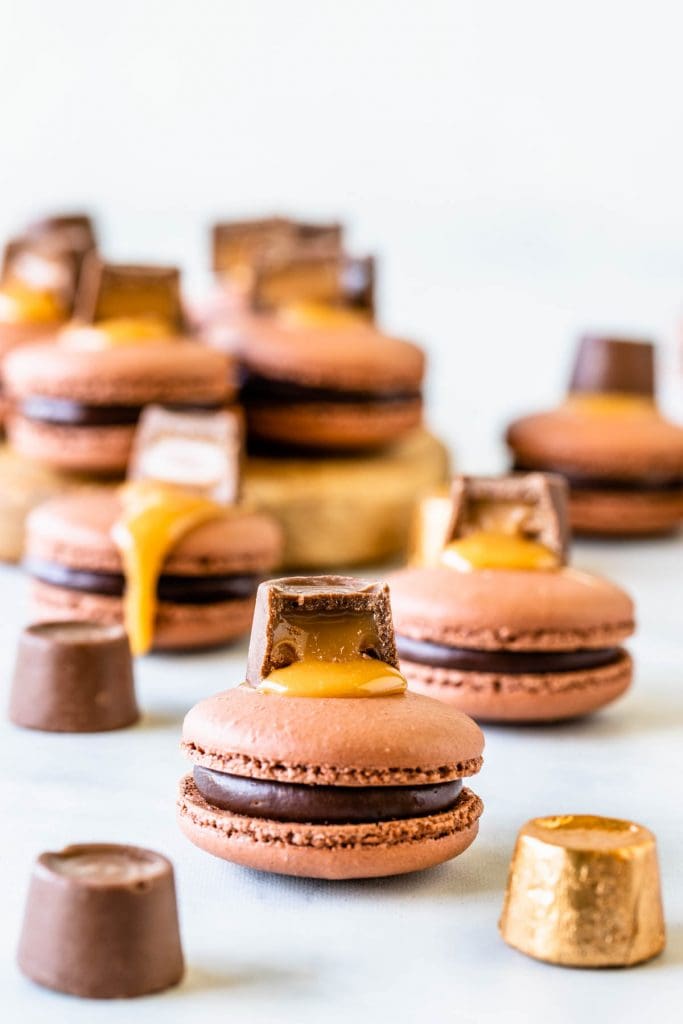
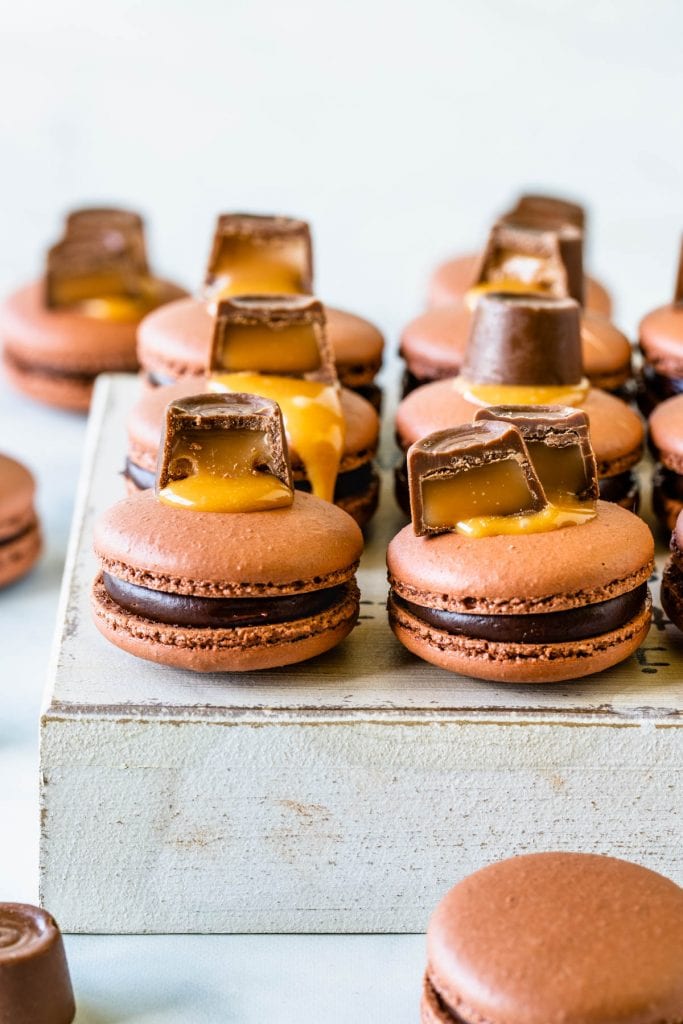
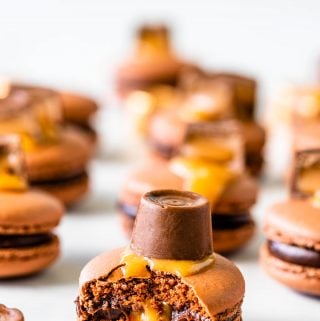
Chocolate Caramel Macarons
Hello dear friends! Today I am bringing a very special recipe, which was a request by one of my followers! Chocolate Caramel Macarons, which resemble a Rolo® candy (not sponsored by Rolo®).
These Chocolate Caramel Macarons are one of my favorites that I have ever made! And I have made a LOT of them! I have over 70 macaron flavors and ideas here on the blog. (Visit my macaron flavors and recipes page)
I hope to post the video for these Chocolate Caramel Macarons really soon so I can show you step by step how to make them.
This post may contain affiliate links. I earn a commission from qualified purchases. Please read our Privacy policy here.
Videos are so important when learning how to make macarons, because getting a visual of what the meringue, and the batter are supposed to look like at each stage is extremely helpful.
Meanwhile, visit my Youtube Channel to watch videos that might be useful to you.
I always get asked this following question: What advice do you have for someone who wants to start making macarons?
Well, I get asked many questions regarding macarons, and I am organizing them all in a comprehensive post, but I figured I’d address this specific question today.
If you are a beginner at making macarons, here are my advices:
- Study. Read blog posts, watch YouTube videos, join Facebook groups for macaron bakers.
- Practice. Try a couple of different recipes, and stick to one that resonates the most with you, and practice it until you master it. There are different methods for making macarons: the French method, the Italian, and the Swiss. I use the Swiss method for the most part, and the French method for my Vegan Macarons, and for some regular macarons.
Visit my Vegan Macarons category page.
And visit the Coconut Macarons post to check out the French Macaron recipe.
More tips below.
- Make sure you have an oven thermometer in place. This is probably the most important thing about baking macarons. Please visit my Vegan Matcha Macaron post to read why it’s so important to have an oven thermometer when making macarons (vegans or not).
- Study your own oven. Pipe the batter in different trays, and bake each at a different temperature, and on a different height, to figure out what is best for your oven. Each oven works differently, and your optimal temperature might be different than mine. Specially if you are using a convection fan (in this case, turn down the temperature, by the way).
If you liked these Chocolate Caramel Macarons, visit the next few recipes to check out links to other ideas you might enjoy:
- Salted Caramel Macarons
- Oreo Macarons
- Orange Macarons
- Caramelized White Chocolate Macarons
- Nutella Macarons
- Pecan Turtle Macarons
- German Chocolate Macarons
- Toffee Macarons
- Samoa Cookie Macarons
- Caramel Popcorn Macarons
If you make any of my recipes, please tag me on instagram (visit my Instagram page), and don’t hesitate to ask me any questions. I have been getting a very high amount of questions, but I do try to reply to them all as possible, and I would love to help you with your macaron baking questions.
Thank you for reading my blog and being a part of my journey, making possible for me to do what I love and share this passion with the world!
Chocolate Caramel Macarons
Ingredients
Chocolate Macaron Shells
- 100 grams egg whites about 3 egg whites, 3.5 oz
- 100 grams white sugar 3.5 oz
- 96 grams almond flour 3.4 oz
- 75 grams powdered sugar 2.64 oz
- 14 grams cocoa powder 0.8 oz
- Food coloring a few drops of brown, optional for color
Dark Chocolate Ganache
- 6 ounces dark chocolate 170 grams
- 1/2 cup heavy cream 120 ml
Caramel Filling
- 2.6 oz soft caramel candies unwrapped (73 grams)
- 3 tsp heavy cream or more for consistency
Instructions
Chocolate Macaron Shells
- Before you start, get all of the ingredients ready. Prepare a large piping bag, fitted with a large round tip. Set aside.
- Line two baking sheets with parchment paper or silicon mat.
- I use a baking mat with the macaron template already in it. You can make your own or print it from the internet, and just place it under silicone mat, or parchment paper. I recommend using a silicone mat.
- Measure out all of the ingredients.
- Sift the powdered sugar, almond flour, and cocoa powder together. Set aside.
- Place the egg whites and granulated sugar in a heat proof bowl or in a double boiler. Over a pan of simmering water, whisk the whites and sugar until frothy and sugar completely melted. It will take a couple minutes. You can test by touching the mixture between your fingers, and if you feel any sugar granules just keep whisking mixture over the water bath.
- Make sure the bottom of the bowl isn’t touching the simmering water. You don’t want the egg whites to cook.
- Transfer the syrup to the bowl of a stand mixer.
- With the whisk attachment, start whisking the mixture on low for about 30 seconds, then gradually start increasing speed to medium. Whisk on medium for one to two minutes, until the mixture is white and starting to become fluffy.
- Raise the speed to high for a few minutes until stiff peaks are formed. Once the meringue get glossy and you start seeing streaks formed by the whisk, it might be time to stop.
- Whisk until stiff peaks have formed. When you pull your whip up, the peak should form a bird’s beak shape, but shouldn’t be falling to the side, the peak should be stiff, forming a slightly curved shape at the top.
- Pour the sifted powdered sugar, almond flour, and cocoa powder into stiff whites.
- Start folding gently forming a letter J with a spatula.
- Add the food coloring at this point, if using. You can add a bit of brown food coloring to enhance the color of the shells if you want to.
- It’s time to stop folding when the batter is glossy and has a thick and flowing consistency. There are several ways to test this, and you might have a couple failed batches before you get this right.
- First, I pick up some batter with my spatula and try to draw a figure 8 with the batter that is dripping off the spatula. If you can form several 8 figures without the batter breaking up, that’s one indication that it might be ready.
- There’s another test you can do. I call it the Teaspoon test.
- Grab a teaspoon of batter and spoon onto the parchment paper or silicon mat. Wait a minute to see how it behaves.
- If the batter stays stiff, forming a point and doesn’t spread out a bit, I start folding a little bit more, about 3 folds.
- Test again.
- Once the batter spreads out a bit and starts to look glossy and smooth on top, on the parchment paper or baking mat, I transfer my mixture to the piping bag.
- You don’t want your batter to be too runny either. So be careful not to over mix. It’s always best to under mix and test several times until the proper consistency has been achieved.
- The best way I can describe this stage being perfect is when you hold the spatula with batter on top of the bowl and the batter falls off the spatula slowly but effortlessly. The batter will keep flowing off the spatula non-stop, but not too quickly.
- Transfer the batter to a piping bag fitted with a round tip.
- Place the piping bag directly 90 degrees over the center of each macaron template. Apply equal pressure and carefully pipe for about 3 seconds, and then quickly pull the bag up twisting slightly.
- Once you’ve piped as many circles as you can, bang the trays against the counter a few times each. This will release air bubbles that are in the batter and prevent your macaron shells from cracking.
- Use a toothpick to gently poke any bubbles of air that may have formed on the surface of the macaron shells.
- Let the trays sit for a while so the shells will dry out a little bit. I usually leave about 20-40 minutes, depending on how humid the day is. You’ll know they’re ready when you gently touch the surface of a macaron and it seems dry.
- Pre-heat the oven to 300°F.
- Bake one tray at a time.
- Bake for 5 minutes, rotate tray.
- I bake each tray for a total of 18-20 minutes.
- When baked, the macarons will have a deeper color and formed feet. And they will be coming off the mat easily, and with a completely formed bottom.
- If you try to move a macaron and it feels jiggly, it needs to keep baking.
- Remove from the oven and bake the other tray.
- Let the macarons cool down before proceeding with the filling.
Dark Chocolate Ganache
- Chop dark chocolate very finely. Place it in a bowl.
- Heat heavy cream in a small pan over medium heat, or in the microwave. No matter what method you choose, be very careful not to boil the heavy cream.
- Pour hot cream over chopped chocolate. Let it stand for a minute.
- Start stirring with a spatula until completely melted.
- Let it come to room temperature. Refrigerate for a bit before using, until it has piping consistency.
- To achieve the piping consistency for the ganache, you will have to rely a lot on the temperature of the ganache.
- If it has been in the fridge for a while, and it’s too thick and hard to pipe, insert it in the microwave for a few quick seconds, and stir it again. Test for consistency and keep going until you achieve the desired consistency.
- To be pipeable, the ganache should be thick, but easy to spread.
- If it happens that the ganache is too thin, you might want to put it in the fridge for a few minutes so it will harden up.
- Transfer the ganache to a piping bag fitted with a round tip.
Caramel Filling
- To make the caramel, place the candies in a small bowl along with 3 tsp of heavy cream. Microwave for 15 second intervals, stirring in between, until the caramels and the heavy cream are combined and incorporated together.
- If the caramel is too stiff, you might want to add another teaspoon of heavy cream and continue to stir.
- Transfer the caramel to a piping bag and cut a small hole at the end to pipe the caramel.
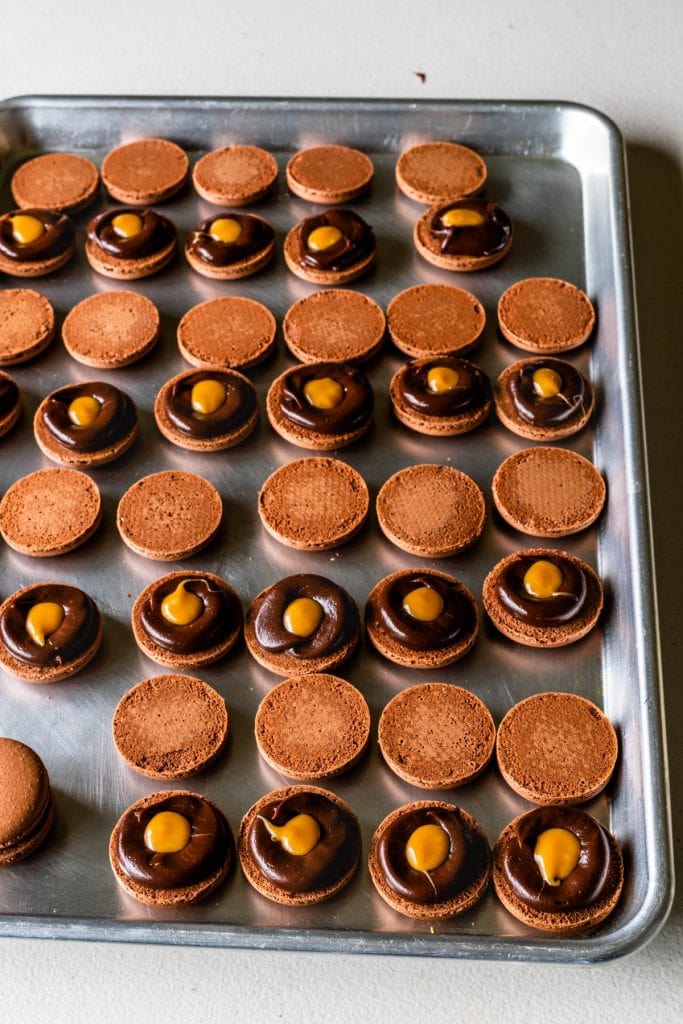
To assemble
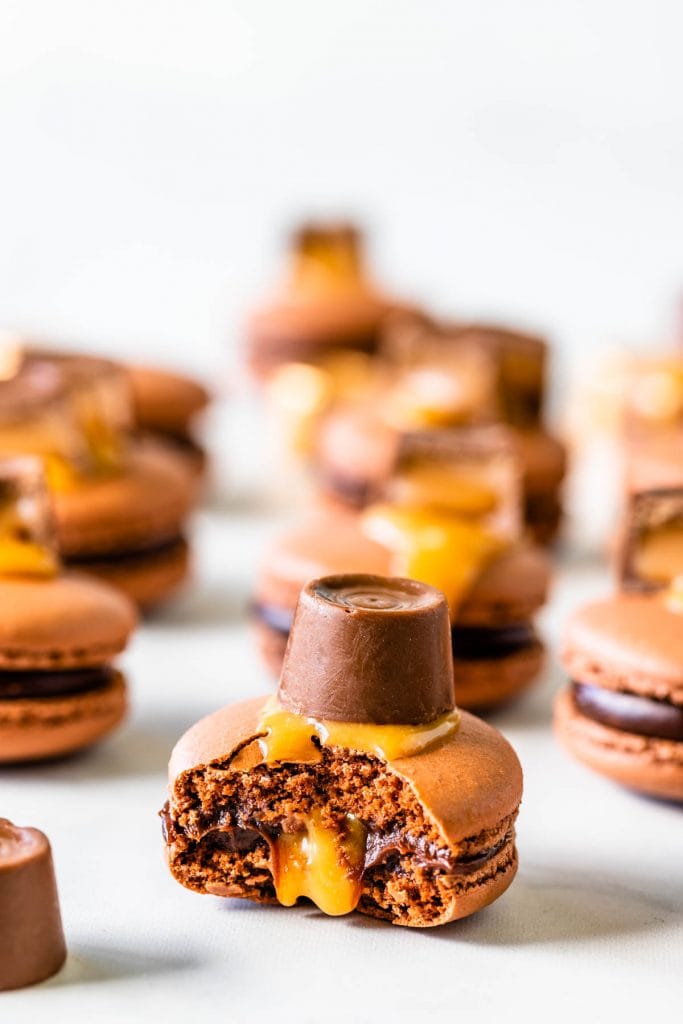
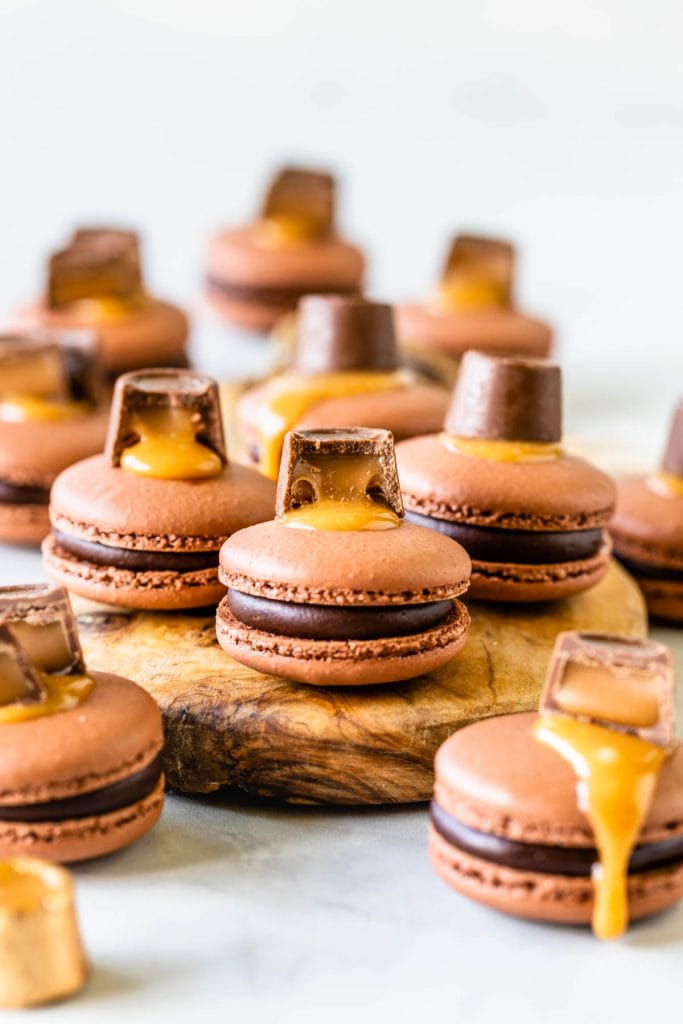
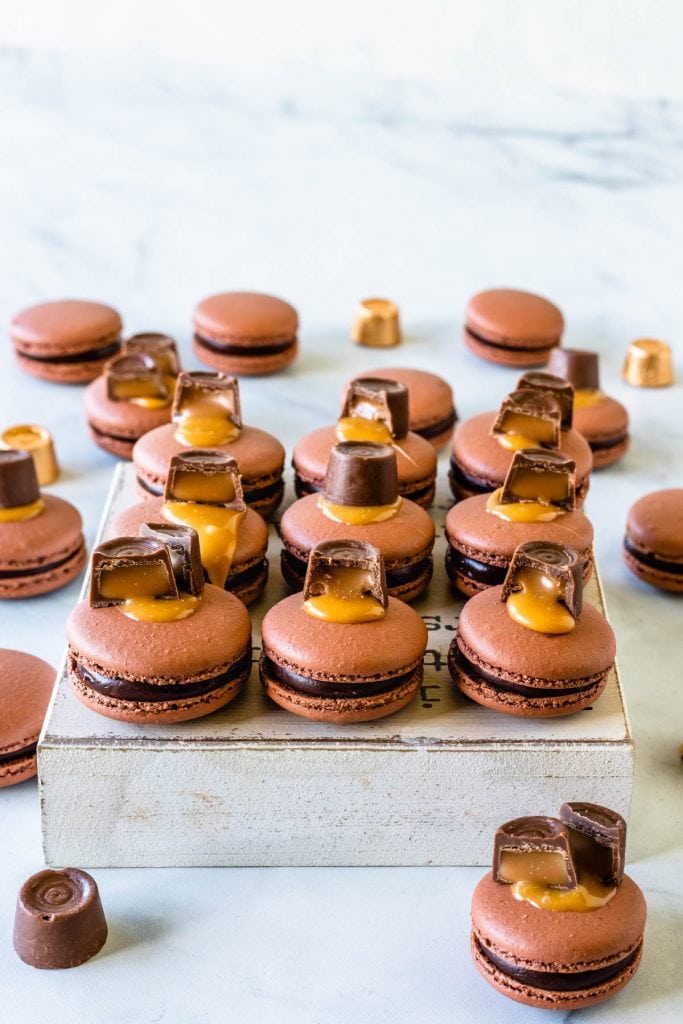
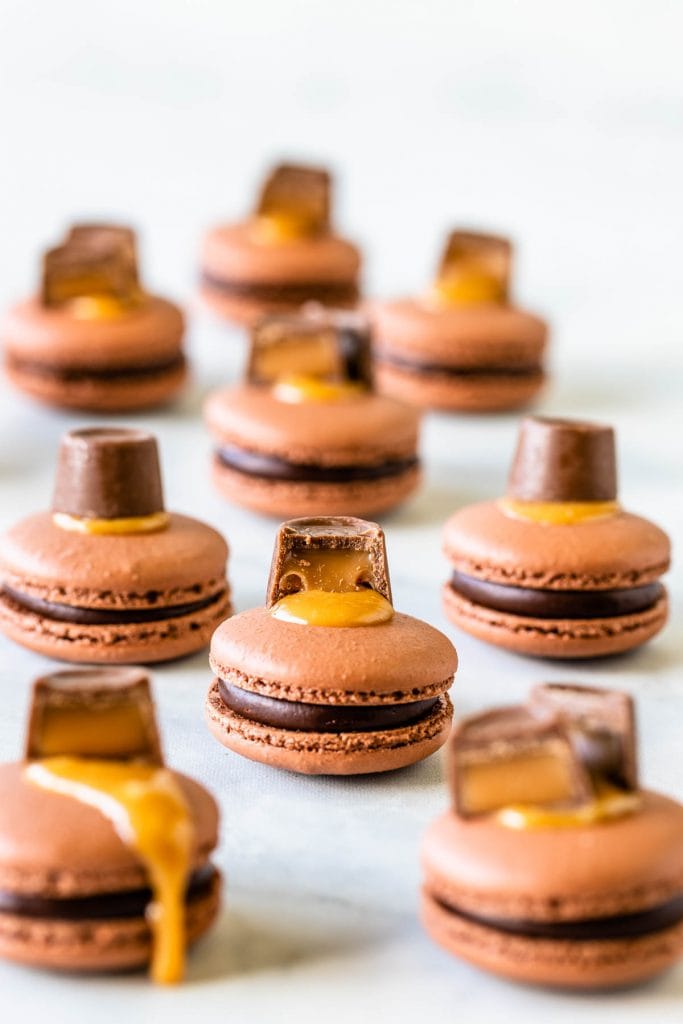
- Pipe a circle of ganache around the edges of each bottom shell of the macarons.
- Fill the middle with a bit of the caramel.
- Top with another shell.
- I also piped a bit of caramel on top of some shells and topped with Rolo® candies.
Storage
- Keep in the fridge for up to 5 days, or in the freezer for 1 to 2 months, in an air tight container.
Thank you!!
Could you please let us know which chocolate covered caramels you used? I feel like I recognize them but can’t think which they are!! I’d be fine with an email reply if you don’t want to publish the brand.
Can’t wait to try this recipe!
Thank you.
It’s rolos 🙂
Is it same ratio of chocolate to cream when doing milk Hershey bars?
you’ll need more chocolate, try 7.5 oz instead of 6
I tried this recipe and it was a major hit. I want to make it for an event 2 days in advance, would that be okay if I just stick them in the fridge? Should I make the shells one day and the filling the next day?
es they will be perfectly ok in the fridge for even up to 4 or 5 days. You can also freeze them up to one to 2 months. You can make the shells a day before and fill the next day, but I do recommend filling them one or two days before serving, to give them time to mature, which will allow the shells to absorb moisture and flavor from the filling, resulting in a delicious final result.
Thank you. Is that a general rule for all macarons?
yes it is!
Hey there! Looks delicious. What are your storage recommendation for the macarons? In the fridge or room temp? How many days in advance can we make them? Will they still be good the day after making them?
Thanks !!
In the fridge or freezer. they last up to 5 days in the fridge and up to 1-2 months in the freezer. Macarons are always better to be served about 24 to 48 hours after they are filled and have sat in the fridge, because that’s the maturing process, which hydrates the shell which improves the texture and also the taste.
Hi, I love your Macaron recipes! I’ve made a few of them. The Salted Caramel is amazing! I made these chocolate ones tonight and the shells cracked after 7 minutes in a 320 F oven. The second pan came out much better. I kept checking every 2 minutes after 5 minutes. I can’t figure out what happened. My oven works really well..true to temp. Can the egg whites be “dehydrated” too long in the fridge? I left them in for 3 nights. I wanted to make after one night but something came up.
Thank you!
you probably didn’t rest the first tray enough. I dont think it has anything to do with the egg whites drying, specially if you weigh them after they’ve sat in the fridge, and also the second tray turned out fine, so either it was an issue with the oven temperature, or resting time, most likely resting time.
So grateful for how thorough this recipe was.. And delicious! First time making Italian Macs and they are better than any I’ve done before. The filling was also amazing. Thank you for your time! I’m excited to try the other flavors…
Thanks Karen!