Pão de Queijo Recipe
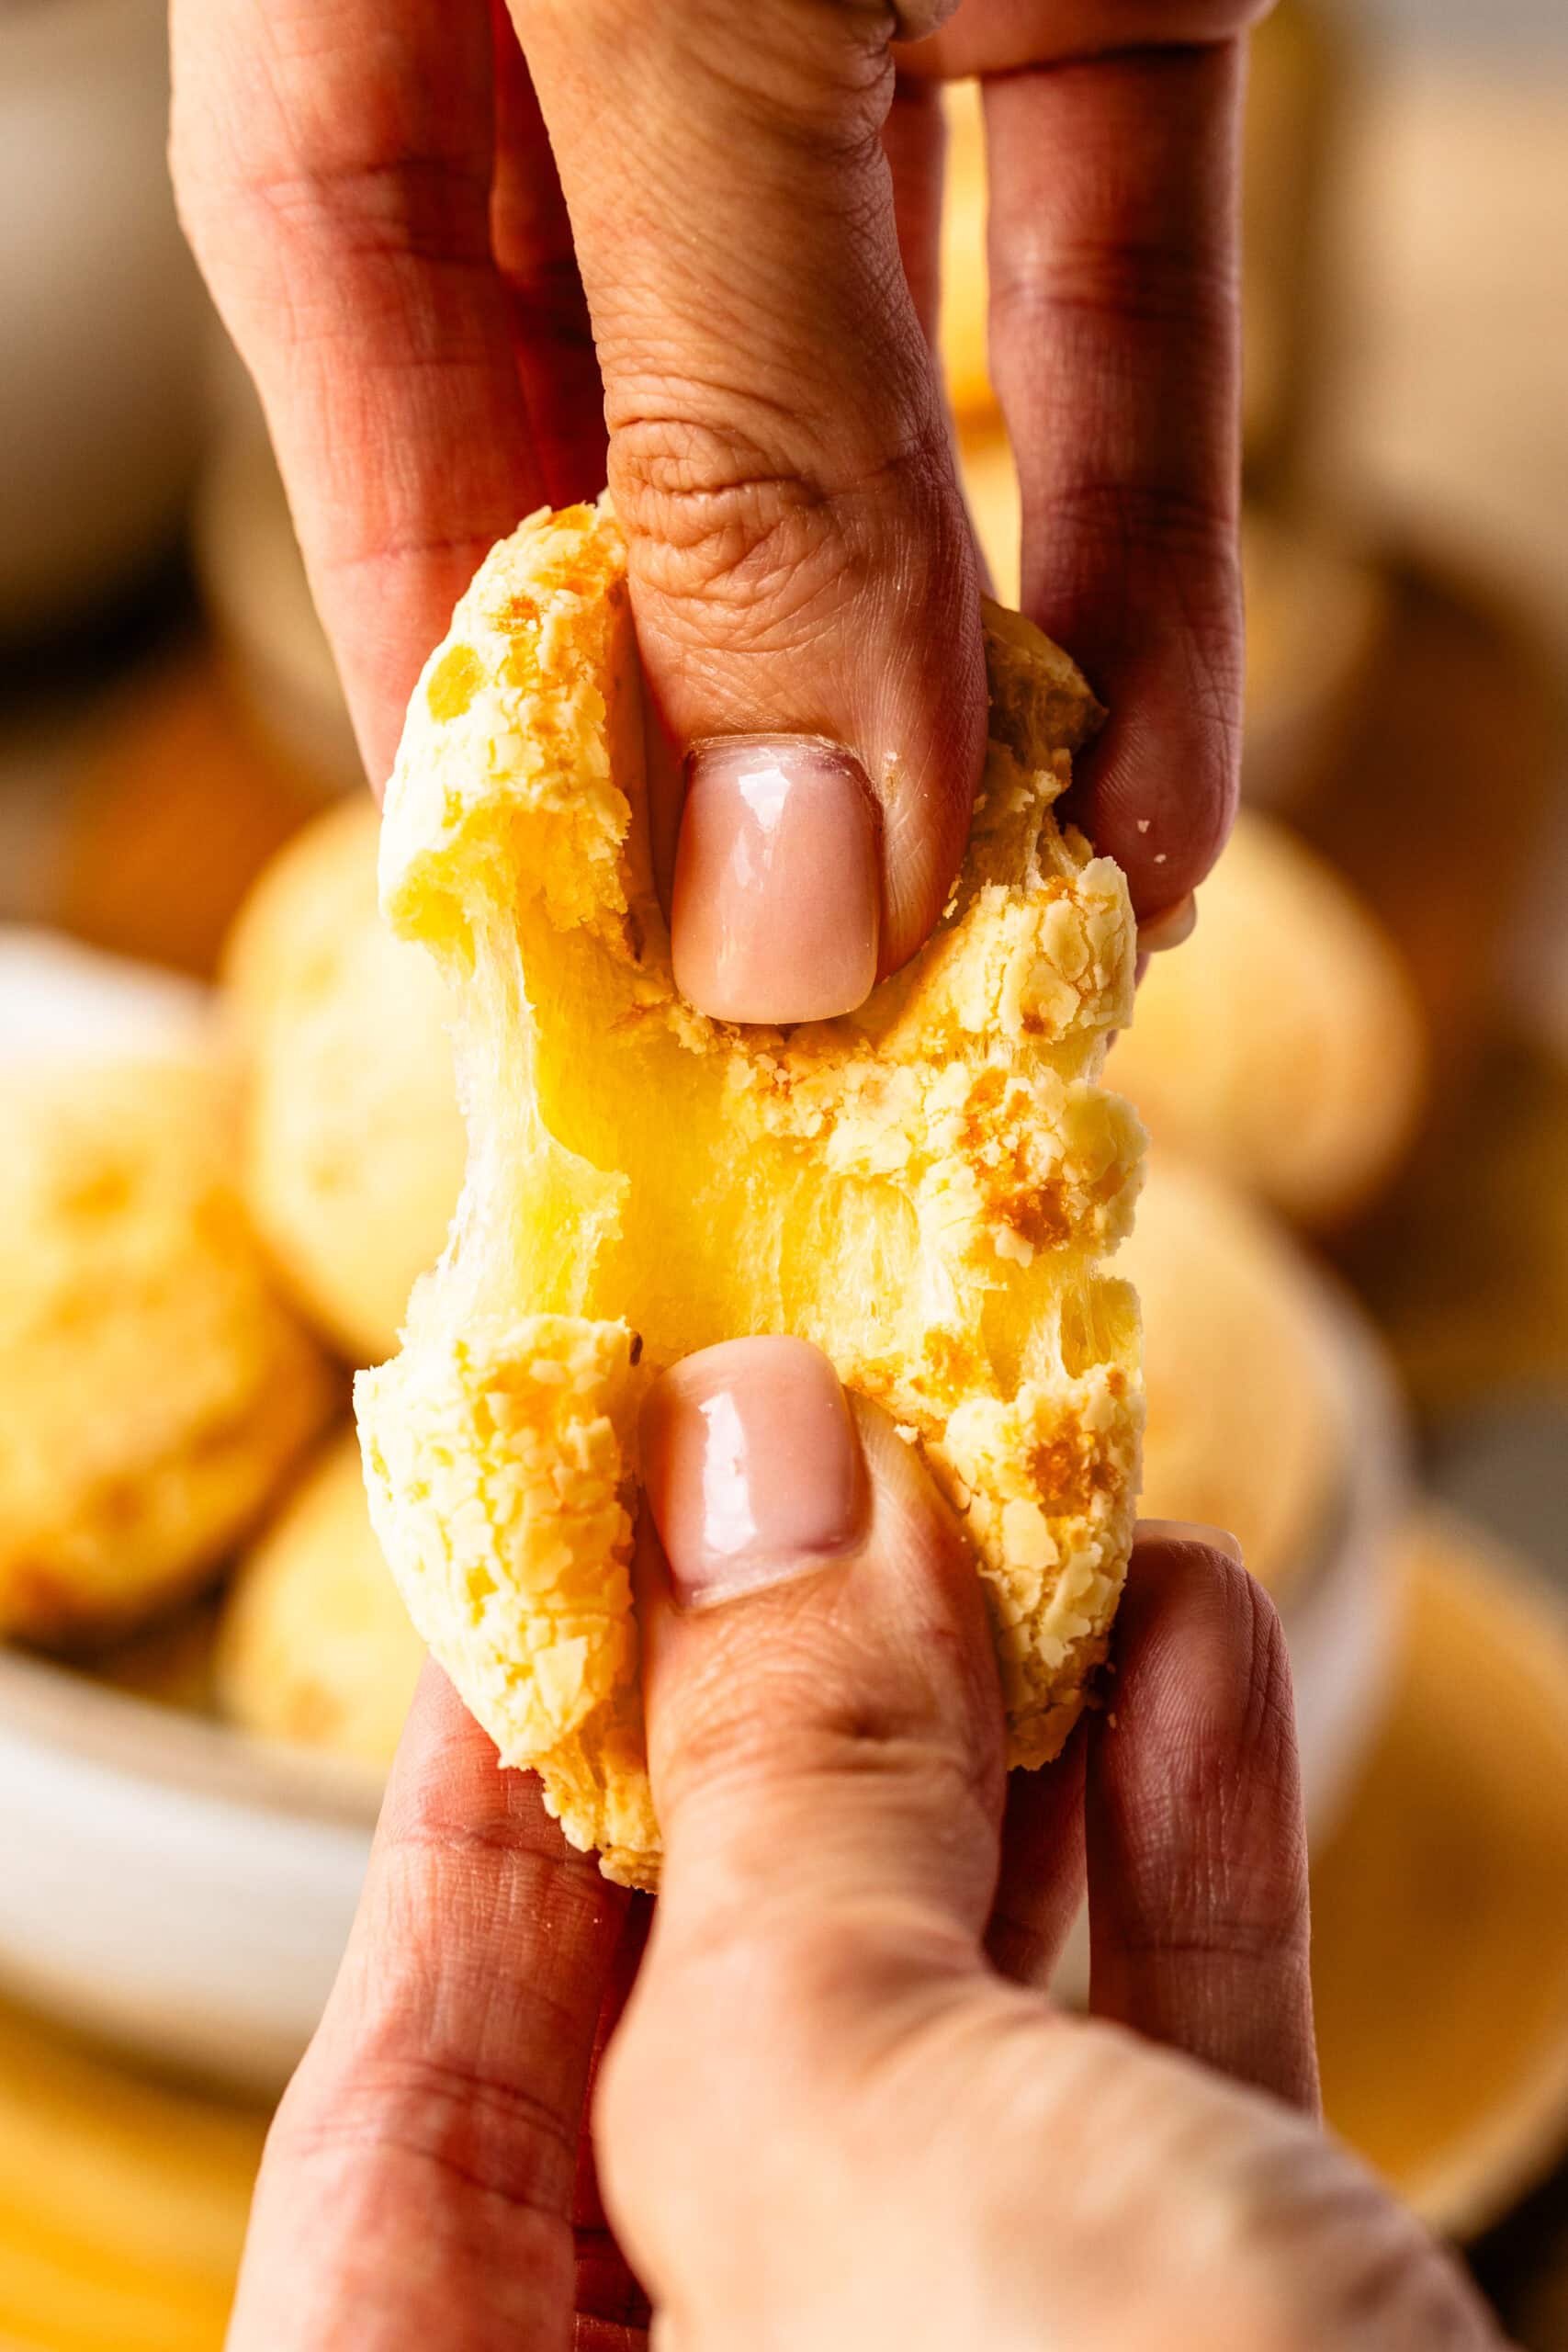
I make this pão de queijo recipe a couple of times a month because my son loves it, and making it at home is far better (and cheaper) than buying frozen versions at the store. Growing up in Brazil, pão de queijo was a regular part of my life, and this is the version I stick with now because it consistently delivers the texture I care about—chewy centers, lightly crisp shells, and real, satisfying cheese flavor.
I usually make a big batch and freeze the dough so I can bake pão de queijo whenever we want, straight from the freezer. It’s one of those recipes that fits easily into real life and still feels special every time it comes out of the oven.

In Brazil, these cheesy rolls are a staple and you can find them anywhere — from gas stations to bakeries to corner stores. Whether it’s breakfast with coffee, a cozy afternoon snack, or something to share with friends, pão de queijo is always present at our table.
This post may contain affiliate links. I earn a commission from qualified purchases. Please read our Privacy policy here.
Why you’ll love this recipe
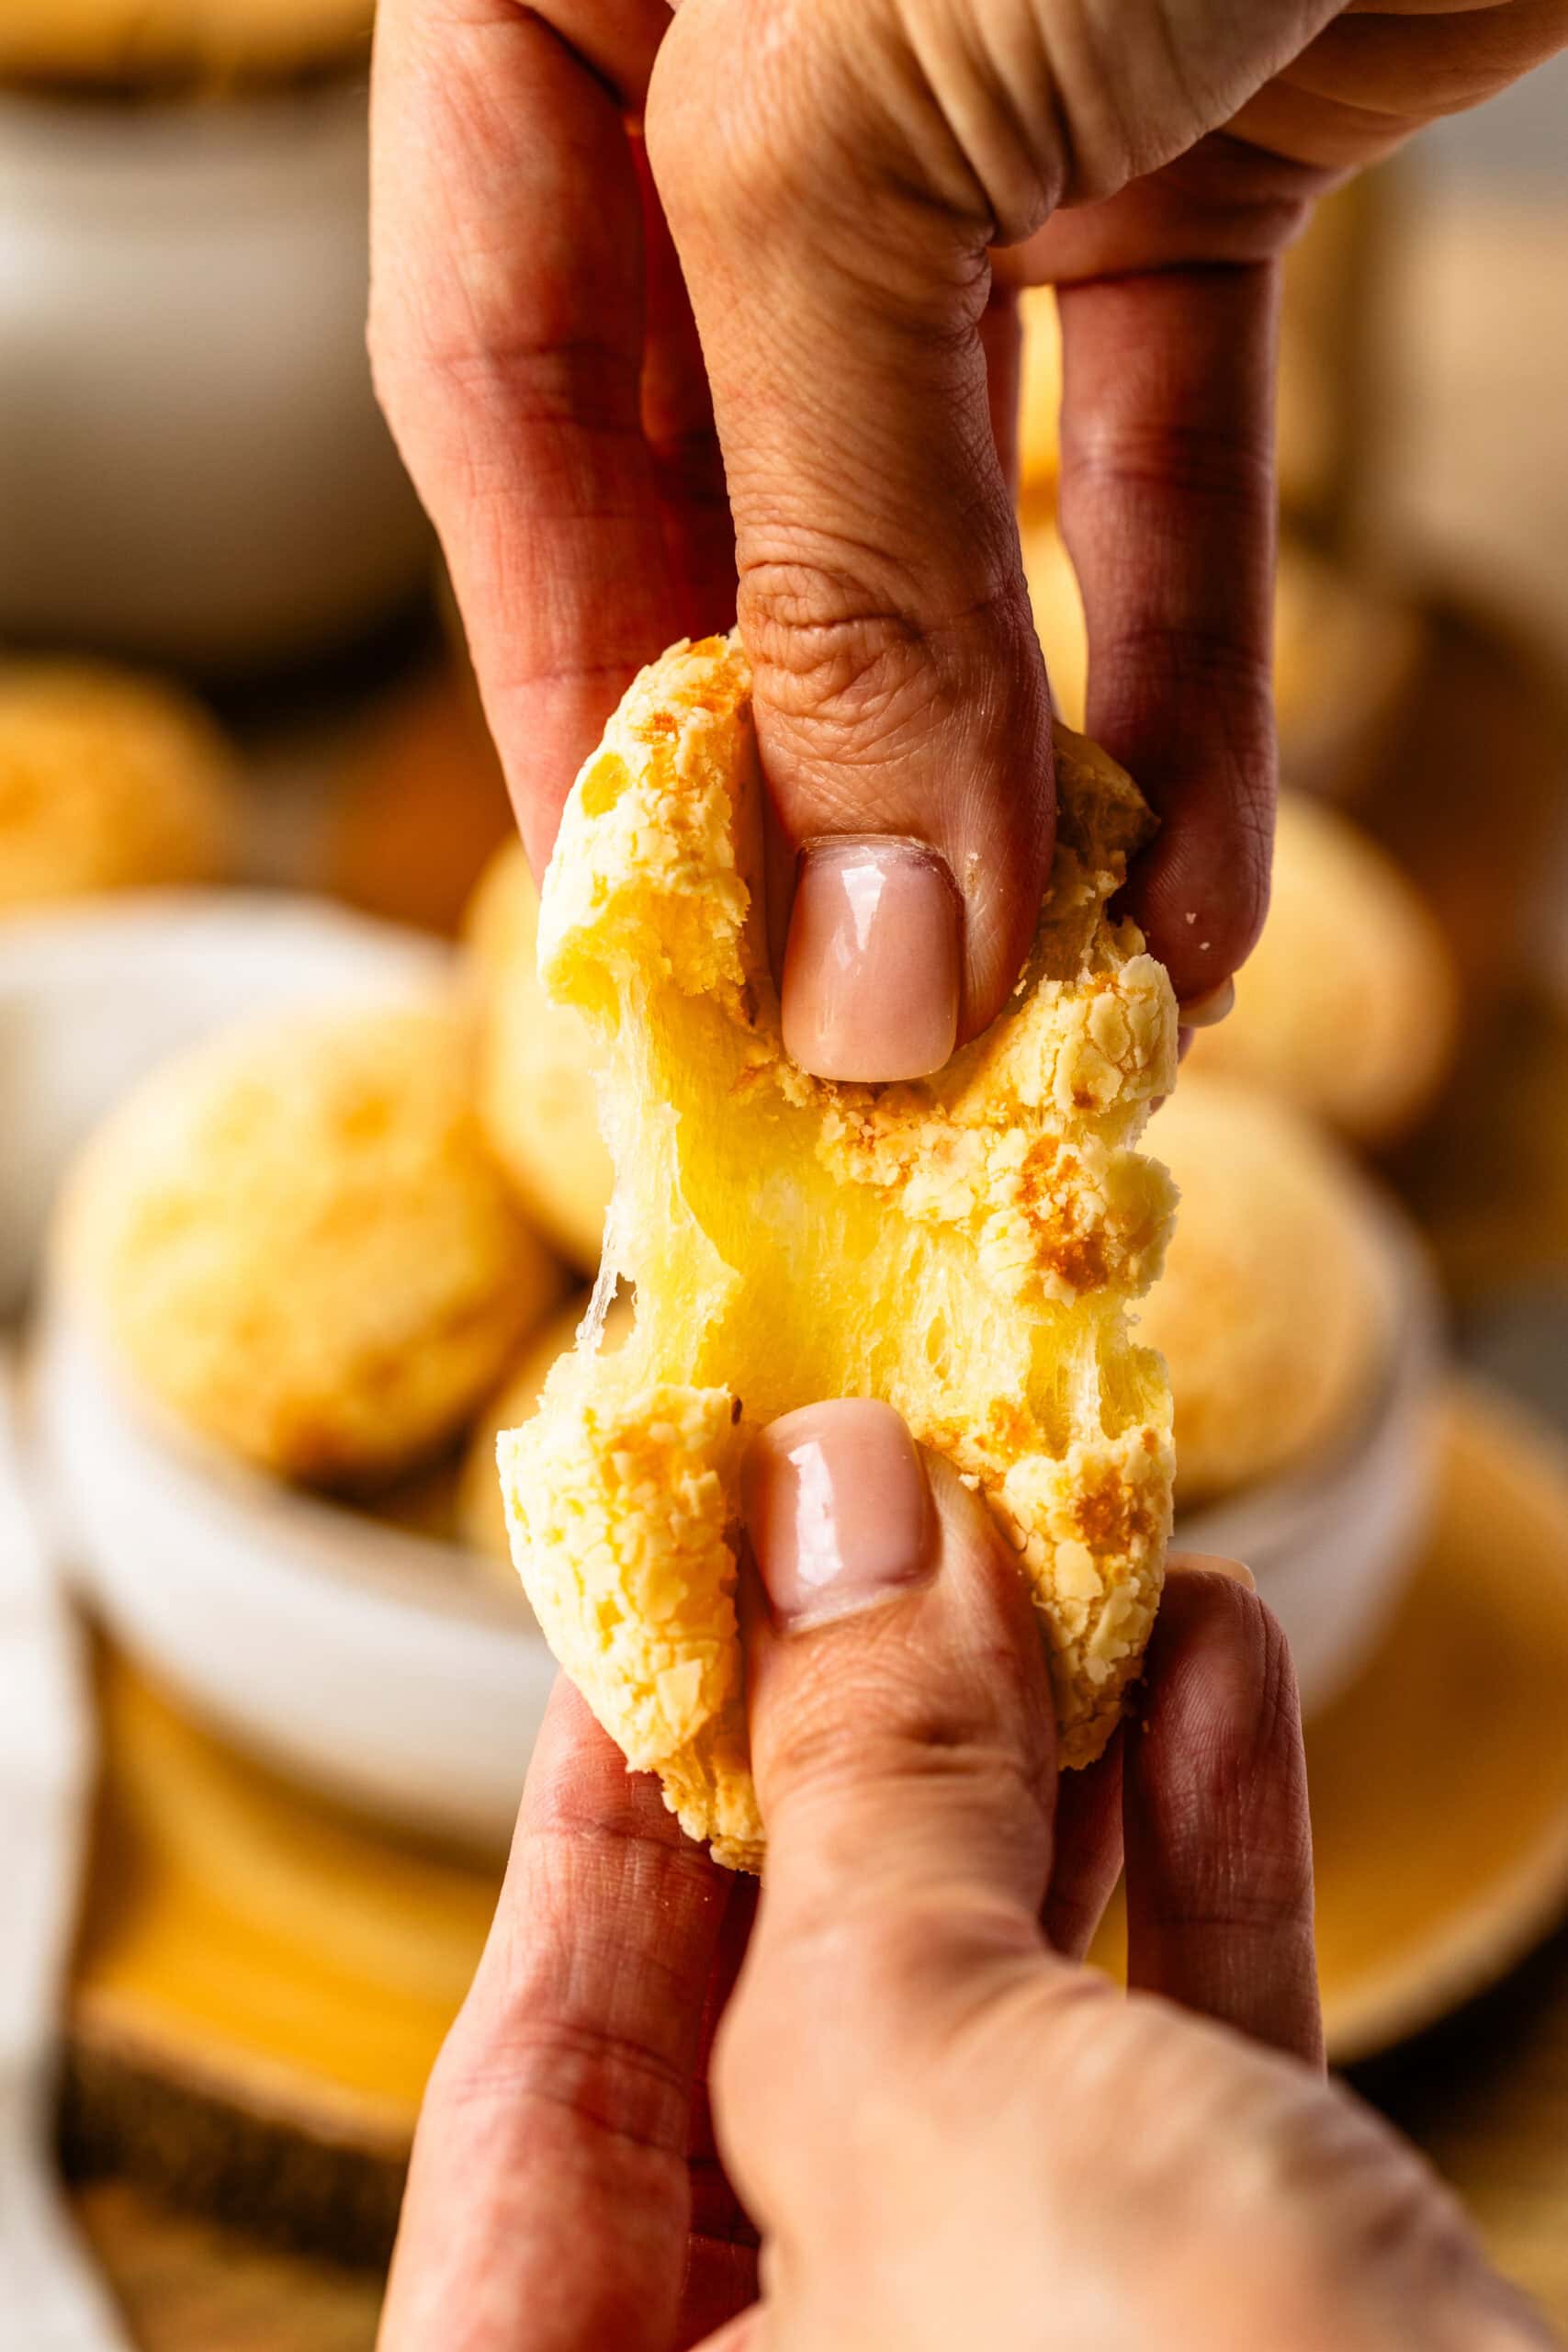
- The texture is reliable. The centers stay chewy and stretchy, while the outside bakes up lightly crisp without drying out.
- It works with ingredients you can actually find. I explain how I make it with U.S. grocery store tapioca flour and how to adjust if you have Brazilian polvilho.
- It’s freezer-friendly and practical. I make the dough once, freeze it, and bake as needed—perfect for quick snacks or breakfast.
- The cheese flavor comes through clearly. This version avoids greasiness and gumminess, so the cheese tastes clean and balanced.
- It’s a recipe you’ll actually repeat. Simple enough for regular use, but good enough to serve to friends. Many people report making this recipe over and over!
The Recipe
This is my go-to pão de queijo recipe—soft and stretchy on the inside, crisp and golden on the outside, and loaded with cheesy flavor. I’ve been sharing it for years on my Instagram, and kept being asked to write a post about it so people could have easier access to it. So here it is!
Find the full ngredients, baking time, and step by step instructions in the recipe card at the bottom of this post!
Key ingredients & how I use them
- Tapioca flour: I use regular tapioca flour most of the time, which you can find at most U.S. grocery stores. It works reliably and gives the chewy texture I’m looking for. When I have access to Brazilian polvilho, I sometimes use it instead, which I explain in more detail below. You can find polvilho on Amazon or at specialty Brazilian grocery stores.
- Eggs: These help bind the dough and give it elasticity.
- Milk & oil: Heating them before mixing gelatinizes the starch, which is key for the chewy texture.
- Cheese: I use cheeses that give salt and structure without excess moisture so the centers don’t turn gummy.
- Salt: Just enough to balance the cheese.
That’s it. No wheat flour, no yeast. The dough is naturally gluten-free and gets its structure from the gelatinized tapioca starch and the eggs.
Cheese Matters
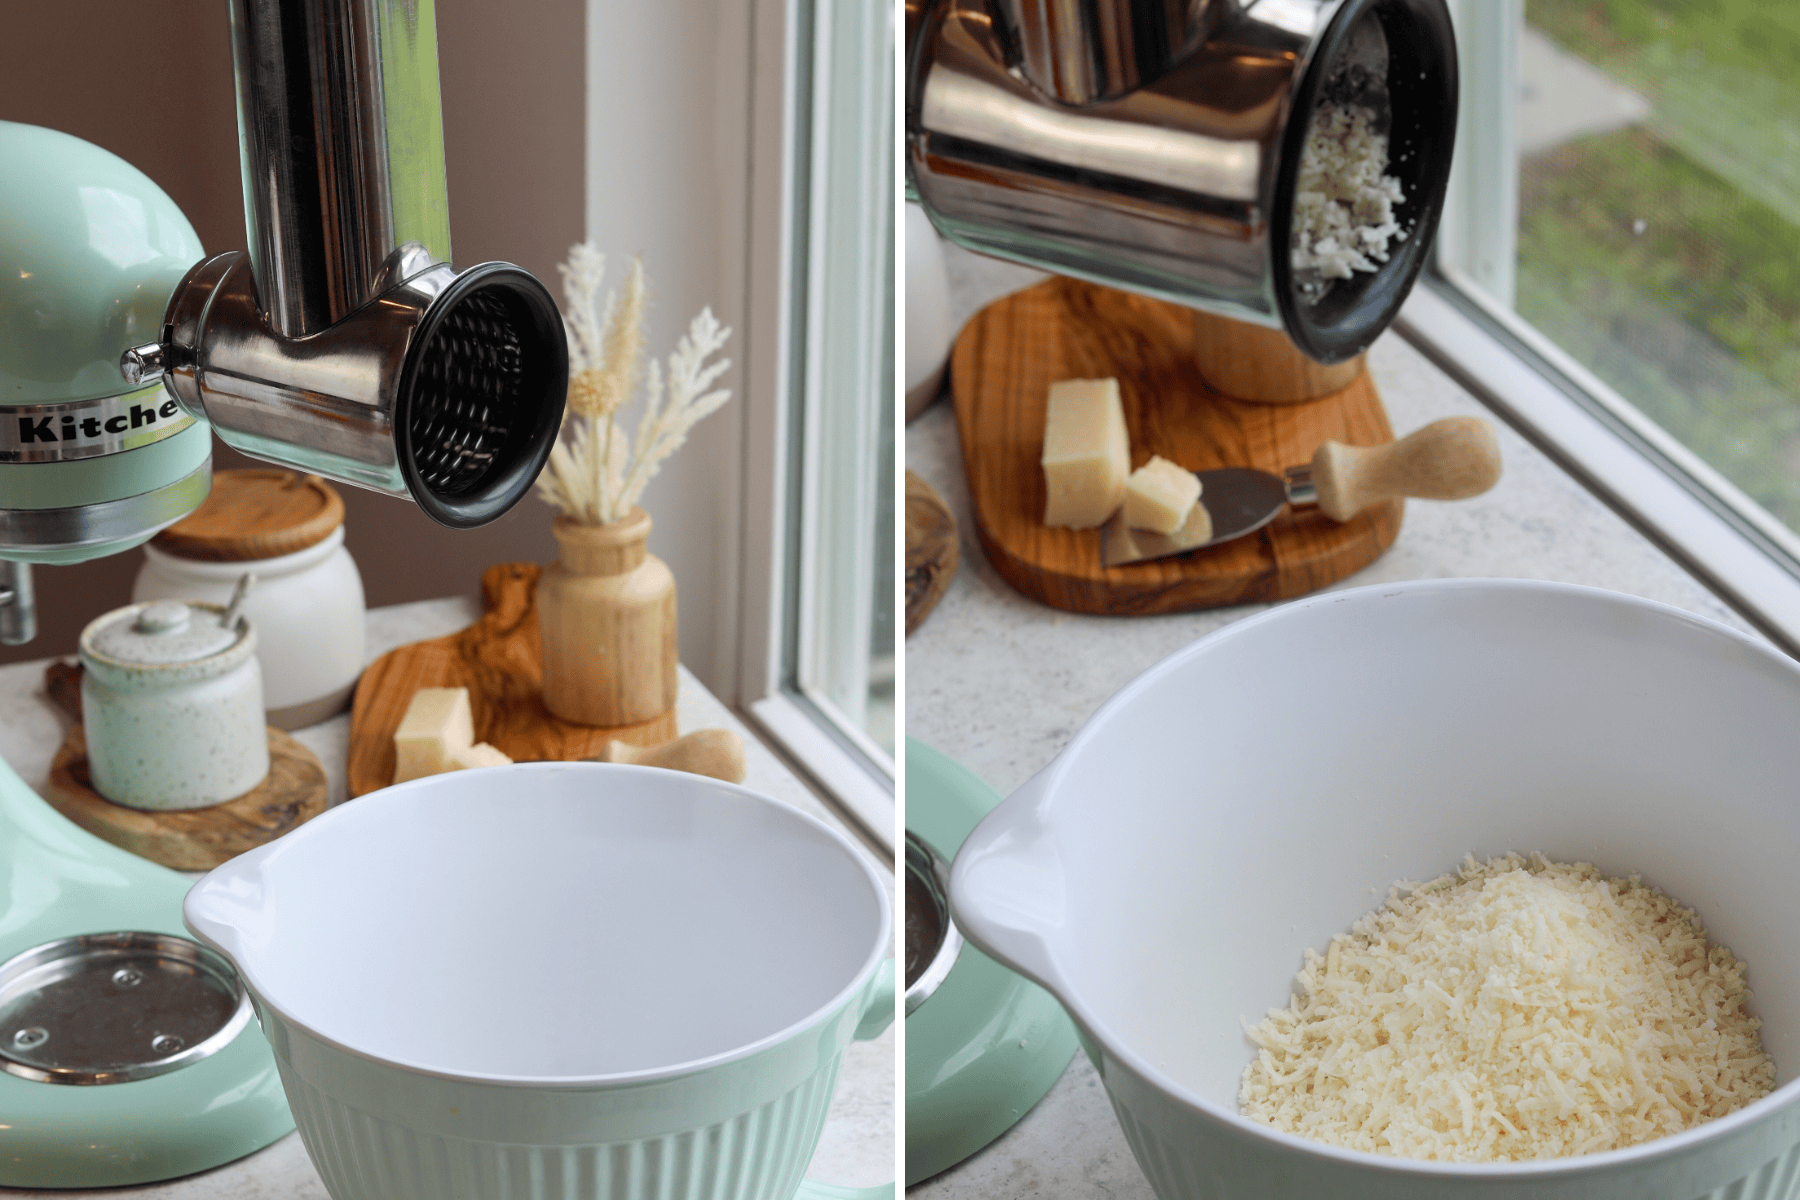
Traditional pão de queijo is made with queijo meia cura, a semi-aged Brazilian cheese that’s hard to find outside Brazil. I’ve tested a lot of substitutes over the years, and the combination I use most often is cotija and parmesan. Cotija gives that salty, crumbly quality similar to meia cura, while parmesan adds sharpness without making the dough greasy.
This combination gives me consistent structure and flavor using ingredients I can reliably find.
Let’s get started!
Make the Pão de Queijo Dough
The full printable recipe is below, but here’s how I make it step by step.
Step 1: Prep the ingredients
I start by shredding the cheese and measuring out all the ingredients. Having everything ready makes the process smooth, especially once the hot liquid is involved.
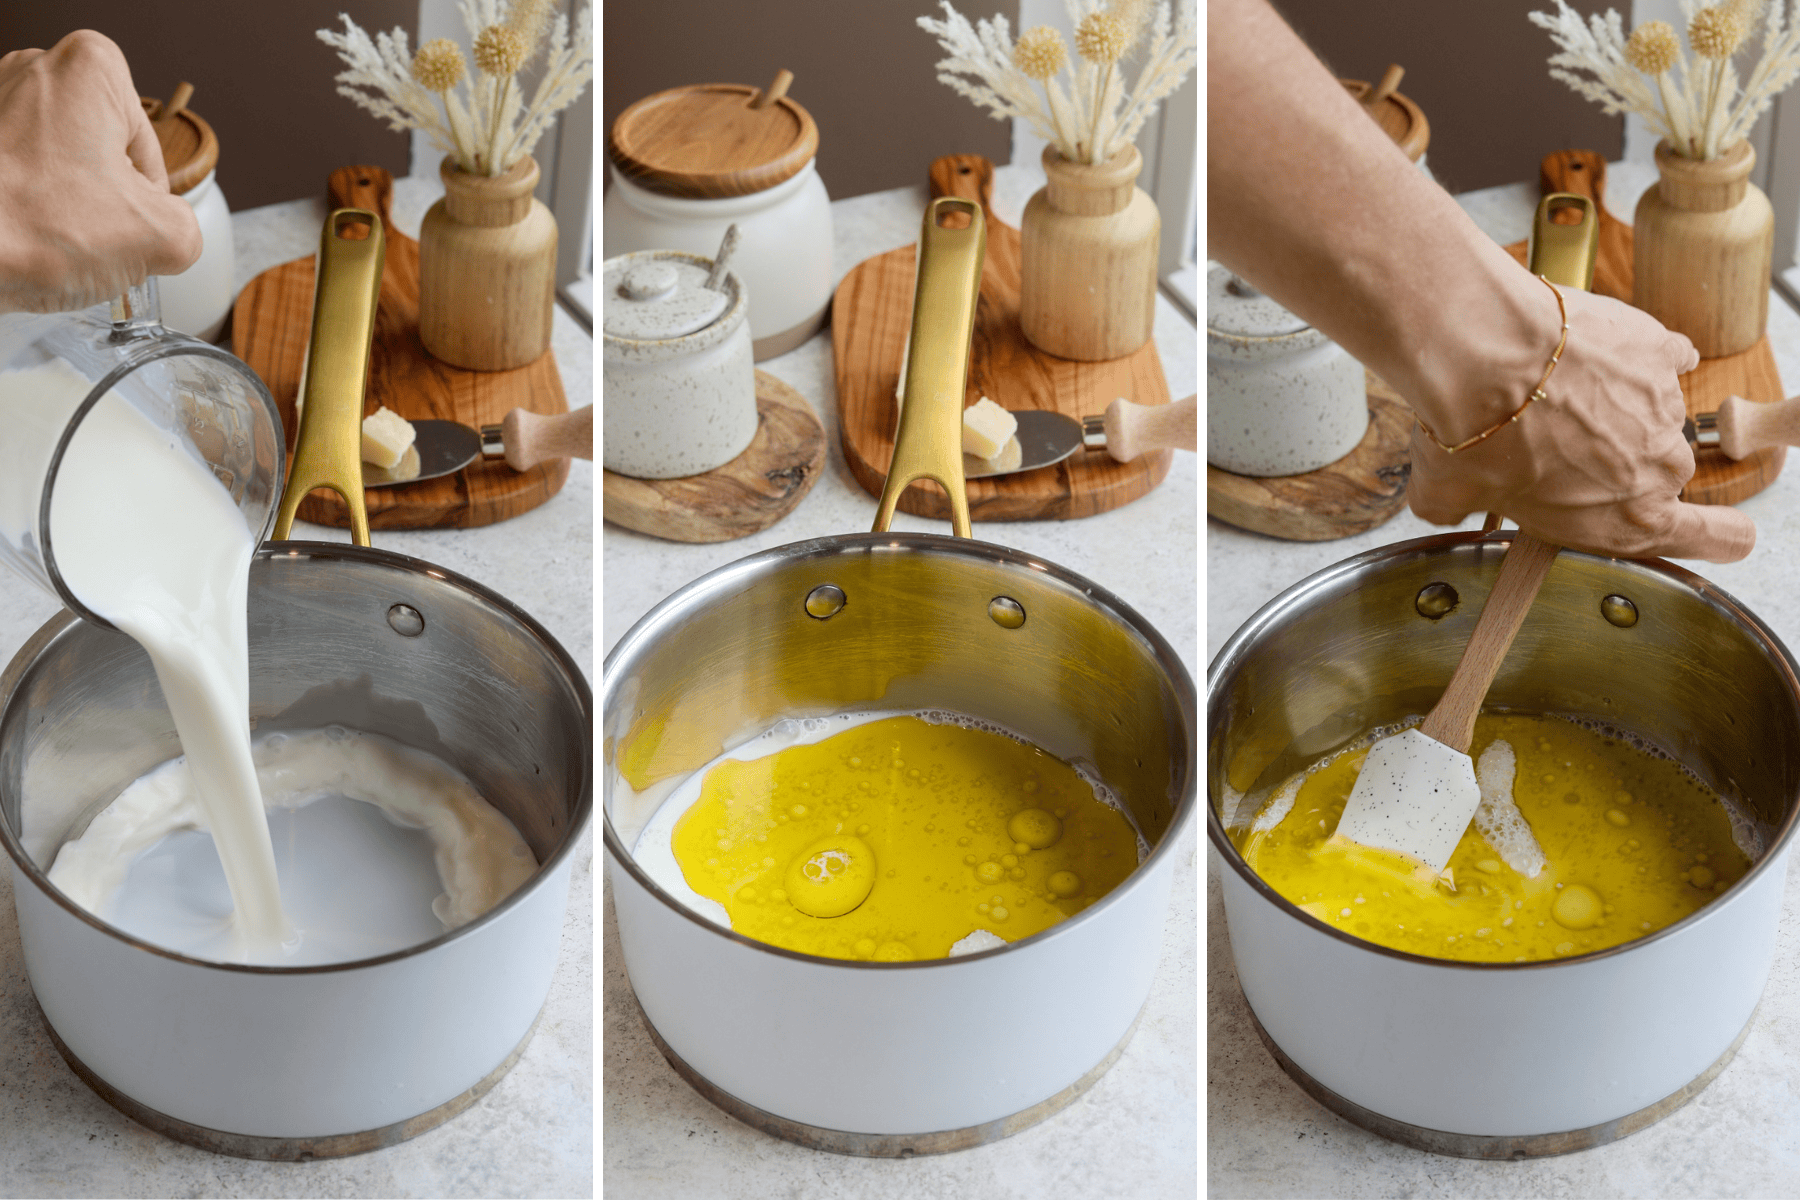
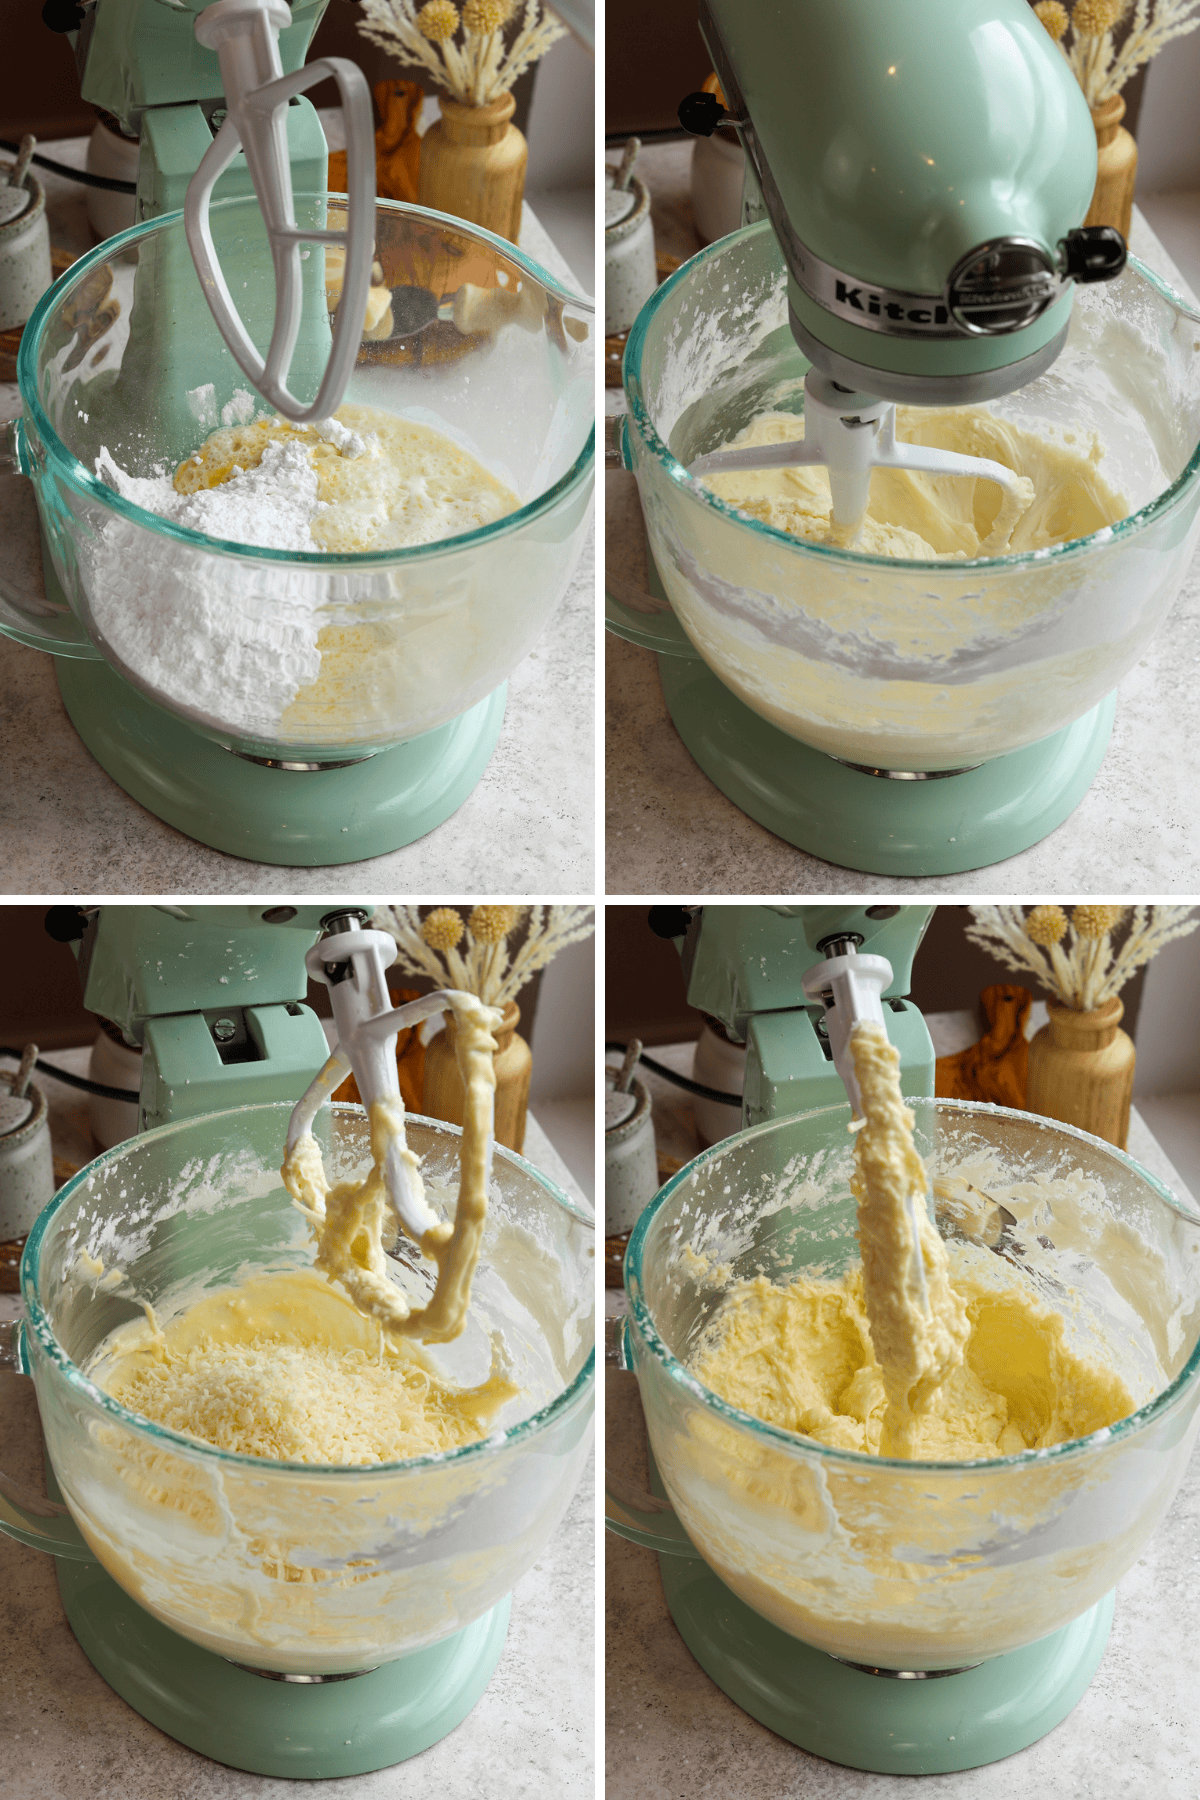
Step 2: Heat the liquids
I heat the milk, vegetable oil, and salt together in a saucepan just until it starts to simmer. I avoid letting it boil—too much heat here can affect the final texture.
Step 3: Pour the milk over the tapioca
I pour the hot milk mixture over the tapioca flour and stir until combined. This step is essential—it’s what gelatinizes the starch and gives pão de queijo its signature chewy structure.
Step 4: Add the eggs
I let the dough cool slightly, about 5 minutes, then mix in the eggs one at a time. Adding them gradually helps them fully incorporate; if they go in all at once, the dough can look separated or uneven.
Step 5: Stir in the cheese
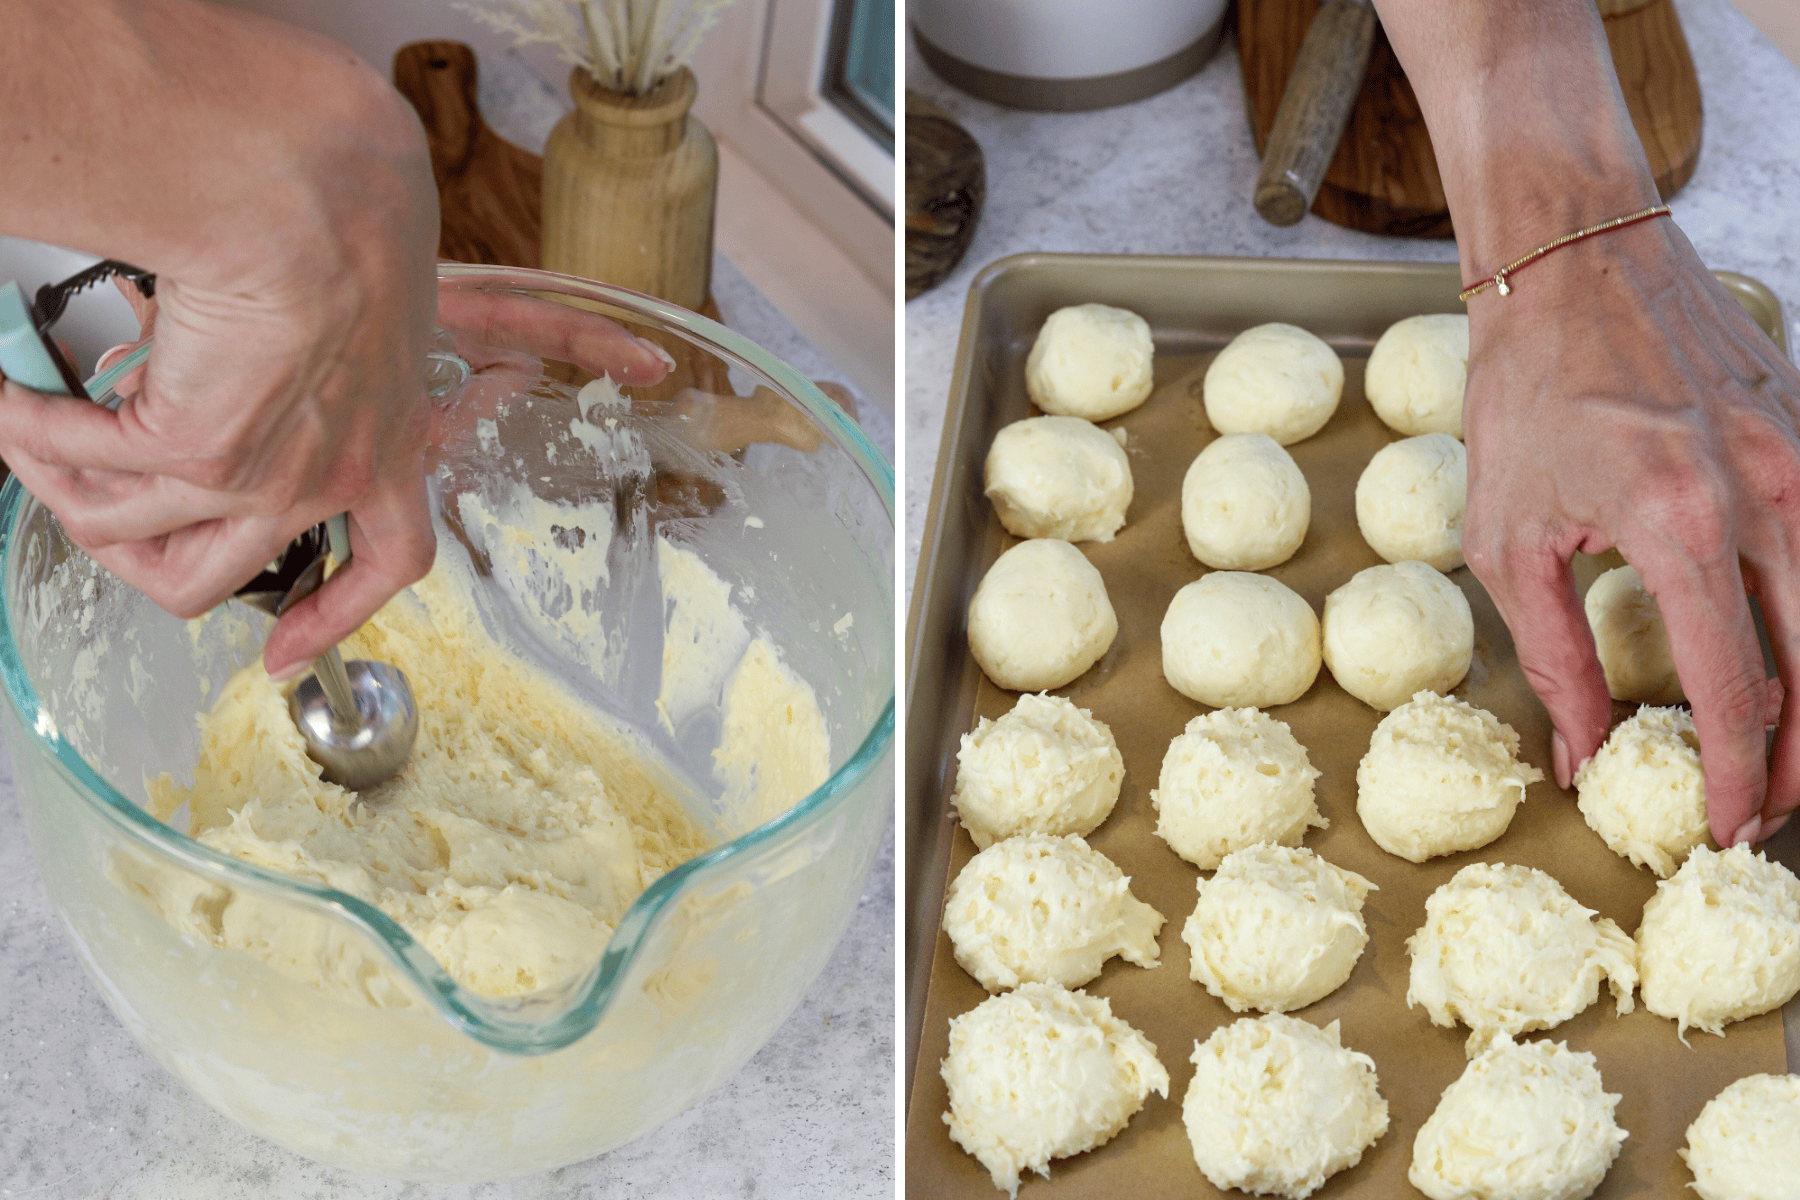
I mix in the shredded cheeses until the dough is sticky and elastic. If the dough feels too soft to shape comfortably, I chill it briefly to firm it up before rolling.
Shaping and Baking
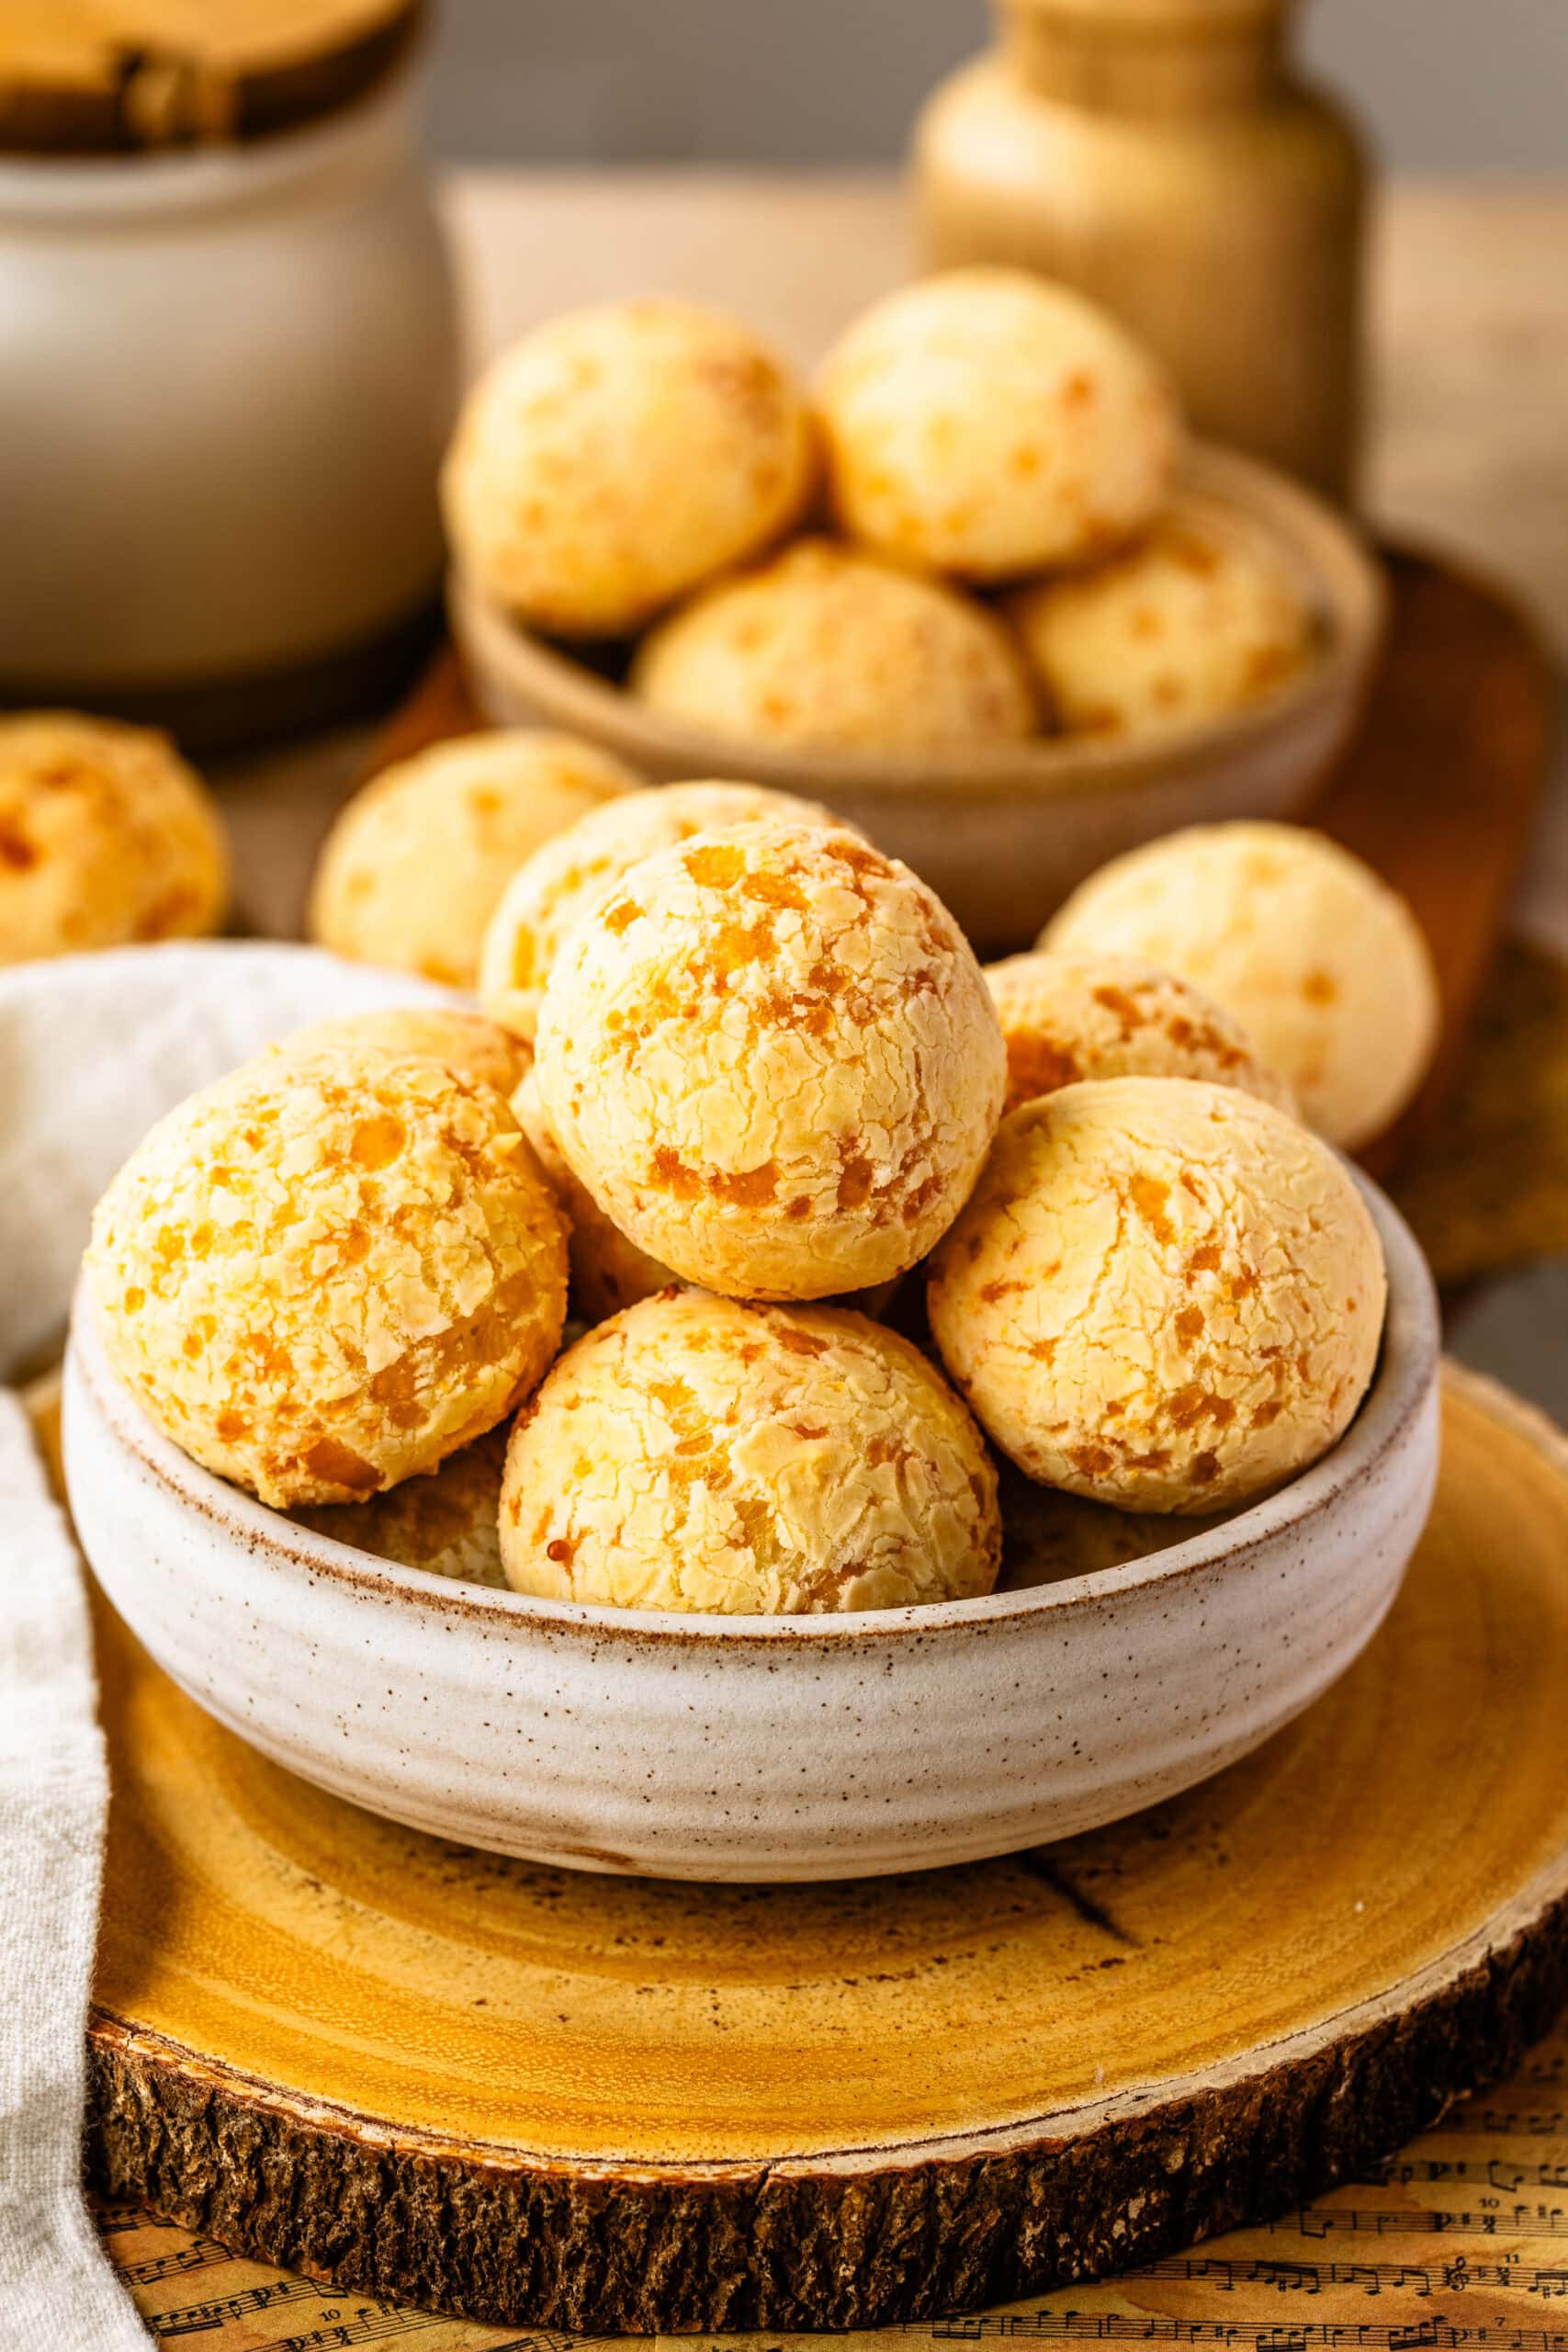
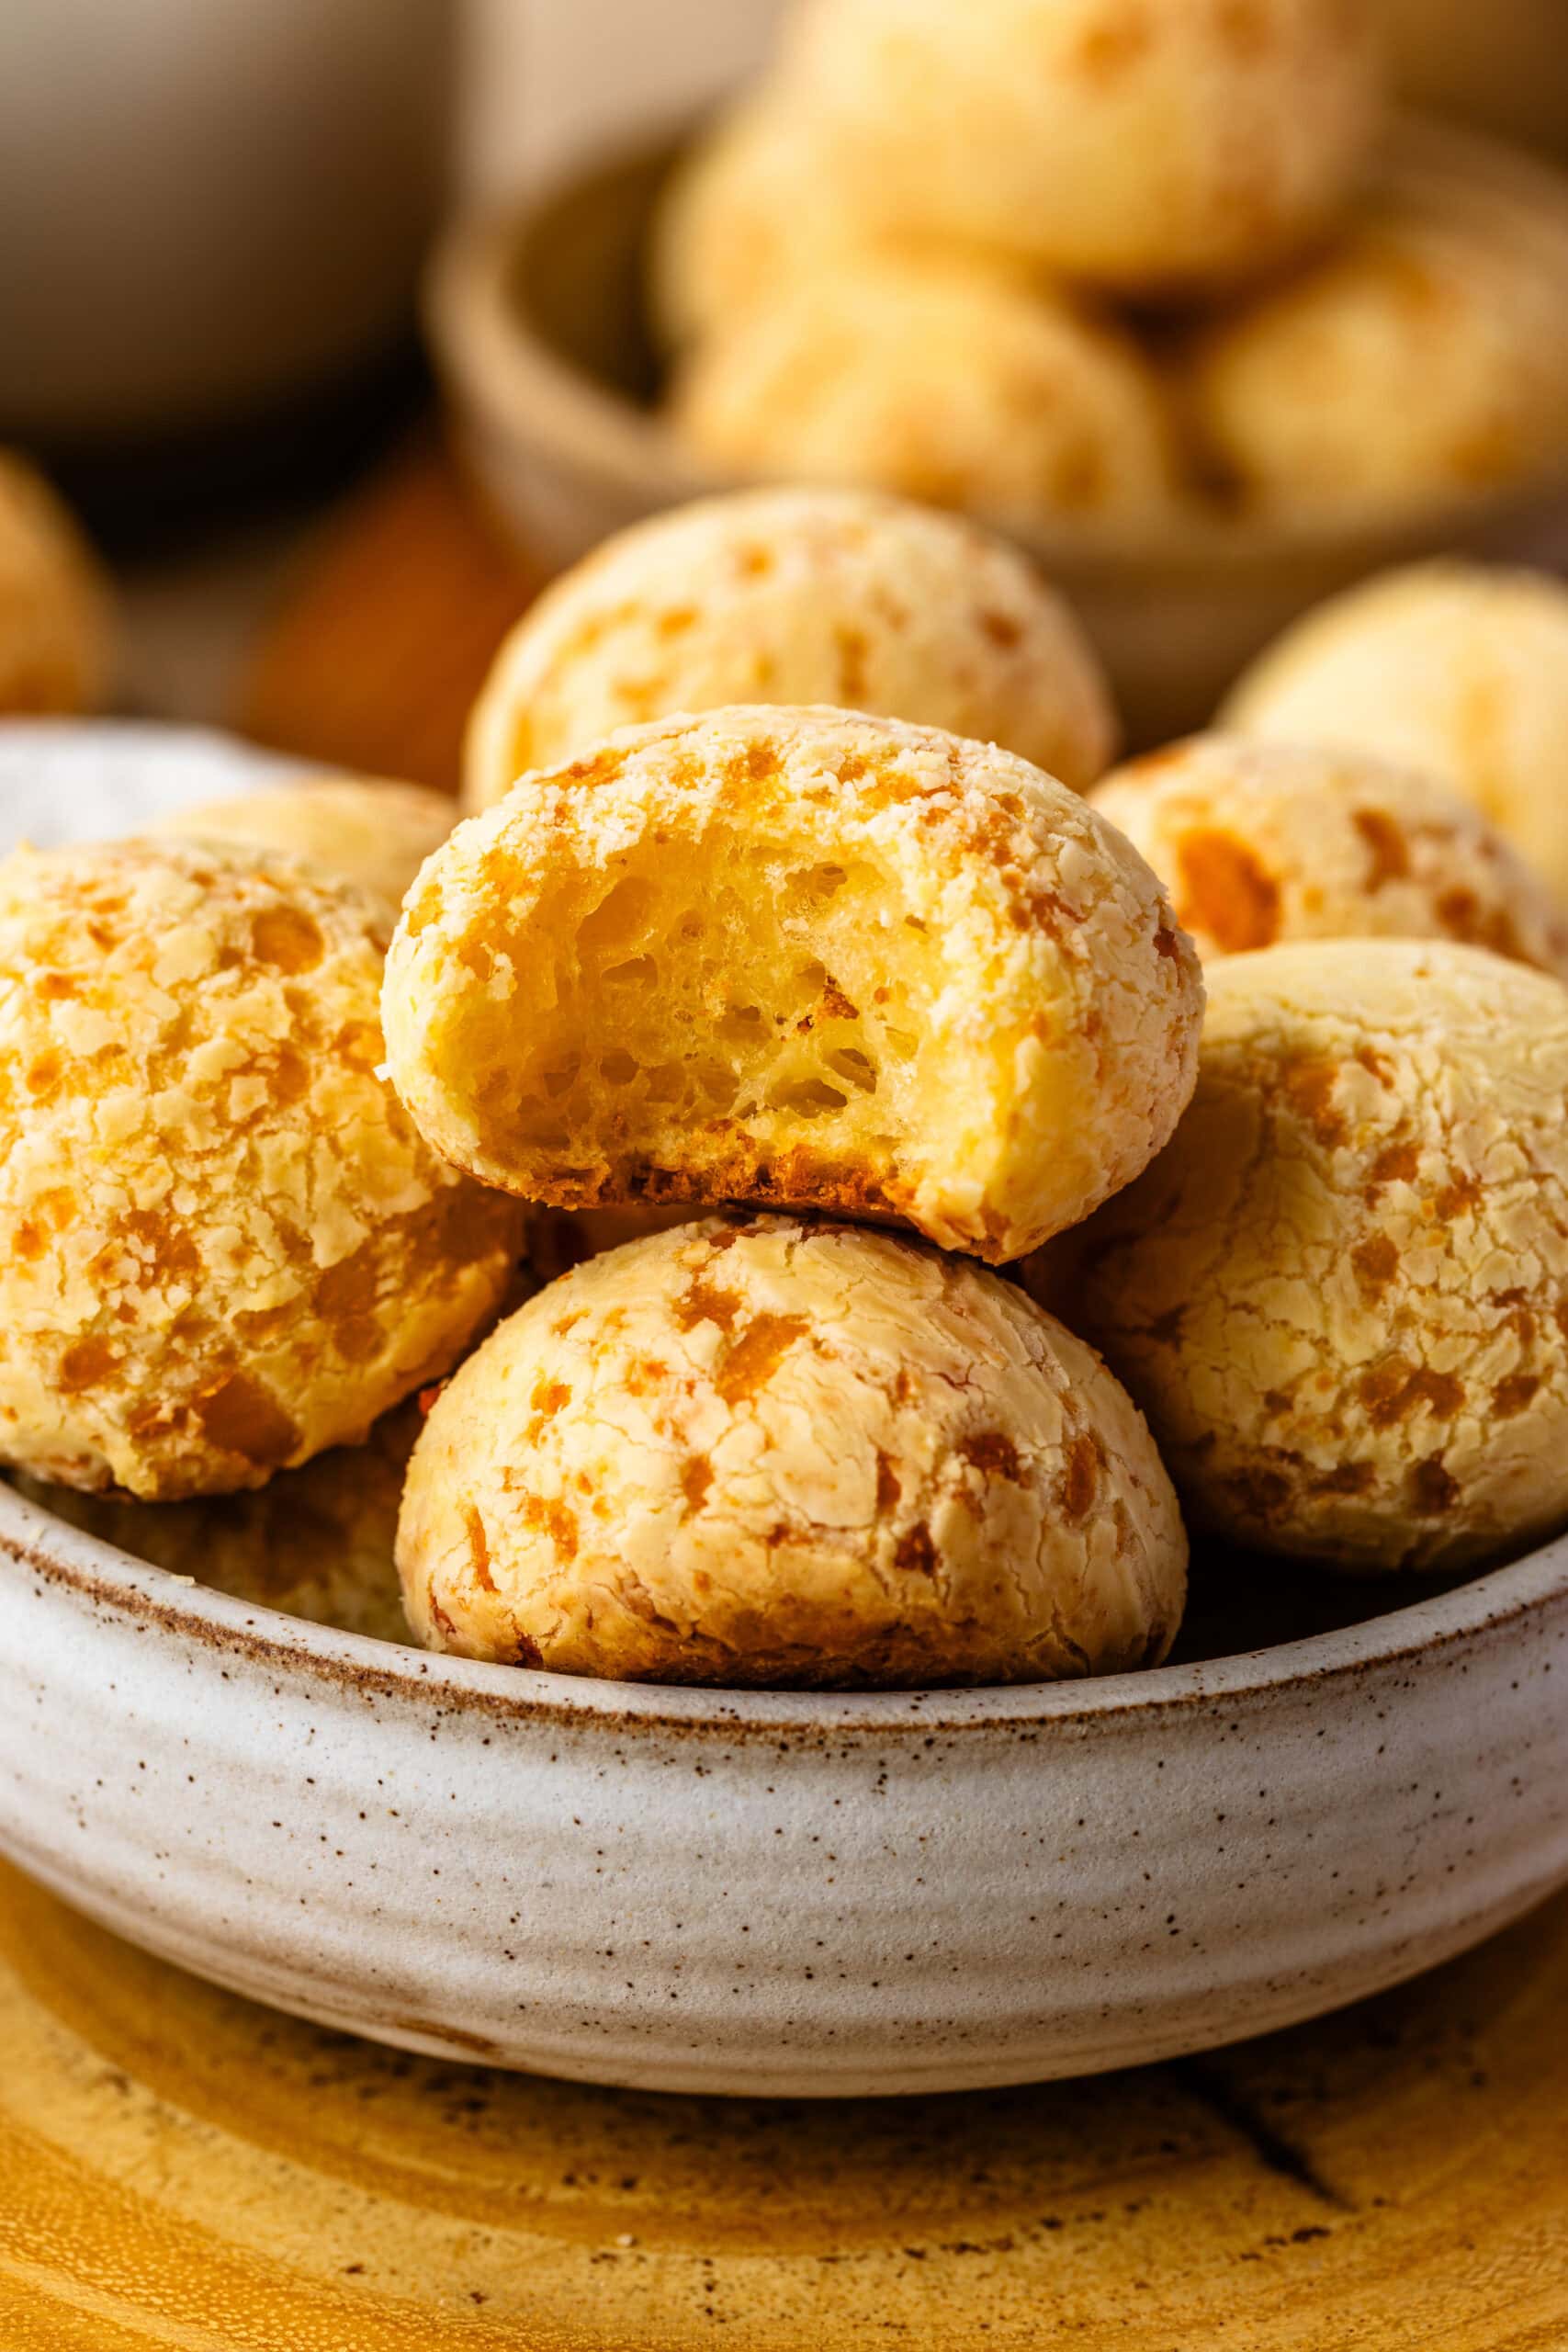
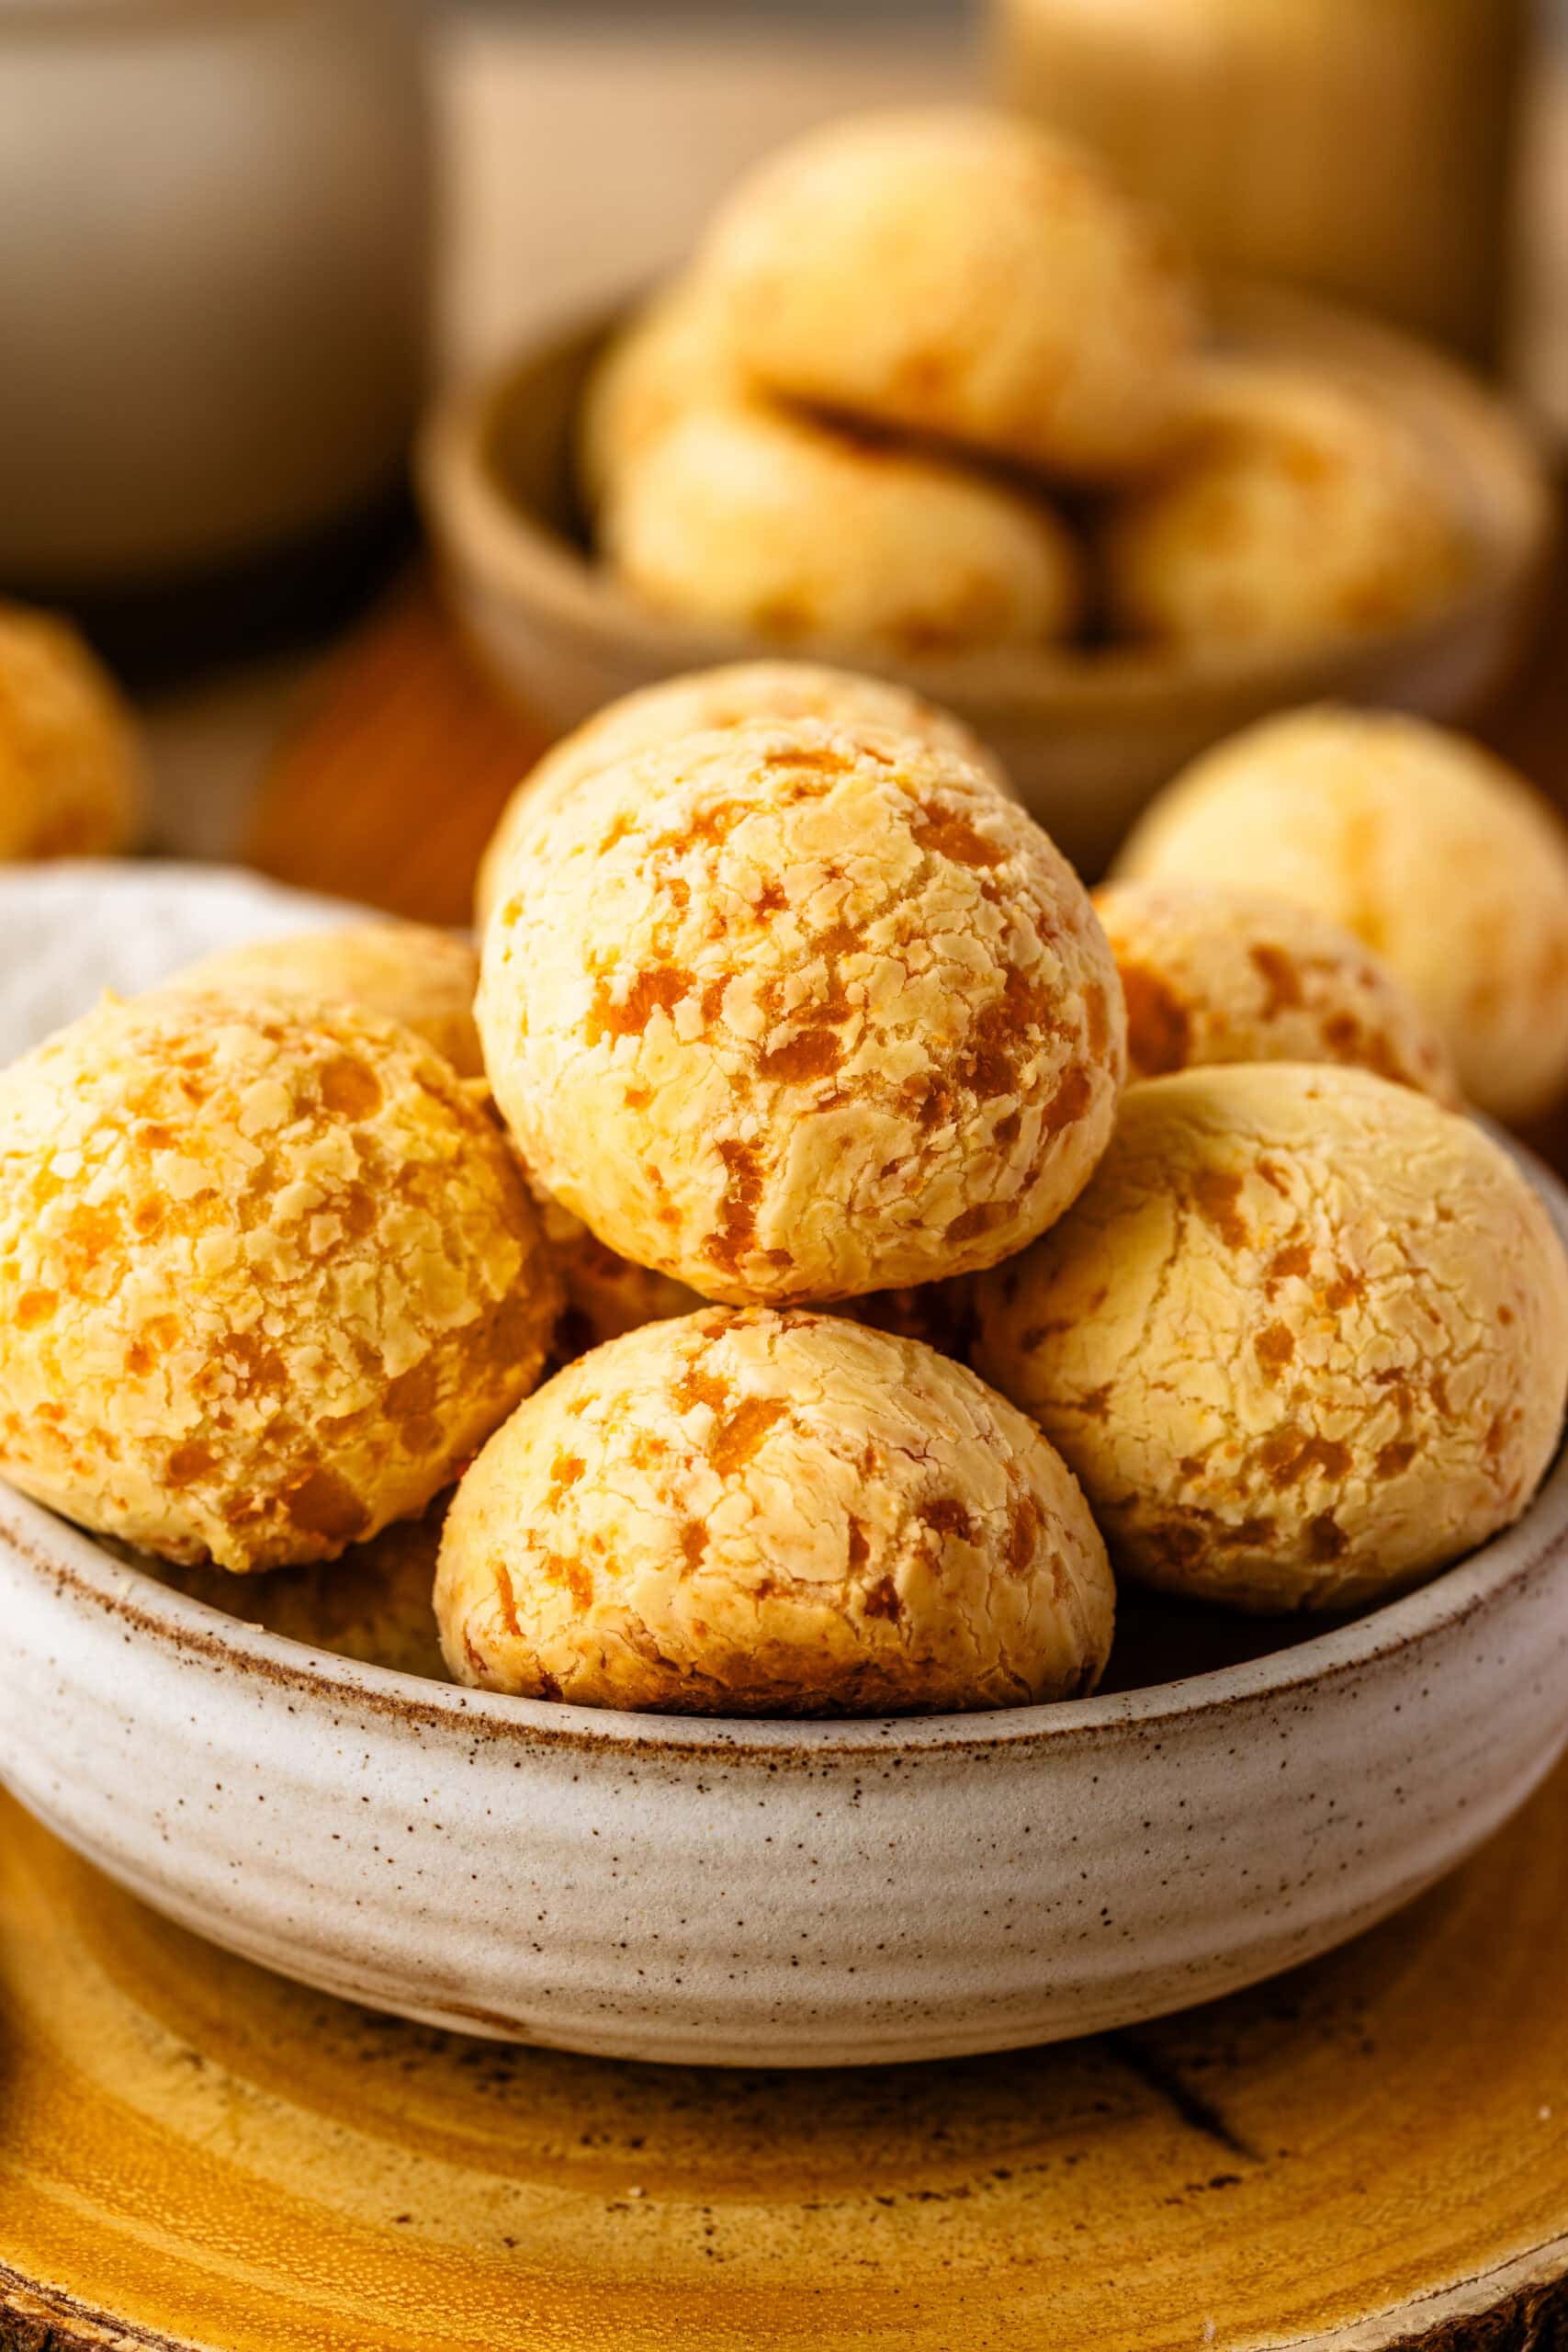
Scoop and roll the dough into small balls (about the size of a golf ball) and place them a couple of inches apart on lined baking sheets. Bake at 375°F until puffed and lightly golden, about 20–25 minutes. Pão de queijo is best enjoyed warm from the oven, when the centers are still soft and cheesy and that chewy texture is just perfect.
Storage
To freeze unbaked:
I shape the dough into balls, freeze them on a baking sheet, then transfer them to a freezer bag. They can be baked straight from the freezer—just add about 5 extra minutes to the bake time.
To freeze baked:
Let them cool completely, then store in an airtight container or freezer bag. I reheat them in a 350°F oven for 5–8 minutes until warmed through. They’re best fresh, but this works well for leftovers.

Tips & Tricks
- If you have access to Brazilian polvilho, a 50/50 mix of sweet and sour gives excellent structure.
- I avoid olive oil here—it makes the dough too loose. A neutral oil works best. I’ve ruined a couple of batches of pão de queijo by using olive oil, until I realized that was the issue.
- If the dough feels too soft to roll, a short chill makes it much easier to handle. You can also scoop it into a muffin pan and bake it that way.
Variations
- Mozzarella + provolone: A milder, extra-melty version that keeps the texture soft and stretchy.
- Cheddar: Use sparingly for a sharper flavor. Too much cheddar can make the centers dense or gummy. Substitute up to 2 tbsp of parmesan cheese for cheddar.
- Herbs: Add a small pinch of dried oregano or thyme for a subtle savory note.
- Bacon: Fold in about ¼ cup cooked bacon bits for a salty, savory variation. I make sure the bacon is fully cooked and cooled so it doesn’t add excess moisture. Also make sure it’s chopped very finely. Add at the very end of mixing the dough.
- Garlic: Add ¼ to ½ teaspoon garlic powder to the tapioca flour for a gentle garlic flavor that doesn’t overpower the cheese.
Pão de Queijo – FAQ
1. Why didn’t my pão de queijo puff as much as expected? This usually comes down to starch type or oven temperature. Using a mix of sweet and sour polvilho gives more lift, and a fully preheated oven makes a noticeable difference.
2. How do I handle sticky, hard-to-shape dough? This dough is naturally stretchy and tacky. If it’s too soft to roll into balls, chill it in the fridge for 20–30 minutes—this will help firm it up so it’s easier to shape. You can also bake it in greased muffin tins.
3. Can I make these dairy-free? This recipe relies heavily on cheese for both structure and flavor, so I don’t recommend dairy-free substitutions here.
4. Why does my pão de queijo dough feel dry or crumbly? This usually means the dough didn’t get enough moisture or the starch wasn’t fully hydrated. Make sure the milk and oil are poured over the tapioca flour while they’re still hot so the starch gelatinizes properly. If the dough still feels dry, let it rest for a few minutes—tapioca starch continues to absorb liquid as it sits.
Similar Recipes
If cheesy breads are your thing, I also have recipes for Cheddar Biscuits, Baked Brie, and Spinach Puffs. They’re all simple, comforting, and perfect for sharing.
Can’t wait to see your pão de queijo! If you make it, tag me on Instagram @piesandtacos so I can drool over your cheesy creations.

Pão de Queijo Recipe
Ingredients
- 4 cups tapioca flour 1 lb
- 1¼ cup milk
- ⅓ cup vegetable oil (DO NOT use olive oil)
- 2 tsp salt
- 2 eggs
- 1 cup cotija cheese or mozzarella
- 1 cup parmesan cheese
Instructions
- Preheat the oven to 375°F (190°C). Line two baking sheets with parchment paper or silicone mats.
- In a saucepan, combine the milk, oil, and salt. Heat over medium heat until the mixture just comes to a boil. Watch it closely. Once it starts bubbling, remove it immediately from the heat.
- Place the tapioca flour in a large mixing bowl, or in the bowl of a stand mixer. Pour the hot milk mixture over the flour. Stir with a sturdy wooden spoon or with the paddle attachment until the mixture is evenly combined. It will look sticky and clumpy, that’s normal.
- Allow the mixture to cool for about 5 minutes.
- Crack in the eggs, one at a time, mixing well after each addition. The dough will be sticky and stretchy. Then, add the cotija and parmesan cheeses. Mix until fully combined, you can use your hands to knead it together if needed.
- If the dough is too loose to roll, chill it for 20–30 minutes to firm up. If too dry, add a splash more milk.
- Scoop about 1½ tablespoons of dough and roll into balls (about golf-ball size). Arrange them on the baking sheets, spacing a couple of inches apart.
- Bake for 20–25 minutes, or until the pão de queijos are puffed and golden.
- Pão de queijo is best enjoyed fresh out of the oven.
- Leftovers can be reheated in a toaster oven or frozen after baking.
the best pao de queijo recipe I’ve ever made.