German Chocolate Macarons
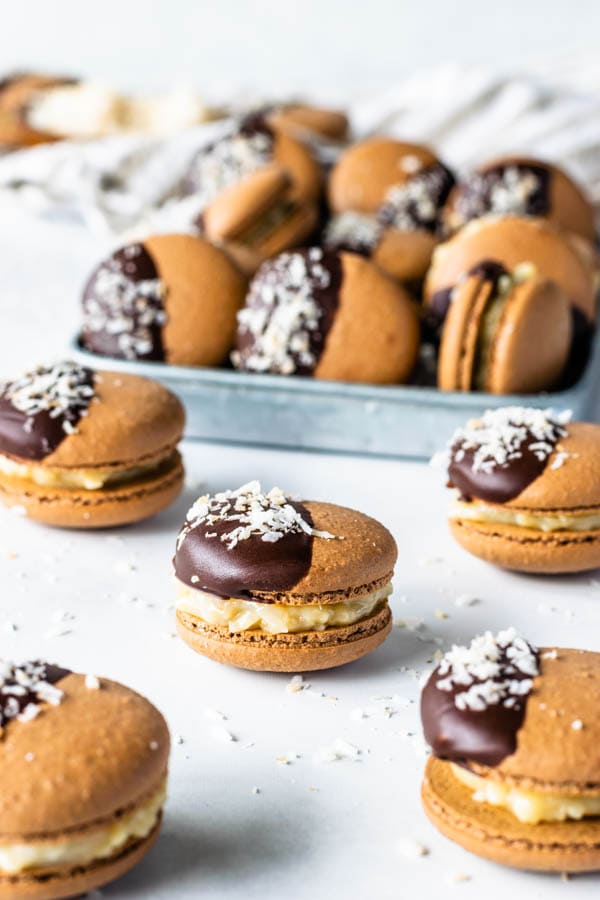
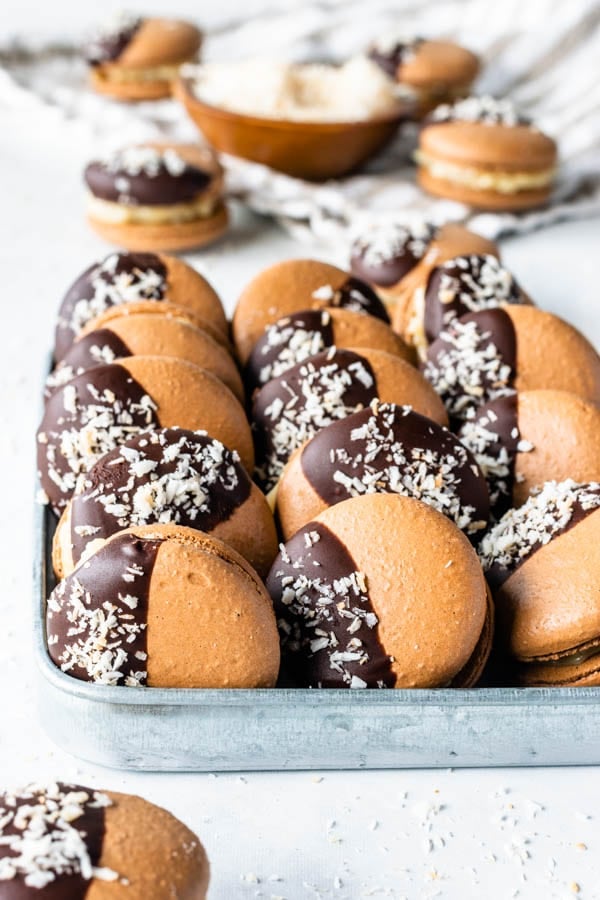
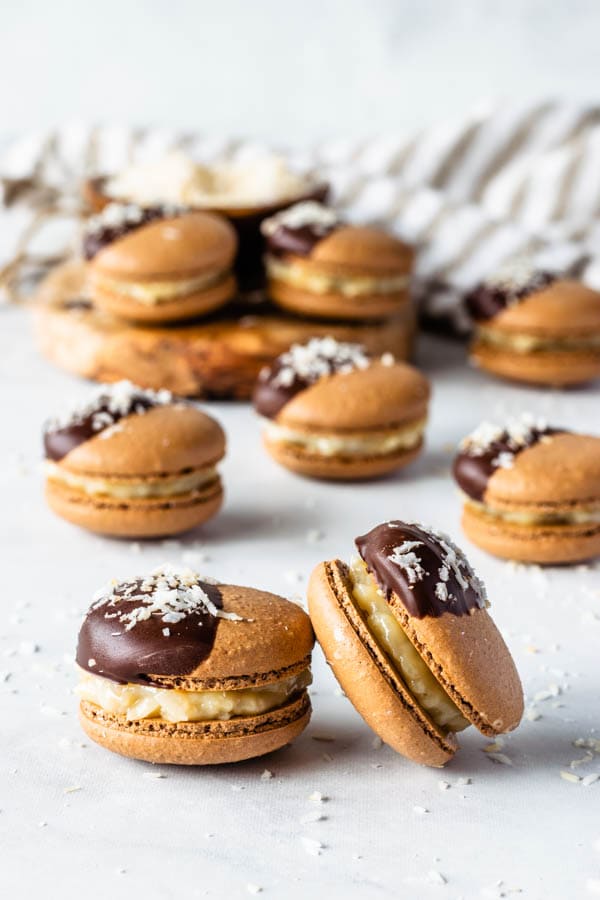
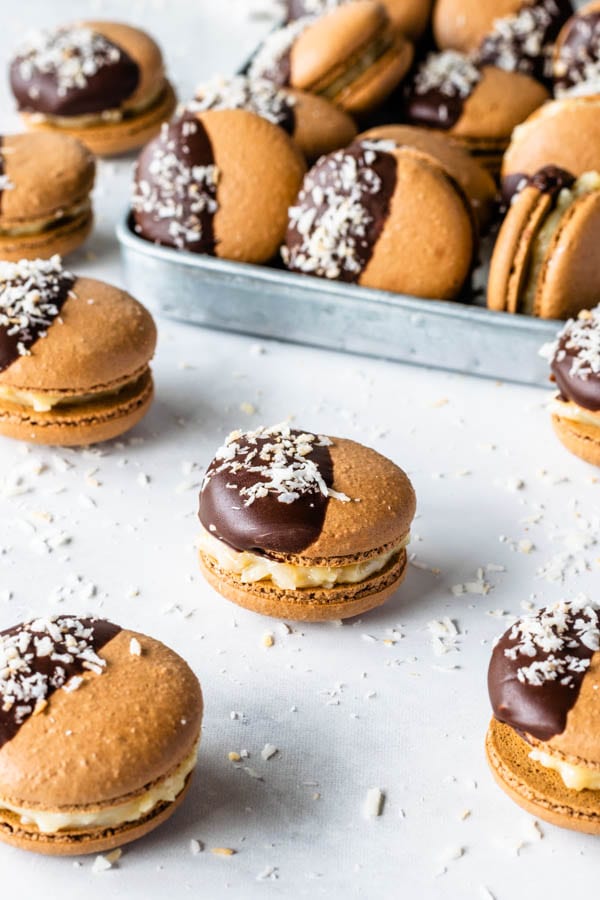
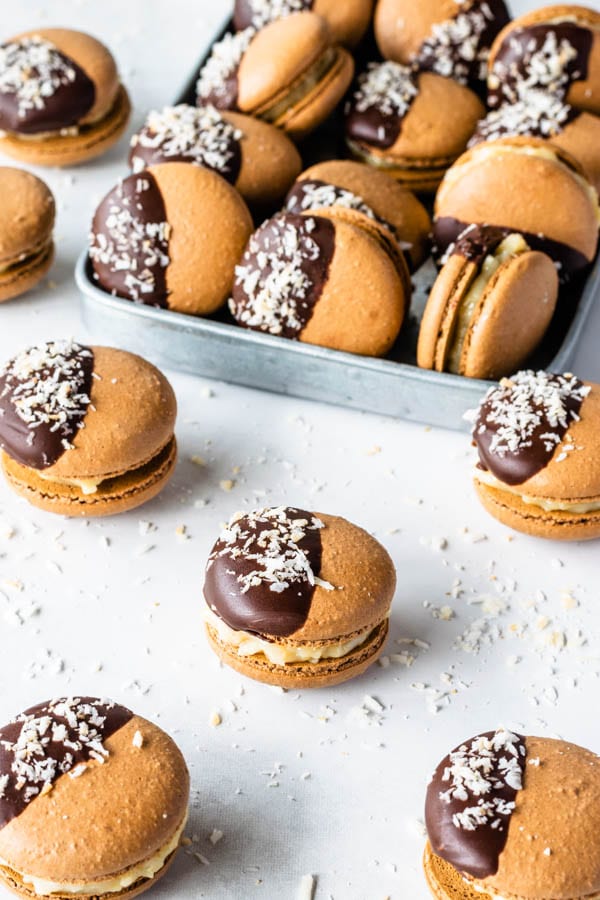
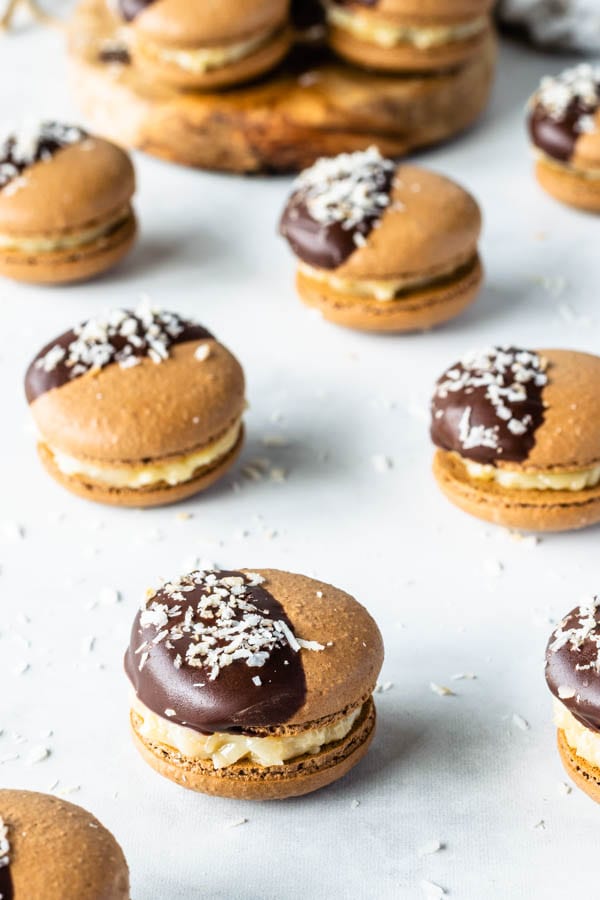
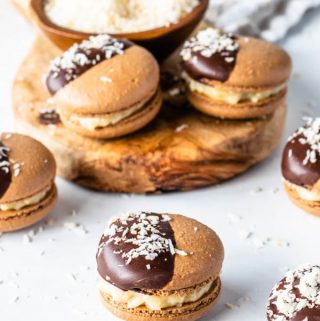
Hello friends! Today let’s make German Chocolate Macarons filled with a coconut fudge filling. The top shell is dipped in chocolate and sprinkled with some more coconut.

I actually made these German Chocolate Macarons a while ago, like last month. But I had some fall themed posts to post here, and I have been so dedicated to learning videos and working on my Youtube channel, that I kind of left this recipe behind until I remembered about it yesterday! The pictures were buried waaaaaaaay back there in my folder!
Anyway, here we are now. And finally I am proud to bring you these delicious scrumptious German Chocolate Macarons today!
This post may contain affiliate links. I earn a commission from qualified purchases. Please read our Privacy policy here.
I simply never run out of ideas of fillings for macarons. There’s a huge list of fillings I have yet to accomplish, but slowly I will get there! Currently I have 50+ macaron recipes on my blog archives!
How do I come up with so many different ideas for macaron fillings? Well, I just follow my sweet tooth, that’s all! And my sweet tooth had been wanting some German Chocolate Macarons for a while.
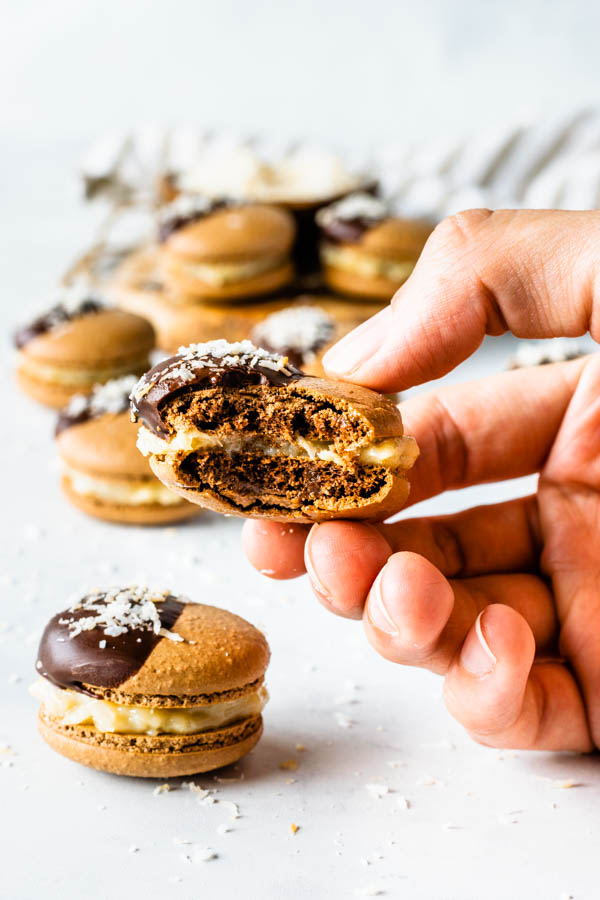
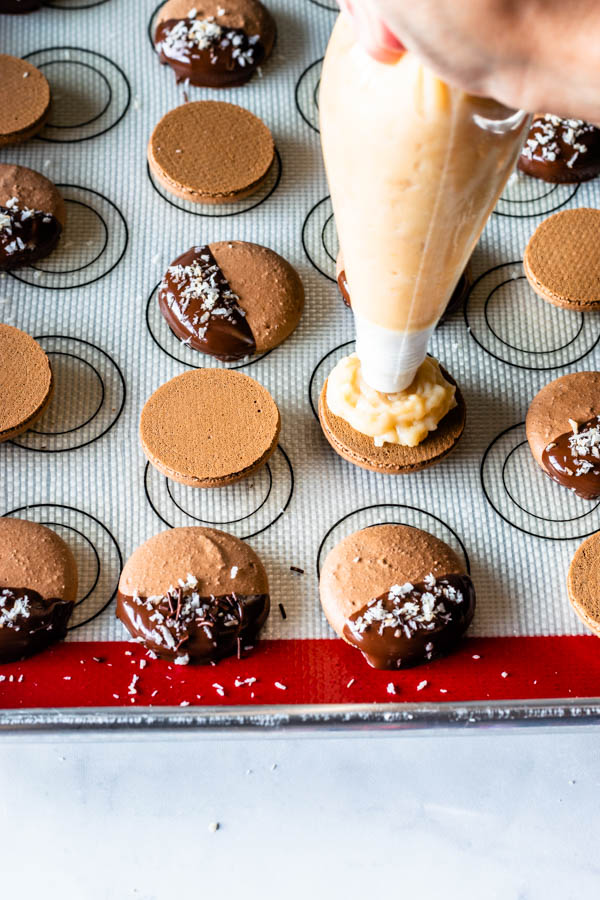
For these German Chocolate Macarons, I chose to dip the top shell in chocolate and sprinkle some coconut flakes on top.
Simply melt some chocolate and dip half of the shells in it. Make sure to scrape the bottom really well so you don’t end up with chocolate “feet” on your macaron shells.

While the chocolate in the shells is still wet, sprinkle some coconut flakes on top, so they are sure to stick.
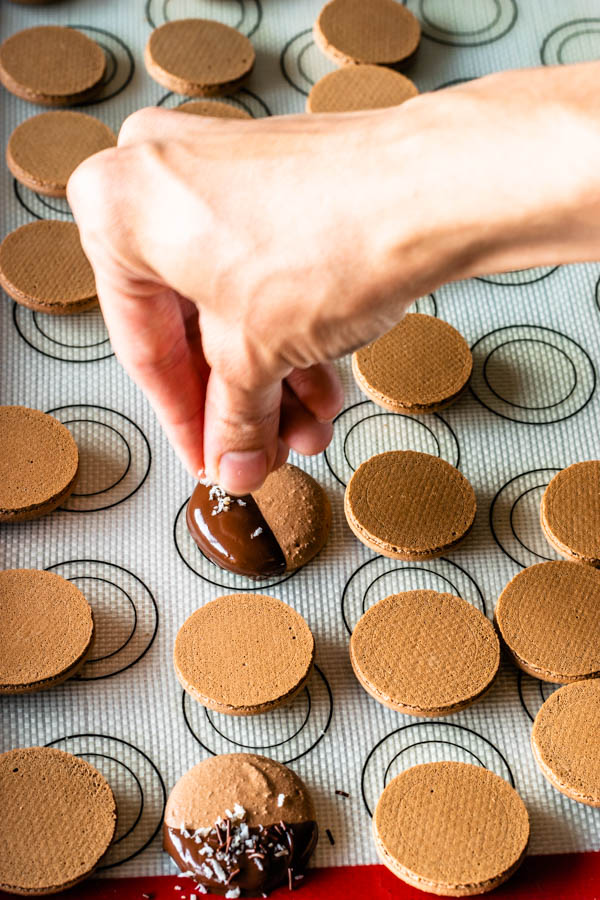
Let the chocolate set and dry all the way before proceeding with the filling. It should take only 10 minutes in the fridge.
So let’s talk more about the Coconut Fudge filling I used in these macarons.
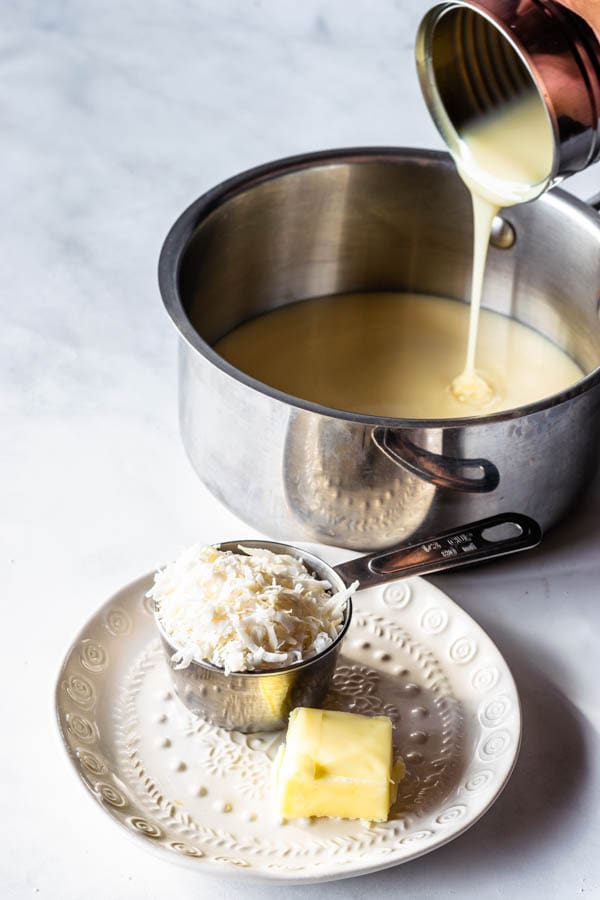
This fudge filling is a popular brazilian treat called Beijinho (translation “little kiss“) and it’s made of condensed milk, butter, and coconut flakes. That’s it! Only 3 ingredients and 15 minutes later, you can have this amazing fudgy delicious treat!
This beijinho is a variation of the famous Brigadeiro, which you may have heard of. Brigadeiro is the chocolate version. I actually use this condensed milk fudge quite a lot in my recipes. I will link below a list of recipes where I use it. And the reason why I use it is because:
- It’s one of my favorite things in the whole world. (I can literally eat a whole batch with a spoon)
- Super easy to make.
- Extremely adaptable. It can be made into literally any flavor you can think of.
- And it is also very versatile, it can be rolled into balls, used as fillings for cupcakes, cakes, macarons, or even be used as frosting.
- Everybody that has ever tried it completely falls in love with it.
Anyway, here is how we make it.
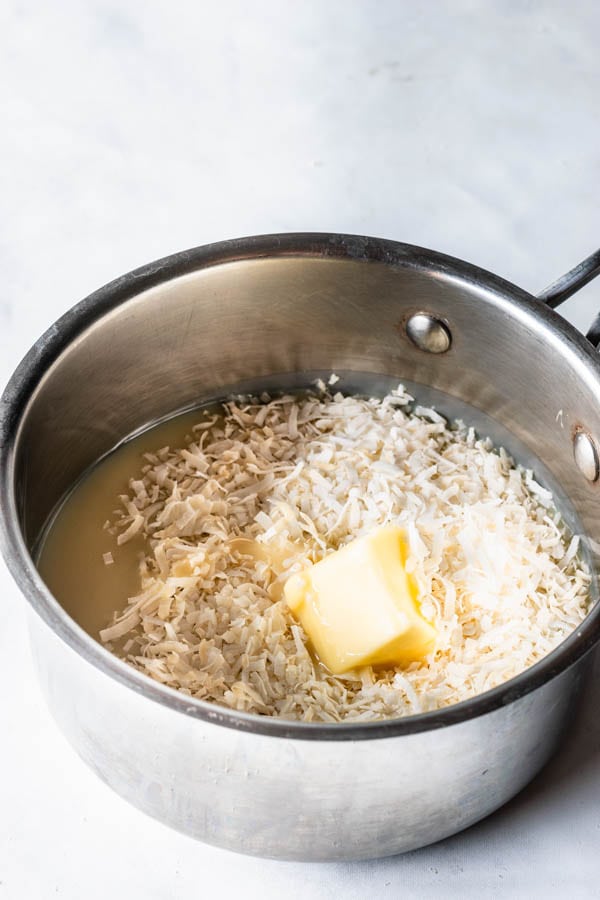
Simply place all ingredients in a small saucepan and cook over medium heat, stirring non-stop, until thick and coming off the bottom of the pan. Which should take 10-15 minutes, depending on how high the heat is.
I recommend leaving the heat on the medium or medium-low, and also stirring without stopping. When I say without stopping, I REALLY mean without stopping. Make sure to scrape the bottom of the bowl on all sides as you cook it.
The coconut fudge will be ready when it looks like this.
Ps. I buttered the dish slightly before pouring the coconut fudge in it, but you don’t necessarily have to do that, I don’t often butter the dish anyway, just when I remember to do it beforehand. 😅
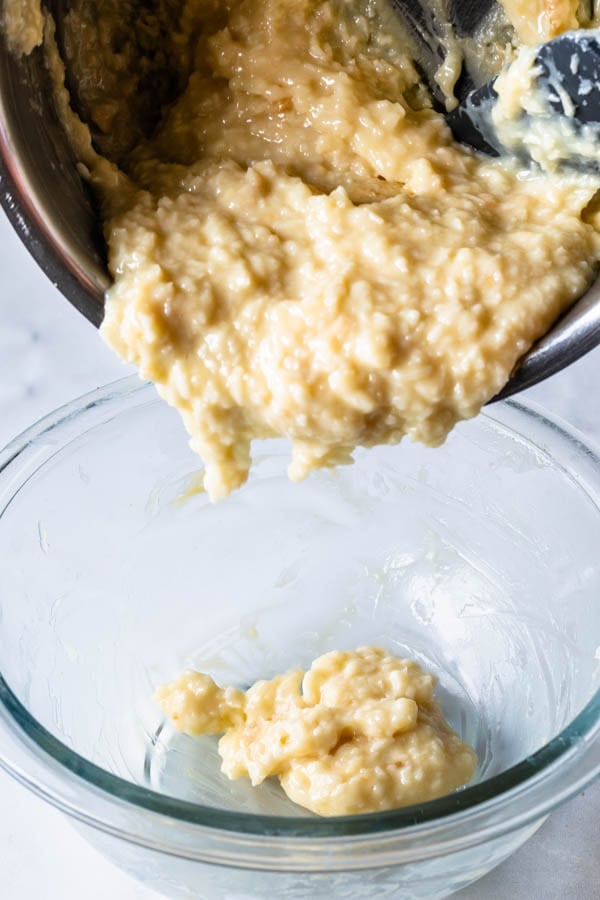
Let the coconut fudge cool down all the way at room temperature. Don’t place it in the fridge. Otherwise it will be impossible to pipe it on the macarons.
If you must make the filling beforehand, and can’t make it the same day you fill the macarons, I have an alternative that will work for you. So, after you make the filling, place it in the fridge, and then, when you are ready to fill the macarons, grab a spoon, scoop some fudge, and roll it into a ball with lightly greased hands, and then flatten it into a disk the same diameter as the macaron, and place on top of a macaron bottom shell, and then place another shell on top. But don’t try to pipe the cold filling or it will rip your piping bag for sure.
Anyway, if you can make the fudge the same day you are going to fill the macarons, you can simply put the room temperature filling in a piping bag, and pipe it in the bottom macaron shells.
Place the macarons in the fridge and let them mature until the next day before consuming. This will help with texture and flavor. And sometimes it also helps to take the macarons out of the fridge about 10 minutes before serving, so they have a chance to soften up slightly.
If you would like some more Macaron ideas and fillings, check some of these macaron recipes out:
- Brownie Macarons
- Dulce de Leche Macarons
- Apple Macarons
- Key Lime Pie Macarons
- M&M’s Macarons
- Caramel Popcorn Macarons
- Chocolate Macarons
- Cookie Dough Macarons
- Toffee Macarons
- Samoa Cookie Macarons
- Brigadeiro Macarons (using the same type of condensed milk fudge filling, but with chocolate instead)
And as promised, above I said I was going to link to some more recipes using the condensed milk fudge recipe, and here you go!
- Brigadeiro Cupcakes (Using the chocolate variation)
- Key Lime Truffles (Key lime flavor)
- Key Lime Pie Cake
- Chocolate Strawberry Cake (Using a plain white variation mixed with strawberries)
- Chocolate Strawberry Cupcakes
- Almond Cupcakes (Almond flavor)
- Macadamia Coconut Cupcakes (Coconut flavor)
- Brigadeiros
Here are some of the products I use to make and store my macarons, that I recommend.
This is the air-tight container I use to store my macarons in the fridge and in the freezer. They are really great for freezing macarons.
These are the piping bags I have been using for the past few months, and haven’t had one rip on me! They are just enough sturdy!
I hope you enjoyed today’s recipe! Thank you for reading my blog! I have a lot of resources that can help you learn how to make macarons, lots of tips on my blog posts and videos on my youtube channel. And you can always dm me on instagram I always try to get to any questions you may have asap! If you are asking a troubleshooting questions it helps to have a picture so I can try to identify what the problem might have been.
Have a lovely day!
German Chocolate Macarons
Ingredients
Chocolate Macaron Shells
- 3 egg whites 100 grams, 3.5 oz
- 1/2 cup white sugar 100 grams, 3.5 oz
- 1 cup almond flour 96 grams, 3.4 oz
- 1/2 cup plus 2 tablespoons powdered sugar 75 grams, 2.64 oz
- 2 1/2 tablespoons cocoa powder 14 grams, 0.8 oz
Coconut Fudge Filling
- 1- 14 oz. can condensed milk
- 1 tablespoon unsalted butter
- 1/3 heaping cup of coconut flakes
Chocolate for the shells
- 3 oz chocolate chips or candy melts 1/2 cup, 85 grams
- 1/4 cup coconut flakes
Instructions
Macaron Shells
- Before you start, get all of your ingredients ready. Prepare a large piping bag, fitted with a large round tip. Set aside.
- Line two baking sheets with parchment paper or silicon mat.
- I use a baking mat with the macaron template already in it. You can make your own or print it from the internet, and just place it under silicon mat, or parchment paper. I recommend using a silicon mat
- Measure out all of your ingredients.
- Sift powdered sugar, almond flour, and cocoa powder together. Set aside.
- Place egg whites and granulated sugar in a heat proof bowl or in a double boiler. Over a pan of simmering water, whisk the whites and sugar until frothy and sugar completely melted. It will take a couple minutes. You can test by touching the mixture between your fingers, and if you feel any sugar granules just keep whisking mixture over the water bath.
- Make sure the bottom of the bowl isn’t touching the simmering water.
- Transfer mixture to the bowl of a stand mixer.
- With the whisk attachment, start whisking mixture on low for about 30 seconds, then gradually start increasing speed to medium. Whisk on medium for one to two minutes, until mixture is white and starting to become fluffy. Raise speed to high for a few minutes until stiff peaks are formed. Best way to check this is to keep your eye on the whites. Once they get glossy and you start seeing streaks formed by the whisk, it might be time to stop.
- Whisk until stiff peaks have formed. When you pull your whip up, the peak should be shooting straight up, it shouldn’t be falling to the side, the peak should be stiff, forming a slightly curved shape at the top.
- Pour powdered sugar and almond flour into stiff whites.
- Start folding gently forming a letter J with a spatula.
- Add the food coloring at this point, if using. You can add a bit of brown food coloring to enhance the color of the shells if you want to.
- It’s time to stop folding when the batter is glossy and has a thick and flowing consistency. There are several ways to test this.
- First, I pick up some batter with my spatula and try to draw a figure 8 with the batter that is dripping off the spatula. If you can form several 8 figures without the batter breaking up, that’s one indication that it might be ready.
- There’s another test you can do. I call it the Teaspoon test.
- Grab a teaspoon of batter and spoon onto the parchment paper or silicon mat. Wait a minute to see how it behaves.
- If the batter stays stiff, forming a point and doesn’t spread out a bit, I start folding a little bit more, about 3 folds.
- Test again.
- Once the batter spreads out a bit and starts to look glossy and smooth on top, on the parchment paper, I transfer my mixture to the piping bag.
- You don’t want your batter to be too runny either. So be careful not to overmix. It’s always best to undermix and test several times until the proper consistency has been achieved.
- The best way I can describe this stage being perfect is when you hold the spatula with batter on top of the bowl and the batter falls off the spatula slowly but effortlessly. The batter will keep flowing off the spatula non-stop, but not too quickly.
- Transfer batter to a piping bag fitted with a round tip.
- Place piping bag directly 90 degrees over the center of each macaron template. Apply equal pressure and carefully pipe for about 3 seconds, and then quickly pull the bag up twisting slightly.
- Once you’ve piped as many circles as you could, bang the trays against the counter a few times each.
- Let your trays sit for a while so the shells will dry out a little bit. I usually leave about 20-40 minutes, depending on how humid the day is. You’ll know they’re ready when you gently touch the surface of a macaron and it seems dry.
- Pre-heat the oven to 300°F.
- Bake one tray at a time.
- Bake for 6 minutes, rotate tray.
- I bake each tray for a total of 18-20 minutes.
- When baked, the macarons will have a deeper color and formed feet. And they will be coming off the mat easily, and with a completely formed bottom.
- Remove from the oven and bake the other tray.
- Let the macarons cool down before proceeding with the filling.
Coconut Fudge Filling
- Add condensed milk, butter, and coconut flakes to a small saucepan. Place it over medium heat.
- Cook the mixture stirring non-stop.
- Lower the heat if the mixture seems to be sticking to the bottom.
- If you stop stirring, even if it’s just for one second, it will stick to the bottom and burn.
- Stir fast and without stopping.
- Cook the mixture at medium or medium-low heat for 10-15 minutes, until thick, fudgy, and you can see the bottom of the pan when you run the spatula through the middle of the fudge.
- Remove to a small bowl and let it cool down all the way. Don’t place it in the fridge before filling the macarons, or it will get too hard to pipe on the macarons, and you won’t be able to recover the proper texture even if you leave it at room temperature.*
To assemble
- Dip half of the shells in melted chocolate, or candy melts. And while the chocolate is still wet, sprinkle some coconut on top. Place it in the fridge so the chocolate will set, or wait until it is completely dry before proceeding.
- Place cooled down (but not cold) fudge filling in a piping bag. Pipe a small amount of coconut fudge in each bottom shell.
- Top with a chocolate dipped shell.
Storage
- Store macarons in an air-tight container (check post to see what I recommend) for up to 1 week in the fridge, or 2 months in the freezer.
Could I use chopped pecans in the filling too?
yes certainly!
Could I add chopped pecans so that it will be like traditional German chocolate frosting?
yes you can!
What kind of coconut do you use? Sweetened or unsweetened? I’m dying to make these!!
you can use either. I’ve made with both, i believe here it’s unsweetened.
These were ridiculously delicious! I overcooked the coconut fudge filling so it was quite stiff even at room temp, but I made it work, sacrificing the prettiness a little bit. Outstanding recipe!
Every time I try to make this certain macaroon, I can’t get it to be the right consistency even when I keep folding. When I barely get it close to the consistency that you say in this recipe, it still cracks. I don’t know how to get to the consistency that the other macaroons are able to get to.
I’ve made these and they are absolutely delicious! I was wondering if you can ship these or will the filling and chocolate melt everywhere? Thanks for the recipe.
The filling is not recommended to be out of the fridge. I am happy you enjoyed them 🙂
These look amazing! Simply magical! My son is macaron-crazy and also German chocolate-cake crazy, these seem a natural for my kitchen!