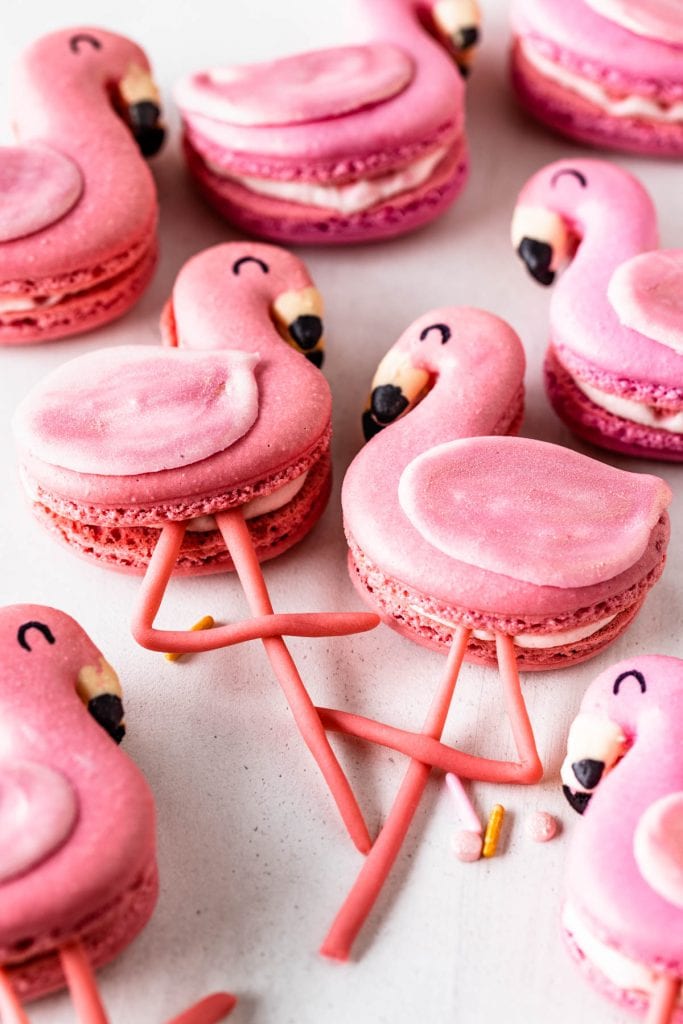
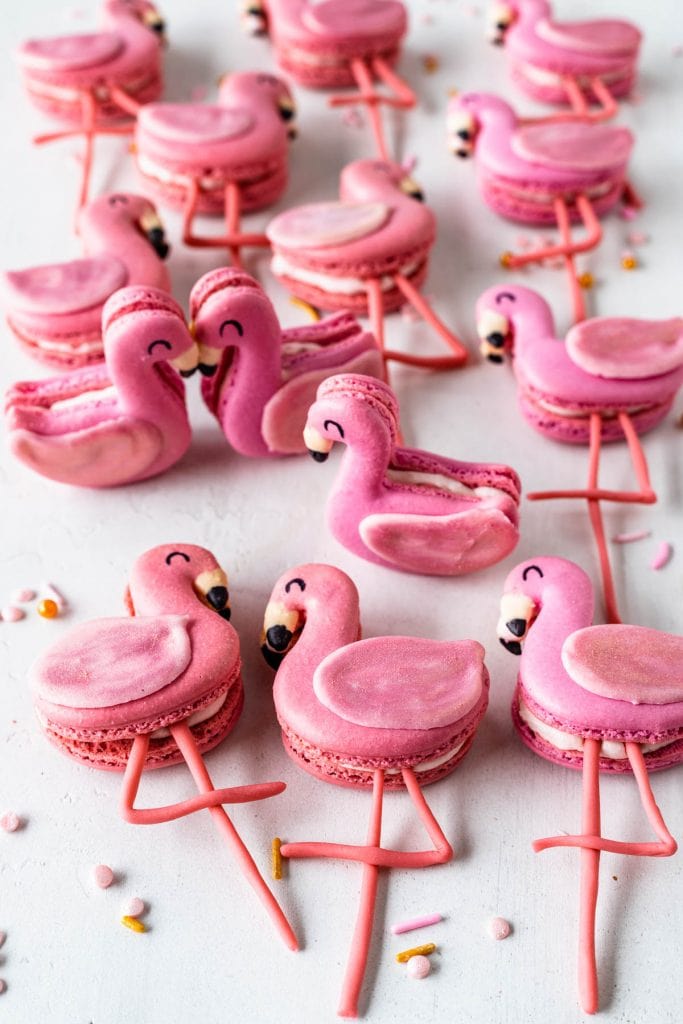
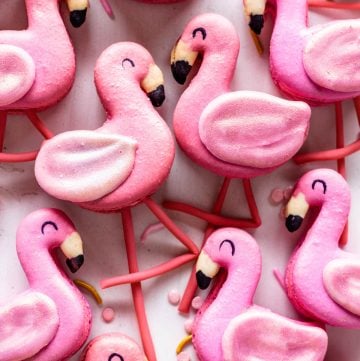
Flamingo Macarons
Hello friends! Today I will show you how to make these Flamingo Macarons. These are some of my favorite macarons that I’ve ever made!
Grab the free template below, so you can download, print, and place under your baking mat to pipe your own flamingo macarons.
Make absolute sure to watch the video on this page or on YouTube showing you how to make the macarons shaped like flamingos.
This post may contain affiliate links. I earn a commission from qualified purchases. Please read our Privacy policy here.
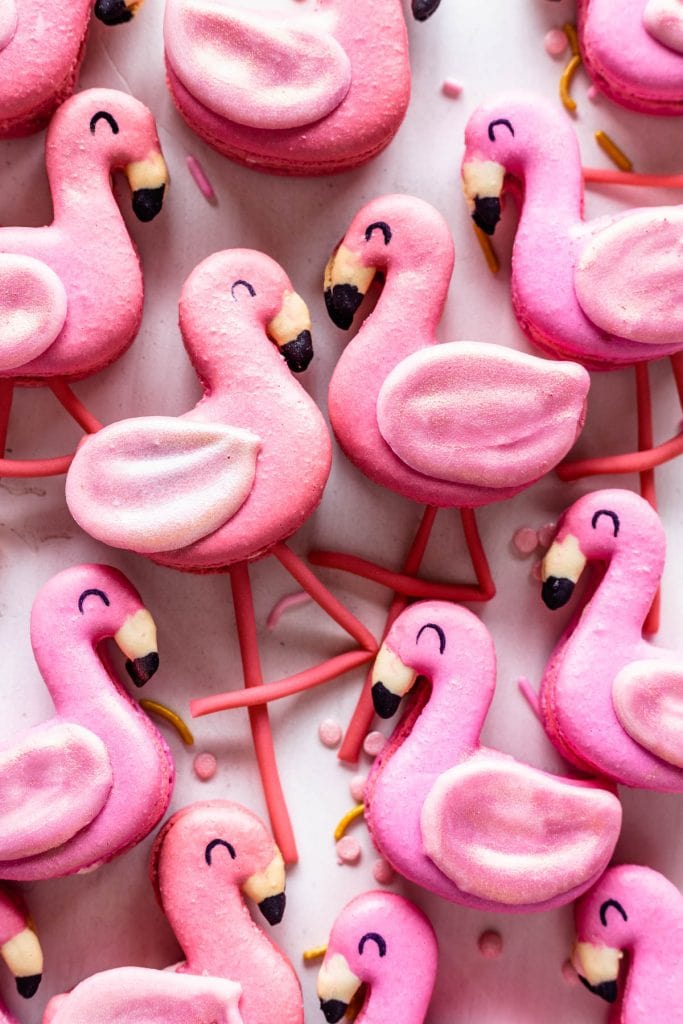
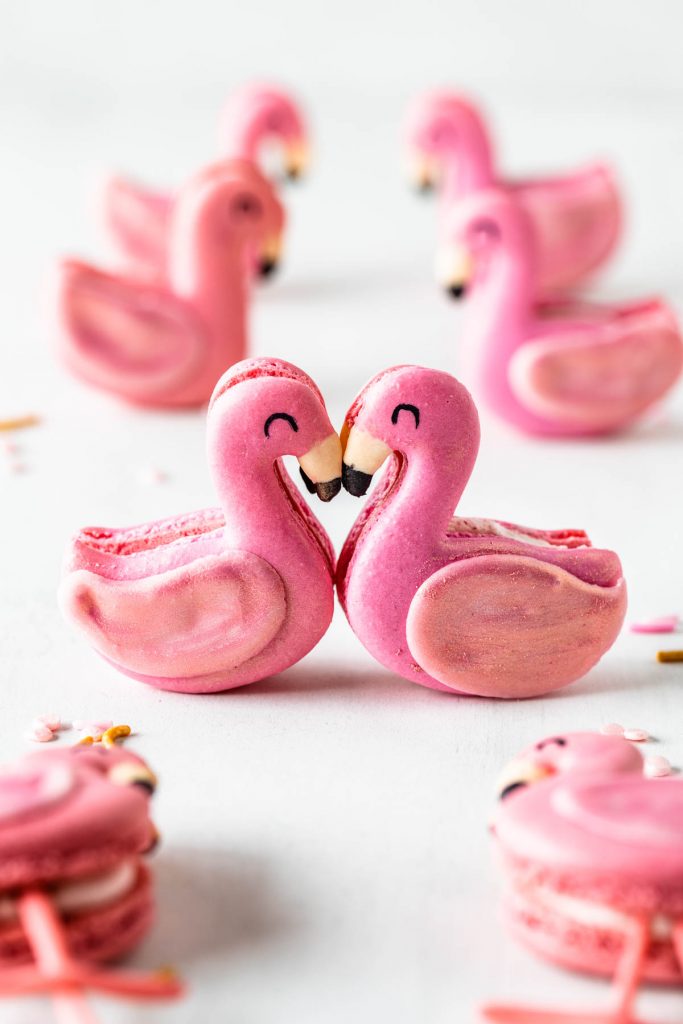
I made these Flamingo Macarons for my sister Marina because it’s her birthday and she loves everything about flamingos.
After searching up and down for a good template, I couldn’t find a flamingo template that I loved, so I created my own.
Check it out below!
Flamingo Macaron Template
Grab the templates to make the Flamingo Macarons here!
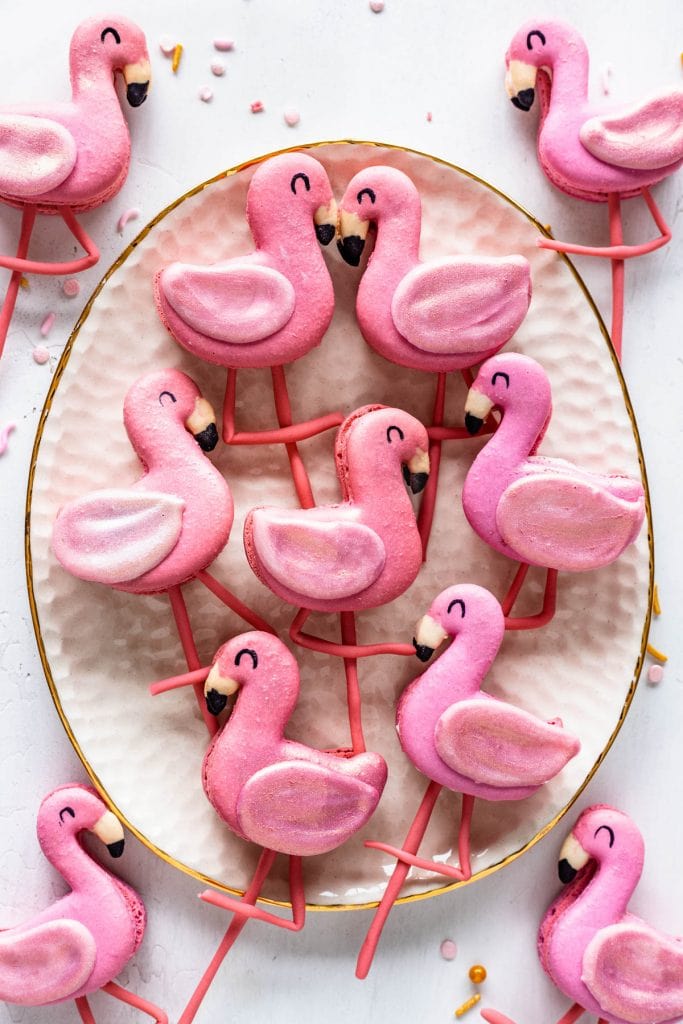
I am offering three templates below: one of the flamingos facing right and the other of the flamingos facing left. You will need both, so you can match the shells later and make the macaron sandwich.
The other template is for the wings, so you can make the wings out of melted chocolate or candy melts.
How to pipe the Flamingo Macarons
To make the batter for the flamingos, you will have to divide it between three bowls after just incorporating the dry ingredients into the meringue.
Don’t fold all the way to the final consistency, otherwise you won’t be able to mix the colors in.
Divide the barely mixed batter between three bowls. You will only need about a spatula full of batter for the black and for the white colors, since you only need a little drop of them for each flamingo.
Once you have all three batters ready, it’s time to start piping.
For the pink batter I used a Tip 8, for the black batter I used a Tip 3, and for the white batter I used a Tip 4.
You will want to use fairly small tips.
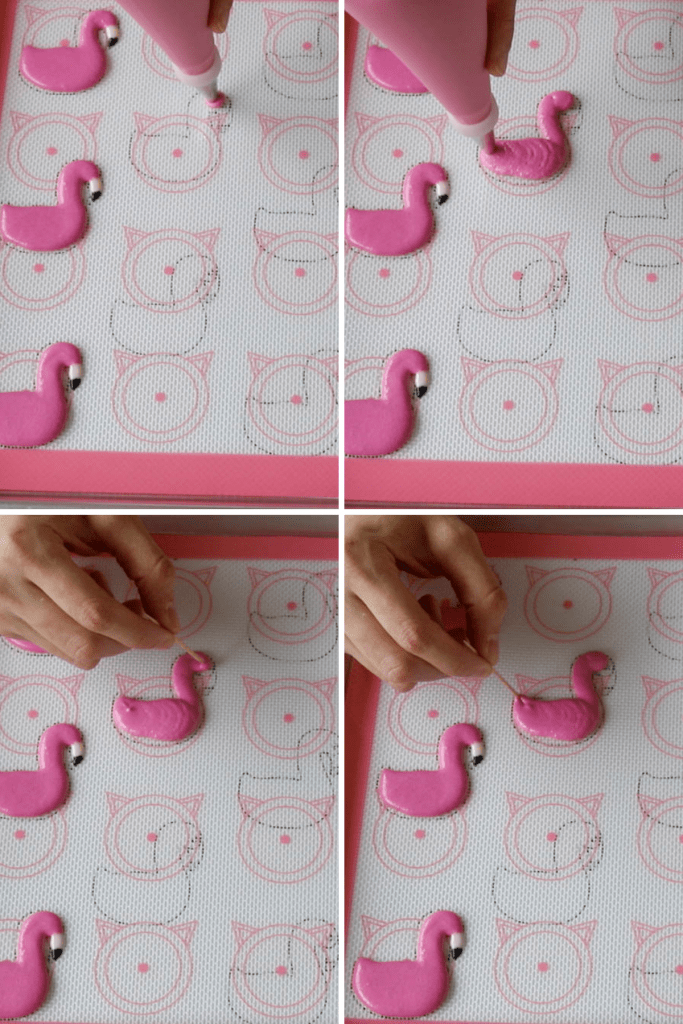
Begin by piping the head, then drag the piping bag around the body shape of the flamingo, applying gentle pressure. When you get to the bottom part, you can apply a bit more pressure to dispense more batter, since this part is a bit thicker.
After piping use a toothpick to smooth out the batter and drag it to the outlines of the template.
I like to use the toothpick to form the little pointy tail of the flamingo.
Frequently tap the tray against the counter or against your hand gently, to smooth out the batter and release any air bubbles.
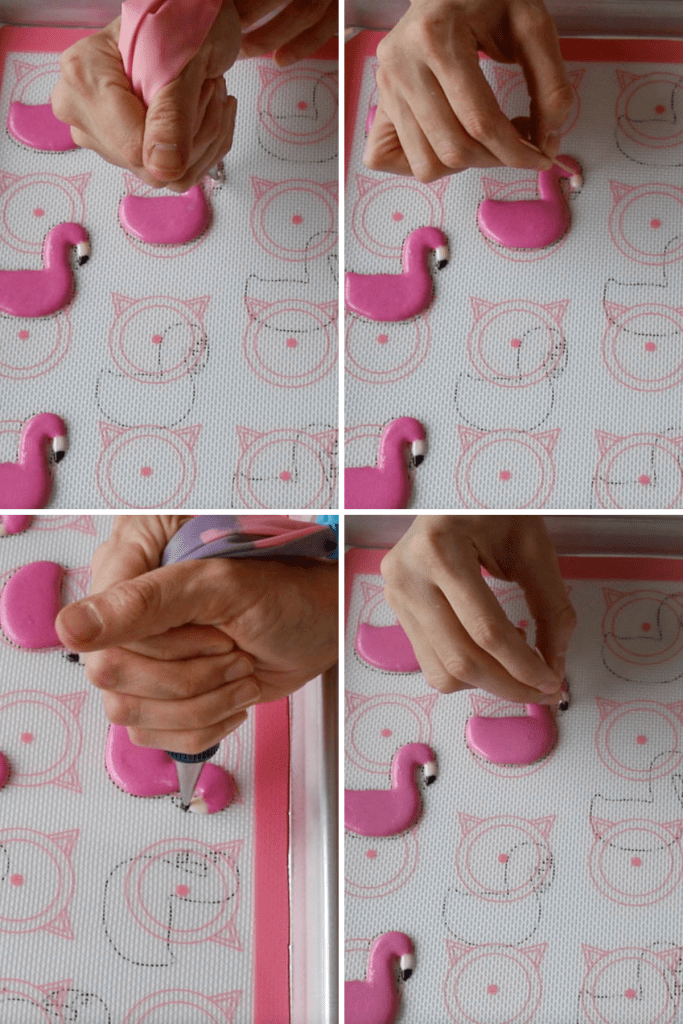
Next, pipe the the white portion of the beak. Just pipe a little drop of batter. Then use a toothpick to smooth it out and drag it to the outlines of the template.
Then do the black part of the beak, just pipe a little dot of frosting, and do the same as previously, using a toothpick to help the batter smooth out to the edges.

Tips on piping the flamingo shaped macarons
- Make sure the batter isn’t too stiff, or the toothpick will form streaks in the batter that won’t smooth out, and you will end up with cracked and bumpy shells.
- Frequently tap the tray gently against the counter or against the palm of your hand as you are piping, to help the batter smooth out.
- The toothpick is your best friend when it comes to forming the shapes, because it will help spread the batter to the outlines.
- Whenever making shapes with different batters, make sure to pipe them at the same thickness, so this way they won’t crack when baking because one portion of the shell will rise too much.
- Let the macarons rest sufficiently before baking, the batter must be dry to the touch.
How to make the decorations for the flamingos
You will want to make the legs and wings a couple of hours prior to assembling, so they have a chance to dry.
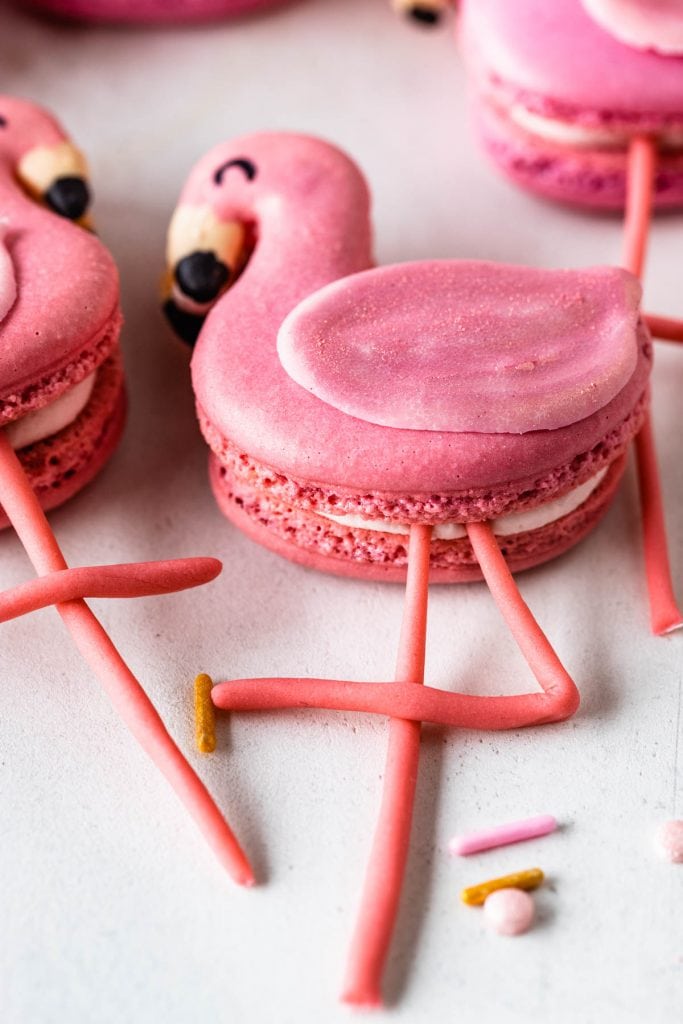
For the legs, I used fondant. I grabbed a small piece of pink fondant and rolled against the counter like a snake shape.
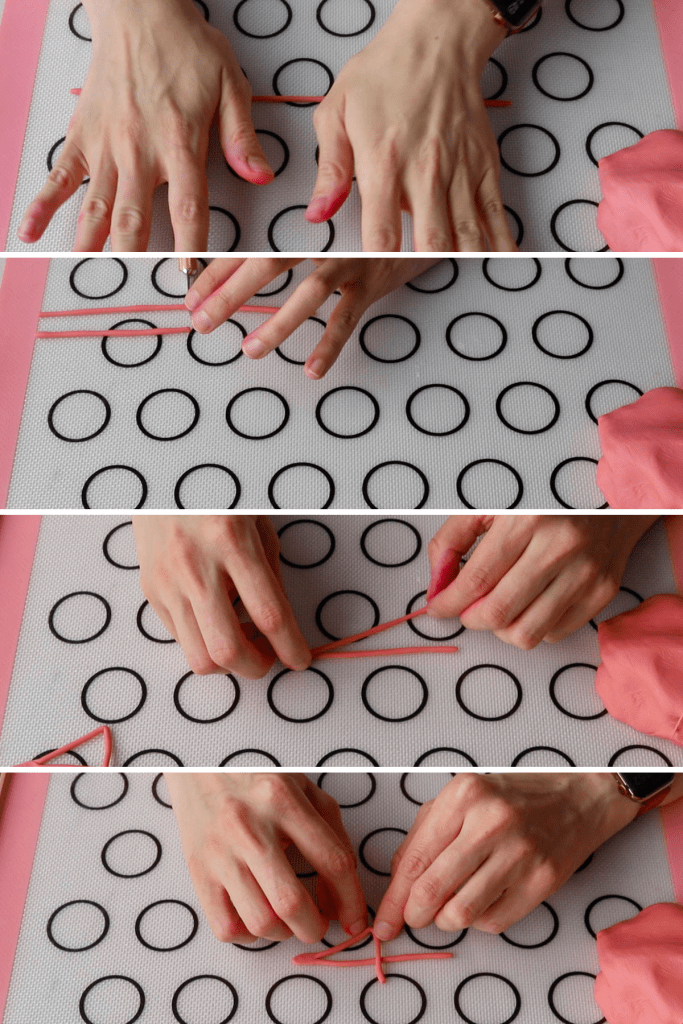
Then cut two pieces the same size. Attach them at the top, and then fold one leg over the other forming a number 4 shape.
Let the legs dry for a couple of hours until they are firm.
For the wings I used white chocolate colored with some powder food coloring, by The Sugar Art.
You can also use candy melts if desired.
Whatever you do, use the proper food coloring to dye the chocolate. If you use gel or liquid food coloring, the chocolate may seize. Which is why I used powder coloring.
Download the template for the wings above.
Print it and place under a piece of parchment or silicone mat.
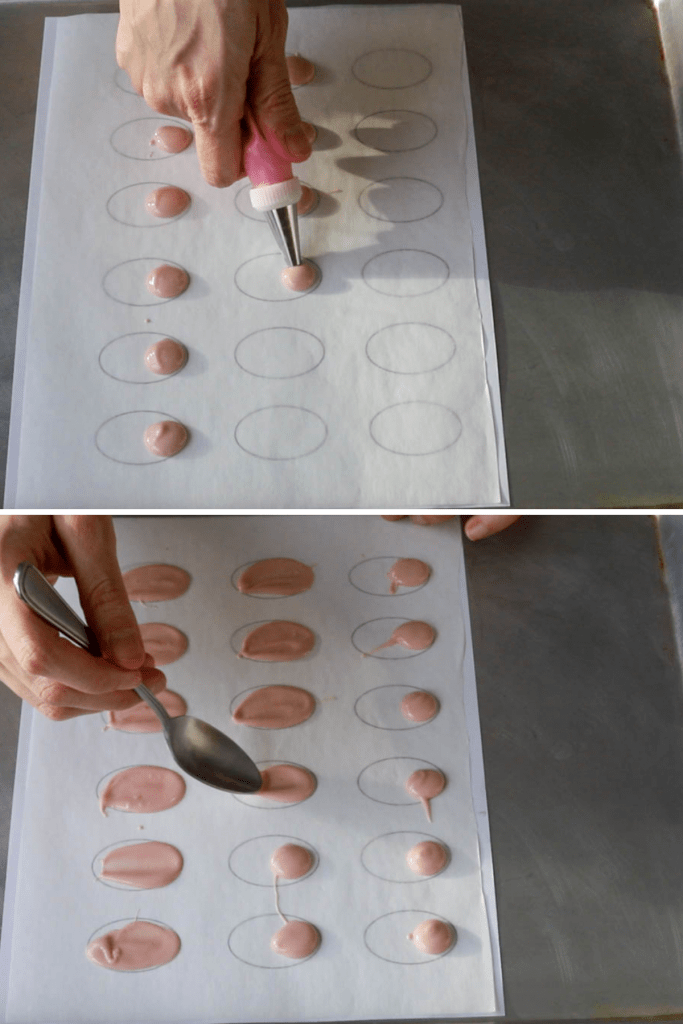
Then pipe a dot of melted chocolate at the beginning of each template.
Use a spoon to drag the chocolate to the side forming a wing shape.
Immediately place the wings in the fridge or freezer so they will firm up.
You don’t necessarily need the template to make the flamingo wings, but this will help them stay uniform.
How to assemble the Flamingo Macarons
First let’s begin by drawing the eyes on the macarons.
I used an edible marker to do so.
This is the Edible Marker I used.
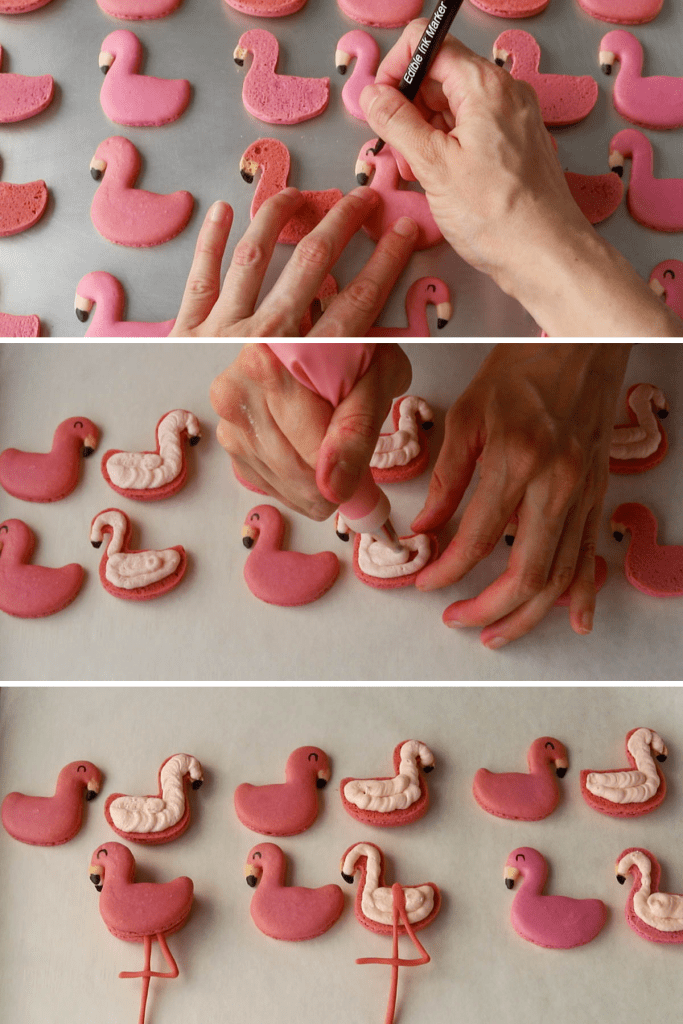
Next, pipe some frosting in the middle of each macaron.
You will need a small round tip to do that, specially in the head area. I used a Tip 6.
After piping the buttercream in the middle of the flamingos, place a dried leg on top. Then top with another flamingo shell.
After placing the legs on the flamingos, keep them supported with the legs elevated, otherwise once the buttercream sets, the legs will dry out bent down.
I used these chocolate bars to keep the legs elevated, because they had the perfect height.

And finally it’s time to place the wings on the macarons.
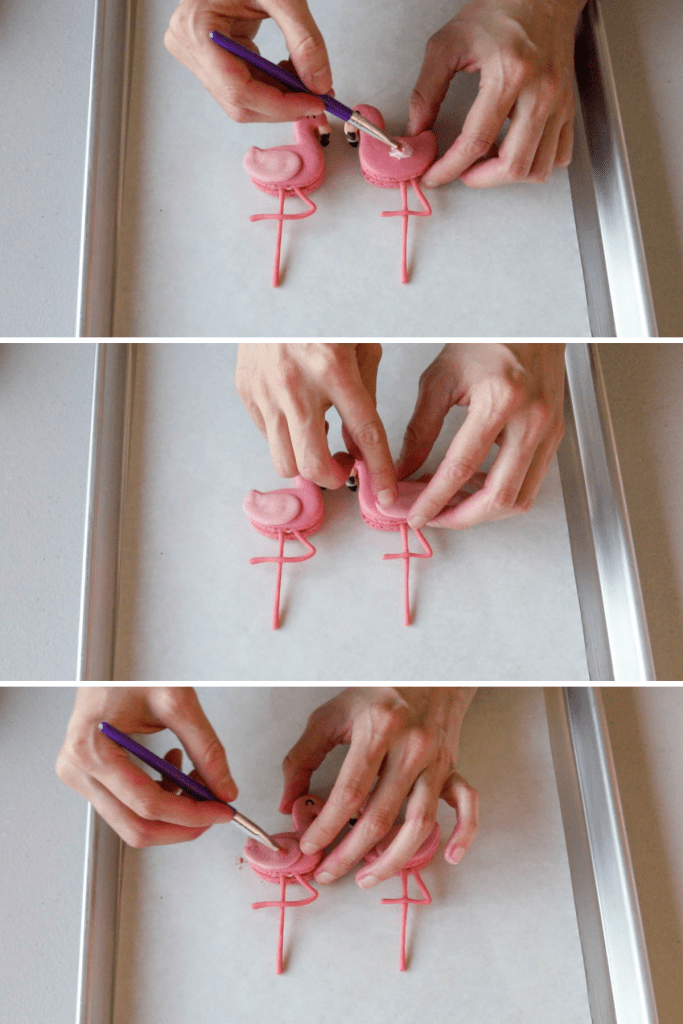
Brush a little dab of melted chocolate on each flamingo body.
Then grab the wings out of the fridge or freezer, peel one off, and attach to the flamingo.
Repeat with all other flamingos.
You can also brush each flamingo with Pink Luster Dust.
Here are some more recipes you may like:
For my full list of over 100 macaron flavors click here.
If you want to learn more about making macarons, I have a space on my blog called Macaron School where I post everything about how to make macarons, lots of tips, tricks, troubleshooting guides, guides for beginners and more!
I hope you enjoyed today’s recipe! If you make these Flamingo Macarons tag me on instagram or leave a comment below, I love hearing from you!
Flamingo Macarons
Ingredients
Macaron Shells
- 100 grams egg whites
- 100 grams granulated sugar
- 105 grams almond flour
- 105 grams powdered sugar
- Pink and black food coloring
Wings
- 56 grams white chocolate or white candy melts
- Pink powder food coloring or candy food coloring
Legs
- Small piece of pink fondant
Vanilla Buttercream
- 6 tbsp unsalted butter softened 85 grams
- 1 1/2 to 2 cups confectioners’ sugar sifted 187 to 240 grams
- 1 tsp vanilla extract
- 1/2 -1 tbsp milk as necessary
- Pink food coloring
To decorate
- Pink Luster Dust
- Edible Marker
Instructions
Macaron shells
- Before you start, get all of the ingredients ready. Prepare one large piping bag, fitted with a round tip, I used a Wilton 8 to pipe the flamingo body. To pipe the beak I used a number 4 tip for the white part, and a number 3 tip for the black part.
- Line two baking sheets with parchment paper or silicone mat, place the printable template under the mat.
- Measure out all of the ingredients. Sift the powdered sugar and almond flour. Set it aside.
- Place a bowl over a pan with barely simmering water. Add the sugar and egg whites to the bowl and whisk the mixture until the sugar is completely melted. It will take a couple of minutes. You can test by touching the mixture between your fingers, and if you feel any sugar granules just keep whisking the mixture over the water bath.
- Make sure the bottom of the bowl isn’t touching the simmering water because you don’t want the whites to cook.
- Also, don’t overheat the sugar syrup, this may cause issues down the line, such as wrinkly macarons.
- Transfer the syrup to the bowl of a stand mixer.
- With the whisk attachment, start whisking the syrup on low for about 30 seconds, then gradually start increasing speed to medium or to medium-high and whisk for a few minutes until stiff peaks are formed. Best way to check this is to keep your eye on the whites. Once they get glossy and you start seeing streaks formed by the whisk, it might be time to stop.
- Whip until stiff peaks have formed. When you pull your whisk up, the peak should be stiff and shooting straight up, with possibly a slight bend at the top, but not bending down to the side.
- Pour the sifted powdered sugar and almond flour into the stiff meringue.
- Start folding gently forming a letter J with a spatula.
- As soon as you see no more dry ingredients in the meringue, stop stirring. Divide the batter between three different bowls. You will only need a tiny little bit for the black batter and for the white batter. About one or two spatula fulls of batter for each of those colors. The majority of the batter will be colored pink.
- Work with one bowl at a time, leaving the other ones covered meanwhile.
- To the first batter I added black food coloring. Fold the batter until the perfect consistency is achieved. The batter should be flowing slowly and effortlessly off the spatula, you should be able to pick up some batter with the spatula and draw several figure 8s with the batter that’s flowing, without having the batter break up. And even after the batter breaks up, it should still continue to flow off the spatula slowly.
- It might be a bit difficult to make the figure 8 with just a little bit of batter, so just make sure the batter is running off the spatula. Watch the video on this page or on Youtube, which will show you better what the consistency is supposed to be like. There’s another test you can do. I call it the Teaspoon test.
- Grab a teaspoon of batter and spoon onto the parchment paper or silicon mat. Wait a minute to see how it behaves.If the batter stays stiff, forming a point and doesn’t spread out, fold a little bit more, about 3 folds.Test again.
- Once the batter spreads out a bit and starts to look glossy and smooth on top, on the parchment paper, it’s ready.
- You don’t want your batter to be too runny either. So be careful not to over-mix. It’s always best to under-mix and test several times until the proper consistency has been achieved.
- When you hold the spatula with batter on top of the bowl and the batter falls off the spatula slowly but effortlessly the batter is ready. The batter will keep flowing off the spatula non-stop, but not too quickly.
- Once the first batter (black) achieves the perfect consistency, transfer it to one of the prepared piping bags fitted with tip number 3. Secure the top with a tie, so the batter doesn’t scape while piping, and to keep the batter from drying out while you work with the remaining batter. Set the piping bag aside.
- Now, it’s time to work with the second batter. I didn’t add any food coloring to the second batter. Simply fold until the perfect consistency is achieved, like I’ve explained above.
- Transfer the batter to another piping bag fitted with a number 4 tip. And secure the top with a tie.
- Now move on to the final batter, the pink color. Add food coloring, I used fuchsia gel food coloring.
- Fold until the perfect consistency has been achieved, and you can pick up some batter and form several figure 8s with the batter that’s flowing off the spatula without having it break up, and even after it breaks up it still continues to flow off the spatula slowly and effortlessly.
- Transfer the pink batter to a piping bag fitted with a number 8 tip.
Piping the flamingos
- Pipe the flamingo’s body with the piping bag positioned at a 90 degree angle at the head, then drag the piping bag along the whole body of the flamingo, when you get to the bottom part, apply a bit more pressure to release more batter, since this part is a bit larger.
- Then drag the piping bag to the side and slightly up, to form the tail part.
- Use a toothpick to smooth out the batter and drag it out to the outlines.
- Now grab the white batter and pipe the white part of the beak by just piping a small drop of batter. Then immediately use a toothpick to spread the batter to the outlines of the beak portion.
- Lastly, pipe the black part by simply piping a dot of black batter at the end of the beak.
- Use a toothpick to drag the batter out slightly so it spreads out to the shape of the beak.
- Tap the trays against the counter or against the palm of your hand to release any air bubbles constantly while piping, so this way the batter will spread out nicely and the bits where you’ve applied the toothpick will smooth out.
- And also use the toothpick to pop any remaining air bubbles on the surface of the shells.
- Continue to pipe all the macarons. Don’t forget to pipe both sides, the flamingos facing right and facing left, so you can pair them up later.
- Let the trays sit for a while so the shells will dry out a little bit. I usually leave about 20-40 minutes, depending on how humid the day is. Drying time will also depend on the consistency of the meringue, on how much you’ve folded the batter, and on how much food coloring you’ve added.
- You’ll know they’re ready when you gently touch the surface of a macaron and it seems dry, and doesn’t stick to your finger.
- Pre-heat the oven to 300°F.
- Bake one tray at a time.
- Bake for 5 minutes, rotate tray.
- Bake for 5 more minutes. Rotate again.
- I bake each tray for about 15 to 20 minutes.
- When baked, the macarons will have a deeper color and formed feet. If you try to move a macaron, it shouldn’t feel jiggly. If the macaron is still jiggly, keep baking.
- Remove from the oven and bake the other tray.
- Let the macarons cool down before proceeding with the filling.
Wings
- Melt the chocolate or candy melts and color it with the food coloring.
- Attention! Most food colorings won’t work with chocolate and candy melts, it will make them seize. Which is why I use powdered food coloring. You will need to get food coloring that is proper for chocolate.
- Print the template for the wings.
- Pipe or spoon a small dollop of chocolate at the end of each wing template.
- Use the back of a spoon to spread the batter out to form a wing shape. You don’t necessarily need the template, but this will help you obtain more uniform wings.
- The wings can’t be too thin or they will break.
- Immediately after piping the wings, place them in the fridge.
Legs
- For the legs, grab a tiny piece of pink fondant.
- Roll it out against the counter to form a thin snake shape.
- Slice two pieces of the fondant string the same size.
- Attach the two pieces at the top, then fold one of the legs over the other forming a number 4 shape.
- Let the legs dry for a couple of hours.
Buttercream
- Cream the butter at medium speed in the bowl of an electric mixer for about 1 minute. With the mixer off, add all of the powdered sugar.
- On low speed, beat the sugar and butter together. Once they are incorporated, turn speed to medium and cream for 1-2 minutes until very fluffy.
- Add the vanilla beat for another 30-45 seconds.
- If necessary, add the milk. Only add 1/2 tablespoon of milk at first. Sometimes you may find that the consistency of the buttercream is already perfect and doesn’t need any more liquid. If the buttercream seems too stiff, add a bit more of milk as necessary. If the buttercream seems too runny, add more sifted powdered sugar until you obtain a firm, but smooth and creamy consistency.
- Add food coloring if you want to. I used a tiny little drop of pink food coloring.
- Place the frosting in a piping bag fitted with a small round tip.
To assemble
- Draw an eye on each flamingo.
- Pipe a small amount of frosting on each bottom shell of the flamingos.
- Place a dried leg in the middle of each shell and then top with another shell, so the leg is attached in the middle of each macaron.
- It’s good to leave the macarons resting with a support under the legs so they are suspended and will be able to maintain a straight shape as the buttercream firms in the fridge.
- Re-melt some of the chocolate from before, and then brush a tiny bit on each flamingo body.
- Remove the wings from the fridge. Attach a wing to each macaron.
- If desired you can also brush each macaron with Pink Luster dust.
Storage
- The macarons will store nicely for up to 5 days in the fridge and in the freezer for up to 1 month.
Hello,
For the legs, can you pipe them with candy melts and chill them until they are set and then use them?
Thank you,
KK
They might break with candy melts, specially if you don’t have a thick enough layer of candy melts in there. Maybe if you make a very thick leg, it could work.
Hi! Mine all got feet EXCEPT at the neck where a lot of them blew out, leaving them looking like turkey necks. Is this likely a piping issue? Or improper temperature? I never have this issue with round macs.
That’s odd, and sounds like a temperature issue maybe, or resting time, maybe it didn’t rest enough. How long did they rest?
Hi, just wondering if you can use ground almonds instead of almond flour when making macaroons?
You could, but usually the food processors we have at home arent great at processing the almonds fine enough to obtain smooth shells, and also there’s the risk of releasing oils when you are processing the almonds, and oils are super bad for the macaron batter. The best thing is to find a super fine almond flour that is dry, and not oily, it may take a while to find a brand you love, if you’re in the US i recommend Blue Diamond, it’s the best.
Hello! I noticed you did not have Egg White Powder in this recipe. Have you stopped using it? I know you have for others and I wondered if/why you stopped. Thank you!
Because the weather is super dry right now where I am, and if I use egg white powder the macarons get completely dry the minute I pipe them and I can’t even pop the air bubbles. So I am leaving them out for the time being, until the weather isn’t so dry anymore.
Thank you for sharing that! I have a very dry house (10% humidity) and was noticing the same problem. I will also leave it out.
Sensacionais, muito lindos!!!!!!