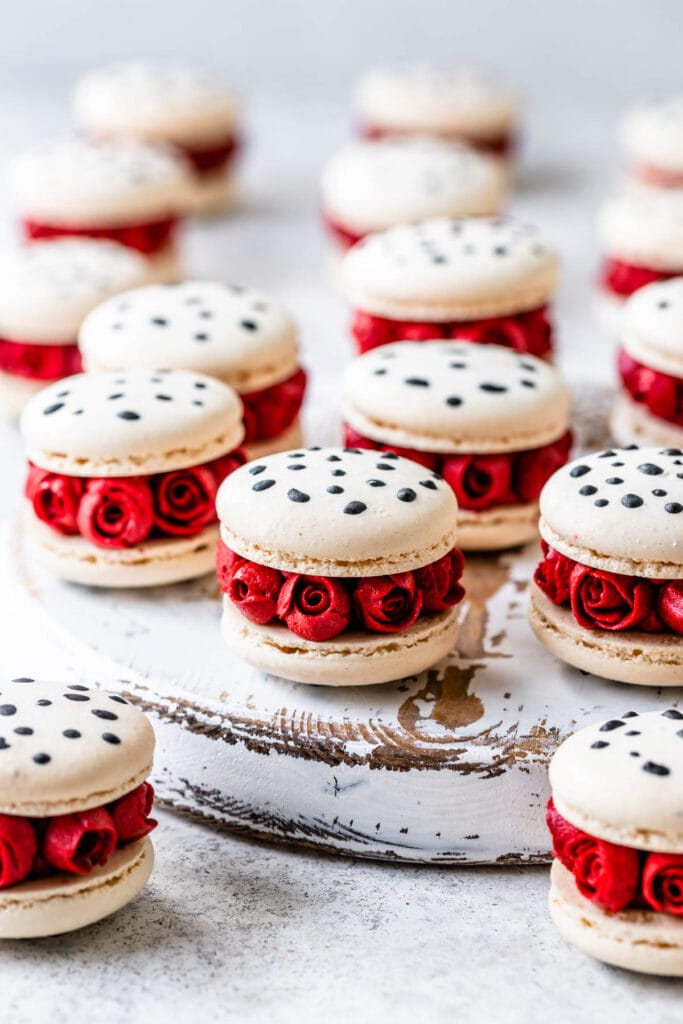
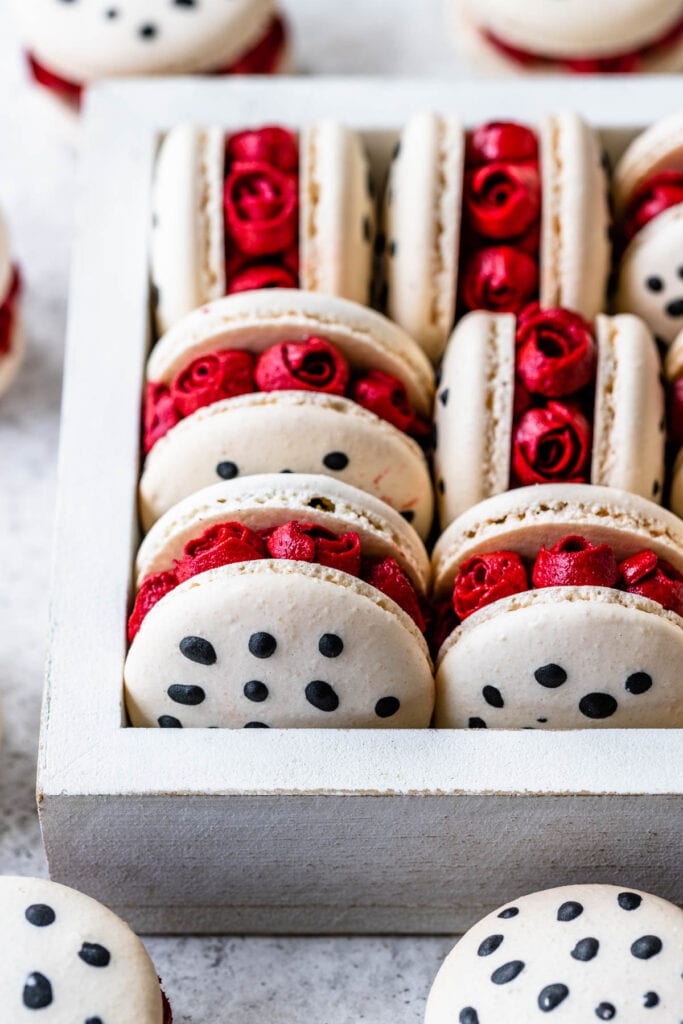
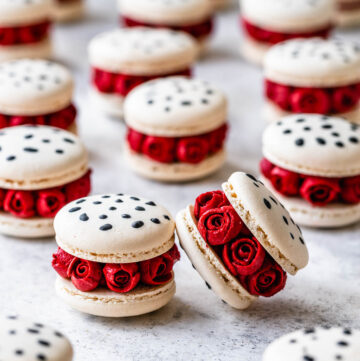
Cruella De Vil Macarons
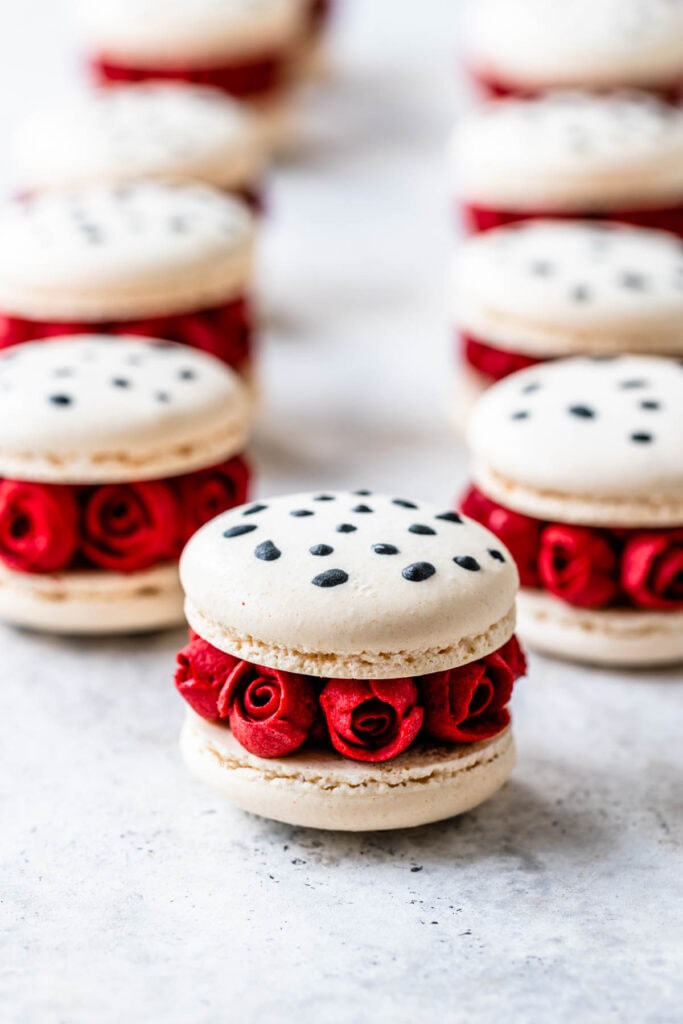
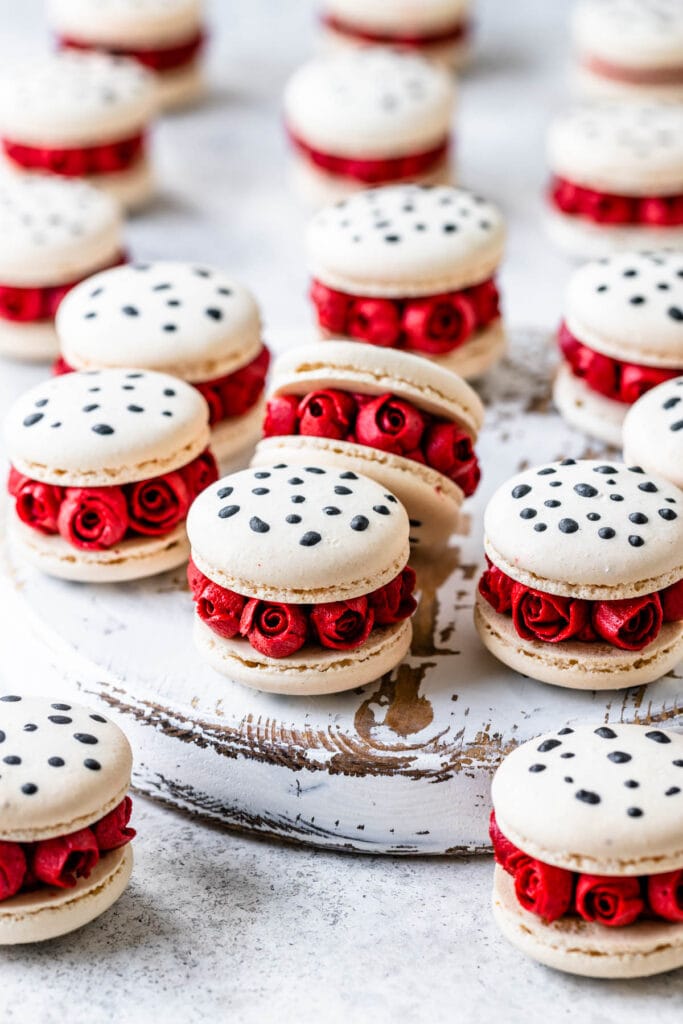
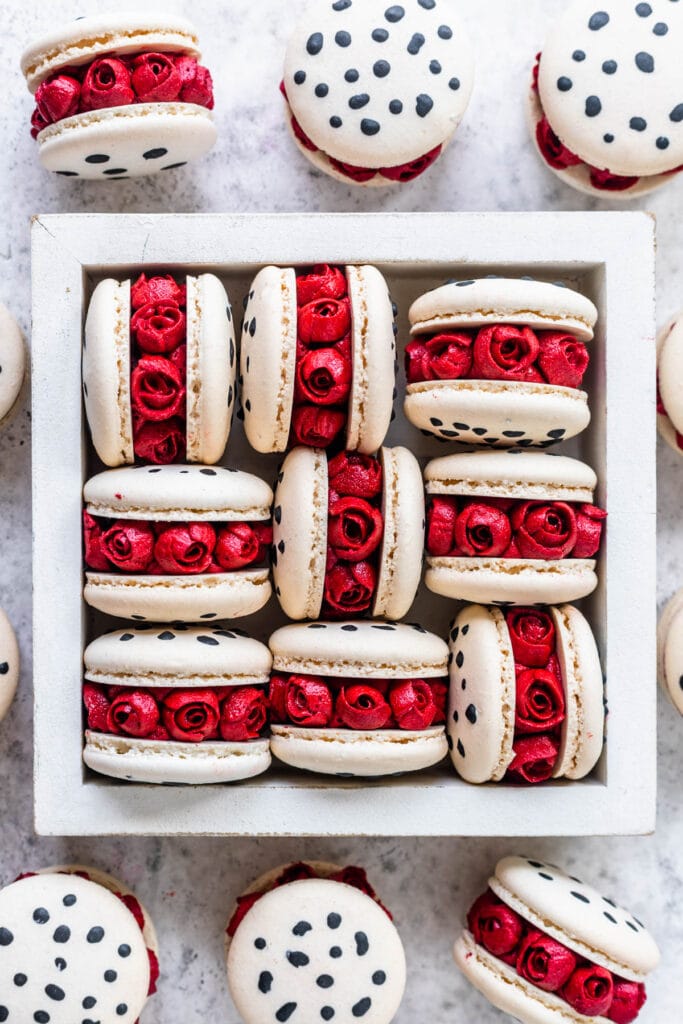
Hello friends! Today we are making these super awesome Cruella De Vil Macarons! They are filled with red velvet cake, and the roses were hand piped with buttercream, and I will show you everything about how to make them!
This design was inspired by a beautiful instagram creator ayseyamanbutikpasta, go check out her account!
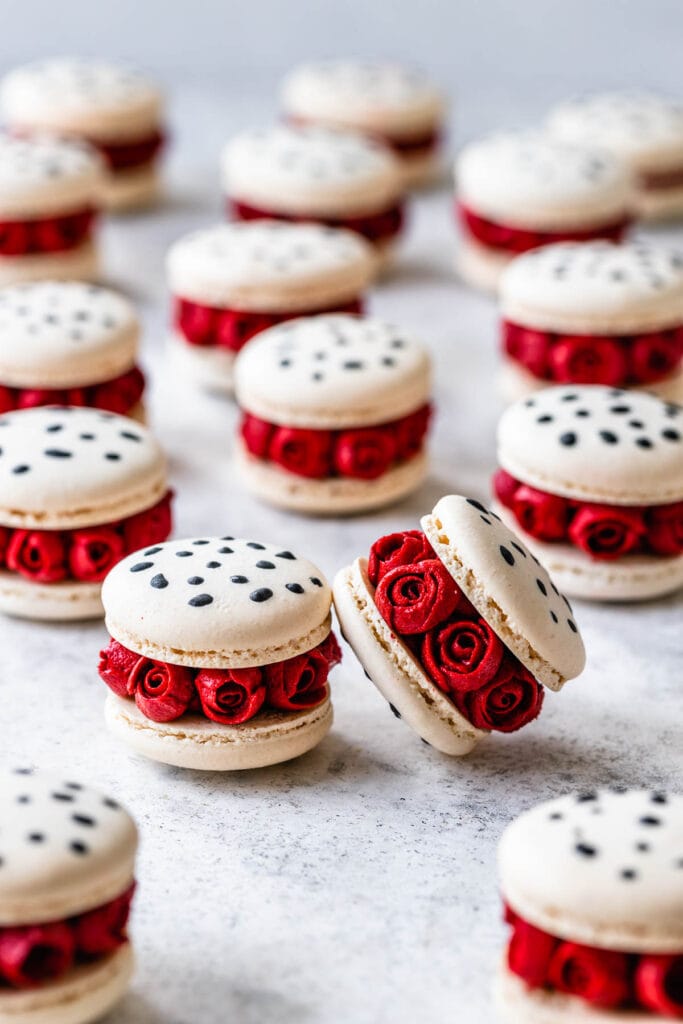
Piping the roses to make these Cruella De Vil Macarons was definitely the hardest part about making these macarons, and not necessarily hard. When I say hard I simply mean it took the longest. It was actually quite enjoyable and therapeutical.
This post may contain affiliate links. I earn a commission from qualified purchases. Please read our Privacy policy here.
I had to pipe over 160 roses, I can’t recall how many anymore, but basically I made about 23 macarons, and each took 8 roses, but I didn’t have enough to complete a couple of them.
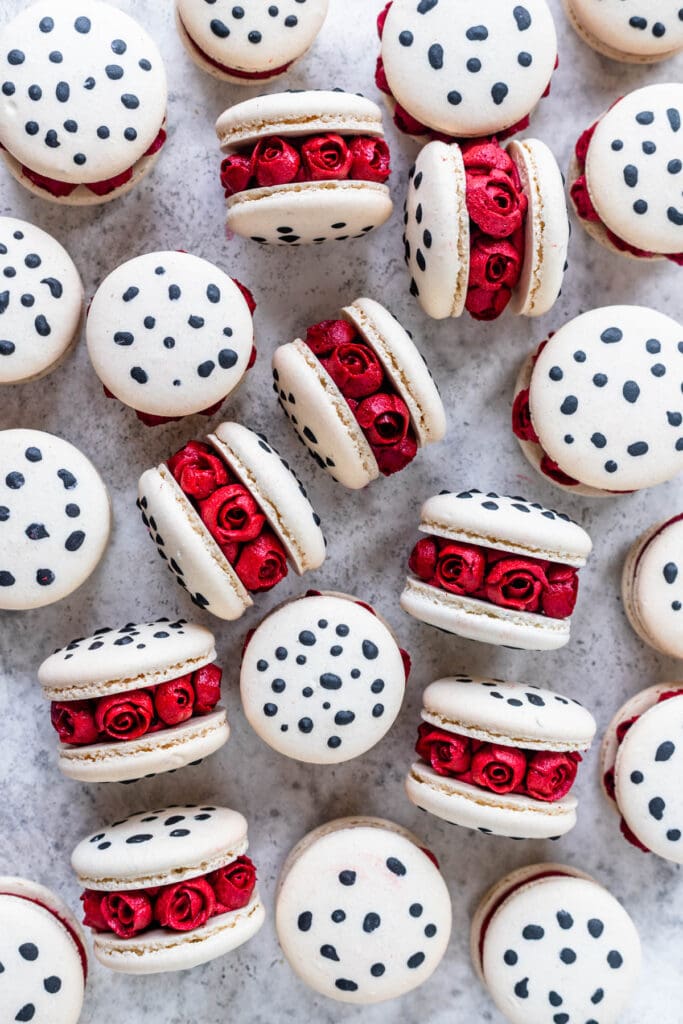
I am so in love with these Cruella De Vil Macarons, it has been such a dream of mine to make macarons with roses like this!
It is such a beautiful design and idea, check out the account on instagram that inspired me: ayseyamanbutikpasta.
And I have another similar design coming soon, with a different type of flower. They will be sunflowers!
The filling for these Cruella De Vil Macarons was red velvet cake and just regular buttercream.
Usually I’d make cream cheese frosting with red velvet cake, however I didn’t think the cream cheese roses would hold up as well as the buttercream ones did.
Next time I might try making them with royal icing because the buttercream tends to get too soft if it’s out of the fridge for too long.
Tips for piping the mini roses for the macarons:
- The buttercream for making the roses can’t be too soft, and it can’t be too stiff, if it’s too soft it won’t hold up its shape, and if it’s too stiff, the petals will be cracked and weird looking.
- While piping the roses, keep a clean towel or a piece of paper napkin nearby, and each time you pipe a petal you might want to wipe the piping tip clean, so this way the roses won’t be all messy.
- As soon as you pipe the roses, place them in the freezer, because if they sit out too long they will start to get too soft.
- Only place the roses in the macarons once they have been totally chilled through in the freezer for at least an hour.
- Work fast when filling the macarons. Pipe the frosting around the cake in the center, and then pull the exact amount of roses you will use from the fridge or freezer, and work quickly to get them placed in the macarons. Keep the roses you aren’t working with in the freezer or fridge so they don’t start to get too soft.
- Place the assembled macarons immediately in the fridge.
I used the piping tip 101 from Wilton, which is the smallest petal tip I could find.
Also make sure to use a flower nail to pipe the roses, I don’t know how I would have done it without a nail.
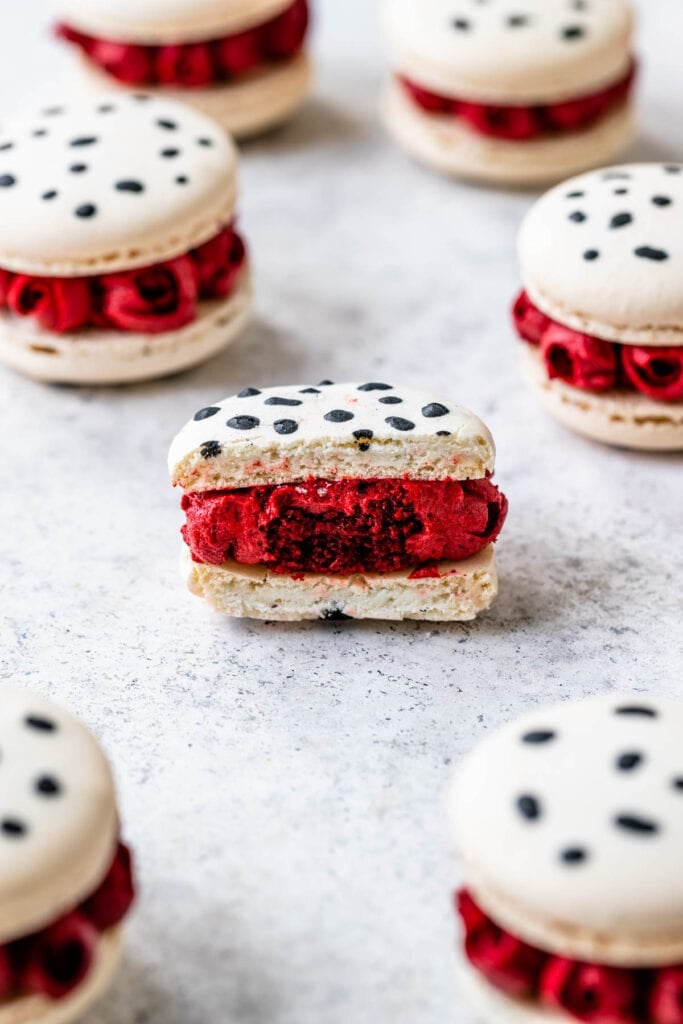
Another important tip about the macarons is to use a small tip to pipe the black spots on the shells. The first time I made them, I used a tip number 3, and the pattern kind of resembled a cow instead of Dalmatians, so I found the tip number 1 to be much better for piping the spots.
Also make sure to watch the video on YouTube or here on this page which will be super helpful to show the whole process of how to make these macarons with roses.
For more macaron recipes click here.
Here are some you might like:
- Red Velvet Macarons
- Ruby Chocolate Macarons
- Mango Raspberry Macarons
- Gold Macarons
- Lavender Macarons
- Snickers Macarons
- Galaxy Macarons
- Hazelnut Macarons
And to learn everything about macarons, check out Macaron School, a page here on my blog dedicated to teach you everything there is to know about how to master the art of making macarons, tips, tricks, troubleshooting, the science behind macarons, and more!
Cruella De Vil Macarons (101 Dalmatians)
Ingredients
Macaron Shells
- 100 grams egg whites
- 100 grams white granulated sugar
- 105 grams almond flour
- 105 grams powdered sugar
- Food coloring for the white batter I used white powder food coloring by the Sugar Art, and for the black batter I used black powder by the Sugar Art and also black gel food coloring by Americolor
Red Velvet Cake
- 1/4 cup unsalted butter room temperature 56 grams
- 1/4 cup vegetable oil
- 3/4 cup granulated sugar 150 grams
- 1 large egg
- 1 tsp vanilla extract
- 14 grams red gel food coloring 1 tbsp
- 1 1/3 cup all-purpose flour 167 grams
- 2 tbsp cocoa powder 15 grams
- 1/2 tsp baking soda
- 1/4 tsp salt
- 2/3 cup buttermilk 156 ml*
Buttercream
- 1 1/2 cup unsalted butter 339 grams
- 4 to 5 cups powdered sugar 500 to 625 grams*
- 2-4 tbsp milk if needed
- 1/2 tsp vanilla extract
Instructions
Macaron Shells
- Before you start, get all of the ingredients ready. Prepare a large piping bag, fitted with a round tip, I use a 1/4” diameter tip. Also line another piping bag fitted with a Wilton #1 piping tip, one of the smallest round tips there are. Set aside.
- Line two baking sheets with parchment paper or silicone mat.
- I use a baking mat with the macaron template already in it.
- Measure out all of the ingredients.
- Sift the powdered sugar and almond flour together. Set it aside.
- Place a bowl over a pan with barely simmering water. Add the sugar and egg white powder to the bowl if using. If you’re not using egg white powder simply skip it.
- Whisk the sugar and egg white powder so it doesn’t clump up.
- Add the egg whites to the bowl and whisk until the sugar is completely melted. It will take a couple of minutes. You can test by touching the mixture between your fingers, and if you feel any sugar granules just keep whisking the mixture over the water bath.
- Make sure the bottom of the bowl isn’t touching the simmering water because you don’t want the whites to cook.
- Also, don’t overheat the sugar syrup, this may cause issues down the line, such as wrinkly macarons.Transfer the syrup to the bowl of a stand mixer.
- With the whisk attachment, start whisking mixture on low for about 30 seconds, then gradually start increasing speed to medium. Whisk on medium for one to two minutes, until the mixture is white and starting to become fluffy. Raise the speed to medium or medium-high and whip for a few minutes until stiff peaks are formed.
- To know if the meringue is done whipping , keep your eye on the whites. Once they get glossy and you start seeing streaks formed by the whisk, and the meringue raising in the center of the whisk, it might be time to stop.
- Whisk until stiff peaks have formed. When you pull your whip up, the peak should be stiff and shooting straight up, with possibly a slight curve at the top, but not bending down to the side.
- Pour the sifted powdered sugar and almond flour into the stiff meringue.
- Start folding gently forming a letter J with a spatula.
- Fold the dry ingredients with the meringue just until you see no more dry ingredients in the meringue.
- As soon as you see no more dry ingredients in the meringue, stop stirring. Divide the batter between two different bowls. You will need more white batter than black, so have that in mind. You could probably do 1/4 of the batter black and the rest white, but I didn’t measure mine I just eyeballed it.
- Work with one bowl at a time, leaving the other bowl covered meanwhile.
- To the first batter add white powder food coloring and stir until the perfect consistency is achieved. The batter should be flowing slowly and effortlessly off the spatula, you should be able to pick up some batter with the spatula and draw several figure 8s with the batter that’s flowing, without having the batter break up. And even after the batter breaks up, it should still continue to flow off the spatula slowly.
- There’s another test you can do. I call it the Teaspoon test. Grab a teaspoon of batter and spoon onto the parchment paper or silicon mat. Wait a minute to see how it behaves.
- If the batter stays stiff, forming a point and doesn’t spread out, fold a little bit more, about 3 folds.
- Test again.
- You don’t want your batter to be too runny either. So be careful not to over mix. It’s always best to under mix and test several times until the proper consistency has been achieved.
- When you hold the spatula with batter on top of the bowl and the batter falls off the spatula slowly but effortlessly the batter is ready. The batter will keep flowing off the spatula non-stop, but not too quickly.
- Once the batter spreads out a bit and starts to look glossy and smooth on top, on the parchment paper, it’s ready.
- Transfer the white batter to the piping bag fitted with the large round tip.
- Now let’s work with the other batter. Add a bit of black powder food coloring as well as gel food coloring to the batter. I am not sure how much I’ve added, I just kept adding until the color was deep enough.
- Be careful at this point not to over mix the batter, because often times people will continue to add color in order to obtain a more vibrant tone, and will end up over mixing the batter in the attempt to obtain the desired color.
- Fold the batter until the perfect consistency is achieved. Like I’ve mentioned before, the batter should be flowing off the spatula slowly and effortlessly, and should be able to form a few figures 8s with the batter that’s flowing off the spatula without having it break up, and even after it breaks up, it should still continue to flow off the spatula slowly and effortlessly.
- Transfer the black batter to the piping bag fitted with the number 1 piping tip, or with the smallest piping tip you have.
- Place the piping bag containing the white batter directly 90 degrees over the center of each macaron template. Apply gentle pressure and carefully pipe for about 3 seconds, and then quickly pull the bag up twisting slightly.
- Once you’ve piped as many circles as you could, pipe small spots with the black batter on the surface of the shells, to form the Dalmatian pattern. Make the spots small, or you’ll end up with a cow pattern, I’m speaking from experience here.
- Bang the trays against the counter or against the palm of your hands a few times to release any air bubbles.
- Use a toothpick to pop any air bubbles in the surface of the shells.
- Let the trays sit for a while so the shells will dry out a little bit. I usually leave about 20-40 minutes, depending on how humid the day is. You’ll know they’re ready when you gently touch the surface of a macaron and it seems dry.
- Pre-heat the oven to 310ºF.
- Bake one tray at a time.
- Bake for 5 minutes, rotate the tray.
- I bake each tray for about 15 to 20 minutes.
- You can place a piece of foil over the macarons to prevent the white part from browning too much.
- When baked, the macarons will have a deeper color and formed feet. If you try to move a macaron, it shouldn’t feel jiggly. If the macaron is still jiggly, keep baking.
- Remove from the oven and bake the other tray.
- Let the macarons cool down before proceeding with the filling.
Red Velvet Cake
- Pre-heat the oven to 350ºF. Grease and line a jelly roll pan (10×15”-read the notes for substitution) with parchment paper, then grease the parchment as well. Or simply butter and flour the pan. Set aside.
- Cream the butter, oil, and granulated sugar in a bowl with an electric mixer for 2 minutes, until fluffy and lightened in color.
- Add the egg and mix to combine.
- Add the vanilla extract and the red gel food coloring, and mix until incorporated.
- In a separate bowl, whisk the flour, cocoa powder, baking soda, and salt together, and let’s add it to the batter in thirds, alternating with the buttermilk.
- Add 1/3 of the dry mixture to the batter. Mix until incorporated.
- Add 1/3 cup of buttermilk to the bowl. Mix until combined.
- Now add another 1/3 of the dry mixture to the batter.
- Mix, and then add the remaining 1/3 cup of buttermilk.
- Finally, finish with another addition of flour. Mix until incorporated.
- Pour the batter onto the prepared baking pan.
- Bake in the pre-heated oven for 15 to 20 minutes, or until a toothpick comes out clean when inserted in the cake.
- Remove and let it cool completely.
Buttercream
- Beat the butter with an electric mixer at medium speed until smooth, for a couple of minutes. Add the powdered sugar and I also added a bit of red powder food coloring at this point to help achieve a vibrant color. Mix on low until incorporated. Raise the speed to medium high and beat for another minute.
- I also added a bit of red gel food coloring to deepen the color.
- Add the vanilla and mix to combine.
- Transfer the buttercream to a piping bag fitted with a petal tip number 101.
- Don’t put all the buttercream in the piping bag at once, because you will be handling the piping bag for a while and that can make the buttercream get warm and soften up. Leave the remaining buttercream covered.
To pipe the roses
- I like to use a flower nail to do this. Also cut small squares of parchment paper.
- Pipe a tiny dollop of frosting on the flower nail and glue the paper on top.
- Place the piping tip perpendicular to the paper, with the larger part of the tip on the bottom, and the thinner part on top.
- Make a cone as you spin the flower nail, and apply pressure to release buttercream.
- Then start piping the petals around by going up and down with the piping bag as you rotate the nail. It’s very helpful to watch the video and see how this is done. You only need a few petals, because the rose can’t be too big for the macarons.
- Place each paper with the piped rose on a baking sheet and then place the baking sheet in the freezer.
- Let the roses sit in there until completely solid. Don’t leave them out for too long or they will start to get soft and will be hard to handle.
To assemble the macarons
- Use a piping tip or small round cutter to cut circles of cake. Place a cake round on a bottom macaron shell.
- Using a small round piping tip pipe some buttercream around the cake circle. Then attach the roses straight from the freezer. Be quick when doing this because the roses may start to get soft and melt very quickly.
- Pipe more buttercream on top of the cake, and then place another shell on top.
- Place in the refrigerator immediately.
Storage
- These macarons can be stored in the fridge for 5 to 7 days, or in the freezer for up to 1 month or so.
Hello and thanks for these beautiful macs!
And for all your work really 💜
Question for you: did you use the sugar art white powder food coloring because you had issues with Americolor white?
I am asking because I have noticed that my almond paste is super sticky – and difficult to work- when i use Americolor white (I i do the Italian method).
Just because americolor white doesn’t really work for me, it never really made my shells too white, but the powder does help a lot.
Thank you so much for posting video.
Can’t wait to try making the roses. I have never made them but willing to try.
They are very fun to make!!
Esses macarons ficaram fantásticos!!!!!!!