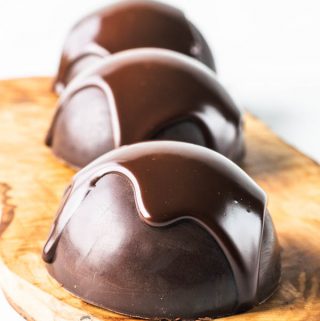
Chocolate Bomb
I made this Chocolate Bomb recipe because I wanted to test my new Half Sphere Silicone Cake Mold.
You can make them using any silicone molds. I do suggest it to be silicone so you can easily take it out of the mold.

To make this Chocolate Bomb recipe, you will have to follow a lot of steps. But the results are so worth it. And the steps are not hard.
This post may contain affiliate links. I earn a commission from qualified purchases. Please read our Privacy policy here.
How to make Chocolate Bombs
My Chocolate Bombs are filled with chocolate mousse, dulce de leche, and chocolate cake. Then, topped with chocolate ganache. It’s really rich and chocolatey, two of my favorite things in a dessert.
Here’s the schedule for making these:
First, you want to start by making the dulce de leche, if not using store-bought. That’s what usually takes the longest, because you have to wait for it to cool down. You can for sure use dulce de leche from the store. That’s up to you. I have instructions bellow.
Second, you want to make the cake.
Have the cake ready and cooled down before you start assembling the chocolate bombs.

I used 2.5″ round cutters to fit my silicon pans.
Third, make the chocolate mousse.

Next, get ready to temper the chocolate.
Tempering chocolate sounds more intimidating than it actually is.
The reason why I like to temper my chocolate is because this process provides a beautiful shine, and proper texture and snap to our final product. Another great benefit to tempered chocolate is that it melts at a higher temperature, so your truffles, molded chocolates, etc, won’t be losing shape or shine any time soon!
Tempering is a very simple process, but can intimidate a few people. First because it involves a thermometer. Second because I believe that not a lot of people really understand why or how tempering actually works.
Basically, tempering is the process that allows very specific cocoa butter crystals to form. The cocoa butter in chocolate can crystalize in 6 different forms. Because of that, you are looking for a very specific temperature in which your desired crystal type will form. They are called beta crystals. And they are the ones that will provide your final product with all those great qualities we’ve mentioned above (shine, texture, snap).
Even if you don’t have a thermometer, you can read this article from The Kitchn on how to temper chocolate without a thermometer.

Once your chocolate is tempered, you are ready to start working. Have all of your elements ready to go and start fast because the chocolate will start to drop temperature.
Start by coating your silicon cavities with the tempered chocolate.

Make sure to get an even layer. So your chocolate bomb will have a smooth dome.
Then, place pans in the freezer for about 15 minutes, or until completely solid.
Remove and Proceed to add mousse to the cavities. About 1 tablespoon.
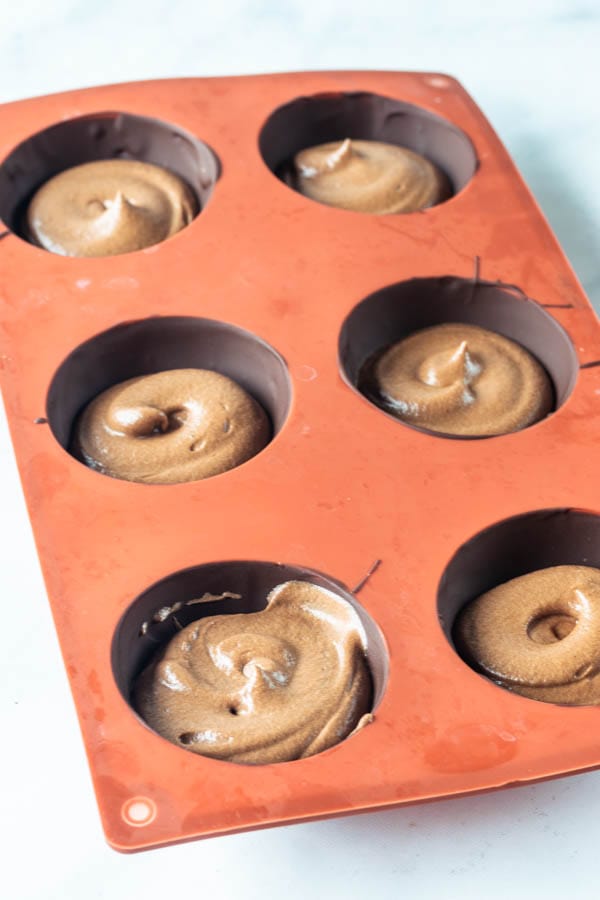
To do this, you can use a spoon to pour some mousse in the cavities, or use a piping bag.
Now place the silicon pans again in the freezer for about 5 minutes.
It’s time to add the dulce de leche.
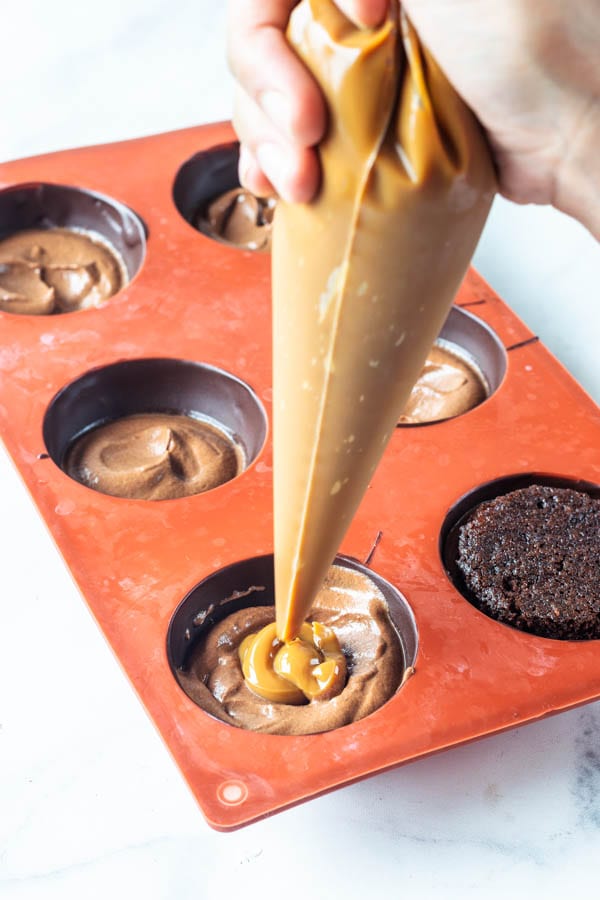
I used a piping bag to do that. Just pipe about 1 teaspoon of dulce de leche right in the center.
Remember the proportions I am giving you are proper to my pan size, which are cavities about 2.75″ in diameter.
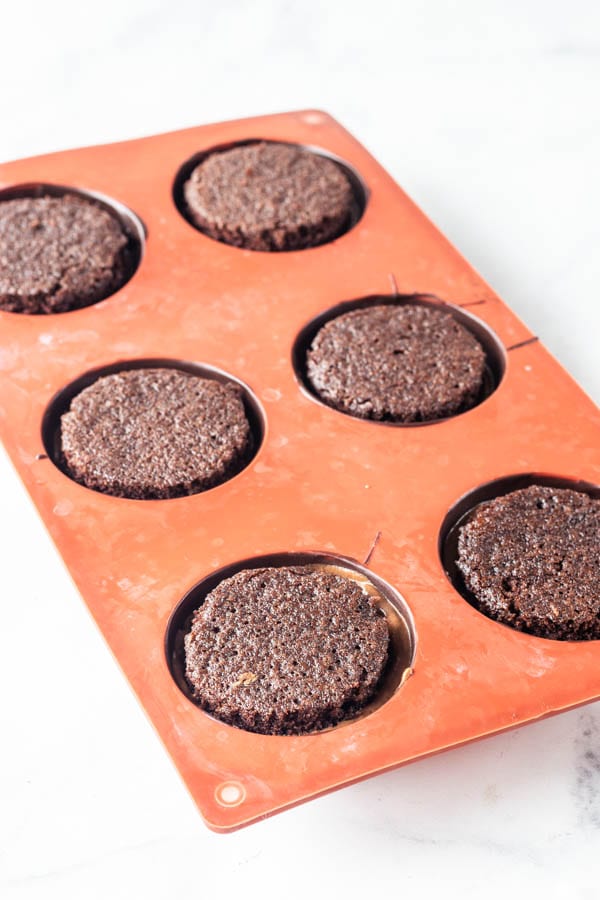
After piping the dulce de leche, place the cut out cake rounds on top.
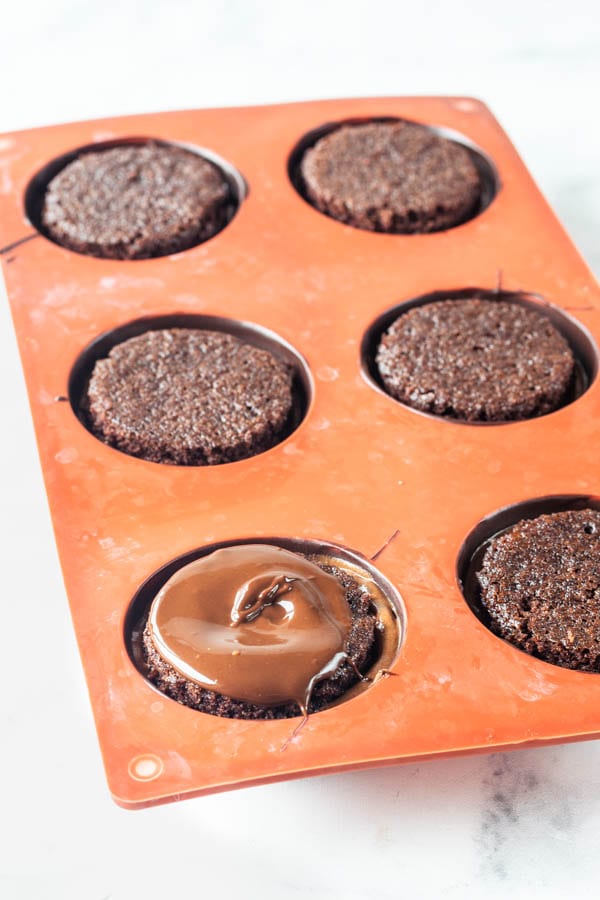
And last but not least, spread the last of the chocolate on top of cake rounds. Make sure to use a spatula to make the chocolate very even. Here in my picture I was just starting to spread the chocolate, I hadn’t had a chance to smooth it out, and forgot to take a picture after I had done it.
Place the whole thing in the freezer for a couple of hours, until completely solid.
About the decorations on top, I actually made some chocolate twirls that I was planning on placing on top of my chocolate bombs.
The chocolate twirls actually came out very pretty.
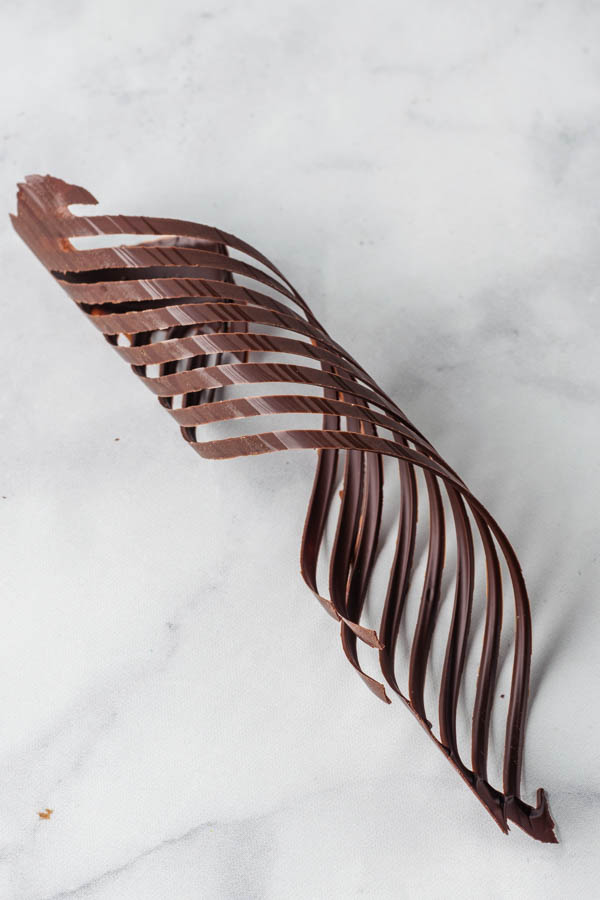
But they were too big to place on top of the small chocolate bomb.
This is the video I watched that taught me how to make these twirls. It’s an awesome video!
Well, I’ll try the twirls technique on another dessert later on.

After resting in the freezer, remove the chocolate domes from the silicon pans.
And now it’s time to pour the ganache. Make the ganache after you are done assembling the chocolate bomb, this way the ganache will have time to come to room temperature so it can be poured over chocolate domes.

After pouring the chocolate over the bombs, if there are any air bubbles, simply pop them with a toothpick. Do this before the chocolate sets, or you’ll just end up with holes in your ganache drip.
And now, the moment we have all been waiting for!
A picture of the inside of our chocolate bomb!

Tada!
This was a pretty neat cut I got when the chocolate dome was still pretty solid.
After leaving it on the counter for about 30 minutes, it got softer and messier, the way I like it.

My favorite creamy, indulgent, delicious chocolate dessert!
I hope you have enjoyed today’s recipe!
Have a great day!

Here are some other chocolate recipes you might like: Pecan Fig Cake, Lindt Truffle Chocolate Cupcakes, Espresso Chocolate Scones.
Chocolate Bomb
Ingredients
Chocolate Shell
- 3 cups chopped dark chocolate 525 grams, 18.5 oz
Chocolate Mousse
- 1/4 cup heavy cream 60 ml
- 1/2 cup chopped dark or semi-sweet chocolate 85 grams, 3 oz
- 1/8 teaspoon fine sea salt
- 1/2 cup heavy cream 120 ml
- 2 tablespoons powdered sugar sifted
- 1/2 teaspoon vanilla extract
Dulce de leche
- 1 can of condensed milk* or
- 1/4 cup dulce de leche 66 grams, 2.3 oz
Chocolate Cake
- 1/2 cup all-purpose flour 63 grams, 2.25 oz
- 1/4 teaspoon fine sea salt
- 1 1/2 tablespoons cocoa powder
- 1/4 teaspoon baking soda
- 1/2 teaspoon vanilla extract
- 1/4 cup butter 1/2 stick, 56 grams, 2 oz
- 1/2 cup sugar 100 grams, 3.5 oz
- 1 egg
- 1/2 teaspoon vanilla extract
- 1/4 cup brewed coffee or hot water if you don’t want to use coffee
Chocolate Ganache
- 60 grams heavy cream 1/4 cup
- 60 grams chopped dark chocolate 1/3 cup
Instructions
Chocolate Shell
- We are going to temper the chocolate for the shells.
- Start by chopping the chocolate very finely.
- Add 3/4 of the chocolate to a double boiler.
- Melt it, stirring constantly, over barely simmering water, until it reaches 114F-118F. (or 105F-113F for milk and white chocolate).
- Add the remaining 1/4 of the chopped chocolate to melted chocolate. Do this slowly. Add a bit, stir until melted, and then proceed to adding more.
- Keep stirring until chocolate reaches 82F-84F. If using milk or white chocolate, it should reach about 81F. Note that this might take some time. Be patient and add the chocolate slowly.
- Once chocolate reaches this temperature, set it over the double boiler, with barely simmering water, stirring constantly, for just a few brief moments, until chocolate reaches 88F-90F. (84F-86F for milk, and 82F-84F for white chocolate)
- That’s when your chocolate is in temper. Test it out by smearing a bit of the chocolate over a piece of parchment paper. If it dries shiny and bright, it’s in temper. If it dries and becomes dull and white, it’s not in temper.
Chocolate Mousse
- Make a ganache by placing chopped chocolate, heavy cream, and salt over a double boiler. Keep stirring mixture to ensure it will melt evenly.
- Alternatively, you can use the microwave and insert the mixture in the microwave at 20 second intervals, stirring in between, until chocolate has melted and the ganache is smooth.
- Leave ganache on the counter until it cools down to room temperature. It shouldn’t be warm. Stir it occasionally to ensure even cooling, and to prevent a skin from forming.
- Once ganache has come to room temperature, you can proceed with whipping 1/2 cup of heavy cream with powdered sugar and vanilla extract.
- Whip on medium-high until stiff peaks form.
- A huge tip I can give you is having very cold heavy cream when you whip it. Insert the heavy cream in the freezer for a few minutes before whipping it. Having your bowl and whip cold will also contribute to a better whipped cream.
- Pour whipped cream over cooled ganache. Fold slowly until completely incorporated and you don’t see any white streaks, but don’t overmix the mousse.
- Line a large piping bag with a round tip. Fill it up with the mouse. This will help you pour the mousse into the silicone cups later. If you prefer, you can simply leave the mousse in a bowl and spoon it onto your silicone cups.
Dulce de Leche
- There are many ways you can go about making homemade dulce de leche from a can of condensed milk. One way of doing this is to pour the condensed milk in a glass baking dish, and bake at 350F, over a water bath, and covered with a piece of aluminum foil for about 2-3 hours, stirring in between, until I achieve my desired color and consistency. Choose a small baking dish if you are only baking the one can of condensed milk.
- Alternatively, you can put the sealed can in a pressure cooker, filled with water a bit below capacity. Cook over medium-low heat for about 25 minutes. Let the can cool completely before opening it! This is very important! I leave my can submerged in the water until cool enough to be handled.
- Store leftovers in a container in the fridge for up to 15 days.
Chocolate Cake
- Line a 9×13” cake pan with a piece of parchment paper.
- Pre-heat oven to 350F.
- Sift flour, salt, baking soda, and cocoa powder together.
- With an electric mixer, cream butter for about 45 seconds on medium high speed.
- Add sugar, and cream until mixture is fluffy and lightened in color, about 1 minute.
- Add egg and vanilla. Mix until incorporated.
- Add dry ingredients and stir with a spatula, by hand.
- If you see lots of lumps, use a whisk to gently smooth them out.
- Add hot coffee, or water to the batter. Mix until combined.
- Pour onto prepared pan.
- Bake for about 10 minutes. After 8 minutes in, keep checking, and rotate cake if necessary.
- Let cake cool down.
Chocolate Ganache
- Place chopped chocolate in a bowl.
- Heat heavy cream until it almost comes to a boil.
- Pour over chopped chocolate.
- Let it sit for 1 minute.
- Stir until completely melted.
- Set aside to cool. Ganache should cool completely before you pour it over Chocolate Domes. Test its consistency by pouring a small drop over a chocolate dome. If it seems too runny, place ganache in the fridge for a few minutes, stir, and check for consistency again. If ganache seems too stiff and not dripping enough, place it in the microwave for just a few seconds at a time. I am talking like 4 seconds at a time, stirring in between, and checking for consistency.
To assemble
- When assembling this, have all elements ready to go.
- You will need silicone pans to do this.
- are the pans I used. If using different a different pan, you might need to make adjustments to the following directions. You are simply going to adjust the amount of mousse, or the amount of dulce de leche, and the size of your cake rounds according to the size of your pans.
- Place mousse in a piping bag, or have it in a bowl with a spoon right next to it.
- Have your chocolate in temper, which is why tempering the chocolate should be the last thing you do. Because it will lose temper as it sits, and you will have to re temper it, which takes some time.
- Have your dulce de leche in a piping bag, or in a bowl, with a spoon ready to go.
- Have your cake rounds cut out. Cut out circles with a 2 1/2” cookie cutter. You will need 12 cake rounds if using the same size pans I am using.
- Start by using a spoon to cover the surface of your cavity with chocolate. Spread it evenly.
- Place pans in the freezer for about 15 minutes, until solid.
- You can try to keep the chocolate in a warm place while you wait for the shells to solidify, maybe over the pan of water you used for the double boiler, since the water will still be hot from when you had it simmering earlier. This way you don’t have to re-temper your chocolate to finish making the bottom part of the domes.
- Remove pans from the freezer, pour a little bit of mousse in each cavity, about 1 tablespoon.
- Place in the freezer for about 5 minutes.
- Remove from the freezer and pipe some dulce de leche over mousse, in the center. You will use about 1 teaspoon each.
- Place the cake round on top of dulce de leche.
- Cover with more tempered chocolate, spread it with a spatula in order to obtain a smooth bottom that won’t be crooked once you flip them over.
- Leave them in the freezer for a few hours.
- Remove and flip over.
- Pour ganache on top. Serve.
- Store in the fridge in an air tight container for up to 4 days.
- I like to serve mine immediately after I am done assembling it, because once you start storing your chocolate bombs in the fridge, they will sweat after you let them sit at room temperature, because that’s what chocolate does. Either way, it’s not a huge deal.
Notes
Nutrition
can i use this recipe in a large 2 and 4 silicone mold for a birthday ill have to double or triple recipe
I would double the recipe just to make sure!
On step 4 of “Melting Chocolate (tempering), do you remove it from the double boiler after it reaches the applicable temperature, add the remaining chocolate, then add it back to the double boiler?
Not back to the double boiler, unless you need to bring the temperature back up. But if you’re using good quality chocolate, you don’t have to be so rigid about tempering. Chocolates like Callebaut, even Lindt are very good about keeping the shine without strict tempering rules.
On step 4 of Melting Chocolate- tempering. Do you remove it from the stove after it reaches the applicable temperature and then add the remaining chocolate. Once all that is melted then add it back to the double boiler?
Hi
This looks great can it be made ahead and kept in the freezer until Christmas please.
Yes you can!
great recipe, followed it exactly, but I already had a homemade salted caramel sauce that was almost as thick as dulce leche, so I used that. Everyone loved them. Thank you
Sounds amazing!!!
I if making the night before should I keep them in freezer and then top with chocolate ganache the next day?
yes you can do that, or just add the chocolate and keep them in the fridge.
Hi. I’m in the UK… for the cake. Baking Soda is that what we call Bi Carb of Soda? If so what’s the acidic ingredient to activate the soda….. or should this be what we call baking powder?
the cocoa powder is acidic, the coffee is also mildly acidic but mainly the cocoa powder is activating it.
making this right not but my cake didnt come out as dark. i am a professional chef and pastry chef. i’m using hershey cocoa at home, hmmmm