Bunny Macarons
Hello friends! Today I will show you how to make these cute Bunny Macarons! They are perfect for Easter. These Bunny Macarons are filled with Golden Oreo Buttercream, and you will also find a free bunny template on this page that you can download, print, and place under your silicone mat or parchment paper to pipe your own cute little bunnies!
Make sure to watch the video on this page or on YouTube to see how to make the bunny shaped macarons!

Bunny Template
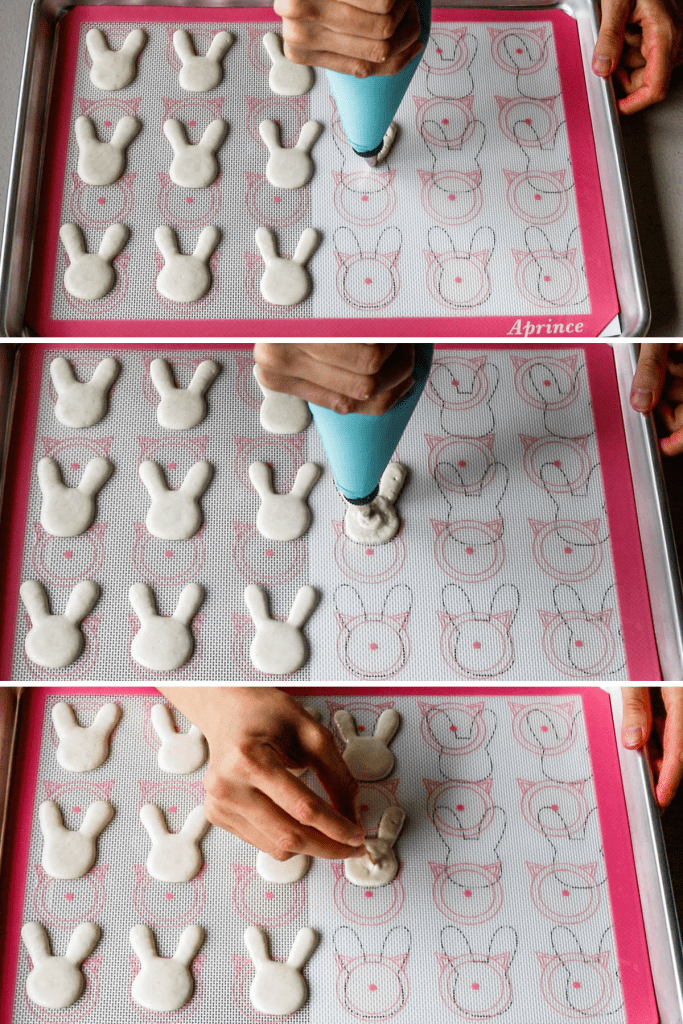
First things first, here is the Bunny Template! You can download it, print it, and place under your mat or parchment paper to pipe your own little bunnies.
This post may contain affiliate links. I earn a commission from qualified purchases. Please read our Privacy policy here.
Tips on how to pipe Bunny Macarons
- When piping shapes it helps if the batter isn’t too thick. If the batter is too thick or on the under mixed side, the macarons are not going to be smooth.
- Make sure to use a smaller tip such as a Wilton #8 or Wilton #6, specially because of the ears.
- Constantly tap the tray against the counter or against the palm of your hand to release air bubbles and to help the batter spread out.
- Also use a toothpick to pop air bubbles and to help drag the batter to the outlines if necessary.
Tips on how to bake Bunny Macarons
- Turn the oven temperature down if necessary. Initially I baked the first tray of bunny macarons at my usual 325ºF oven, and all the macarons were super dark and crispy. For the second tray, I lowered the temperature to 310ºF, which yielded much better results. And that’s because the batter will be thinner for the bunny macarons comparing to regular round macarons so maybe you can benefit from lowering the temperature.
- While you are at it, also lower baking time for the same reasons.
- Place a piece of foil or parchment paper halfway through baking the macarons, so they don’t brown too much as they bake.
Making shaped macarons doesn’t have to be super hard. It can be fun and you will get better as you continue to practice.
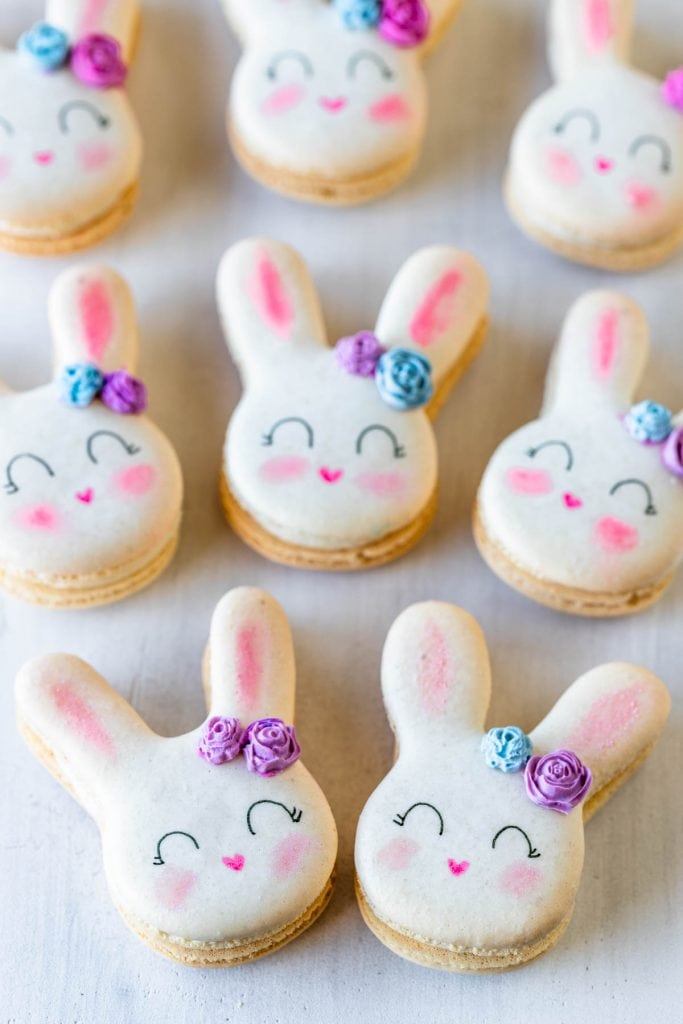
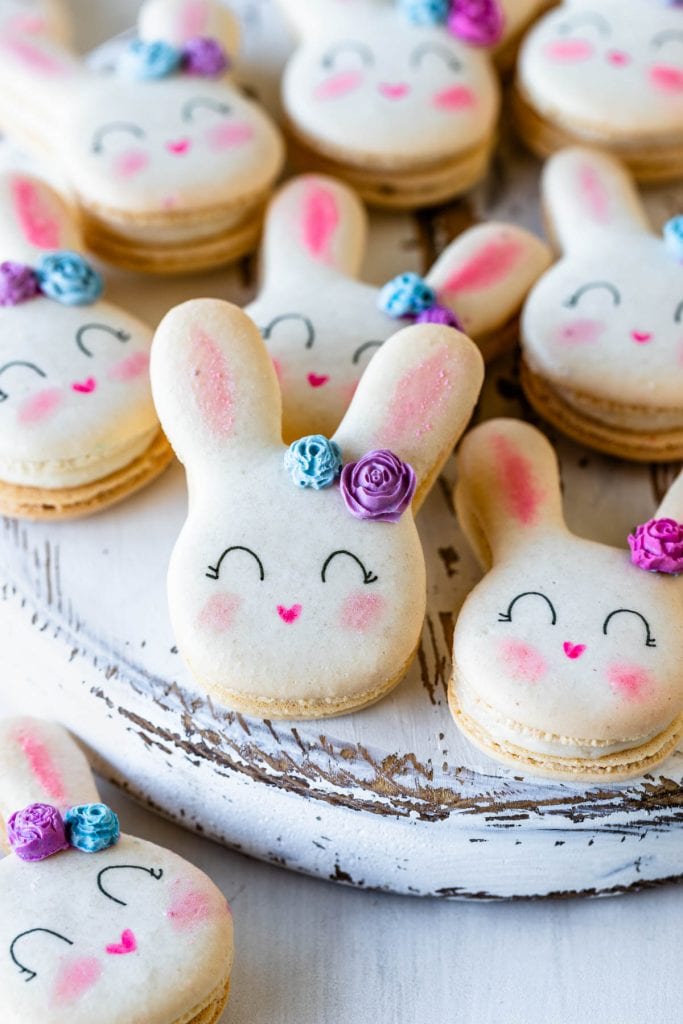
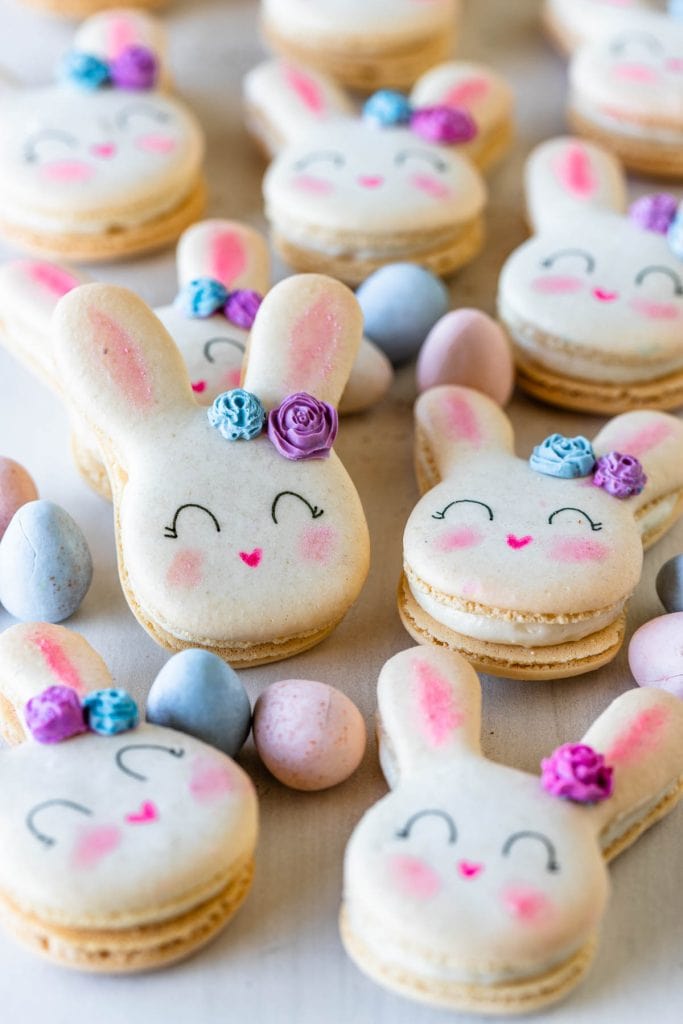
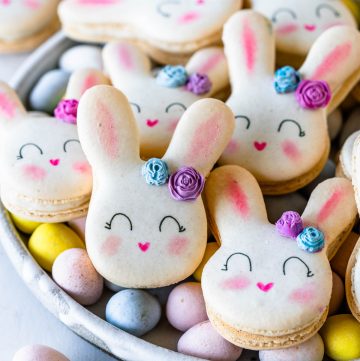
Bunny Macaron Decoration
To decorate the bunnies, I used edible pen, pink luster dust, and also candy melt roses.
This is the rose mold I used. I melted candy melts and added powdered food coloring, and then poured some in the smallest roses of the mold. Let the mold rest in the freezer for 5 minutes before removing the roses.
Don’t try to add liquid or gel food coloring to candy melts, it will curdle it. You need candy melt appropriate coloring, or powder food coloring will also work well.
For the cheeks and ears, I simply dipped my brush in the pink luster dust and brushed on the bunny’s ears and cheeks.
I used a black pen to draw the eyes of the bunnies, and a pink pen to draw the nose.
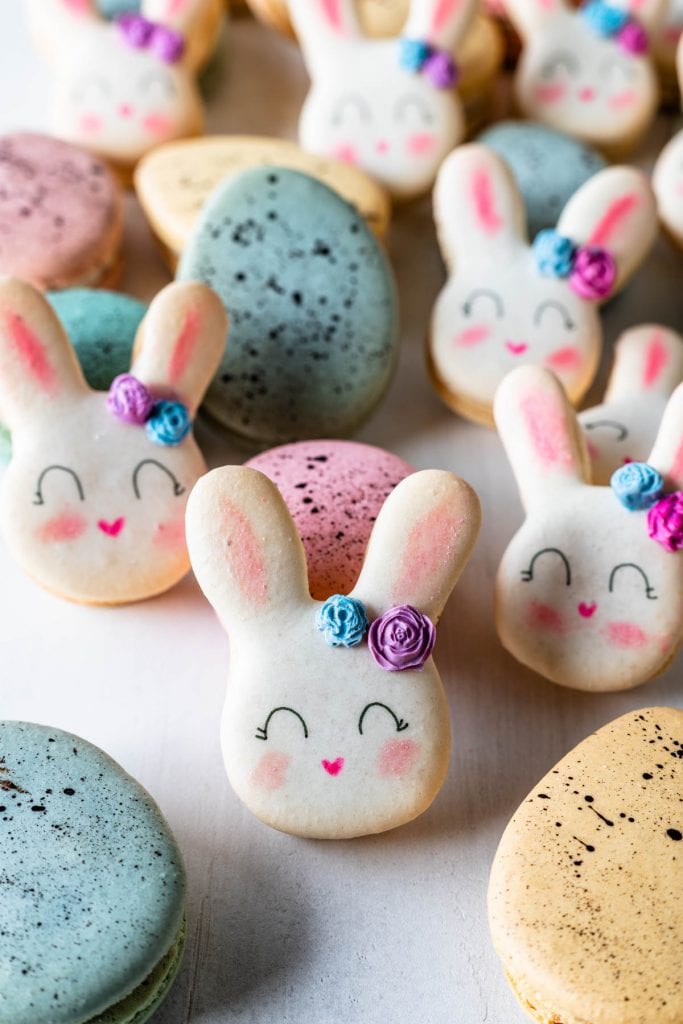
If you like these Bunny Macarons, you may also like:
- Carrot Cake Macarons
- Robin’s Eggs Macarons
- Eggs Nest Macarons
- Lemon Macarons
- Coconut Macarons
- Nutella Macarons
- French Vanilla Macarons
- Vanilla Bean Macarons
- Spring Macarons
- Earl Grey Macarons
- Chai Macarons
- Oreo Macarons
And if you are trying to improve your macaron skills, check out Macaron School, it has a lot of resources, articles, troubleshooting guides, and everything else you need to know to make amazing macarons!
Thank you so much for reading!
If you make this recipe tag me on instagram so I can see it, I love it when you share your work with me!
Bunny Macarons
Ingredients
Macaron Shells
- 100 grams egg whites
- 100 grams granulated sugar
- 105 grams almond flour
- 105 grams powdered sugar
- Food coloring if using
Golden Oreo Cream Cheese Frosting
- 48 grams crushed golden Oreos
- 85 grams cream cheese softened (3.5 oz)
- 42 grams unsalted butter 1.5 oz
- 118 grams powdered sugar
- 1 to 2 tsp cream as necessary
- 1/4 tsp vanilla extract
Candy Flowers
- 56 grams candy melts
- Powdered food coloring
To decorate
- Edible pens I used black and pink
- Pink Luster Dust
Instructions
Macaron Shells
- Before you start, get all of the ingredients ready. Prepare a large piping bag, fitted with a large round tip, I used a tip Wilton #8. Set aside.
- Line two baking sheets with parchment paper or silicone mat. Place the bunny templates underneath the silicone mat.
- Measure out all of the ingredients.
- Sift the powdered sugar and almond flour together. Set it aside.
- Place a bowl over a pan with barely simmering water, add the sugar and egg whites to the bowl. Whisk the mixture until frothy and the sugar is completely melted. It will take a couple of minutes. You can test by touching the mixture between your fingers, and if you feel any sugar granules just keep whisking the mixture over the water bath.
- Make sure the bottom of the bowl isn’t touching the simmering water because you don’t want the whites to cook.
- Also, don’t overheat the sugar syrup, this may cause issues down the line, such as wrinkly macarons.
- Transfer the syrup to the bowl of a stand mixer.
- With the whisk attachment, start whisking mixture on low for about 30 seconds, then gradually start increasing speed to medium. Whisk on medium for one to two minutes, until the mixture is white and starting to become fluffy. Raise the speed to medium-high and whisk for a few minutes until stiff peaks are formed. Best way to check this is to keep your eye on the whites. Once they get glossy and you start seeing streaks formed by the whisk, it might be time to stop.
- Whisk until stiff peaks have formed. When you pull your whip up, the peak should be stiff and shooting straight up, with possibly a slight bend at the top, but not bending down to the side.
- Pour the sifted powdered sugar and almond flour into the stiff meringue.
- Add the food coloring at this point, if using. I didn’t add any.
- Start folding gently forming a letter J with a spatula.
- How to know when to stop folding the batter: It’s time to stop folding when the batter is glossy and has a thick and flowing consistency. There are several ways to test this.
- First, pick up some batter with the spatula and try to draw a figure 8 with the batter that is dripping off the spatula. If you can form several 8 figures without the batter breaking up, that’s one indication that it might be ready.
- There’s another test you can do. I call it the Teaspoon test.
- Grab a teaspoon of batter and spoon onto the parchment paper or silicon mat. Wait a minute to see how it behaves.
- If the batter stays stiff, forming a point and doesn’t spread out, fold a little bit more, about 3 folds. Test again.
- Once the batter spreads out a bit and starts to look glossy and smooth on top, on the parchment paper or silicone mat, it’s ready.
- You don’t want your batter to be too runny either. So be careful not to over mix. It’s always best to under mix and test several times until the proper consistency has been achieved.
- When you hold the spatula with batter on top of the bowl and the batter falls off the spatula slowly but effortlessly the batter is ready. The batter will keep flowing off the spatula non-stop, but not too quickly.
- Transfer the batter to the piping bag.
- Pipe the ears of the bunny, go around the face with the piping bag and end in the center, then pull the bag up.
- Use a toothpick to spread the batter to the outlines if necessary and to pop any air bubbles.
- Tap the tray gently a few times against the palm of your hand or against the counter, and then use a toothpick again if necessary.
- Then move on to the next bunny and repeat the piping.
- Let the trays sit for a while so the shells will dry out a little bit. I usually leave about 20-40 minutes, depending on how humid the day is. You’ll know they’re ready when you gently touch the surface of a macaron and it seems dry.
- Pre-heat the oven to 310ºF. I typically bake my macarons at 325ºF, but my first tray of bunnies burned because the oven was too hot for them. Since each bunny has less batter than a regular round macaron, it will not only bake faster, but may also require a lower baking temperature.
- Adjust this according to your oven.
- Bake one tray at a time.
- Bake for 5 minutes, rotate tray.
- Continue baking for another 5 to 7 minutes, time baking depends on your oven and temperature you are using.
- You know the macarons are done baking if you try to move a macaron and it doesn’t feel jiggly. If the macaron is still jiggly, keep baking.
- Remove from the oven and bake the other trays.
- Let the macarons cool down before proceeding with the filling.
- You can also place a piece of foil or parchment paper halfway through baking to prevent the macarons from browning too much.
Golden Oreo Cream Cheese Frosting
- Make sure the Oreos are finely ground.
- Beat the cream cheese and the butter with an electric mixer for about 2 minutes until fluffy.
- Add the crushed Oreos, the powdered sugar and mix until combined.
- If the frosting is too stiff, add the additional cream, or milk, or even water if you prefer. And if the frosting is too runny, add more powdered sugar until it becomes thicker and creamy.
- Add the vanilla and mix until combined.
- Place the frosting in a piping bag fitted with a round tip.
Candy Flowers
- Melt the candy melts and add the powdered food coloring to dye it. Pour the melted candy melts in mini rose molds. Place the mold in the freezer for 5 minutes, then remove the roses from the molds. To decorate the bunnies
- Draw each bunny’s eyes and nose.
- Use a small brush dipped in pink luster dust to brush the cheeks and the ears of the bunny.
- Brush a bit of melted candy melt in the back of each rose and glue it in the bunny’s ear.
To assemble
- Pipe the filling on the bottom shells, then top with a decorated shell.
- Let the macarons mature overnight before serving.
Storage
- Store the bunnies in the fridge for up to 5 days, and in the freezer for up to 1 month.
Another phenomenal recipe from Camila/Pies and Tacos. Did a test batch to try before Easter. Came out beautifully. I used her a coconut filling instead of the vanilla Oreo. They are delicious. Thank you, Camila.!!!
Hi Juliene! I’m so glad you liked them!! Yay! Thank you for making my recipes! I really appreciate you!
So very excited to try this recipe!! But I only have measuring tools in ml and cups, I’ve looked at conversion charts, if there is a slight difference in the amount of ingredients, will it affect the outcome of the recipe? Thank you so much!!
you can try using the conversion charts but the issue is that each time you scoop one cup of almond flour or sugar, it is never the same consistently. if you scoop half of a cup of sugar using a measuring cup, it wont necessarily be the 100 grams you need for the recipe because it’s an inaccurate way of measuring. you can try until you can get a scale, but you do risk wasting ingredients and not achieving the best results by doing so.
If you added no food coloring, how did you get your macarons so white? In the picture they look Very White! I can never get mine to look like that? How do you do it?
I covered them with foil at the final 5 minutes of baking.
I have become OBSESSED with macarons since mastering the art of baking them. I love your site, so many great ideas to help me come up with my own. PS: Your Pink Floyd ones were OUT OF THIS WORLD!!!
Thank you so much!!!
Que lindos!! Adorei!! 😍😍😋😋😋👏👏👏👏
obrigada mae!! 🥰🥰🥰
Ficaram fantásticos, você tem uma habilidade incrível!!!!!!
obrigada pai🥰💛