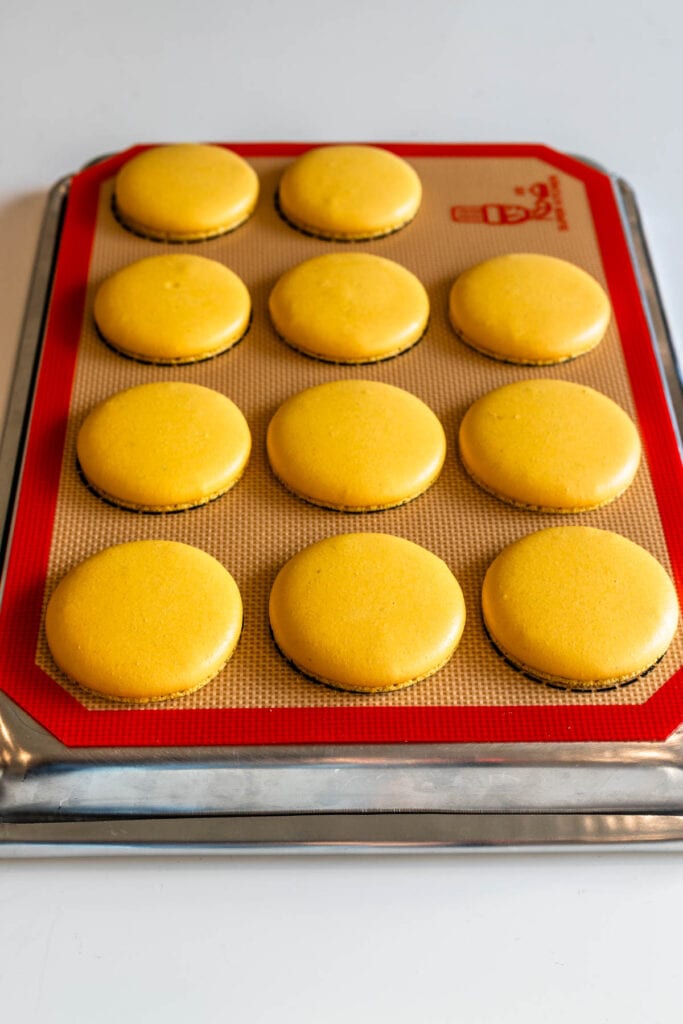
No Rest Macarons
Hello friends, today we are going to dive into no rest macarons.
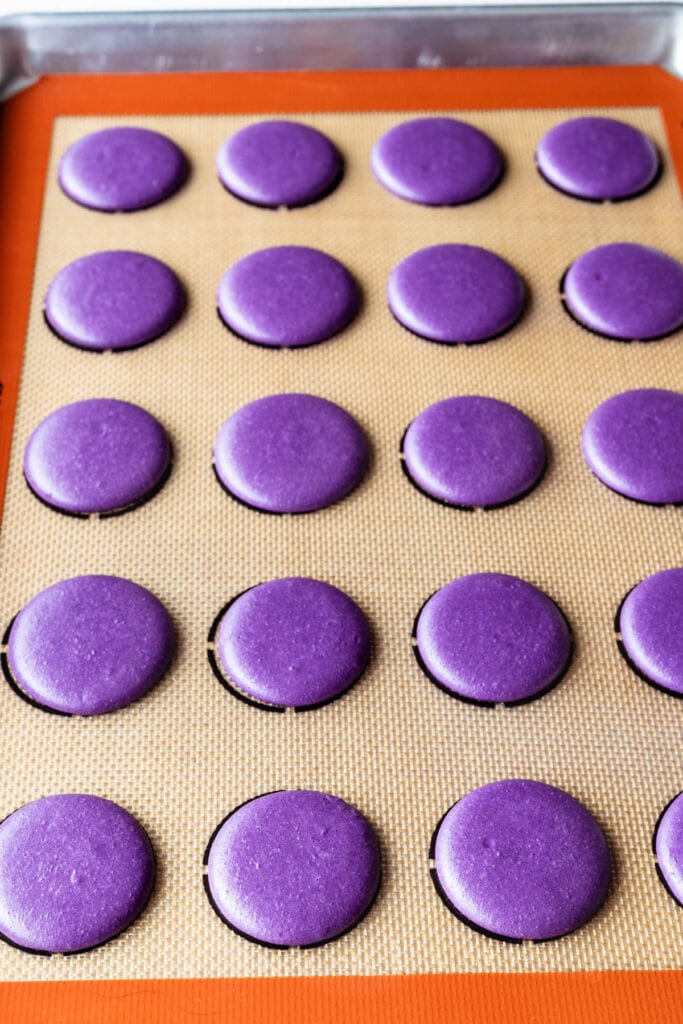
No rest macarons can be accomplished by almost everybody, in any kitchen, climate, method, or recipe. Typically, recipes using the Italian method don’t require any resting, but I don’t use the Italian method, so I will be speaking about the Swiss and French today, but mainly the Swiss method, which is my preferred method of choice.
I first came across no rest macarons in the book Les Petits Macarons, the very first macaron book I ever acquired.
This post may contain affiliate links. I earn a commission from qualified purchases. Please read our Privacy policy here.
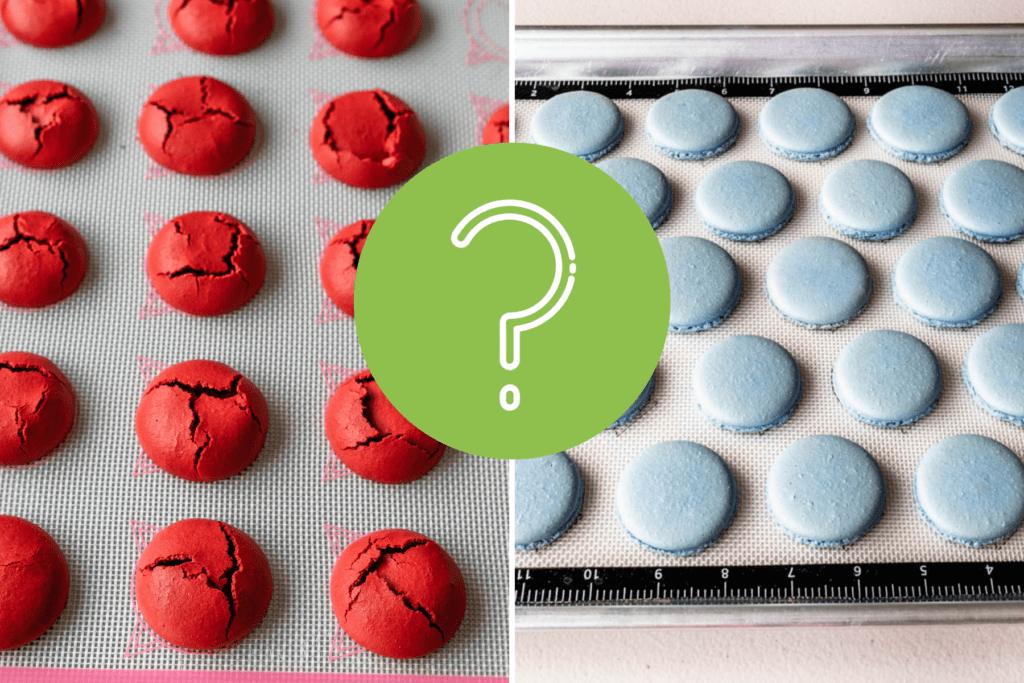
In that book, they instruct to bake the macarons immediately following piping. For some reason, and I didn’t know why at the time, this never worked for me, and every time I baked my Swiss macarons immediately after piping, they would crack.
So I literally gave the no rest method a rest (get it), and continued to rest my macarons before baking as usual.
French no rest macarons
After a while, I developed a French no rest method, which I published on my blog back in 2020, this recipe used the French method instead of the Swiss, and also used cornstarch in the batter.
The higher ratio of dry ingredients, and the use of cornstarch made it possible to work with a no rest method, because the dry ingredients soaked up the moisture from the shells. But even then, the method was still inconsistent, and would give mixed results to me and other bakers, sometimes it would work and the shells would come out looking great, and other times they would crack or become lopsided, or with tiny feet. And that’s because of a combination of oven temperature irregularities, and using the wrong baking tray. And I will expand on both of those topics as we go.
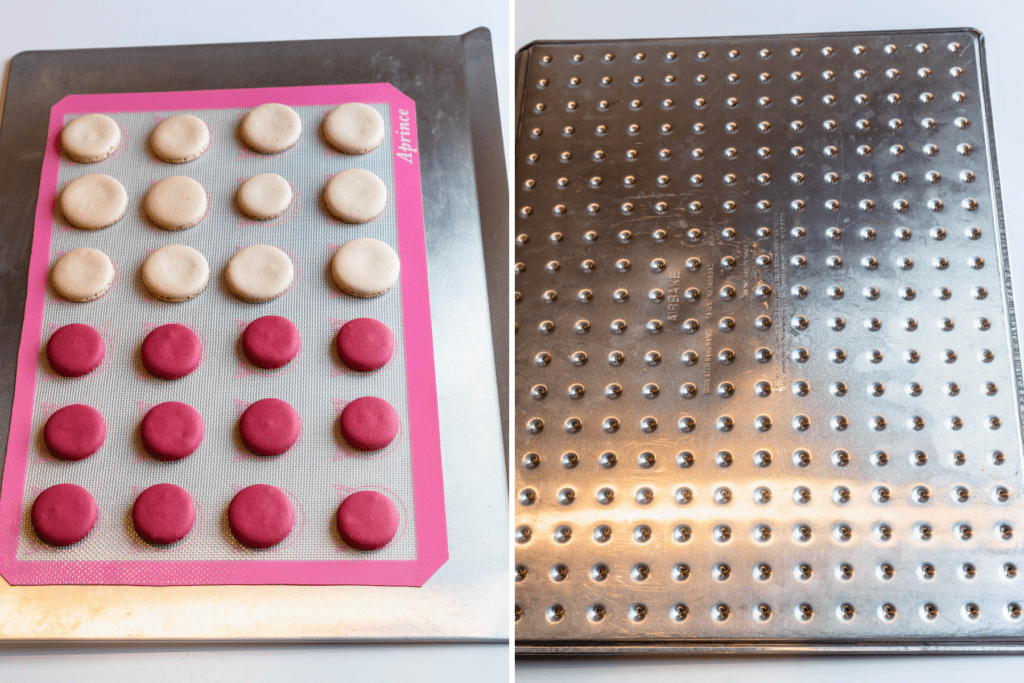
Airbake tray
Last year, I came across a video on Nicole’s channel Bake Toujours where she is showing how to do the no rest method using an airbake tray. The idea comes from Teyanna from Whisk ATX. I purchased an airbake tray and started making no rest macarons at home.
The airbake tray is insulated so it has a vacuum on the bottom, which means the macarons heat up slowly, so they don’t crack from the sudden heat impact of the oven. The slow heating of the tray gives them a chance to slowly rise and bake (similarly to an oven-drying technique, which is a story for another post, and another day).
The airbake tray worked fine for me for a while. However I moved to a different house, and that’s when it started giving me issues.
When I moved to a different house, the no rest method using the airbake tray would no longer work on my new oven. The macarons would split at the feet, or not develop a bottom at all, or the feet would be all chopped and not formed. Often times the macarons would come out concave.
And that’s due to the slow heating of the tray.
Sometimes you can combat those types of issues by raising the temperature of the oven. However, for me this didn’t work, my large oven has very uneven heat distribution and is very inconsistent at keeping the temperature from fluctuating. So, when I raised the temperature of the oven, the macarons would crack regardless of using the airbake tray or not, and the oven would spike in temperature once I set it to higher than 315ºF.
And the whole premise of the no rest method with the air bake tray is a slow initial baking of the macarons, and a slow rise, which get defeated by a high oven temperature.
Anyway, the airbake trays no longer work for me, but they still work for a lot of people, so it will depend on your oven whether or not it works for you, and we will continue to discuss this.
No rest in a countertop oven
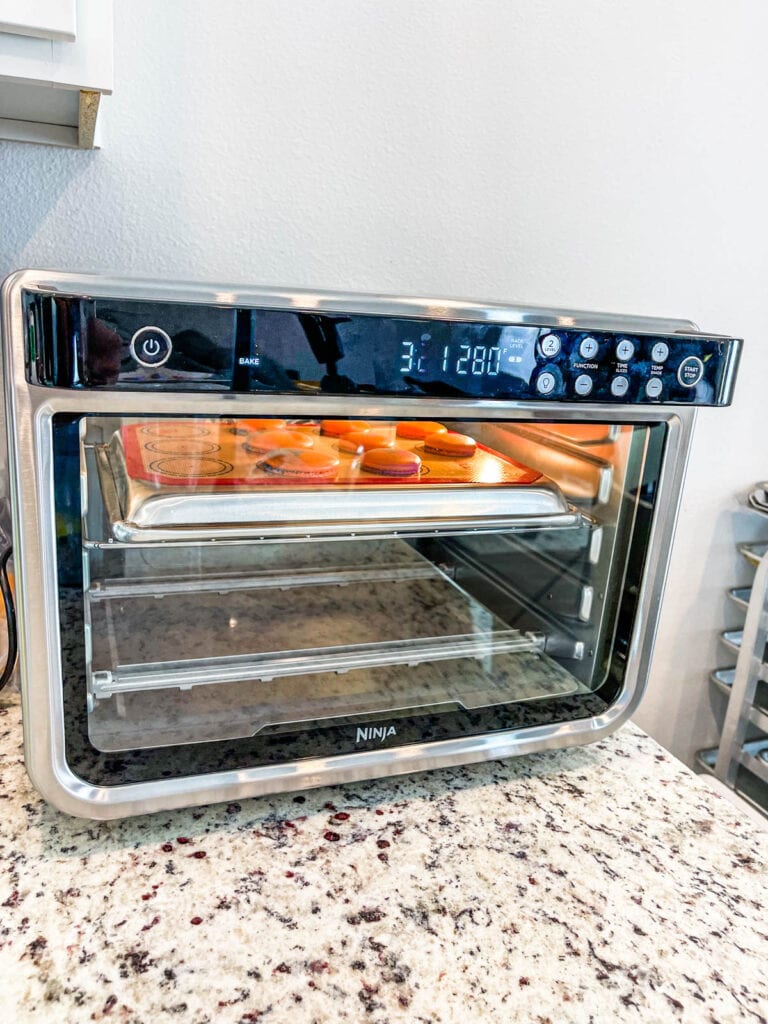
After seeing countless posts on the facebook group about the countertop ovens, I decided to get one and try it out so I could give the no rest method another go.
I went and got the Ninja DT251 Foodi 10-in-1, and finally the no rest method began working for me again. It took me a couple of tries and experimenting with different baking sheets. I got a rimless steel baking sheet and the macarons all cracked, even when I lowered the oven temperature.
So what ended up working at the end was to get an aluminum baking sheet, and flipping it upside down to eliminate the rims, and baking the macarons at a temperature range from 280ºF to 290ºF.
Here is the link for the oven if you are interested: Ninja DT251 Foodi 10-in-1.
So here’s the question: is there a foolproof way to make the no rest method work every single time?
It really depends on a few things:
- Oven (heat distribution and temperature)
- Baking tray
- Food coloring amount
Let’s talk about them.
Oven
Like I explained above, on my large oven, the no rest method does not work. Typically for the no rest method to work, you’ll need lower baking temperatures.
If the temperature goes too low on my oven, the macarons end up with no bottom (concave), or with broken feet, or with a huge gap between the feet and the top of the shell, or worst yet, with no feet at all.
If the temperature goes too high, the macarons crack.
My large oven has very uneven heat distribution and has a hard time keeping the temperature stable, which leads to severe temperature fluctuations, the temperatures drop and spike.
However, on my small countertop oven, I am able to use the no rest method for the most part, as long as I observe the tray I am using, and the amount of food coloring I use.
I also tried the no rest method on my parents’ oven in Brazil, which is a gas oven and was set to a very low temperature (about 290ºF, the lowest I could reach in the oven) I was using a rimless aluminum baking sheet, but it’s my belief that they won’t work in that type of oven, unless the temperature can go much lower. Once I let macarons from that same batch rest, they baked fine and with beautiful feet in the gas oven.
So my advice is to try. It can’t hurt to try it out. To know if your oven will be able to support the no rest method, you might have to play around with different baking trays and temperatures in order to find out. So read this post to find out the best baking trays for no rest method, which I mention a few times, and also experiment with different oven temperatures, but try not going over 300ºF.

Baking tray
Alright, so let’s talk baking trays!
First, I would stay away from steel trays. I do know of my good friend Barb who bakes her macarons using steel trays, I was never able to make it work for me, even on my small Ninja oven, I got a steel rimless baking tray, and even the rested macarons cracked while using it.
I’ve spoken about this before but steel is a poor heat conductor compared to aluminum. Steel retains heat, and also has a very uneven heat distribution, which means it will have spots where it heats more than others, and it will also absorb a lot of heat, which leads to major issues such as cracked macarons, spread out feet, or even macarons that look fine but are hollow. Anyway, I will continue to advocate against steel trays for as long as they continue to fail me!
Second, no dark baking trays. They are a big no-no when making macarons. Dark trays absorb a lot of heat and will cause all of the issues I mentioned above with steel.
Go for aluminum baking trays.
And within that, you have a few options:
- AirBake Natural Cookie Sheet, which is insulated and has a vacuum on the bottom, and that allows for the macarons to have a slow rise, so essentially the gentle heat is drying them up before it begins to actually bake them. However, as I mentioned above, this tray doesn’t work for me anymore and it will depend on your oven whether or not it works for you.
- Crown Cookie Sheets, my favorite baking sheets for macarons ever! They don’t have rims, and will work for the no rest method if your oven supports it. Also they aren’t insulated, so you might not end up with concave shells as you would using the airbake trays, as long as the oven temperature isn’t too low. And just overall, it’s a superior baking tray, I use it for my macarons everyday, even though I do rest them. The lack of rims allows for even heat distribution, and they are just wonderful!
- Regular aluminum baking sheets such as Nordic Ware that do have the tall rims, but you can flip them over and bake on the bottom of the trays, which will eliminate the rims and works for a lot of people who do the no rest method in their ovens.
- For my Ninja oven, I use the New Star Foodservice quarter sheets, which are obviously aluminum, and I do bake them with the tray flipped upside down, so I bake on the bottom of the baking tray to eliminate the rims and allow for even heat distribution.

My advice when approaching baking trays is to just try with what you have right now, if what you have at home is the regular baking sheet with the tall rims such as the Nordic Ware trays, go with them, flip them upside down, set your oven to a lower temperature such as 290ºF and try baking some macarons without resting. You don’t even need to pipe the whole tray of macarons, you can just pipe a few of them to experiment and not waste the whole batch this way. And this might work regardless of using the French or Swiss, so give it a try.
Food coloring amount
I’ve experimented countless times to bake macarons with a large amount of food coloring without resting. I’ve tried with all of the trays I have, and even in my different ovens (old oven, new oven, and countertop oven), and was never able to achieve macarons that didn’t crack.
Now, when I say a lot of food coloring, I mean about 1 teaspoon of food coloring or more for a regular batch of my Swiss macarons. If I add anything over that amount, I rest the macarons regardless, after learning my lesson.
So I suggest you also experiment. Maybe your oven is much better than any oven I’ve ever tried baking in, and it could work for you.
When the no rest method typically doesn’t work:
- For shaped macarons: when making shaped macarons always rest your macarons a LOT! It will help improve their feet, and it will help them not crack. Even if I am making shaped macaron with no food coloring added at all, I still rest it before baking.
- When using too much food coloring: I’ve never been able to bake macarons with too much food coloring straight after piping, even on my previous large oven with the air bake tray which supported the no rest method, and I still can’t do it on my Ninja countertop oven, trust me, I sacrificed a few batches in the attempt of making it work.
- Depending on the baking tray: if using steel or tall rimmed baking sheets it might not work, because the steel trays heat up too much and retain a lot of heat, and heat unevenly, and the tall rimmed trays cause uneven heat distribution.
- Uneven/Inconsistent oven temperature: your oven needs to be a low, slow, and consistent heat source in order to make the best no rest macarons, if your oven is inconsistent, or spikes and drops temperature rapidly, the no rest method might not work on it.
- Oven temperature: if the oven can’t reach a super low temperature like the gas oven I used at my parents’ house in Brazil, which wouldn’t go below 290ºF, you might not be able to make the no rest method work.
Final considerations
Experiment with what you have.
Like I mentioned above, if all you have right now is the regular Nordic Ware pans, just flip them upside down, turn your oven to a lower temperature (below 290 or 300 Fahrenheit), and start experimenting with different temperatures. Remember each oven works differently.
If you are so inclined, you can try the airbake tray, or the crown trays I mentioned above on the baking trays section.
And if you’ve tried all those things and didn’t work, you can always get the little Ninja oven I talked about. It’s also a great oven for everyday use, I make lots of things in mine. Using a small oven won’t necessarily save you much time, because the macarons bake slower (being that it needs to be at a lower temperature), and you can’t bake as many shells at once since the sheets are quarter sized, but you can use it to team up with your larger oven, which then will make things go faster. Or if you are in a humid climate such as I am, and resting times sometimes can be up to 2 hours, then it can be a time saver to have the little oven.
Personally, I adore the feet of the macarons once they rest. Resting does benefit the feet of the shells, which is something very important to consider when experimenting with different methods of baking.
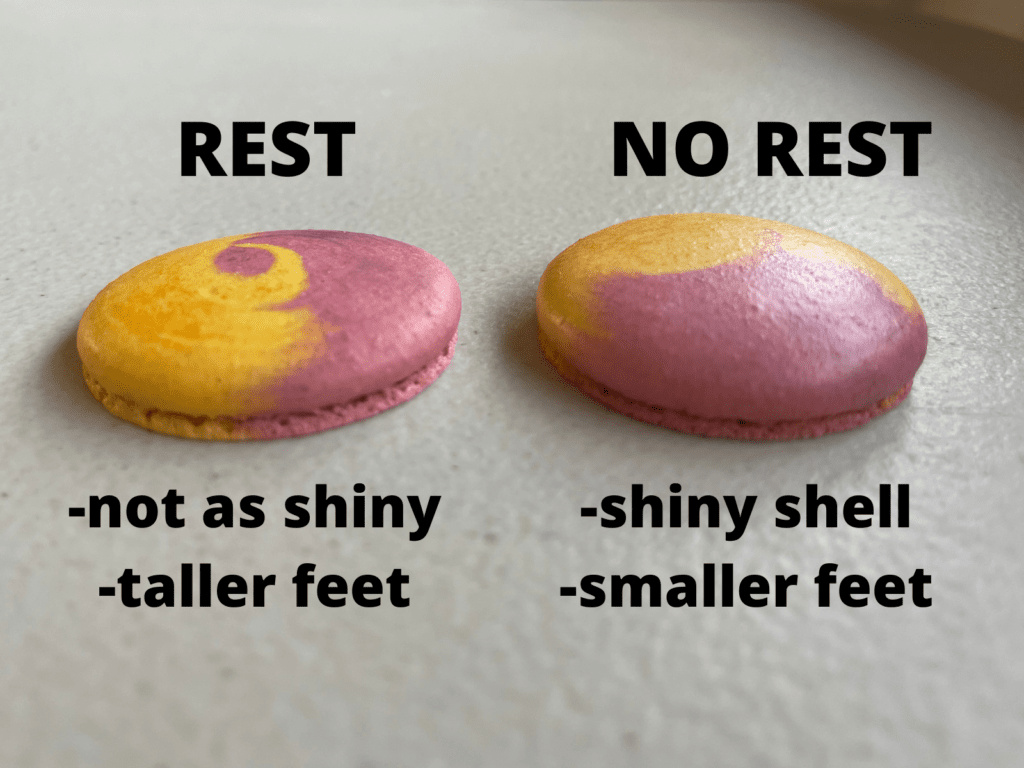
And while I love resting my macarons because their feet turn out wonderful, not resting has its benefits, such as saving time, and making for shiny macaron shells.
Just like with any other aspect of macaron making, this is something you will have to explore for yourself and find out how it works in your kitchen. Good luck, and happy baking!
Have you ever tried using sugar free alternatives in your macarons? I have tried twice now and both times they do not dry and take hours to barely even be dry to the touch. then when they bake, they don’t have feet and are very chewy. Any help or guidance would be greatly appreciated.
I have tried. It doesnt work. Here is more as to why: https://www.piesandtacos.com/sugar-role-in-macarons/
I think no rest varies from person to person. I do No Rest – conventional oven, 310F, aluminum pan (love my Doughmakers.) I do think it makes a difference what kind of mat you use. I use parchment. As long as I use powdered colors – it doesn’t matter how dark the color is. The only time they are lopsided is usually the last few out of the piping bag. I never get cracks. It just works for me!
That’s why I explain how many different approaches there are to the method. It can definitely be accomplish by almost anybody in any kitchen or climate depending on the variations and alterations people make to their method and technique.
Hello from South Carolina! My niece told me about your website and I am having so much fun trying to make macrons. Your videos and instructions are spot on and so helpful. I have been able to make several batches with success and some, well not so much.
I purchased all the items on your “tools” page including the Ninja air fryer.
I get bigger feet in the air fryer than my electric oven. The humidity here is usually around 73% so that is a challenge. Thinking about getting the dehumidifier next. I’ve taken several batches to the hospital where I work and my co-workers (friends) LOVE the macrons I’ve made.
Just wanted to say thank you for all the hard work you put into making the videos and troubleshooting. I just ordered your book and I am excited to continue this journey of creating food art!
that’s wonderful to hear thank you so much Jeanette!!! I appreciate it!!!
Would you recommend using egg white powder in this recipe, and if so, how much? I’ve been using this recipe successfully for a year, but my macarons have suddenly started cracking (possibly due to the weather changing).
I use during humid days 4 grams of egg white powder per 100 grams of egg whites
Thanks for the information and for sharing your skills with us, for the first time my macarons have feet and look like macarons. Im ecstatic thank you so much, will keep on practicing.
That’s incredible I am so happy to hear!!!
Hallo Camilla, I trust that you are well. Just a thank you from my side for all your advice and hard work. Appreciate you so much. Stay blessed.
Elizabeth
Thank you very much!!!
Thank you for your easy explanations and instructions, since I found your website I have been more successful and more confident in making macarons, you are my go to girl when ever I need help.
That’s amazing to hear thank you so much!!!
This is the best information I have read on the No rest method. Thank you so much for sharing your expertise!! I feel like I have tried everything to make it work in my oven, and because of the fluctuations sometimes it works and sometimes it doesn’t. I think I will stick with resting my shells. Thank you!!
Thank you so much Penny, I am so glad this info is helpful!!
You mentioned not needing to necessarily bake an entire batch of cookies in one of the sections above. Are you able to save batter and bake it later?!? I’ve read before that when you mix macaron batter, you need to immediately pipe it. So are you saying you can keep it unpiped? If so, in the piping bag or covered in the bowl?? Thanks!
I’d keep it in the piping bag, making sure it’s not exposed, seal the top of the piping bag with a bag tie. I’ve left my batter sitting in the piping bag for as long as 6 hours before and they turned out fine. Whenever I am piping shapes it takes me hours upon hours, and the batter always sits in the bag, and it turns out fine, just make sure it’s not exposed. And I wouldn’t leave for longer than 6 hours or so, because that’s what I’ve experimented with, I haven’t experimented with any longer lengths of time.
Thanks for the question. I was wondering the thing.
I learned so much from you! Thank you for sharing all of your research with us so we don’t have to waste batches ourselves! 😆
By the way, what are your thoughts on convection setting of ovens?
Convection settings are wonderful, because they help distribute the heat evenly in the oven and keep it from fluctuating. However, when using convection you will have to use lower temperatures, but what the temperature exactly is will require a bit of experimenting, so go about 20% less than what recommended in recipes (unless the person specifies they are using a convection oven), and work from there, experimenting with 5 degree increments up and down to see what lands the best results in terms of feet, structure, fullness, etc…
Thank you so much!!!
Agora que vi atualização no blog…como assim?? A big,master,super,ultra fã desse paraíso!!!!! Então, escrevendo pela primeira vez aqui …tenho feito o italiano,sem descanso tbm Cá…seco uns 10 minutinhos em baixa temperatura e já asso em seguida.Está dando certo.😍 Qto a mim… sempre por aqui…rsrs (Cida)
Ahhh amiga voce por aqui!!! bem vinda!!! Que maravilha poder fazer sem deixar secando né salva tanto tempo!!! Algum dia desses vou tentar o italiano de novo (faz uns 6 anos que nao faço italiano haha)!!! Abraços!!!
Agora que vi atualização no blog…como assim?? A big,master,super,ultra fã desse paraíso!!!!! Então, escrevendo pela primeira vez aqui …tenho feito o italiano,sem descanso tbm Cá…seco uns 10 minutinhos em baixa temperatura e já asso em seguida.Está dando certo. Não vejo a hora de testar suas novas receitas do meu livro lindo😍 Qto a mim… sempre por aqui…rsrs
Your macaroons are perfect. I tried many websites, and got it right with yours ultimately.. Thanks so much. A very happy New Year and please stay safe.
Thank you so much! Happy new year!!!
Mine cracked and looked like crinkled cookies , could it be that my oven was too hot ? I’ll be trying again soon.
it depends, some ovens aren’t going to work with the no rest method no matter what. but it’s important to try all possible settings before giving up.