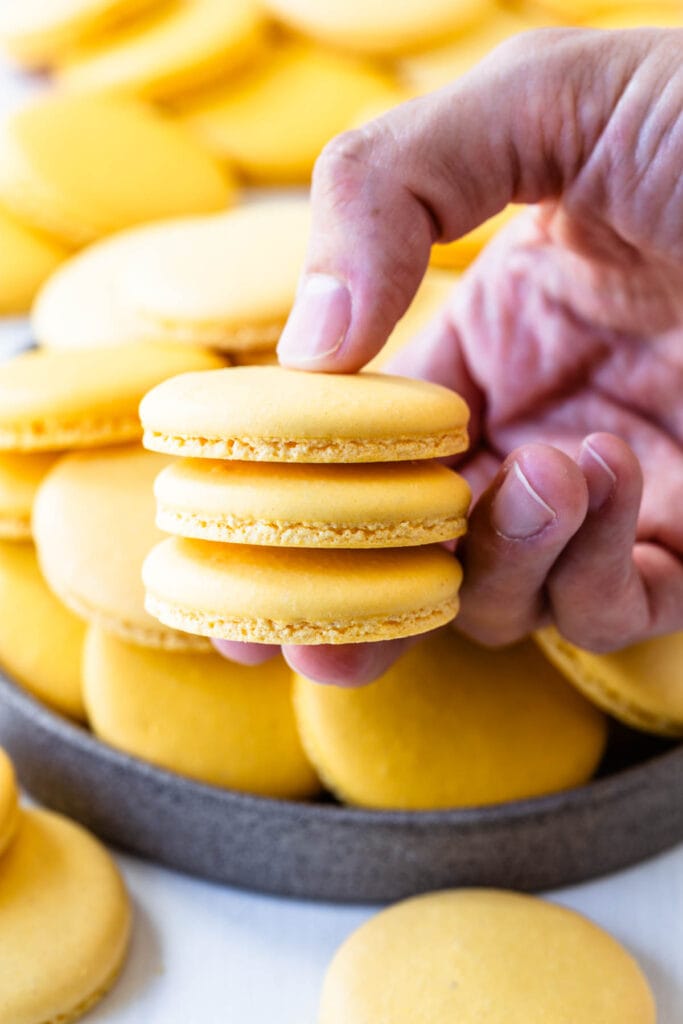
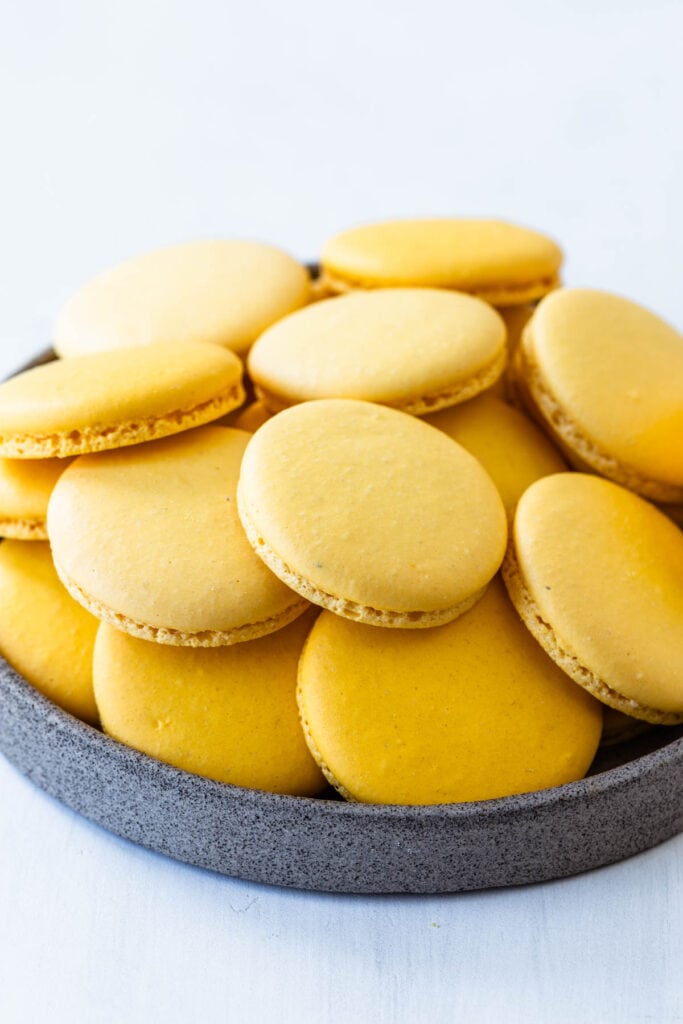
Swiss Meringue Macaron Recipe
Hello friends, today I will show you the basic Swiss Meringue Macaron Recipe, using the Swiss method to make the meringue. We will talk about why this is my favorite method, many tips and tricks, and detailed instructions on how to make the best macaron recipe!
In my opinion, macarons are the best cookies in the world, and also have the fame of being the hardest to make. And that’s because when it comes to making macaron cookies, it’s all about mastering the technique, finding a method that works for you, getting comfortable with it, and basically getting acquainted with the consistency of each stage of the process, from the meringue until the final batter, and learning your oven.
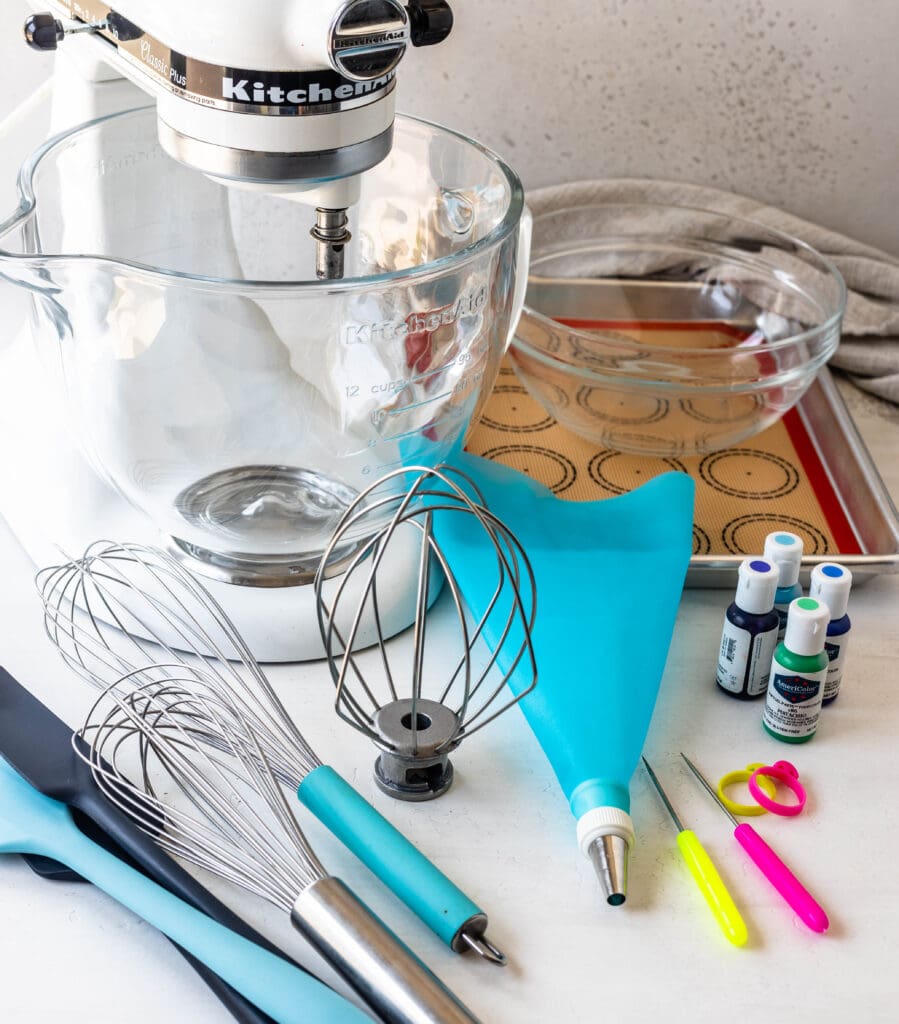
To see all the tools I use to make my macarons please click here.
This post may contain affiliate links. I earn a commission from qualified purchases. Please read our Privacy policy here.
Swiss Macarons versus French Macarons versus Italian Macarons
First, let’s talk about why the Swiss Meringue Macaron Recipe is the best for making macarons (in my opinion at least).
The Swiss method entails heating up the sugar and egg whites over a double boiler before whipping the meringue. And once the meringue has been whipped to stiff peaks, you add the dry ingredients (almond flour and powdered sugar) and fold them together with the whipped meringue.
When making the French method, you simply whip the whites as they are until the meringue is stiff, and then fold the dry ingredients (almond flour and powdered sugar) with the meringue.
And when making the Italian meringue, you have to make a sugar syrup with water and sugar, and bring it to a soft ball stage (238ºF-240ºF) while the whites get whipped to soft peaks. Then, as soon as the syrup reaches this temperature you have to add it to the soft peaks whites, while the mixer is still running, and continue to whip until the meringue achieves stiff peaks, which will also take a while, since now the meringue has to cool down a lot before it reaches the peaks. And you should also mix some of the egg whites with the powdered sugar and almond flour, forming a paste, which will get folded into the meringue.
So as you can see, French is the most simplistic method, Italian is the most high maintenance one, and Swiss is somewhere in the middle. The Swiss method is definitely not nearly as complicated as the Italian method, and it adds a step to the French method (heating the sugar and whites over a double boiler) that ensures a very strong meringue.
Why is the Swiss method more stable than French?
The Swiss meringue macaron recipe produces a more stable meringue than the French method for two reasons.
1- The addition of heat to the mixture (when whisking the egg whites and sugar together over the double boiler) helps the proteins unfold more easily during the denaturation process. Denaturation happens when we start whipping the meringue, and it means the curled proteins are unfolding to get organized into the meringue structure.
2- The melted sugar increases the viscosity of the syrup that coats the air and water particles that constitute the meringue, making a stronger layer of protection that helps avoid over whipping, broken and deflated meringue.
Swiss Meringue Macaron Recipe
Ok let’s get to the recipe and the process.
Before starting, read through the recipe, watch the video, make sure you have the tools you need.
Here are all the tools I use when making macarons.
You don’t need a KitchenAid or even a stand mixer for that matter, but it can make things easier. However, I have many videos showing how to make macarons without a KitchenAid, just using a hand mixer.
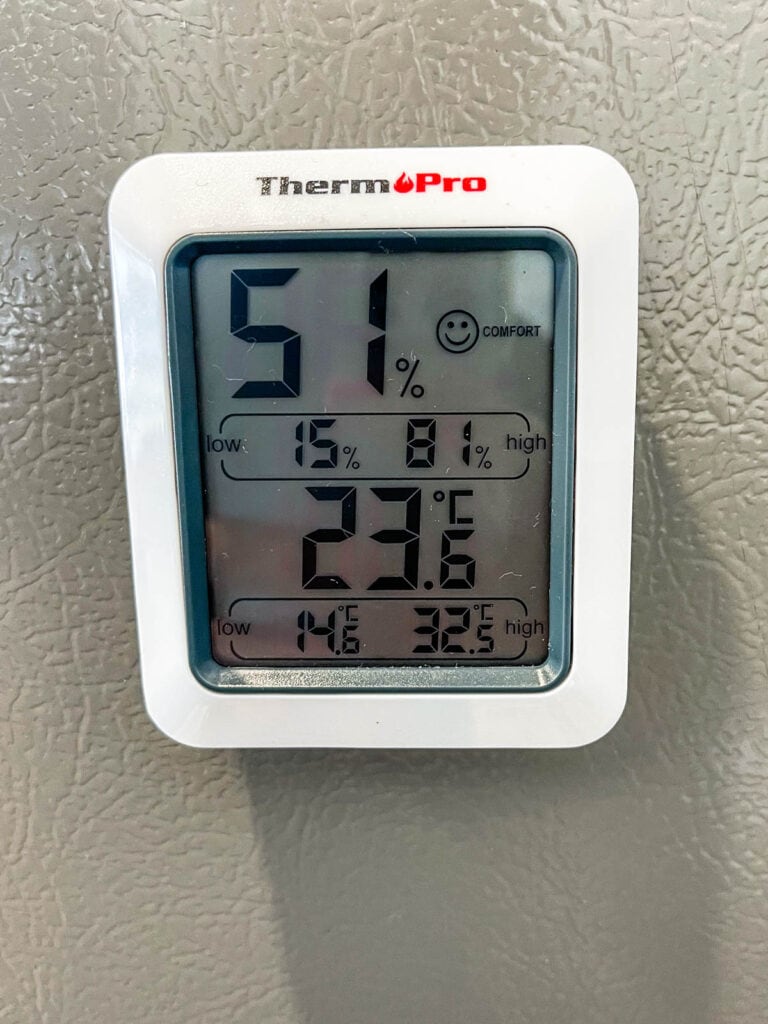
I live in a humid climate, so I also check the humidity before beginning. If it’s higher than 45%, I turn the ac down, turn the dehumidifier on. To read more about macarons and humidity, check out my article here. I love the humid weather for making macarons.
You can get a Digital Hygrometer like the one below on Amazon. The humidity inside your house is different than the humidity outside, so the weather apps are just checking what the humidity outside measures. To know how humid it is inside your home, you will need a hygrometer.
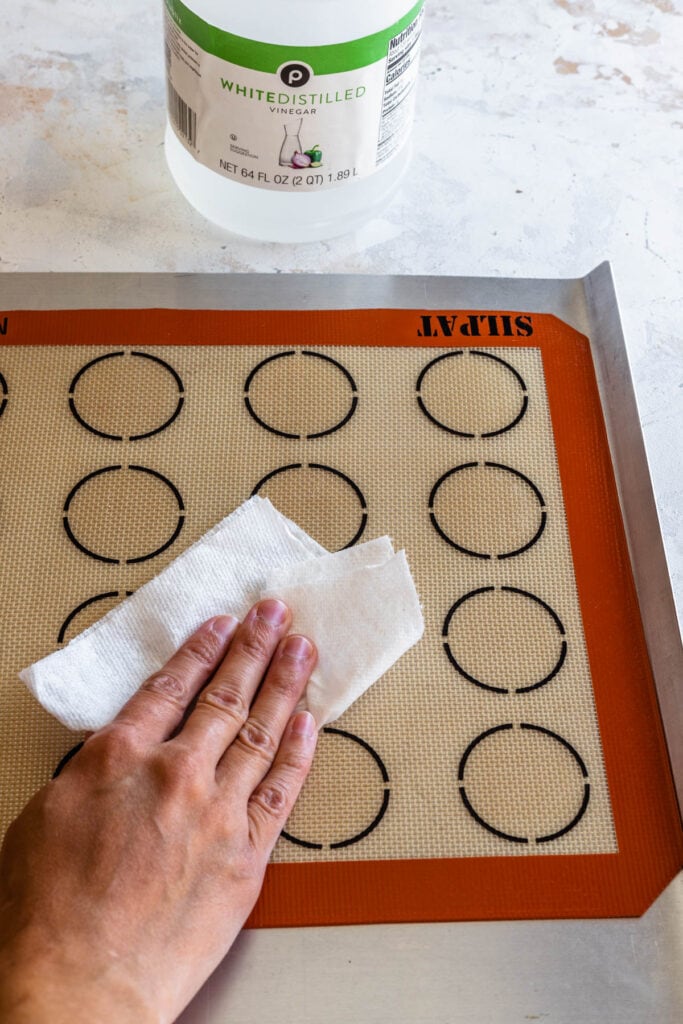
Also, before starting I like to wipe the silicone mats, whisk, and mixer bowl with a piece of paper towel dipped in vinegar, to get rid of any grease particles that might be on the tools. Is this step necessary? It’s not absolutely necessary, just something I like to do to ensure no grease particles will get in contact with the meringue and batter, which can affect the macarons.
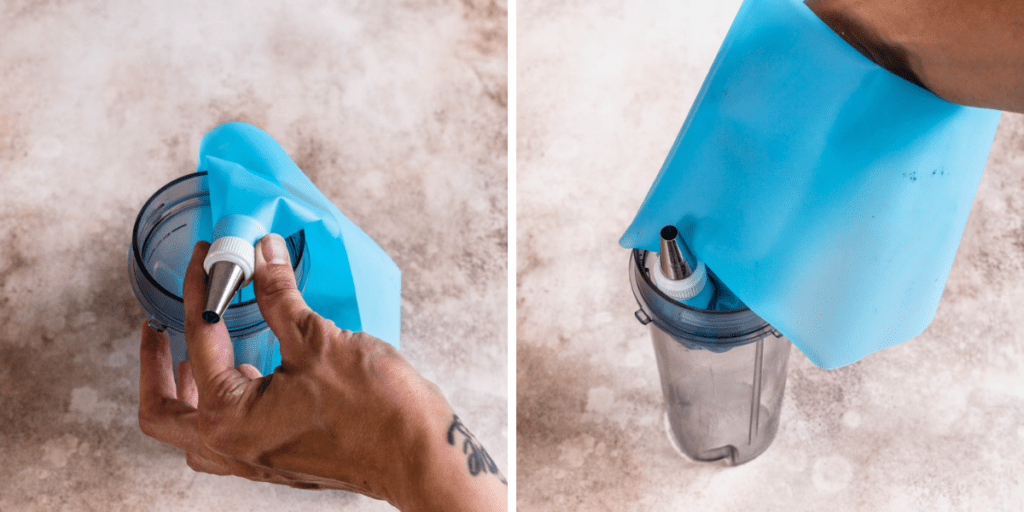
Set aside a piping pastry bag fitted with a round tip. I like to use a Wilton 12 which is 1/4″ in diameter.
Place the piping bag in a cup, with the tip facing up like so.
Before starting, you also want to start pre-heating your oven. I bake my shells in two different ovens, a small counter top oven, and a large electric regular kitchen oven (not convection). I pre-heat my large oven to 310ºF for 60 to 90 minutes, this helps with temperature fluctuations. I pre-heat the countertop oven for 30 to 45 minutes.
Prepping the ingredients
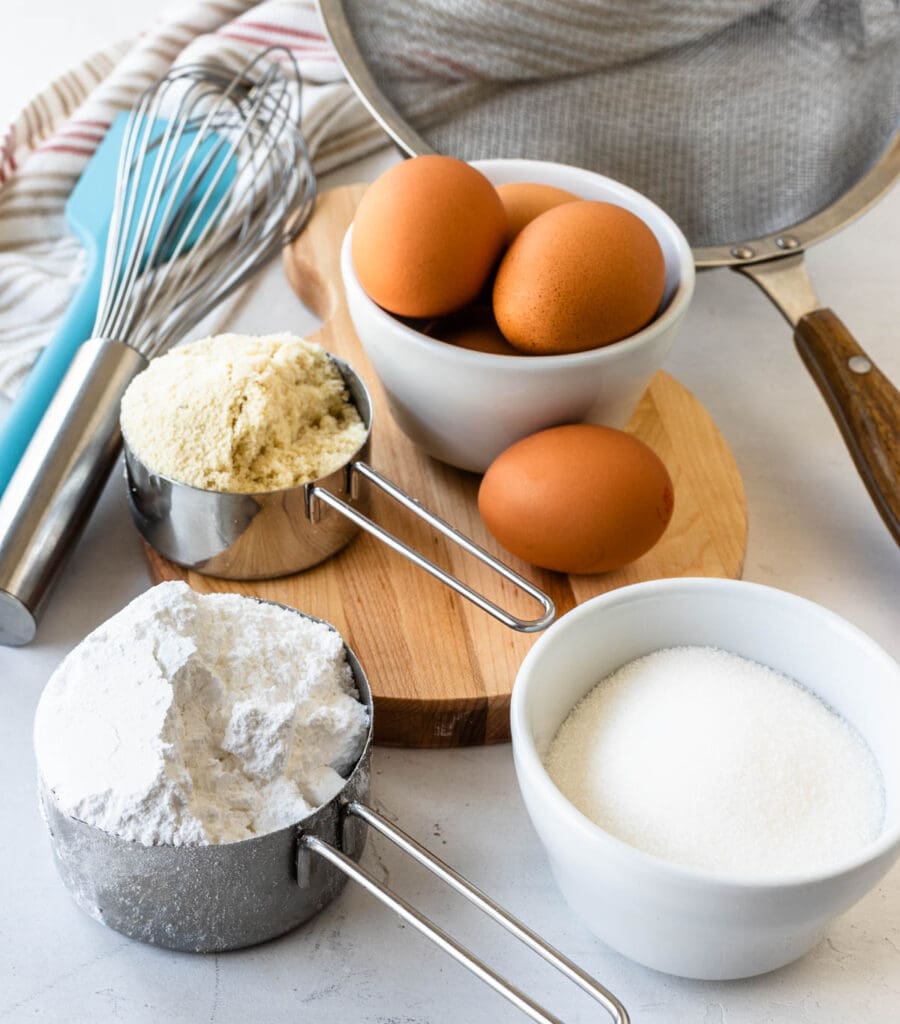
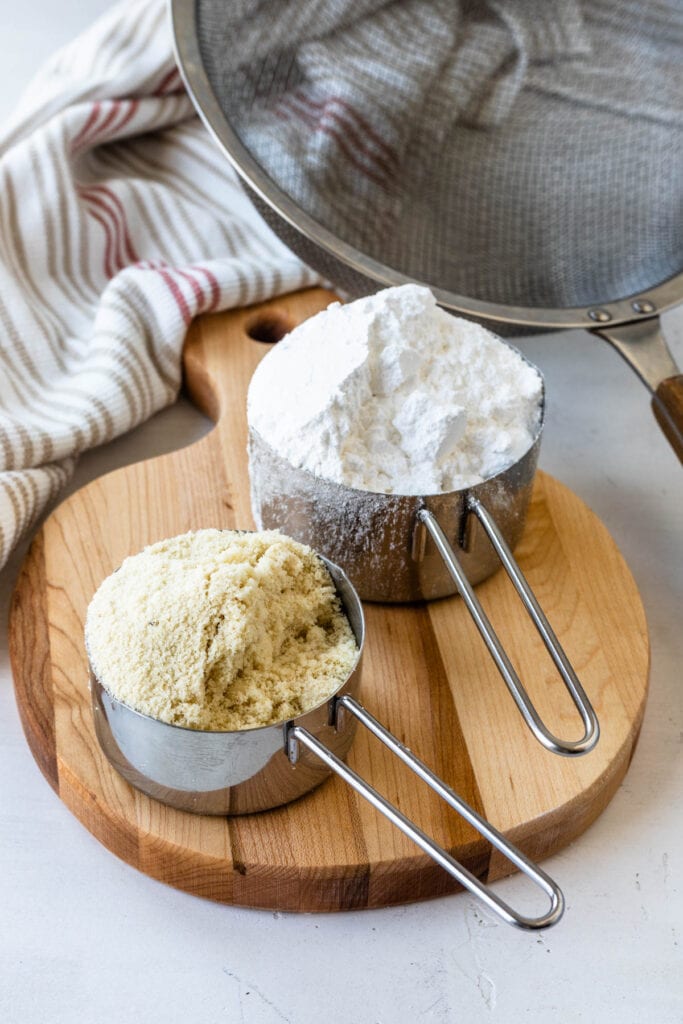
Gather all the ingredients you’ll need. Weigh the sugars, almond flour, egg whites, and egg white powder (if using).
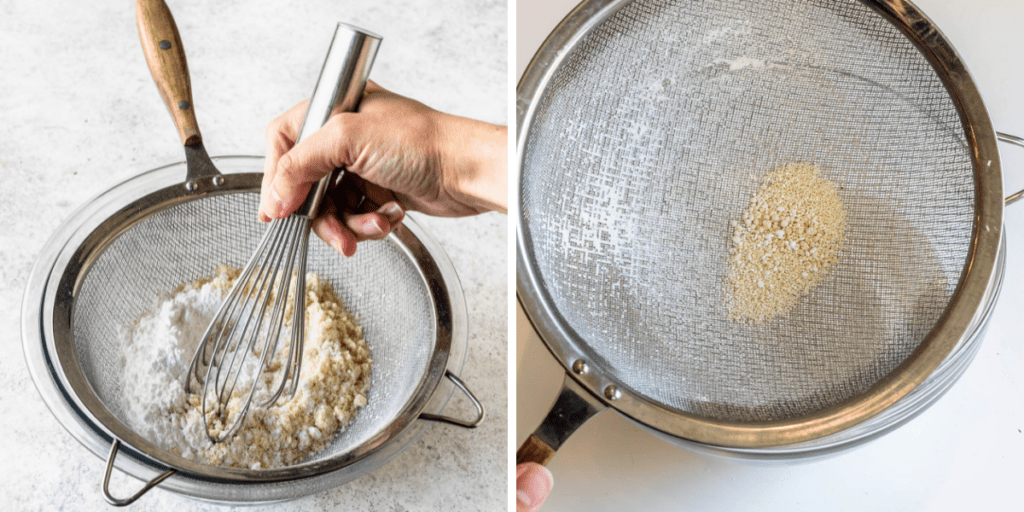
After weighing the ingredients, sift the almond flour and powdered sugar together using a fine mesh sieve (you can find the fine mesh sieve I use here in the Macarons Tools post). And set it aside.
There shouldn’t be more than 1 to 2 tablespoons leftover of dry ingredients in the whisk. If there is too much left in the sifter, it means your almond flour isn’t fine enough for macarons.
I weigh my dry ingredients before sifting, because I never have more than what’s shown on the picture below left in the sifter. However, if you do, you might want to consider weighing the ingredients after sifting. Also, please consider just finding a different brand of flour altogether, because if the almond flour is too coarse, the shells will be bumpy or shaggy looking.
My favorite brand is Blue Diamond Almond Flour. It’s dry and finely sifted. I used Bob’s Red Mill in the past, but it became too coarse and almost kind of humid for me, every time I got it it would leave a lot of flour back in the sifter, and the flour would feel moist as well, which is also not a good thing.
Which leads to the next question I usually get: Can I process the flour in the food processor to make it finer?
My advice is to not do that because when you process the almond flour, it tends to release oils, which is not good for macarons, it can leave you with wrinkled, porous, or blotchy shells.
But let’s say that’s the only flour you can find. In that case, I would first dry the flour in the oven by spreading it on a baking sheet and baking in the oven at 200ºF for about 30 minutes, stirring in between. Let the flour cool down completely, and then process it in the food processor along with the sugar, so the powdered sugar can help soak up any moisture if it releases some.
Alternatively, you can process the flour before drying it as well, but then you can’t process it with the powdered sugar, just by itself because you shouldn’t put the powdered sugar in the oven.
Making the Swiss Meringue
Weigh the sugar and mix it with the egg white powder if using.
Also weigh the fresh egg whites. I don’t use room temperature egg whites, simply because we are going to heat up the eggs over the double boiler with the sugar, so there’s no use in having the egg whites be at room temperature. The temperature of the whites will determine how long you’ll need to whisk it over the double boiler, cold egg whites will take longer to dissolve the sugar than room temperature egg whites.
On the same note, I don’t age the egg whites before using them. I have experimented numerous times both with aged egg whites and regular egg whites and there haven’t been any noticeable differences in my opinion, that made me want to start aging the egg whites.
Now back to the egg white powder as I mentioned above. Egg white powder is not mandatory, and it’s not right for everyone. I do like to use it on my macarons, I explain everything about egg white powder here. Read the article to find out if egg white powder is right for you or not, and how to use it.
I use 4 grams of egg white powder for each 100 grams of sugar for regular shells, and 2 grams for matcha or chocolate shells.
Egg white powder is a great meringue stabilizer. When you add egg white powder to the shells, you are basically making this whole structure stronger by giving a boost of protein “walls” to the meringue, which keep the air and water trapped in nice and safe. But like I said before, it’s not right for everyone, for example it’s not right for people that live in dry climates. Read my article linked above to find out more.
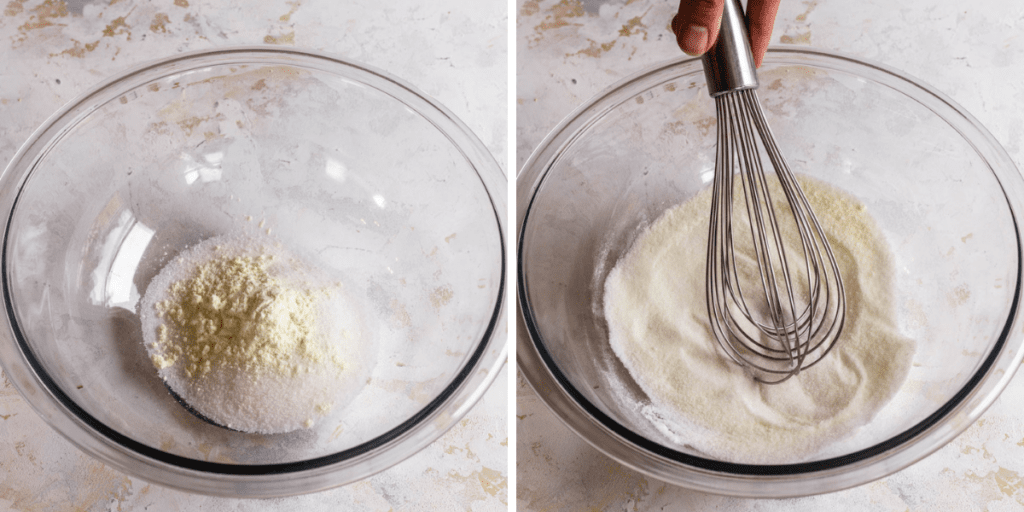
It’s important to whisk the egg white powder and sugar together before adding the egg whites otherwise the egg white powder will form clumps that won’t dissolve.
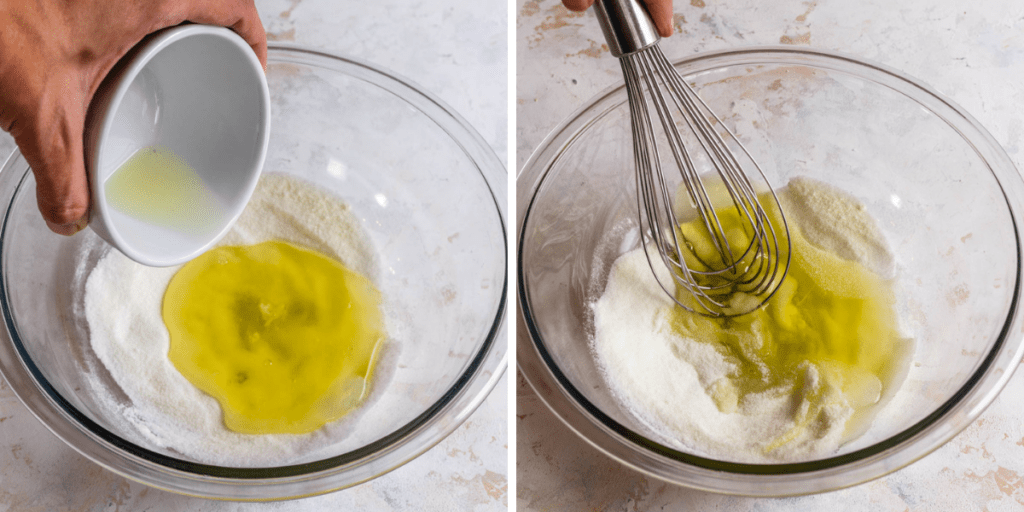
Add the fresh whites to the sugar and whisk to combine. Then you can place the bowl over a pan with barely simmering water. The whites do not have to be at room temperature, since we will make the sugar syrup over the double boiler. The only difference is how long it will take to melt the sugar depending on the temperature of the whites.
I should also say that I do not age my whites before adding them to the meringue. I get this question a lot. I talk about aged whites here on this Macaron Myths article.
Make sure the water isn’t touching the bottom of the bowl, otherwise the whites may cook. The heat shouldn’t be too high, and you should whisk the mixture the whole time it’s on top of the double boiler, otherwise the whites in direct contact with the walls of the bowl will end up cooking (speaking from experience here folks).
It will take about 2 minutes to melt the sugar. This depends on the temperature of the eggs (if they were cold from the fridge or at room temperature), and on how high the simmer is.
You don’t have to bring the syrup up to any certain temperature, just don’t bring it higher than 130-140ºF, and even that will be a bit to high for my liking, and just make sure the sugar is completely dissolved.
Touch the mixture with your fingers and if you don’t feel any sugar granules you can remove it from the heat.
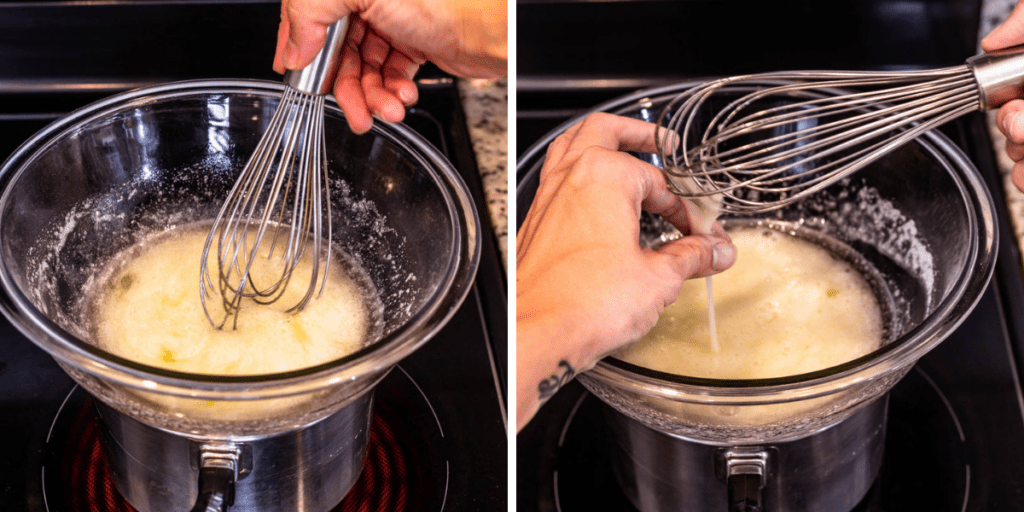
Transfer the syrup to a mixer. Before doing that, wipe the bottom of the bowl with a towel to get rid of any water condensation from the double boiler, to avoid the water from falling into the meringue bowl.
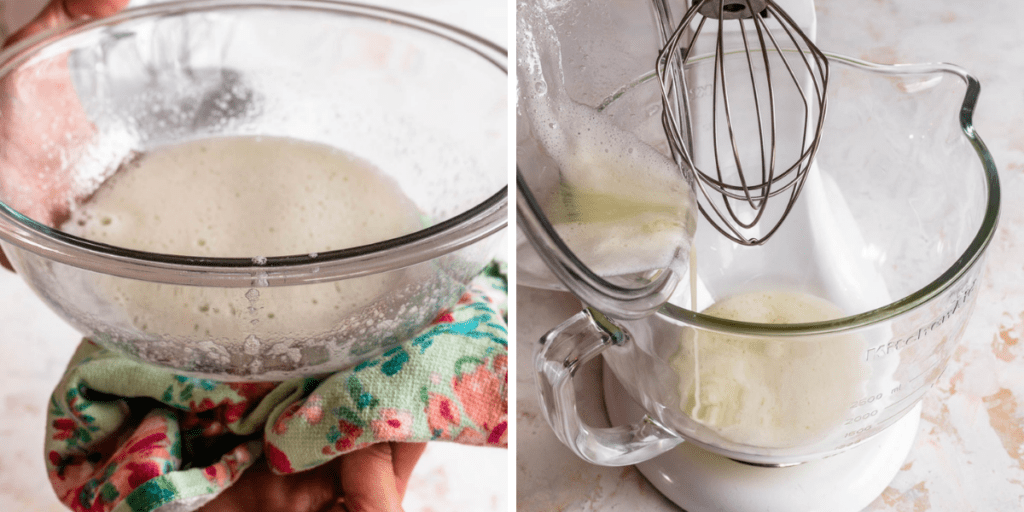
Now let’s start whipping the meringue.
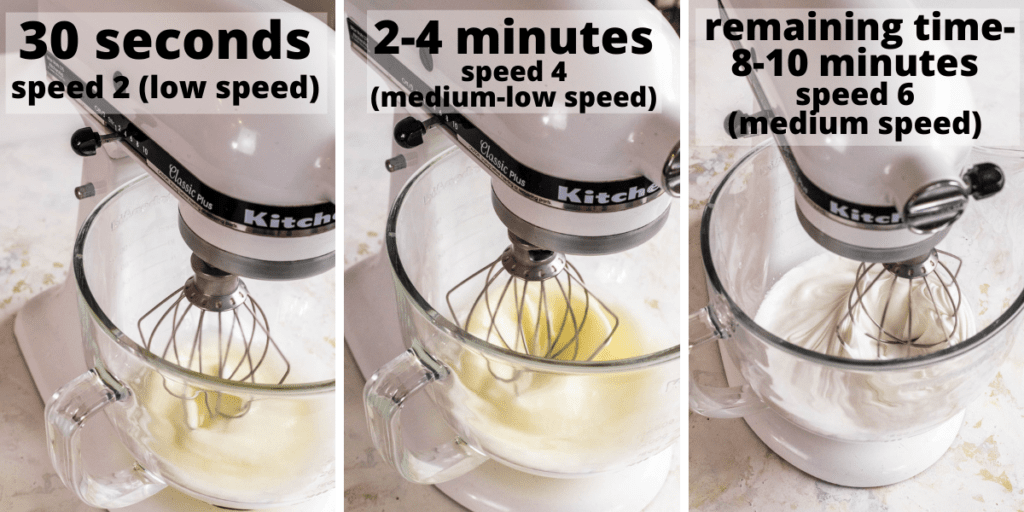
I start whipping on low speed (speed 2 of the KitchenAid) for 30 seconds, just to get things going.
Then, I raise the speed to medium low (which would be speed 4 of the KitchenAid), for another few minutes, usually 2 to 4 minutes. Though sometimes I forget and end up leaving for longer.
And I finish whipping the meringue on speed 6 of the KitchenAid, which is medium (almost medium high) speed.
It takes me about 13 to 15 minutes to whip the meringue (it depends a lot on how long I actually whipped on speed 4 before turning the speed up) but you should never go by time, you should go by the meringue consistency instead.
Even during my lives, I’ve had people literally make the macarons with me at the exact same time, using the exact same settings on their KitchenAid, and it took them 7 minutes to whip the meringue ( my dear friend Lina for example). So this comes to show that lots of things can affect whipping time, such as quality of the eggs, weather, how powerful your mixer is. Mine is almost 10 years old for example, so maybe a brand new mixer will be more powerful than my old KitchenAid.
I have a whole article talking about meringue called How long should you whip the meringue? and you should check it out to see what can affect the whipping time.
Also I should highlight that whipping at a lower speed helps with hollow macarons immensely, because you aren’t adding too much air too fast to the meringue, and also you can control better the meringue consistency so it’s not overly stiff. I used to whip my meringue on 8 and even 10 sometimes, and I’ve changed it to get better and more consistent results, and now I don’t go past speed 6.
So since we can’t count on time whipping, let’s learn the best meringue consistency and when you should stop whipping based on what the meringue looks like.
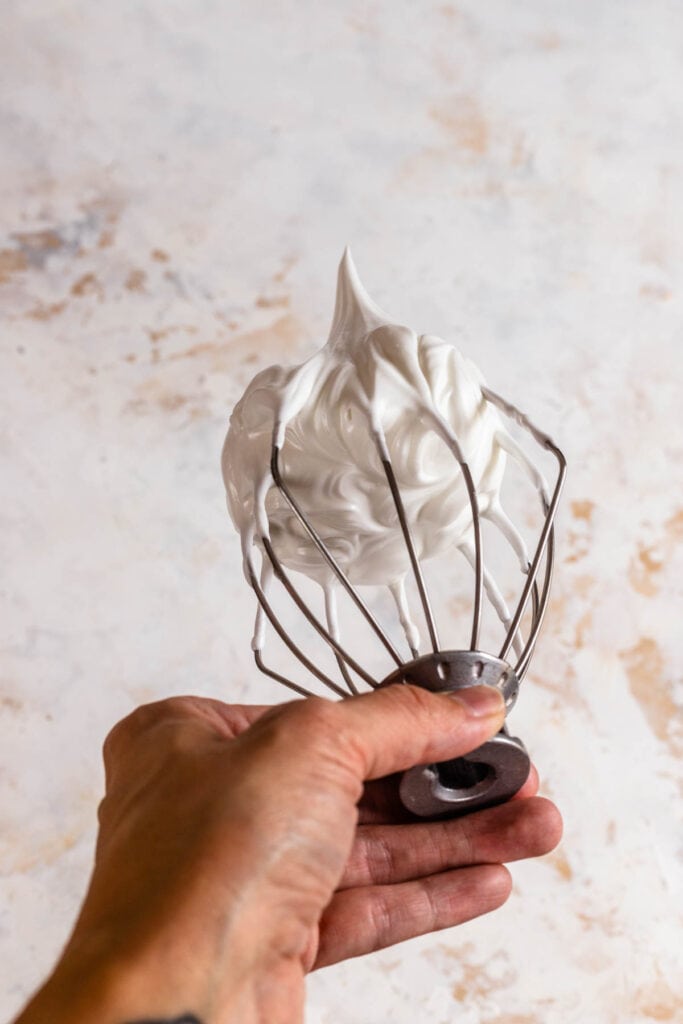
First, notice when the meringue is rising around the whisk as you are whipping, and the whisk is leaving deep streak marks on the meringue, as you can see on the picture above.
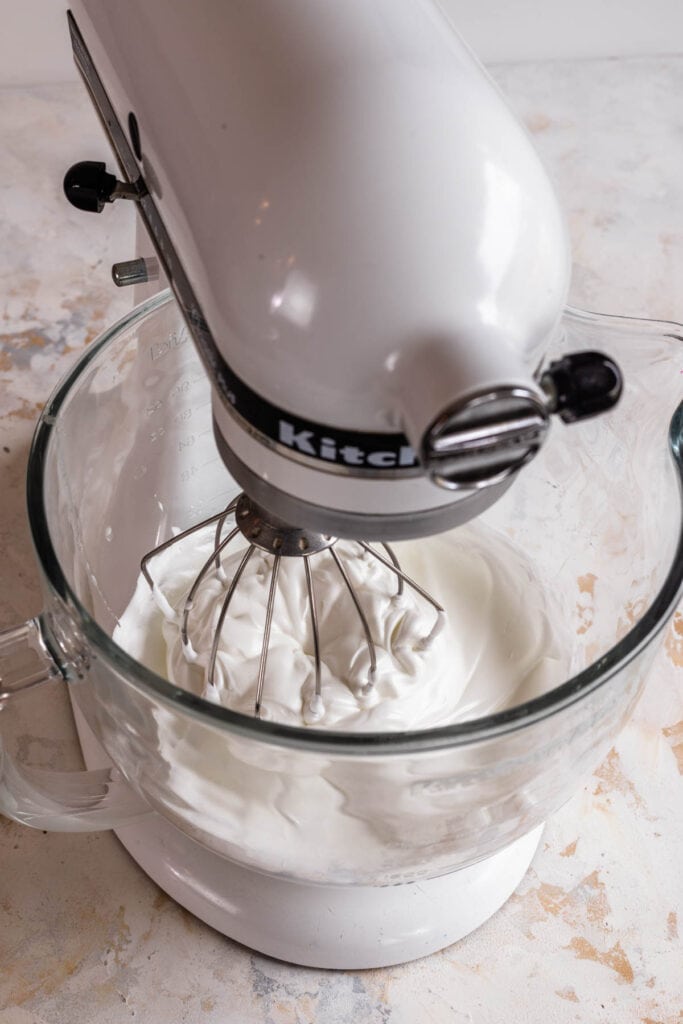
When this happens, stop the mixer, and swirl the whisk around in the bowl.
You should feel some resistance from the meringue against the whisk. If you don’t feel any resistance, that’s a sign it might need to be whipped longer.
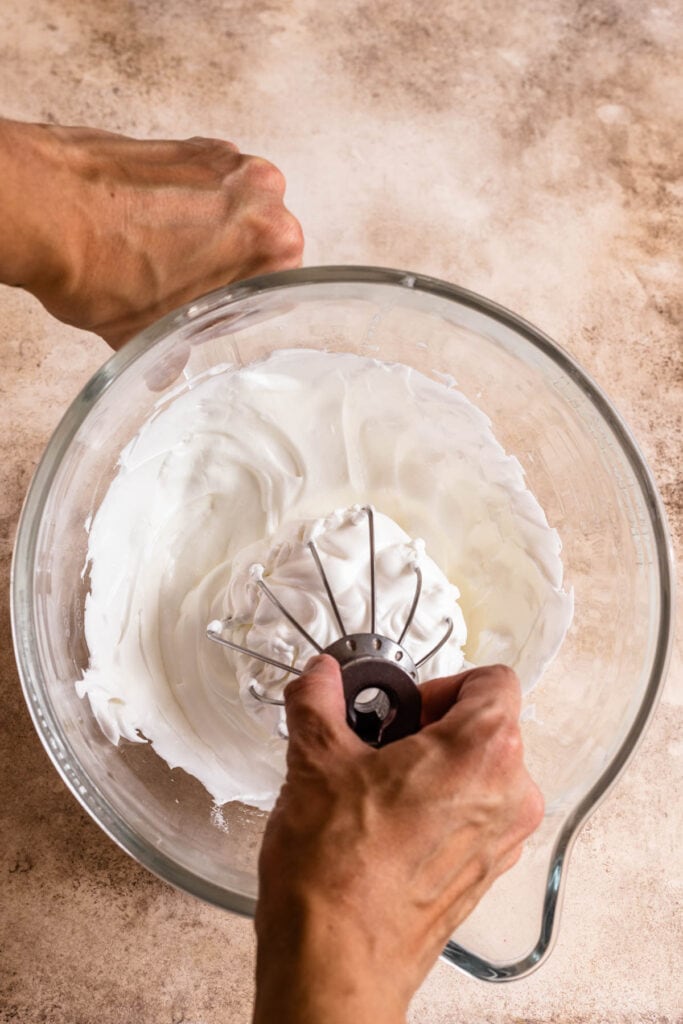
Then hold up the whisk with the collected meringue and let’s analyze the peak.
The peak should be shooting straight up, not bending down to the side.
It should measure about 2 to 3 inches. If the peak is too long or too elastic or bending down, it’s still under whipped.
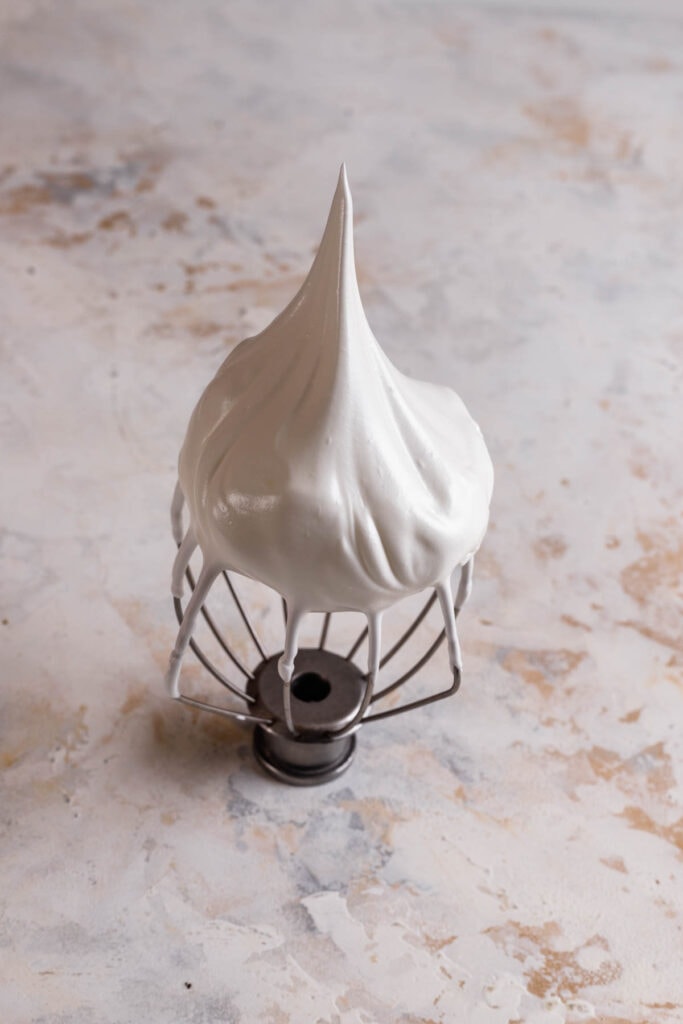
Also analyze the bottom of the meringue collected in the whisk. It should be forming soft but defined waves as you can see on the picture below.
How to tell if the meringue has been over whipped: if it has too many short and stiff peaks, and if it has too much resistance when you are swirling the whisk in the bowl.
Over whipped meringue will cause delicate shell tops, hollow macarons, tall and ruffled feet.
Under whipped meringue will cause cracked shells, or misshapen shells, spread out feet, because the macaron batter will be too soft.
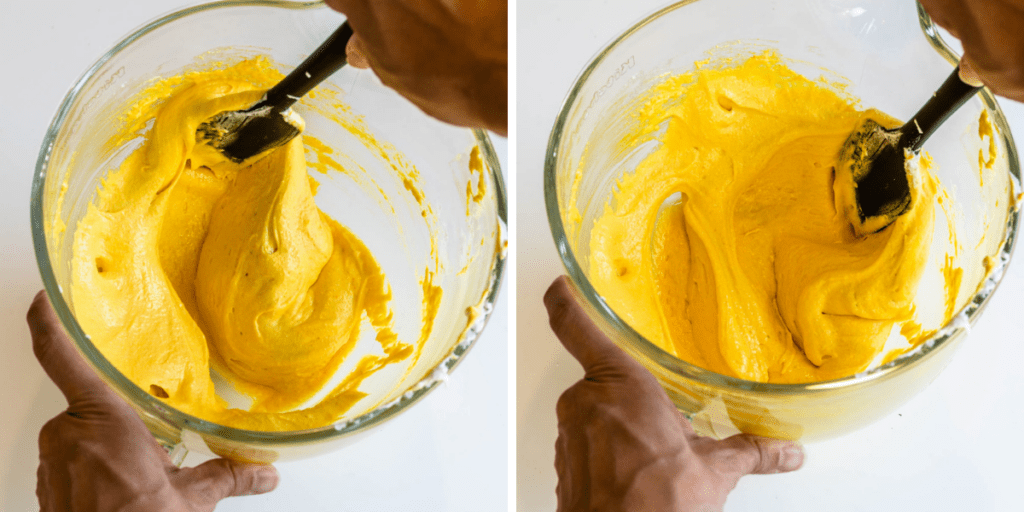
Macaronage
Now that we have our perfectly whipped meringue, let’s begin the macaronage.
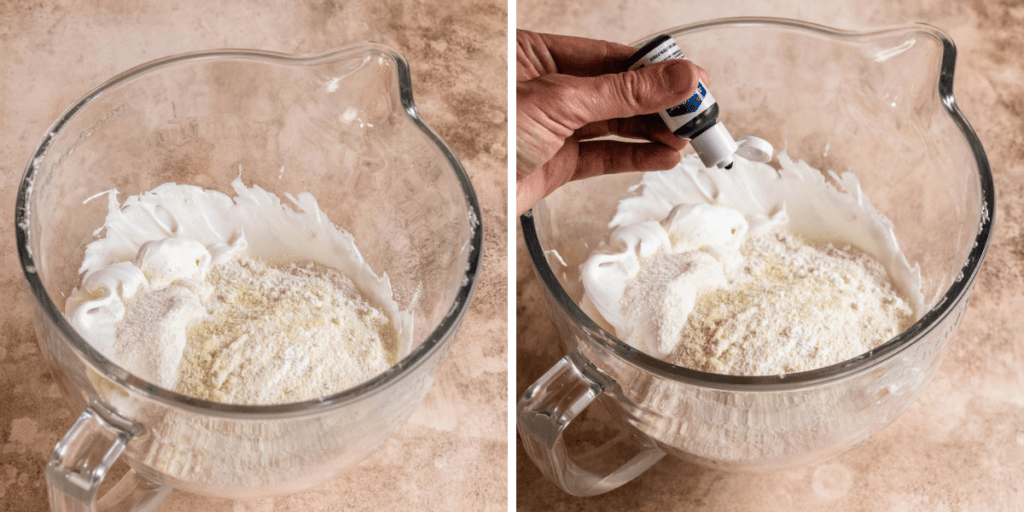
Add the sifted dry ingredients to the meringue bowl.
Also add food coloring if using any.
I like to use gel food coloring by Americolor, or powder food coloring by The Sugar Art. Don’t use liquid food coloring. You can read my entire color guide here.
You can also add the powder food coloring to the meringue when you are whipping it if you wish to do so.
Begin folding the macaron batter with a J motion, which means you are cutting through the middle of the bowl with the rubber spatula and then going around and over, back to the center, around and over again.
I like using a sturdy flat rubber spatula to do the macaronage.
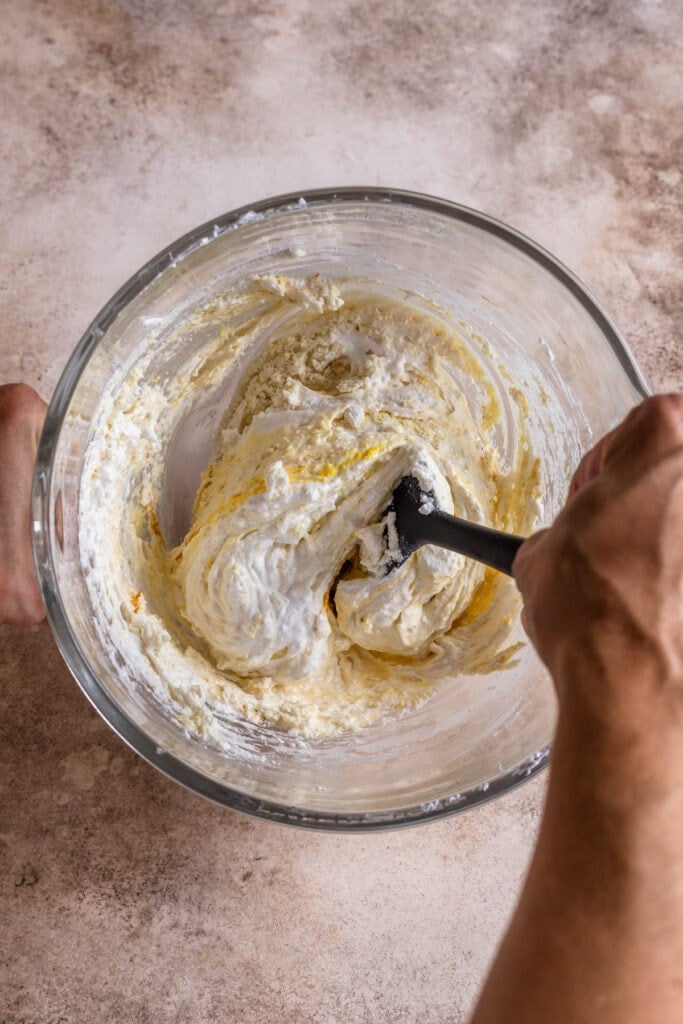
Towards the end of the macaronage, I like to press the macaron batter with the spatula up against the bowl, to squeeze out air bubbles as you can see below.
Time doing the macaronage will vary from one person to the other. It takes me about 3 to 5 minutes to do the macaronage. But again, don’t go by time. Things that can affect macaronage time are: consistency of the meringue, weather, how much food coloring you’ve added, how gently you are handling the macaron batter.
As always, it’s best to go by consistency rather than by time.
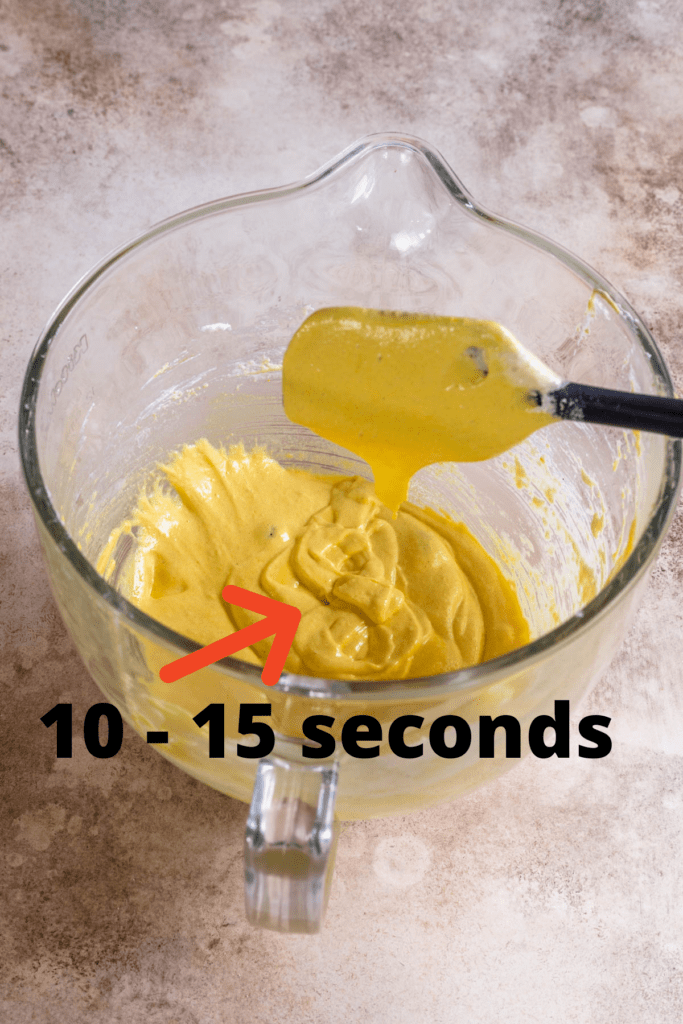
The perfect batter will be flowing off the spatula slowly and effortlessly. Some people refer to this as “lava consistency”, as you may have heard.
You should be able to draw several figure 8s with the batter that’s flowing off the spatula, and even after the batter breaks up, it should still continue to flow off the spatula slowly and effortlessly.
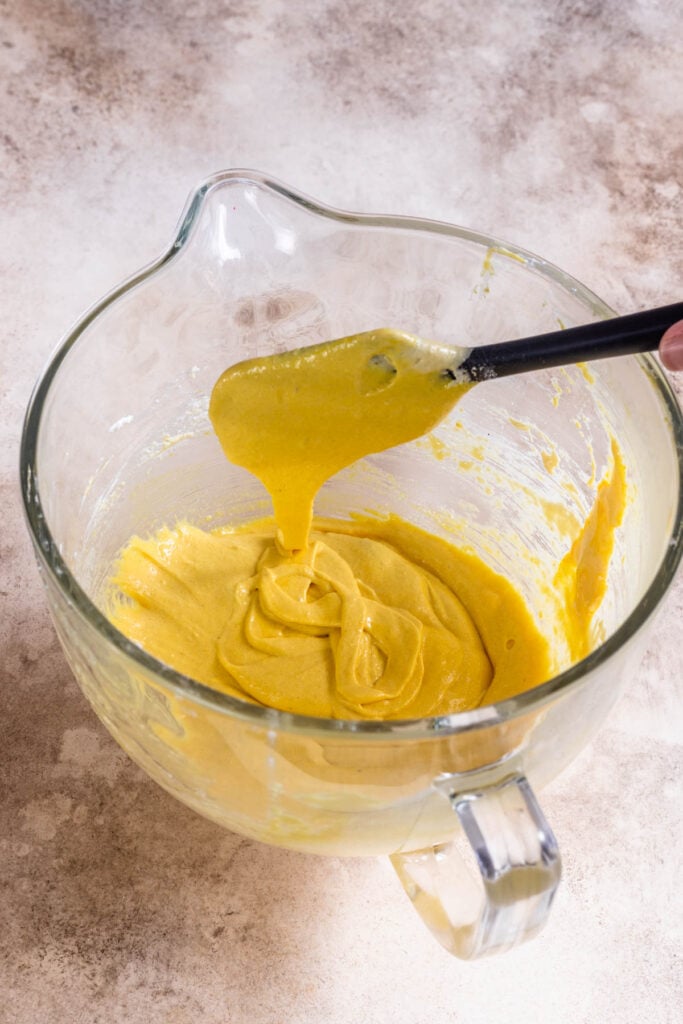
And the batter that’s falling back into the bowl should take about 10 to 15 seconds to incorporate and blend with the batter that’s already in the bowl.
Under mixed batter will very clearly show the tips on the top of the shell. The shell won’t smooth out and spread out nicely. And over mixed batter will cause shells that are misshapen, wrinkled, hollow, with the feet spread out, or ruffled.
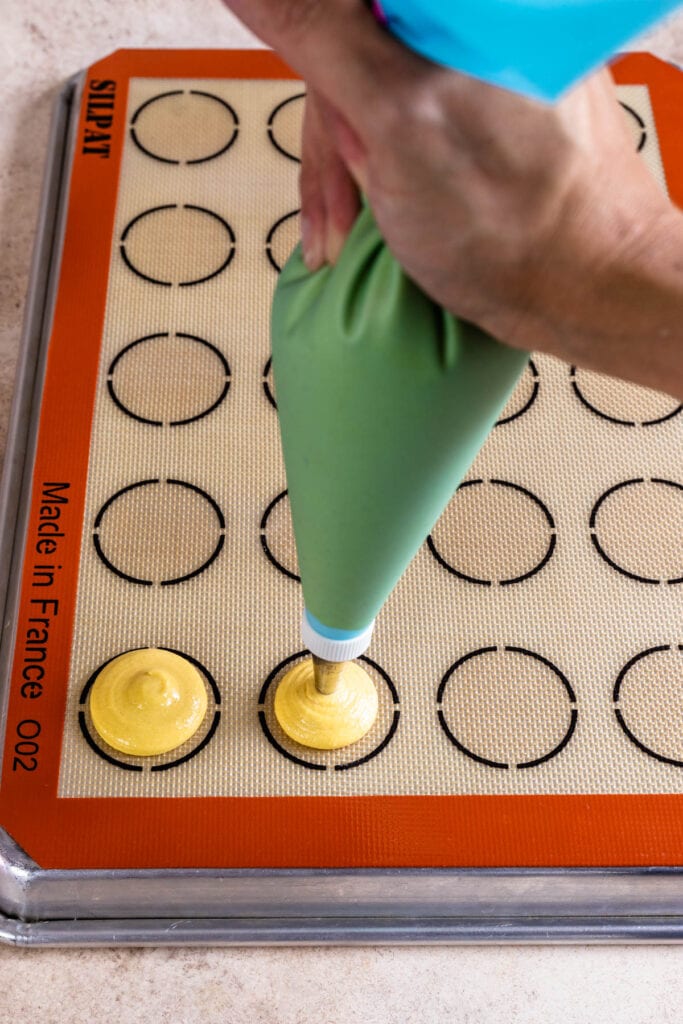
Once the batter is at the right consistency, transfer it to the pastry bag we’ve prepared earlier. Tie the end of the bag with a bag tie, so the batter doesn’t dry out and it gives you more control while piping because there’s no risk of the batter escaping through the top of the pastry bag.

Piping the macaron shells
Let’s pipe the macaron shells!
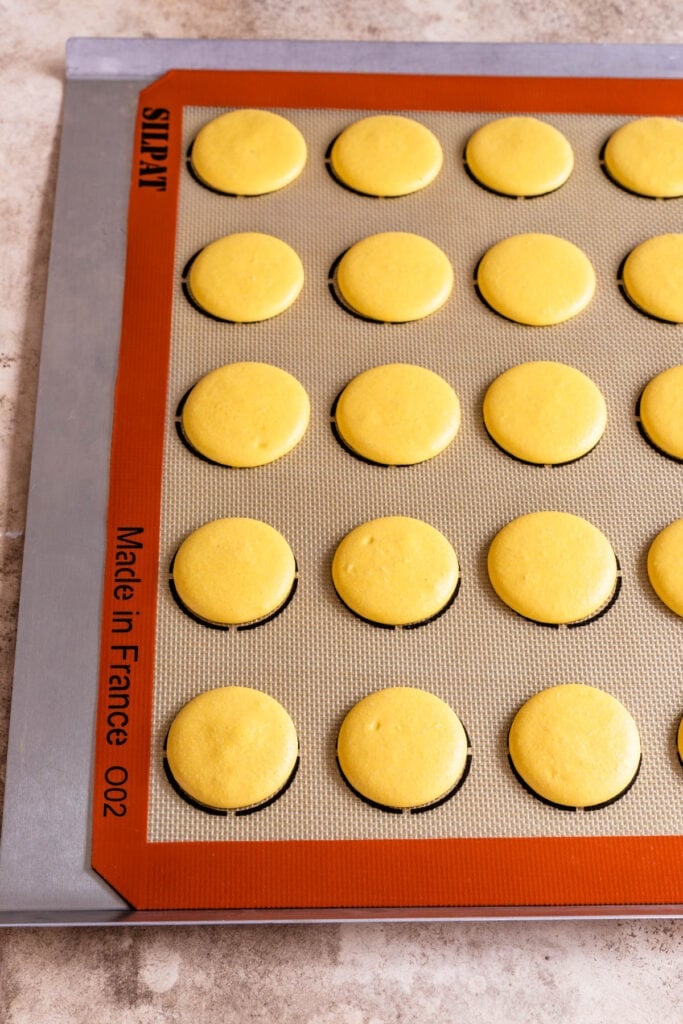
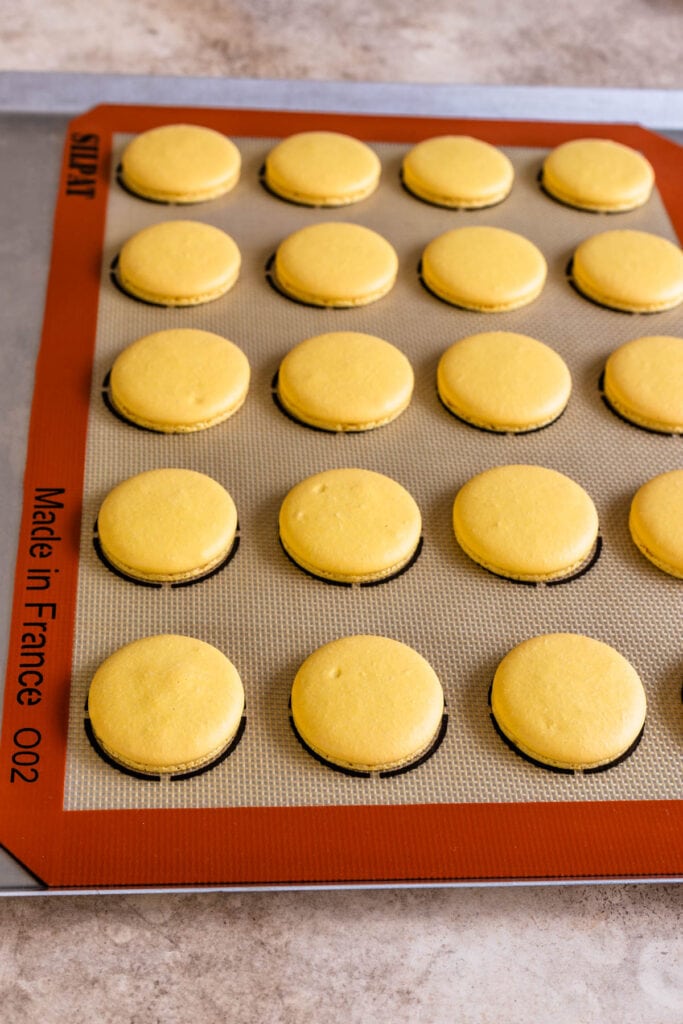
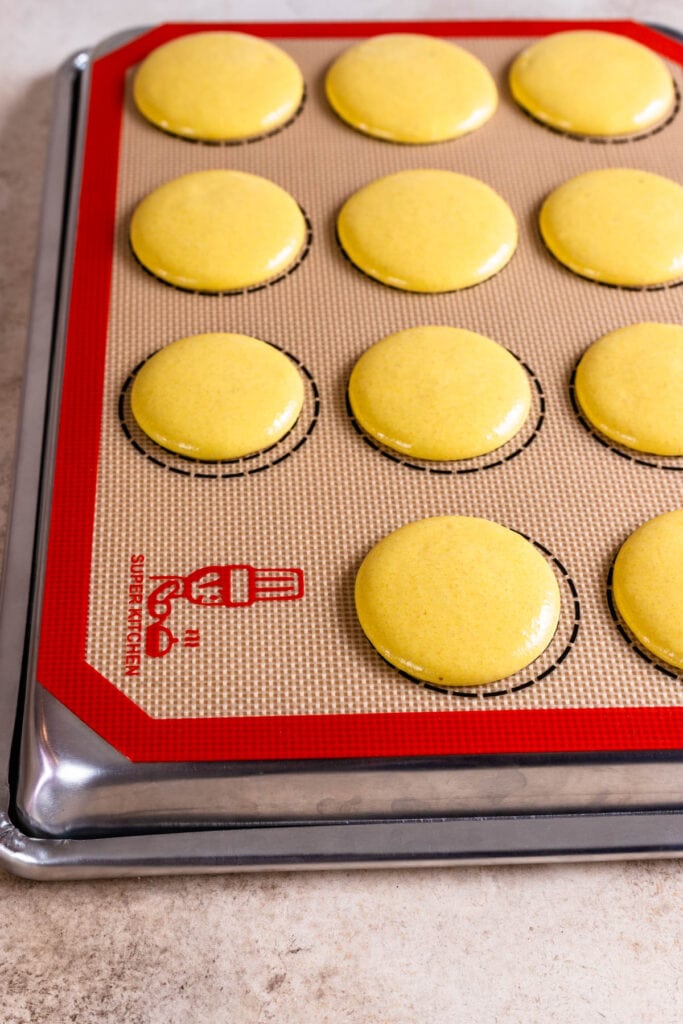
Place the piping bag directly 90 degrees over the center of each macaron template. Apply gentle pressure and carefully pipe for about 3 to 5 seconds, and then quickly pull the bag up twisting slightly at the top.
Once you’ve piped as many shells as you could, bang the tray against the counter or against the palm of your hand a few times each. Use a toothpick to pop any air bubbles in the surface of the shells.
Tapping the trays will help release some of the air bubbles and can help the batter smooth out. However, contrary to popular belief it does NOT prevent cracked shells. If your macaron shells are cracking it’s due to other issues and you can try to explore them in the Troubleshooting Guide.
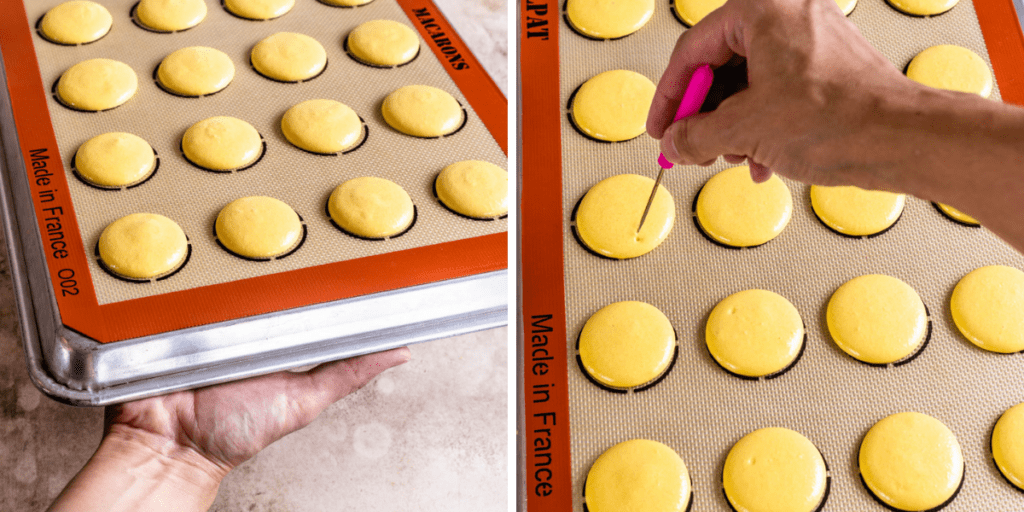
I always bake the shells with the tray upside down, or on the rimless baking tray as you can see below, because the lack of rims allows for the air to flow freely and evenly throughout the shells, which helps with the heat distribution. This avoids lopsided or cracked macaron shells.
The Rimless Baking Tray below is my favorite currently. You can find them on Amazon.
Baking the shells with the rest method
There are two approaches to baking the shells: resting and not resting them. Luckily I know about both because one of my ovens allows me to rest, and the other doesn’t. Being able to do the no-rest method has to do with three factors: your oven, the pan you are using, and how much food coloring you’ve added.
Let’s talk about the rest method first.
On my large oven I have to rest the shells, otherwise they crack, or come out lopsided, or the feet separate from the top of the shell.
So I bake the resting shells on my large oven at 310ºF. I rest the shells for 20 to 40 minutes, even longer depending if they have a lot of food coloring, if the day is humid, or if it’s a shaped macaron. Shaped macarons require a lot of rest in my experience in order to not crack. Sometimes I rest my shells even longer than 1 hour.
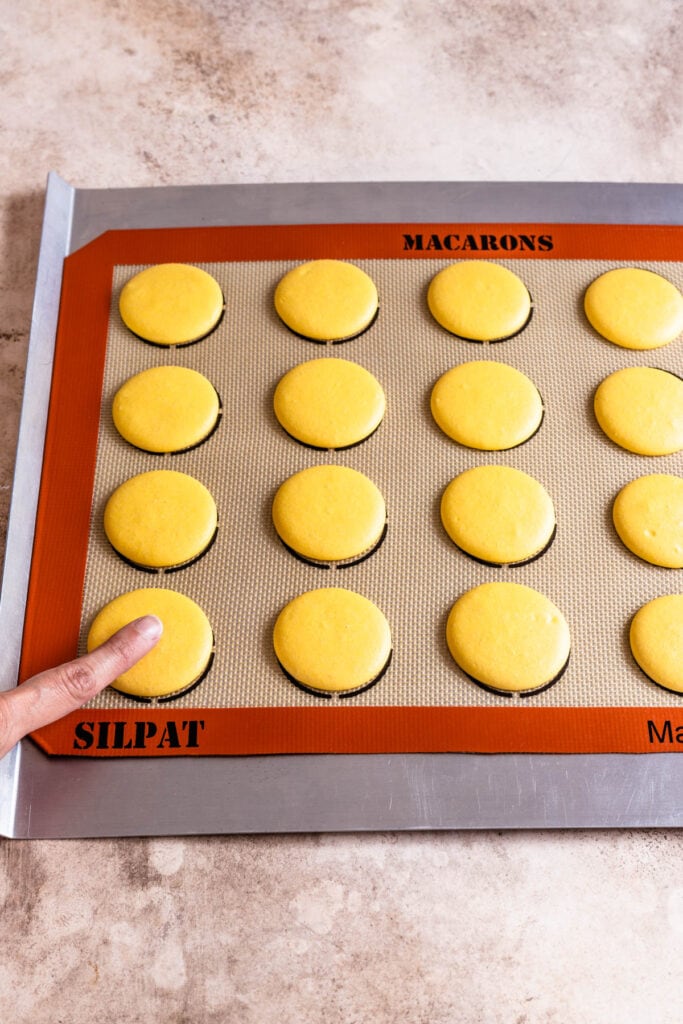
Touch the top of a shell, and if it doesn’t stick to your finger, and if it doesn’t form a deep indentation that won’t bounce back, you can start baking.
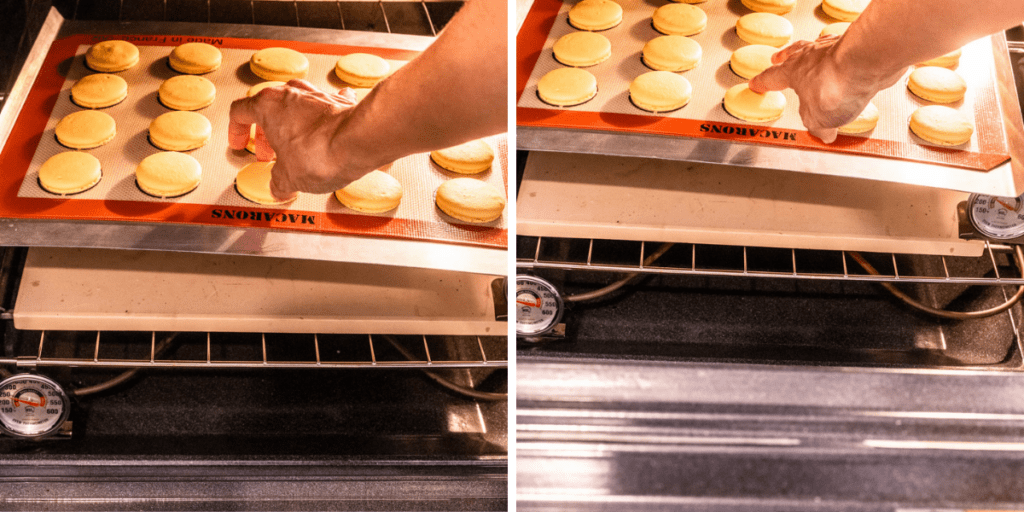
Like I said before I bake my macarons in the large oven at 310ºF, after 6 minutes baking, I rotate the tray in the oven, if I don’t the macarons turn out lopsided. Not every baker has to do this, it depends on your oven heat distribution.
Also notice how I have a pizza stone in the oven, this helps with temperature fluctuation, since my oven is so inconsistent. The pizza stone acts like a radiator, so it stabilizes the temperature in the oven, and when I open the oven door to rotate the shells, the pizza stone helps the temperature quickly bounce back up.

I bake the shells for 15 to 20 minutes, time baking depends on how much food coloring is on the shells, how well the oven keep the temperature stable, how big or small I’ve piped the macarons, and so forth.
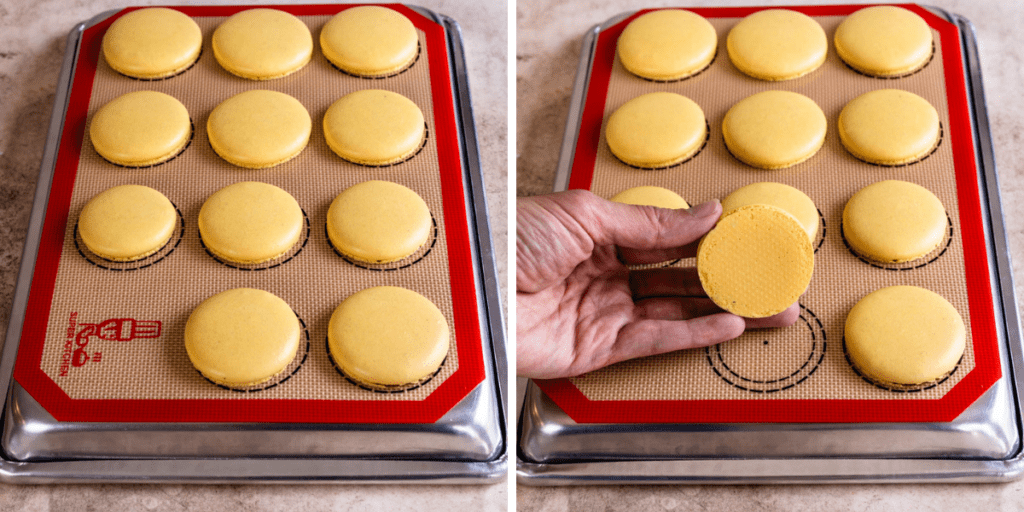
To know if the macarons are done baking, you can try to move a shell, if it doesn’t feel jiggly, it is probably done baking. The next test is to touch the top of a shell and if it doesn’t feel soft, you can remove the shells from the oven.
Let the shells cool down completely before removing from the mat and filling.
Baking the shells with the no-rest method
I used to be able to bake my shells with the no-rest method on my large oven back in my old house, using an air bake tray, as I had learned from Whiskatx and Nicole from Bake Toujours. However, I am no longer able to use the air bake tray on my current oven, because of the insulation of the tray, it doesn’t allow the shells to bake nicely, and they end up concave, without a formed bottom, or the feet end up separating from the top of the shell, because of the lack of heat.
However, when doing the no-rest method, the air bake trays work for a lot of people, and it worked for me on my previous oven, so you can try for yourself.
For me to do the no-rest method, I have to use my countertop oven, and the tray flipped upside down, to allow for better air circulation, and avoid cracked shells or lopsided macarons.
After piping the shells, I can bake them immediately, unless they have a lot of food coloring added (such as black shells), or if they are shaped macarons, I recently tried baking pumpkins that didn’t even have a lot of color in them and they all cracked. So usually shaped macarons require longer resting time in my experience.
Anyway, back to the no-rest method in my small oven.
I use a 290ºF temperature, and bake for about 20 to 23 minutes, and unlike with my large oven, I don’t have to rotate the tray.
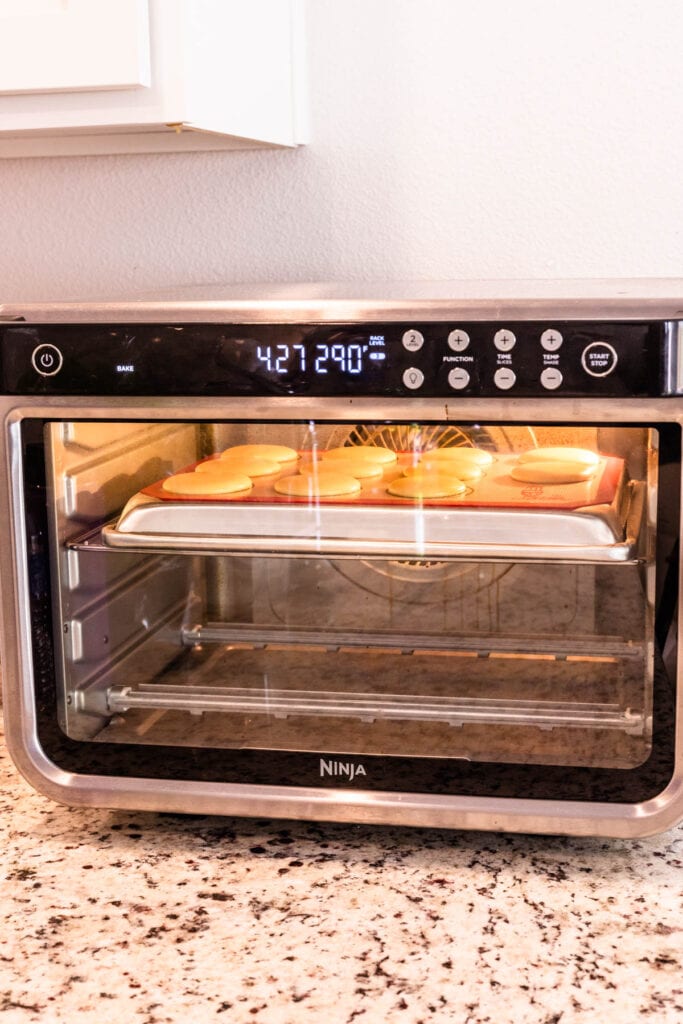
The oven I use is the Ninja DT201 Foodi 10-in-1 XL Pro and can be found on Amazon.
And as I’ve explained above with the rest method, the way to tell if the shells are baked is the same: try to move a shell, if it doesn’t feel jiggly, it is probably done baking. The next test is to touch the top of a shell and if it doesn’t feel soft, you can remove the shells from the oven.
Storage
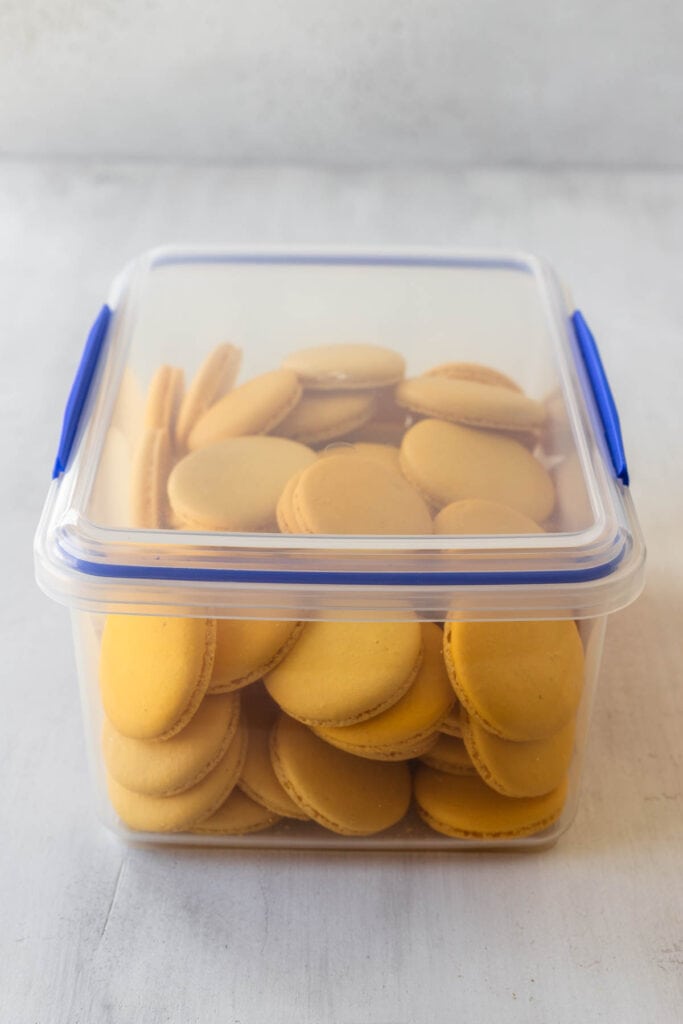
Let’s talk about how to store our macarons now. I store the unfilled shells in an air tight container in the fridge for up to 5 days, and in the freezer for 1 to 2 months.
I love the Sistema and also Rubbermaid air tight containers for storing my shells.
Filling
To fill the macarons, I have available over 100 macaron fillings and ideas on the blog. You can find a full list here.
You can use anything from buttercream to ganache, and combine them with curds, jams, custards to fill the macarons.
It’s usually said that the filling to shell ratio should be 1:2. And to be honest, sometimes I like to fill them up a bit more, depending on the piping tip you are using, or on the type of filling. Not to mention the famous Korean Fatcarons, that are filled with an overload of delicious filling in the middle.
Fill the macarons with the filling of your choice by piping the filling on the bottom shell and topping with another shell to form the macaron sandwich.
Maturing
After filling the macarons with the filling of your choice, you should let them sit in the fridge and mature for at least 24 hours before serving. The maturation process will make so the shells get hydrated as they are in contact with the wet filling, which will develop their texture and flavors, making the macaron cookies have that desirable chewy texture with the slight crunch of the outside shell, and the delectable soft filling inside.
A great tip I have to speed up the maturing process, or to help soften up hard macaron shells (that became hard due to over baking, or using egg white powder in a dry climate for example). The tip is to place the assembled macaron sandwiches in an air tight container with a slice of bread, or a sugar bear inside. The sugar bear, or the slice of bread will both lend moisture to the sugar particles in the macaron shells, which will make them soften up. Now two important disclaimers about this tip: first, don’t let the bread or the sugar bear in direct contact with the macarons, always have them separated by a layer of plastic or foil. And second, if you are making macarons for to serve to someone who is gluten-free, use gluten-free bread, or go for the sugar bear instead. Brown sugar bears can be found on Amazon, and many places.
Serving
Always before serving the macarons let them sit at room temperature for at least 10 minutes or so. This will help them soften up and become more enjoyable, texture and flavor wise.
Here are some more useful links for you:
- Macaron School (page containing everything you need to know about macarons, tips, tricks, the science behind macarons, and much more)
- Macaron Troubleshooting
- My favorite Macaron Tools
Watch Video

Basic Swiss Meringue Macaron Recipe
Ingredients
- 100 grams white granulated sugar
- 4 grams egg white powder optional, read notes below
- 100 grams egg whites
- 105 grams almond flour
- 105 grams powdered sugar
- Food coloring if desired
Instructions
Prep the ingredients and tools
- Before you start, get all of the ingredients ready. Prepare a large piping pastry bag, fitted with a large round tip, I use a 1/4” diameter tip, or a Wilton 12. Set aside.
- Line two baking sheets with parchment paper or silicone mat.
- I use a baking mat with the macaron template already in it.
- Wipe the tools such as bowls, spatulas, and silicone mats with vinegar if desired, this helps getting rid of any grease particles that might be in the tools.
- Measure out all of the ingredients.
- Sift the powdered sugar and almond flour together. Set it aside.
- Start pre-heating the oven. I pre-heat my large oven to 310ºF for 60 to 90 minutes, this helps with temperature fluctuations. I pre-heat the countertop oven for 30 to 45 minutes.
Making the Swiss Meringue
- Place a bowl over a pan with barely simmering water. Add the sugar and egg white powder to the bowl if using. If you’re not using egg white powder simply skip it, nothing needs to be changed in the recipe.
- Whisk the sugar and egg white powder so it doesn’t clump up.
- Add the egg whites to the bowl and whisk until the sugar is completely melted. It will take a couple of minutes. You can test by touching the mixture between your fingers, and if you feel any sugar granules just keep whisking the mixture over the water bath.
- Make sure the bottom of the bowl isn’t touching the simmering water because you don’t want the whites to cook.
- Also, don’t overheat the sugar syrup, you are just looking to melt the sugar, no need to bring it to a certain temperature.Transfer the syrup to the bowl of a stand mixer. Before transferring the syrup, you might consider whipping the bottom of the bowl with a towel so the water doesn’t fall into the mixer bowl.
- With the whisk attachment, start whisking mixture on low (speed 2 of the KitchenAid) for about 30 seconds, then gradually start increasing speed to medium. Whisk on medium (speed 4) for one to two minutes, until the mixture is white and starting to become fluffy. Raise the speed to medium or medium-high and whip for a few minutes until stiff peaks are formed. I like to finish whipping the meringue on speed 6 of the KitchenAid.
- It takes me about 13 to 15 minutes to whip the meringue, but you shouldn’t go by time, go by what the meringue is supposed to look like because a lot of things can affect whipping time, such as the quality of the eggs, the weather, how powerful your mixer is, and more.
- Once the meringue gets glossy and you start seeing streaks formed by the whisk, and the meringue raising in the center of the whisk, it might be time to stop.
- You don’t want to over whip the meringue at this point because that can cause several issues, mainly hollow macarons.
- Whisk until stiff peaks have formed. When you pull the whip up, the peak should be stiff and shooting straight up, with possibly a slight bend at the top, but not bending to the side.
- Also when you swirl the whisk around in the bowl to collect the meringue, you should feel some resistance from the meringue. And when you look on the bottom of the whisk the meringue collected should be forming soft but defined waves.
Macaronage
- Pour the sifted powdered sugar and almond flour into the stiff meringue.
- Add the food coloring at this point, if using. If you were using powder food coloring, you could add it during the final stages of whipping the meringue.
- Start folding gently forming a letter J with a spatula.
- Once the dry ingredients have incorporated with the meringue, you can start squeezing the air out of the batter by pressing it down along the sides of the bowl as you fold.
- How to know when to stop folding the batter: It’s time to stop folding when the batter is glossy and has a thick and flowing consistency. There are several ways to test this.
- First, pick up some batter with the spatula and try to draw a figure 8 with the batter that is dripping off the spatula. If you can form several 8 figures without the batter breaking up, that’s one indication that it might be ready.
- The batter that’s falling back into the bowl should take 10 to 15 seconds to incorporate with the batter that’s already in the bowl.
- There’s another test you can do. I call it the Teaspoon test. Grab a teaspoon of batter and spoon onto the parchment paper or silicon mat. Wait a minute to see how it behaves.
- If the batter stays stiff, forming a point and doesn’t spread out, fold a little bit more, about 3 folds.
- Test again.
- Once the batter spreads out a bit and starts to look glossy and smooth on top, on the parchment paper or silicone mat, it’s ready.
- You don’t want your batter to be too runny either. So be careful not to over mix. It’s always best to under mix and test several times until the proper consistency has been achieved.
- When you hold the spatula with batter on top of the bowl and the batter falls off the spatula slowly but effortlessly the batter is ready. The batter will keep flowing off the spatula non-stop, but not too quickly.
- Transfer the batter to the piping bag. I also like to seal the top with a bag tie, so the batter doesn’t dry out and it gives you more control while piping because there’s no risk of the batter escaping through the top of the piping bag.
- Place the piping bag directly 90 degrees over the center of each macaron template. Apply gentle pressure and carefully pipe for about 3 to 5 seconds, and then quickly pull the bag up twisting slightly at the top.
- Once you’ve piped as many circles as you could, bang the trays against the counter or against the palm of your hand a few times each.
- Use a toothpick to pop any air bubbles in the surface of the shells.
Resting or not resting the shells
- Let the trays sit for a while so the shells will dry out before baking, if you are resting the macarons. I usually leave about 20-40 minutes, depending on how humid the day is. You’ll know they’re ready when you gently touch the surface of a macaron and it seems dry.
- To do the no-rest method, you can bake the trays immediately.
- The no-rest method will depend on your oven and baking sheets you are using. Read the post above for more information.
- I can do the no-rest method on my small counter top oven, but not on my large oven, because the temperature is too uneven on the large oven.
Baking
- On my large oven I bake the macarons at 310ºF, and on the small countertop oven I bake them at 290ºF. I pre-heat both ovens for quite a bit of time. I pre-heat the large oven for 60 to 90 minutes, and the small oven for 30 minutes or so.
- Bake one tray at a time.
- Bake for 5 minutes, rotate the tray. This step is not necessary, I don’t rotate the trays on the small oven, but I have to do so on my large oven, otherwise the macarons will be lopsided. Not all bakers have to rotate the tray.
- I bake each tray for about 15 to 20 minutes.
- When baked, the macarons will have a deeper color and formed feet. If you try to move a macaron, it shouldn’t feel jiggly. If the macaron is still jiggly, keep baking. Also try to touch the top of a macaron and it shouldn’t feel soft, if it’s still soft, keep baking.
- Remove from the oven and bake the other tray.
- Let the macarons cool down before proceeding with the filling.
Storage
- I store the unfilled shells in an air tight container in the fridge for up to 5 days, and in the freezer for 1 to 2 months.
Hi Camilla. What is the perfect size for macarons. I know it depends on what we decide but is there a “normal size” 2 bites, three bites…cm?
Also, when it comes to filling how do you keep the filling from squeezing out on the sides when you bite in! U like a lighter filling but even with ganache it sometimes squeezes out
Hi! 😊 I find that macarons around 1.5 to 1.75 inches (about 4–4.5 cm) in diameter are the perfect size. They’re large enough to show off the filling but still easy to eat in two or three bites.
As for the filling squeezing out, that usually happens for one of two reasons. The most common is eating the macarons straight from the refrigerator when the shells are still firm and cold. The shells should soften slightly after maturing, and I like to let macarons sit at room temperature for about 15–20 minutes before serving. Another possibility is that the shells were a bit overbaked, which can make them less tender and cause the filling to be pushed out when you bite into them.
I hope that helps! 😊💕
Can you double this recipe?
Absolutely you can! It works wonderfully!
Can I bake them on parchment paper? I see others using it, and their macarons turn out fine.
Yes you can. I just prefer silicone mats 🙂
Hi there,
I am in Sarasota, fl. And have made several of your different recipes. Is it ok to let them dry for an hour and then cooking at 300 degrees for 14 minutes?
Hi Karen, that will depend on your oven, kitchen, whether you use egg white powder or not, how much food coloring you’re adding. Batters with food coloring take longer to dry. They can take longer to dry on a humid day. It all depends. Instead of going by time, it’s best to touch the surface of the macaron and if it’s dry with a nice skin, you can bake it.
About baking, it also depends. You have to experiment with your oven to find out the best baking time and temperature. If you have a conventional oven, I suggest starting at 300-310F range, and bake until the macarons aren’t jiggly when you wiggle one. If the macarons aren’t developing feet, or cracking, or not developing bottoms, then you look to either increase baking time, or decrease it, and play around with the temperatures.
I also recommend experimenting from the same batch. So this way you reduce the variables. Make one batch, pipe into a few different trays if possible and bake at different temperatures and see which one comes out best. Same for resting time. If your macarons are cracking, it could mean they need longer resting time.
Oh. My. Gosh. Your tutorial was FABULOUS. I just tried these for the first time, and my macarons came out almost perfect. Only four were cracked, and I think because I piped them too big and didn’t let it rest long enough for the big ones to form enough skin. But the rest were perfect! Perfect top, perfect foot, perfect bottom, perfect chewy inside. I am SO EXCITED. I didn’t have egg white powder, so I went without and it was no issue. Wow!!!
That’s awesome to hear! And yes the cracked could very well be that indeed! I love that these worked for you! I love the Swiss method and I love it when people achieve awesome results like this! Good job! Well done, Laura! Thanks for making my recipe!
May I know if the batter volume is supposed to decrease as you macaronage?
In all my previous attempts, my macaron shells inflated then deflated in the oven and came out porous, dense and had no feet. In my latest batch, I finally have a shell though its cracked. I have no idea what I did differently, except, during the macaronage, my batter went from thick, to loose, then it started to get slightly thick again. The volume also visibly shrunk. I followed your recipe but I made a smaller batch by a factor of 3. I also add abit of cream of tar tar. In my previous attempts, I could pipe put about 19 shells, but in this attempt I could only pipe out 13. It also dried faster than previous batches, which was always a problem for me because its so humid.
Yes, some decrease in volume during the macaronage is totally normal. The batter deflates as you fold because you’re intentionally knocking some air out of the meringue to get the right consistency. What you described actually sounds much closer to a proper macaronage than your previous attempts.
From what you’re saying, I think your earlier batches were likely under-mixed, which can cause the shells to puff up, crack, stay dense inside, and not develop feet properly. The fact that this batch dried faster and produced fewer shells also points to the batter being more properly deflated this time.
It’s also normal for the batter to loosen first and then feel slightly thicker again toward the end of the macaronage. That happens as the air bubbles become smaller and the batter starts flowing more evenly.
The cracking could still come from a few things: meringue being under whipped, shells not resting enough. If you have pictures of your shells send them to my email or social media dm so I can take a look at the pics.
I wouldnt add cream of tartar and egg white powder together. Either one or the other. And for cream of tartar, you’d need very little. 1/4 tsp for one full batch.