Cookie Dough Ice Cream
Hello dessert lovers! If my previous Edible Cookie Dough recipe wasn’t enough for you, you’re in luck. I used that recipe to make this most delicious Cookie Dough Ice Cream recipe and it is just so good! It’s the ultimate indulgence, combining rich fudge sauce, creamy no-churn ice cream, and of course, my delicious edible cookie dough.
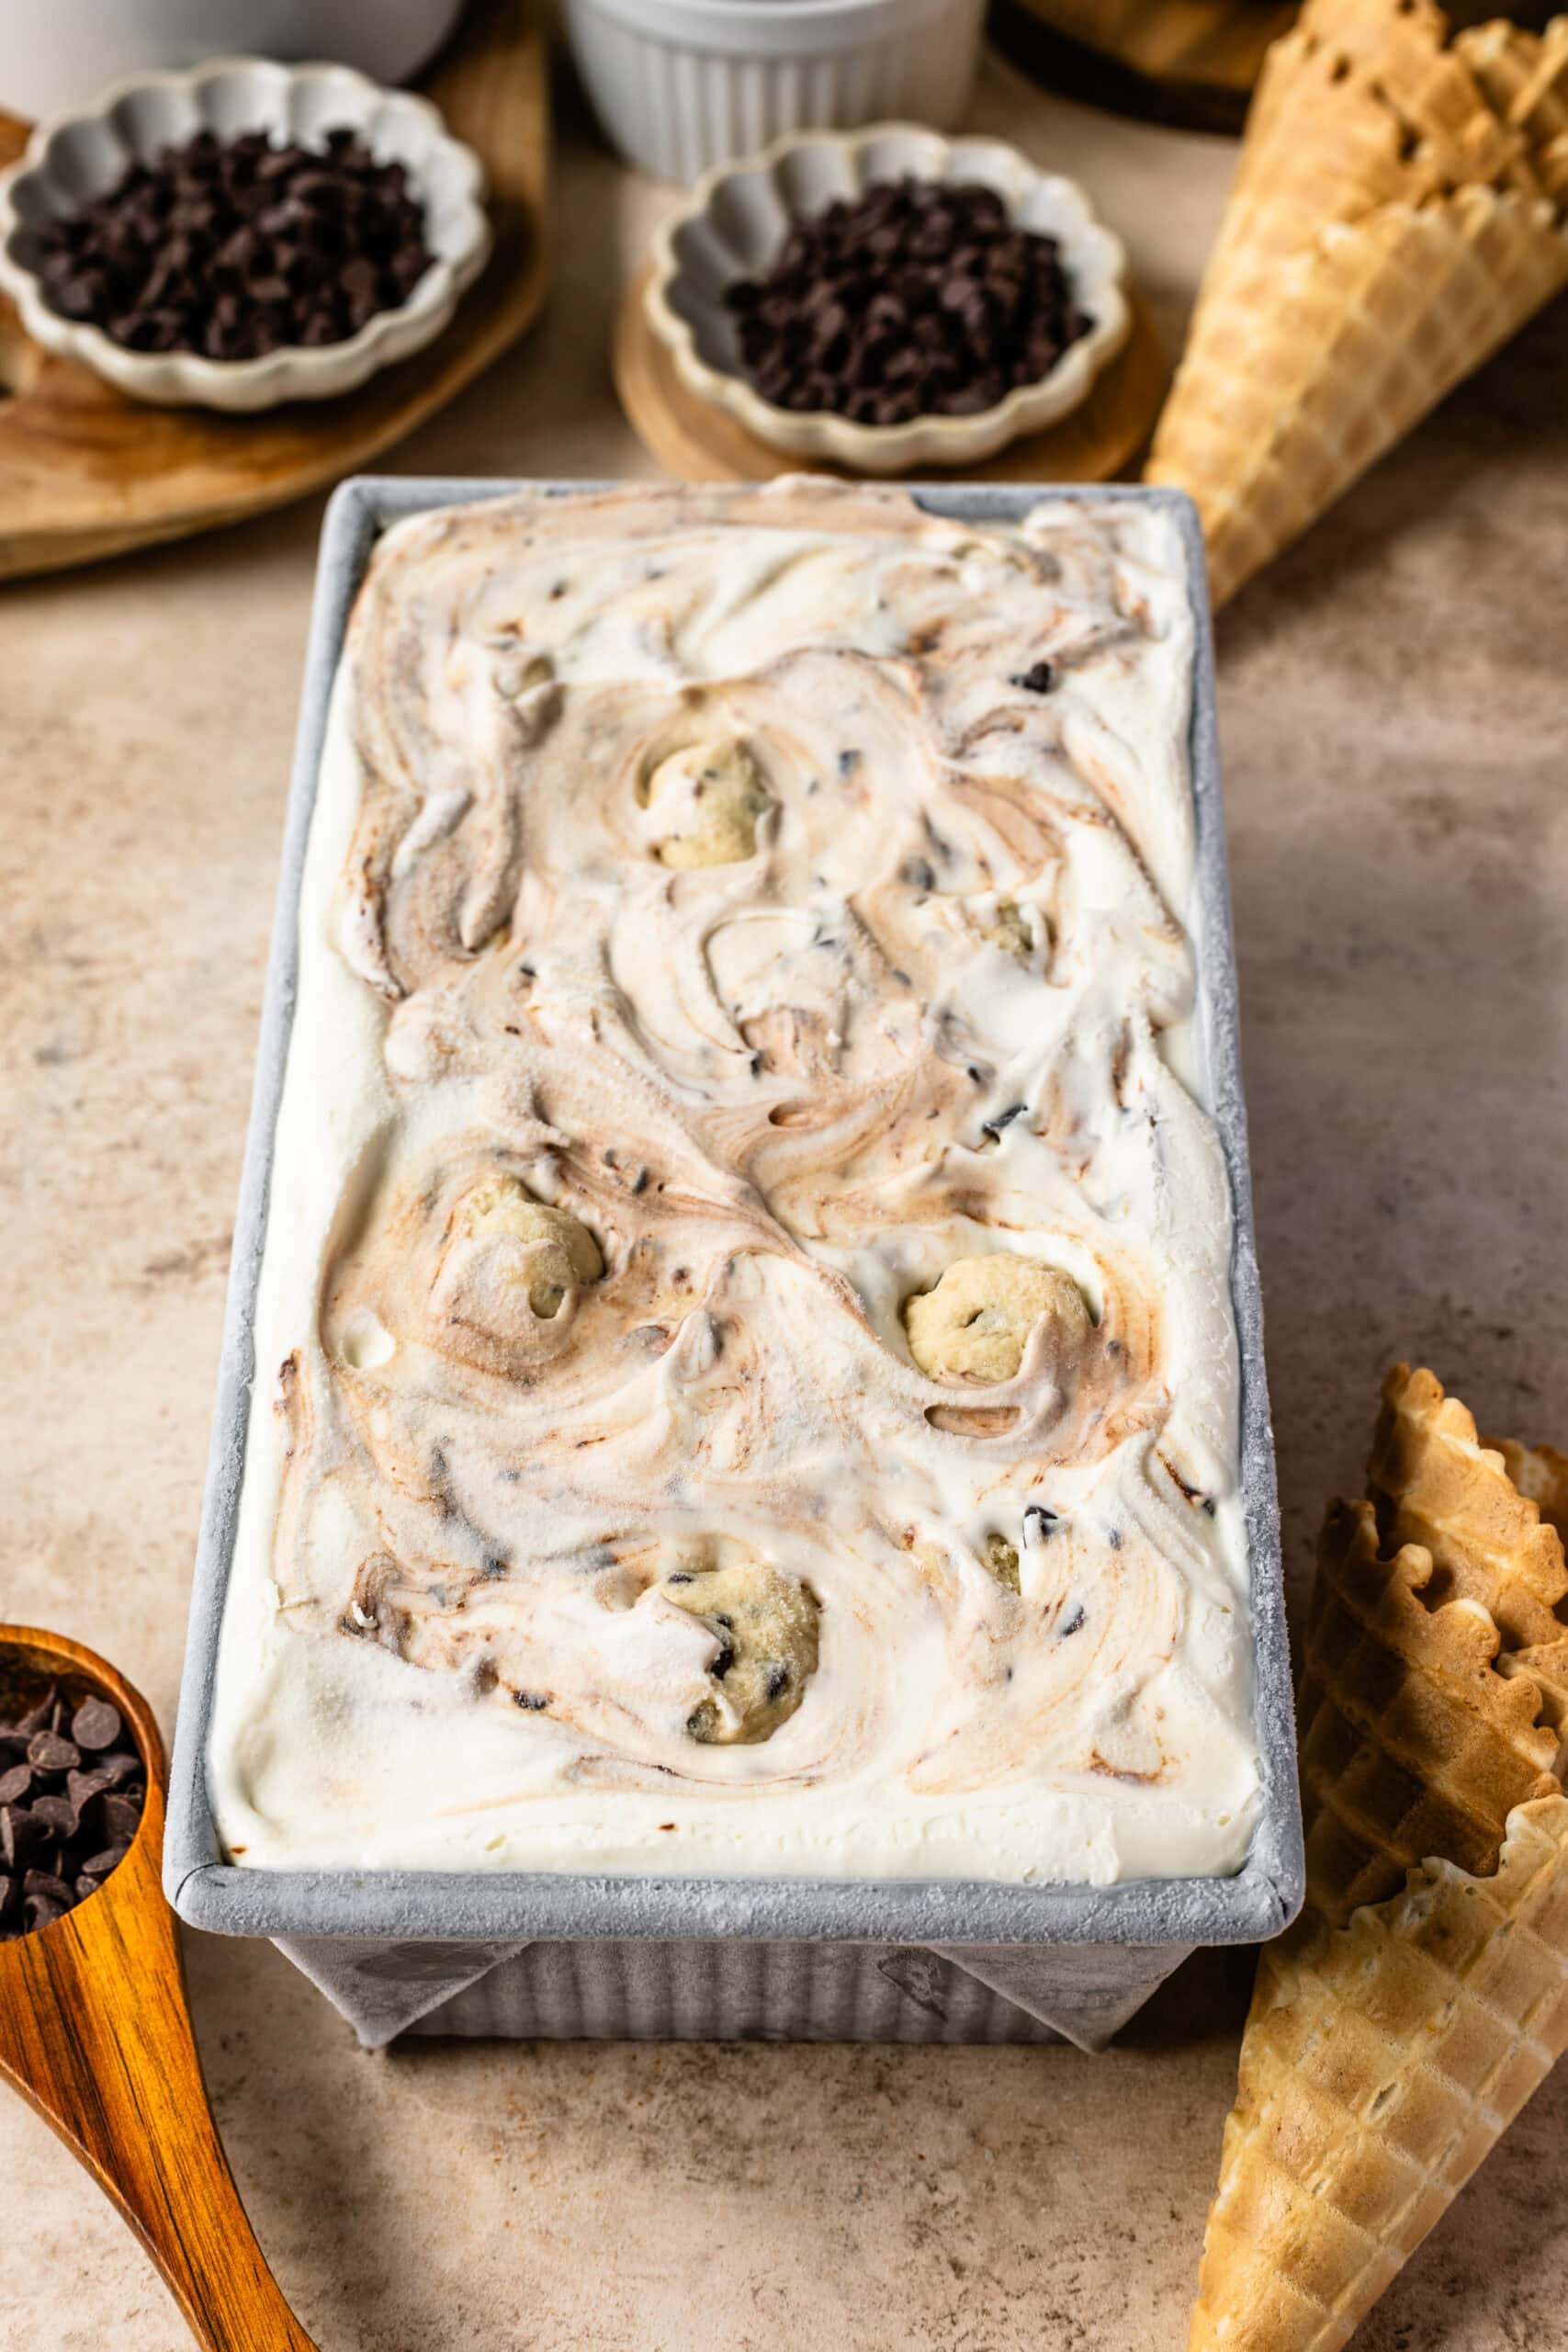
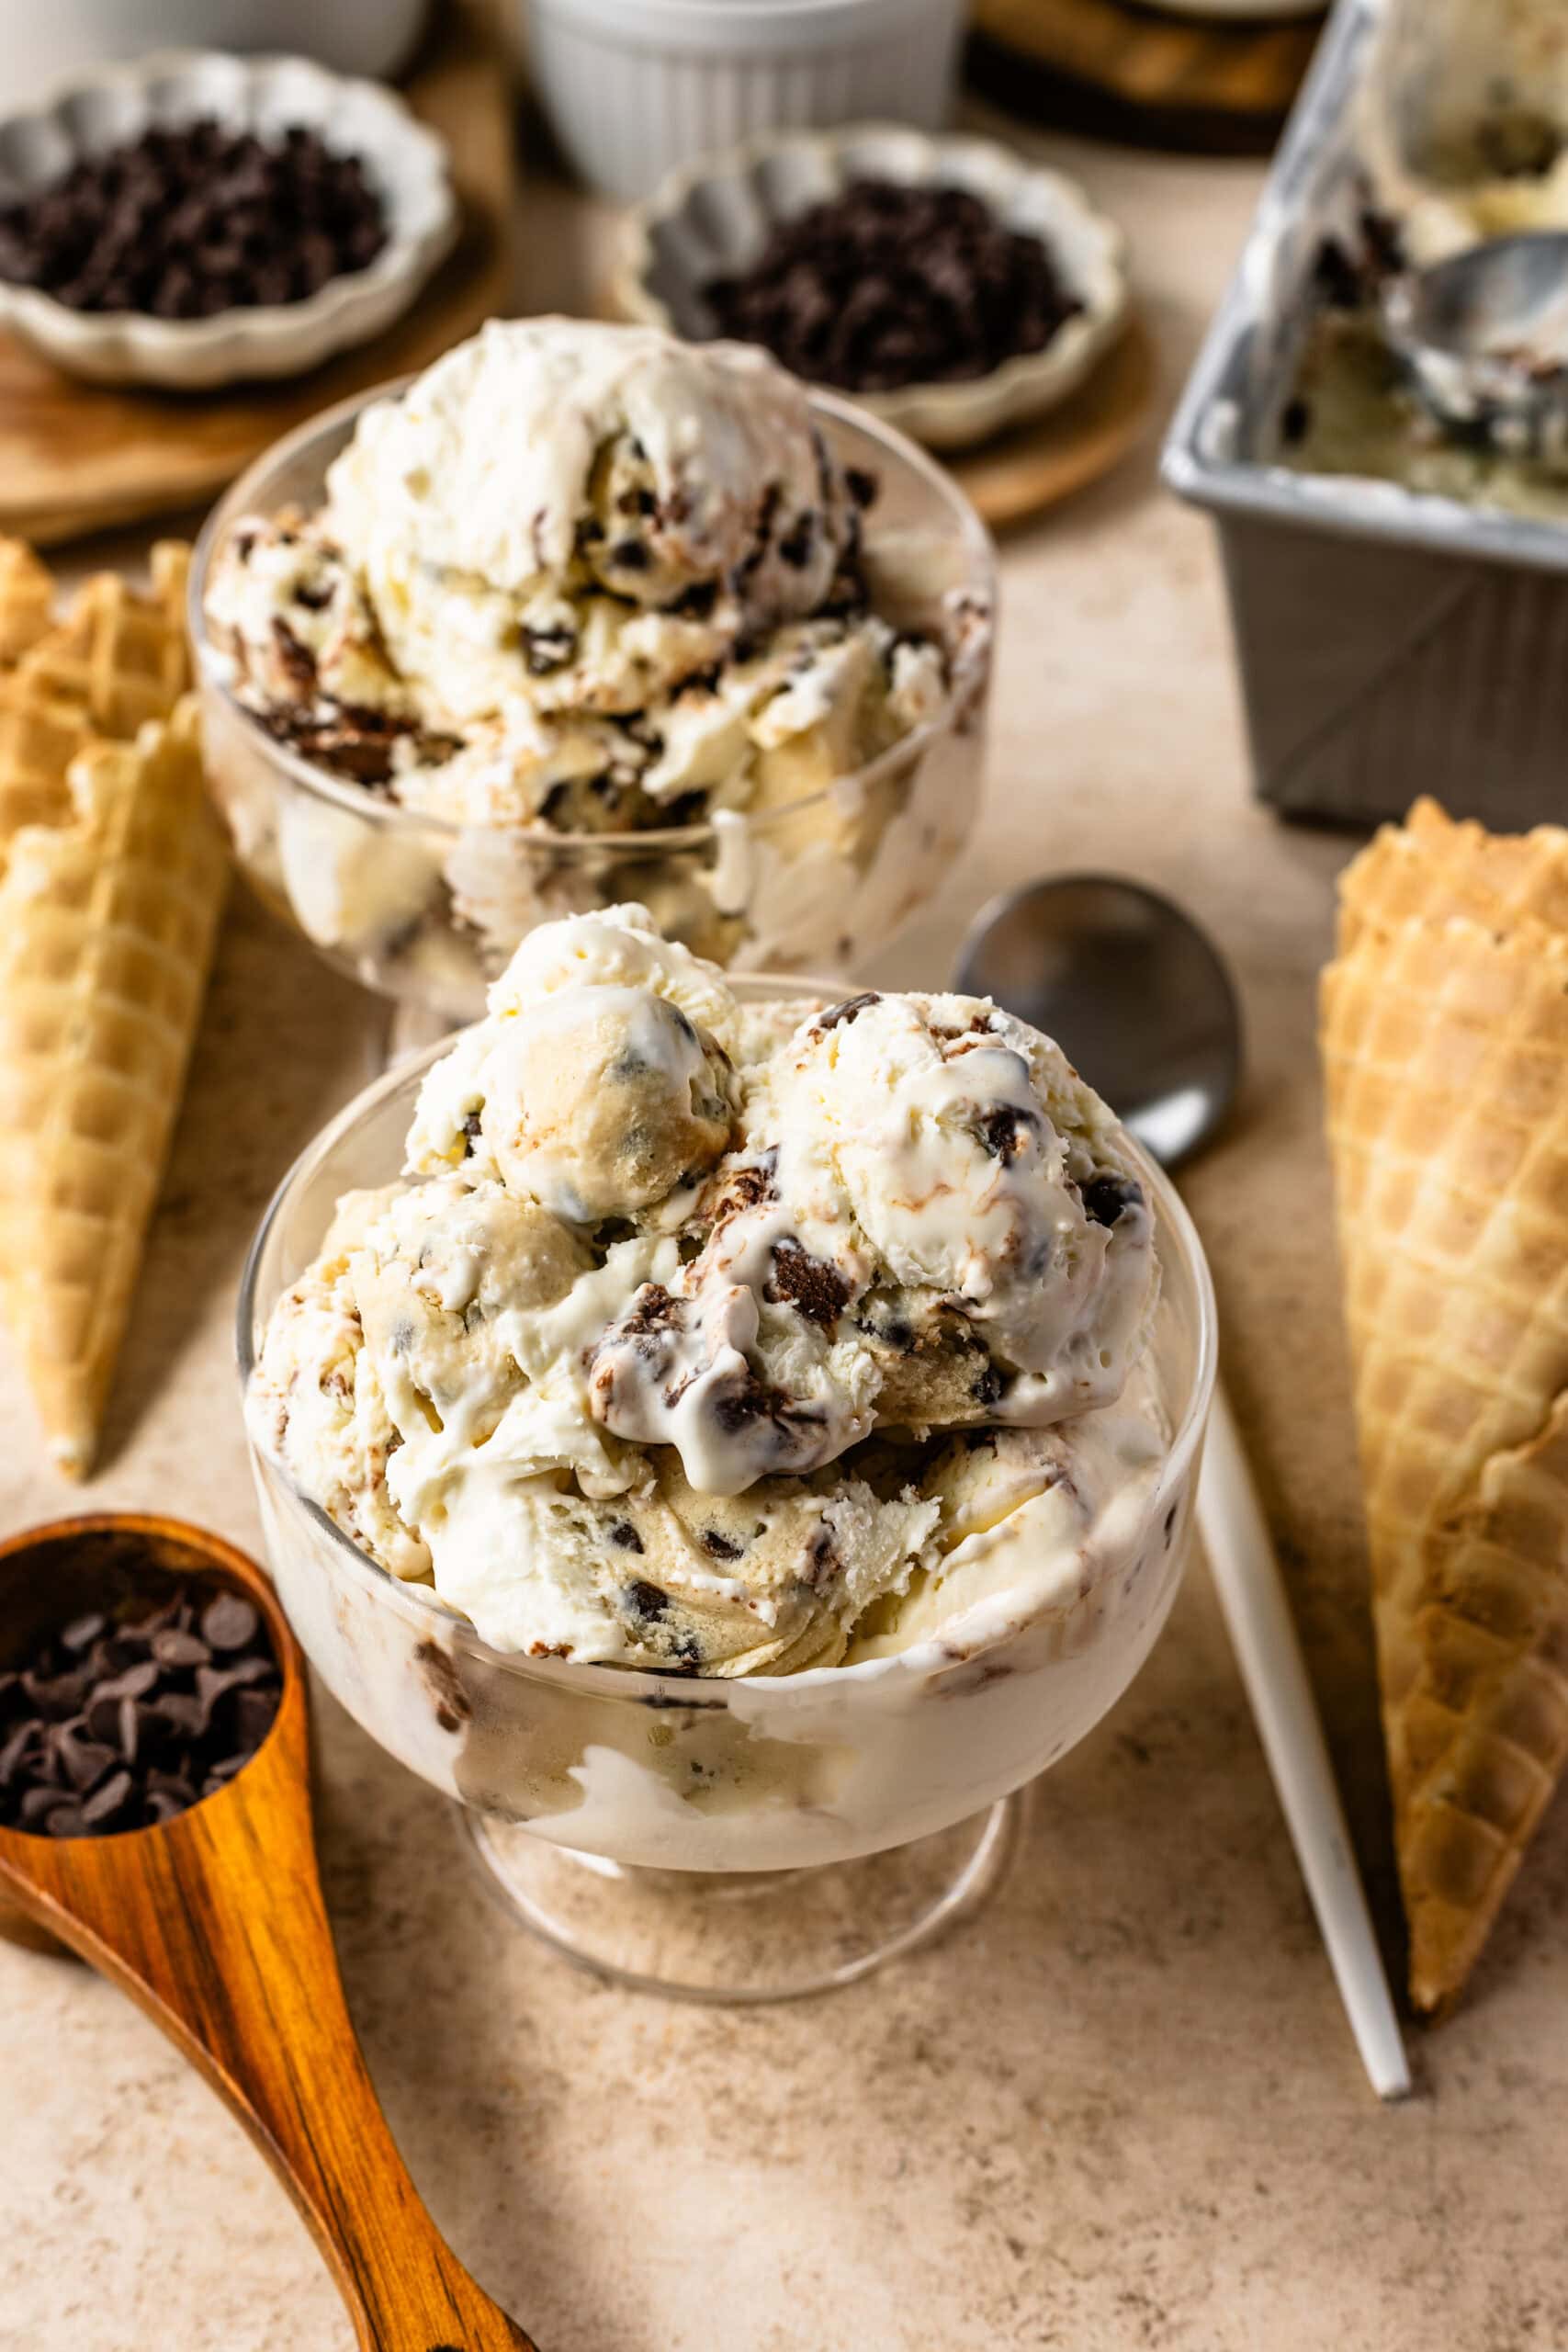
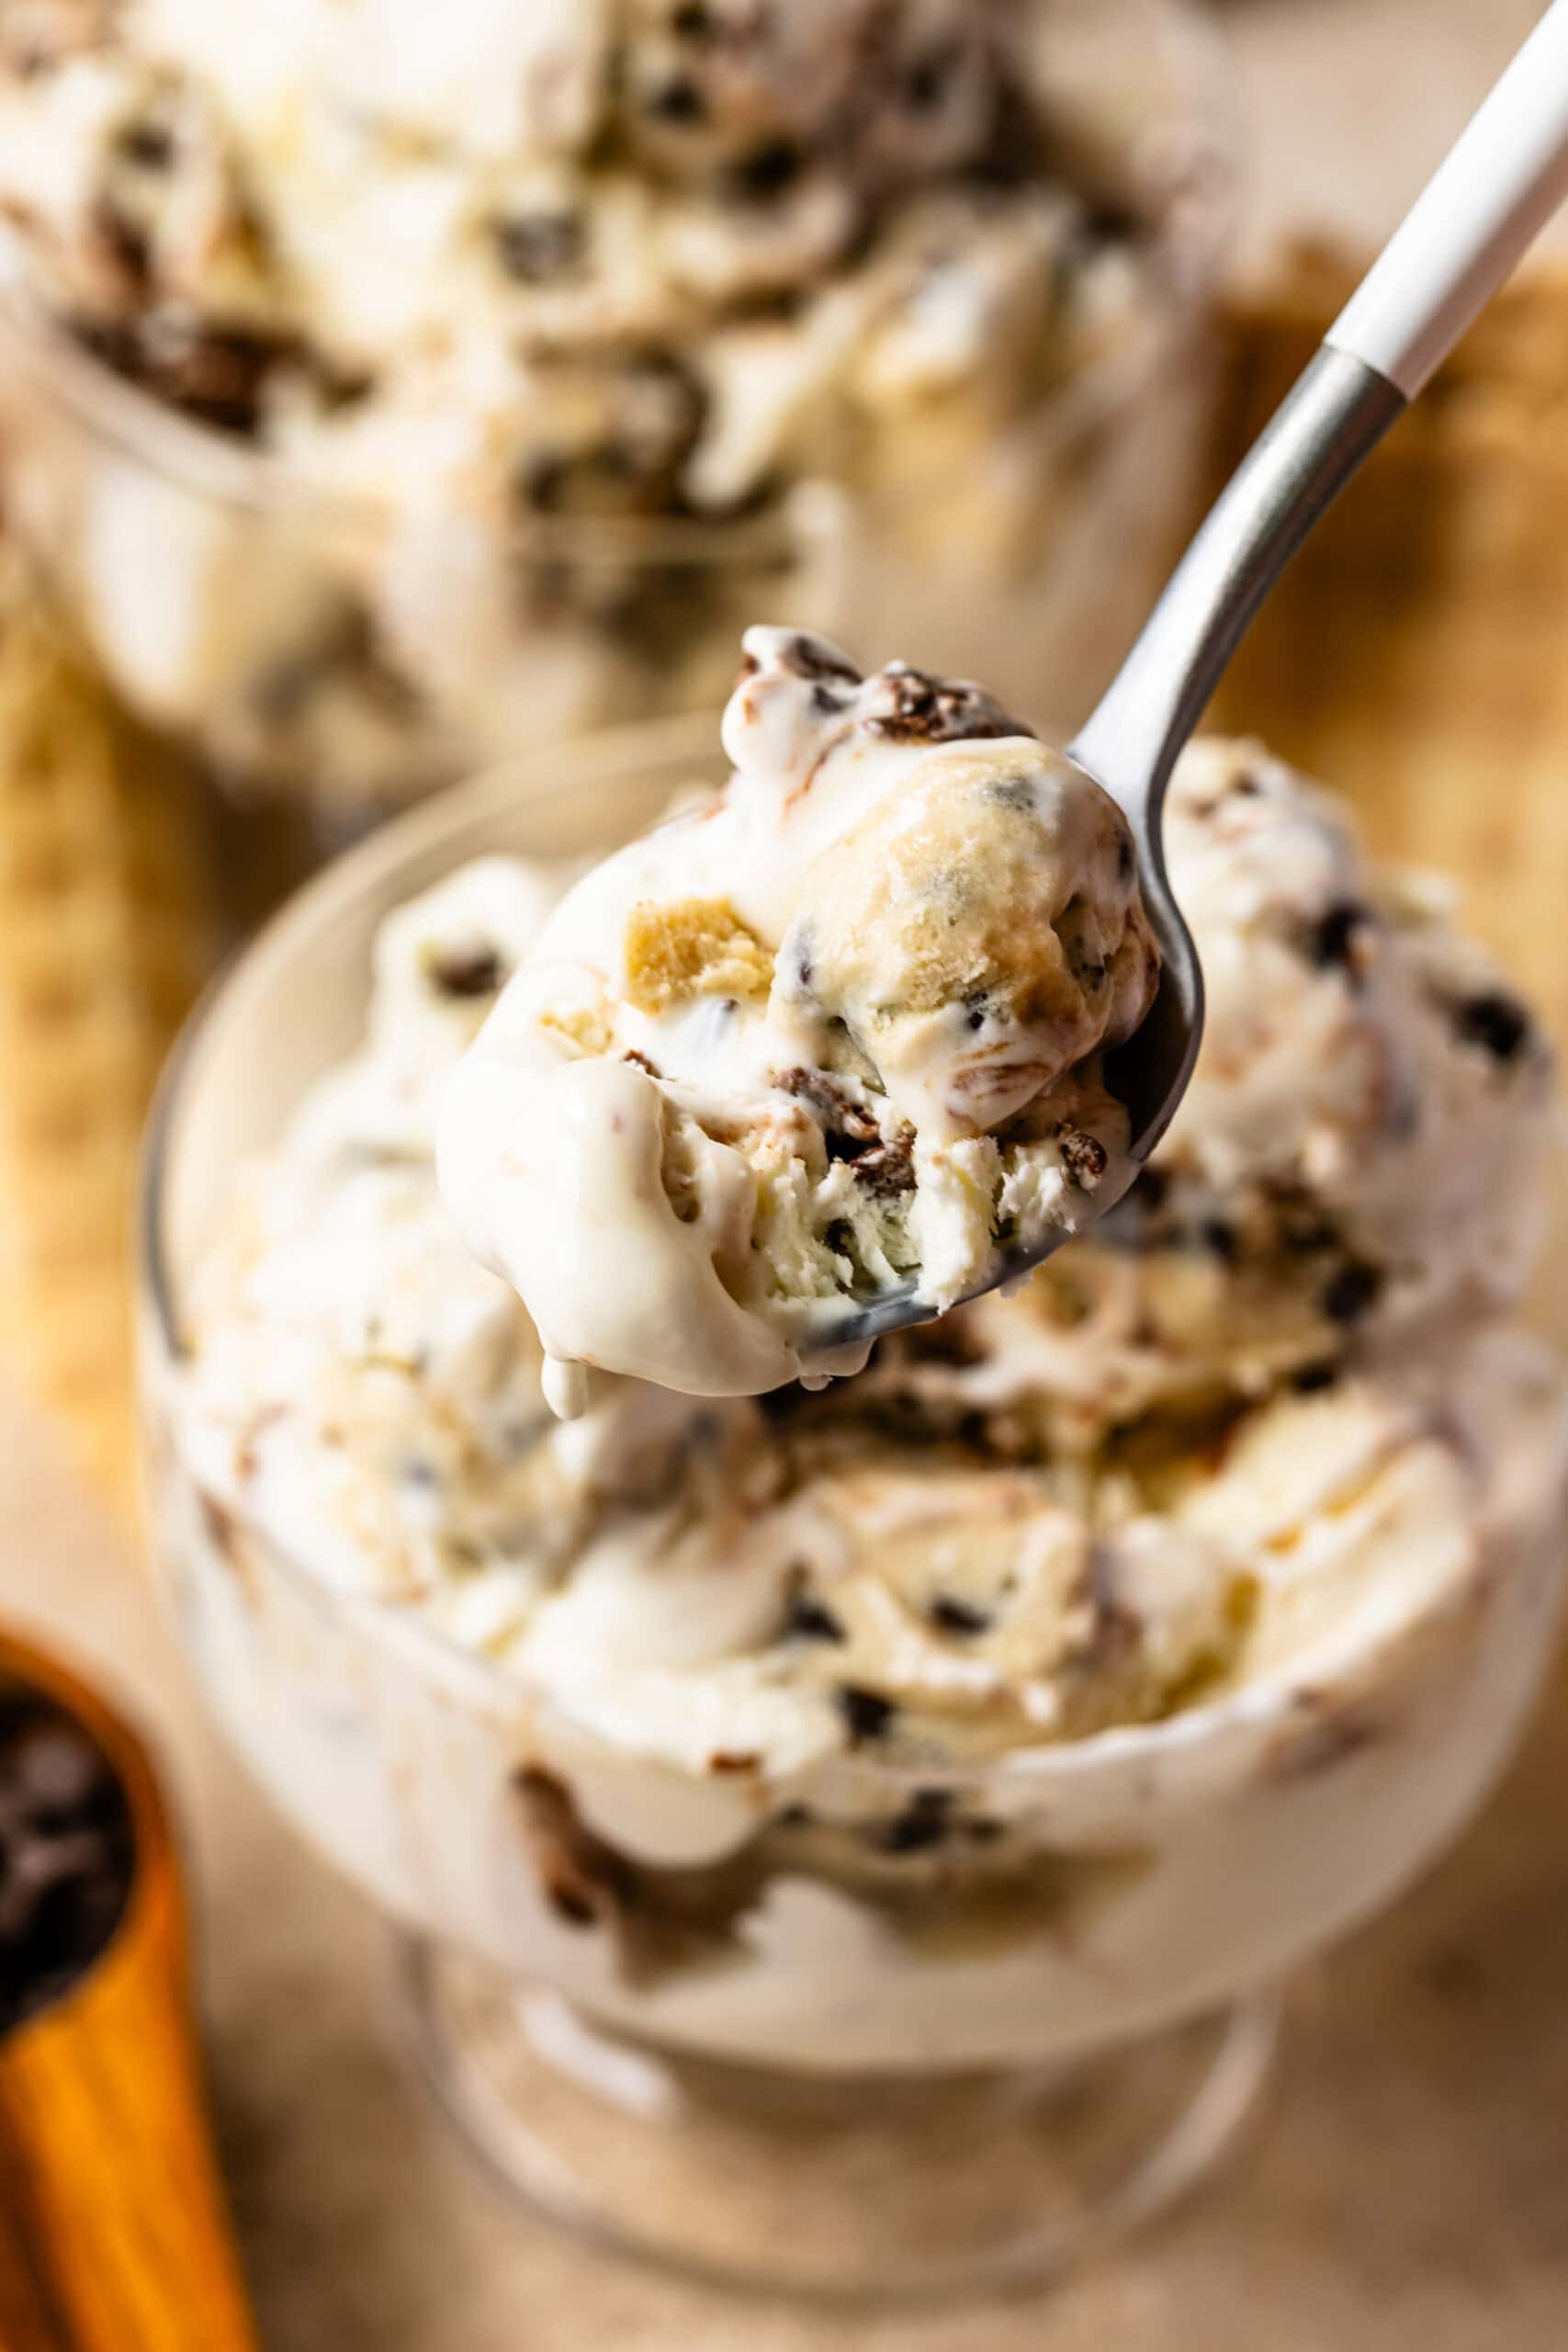
Each scoop is filled with soft bites of cookie dough, swirls of chocolate fudge, and mini chocolate chips, creating a perfect dessert for any occasion. Best of all, this no-churn method requires no ice cream maker, making it easy to whip up and freeze.

Best Cookie Dough Ice Cream Recipe
In this post, I’ll walk you through how to make fudge sauce, edible cookie dough, and creamy no-churn ice cream. Find detailed instructions, tips, and ideas to help you create the perfect homemade ice cream. All ingredients and in depth instructions are listed below!
This post may contain affiliate links. I earn a commission from qualified purchases. Please read our Privacy policy here.
Whether you’re making it for a summer treat or as a fun weekend project, this ice cream will surely impress! The best part is that you can snack on the cookie dough as you go because it doesn’t contain eggs!
Fudge Sauce
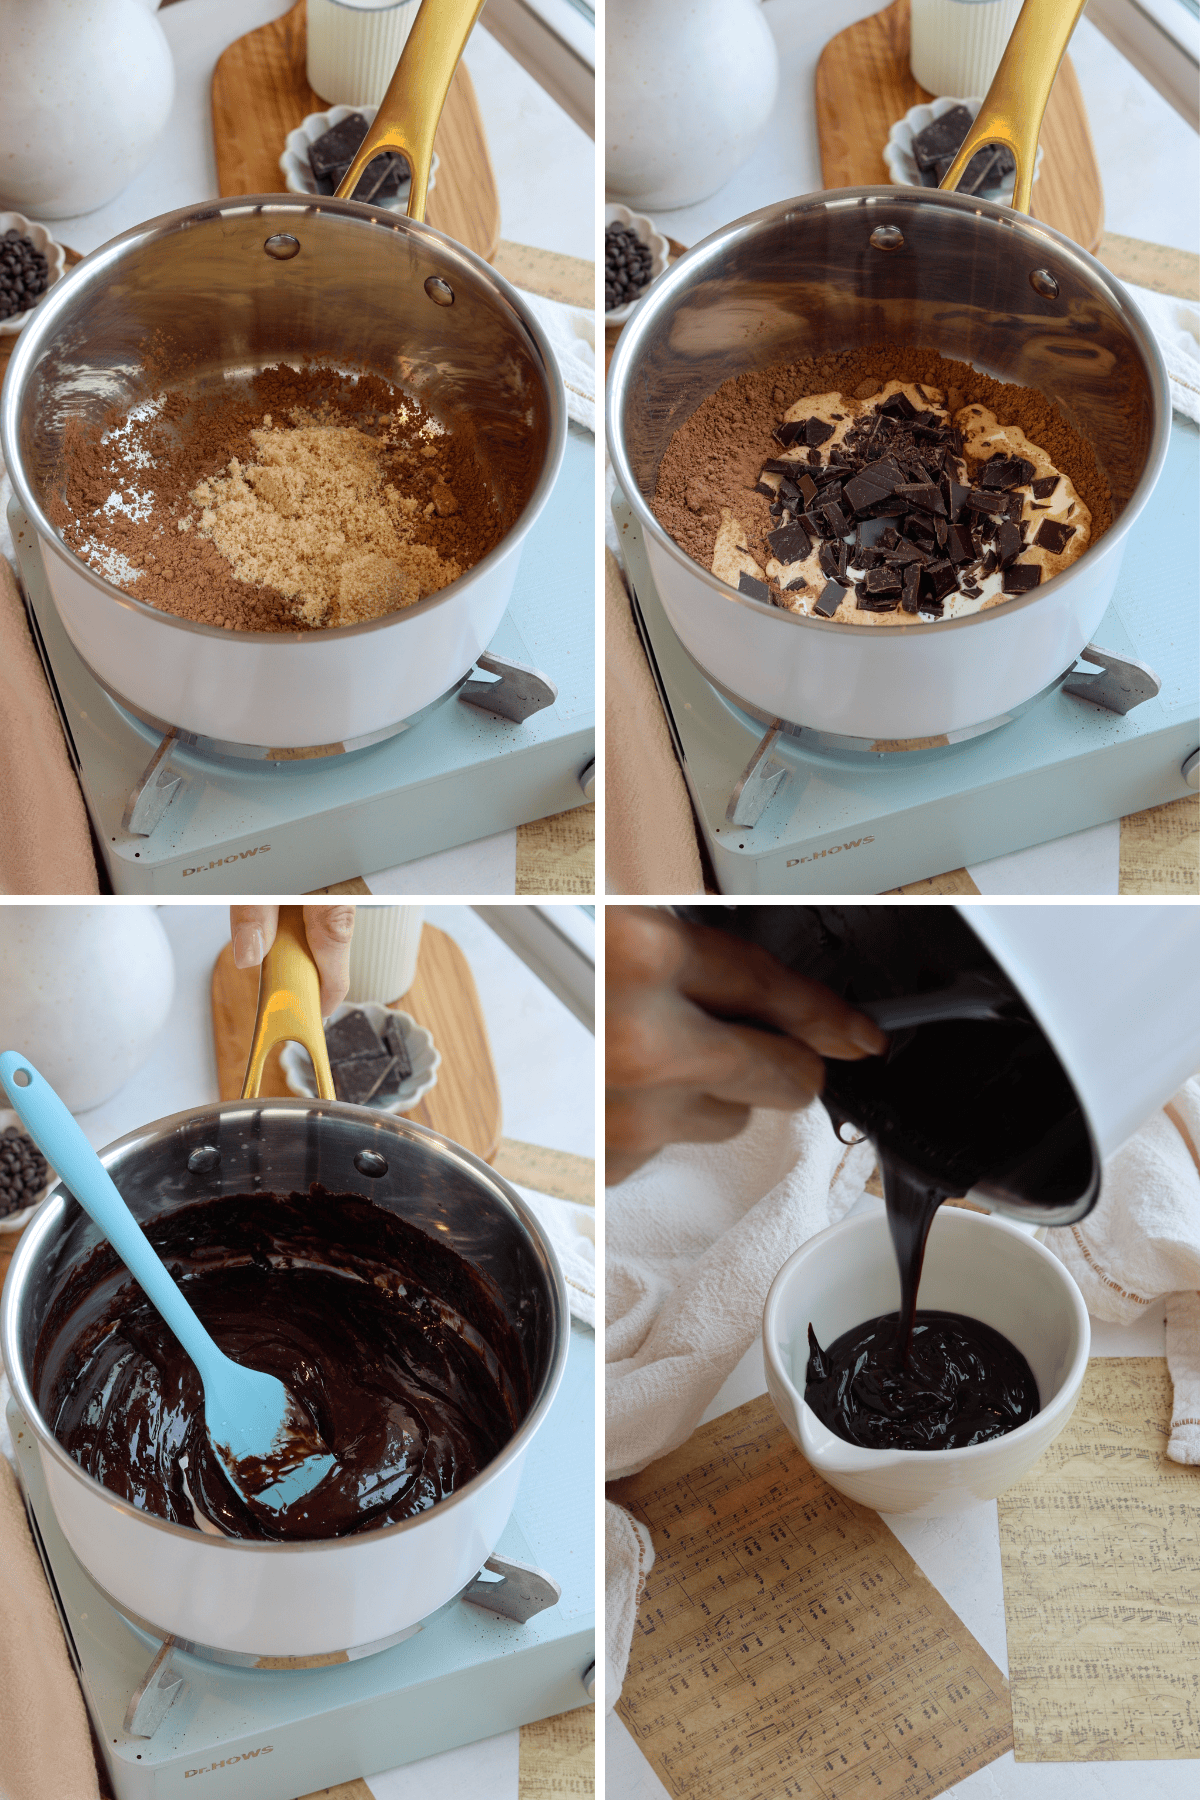
In a medium saucepan, whisk together the brown sugar and cocoa powder until combined. Add the heavy cream, corn syrup, and chopped chocolate, then whisk over medium heat. Bring the mixture to a boil and let it simmer for about 1 minute, until it thickens and the chocolate melts completely. Stir in the butter until fully incorporated. Once thick and glossy, remove from heat. Allow the fudge to cool completely before adding it to the ice cream. You can chill in the fridge if needed.
Prep the Cookie Dough
You can see my full post on Edible Cookie Dough here. But for sake of ease, here is how you make it! Start by heat-treating the raw flour to make it safe for consumption. You can do this by preheating the oven to 300ºF and baking the flour on a lined baking sheet for 10 minutes, stirring occasionally. Alternatively, microwave the flour in a safe bowl in 30-second increments until it reaches 160ºF. Let the flour cool.
In a medium bowl, beat the room-temperature butter with the brown sugar for 2 minutes until creamy. Add the powdered sugar and beat for another minute.
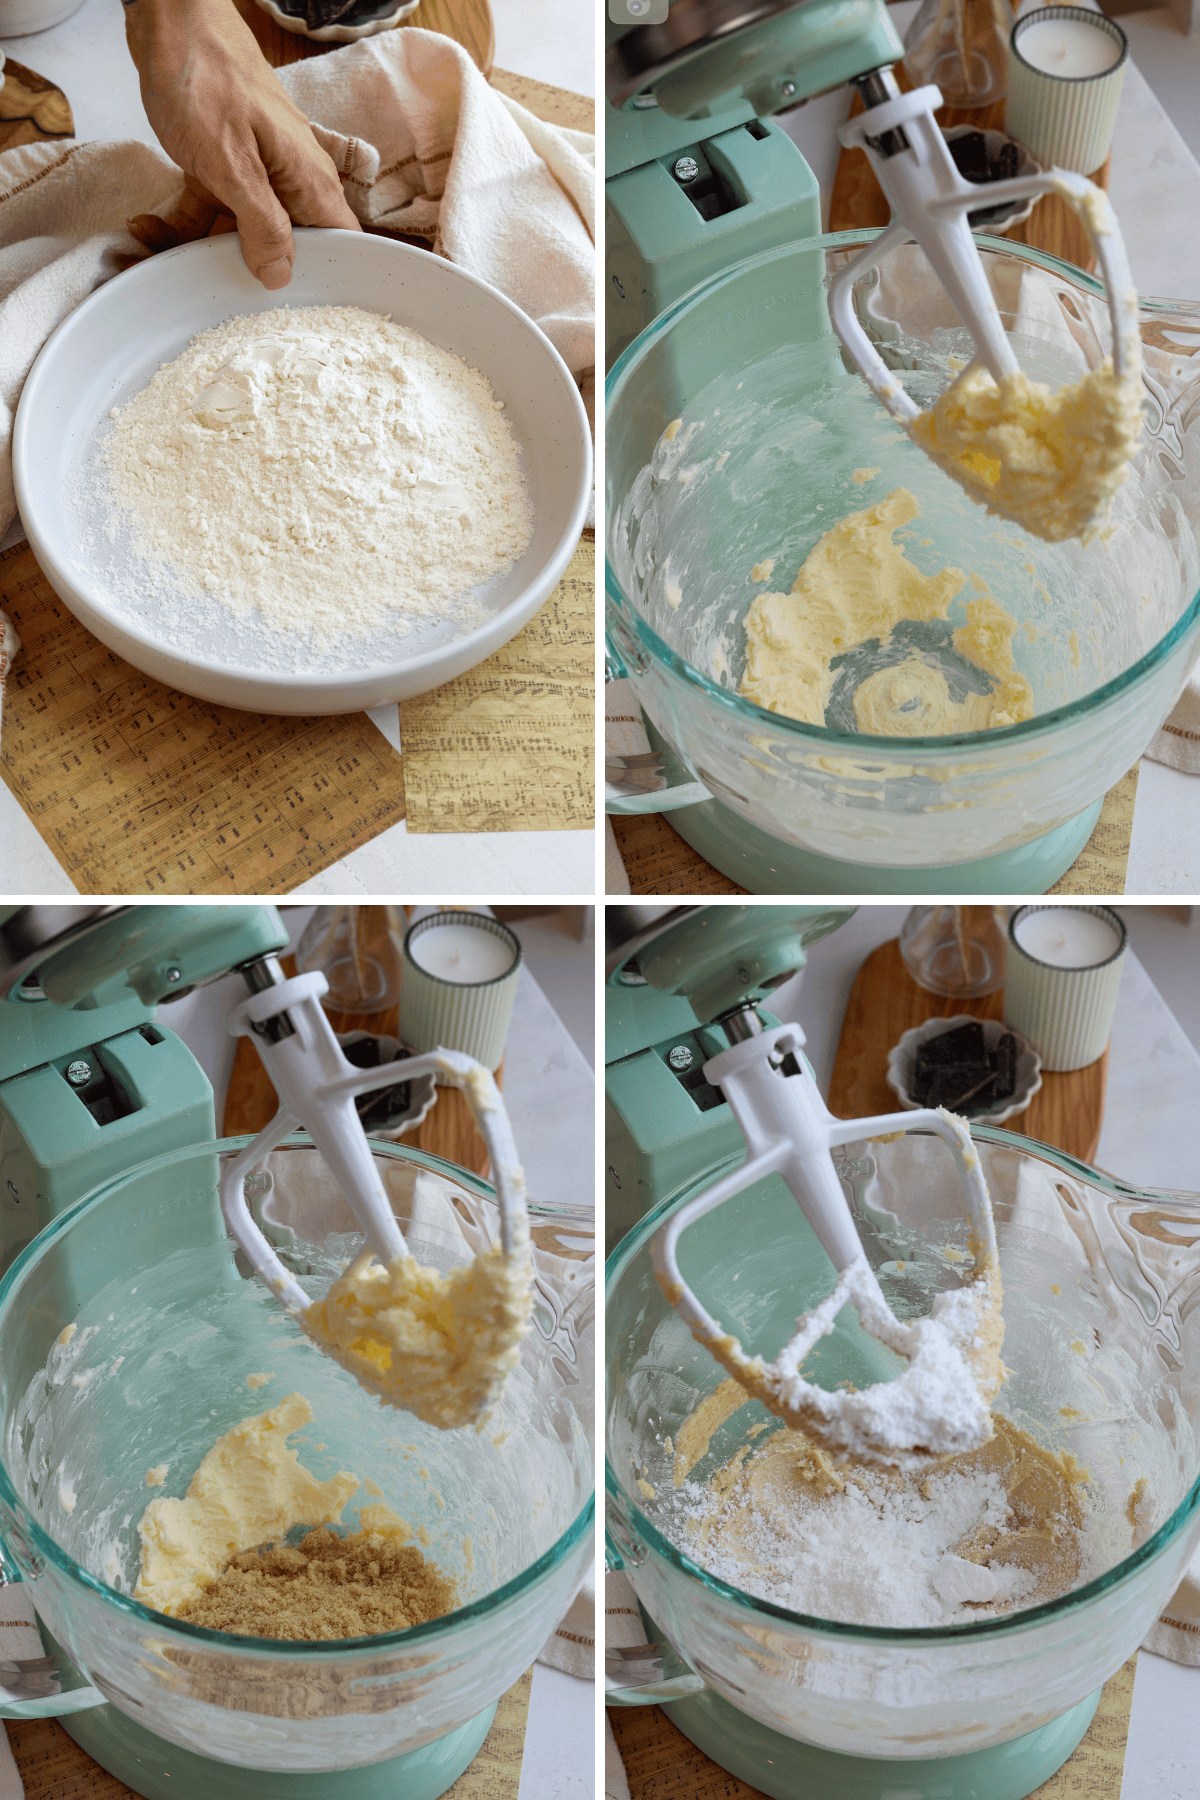
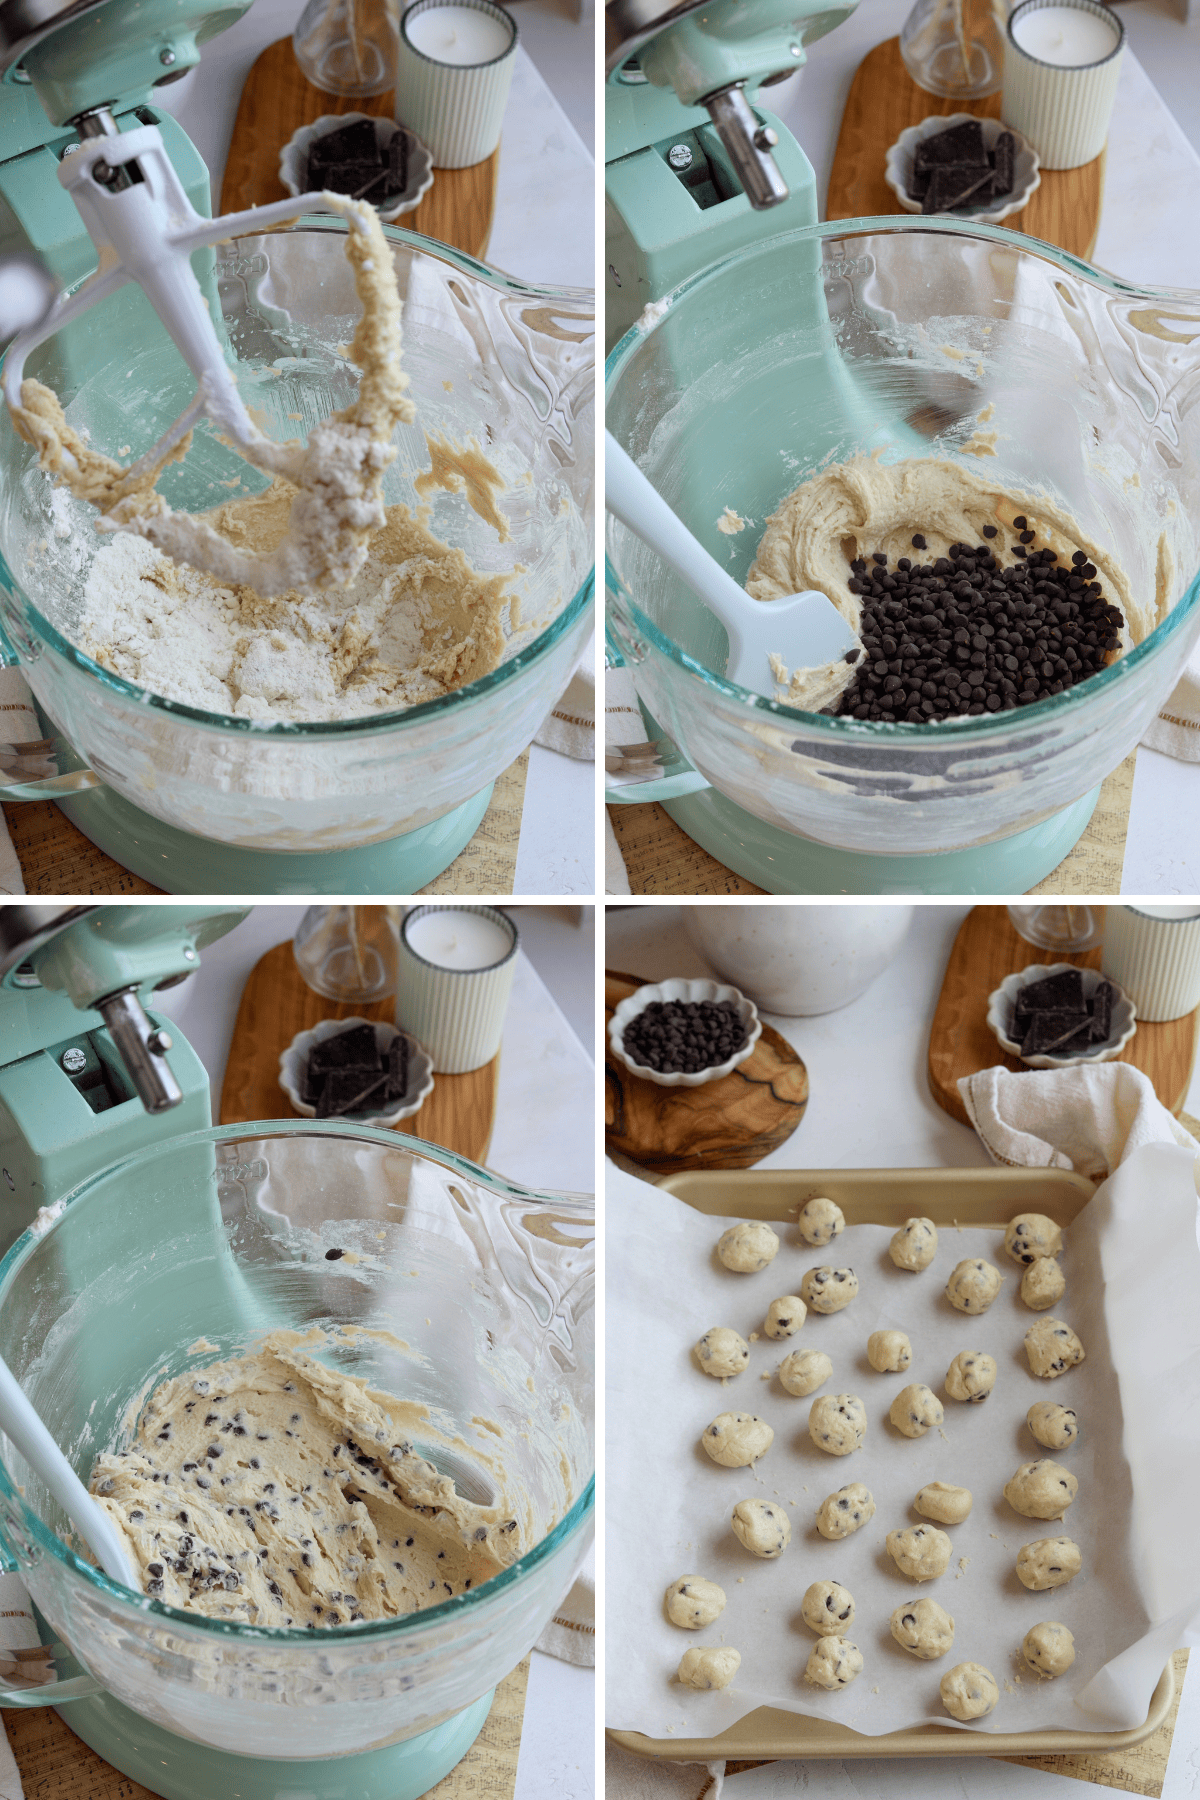
Stir in the vanilla, salt, and milk until well combined. Gradually add the cooled flour and mix on low speed. Fold in the mini chocolate chips.
Roll small balls of cookie dough between your hands and place them on a parchment-lined sheet. Freeze the cookie dough balls for about 1 hour.
No-Churn Vanilla Ice Cream
This ice cream base is so easy to make, it turns out creamy, rich, and delicious!
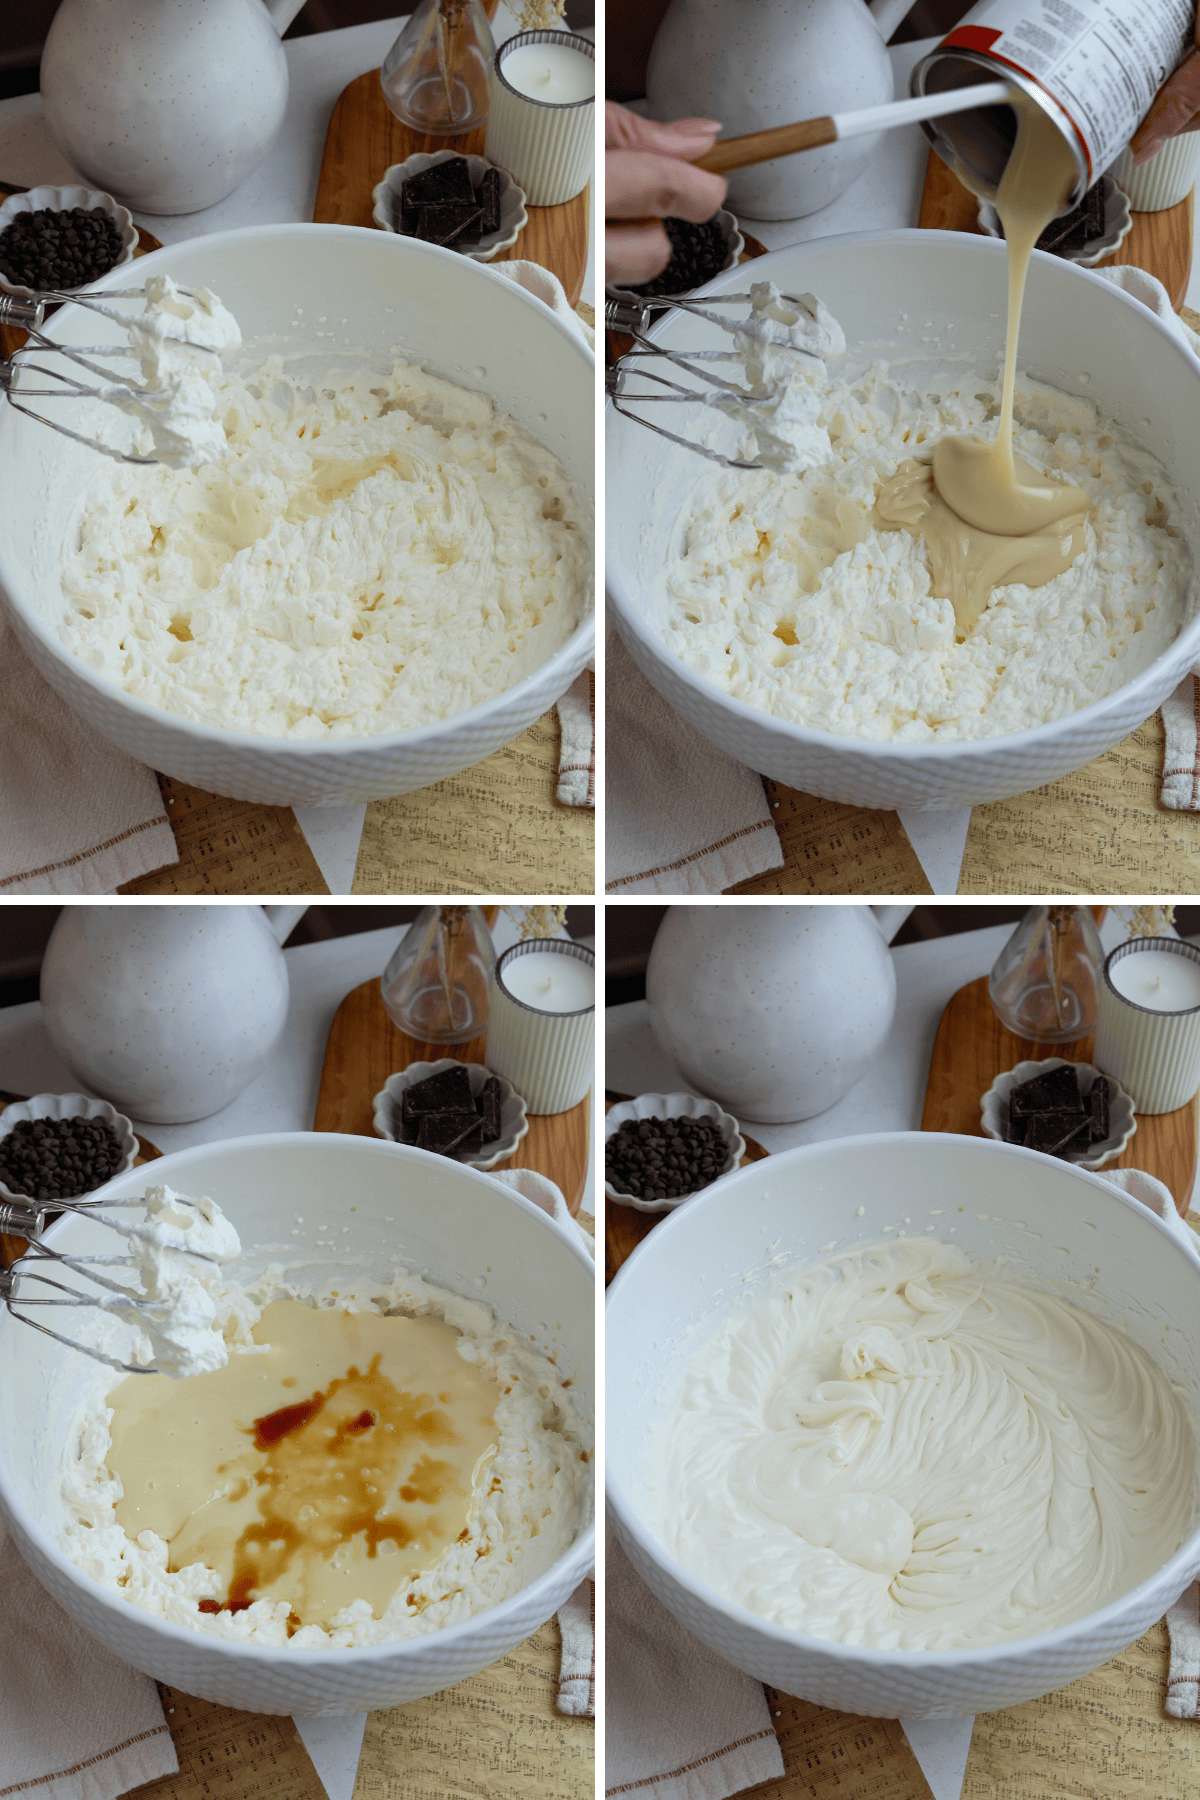
Place a 10×5” loaf pan in the freezer to chill. In a large bowl, add the heavy cream and whip using an electric mixer with the whisk attachment for about 4 minutes until stiff peaks form. Gently fold in the sweetened condensed milk and vanilla extract using a spatula, making sure not to deflate the whipped cream.
Assembly
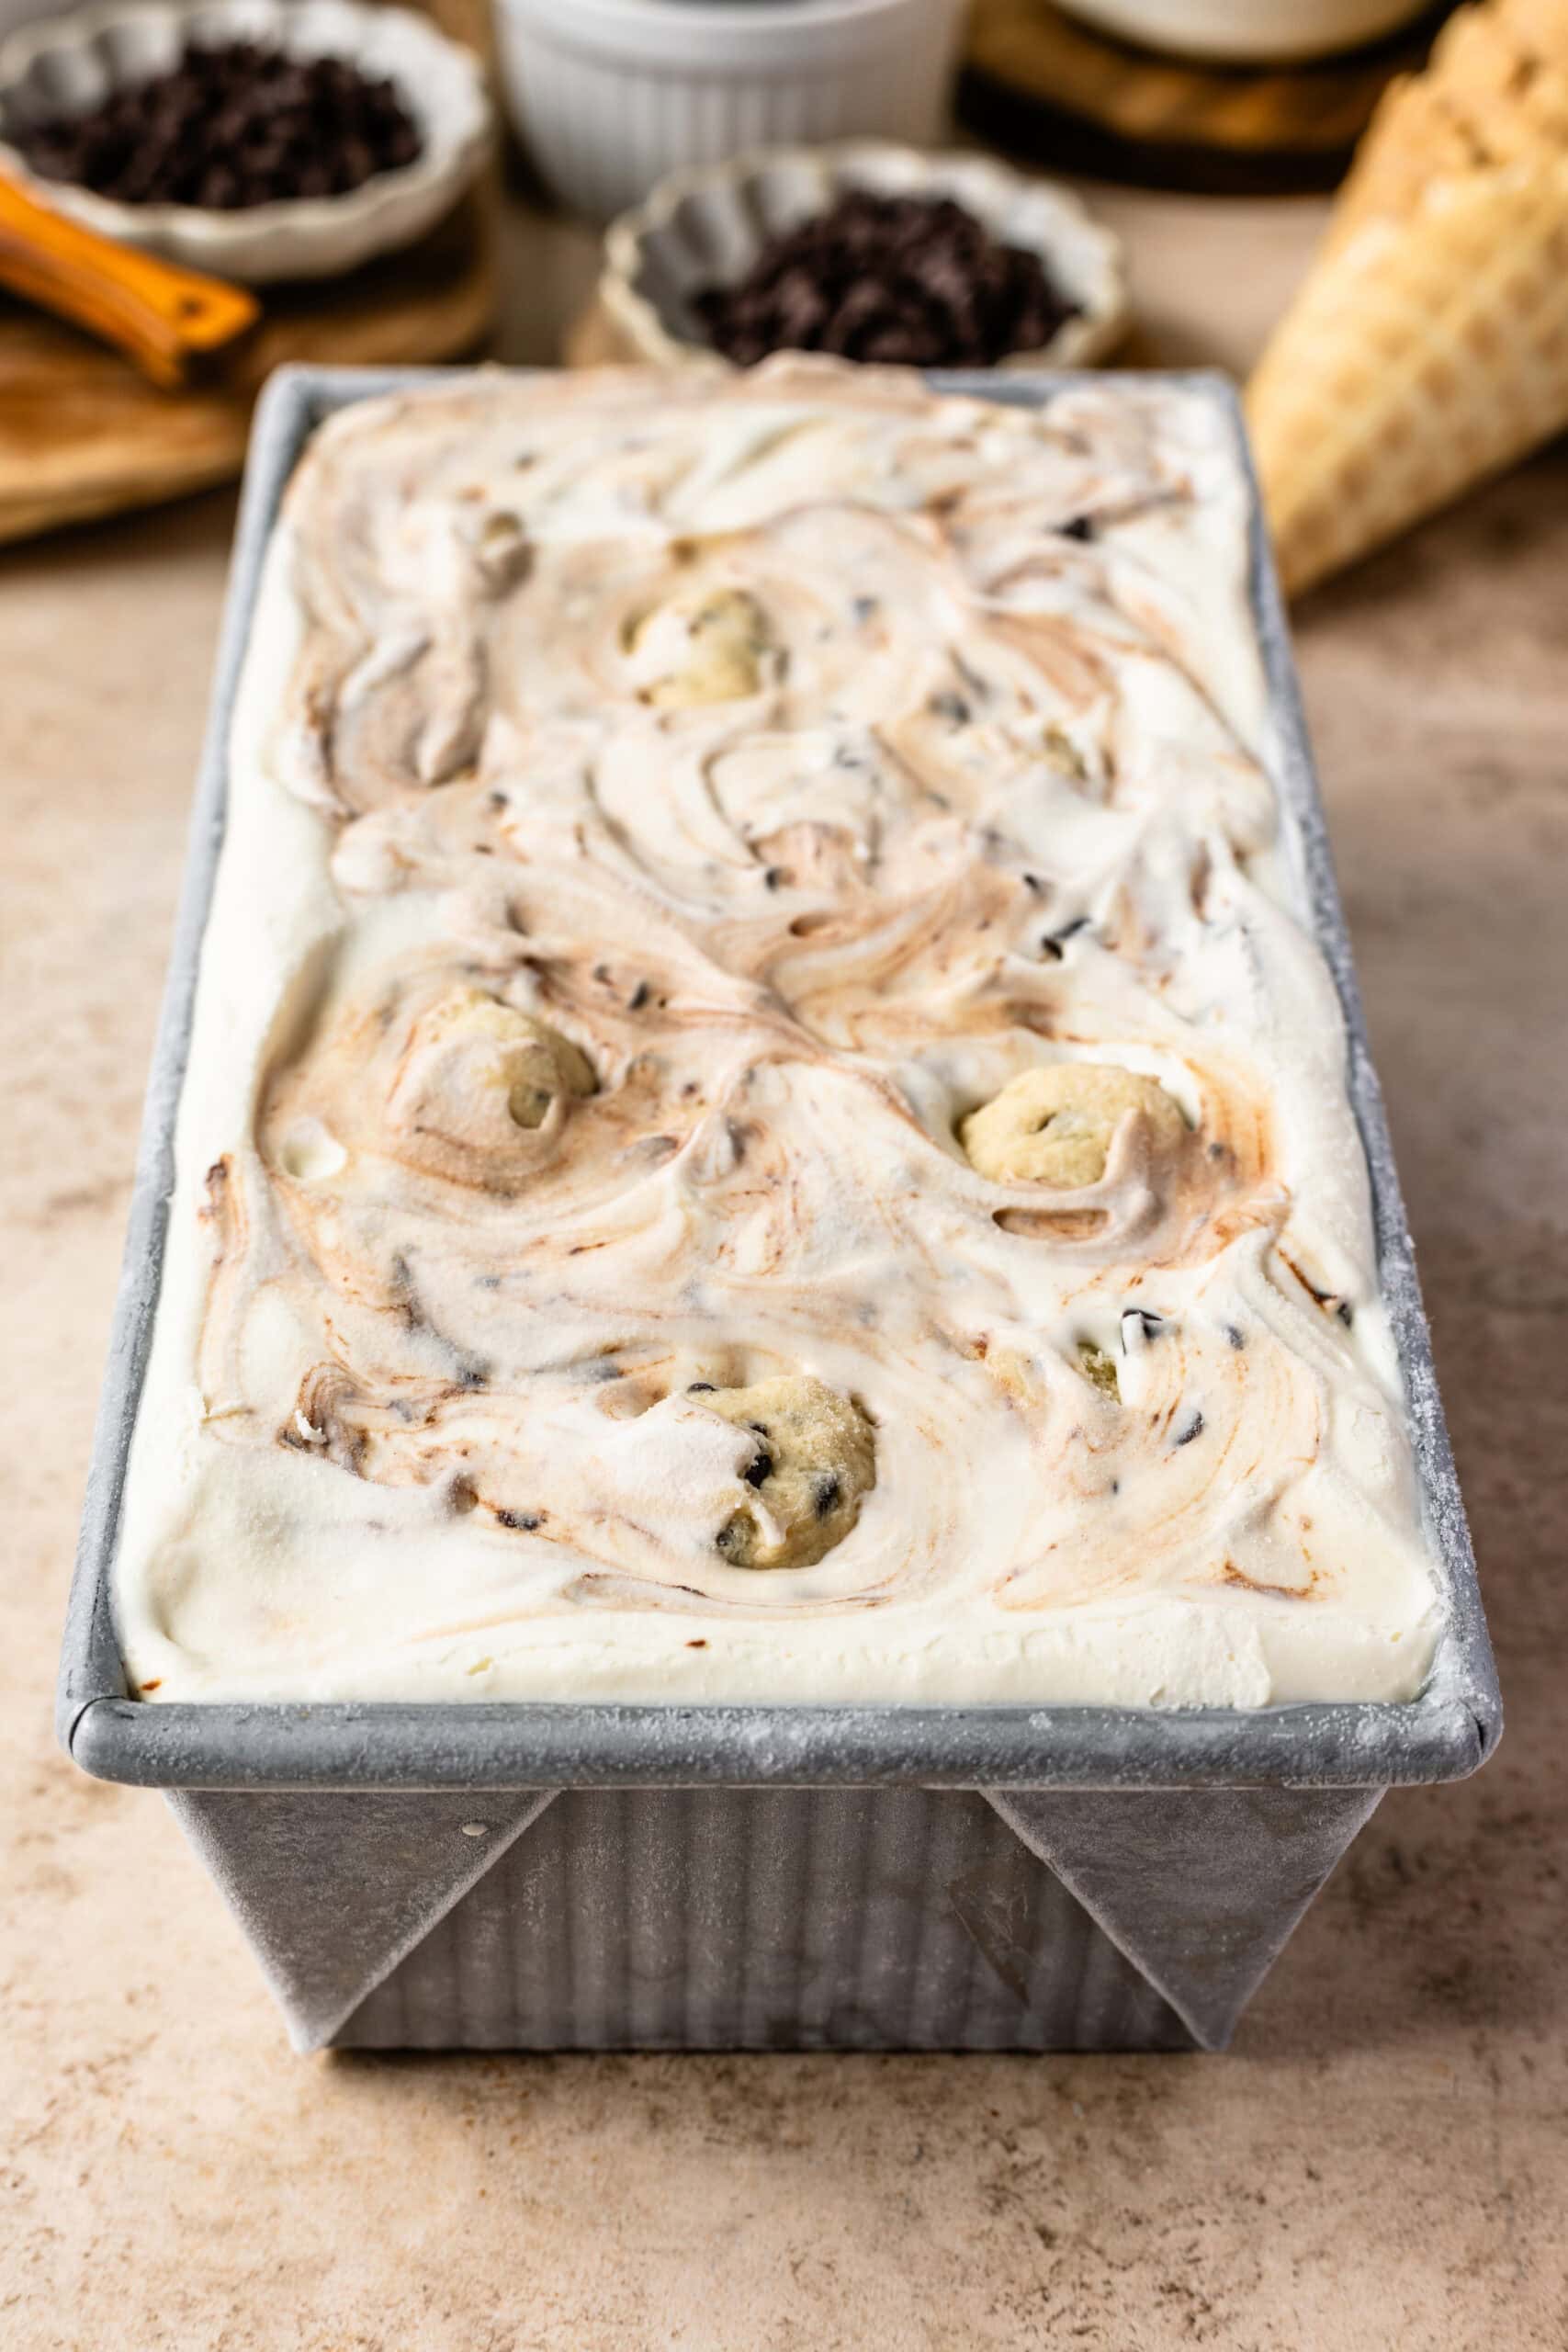
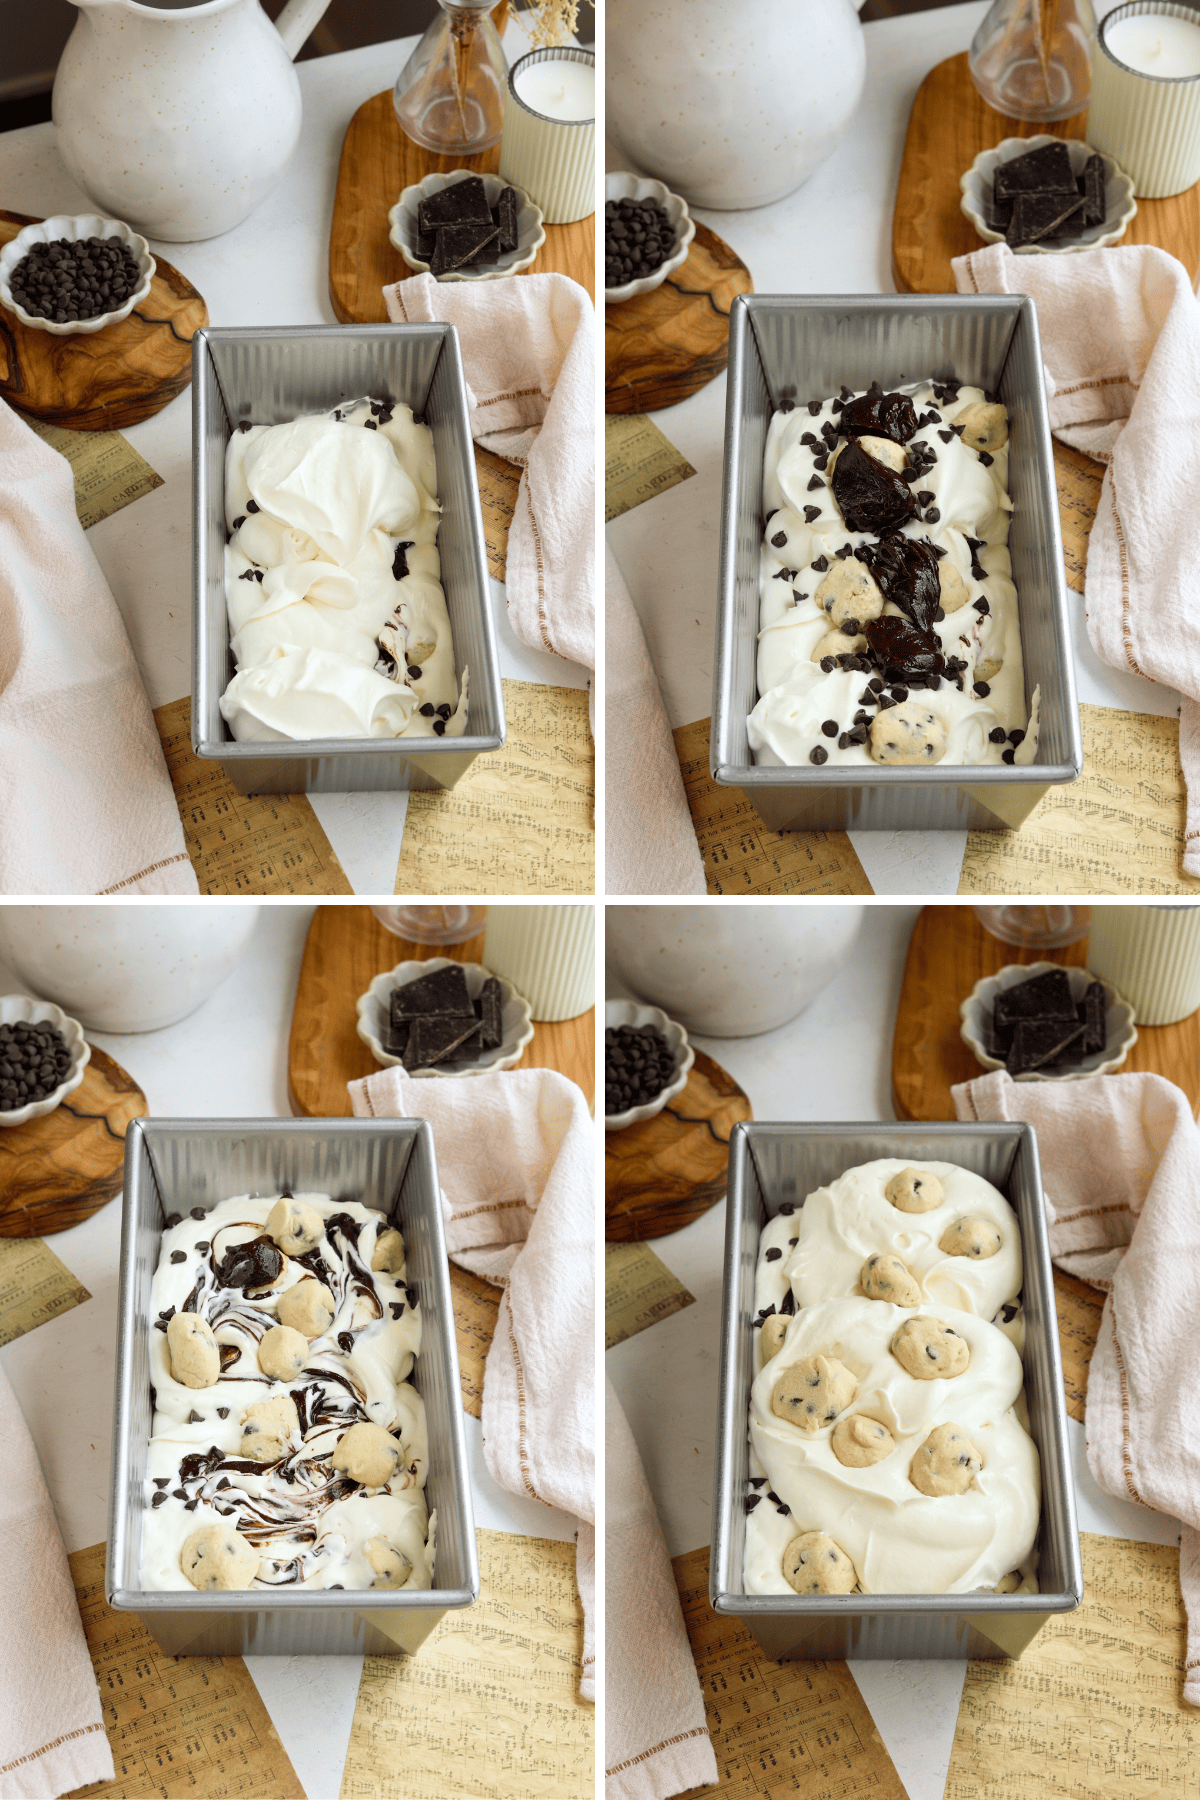
To assemble the ice cream, spread one-third of the ice cream mixture on the bottom of the chilled loaf pan. Scatter some cookie dough chunks, a tablespoon of mini chocolate chips, and a few tablespoons of fudge sauce over the ice cream.

Use a spatula to swirl the toppings into the ice cream. Repeat with the next layer of ice cream, cookie dough balls, chocolate chips, and fudge sauce. Swirl again
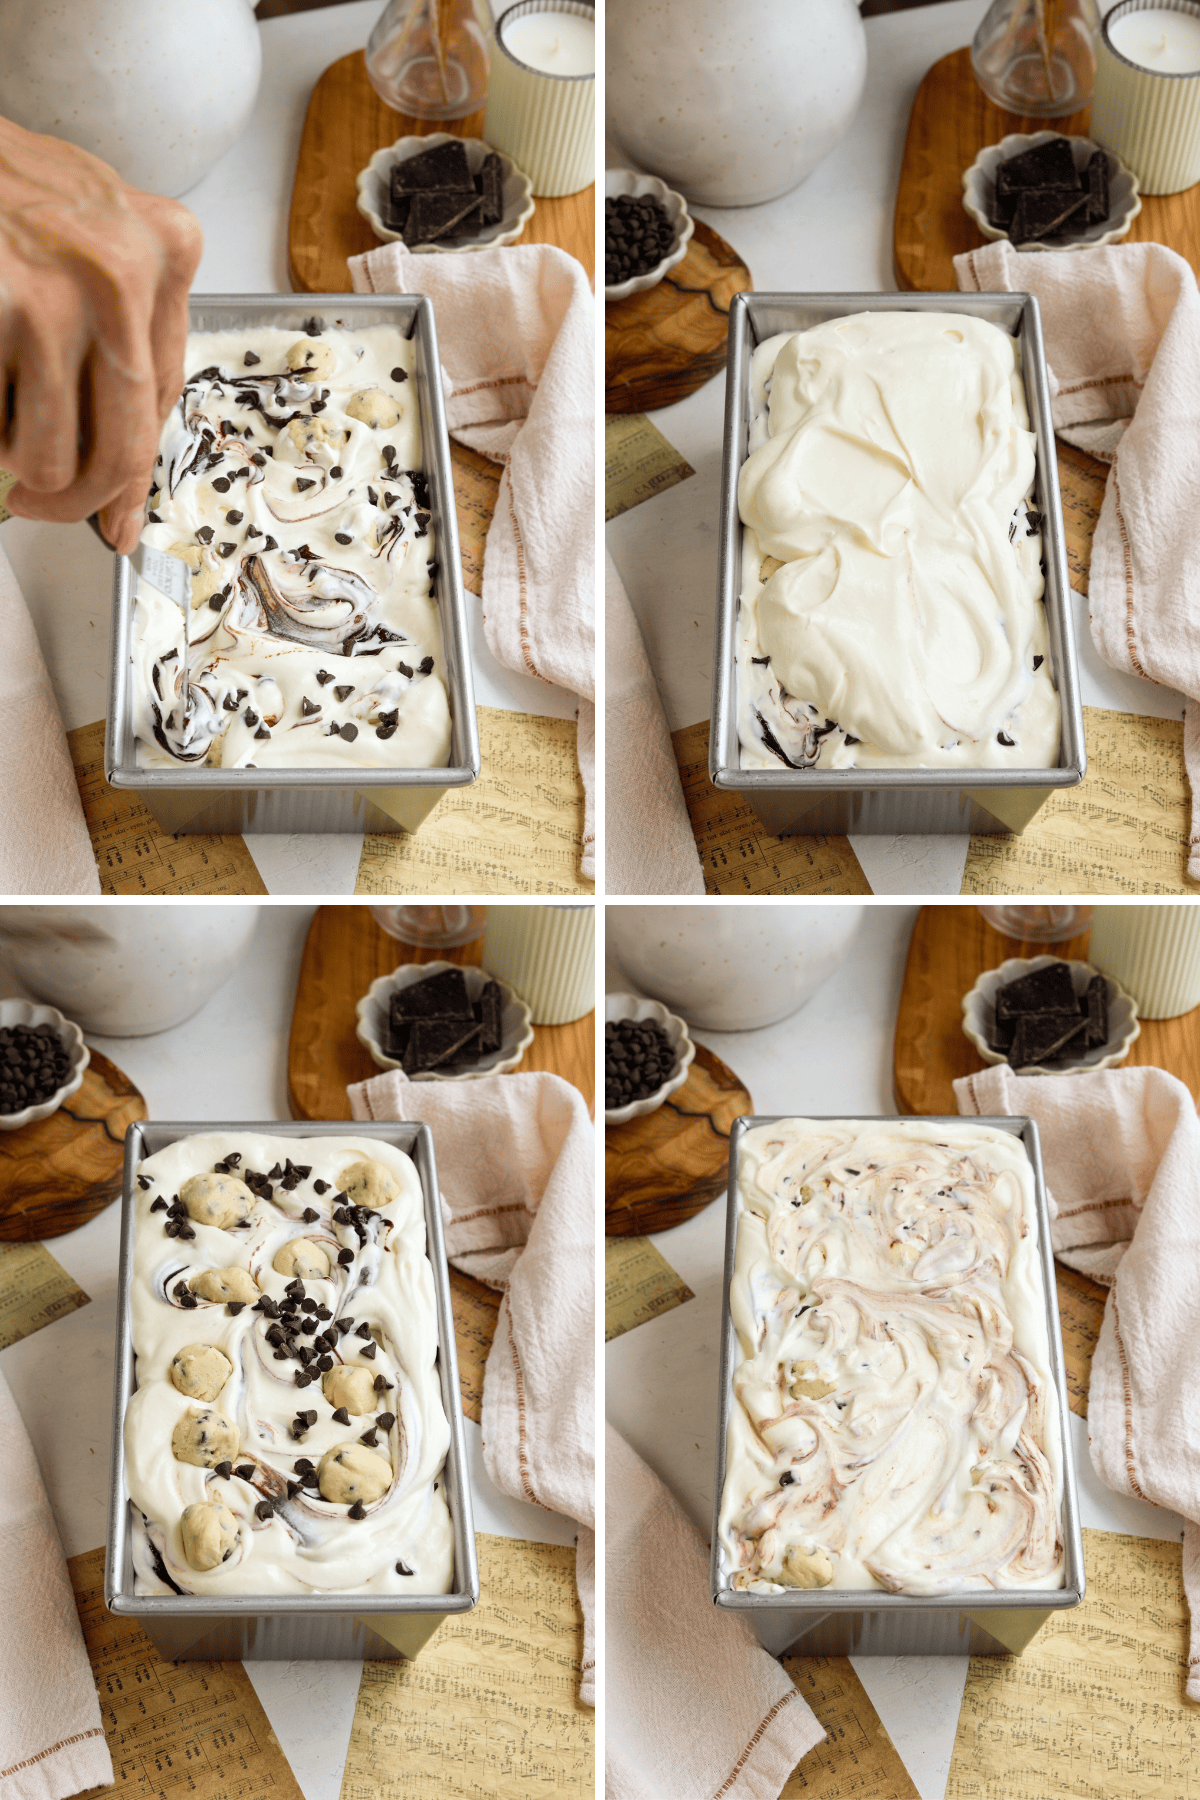
Finally, spread the remaining ice cream on top, followed by more cookie dough, chocolate chips, and fudge sauce, swirling everything together one last time. Smooth the top of the ice cream and freeze for at least 6 hours, or until firm.
Store the ice cream in an airtight container in the freezer for up to 2 weeks.
Store your cookie dough ice cream in an airtight, freezer-safe container with a layer of plastic wrap pressed against the surface. This prevents ice crystals from forming and keeps your ice cream fresh longer.
Allow the ice cream to sit at room temperature for a few minutes before scooping for easy serving.
Tips & Tricks
- Heat-Treating Flour: Always heat-treat your flour for edible cookie dough to eliminate any risk of bacteria. Baking or microwaving the flour until it reaches 160ºF will ensure it’s safe to eat.
- Soft Cookie Dough Balls: To prevent cookie dough balls from becoming too hard in the freezer, don’t over-freeze them before adding to the ice cream.
- Fudge Swirls: Let the fudge sauce cool completely to room temperature before adding to the ice cream to prevent it from melting the ice cream layers.
- Smooth Ice Cream Texture: When folding in the sweetened condensed milk, do so gently to keep the mixture light and airy for a creamier result.
- Chill Time: Allow your cookie dough ice cream to chill for at least 4-6 hours, or overnight if possible, for the best texture. This ensures the ice cream becomes firm enough to scoop easily.
- Layering Ingredients: When layering cookie dough and fudge swirls, be sure to spread the ice cream base in thin layers, alternating with cookie dough balls and fudge. This will give a more even distribution of cookie dough and fudge throughout the ice cream.
- Avoid Over mixing: When mixing the fudge into the ice cream base, swirl gently to create a marbled effect. Over mixing can result in the fudge blending too much and losing its distinct swirls.
Variations
- Peanut Butter Cookie Dough: Swap the chocolate chips in the cookie dough for peanut butter chips, or add 1 tablespoon of peanut butter to the cookie dough for a fun twist.
- Different Chips: Try white chocolate, dark chocolate, or caramel chips in place of semi-sweet chocolate chips.
- Oreo Cookie Dough Ice Cream: Add crushed Oreos into the cookie dough and ice cream for a cookies-and-cream version.
- Mint Chocolate Chip Cookie Dough Ice Cream: Add 1/2 teaspoon of mint extract to the no-churn ice cream base and replace the regular chocolate chips with mint-flavored chips or dark chocolate for a refreshing twist.
- Salted Caramel Cookie Dough Ice Cream: Drizzle layers of my caramel sauce in between the ice cream layers. You can also add a pinch of sea salt to the cookie dough for a sweet and salty contrast.
- Nuts: If you enjoy a little crunch, adding chopped nuts like pecans, walnuts, or almonds would be a great addition to this ice cream. Sprinkle the chopped nuts between the ice cream layers along with the chocolate chips and fudge sauce.
FAQ Section
Here are some questions you might have about this recipe.
- Can I use store-bought cookie dough? Yes, but make sure it’s edible and safe for raw consumption.
- Why is my ice cream too hard to scoop? Homemade ice cream tends to freeze more solid than store-bought versions due to the lack of stabilizers. Leave it at room temperature for a few minutes before scooping.
- Can I make this ice cream without the fudge sauce? Yes! The fudge sauce adds a rich, chocolatey swirl, but if you prefer a simpler cookie dough ice cream, you can skip the fudge. You can also replace it with other mix-ins like caramel sauce, peanut butter, or even crushed cookies. Or try any of the variations mentioned above in the “Variations” section.
- How do I prevent ice crystals from forming in my ice cream? To prevent ice crystals, be sure to cover the surface of the ice cream with plastic wrap or parchment paper before sealing it in an airtight freezer-safe container. This helps reduce the amount of air exposure, which is what causes ice crystals to form.
- Can I make this recipe gluten-free? Absolutely! You can substitute the all-purpose flour in the edible cookie dough with a gluten-free flour blend.
If you like this recipe, you’ll love these other ones!
- Cookie Dough Cheesecake
- Cookie Dough Fudge
- Chocolate Raspberry Ice Cream Bars
- Vegan Cookie Dough Bars
- Jumbo Thick Chocolate Chip Cookies
I’d love to hear how your Cookie Dough Ice Cream turns out! Don’t forget to share your photos and tag me on Instagram!

Cookie Dough Ice Cream
Ingredients
Fudge Sauce
- 3 tbsp brown sugar
- 2 tbsp cocoa powder 14 grams
- 1/4 cup heavy cream 60 ml
- 1 tbsp corn syrup 22 grams
- 1/3 cup chopped semi-sweet chocolate 56 grams
- 1 tbsp unsalted butter
Edible Cookie Dough
- 1/2 cup all-purpose flour 63 grams
- 1/4 cup unsalted butter room temperature (56 grams)
- 1/4 cup brown sugar 65 grams
- 1/4 cup powdered sugar 31 grams
- 1/2 tsp vanilla extract
- 1/8 tsp salt
- 1 tbsp milk
- 1/4 cup mini chocolate chips 43 grams
No-Churn Ice Cream
- 2 cups heavy cream 473 ml
- 1 can sweetened condensed milk 396 grams
- 2 tsp vanilla extract
- 1/4 cup mini chocolate chips 43 grams
Instructions
Fudge Sauce
- In a medium saucepan, whisk the sugar and cocoa powder together. Add the heavy cream, light corn syrup, and chopped chocolate. Whisk over medium heat until it reaches a boil and then let it simmer. The mixture will become thick and the chocolate and sugar will melt entirely. This should take about 1 minute.
- Add the butter and mix until incorporated/melted.
- Remove from the heat when the mixture is thick, and coating the back of a spoon.
- Let it cool down completely. The fudge must be at room temperature when added to the ice cream.
Edible Cookie Dough
- Start by heat treating the flour. To heat treat flour, you can use the oven or the microwave method. Pre-heat the oven to 300ºF, spread the flour on a baking sheet lined with parchment paper on an even layer. Bake for 10 minutes, stirring in between, until the flour reaches 160ºF. To use the microwave method, place the flour in a microwave-safe bowl and microwave for 30 second increments, stirring in between, until it reaches 160ºF. Let it cool down.
- Meanwhile beat the butter with the brown sugar for 2 minutes on medium speed, scraping the bowl in between.
- Add the powdered sugar and beat for another minute.
- Pour in the vanilla, salt, milk, mix until incorporated.
- Add the flour and mix on low to combine.
- Add the chocolate chips and fold with a spatula.
- Form mini balls (1-2 tbsp) from the cookie dough by rolling each between your hands. Place the cookie dough balls on top of a baking sheet lined with parchment paper, and freeze for one hour.
No-Churn Ice Cream
- Place a 10×5” loaf pan in the freezer.
- Whip the heavy cream with an electric mixer using the whisk attachment for about 4 minutes, until the cream achieves stiff peaks.
- Add the sweetened condensed milk to the bowl and the vanilla extract, and fold gently with a spatula to combine.
Assembly
- Spread 1/3 of the ice cream on the bottom of the pan.
- Sprinkle some cookie dough balls on top, then mini chocolate chips on top, then a couple tablespoons of fudge sauce. Swirl with a spatula.
- Spread another third of the ice cream on top.
- Repeat with the layer of cookie dough balls, mini chocolate chips, and fudge sauce. Swirl with a spatula.
- Spread the remaining ice cream on top, more cookie dough balls, chocolate chips, and fudge sauce. Swirl with a spatula and smooth out the top.
- Place the pan in the freezer. Once the ice cream has frozen solid after a couple of hours, cover with plastic wrap. Let the ice cream freeze for at least 6 hours before serving.
Oh my gosh! This is the first time I made ice cream and it is DELICIOUS! I made it for my grandsons – but I seem to be the one eating most of it!! Creamy and wonderful!
That’s wonderful to hear! Thank you so much!!! I totally understand you lol!!!