Christmas Sugar Cookies
Hello friends, today we are going to make Christmas Sugar Cookies, and I am going to teach you how to decorate them two different ones. One way is to decorate the Christmas Sugar Cookies with royal icing, and the second way will be to make a beautiful Star Cookie Christmas Tree with buttercream.
This post is sponsored by Eagle Brand® Sweetened Condensed Milk, all opinions are my own.

Let’s start talking about the cookie dough I used to make these Christmas Sugar Cookies. In this dough, we have a secret ingredient: sweetened condensed milk. Now you might be asking what does adding sweetened condensed milk does to the cookie dough.
This post may contain affiliate links. I earn a commission from qualified purchases. Please read our Privacy policy here.
I will tell you this was the tastiest sugar cookie I have ever made! Yes, you can clearly taste the sweetened condensed milk in the cookie, it’s an indescribable experience! The cookies taste richer than they would if normally made out of just sugar, butter, flour and eggs. The sweetened condensed milk adds a delicious layer of flavor to the cookies that clearly distinguishes them from the regular sugar cookies.
And the texture of the cookies was soft, chewy, and perfect, even days after they had been made.
I am never going back to making sugar cookies without condensed milk in them.

Some of the Christmas Sugar Cookies were decorated with royal icing, and I also made a batch into Star Christmas Sugar Cookie Trees. Both recipes for the royal icing, and for the buttercream used to decorate the trees can be found below.

The Christmas Cookie Tree was surprisingly easy to make, and I show step by step on the video on this page or on YouTube.
I also recommend watching the video so you can see what is the proper consistency for the royal icing when decorating the Christmas tree cookies and the mittens.

Making the dough is the easiest part of the whole process, it takes less than 10 minutes.
The part that takes the longest would probably letting the dough rest in the fridge for a couple of hours, and make sure not to skip this part. Having to let the dough rest is actually great, because it means you can make the cookie dough way ahead of time, and then roll the cookies later.
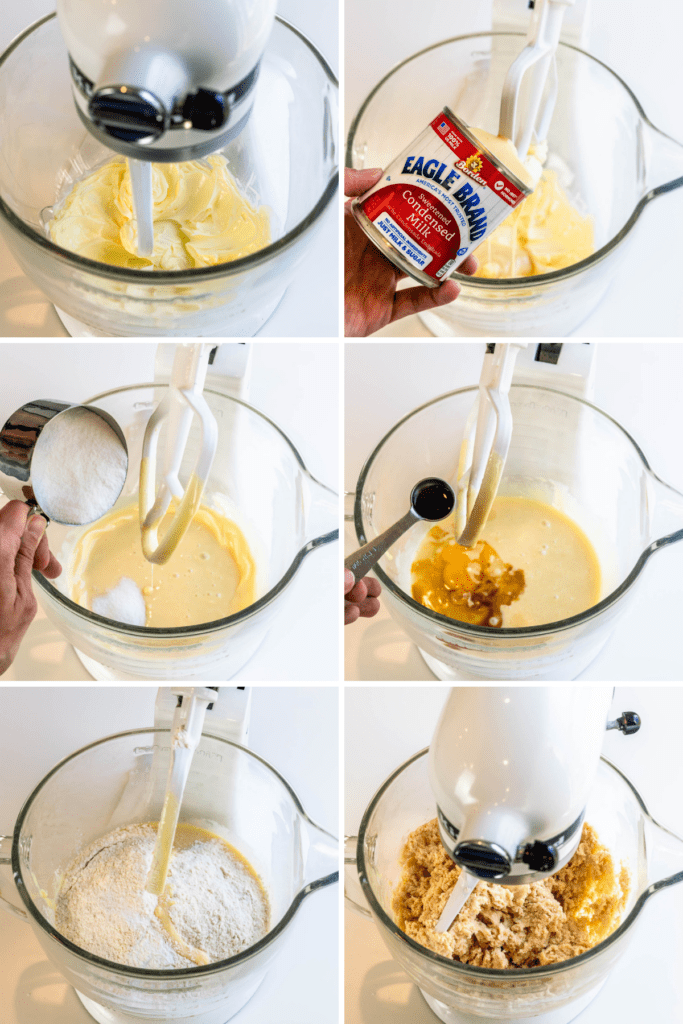
Start by beating the butter until soft and creamy, then add our secret ingredient: Eagle Brand® Sweetened Condensed Milk, and mix to combine.
After that, we are adding the sugar, followed by the egg and vanilla.
Lastly, we add the flour, baking powder, and salt in. Make sure not to over mix the dough after adding the flour, you don’t want to develop too much gluten which will create tough cookies.
Mix the dough just until incorporated, you can finish mixing with a spatula to ensure the dough is smooth and to prevent over mixing.
After this point, wrap the dough in plastic wrap and place it in the fridge for 2 hours, or even overnight.
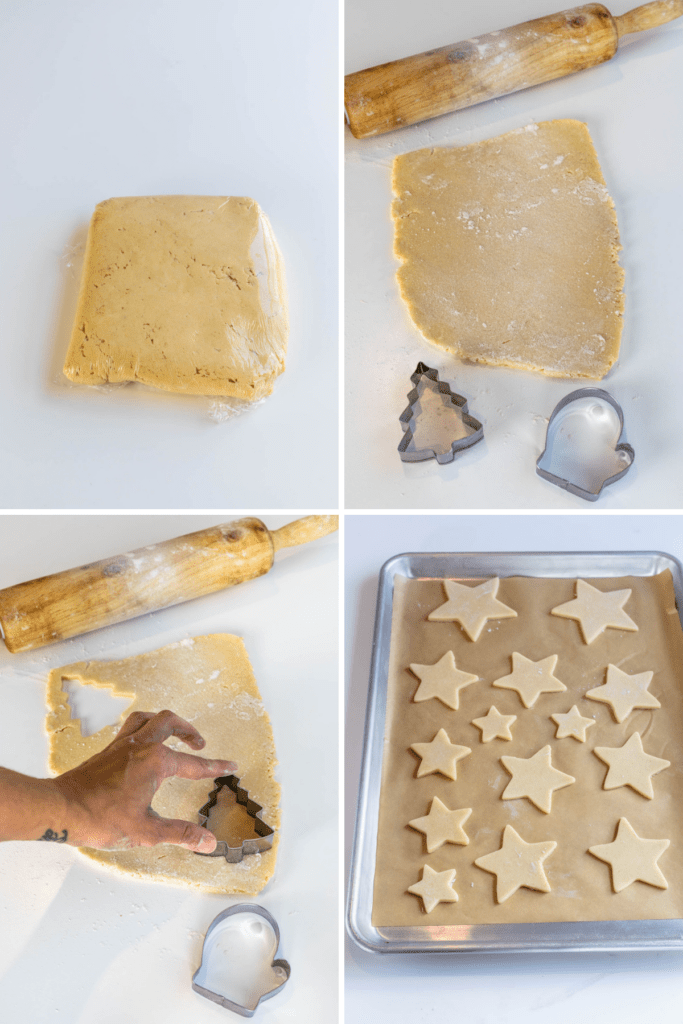
Cut the dough in quarters before rolling, making sure to leave the remaining dough covered and refrigerated, while you work with one piece at a time.
Roll the dough until it’s about 3/4″ thick, and then cut it with the cookie cutters.
Place each cut out cookie on a baking sheet, and bake on the pre-heated oven at 350ºF.
I like to keep all the cookies refrigerated while they wait for the oven to free up to be able to bake more cookies. This ensures they will hold a nice shape when baked.

Tips for making the best Christmas Sugar Cookies
- Use softened butter, but make sure it isn’t too soft. The butter temperature should be around 72ºF, which is room temperature. If the butter is too soft, the dough will turn out too soft and will require more flour, which will make the cookies tough and dry.
- Speaking of dry cookies, don’t use too much flour to roll the dough out. If you feel like you have to add too much flour, place the cookie dough between two sheets of parchment paper, or wax paper, and roll the cookies between the paper, which means you won’t need as much flour because the cookies won’t be sticking to the counter.
- On that same note, don’t over mix the dough when mixing the flour in. After the flour has been mostly incorporated, switch from the mixer to a spatula and mix the cookies by hand instead, which will prevent over mixing.
- Do refrigerate the cookie dough for at least two hours, and if the cookies became too soft in the process of rolling them out, refrigerate them before baking. I swear by this tip, it helps the cookies retain a nice shape.
- Don’t over bake the cookies, over baking the cookies will make them tough when they cool down.
- Store the cookies in an air tight container, which will help them stay fresh and soft.

Definitely make these Christmas Sugar Cookies with sweetened condensed milk, and let me know what you thought, I am super excited to share this incredible recipe with you and I would love to hear your thoughts by leaving a comment below, or tagging me on instagram!


Christmas Sugar Cookies
Ingredients
Cookie Dough
- 3/4 cup unsalted butter softened (169 grams)
- 1 14 oz. can Eagle Brand® Sweetened Condensed Milk 396 grams
- 3/4 cup granulated sugar 150 grams
- 1 large egg room temperature
- 2 tsp vanilla extract
- 3 1/2 cups flour 446.5 grams
- 1 1/2 tsp baking powder
- 1/4 tsp salt
Royal Icing
- 5 cups powdered sugar 625 grams
- 4 tbsp meringue powder
- 10 to 12 tbsp water
- Gel food coloring
Buttercream
- 1 1/2 cup unsalted butter 339 grams
- 4 to 5 cups powdered sugar 500 to 625 grams*
- 2-4 tbsp milk if needed
- 1/2 tsp vanilla extract
Instructions
Cookie Dough
- Start by beating the butter with an electric mixer for 2 minutes, until fluffy and creamy.
- Add the Eagle Brand® Sweetened Condensed Milk and mix to combine.
- Add the granulated sugar and mix on medium speed until incorporated.
- Then add the egg and vanilla to the bowl and mix to combine. Remember to scrape the sides of the bowl occasionally to ensure all ingredients are getting blended together.
- Add the flour, baking powder, and salt, mix on the lowest setting until almost entirely incorporated. I like to finish mixing the ingredients by hand with a spatula which ensures the dough isn’t getting overworked, and also ensures all ingredients from the bottom of the bowl and getting incorporated nicely together.
- Transfer the dough to the counter and wrap it on plastic tightly. Place it in the fridge for at least 2 hours or overnight.
- Pre-heat the oven to 350ºF.
- After 2 hours, remove the dough from the fridge, cut it into 4 pieces and work with one piece at a time, leaving the other pieces covered with the plastic, inside the fridge.
- Sprinkle the counter with some flour, and then sprinkle some flour on top of the piece of dough. Begin rolling with a rolling pin, until the dough is 1/4” thick. You may need to add more flour to the bottom of the dough, so it doesn’t stick to the counter, but don’t be so liberal with the flour, you don’t want to add too much of it, because it can make the dough dry.
- Use the cookie cutters of your choice to cut shapes out of the cookie dough, and place the shapes about 1 inch apart from each other on top of a parchment paper lined baking sheet.
- Bake the cookies in the pre-heated oven for 10 to 12 minutes, time baking will depend on the size of the cookies, smaller cookies will take less time to bake, and big cookies will take longer. Once the cookies start to look slightly golden around the edges you can remove from the oven, don’t let them get too golden though, or they will be over baked and hard as they cool down.
- Gather the leftover dough back into a ball, then flatten it out and roll it out, repeat cutting with the cookie cutters.
- I don’t like to re-roll the dough scraps more than once, because the cookies tend to become tough after that because the dough becomes over worked.
- Repeat rolling, cutting, and baking with the remaining dough that’s in the fridge.
- Once the cookies have cooled down, you can decorate them with royal icing, buttercream frosting, or any other frosting you’d like.
- I have decorated some cookies with royal icing, and I have also made some into a star tree.
Royal Icing
- Beat all ingredients together, except for the food coloring, for about 5 minutes on high speed.
- Divide into different bowls to make different colors. I made green, red, brown, and left one bowl white. Remember to always keep the royal icing covered, or it will start to dry out pretty soon.
- You might need to add more water to adjust the consistency, or maybe even more sifted powdered sugar, if your icing is too thin. The consistency should be flowing but not too liquidy.
- Place the icing in a piping bag and tie the end with a bag tie.
- To decorate the Christmas trees, I piped some green frosting around the edges of the cookies, and then filled the center with more royal icing. Then I left it drying for an hour or so. After the green royal icing was dry, I used the brown icing with the tip number 1, to draw lines in the Christmas tree. And using the red icing, with a tip number 1, I piped some Christmas balls on the tree. For the star on top, I used a star sprinkle, and a bit of royal icing dabbed on the back of the star to glue it to the top of the tree.
- And for the mittens, I simply piped a line of red royal icing around the edges of the cookie, and then filled the middle with more red royal icing, and decorated the bottom with white royal icing.
Buttercream
- Beat the butter with an electric mixer at medium high speed until smooth, for a few minutes.
- Add the powdered sugar and vanilla, mix on low to combine, and then raise the speed to medium high and beat for another minute or two.
- Add food coloring as you wish, I added a bit of pistachio gel food coloring, and leaf green gel food coloring.
- Add the milk only if necessary, if the frosting is too stiff.
- This amount of frosting will be enough to decorate about 3 Christmas trees.
- To make the star Christmas trees, I used a set of cutters that went from the smallest to the largest size, and there were 7 different sizes. Once the cookies are baked and cooled down, place the largest star on a cake plate, then pipe buttercream on top using a star piping tip. Top with the next smallest star. Pipe buttercream on top, and place the next smallest star on top of it. Repeat this until you have used all the stars. Then you can decorate the tree with sprinkles, and also sift some powdered sugar on top of the tree to decorate it.
Storage
- The cookies decorated with royal icing will last quite a bit at room temperature in an air tight container, for about 10 days.
- The tree with the buttercream should be refrigerated if you have added milk to the frosting, if not, it can stay at room temperature for a day or so. If you keep the tree in the fridge, make sure to let it come to room temperature slightly before serving.
Hi there, is it possible to store the unbaked cookie dough in the fridge for a week?
A whole week might be too much. I’d leave it in the fridge for up to 3 days, but you can freeze it for like 4 days, and then remove from the freezer on the 4th day (or a day before baking) and place it in the fridge.
how long can these cookies keep for?
I even froze some for like 15 days when I made them and they were soft when I thawed them. So I’d say for quite a bit. They will remain fresh in an air tight container for like 1 to 2 weeks at room temperature.
Thank you! Can’t wait to try.
I just found out I have only 392g of condensed milk, should I subsitute it with anything else?
You’ll be fine with that amount
Thank you! And have a merry Christmas in advance:)
The recipe states 3/4 cup butter but also says (169 grams). Please clarify. Thanks!
3/4 cups of butter weigh 169 grams. theyre the same thing
Hello, I want to pass on that I made these delicious cookies and they are really delicious, super taste, thank you
thank you so much!!!
The recipe says to roll the dough 3/4” thick; is this correct?
ops!!! sorry it’s supposed to say 1/4″ thick!!! Fixing it now!
Biscoitos fantásticos!!!!!!!
Uau!! Que lindas!! 🌲😍