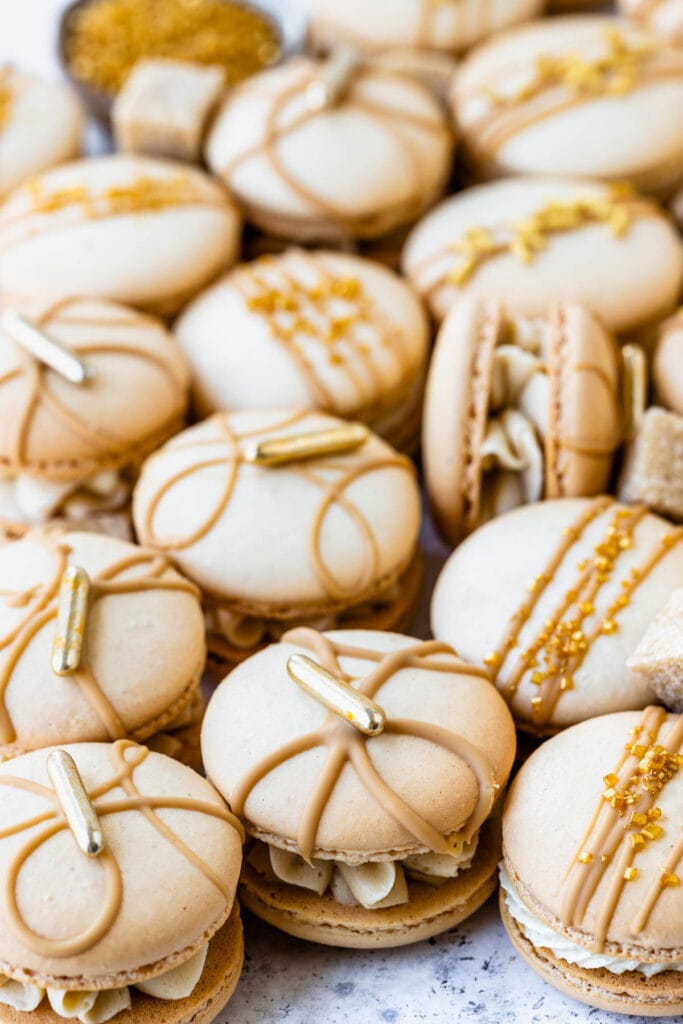
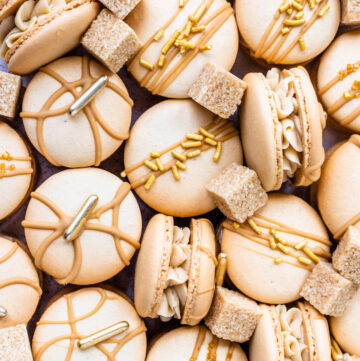
Brown Sugar Macarons
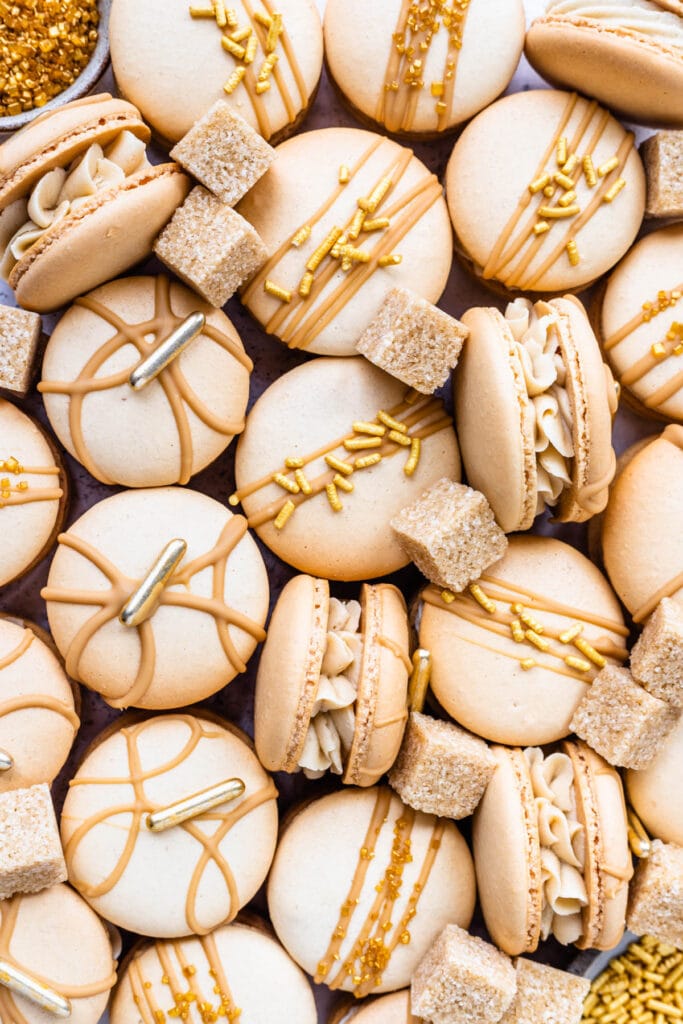
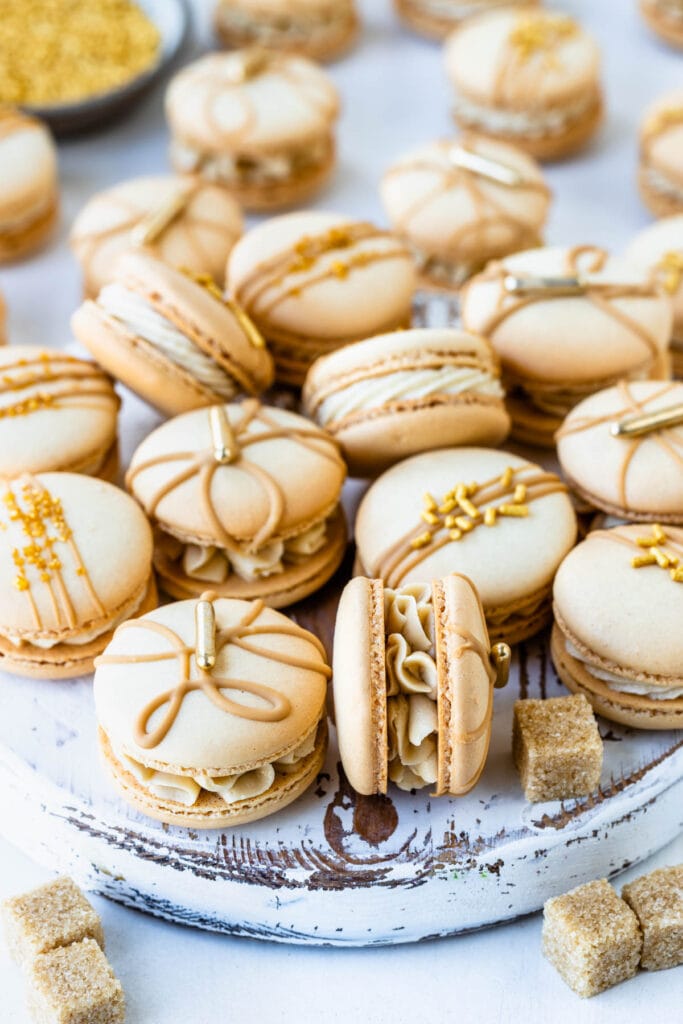
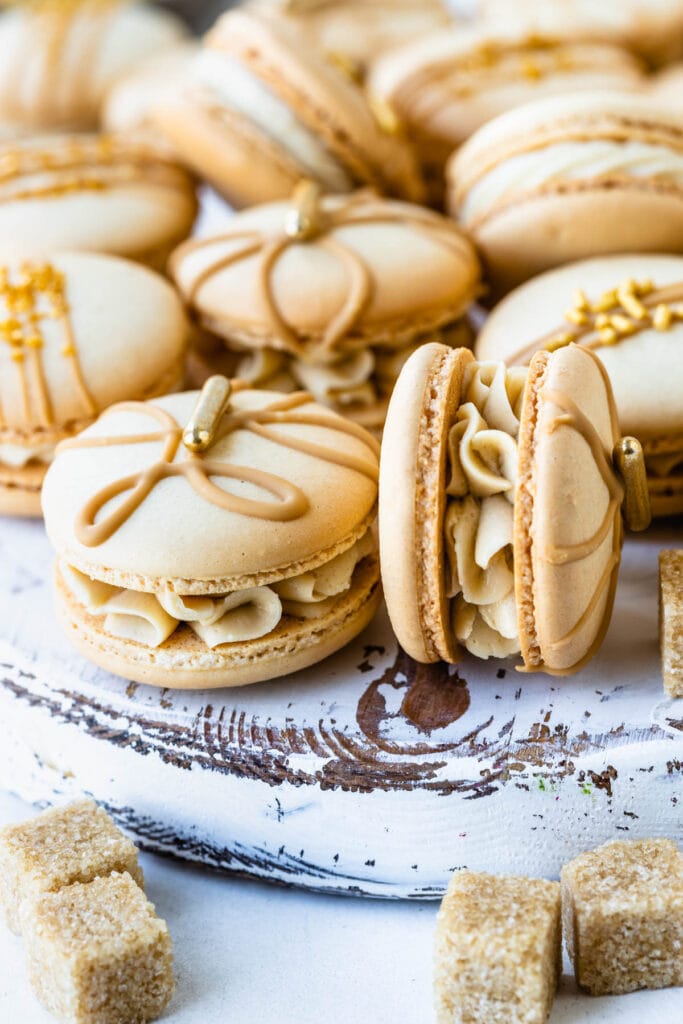
Hello friends, today I will show you how to make Brown Sugar Macarons. The shells are made with brown sugar instead of white granulated sugar, which gives the macarons a nutty and caramelized flavor and aroma. The Brown Sugar Macarons also have a naturally tan color, slightly golden, very beautiful.
I am also going to teach you how to make two different types of fillings for the macarons: Brown Sugar Swiss Meringue Buttercream, and Brown Sugar American Buttercream.
Make sure to watch the video on YouTube or on this page to check out how to make this awesome recipe.
This post may contain affiliate links. I earn a commission from qualified purchases. Please read our Privacy policy here.
Can I use brown sugar to make macarons instead of granulated sugar?
The answer is yes, absolutely. Brown sugar can be used to make macarons instead of granulated sugar. The amount of brown sugar you will use is the exact same amount of white granulated sugar you’d normally use.
There aren’t too many differences as far as the technique goes. I felt like the brown sugar meringue felt a bit softer than the white sugar one, so I whipped a bit longer. I still remember the first time I made brown sugar macarons last year, they cracked because my meringue wasn’t stiff enough, I was afraid to over whip because I had been whipping it for longer than I normally do, which made me think the meringue would be ready by then.
So I recommend observing real closely the consistency of the meringue, and ensuring it’s stiff enough, even if it takes a bit longer to get there, which can vary from my experience to your, of course, like everything else in macarons.
Do the Brown Sugar Macarons taste different than macarons made with regular white sugar?
Yes they do, they not only taste different, but also have a different naturally golden and tan shade.
The macarons made with brown sugar taste a bit nuttier, with a slight but noticeable caramelized flavor, and will make your house smell amazing while you are baking them.
Should I use light brown sugar or dark brown sugar to make Brown Sugar Macarons?
You can use either. I used light brown sugar, but dark brown sugar will also work.
However, like I mentioned before, the meringue might be slightly different in consistency. One of the reasons for example, is the fact that brown sugar has a higher liquid content in it than white sugar, which will definitely impact the meringue.
If you are so inclined, you can experiment with adding egg white powder to the meringue, to help offset the extra liquid with some more dry protein. Or just keep the egg white powder out if it doesn’t work for you, and make sure to whip that meringue to the proper consistency, taking extra care to ensure it will be whipped to stiff peaks.
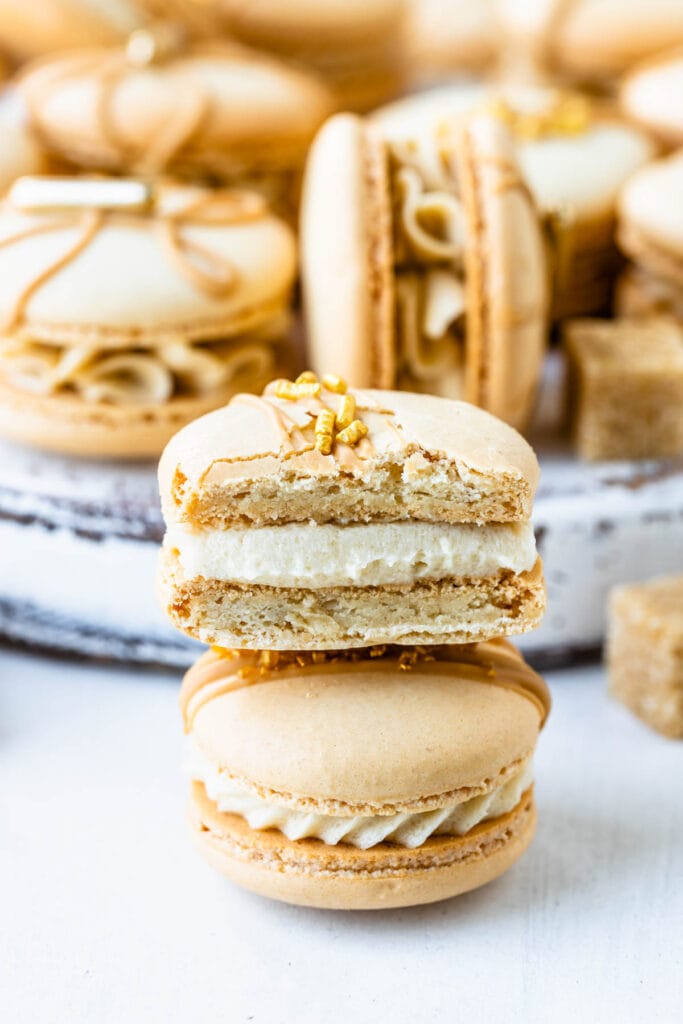
Let’s talk about the filling. Below, I am giving you two filling options: Brown Sugar Swiss Meringue Buttercream and Brown Sugar American Buttercream.
Here are a few notes to be mindful of:
- If making the Brown Sugar Swiss Meringue Buttercream, use a hand mixer, because since it’s just one egg white, the whisk in the kitchenaid mixer won’t be able to reach the bottom of the bowl and whip the syrup properly.
- Make sure to whip the meringue for the buttercream until it achieves stiff peaks, the peaks won’t be as stiff as the peaks of the macaron meringue, but they do need to be somewhat stiff and glossy, or the buttercream won’t firm up.
- Also ensure to use butter at 72ºF, if the butter is too cold, it will form lumps in the buttercream that won’t dissolve or incorporate, and nobody wants to bite into a lump of butter. And if the butter is too warm, the buttercream will be soupy and won’t come together.
- When making the Brown Sugar American Buttercream, it will be slightly grainy, because the brown sugar won’t be able to completely dissolve with the buttercream, to help offset this, you should try to whip the brown sugar with the butter for a little longer if possible.
If you like this recipe, don’t forget to check out my many other macaron recipes here on the blog, I have over 100 of them! Just click here to check out all of my macaron recipes and ideas.
And if you are learning how to make macarons, check out my Macaron School, your number one resource that will help you elevate your macaron baking!! I post articles about troubleshooting, beginner’s guides, tools, science behind macarons, and much more!!
Brown Sugar Macarons
Ingredients
Brown Sugar Shells
- 100 grams brown sugar (light or dark)
- 4 grams egg white powder optional read notes below
- 100 grams egg whites
- 105 grams almond flour
- 105 grams powdered sugar
- Food coloring if desired
Brown Sugar Swiss Meringue Buttercream
- 1 large egg white
- 66 grams brown sugar
- 85 grams unsalted butter at precisely 72ºF
- 1/2 tsp vanilla extract
Brown Sugar American Buttercream
- 85 grams unsalted butter room temperature
- 50 grams brown sugar
- 125 grams powdered sugar
- 1 tsp vanilla extract
- 1 to 2 tbsp milk if necessary
To decorate
- 1/3 cup gold chocolate chips optional
- Sprinkles
Instructions
Prep the ingredients and tools
- Before you start, get all of the ingredients ready. Prepare a large piping bag, fitted with a large round tip, I use a 1/4” diameter tip, or a Wilton 12. Set aside.
- Line two baking sheets with parchment paper or silicone mat.
- I use a baking mat with the macaron template already in it.
- Wipe the tools such as bowls, spatulas, and silicone mats with vinegar if desired, this helps getting rid of any grease particles that might be in the tools.
- Measure out all of the ingredients.
- Sift the powdered sugar and almond flour together. Set it aside.
- Start pre-heating the oven. I pre-heat my large oven to 310ºF for 60 to 90 minutes, this helps with temperature fluctuations. I pre-heat the countertop oven for 30 to 45 minutes.
Making the Swiss Meringue
- Place a bowl over a pan with barely simmering water. Add the brown sugar and egg white powder to the bowl if using. If you’re not using egg white powder simply skip it, nothing needs to be changed in the recipe.
- Whisk the sugar and egg white powder so it doesn’t clump up.
- Add the egg whites to the bowl and whisk until the sugar is completely melted. It will take a couple of minutes. You can test by touching the mixture between your fingers, and if you feel any sugar granules just keep whisking the mixture over the water bath.
- Make sure the bottom of the bowl isn’t touching the simmering water because you don’t want the whites to cook.
- Also, don’t overheat the sugar syrup, you are just looking to melt the sugar, no need to bring it to a certain temperature.Transfer the syrup to the bowl of a stand mixer. Before transferring the syrup, you might consider whipping the bottom of the bowl with a towel so the water doesn’t fall into the mixer bowl.
- With the whisk attachment, start whisking mixture on low (speed 2 of the KitchenAid) for about 30 seconds, then gradually start increasing speed to medium. Whisk on medium (speed 4) for one to two minutes, until the mixture is white and starting to become fluffy. Raise the speed to medium or medium-high and whip for a few minutes until stiff peaks are formed. I like to finish whipping the meringue on speed 6 of the KitchenAid.
- It takes me about 13 to 15 minutes to whip the meringue, but you shouldn’t go by time, go by what the meringue is supposed to look like because a lot of things can affect whipping time, such as the quality of the eggs, the weather, how powerful your mixer is, and more.
- Once the meringue gets glossy and you start seeing streaks formed by the whisk, and the meringue raising in the center of the whisk, it might be time to stop.
- You don’t want to over whip the meringue at this point because that can cause several issues, mainly hollow macarons.
- Whisk until stiff peaks have formed. When you pull the whip up, the peak should be stiff and shooting straight up, with possibly a slight bend at the top, but not bending to the side.
- Also when you swirl the whisk around in the bowl to collect the meringue, you should feel some resistance from the meringue. And when you look on the bottom of the whisk the meringue collected should be forming soft but defined waves.
Macaronage
- Pour the sifted powdered sugar and almond flour into the stiff meringue.
- Add the food coloring at this point, if using. If you were using powder food coloring, you could add it during the final stages of whipping the meringue.
- Start folding gently forming a letter J with a spatula.
- Once the dry ingredients have incorporated with the meringue, you can start squeezing the air out of the batter by pressing it down along the sides of the bowl as you fold.
- How to know when to stop folding the batter: It’s time to stop folding when the batter is glossy and has a thick and flowing consistency. There are several ways to test this.
- First, pick up some batter with the spatula and try to draw a figure 8 with the batter that is dripping off the spatula. If you can form several 8 figures without the batter breaking up, that’s one indication that it might be ready.
- The batter that’s falling back into the bowl should take 10 to 15 seconds to incorporate with the batter that’s already in the bowl.
- There’s another test you can do. I call it the Teaspoon test. Grab a teaspoon of batter and spoon onto the parchment paper or silicon mat. Wait a minute to see how it behaves.
- If the batter stays stiff, forming a point and doesn’t spread out, fold a little bit more, about 3 folds.
- Test again.
- Once the batter spreads out a bit and starts to look glossy and smooth on top, on the parchment paper or silicone mat, it’s ready.
- You don’t want your batter to be too runny either. So be careful not to over mix. It’s always best to under mix and test several times until the proper consistency has been achieved.
- When you hold the spatula with batter on top of the bowl and the batter falls off the spatula slowly but effortlessly the batter is ready. The batter will keep flowing off the spatula non-stop, but not too quickly.
- Transfer the batter to the piping bag. I also like to seal the top with a bag tie, so the batter doesn’t dry out and it gives you more control while piping because there’s no risk of the batter escaping through the top of the piping bag.
- Place the piping bag directly 90 degrees over the center of each macaron template. Apply gentle pressure and carefully pipe for about 3 to 5 seconds, and then quickly pull the bag up twisting slightly at the top.
- Once you’ve piped as many circles as you could, bang the trays against the counter or against the palm of your hand a few times each.
- Use a toothpick to pop any air bubbles in the surface of the shells.
Resting or not resting the shells
- Let the trays sit for a while so the shells will dry out before baking, if you are resting the macarons. I usually leave about 20-40 minutes, depending on how humid the day is. You’ll know they’re ready when you gently touch the surface of a macaron and it seems dry.
- To do the no-rest method, you can bake the trays immediately.
- The no-rest method will depend on your oven and baking sheets you are using. Read the post above for more information.
- I can do the no-rest method on my small counter top oven, but not on my large oven, because the temperature is too uneven on the large oven.
Baking
- On my large oven I bake the macarons at 310ºF, and on the small countertop oven I bake them at 290ºF. I pre-heat both ovens for quite a bit of time. I pre-heat the large oven for 60 to 90 minutes, and the small oven for 30 minutes or so.
- Bake one tray at a time.
- Bake for 5 minutes, rotate the tray. This step is not necessary, I don’t rotate the trays on the small oven, but I have to do so on my large oven, otherwise the macarons will be lopsided. Not all bakers have to rotate the tray.
- I bake each tray for about 15 to 20 minutes.
- When baked, the macarons will have a deeper color and formed feet. If you try to move a macaron, it shouldn’t feel jiggly. If the macaron is still jiggly, keep baking. Also try to touch the top of a macaron and it shouldn’t feel soft, if it’s still soft, keep baking.
- Remove from the oven and bake the other tray.
- Let the macarons cool down before proceeding with the filling.
Brown Sugar Swiss Meringue Buttercream
- Make sure the butter is at 72ºF for the recipe to work, if the butter is cold, it will form lumps in the frosting and not incorporate well, and if it’s too soft, the buttercream won’t firm up.
- Put the whites and the sugar in a heatproof bowl.
- Place the bowl on top of a small pot with simmering water.
- Whisk the whites and sugar until they temp 140 Fahrenheit. Basically you are looking to melt the sugar granules, and also make it so the egg white is in a safe temperature to be consumed.
- Once you achieve that temperature, transfer the syrup to your mixer bowl.
- Whip with the whisk attachment for about 2 minutes at medium speed, until the mixture looks white, and thicker. At this point, raise speed to high and continue to whip until fluffy and doubled in size. The meringue should have stiff peaks. It can take anywhere from 5-10 minutes to obtain stiff peaks. The peaks won’t be as stiff as the peaks of the meringue we made for the macarons, but they should be firm.
- Test every so often, so you don’t over whip it. Also, it’s best to use a hand mixer instead of the kitchenaid considering that it’s just one egg white and the kitchenaid whisk probably won’t reach the bottom of the bowl.
- Cut the butter into very thin pats. Starts adding one by one to the meringue with the mixer running on medium-high.
- Wait for one butter pat to be incorporated before adding the next one.
- By the end, the butter should have incorporated with the buttercream, which will be creamy and fluffy. Add vanilla extract and mix to combine.
Brown Sugar American Buttercream
- Start by beating the butter with a mixer, until creamy and fluffy, for about 2 minutes over medium speed.
- Add the brown sugar and mix on medium to combine with the butter.
- Add the powdered sugar and vanilla, mix on low until incorporated, and then raise the speed to medium or medium high for another minute or so.
- Add the vanilla and mix until incorporated.
To decorate the macarons
- Place the chocolate in a bowl and microwave for 15 second intervals, stirring in between until completely melted.
- Place the melted chocolate in a piping bag, and snip the end with scissors.
- Drizzle melted chocolate over the macarons, and then put sprinkles on top if desired.
To fill the macarons
- To pipe the filling in the shells, I used the tip 348 for the brown sugar American buttercream. And to pipe the brown sugar Swiss meringue buttercream, I used a tip 336.
- Pipe a bit of filling on the bottom shells and top with a decorated shell.
Storage
- I store the unfilled shells in an air tight container in the fridge for up to 5 days, and in the freezer for 1 to 2 months.
Can you make these brown sugar macarons using the French method?
you’d have to use a french recipe with the ratios for french method and substitute the granulated sugar for brown sugar
This is the first recipe I ever used to make macarons. They turned out amazing! I was nervous to make the swiss meringue buttercream so I made the American buttercream. While it was still good I highly recommend the Swiss meringue buttercream. I made it with another recipe and it just melts in your mouth. Instructions are very through! Just make sure you read them carefully and you will succeed.
The macarons came out very good, I always use your method of making swiss meringue ones and they come out perfect. I really didn’t like the American buttercream version of the frosting though, because of the brown sugar it tasted pretty grainy and was unusable. If following the swiss meringue version it would probably come out fine because it’s all melted first, but I wish there was a solution to the regular buttercream. Thanks for the recipe though, never thought of putting brown sugar to macarons.
These look amazing!! I’m going to fill these with your cookie dough macaron filling!
oh awesome!!!!
yes I use your recipe, I use scales, I beat egg whites to a firm cock
CAMILA i have a big problem with making macarons especially with batter they say if you keep stirring more than enough then batter becomes liquid but with me it gets solid and solid that i get pain in my arm to mix batter , what is the problem with me I get a lot of trouble with always fail baking macarons thanks
are you using my recipe? are you using a scale to weigh the ingredients? How stiff are you whipping the meringue?
This recipe did not work at all. I have made many macarons using white sugar with great sucess. This is a time consuming method which I have tried three times with no success.
Then stick to what works for you. This recipe has most definitely worked for tons of people, so maybe it’s just not right for you, it’s all about improving the technique. And as far as being time consuming, it literally takes less than 5 minutes to make the sugar syrup and it makes for a way stronger meringue than the French method 🤷♀️ And about the brown sugar, it definitely works, as you can see on my videos, and many other people use brown sugar on their macarons as well, I am not the first person to do this. I hope you have a great day!
Macarons fantásticos!!!!!!
Adorei s receita!! Que delícia!!😋😋