Cannoli Recipe
Hello friends! Today I am updating this lovely homemade Cannoli recipe!
Let’s learn how to make cannoli shells from scratch!
Whenever I make homemade Cannoli, I start by making the dough for the shells, and the fresh ricotta on the day before I want to eat it or serve it.
This post may contain affiliate links. I earn a commission from qualified purchases. Please read our Privacy policy here.
And you don’t have to make the ricotta from scratch, but if you want to, here is my recipe for the homemade ricotta!

Making cannoli shells from scratch is a labor of love, and it will demand a couple of hours in the kitchen. It’s a great weekend project!
The shells are made of a very simple, wine based, pasta-like dough. And like I said above, I make the dough for the shells a day before, because much like pasta dough, it needs to rest before being rolled out.
And why does the dough need to rest?
Because the liquid ingredients can be fully absorbed by the flour, the gluten strands have a chance to relax, and this yields a strong and pliable dough, that will be smooth and won’t tear.
If you don’t want to make the Cannoli dough the day before, give it at least 4 hours of rest in the fridge before rolling it out.
You can even get the kids to help you roll out the dough, just be careful when it’s time to fry the shells!
And you can watch the video on this page and see in detail how to make the dough. Also, here are some process shots on how to make this homemade Cannoli recipe:
Can I use something else besides wine?
Yes! You don’t have to use wine in the recipe! You can substitute the wine for a combination of water and vinegar. No biggie. The results will be a little less crispy, specially on the second day, but still very delicious!
In my Vegan Cannoli recipe I even use sparkling water. It comes out fabulous.
You can use a KitchenAid to make the dough, or just use your hands, as you can watch me do in the video. It’s important to knead the dough until it’s not sticky, soft, and smooth. Also, make sure not to add too much extra flour as you knead the dough. Too much flour will yield a tough and dry dough.
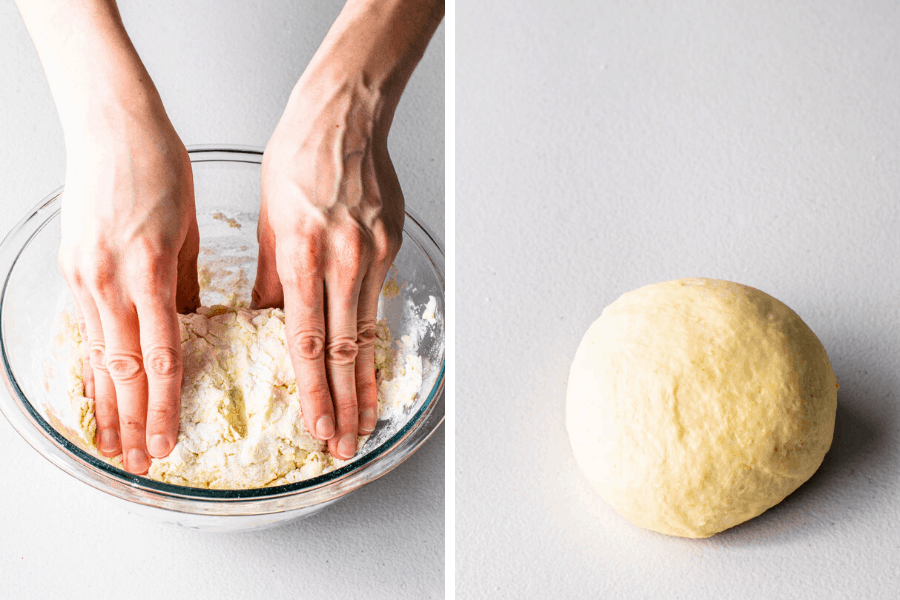
After making the dough, place it in the fridge like I’ve mentioned above. And when it’s time to roll it out, you can either use elbow grease and roll it out by hand, or you can take a shortcut and roll it out using a pasta machine.
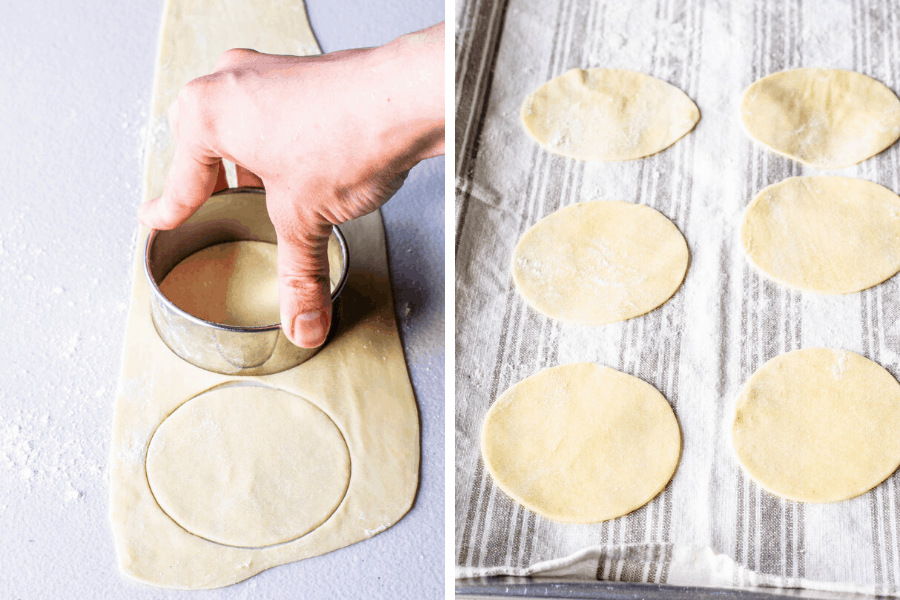
I will confess, I hardly ever roll the dough out by hand. The pasta machine makes this job so easy and so much faster! I divide the dough into 8 parts, keeping all the parts I’m not working with covered, and roll each part once in each setting until number 6, on my KitchenAid pasta machine attachment.
Here are the logistics of my process of making Cannoli from scratch.
First, I roll out and cut out about 16 circles.
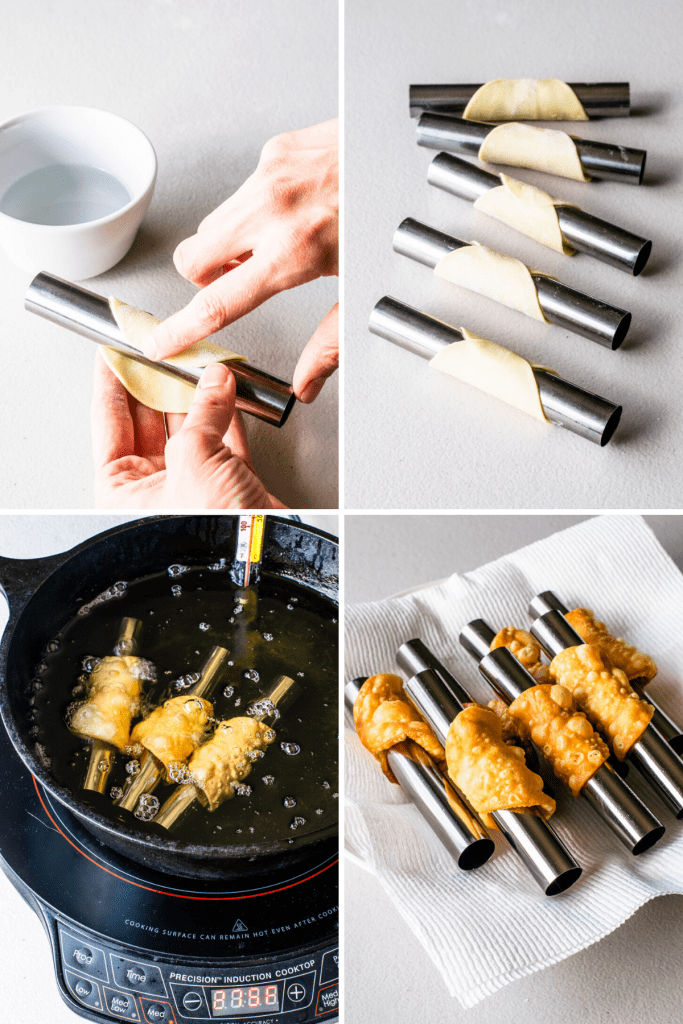
These are the Cannoli Rings I use. And I use the 3.5″ cutter from this set.
The Cannoli set comes with 4 rings, and I have 2 sets, which means I have 8 cannoli forms.
Once I have 16 circles, I wrap the rings with a circle, and use just a dab of water to seal the edges together. Then, I begin to fry the dough, and at the same time, I continue to roll out more dough, and cut out more circles. Always remembering to keep the circles and any dough covered at all times.
In my pan, I am able to fry 4 cannoli shells at a time. Fry them for about 1 minute on each side. And then remove the shells to a plate lined with paper towels. Use paper towels to remove the cannoli from the ring, and be careful when doing this because they will be piping hot!
Then wrap more circles around the rings, fry them, rinse, repeat.
A few important things when frying the homemade cannoli shells.
- Have a thermometer clipped to the side of your frying pan, so you can control the temperature of the oil, keeping it always at 350ºF.
- Sometimes, you can’t roll and keep up with frying, so you may have to turn the oil off for a few minutes while you roll out a next batch of circles. Which is another reason why it’s very important to have that thermometer.
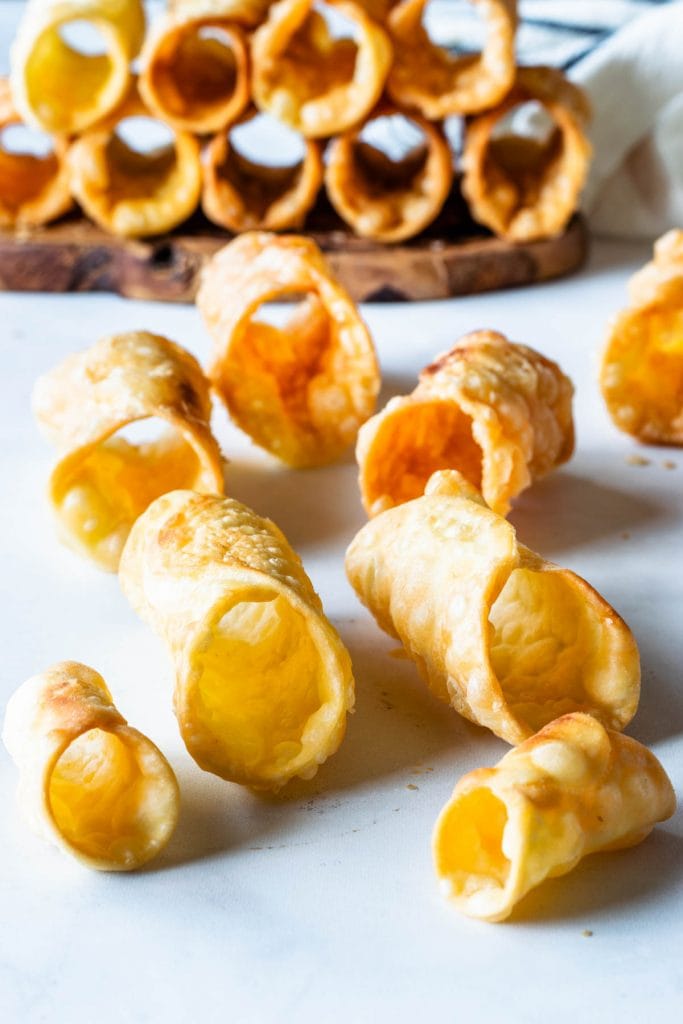
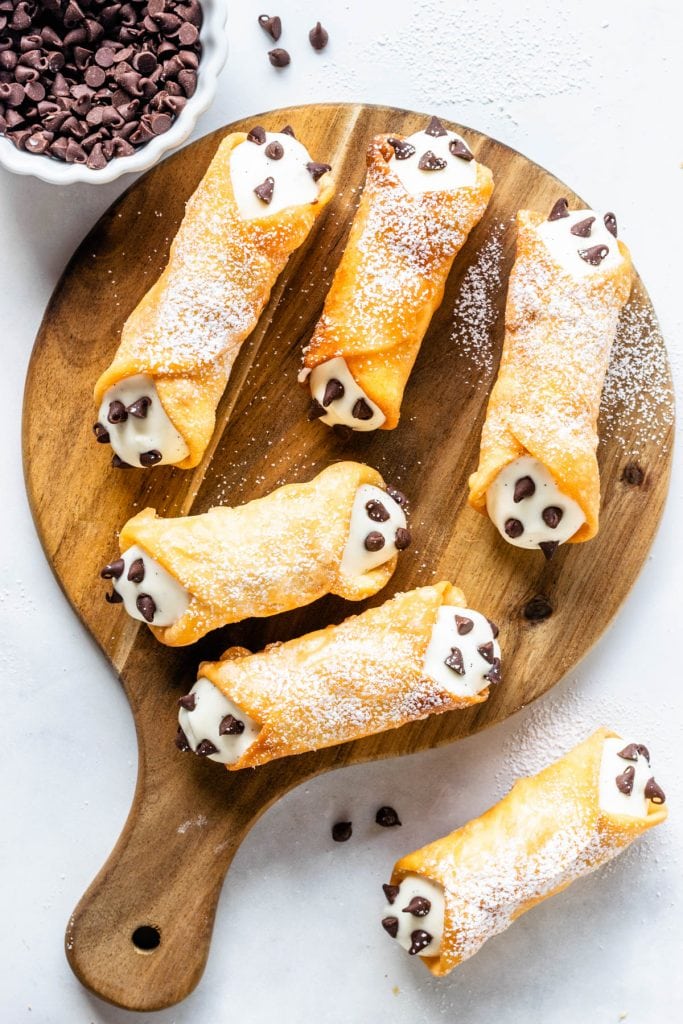
In this picture you will see I also made mini shells, using a mini Cannoli mold.
They are pretty cute, make for very small shells, and are perfect for topping cupcakes, which is what I did.

Here are some tips on how to make this homemade Cannoli recipe:
- Make the dough ahead of time so it has a chance to rest.
- Roll it out in batches, or the circles will start to dry out, even if they are covered.
- Do use flour to roll out the dough, specially if using a pasta machine, but don’t go overboard with it. Use minimal flour, but enough so the dough doesn’t stick.
- Keep the unused dough covered at all times.

Can I freeze Cannoli dough?
Yes! You can freeze the dough. Make sure to portion it, so it thaws faster, and also so you have the option of using only parts of it and not the whole thing. So you can divide the dough into 4 pieces, place each piece in a freezer bag, and freeze them individually.
To thaw, place it in the fridge overnight.
Can I freeze fried Cannoli shells?
I do not recommend freezing the fried shells. They have a shelf life of about 4 days after fried, and should be kept in an air tight container at room temperature, unfilled.
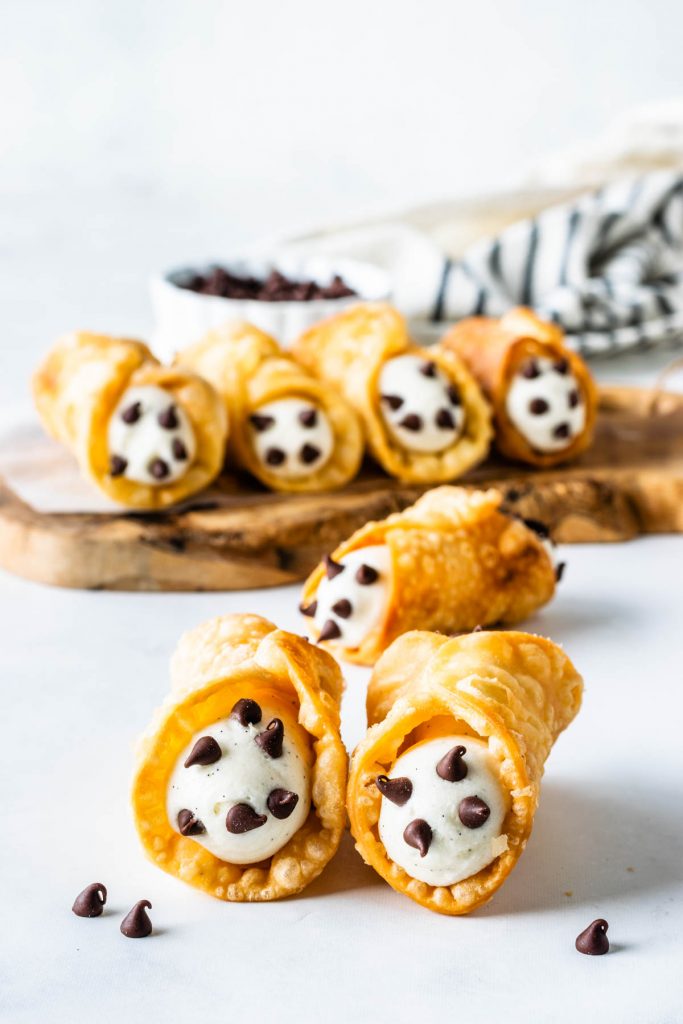
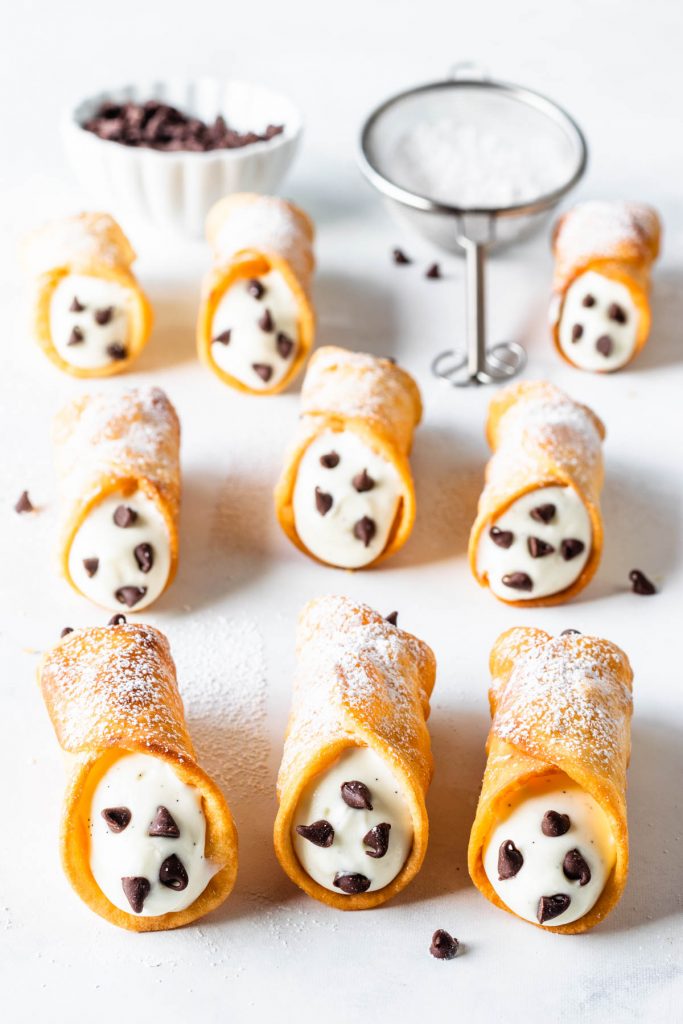
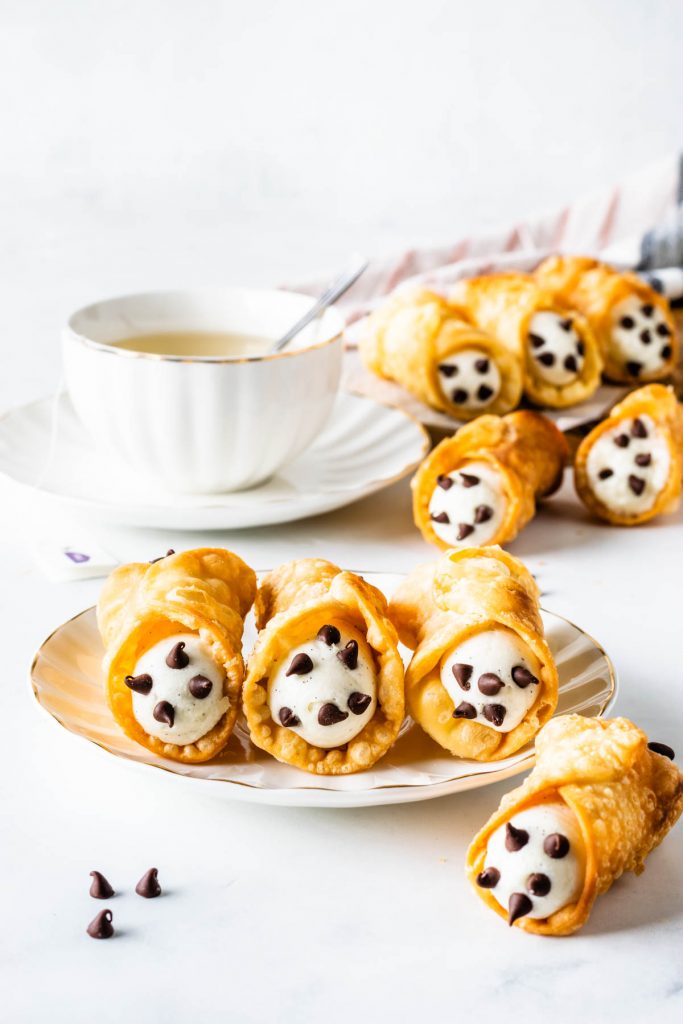
The perfect cannoli are harmonic. They are light and not overly sweet, the crispy and delicate shells melt in your mouth with the creamy Ricotta Filling.
And speaking about the Ricotta filling, I will say the single most important thing about making the perfect Cannoli filling: Strain the ricotta!
If you follow my Homemade Ricotta recipe, you will notice I strain my ricotta in the fridge overnight. So if you are making that recipe, you probably don’t have to strain it again before making the filling.
However, if you are using store-bought ricotta, make sure to do it!
Line a fine mesh strainer with a double layer of cheesecloth, and place it over a bowl. Scoop the ricotta into the strainer, and fold the overhanging pieces of the cheesecloth over it, so the ricotta is nice and protected. Then place the whole thing in the fridge and let the ricotta drain for a few hours, maybe even overnight.
Trust me, you don’t want to skip this step! Or you will end up with a soupy filling that will make the shells soggy and won’t even hold up enough to be piped.
Speaking of soggy shells, you don’t want that either. So only fill the shells right before you are going to serve the Cannoli. Or at least a couple of hours before. As the shells sit with the filling inside, they will start to soften up, and you probably prefer to eat crispy shells, right? That’s the whole point.
I use vanilla bean seeds to make my Cannoli filling. It’s just so delicious! If you prefer, or if that’s all you have in hand, you can use just vanilla extract.
And if you do use vanilla bean seeds, don’t discard the vanilla pod that’s leftover. Here’s what you can do with it:
- Add it to jams, sweet sauces while you cook them.
- Save it to gather with more pods and make vanilla extract.
- Stick it in your sugar jar to flavor your sugar and give it a nice vanilla aroma. Every time you open your sugar container, you will be graced with the sweet smell of vanilla sugar.
Ways to serve the Cannoli:
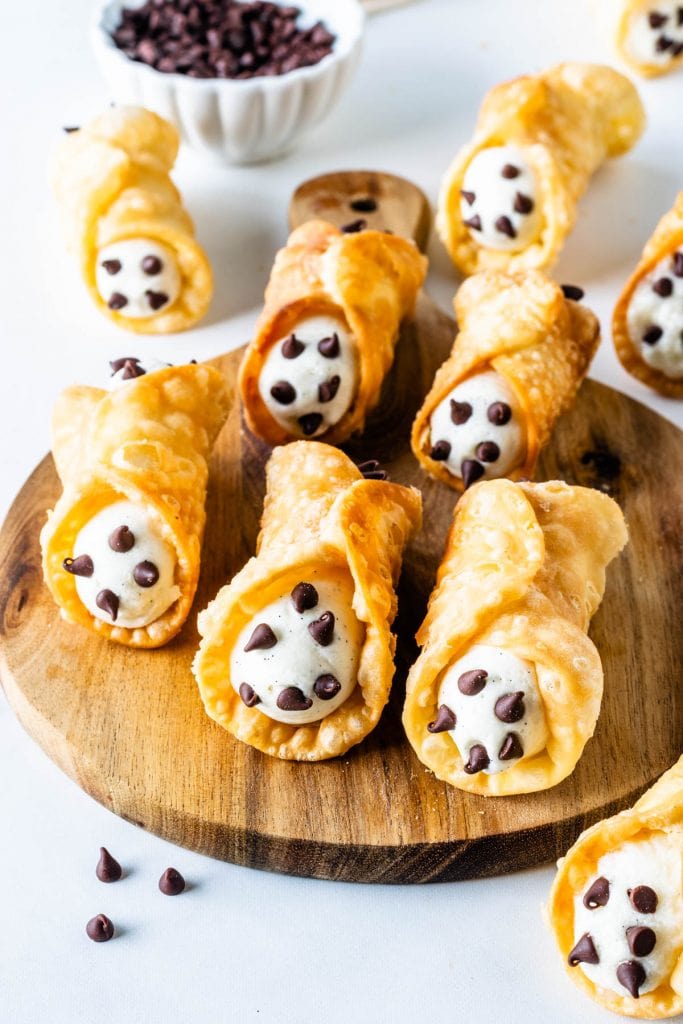
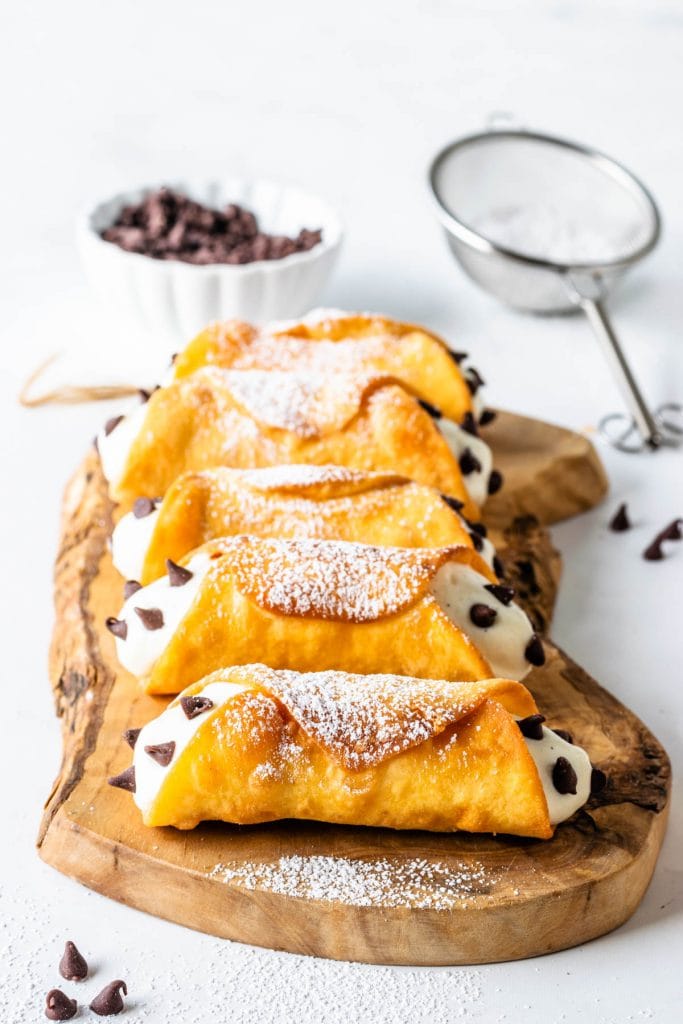
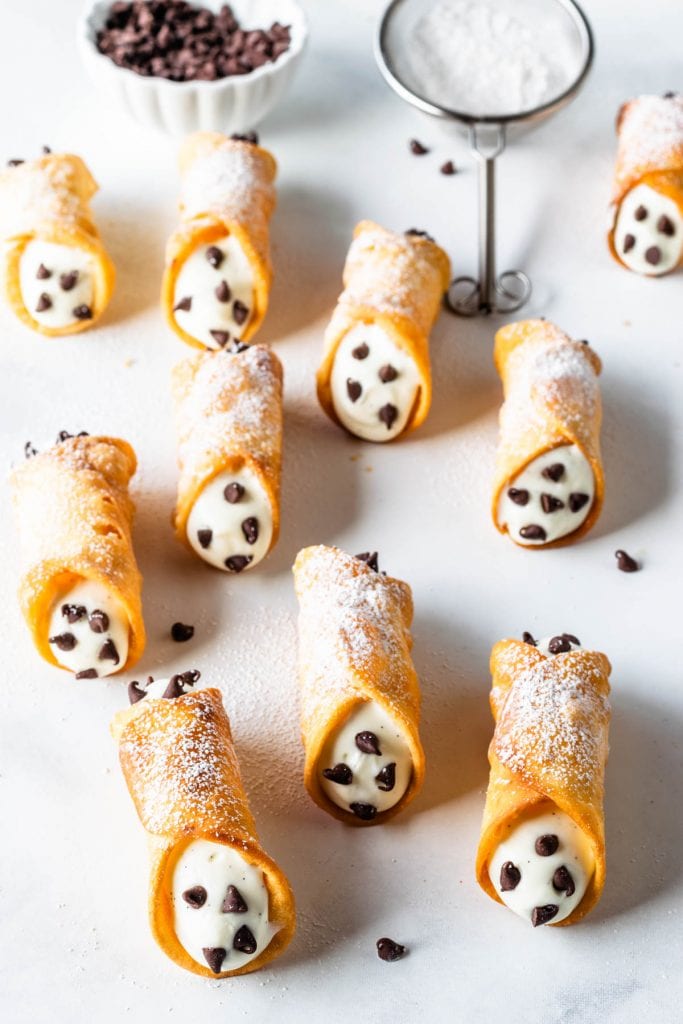
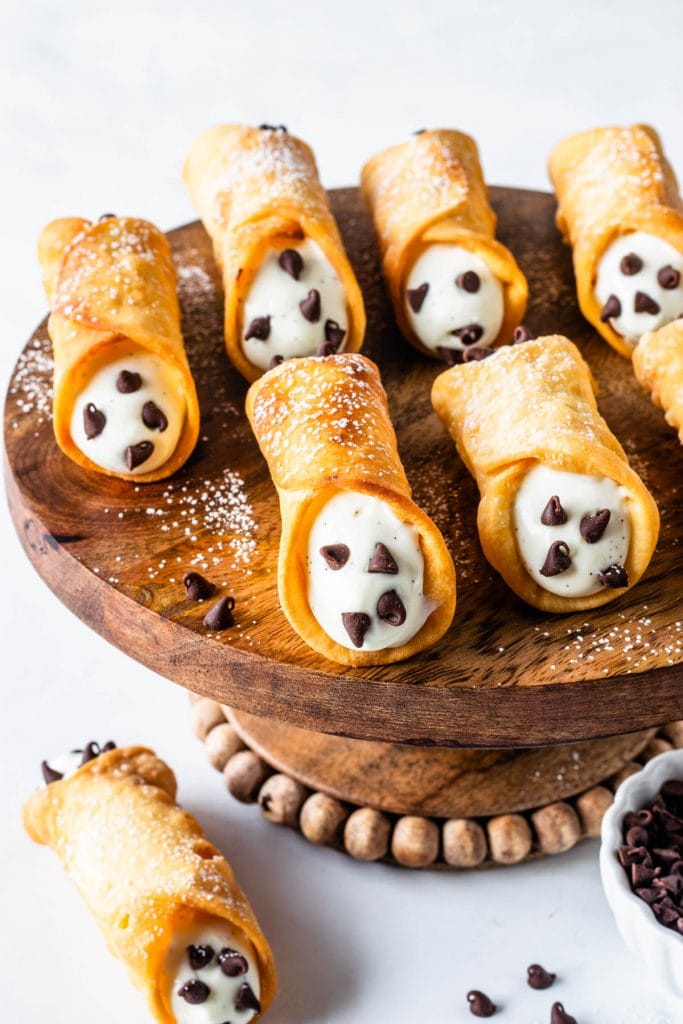
- With mini chocolate chips, either mixed in the ricotta filling, or by sprinkling it on top of the filling. (Be aware that mixing the chocolate chips in with the ricotta might clog up the piping tip as you are trying to pipe the filling in)
- Coat the sides of the cannoli in chocolate (I have two great Cannoli variations coming soon where I show you how to do this)
- Sprinkle the sides with chopped pistachio, or any other nuts.

Anyway, this post became quite lengthy, but I was trying to give you my best tips to make Cannoli from scratch, which can be super fun, somewhat challenging, and for sure a very delicious experience!
Here are some more recipes you may like:
- Pistachio Cannoli
- Chocolate Cannoli
- Dulce de Leche Donuts
- Lemon Raspberry Rolls
- Bavarian Cream Donuts
- Walnut Pastries
- Strawberry Pop-tarts
And just notice below, this is the first picture I took of this Cannoli recipe when I first made it for the blog in 2017. Just notice the difference and progression in my photography! That’s something that makes me super happy and proud!

Thanks for reading this far, I hope you’ve enjoyed the post and all of my tips on how to make Cannoli from scratch, as well as the video, which can also be found on my Youtube channel! And make sure to tag me on instagram if you make this recipe!

Cannoli Recipe
Ingredients
Cannoli Shells
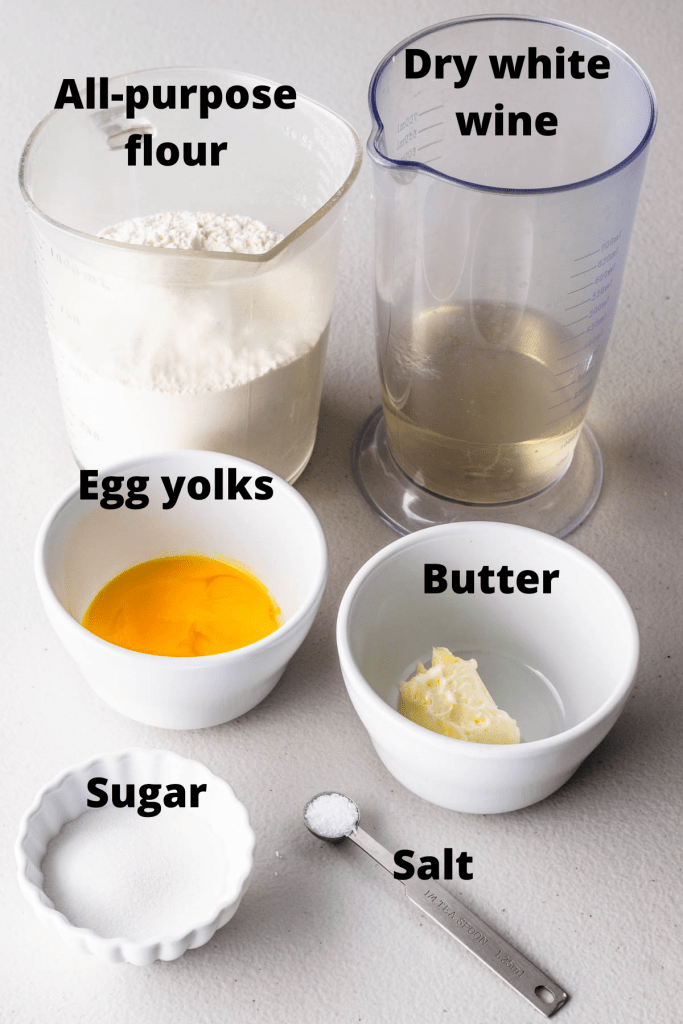
- 2 1/2 cups all-purpose flour (11.25 oz, 318 grams)
- 2 tbsp granulated sugar (0.88 oz, 25 grams)
- 1/4 tsp salt
- 2 large egg yolks slightly beaten
- 2 tbsp butter softened (1 oz, 28 grams)
- 2/3 cup dry white wine or Marsala wine (156 ml)
Cannoli filling
- 5 cups ricotta cheese store-bought or homemade
- 2 to 2 1/2 cups powdered sugar (8.8 oz, 250 grams to 11 oz, 312 grams)
- 1 vanilla bean split and seeds scraped
- 2 tsp vanilla extract
Instructions
To make the dough
- Mix the flour, sugar and salt in the bowl of a stand mixer, or any bowl if you plan on kneading by hand.
- Add the butter and yolks to the flour mixture.
- Slowly start to incorporate the wine, as you stir. And mix with the paddle attachment, or a spoon or fork, to form a ball.
- Switch to the dough hook, and begin to knead. Or continue to knead by hand.
- Using the dough hook, it should take about 4 minutes to knead the dough. By hand it will take a bit more, from 6 to 8 minutes.
- Only add more flour during the kneading process if necessary. After kneading for a while, the dough should become smooth, soft, and it shouldn't be sticky.
- Flatten the dough into a disk, wrap it well in plastic, and refrigerate for at least 4 hours, preferably overnight.
- Once the dough rests, remove it from the fridge. It's time to begin rolling.
- You can roll the dough out by hand, or with a pasta machine. Divide the dough into 8 pieces, and work with one piece at a time. If rolling out by hand, you can probably handle larger pieces, but most pasta machines won't take a huge piece of dough in, which is why I divide mine into 8 pieces.
- The dough should be about 1/4" thick, perhaps slightly thiner. Using the pasta machine, I roll it in each setting once until number 6.
- Don't use too much flour in the rolling process, but use enough so the dough isn't sticking.
- Too much flour will produce a dry and tough dough.
- You want to do this process in parts. Roll out about 1/4 of the dough and cut out circles using a 3.5" inch cutter.
- Remember to keep the unused dough covered at all times.
- Re-roll the scrapes of dough out and cut more circles out of it.
- Once you have a few circles, start wrapping the cannoli tubes.
- To wrap the tubes, place each in the middle of a dough circle, roll out the bottom half and lightly dip your finger in water and brush where will be the seam so the other side will seal. Press it to make sure the tube won't pop open in the fryer.
- Heat 4 cups of shortening or oil in a large pan with a heavy bottom, until it registers 350ºF. Start frying the cannoli in batches. Fry for 1 to 2 minutes on each side, and use tongs to flip the cannoli over.
- Once the cannoli are golden brown, remove to a plate or tray lines with paper towel to drain the oil.
- Wait a little bit, and use paper towels to gently help remove the shells from the tube. And then proceed to wrap more shells and fry them.
- It helps to have more than a few tubes. I can manage doing this with 8 tubes, but often times, I have to turn the heat off the oil so I can have time to catch up with rolling out the dough and cutting out the circles.
- Rolling, cutting, wrapping, frying. Repeat until done.
- Also remember to have a thermometer clipped to the side of the pan so you can control the temperature of the oil, which should be kept constantly at 350ºF.
- Once the shells are cool, place them in an air-tight container, they will keep for up to 4 days, but might not be as fresh as the first 2 days.
To make the Cannoli filling
- A few hours or the day before making the filling, line a strainer with a double layer of cheesecloth, and place it over a bowl. Pour the ricotta on the strainer, and cover it with the overhanging cheesecloth. Insert it in the fridge and let it drain for a few hours, squeezing gently if you wish. This is very important because otherwise the filling will be way too wet to be piped in the cannoli.
- Sift the powdered sugar.
- Add the strained ricotta and vanilla seeds to the bowl of a mixer. Add the sifted powdered sugar to the bowl. Mix on low until combined.
- Add the vanilla extract.
- Raise the speed to medium-high and beat the mixture for a couple of minutes, until light, fluffy and creamy.
To assemble
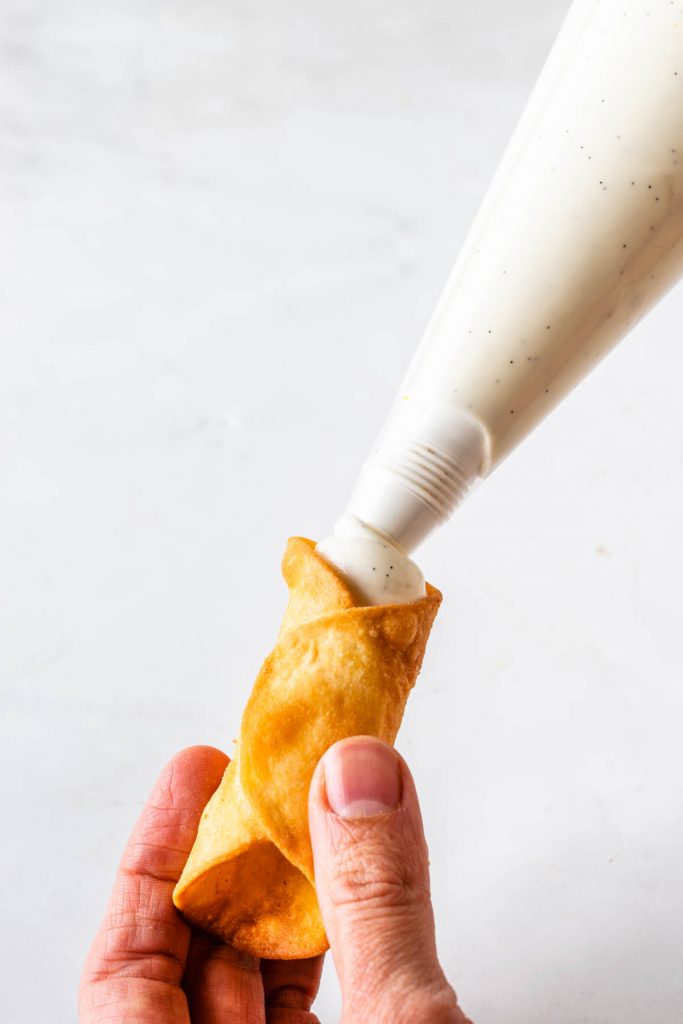
- Don’t assemble until you are ready to serve or serve within the next couple hours because if you let the filled cannoli sit, the shell gets soggy. I like to keep the filling in a piping bag inside my fridge and the shells stored in a airtight container on my counter. When ready to serve to my lucky guests, I simply pipe the filling in. Fresh, crispy and delicious! Perfection!
- I like to use a large round piping tip (around 1/2” inch) fitted in a large piping bag. Scoop the filling in and pipe from the middle to the outside from both sides.
- You can coat the tips in crushed pistachios, or any other nuts or in mini chocolate chips.
- Another option is to dip the ends of the shells into melted chocolate and let them dry for a while and once the chocolate is dry, fill with the ricotta.
- Sprinkle powdered sugar over the shells for the final touch.
Notes
Nutrition
Can I halve the recipe for both the shells and filling
Que delícia essa receita! Adoro canolli!! Os seus estão lindos!!
My filling has a grainy texture. Is there a way to fix this?
add more powdered sugar.
Hi, I’m going to try this recipe out and was wondering if the filling and dough can be made the night before and sit in the fridge? Also, if I have extra cream and dough, how long will they last in the fridge/freezer before I need to use them? Thanks, looking forward to trying it!
the fresher the filling is the better. but the dough can certainly be made the day before, and it’s even better if it sits in the fridge overnight
So I had trouble with the filling. Is the cheesecloth absolutely necessary? I went around to all my local stores and couldn’t find any so I just put the ricotta in a strainer over a bowl in my fridge when I got home at 6 and left it there over night. There was some liquid on the bowl the next morning but I’ve had to give up on it because it’s way too soupy to pipe 😭
Yes you definitely need the cheesecloth. sorry!
This is my go to recipe when I’m making my Canoli Cream. Everyone loves it Thankyou.
I wish I could post my Canoli picture
Awe that is so wonderful to hear!!! you could send it to my email or post on instagram and tag me! thank you so much!!!
I am very tempted to try this recipe… it looks perfect 😍👌🏼 Can I substitute the white wine for something non-alcoholic?
Wine: Feel free to sub the wine for 1/2 cup water plus 2 1/2 tbsp of vinegar in the recipe.
What is the alternative for the dry white wine? 😊
Alternative for white wine: 1/2 cup water plus 2 1/2 tbsp of vinegar
Sensacionais, muito gostosos!!!!
Obrigada 🙂
❤🦔😋😋
Que delícia!! 😋😋😋😋😋
Sandi, what a work of art. Everything looks delicious and so pretty. That’s quite the production to make everything from scratch but you make it look so easy. I don’t think I have the patience to make all that. Loved reading your blog.😍
I remember you preparing these on your IG story (of which I watch all of them) and was immediately intimidated; being totally honest. I’m going to take baby steps with the taco tortillas and then I will consider trying this one. Because I REALLY WANT TO MAKE these so badly!!
Lol, you can definitely make this! Just need patience lol and study the recipe first 🙂 You can do it, Mike!! 🙂
Homemade ricotta is one of the best things on earth!! Beautiful pictures!
I have to agree!!! Once you make it homemade, you can never go back! Thank you!!