Banoffee Macarons
To me, there aren’t many better combinations than banana + dulce de leche. And that’s why I bring these Banoffee Macarons to the party today. Also, some tips on how to make macarons!
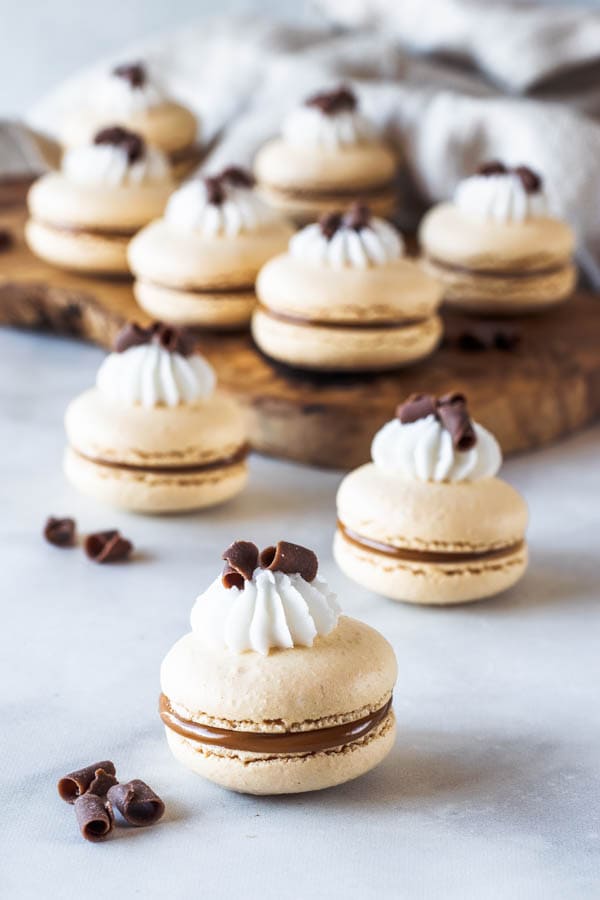
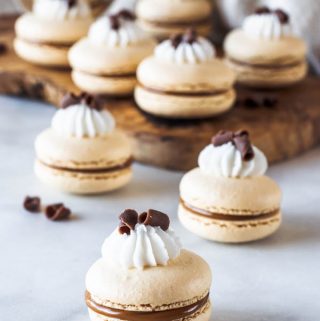
Let’s begin by talking about these beauties.
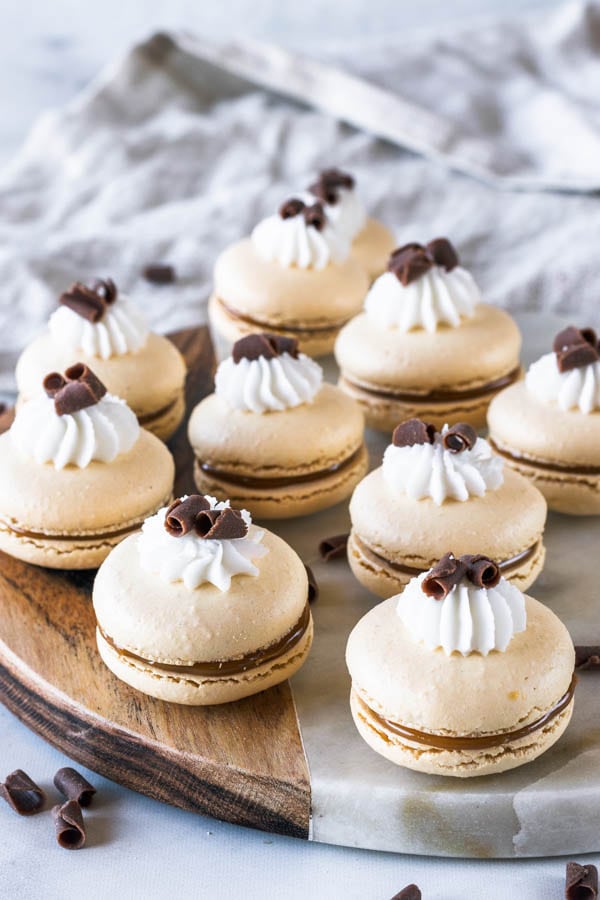
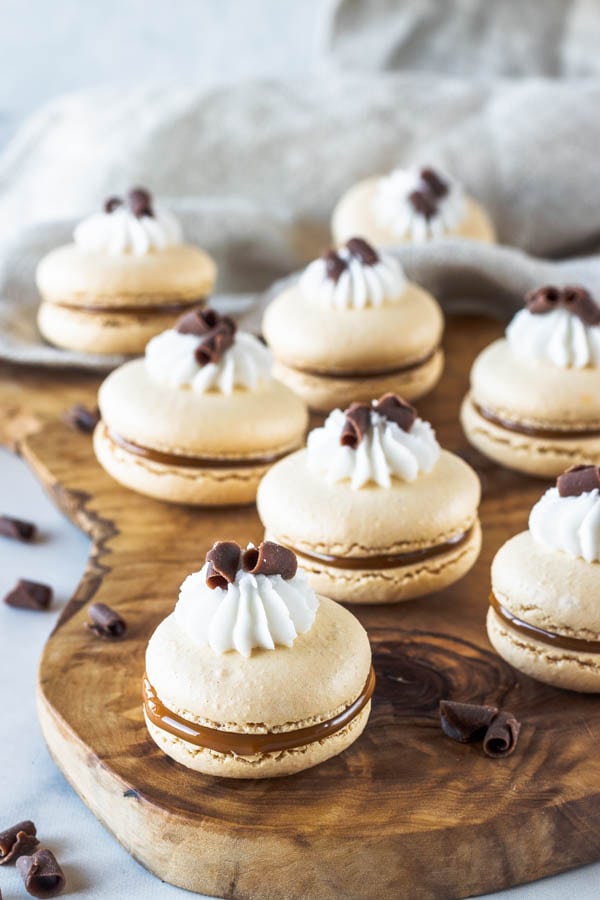
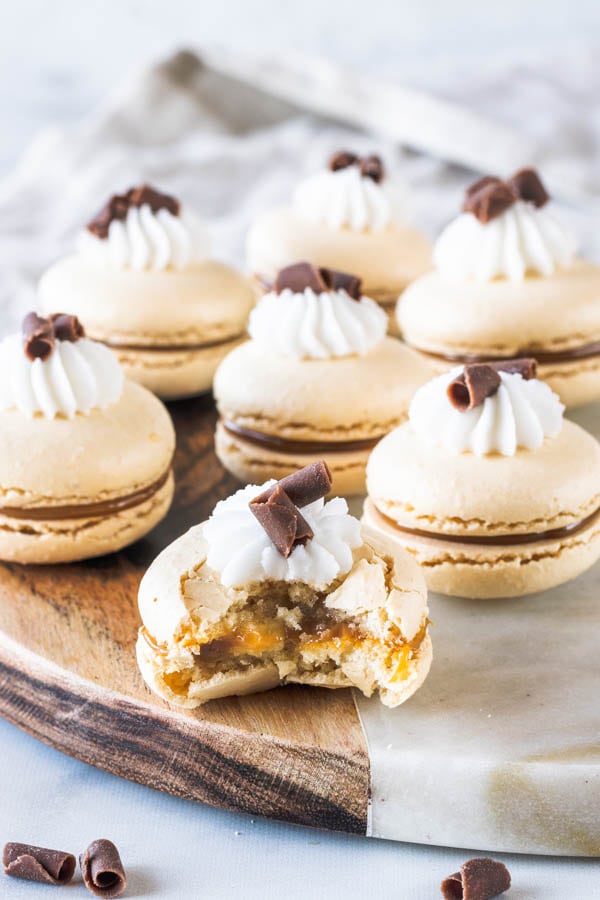
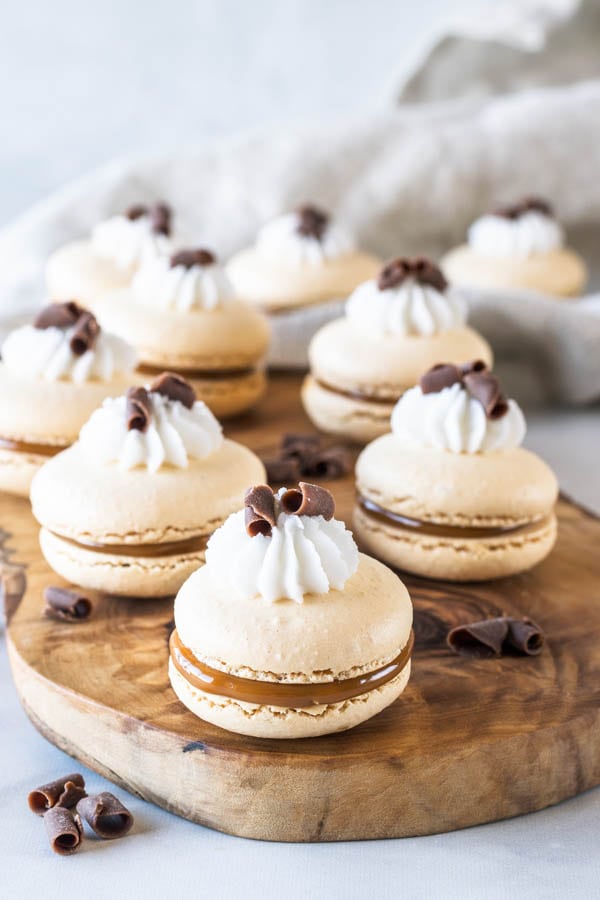
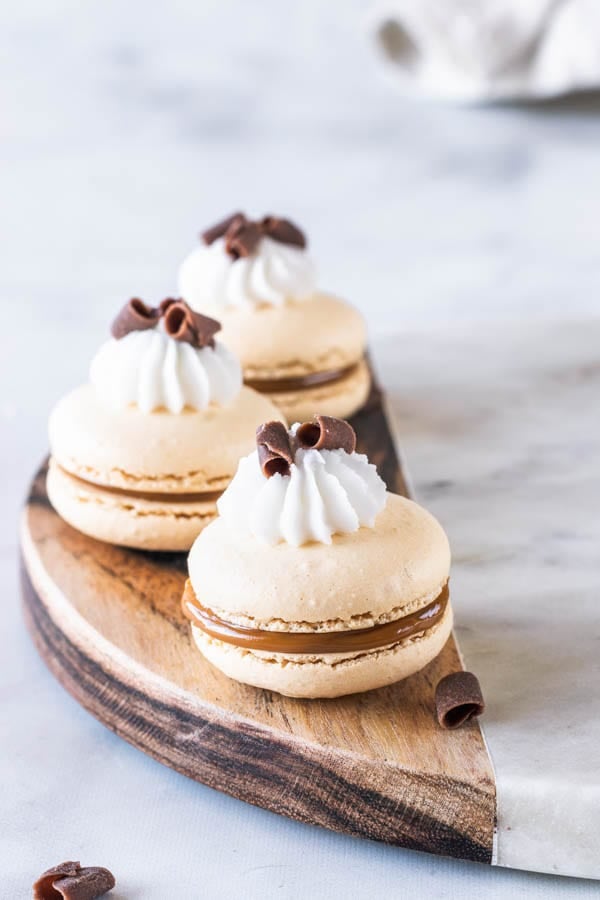
These Banoffee Macarons are filled with dulce de leche and banana. Topped with whipped cream and chocolate curls.
This post may contain affiliate links. I earn a commission from qualified purchases. Please read our Privacy policy here.
Here are the chocolate curls I used in my Banoffee Macarons. They’re simply awesome.
I’ve used them in another recipe as well (coming soon!). Ps. it also involves banana + dulce de leche!
Guys, you might not be able to tell, but I had some problems with these Banoffee Macarons, actually.
I made a mistake while making the batter. And I totally did it because I wasn’t paying my fullest attention to making the macarons.
I over whipped my meringue in the beginning.
What happens if you over whip the meringue when making macarons?
Well, I over whipped the macarons slightly. When I turned off my mixer, the egg whites were starting to clump up.
If your egg whites start to clump up, or form a ball around the whisk, you’re probably over whipping your meringue.
This is a huge tip about making macarons. Be really careful not to over whip your meringue. Stop before the whites clump up and form a ball around the whisk.
When ready, your meringue tips should be resembling birds curvy beaks, but still stiff and holding their shape.
Anyway, my mistake of over whipping the meringue when making my Banoffee Macarons, had two consequences.
First- The feet of the macarons are a little bit off, kind of retracted, they didn’t fully rise. The feet of the macarons kind of resemble cracks at the edge of the shell.
Second- Since my meringue over whipped, the batter was kind of stiff when folding, making me work a little bit harder. As I kept folding, the batter was becoming too liquid, but it still wasn’t turning smooth when piped, leaving lots of peaks, and deformities in the shells.
Based on this, I can recommend three major tips on making macarons today.
- Don’t over whip your meringue.
As discussed above, just don’t over whip the meringue. Besides both of the consequences I described (undeveloped/weird feet, and uneven surface), your macarons may also turn hollow from over whipping your meringue.
- Pay attention…
…to every single step of the recipe when making macarons, stay present, bring your strong energy to the game, or a lot can go wrong. The slightest lack of engagement when making macarons can lead to problems. I turned my back for one second to put some dishes away, lost track of time, and bam, over whipped meringue.
- Make the best of it.
I know my macarons didn’t turn out completely perfect this time. And I even thought about tossing them, at first. But then I decided to make the best of it, come here and tell you all, my fellow macaron baker friends, what can happen when you over whip your meringue when making macarons. Whenever you are faced with a failure, or a challenge, you have two options: let it upset you, or make it a way of learning happen. And here I am trying to make this learning happen for myself and also for you.
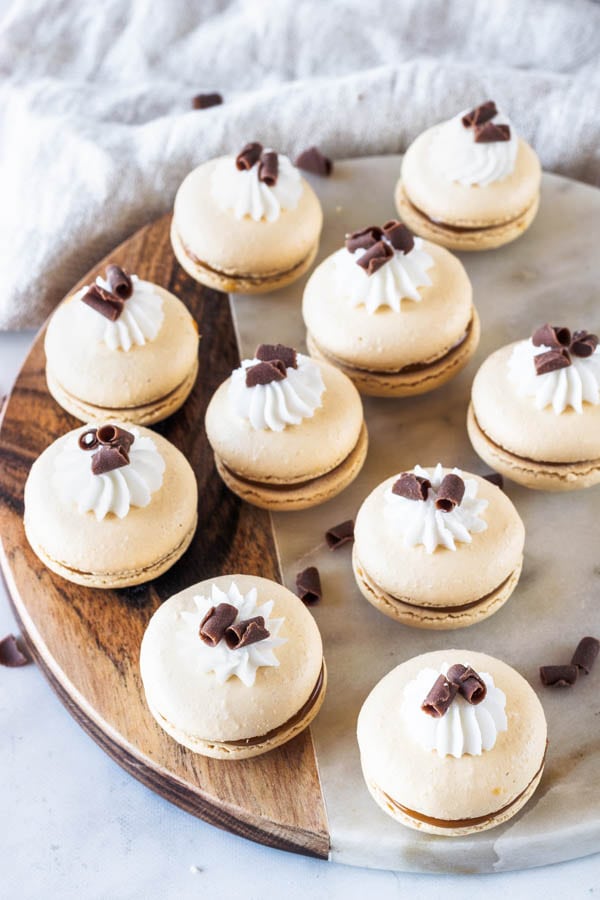
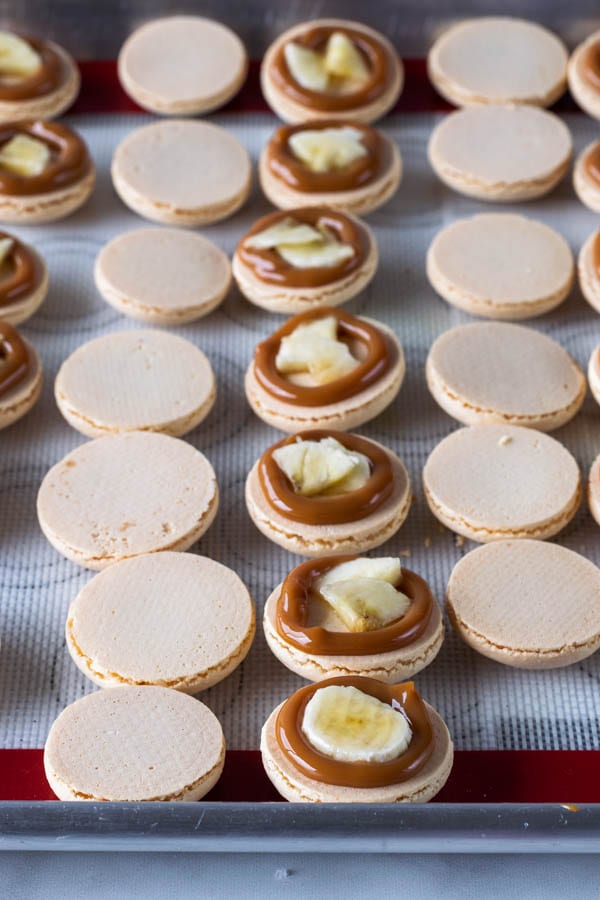
The filling in these Banoffee Macarons is simply sliced banana and dulce de leche, which can be store bought, or made at home, just read the instructions down below.
Make sure the banana slices are very thin so you can easily place the top shell on the macaron, and it won’t be crooked.
If you like Dulce de leche, here are some other amazing recipes you can try:
I would not recommend freezing these macarons, as the bananas in the middle might become too sticky, dark in color. And the whipped cream on top also won’t be able to withstand the freezing/thawing.
You can still freeze the unassembled shells, and just assemble the day before you serve these macarons.
It’s always best to let macarons mature over night before serving them. For taste and texture sake.
Want to see more macaron recipes and tips?
Stay tuned for my eBook coming out during summer. Subscribe to my blog, on the side bar to get any notifications of new posts.
Or, just check my huge Macaron section on my blog, with tones of macaron recipes, ideas, macaron tricks, tips on how to make french macarons, and more.
Here are some of my favorite macaron recipes:
- Toffee Macarons
- Cookie Dough Macarons
- Blackberry Macarons
- Samoa Cookie Macarons
- Brigadeiro Macarons
- Pecan Macarons
- Coffee Macarons
Thank you so much for reading my blog. Have a great day!
Banoffee Macarons
Ingredients
Macaron Shells
- 100 grams egg whites
- 100 grams granulated sugar
- 105 grams almond flour
- 105 grams powdered sugar
Banoffee filling
- 1/3 cup dulce de leche
- 1 banana sliced thin
For the top
- 1/3 cup heavy cream
- 1/2 tbsp powdered sugar optional
- Chocolate curls or chocolate shavings to decorate the top
Instructions
Macaron Shells
- Before you start, get all of the ingredients ready. Prepare a large piping bag, fitted with a large round tip.
- Line two baking sheets with parchment paper or silicone mat.
- Measure out all of the ingredients.
- Sift the powdered sugar and almond flour together. Set aside.
- Place the egg whites and granulated sugar in a heat proof bowl or in a double boiler. Over a pan of barely simmering water, whisk the whites and sugar until frothy and the sugar is completely melted. It will take a couple of minutes. You can test by touching the mixture between your fingers, and if you feel any sugar granules just keep whisking the mixture over the water bath.
- Make sure the bottom of the bowl isn’t touching the simmering water.
- Transfer mixture to the bowl of a stand mixer.
- With the whisk attachment, start whisking mixture on low for about 30 seconds, then gradually start increasing speed to medium. Whisk on medium for one to two minutes, until the mixture is white and starting to become fluffy. Raise the speed to high for a few minutes until stiff peaks are formed. Best way to check this is to keep your eye on the whites. Once they get glossy and you start seeing streaks formed by the whisk, it might be time to stop.
- Whisk until stiff peaks have formed. When you pull your whip up, the peak should be stiff and shooting straight up, with possibly a slight bend at the top, but not bending to the side.
- Pour the sifted powdered sugar and almond flour into stiff whites.
- Start folding gently forming a letter J with a spatula. Add the food coloring at this point.
- How to know when to stop folding the batter: It’s time to stop folding when the batter is glossy and has a thick and flowing consistency. There are several ways to test this.
- First, pick up some batter with the spatula and try to draw a figure 8 with the batter that is dripping off the spatula. If you can form several 8 figures without the batter breaking up, that’s one indication that it might be ready.
- There’s another test you can do. I call it the Teaspoon test.
- Grab a teaspoon of batter and spoon onto the parchment paper or silicon mat. Wait a minute to see how it behaves.
- If the batter stays stiff, forming a point and doesn’t spread out, fold a little bit more, about 3 folds.
- Test again.
- You don’t want your batter to be too runny either. So be careful not to overmix. It’s always best to undermix and test several times until the proper consistency has been achieved.
- When you hold the spatula with batter on top of the bowl and the batter falls off the spatula slowly but effortlessly the batter is ready. The batter will keep flowing off the spatula non-stop, but not too quickly.
- Transfer the batter to the piping bag.
- Place the piping bag directly 90 degrees over the center of each macaron template. Apply gentle pressure and carefully pipe for about 3 seconds, and then quickly pull the bag up twisting slightly.
- Once you’ve piped as many circles as you could, bang the trays against the counter a few times each. This will release air bubbles that are in the batter and prevent your macaron shells from cracking.
- Use a toothpick to pop any air bubbles in the surface of the shells.
- Let the trays sit for a while so the shells will dry out a little bit. I usually leave about 20-40 minutes, depending on how humid the day is. You’ll know they’re ready when you gently touch the surface of a macaron and it seems dry.
- Pre-heat the oven to 300ºF.
- Bake one tray at a time.
- Bake for 5 minutes, rotate tray.
- Bake for 5 more minutes. Rotate again.
- I bake each tray for about 15 to 20 minutes.
- When baked, the macarons will have a deeper color and formed feet. If you try to move a macaron, it shouldn’t feel jiggly. If the macaron is still jiggly, keep baking.
- Remove from the oven and bake the other tray.
- Let the macarons cool down before proceeding with the filling.
Whipped cream
- Whip heavy cream with powdered sugar on high until it achieve stiff peaks, about 1 minute or so.
- Place it in a piping bag.
How to assemble
- Pipe a circle of dulce de leche around the edges of the macaron, in a way that you have a little hole in the middle. Fill the little hole with a couple slices of banana. Don’t overfill it. Place another shell on top. Pipe some whipped cream on top of the macarons, and then top with the chocolate curls, or chocolate shavings.
Storage
- These Macarons are best stored for up to 7 days in the fridge. If you want to freeze them, just make sure to package them really well, in a container in the freezer, and keep it for 1 month.
Do you think these would still work with mashed bananas instead of sliced??
for sure, Kim!! Thank you have a lovely day!!
I LOOOOVE dulce de leche and banana. I’ve had it since I was little, it’s quite popular in Chile! I can’t wait to see your ebook coming out! <3
Só de olhar já estou com água na boca, que Macarons sensacionais!!!!!