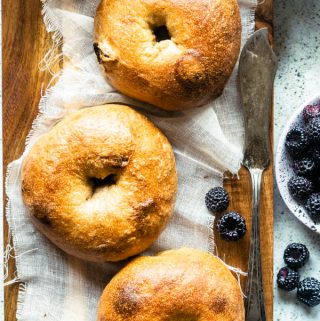
Sourdough Cinnamon Raisin Bagels
Sourdough Cinnamon Raisin Bagels are finally here. I’ve been wanting to share this recipe for a long time. It’s one of those bakes that’s absolutely worth the wait. These bagels are chewy, perfectly spiced, lightly sweet, and loaded with juicy raisins—everything you want in a classic cinnamon raisin bagel, but made naturally with sourdough.
If you love homemade bread or you’ve been looking to level up your bagel game, this is the perfect place to start.

I’ve been working on perfecting my sourdough bagels for a long time, and this is the best version I’ve created so far. Along the way, I tested just about every method and trick out there—some worked beautifully, and others didn’t do much for me at all.
This post may contain affiliate links. I earn a commission from qualified purchases. Please read our Privacy policy here.
But sourdough can behave differently from kitchen to kitchen, so something that didn’t work for me might end up being the key for you. If you’re also on the hunt for your perfect bagel, here are the tips and techniques that made the biggest difference in my recipe. Try them out and let me know what works in your own “perfect bagel” journey.

The Sourdough Starter
Let’s start with the sourdough component of these bagels. My starter, Phoebe, is at 100% hydration, meaning it’s fed with equal parts starter, water, and flour. For this recipe, I use a generous amount—300 grams (about 1 1/2 cups) of active starter. I’ve tested lower amounts, but increasing the starter gave me better rise, structure, and flavor. Whatever amount you use, make sure your starter is fully active before mixing the dough.
If you keep your starter at room temperature, feed it a few hours before you begin, depending on how long your own starter takes to reach peak activity. Mine—Phoebe—usually needs a few hours after feeding. When I’m making dough in the morning, I feed her the night before; if I’m mixing dough at night, I feed her in the morning.
If your starter lives in the fridge, you’ll likely need to pull it out a day or two ahead and give it a couple of feedings until it’s bubbly and ready to use. The result is a bagel with a slightly tangy, rustic flavor that only sourdough can create—and honestly, sourdough bagels are my absolute favorite.
The Flour
Most bagel recipes call for bread flour, and it makes sense. Bagels are known for their chewy texture and crisp exterior, and bread flour’s higher gluten content is supposed to deliver exactly that.
But in my own testing, I’ve found that using all bread flour can sometimes make homemade bagels a little too chewy and even slightly tough.
So I started experimenting with a blend of flours: half whole wheat and half all-purpose. The result was the best batch I’ve ever made. The whole wheat adds a subtle nuttiness that pairs beautifully with the tanginess of the sourdough, while the all-purpose flour keeps the texture tender without losing the classic bagel bite. I really encourage you to try this combination—just once. Let it be your weekend baking challenge and see what you think.
Kneading
Bagel dough needs an extended kneading time—you want maximum gluten development to get that classic chewy interior and crusty exterior. A stand mixer fitted with a dough hook is definitely the easiest way to get there, and it’s what I recommend. You can knead by hand, but it takes real effort and a good amount of stamina. In a mixer, plan for about 7 minutes of kneading; if you’re doing it by hand, expect roughly double that time.

Proofing Time
I’ve tested a lot of different proofing methods for bagel dough over the years. There are several ways to do it. Let’s go over them.
- Same-Day Method: Let the dough rise at room temperature for about 4 hours, shape the bagels, let them proof for 1–2 hours, then boil and bake.
- Overnight Room-Temperature Fermentation: Let the dough ferment on the counter overnight, shape the bagels in the morning, give them a second proof, then bake.
- Bulk Overnight Fridge Fermentation (Full Dough): Knead the dough and refrigerate the entire bowl of dough overnight. The next morning, bring it to room temp, shape the bagels, proof 1–2 hours, then bake.
- Shaped Overnight Fridge Fermentation: Knead the dough, shape the bagels, place them on trays, cover well, and refrigerate overnight. Boil and bake the bagels straight from cold the next morning.
- Classic Method (Peter Reinhart Style): Shape the bagels right after kneading, let them rest for 20 minutes, form the holes, then refrigerate the shaped bagels overnight to bake the next day.
Boiling
I recommend keeping the boil to about 20 seconds per side. Peter Reinhart suggests boiling bagels for 1 minute per side (or even 2 minutes for extra chew), but in my testing, longer boils made the crust overly tough.
In one of my recent batches, I boiled half the bagels for 1 minute per side and the other half for 20–30 seconds per side. The difference was clear: the longer-boiled bagels were chewy to the point of being tough, while the shorter-boiled ones kept that perfect balance of bite and tenderness.
That said, bagel texture is a matter of preference, so feel free to experiment with timing to find the chew you like best.

Baking
I prefer baking my bagels at 425°F. Many recipes call for 450°F or even 500°F, but with my current oven, 425°F gives me the most even bake—deep golden color on the outside and perfectly cooked centers without over-browning. Every oven behaves differently, so use this as a starting point and adjust the temperature as needed to find the sweet spot for your setup.
I hope these sourdough cinnamon raisin bagels become a staple in your kitchen—they’re one of my favorite ways to put an active starter to good use. If you’re in a bagel-baking mood, you can also try my classic Sourdough Bagels, my traditional Bagel Recipe, or my Protein Bagels for a higher-protein option. And if you want another simple sourdough project, don’t miss my soft and flexible Sourdough Tortillas. Let me know which one you bake next.
Sourdough Cinnamon Raisin Bagels
Ingredients
- 300 grams active sourdough starter 1 1/2 cups, 10.6 oz.
- 295-350 grams warm water 90-100F (1 1/4 cup- 1 1/2 cup, 10-12 oz.)
- 1 tablespoon vegetable oil
- 1 tablespoon barley malt syrup or honey
- 2 1/2 teaspoons fine sea salt
- 382 grams all-purpose flour 3 cups, 13.5 oz.
- 382 grams whole wheat flour 3 cups, 13.5 oz.
- 2 teaspoons ground cinnamon
- 1 cup raisins
To boil bagels
- 1 tablespoon baking soda for boiling bagels
Topping
- 1/4 cup milk
Instructions
- Start by mixing the active sourdough starter, 1 1/4 cup of water, vegetable oil, malt syrup, sea salt, flours, and cinnamon together in a bowl.
- Mixture will seem extremely stiff. That’s ok. Just make sure all the flour is getting hydrated. If necessary, pour that remaining 1/4 cup of water in, if you see too much dry flour that won’t incorporate into the dough.
- Cover bowl with a damp towel and let dough sit for 10 minutes.
- Kneading: I would recommend a stand mixer to knead this dough. Or a lot of elbow grease.
- Bagel dough should be kneaded at least 7 minutes by machine, probably double by hand. And it’s a very stiff dough, so it’s not the easiest to knead.
- At the final 2 minutes of kneading, add raisins so they get incorporated into the dough.
- It’s very important that you knead this dough properly, so the bagels will have their proper texture and gluten development.
- At the end of kneading, dough should be smooth, but still pretty stiff and dense.
- Transfer dough to a lightly oiled bowl.
- Cover with a damp towel.
- Let it rise in a warm place for about 4 hours.
- If your place is cold, let it rise 5 hours.
- Transfer dough to the counter.
- I split mine into 100 g (3.5 oz.) pieces, and ended up with 14 pieces.
- Turn pieces into balls by rolling them against the counter, with your hand in a cup shape.
- Use the counter to push the dough against itself and turn into a perfect round.
- There are plenty of videos on youtube that show this technique properly. Very easy, and you’ll always end up with perfectly shaped rolls, bagels.
- Now that you’ve rolled all the pieces into balls, start by making a hole in the center of each ball with your finger. Expand the center out with your hands, by rotating the bagel as you shape the hole in the middle.
- Then, place bagels in 2 baking mat or parchment paper lined baking sheets.
- I put 7 bagels in each baking sheet.
- Cover both trays with a damp towel. Let them sit at room temperature for 1-2 hours.
- Once the dough is springing back as you touch it, means your bagels are ready to go.
- Pre-heat oven to 425F.
- Bring a large pot of water to a boil.
- Once water comes to a boil, add baking soda to the pot.
- Boil bagels in batches, being careful not to overcrowd the pan.
- You should boil bagels about 20 seconds on each side. I don’t like to boil them over 1 min total, or their crust might turn out too hard.
- Remove bagels with a slotted spoon after they have boiled about 20 seconds on each side.
- Place boiled bagels in a baking sheet, lined with parchment paper or a silicon mat.
- Brush bagels with milk.
- Bake for about 10 minutes. Rotate pans. Bake for another 5-15 minutes. It will really depend on your oven and what size bagels you decided to make.
- Once bagels have a deep golden color, remove them from the oven. Let them cool and enjoy them fresh.
- STORAGE: I like to enjoy the bagels when they are very fresh. That’s when they are the best. However, nothing wrong with leftover bagel toast in the morning. Keep bagels in an air-tight container for up to a couple of days, I wouldn’t go longer than that. You can also freeze them wrapped in foil and inside of a ziplock bag or freezer container for up to 2 months.
Notes
- Same-Day Method: Allow the dough to rise at room temperature for about 4 hours. Shape the bagels, let them proof for 1–2 hours, then boil and bake.
- Overnight Room-Temperature Fermentation: Let the dough ferment on the counter overnight. Shape in the morning, allow a second proof, then bake.
-
Bulk Overnight Fridge Fermentation (Full Dough): Knead the dough and refrigerate the entire bowl overnight.
In the morning, bring to room temperature, shape, proof for 1–2 hours, then bake. -
Shaped Overnight Fridge Fermentation: Knead and shape the bagels, place on trays, cover well, and refrigerate overnight.
Boil and bake straight from the fridge the next morning.
Nutrition
I’ve made these twice and they’ve come out perfect each time. I’ve also made your everything bagels twice, and they’re also perfect! Thanks for the easy to follow recipes!
Oh! Meant to say I have frozen both kinds (after baking and cooling completely) in large freezer bags and it works like a charm. I’ve also made the batch into 18 (instead of 14) to keep the calories/portions lower and had no issues.
You make me want to make them again lol! Thank you Rachel!
That is so wonderful to hear!!!!
What does the milk do? I hate to buy milk to use a tiny amount. Is there a substitute?
My dough has some seams when I ball them. I’m afraid to overwork and don’t think pinching seams will hold up when baked. Suggestions? I’m sure they’ll taste fine regardless.
This recipe came together simply and was easy to work with. Thank you!
the milk is just to brush on top, to make them golden, you could even do an egg wash if you want, or leave it out, but it might not get too golden, which is fine.
For it to not have seams the dough needs to not be so dry or tough, maybe let it rest longer before shaping.
They came out great even if they looked odd. Didn’t add milk or egg since I missed your reply in time.
Today I’m trying kalamata olives for raisins with a spice mixture to replace the cinnamon. Dough is much wetter. Probably should’ve squeezed the moisture from the olives. 🤞🏻
I know white AP flour probably weighs less than Whole Wheat. 382g+382g = 764g which equals 7 1/4 cups of AP flour.. That’s a whole 1 1/4 cup difference! What do you recommend to adjust to AP white flour? I usually go by weight not volume, but was not sure what to do here.
I found a guide by king arthur flour saying to substitute 113 grams of whole wheat flour for 120 grams of all purpose. So doing the math it would only be 400 grams of all purpose flour instead.
I am not sure how accurate the guide is, and I haven’t tried this substitution myself, but you could try it, and if the dough isn’t stiff enough, continue to add a bit more all-purpose flour as needed.
These are really good!
They’re bagels, so the dough needs to be stiff, but my mixer doesn’t handle the dough with all the flour. I used all the water, and then left out the last 80g of flour until the dough had kneaded 7 minutes. Then I added in as much as it would take, which still left 40g of flour unused. (Maybe my flour is just really thirsty, but I usually need to add more water or leave out some flour in bread recipes.) I like more cinnamon, so I’ll up it next time. One of these days I’ll actually try a lye bath instead of the baking soda water.
That’s great to hear, love how you adapted!!! And I’d love to try the lye bath as well!!
Very cool!
Have a great day!
Great recipe! Thank you.
Halved the recipe. They are so good. I managed to make some plain ones topped with sesame. Nothing tops the cinnamon raisin though!
I kept some in an airtight container in the refrigerator for a few days and toasted them for a quick breakfast. They were as good as fresh.
Thank you so much Jacquelyn!! So happy to hear that!!!
Very delicious! I will be making these regularly for my family!
Awesome! Thank you!
Hi! I’m thinking of making your bagel recipe soon and I’m wondering if I could use 6 cups all-purpose flour rather than 3 all-purpose and 3 whole wheat? I’m wondering because I don’t have wheat on hand right now and would really like to try this recipe.
sure can!! 🙂
Mine do not look very pretty but they taste good. Any suggestions on what would help make their appearance better? They do not look puffy.
It could be from adding too much flour, not enough rest time, or the starter wasn’t active enough. maybe just a shaping issue. Just keep practicing, next time you make it they will look great! Every time you make bread you learn a little more. The first bagels I’ve ever made weren’t puffy either, but with practice they became puffy and nice!!! I am glad you like the taste! Thank you so much Naomi!
I have the same issue with them not looking pretty but they do puff and taste great. Thanks for the above information on how to improve the cosmetics.
Thks Camila, I am making another batch today. Will see how this one turns out . There is slight differences in this batch… I will see the end results first then will post it here and let you know.
Thank you Sheela! You rock!
Thanks Camila for the Bagel Recipe. I am from the UK. Your recipe came up very well. I use half and half (bread flour and Cake flour). Also I use the 4th Mehtod and only use half the amount of the recipe stated. And used maple syrup instead of honey.i also cut down on the boiling time 10 secs on each side, basically giving them a total of 20secs. I did each of them that way. It was very quick. I used almond milk for brushing the bagels as we hv adults with dairy intolerance in our household. It baked beautifully for 15mins at about 210°C for those who work on Centigrade measures.. just waiting to get it tested and tasted to see if the chewy ness is up to scratch 😁. I will update all of you later. I’ll post the update pictures on Instagram check is out on there. Thank you again Camila.
Btw , I got 9 bagels from my half recipe of 100gms. We tried the bagels just now toasted with butter absolutely so beautifully soft and the perfect chewyness to it Eventhough it has cooled down the Bagel is still so soft. But we felt it could hv done maybe alittle more baking inthe oven maybe another 2 -3 mins may be . Taste so good being sourdough 👍😋 Got my super taster my Hubby to like it as .He is not normally a great fan of sourdough but is gradually getting to like it by me making thing with things like this, and adjusting proving time with loaves. Which I hv managed to achieve a perfect texture and baking and taste with good moisture content still on the loaf.
Hving a grt time experimenting with Sourdough.
As I keep improving and changing ways how to make it taste as good as normal bread loaf at the same time it holding its texture and taste and moisture in the loaf with out all that compromises. It is achievable 😊.
oh that’s awesome I loved hearing about all of your adaptations!! That’s incredible!!! I appreciate you taking the time to let us all know and also help other readers! Thank you!!!! Have a fabulous day!
Thanks Camila for the Bagel Recipe. I am from the UK. Your recipe came up well. I use half and half . Also I use the 4th Mehtod and only use half the amount of the recipe stated. And used maple syrup instead of honey.i also cut down on the boiling time 10 secs on each side, basically giving them a total of 20secs. I did each of them that way. It was very quick. I used almond milk for brushing the bagels as we hv adults with dairy intolerance in our household. It baked beautifully for 15mins at about 210°C for those who work on Centigrade measures.. just waiting to get it tested and tasted to see if the chewy ness is up to scratch 😁. I will update all of you later. I’ll post the update pictures on Instagram check is out on there. Thank you again Camila.
I made the everything bagels on another post of yours- Great recipe and easy to follow! Definitely want to make these next- When do you add the cinnamon? After the milk brush?
Also, I used sour dough discard (so not super active sour dough starter) that I’ve been saving in my fridge and it seemed to work just fine! Dough still rose after the 4 hours and Still springy bagels before the boiling.
I add the cinnamon straight to the dough along with the flour. Some people have told me they made this by also adding a mixture of cinnamon and sugar to the top of the bagels after brushing with milk. I have to try that technique since it sounds delicious!
Can I use Maple Syrup instead of the barley malt syrup? Thanks heaps
sure thing!
These look great and I have some starter discard to use up.
Is it possible to add the cinnamon later in the process? I’d like to make half a batch of plain bagels and half of the cinnamon raisin, if possible. I’m dying for an egg and cheese bagel sandwich and don’t think it would taste too goo on cinnamon raisin 🙂
Maybe you can sprinkle some of the cinnamon as you’re forming the balls to make the bagels, so add a bit of cinnamon to each individual ball, roll it, and then shape the bagels. that might work 🙂
I did that very thing for my first two batches of bagels, made half into cinnamon raisin and the other half got a cheesy topping of shredded cheddar. The cheese bagels needed a plain dough, so that’s what I made. Then for the cinnamon raisin, I flattened the whole half of dough a bit and then sprinkled over the raisins and cinnamon. I kneaded till cinnamon and raisins were incorporated. The benefit of doing the additions by hand is that you get those streaks of cinnamon that really add to the appearance of the bagels.
That sounds extremely amazing!!!! Thank you SO much for sharing!
Hi, have you tried making a gluten free version of these?
I haven’t tried using gluten free flour to make these