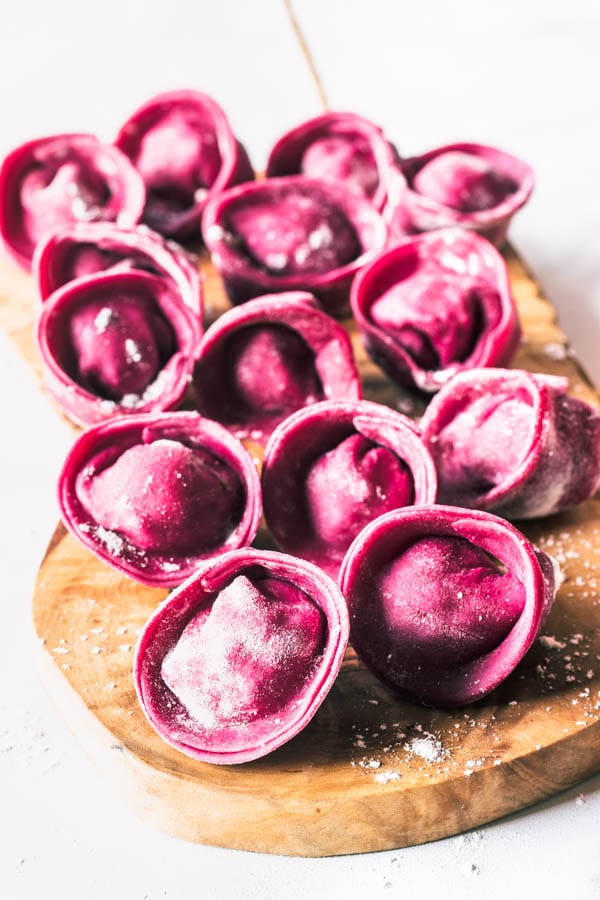
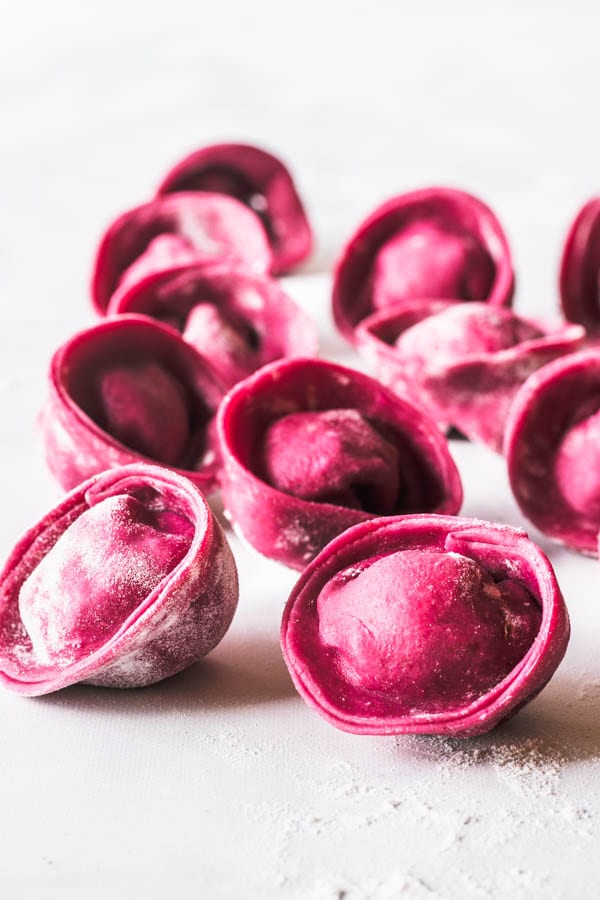
Beet Pasta Mushroom Tortellini from scratch
Today I bring a recipe for Beet Pasta Mushroom Tortellini from scratch, filled with wild mushrooms and creamy feta cheese.
I’ve had this pasta in my mind for a really long time. But I wasn’t sure what I wanted to fill my beet tortellini with.
This is the story about the summer where my husband Brian became obsessed with foraging mushrooms.
This post may contain affiliate links. I earn a commission from qualified purchases. Please read our Privacy policy here.
We have been extremely lucky to be eating all of these amazing mushrooms that he finds in the woods.
Here is our son Luke carrying some maitake mushrooms in his truck. This was just one day of mushroom foraging. About 20 lb. of wild mushrooms.
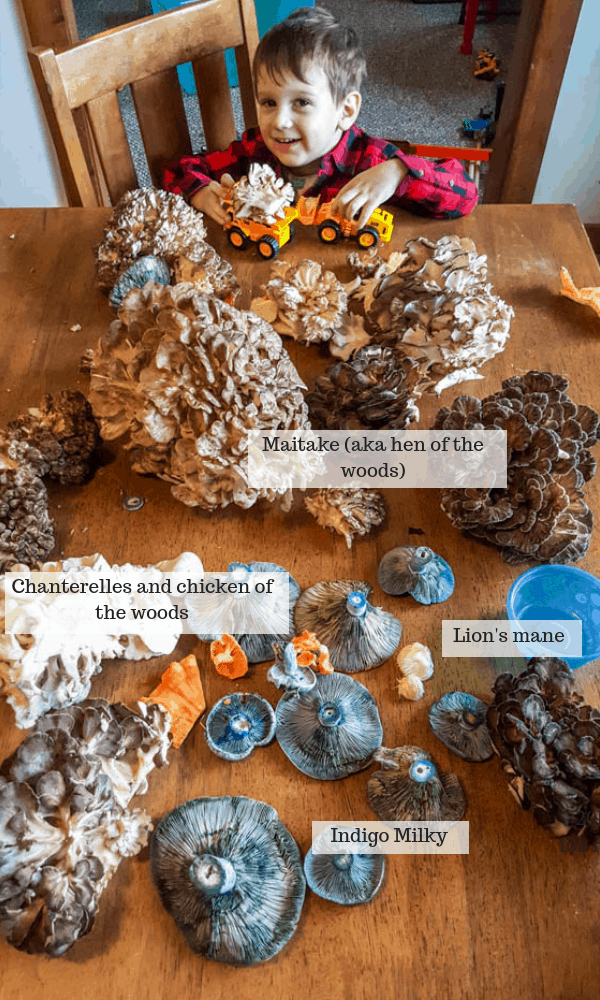
Of course, I am a vegetarian, and I get to eat all of these delicious and exquisite mushrooms, for free!
When I say he has been obsessed, I mean it. We have had chanterelles, puff ball mushrooms, lion’s mane, maitake (hen of the woods), chicken of the woods, porcini, indigo milky (which is the blue mushroom above, that is literally the prettiest hue of blue ever).
Anyway, to celebrate the awesomeness of mushroom foraging, I decided to make these tortellini from scratch, with my fresh beet pasta.
They are very simple to make. It is a lengthy process though. The kind that I love. I love cooking projects like this one.
After making the beet pasta, let it rest in the fridge for at least 2 hours. I usually make it the day before.
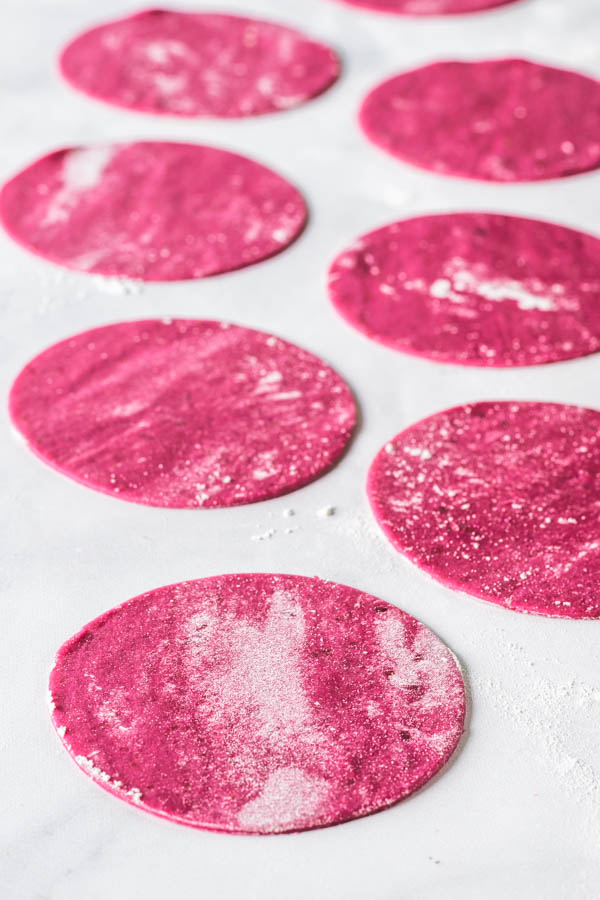
Roll it out with the pasta machine, preferably. Or a rolling pin if you are brave and determined.
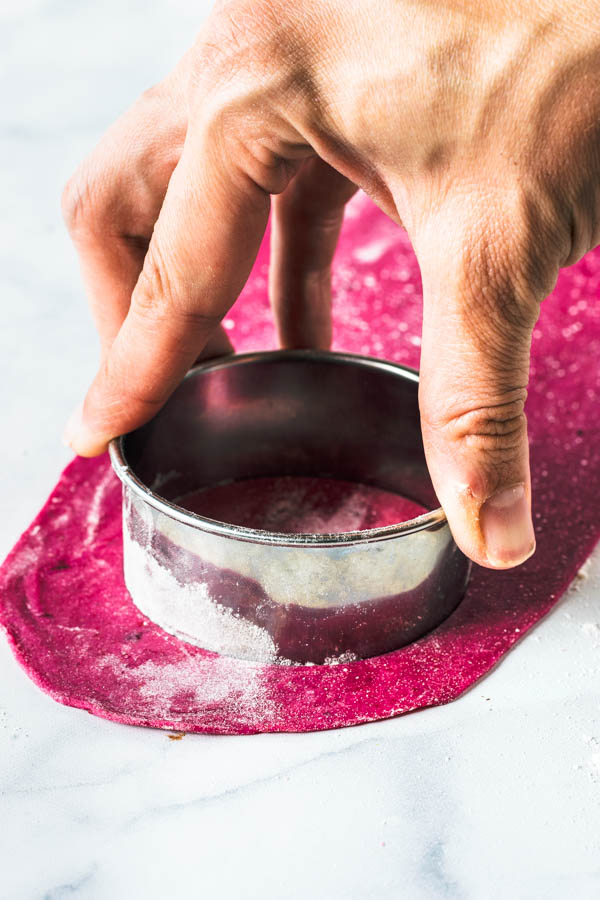
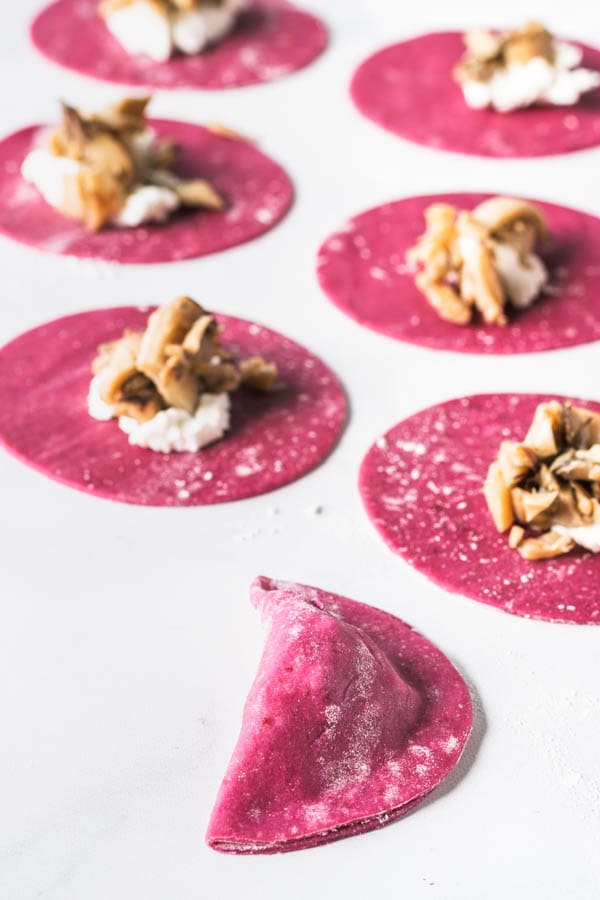
Cut the pasta sheets into circles. I used a 3″ cookie cutter.
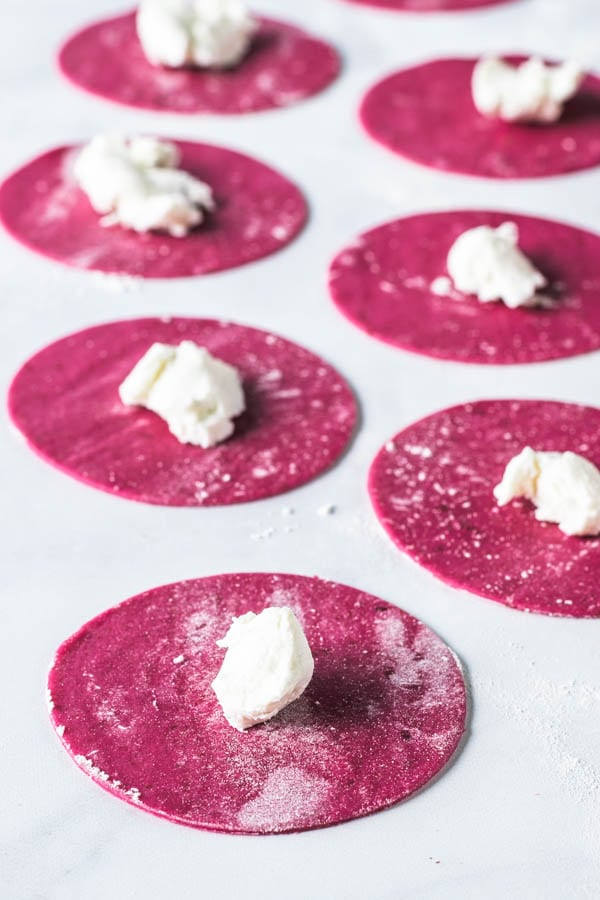
Time to fill them.
A little bit of this.
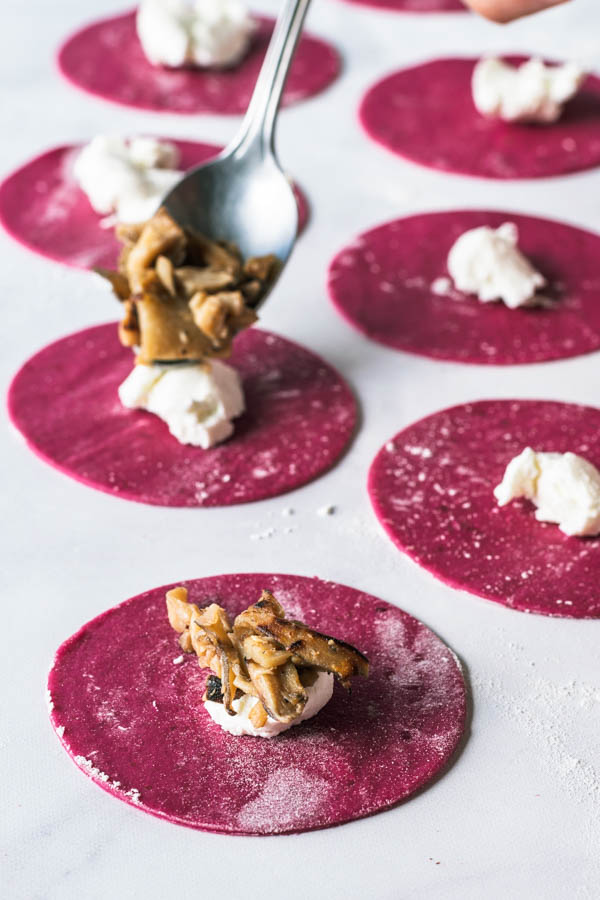
A little bit of that.
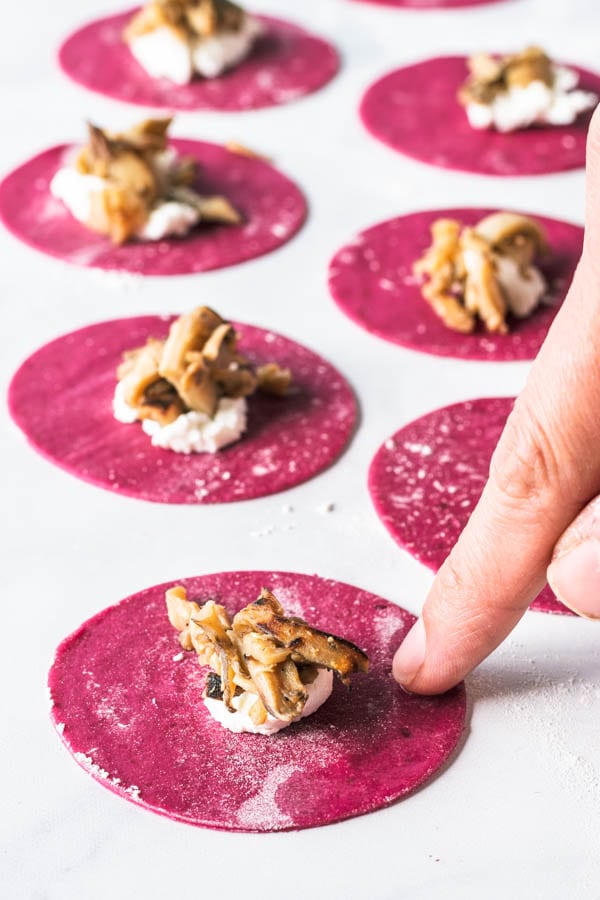
Dip your finger in the water and brush the edge of half of the circle.
The amount of water you will need is minimal. A simply moist finger will work. Don’t use a whole water drop.
Now fold it over. Like a little empanada. Press slightly with your fingers to make the pasta stick together.
Now simply join both ends of the semi circle just like this.
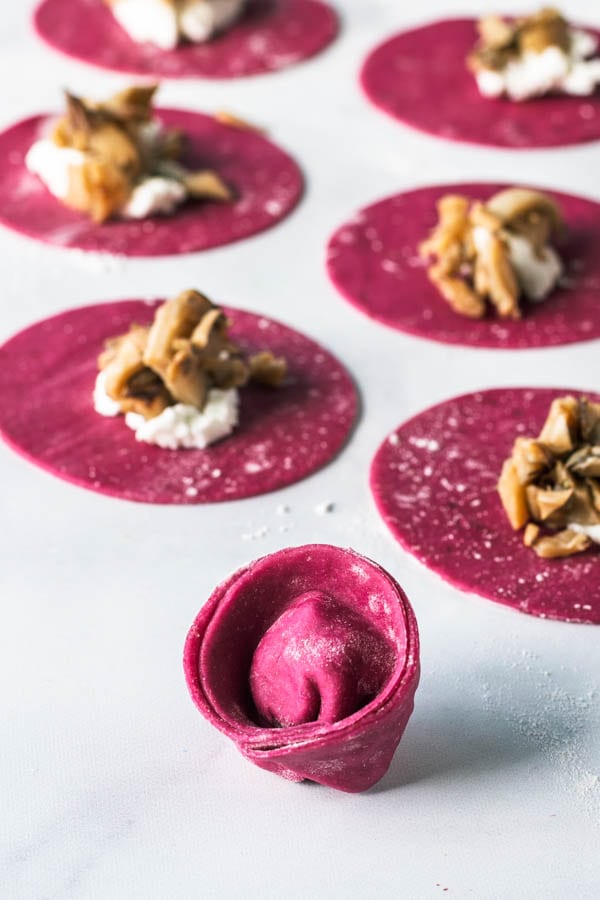
Use a bit of water to connect both ends and seal them together.
Doesn’t sound so complicated, does it?
I promise you’ll have a great time making this, if cooking projects are your type of thang.
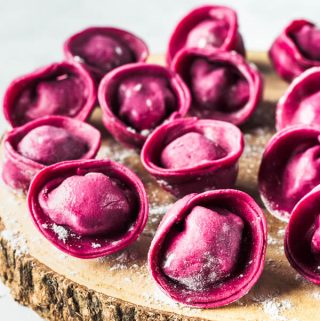
The results.
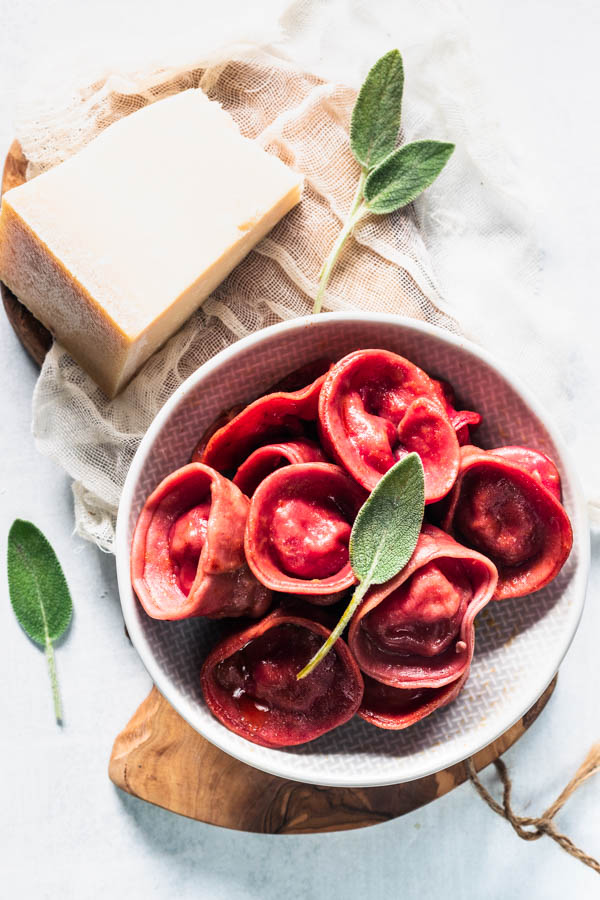
I served it toasted with garlic and sage infused olive oil.
Let me just say it was beyond amazing.
The ravioli did lose a bunch of it’s color as it cooked. The bright pink became a dull red/orange, which I still love.
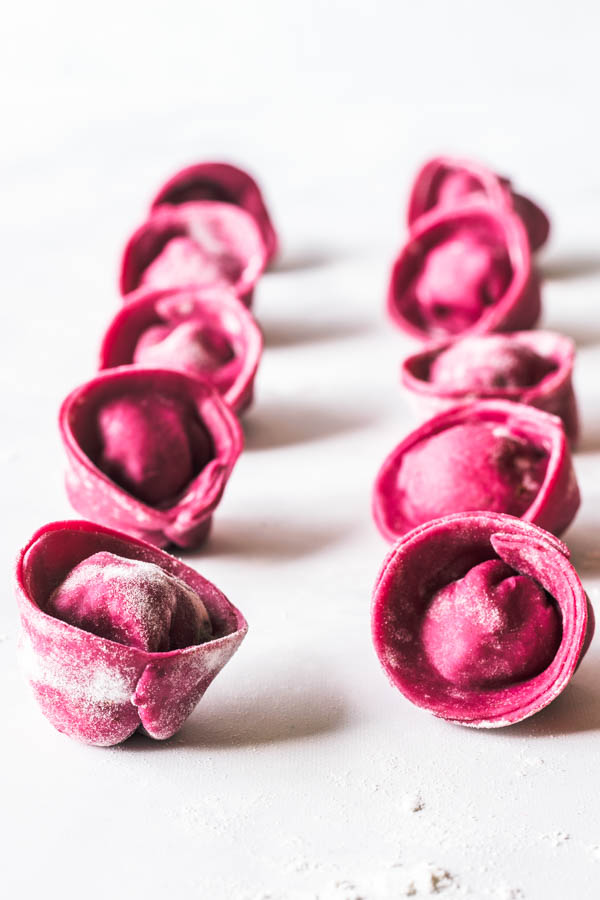
A quick tip, if you want to make this ahead, you can totally keep it in the freezer until you are ready to cook.
How to freeze fresh pasta
To freeze the homemade tortellini, place assembled pieces on a floured baking sheet. Insert the entire baking sheet in the freezer. Let it sit in the freezer for a couple hours, until frozen. Transfer to your container of choice and make sure to seal it properly.
I usually like to just throw a lid on my baking sheet, since I have these amazing baking sheets with lids. I just cover the tortellini really well with plastic wrap and foil and put the cover over them. And keep frozen for up to 1 month, in my experience.

To cook the frozen tortellini, simply bring a large pot of salted water to a boil. Add frozen tortellini to the hot water and cook for about 5-8 minutes. Serve with your favorite sauce or with my Garlic and Sage infused olive oil as described on my recipe bellow.
I hope you liked today’s recipe for this magical, vibrant, and beautiful Beet Pasta Mushroom Tortellini from scratch.

Here you can find some more of my pasta from scratch recipes. Fresh Basil pasta, and Ricotta and Asiago Tortellini (yes, tortellini is my favorite filled pasta shape). You could also make this delicious Cheddar Jalapeno Sourdough Bread to accompany your mushroom tortellini.
Beet Pasta from scratch
Ingredients
Beet Pasta
- 1 medium beet about 84 grams, 3 oz
- 3 large eggs
- 1 large yolk
- 1 teaspoon olive oil
- 3 cups all-purpose flour 382 grams, 13.5 oz
- 1 teaspoon fine sea salt
Wild Mushroom Filling
- 4 cups of maitake mushrooms or any other mushroom, chopped very finely (about 340 grams, 12 oz)
- 1 garlic clove minced
- 2 tablespoons butter or olive oil
- Salt freshly ground pepper to taste
- 2 ounces creamy goat cheese 56 grams
Garlic Sage Sauce
- 3 garlic cloves sliced in half
- 1/4 cup good quality olive oil
- 4 sage leaves plus more for garnish
Instructions
Beet Pasta
- To make the fresh pasta with beets, start by washing your beet. Dry it and rub olive oil on it’s entire skin. Sprinkle it with kosher salt, and wrap in a piece of aluminum foil.
- Bake in a pre-heated 350F oven for 45 minutes to 1 hour. Pierce it with a knife to test for doneness. Beet should be soft.
- Let beet cool down and proceed to skin it.
- Puree beet in a small food processor or blender.
- To make the pasta, you may use a food processor, or just your hands, as long as the beets are already pureed.
- If using the food processor, mix pureed beets, eggs, yolk, and olive oil, and process until incorporated, just a few pulses.
- Add flour and salt to the food processor and pulse a few times to kind of bring the dough together.
- It won’t come together entirely and you don’t want to keep processing your dough.
- So just turn the dough onto a floured surface and knead it by hand for a few minutes until it has a very vibrant pink color. Dough should be smooth.
- If not using the food processor, simply dump all of the flour plus salt on top of your clean counter. Then, open a hole in the center of the flour mount.
- In a small bowl mix the eggs, yolk and beets puree with a fork, just until yolks are broken up a little bit.
- Add liquids to the center of the flour mount and gradually incorporate the flour with the liquid using a fork. Once dough has formed, you can start kneading it with your hands for about 8-10 minutes.
- Wrap dough in plastic wrap, or place it inside a zip loc bag. Refrigerate for at least 2 hours, up to overnight.
- When it’s time to roll the dough out, I recommend a pasta machine. You can for sure use a rolling pin, as I’ve done for a long time before I had a pasta machine. However, it does make things easier.
- I divided my dough into 6 pieces and rolled each one out 3 times on number 1, while folding the dough over each time I rolled it in that setting.
- After that, I rolled it once in each setting up to number 5, without folding the dough.
- Place pieces of rolled out pasta dough in a floured baking sheet. Cover with a clean kitchen towel, sprinkle the kitchen towel with flour, and place the other sheet of pasta dough on top, and keep doing that until you are done rolling out your pasta. I usually use about 8 kitchen towels to do this.
- You have to keep your pasta sheets covered or they will dry and you won’t be able to shape your tortellini.
- Which is why you must have your filling ready before you start rolling out your pasta dough so you can proceed with filling and shaping the tortellini before the dough dries out.
Filling
- You want to have your filling ready before you start rolling out the pasta dough. For that reason, I’d recommend making the filling and refrigerating it, so it’s ready to go when you decide to roll out your pasta dough.
- Heat up the olive oil or butter in a pan. Add garlic and sautee briefly until lightly golden. Add chopped mushrooms. Cook for a few minutes until mushrooms are cooked through. Season with salt and peppers if desired. Once mushrooms cool down, mix them with the goat cheese.
- Cut your pasta sheets into circles. I used a 3 inch cookie cutter.
- Start filling the circles as you go, so they don’t get dry before you get a chance to form the tortellini. Check out the post above for pictures on how to shape the tortellini.
- Basically, place a small amount of goat cheese, and a small amount of mushroom filling in the middle of the pasta circles.
- Use a little bit of water and run your finger around the edges of half of the circle. Fold the dough over itself to form a semi circle shape.
- Then proceed to join the tips of the semi circle together, using a tiny bit of water to make them stay together.
- When I say a tiny bit, I mean a tiny little bit. More like a moist finger than an actual drop of water.
- Place shaped tortellini in a floured baking sheet.
- Boil immediately or freeze. I have frozen my tortellini for up to 1 month before and it held up nicely. Just make sure you package it correctly.
Sauce
- Place olive oil, sage and garlic in a large sauté pan.
- Over medium heat, start to infuse the olive oil with the garlic and the sage. Cook the mixture for about 10 minutes, until the garlic starts to brown.
- In the mean time, have a large pot of salted water boiling.
- Add tortellini to the water in batches. Boil for about 5 minutes, until tortellini floats to the top and the edges are softened.
- Then I like to use one of those slotted spoons to transfer the cooked ravioli to the pan with the garlic sauce. Remember to have the heat on high so you can slightly brown the ravioli, making it extra delicious, and giving the dish some more umami!
- This way, a bit of the pasta water will also be incorporated in the delicious sauce. It will reduce and thicken as it finishes cooking in the olive oil.
- Top with fresh sage leaves and I chose to top mine with some extra parmesan cheese, of course.
Nutrition
Hummmm!! Delícia! A cor é maravilhosa!
I haven’t ever left a recipe comment before, but this was so great I had to! Definitely a labor of love, but so satisfying to make. I used portobello mushroom caps and the goat cheese combo was heavenly. My partner isn’t super keen on mushrooms, so I did half with a spinach, ricotta, and parmesan filling (and of course, garlic) and that was also really tasty. This was my first time making homemade pasta and I didn’t have a machine, so I rolled by hand. For other novices, you probably have to roll thinner than you think- my first few were pretty thick and I also used too big of a circle cutout, so they were really big tortellini. The other thing is that I didn’t use the towel method when rolling, cutting, and filling. I did one dough section at a time- all three steps of roll, cut, fill, close, and set aside on a flour dusted pan- and kept the other balls covered in saran wrap to keep from drying and worked fine. Oh, I also didn’t have sage on hand, so I used rosemary and that was close enough. Will definitely make this again when I have time!
That is amazing to hear!! thank you so much for sharing with me. Sounds like you made a very wonderful dish!!!
I made this tonight, so good!!! Will definitely make it again.
Hi Ms Camilla ,can you pls advice me on how to mantain the bright color.?Bc after i boiled the color washed out.Thank
You so much.
It does look color, it will naturally happen. I’ve thought about this before but haven’t tried it, however, you could try adding some dried hibiscus to the water of the pasta before boiling it. I add hibiscus to my pomegranate curd, to keep it from browning once cooked, so maybe could work on this scenario as well.
Hi!!! I’m so excited to see how these turn out, my dough seemed to be too dry, I left in plastic wrap for the night in the fridge and will roll out today and fill. But it it is still too dry is there anything I can do to fix the dough?
So sorry i just saw this. Usually the dough hydrates in the fridge as it sits, please let me know how it went.
I don’t have goat cheese, so I used cream cheese to my beet pasta mushroom tortellini. It’s still perfect in flavor and color. Thanks your sharing!
thank you so much I am so happy to hear that!! and cream cheese is also so yummy!!!