No-Bake Biscoff Cheesecake
Biscoff is one of my favorite cookies, and if you’ve spent any time baking along with me, you’ve probably noticed it shows up a lot in my recipes. I love its warm spice and depth, especially in desserts that don’t rely on baking for structure. This No-Bake Biscoff Cheesecake is one of my most reliable go-tos—easy to assemble, full of flavor, and always better after a night in the fridge.
Why I Love This Recipe
I loved my Biscoff Cheesecake recipe so much, I just had to make a no-bake version. This is one of those desserts I rely on when I want something impressive without adding extra work on the day I’m serving it.
- I love it because it’s a great make-ahead dessert, which cuts down on kitchen stress.
- Strong Biscoff flavor throughout the cheesecake
- No baking required
- Sets cleanly and slices well
Key Ingredients & Why I Use Them
Biscoff Cookies: They make a naturally spiced crust without needing extra sugar or seasoning.
This post may contain affiliate links. I earn a commission from qualified purchases. Please read our Privacy policy here.
Cream Cheese: Full-fat cream cheese gives the filling enough structure to set properly once chilled.
Whipped Cream: Whipping the cream to stiff peaks replaces eggs and keeps the texture light but stable.
Biscoff Spread: This goes into both the filling and the ganache, so the flavor carries through every layer.
White Chocolate: It gives the ganache body and shine without overpowering the Biscoff.
How to Make No-Bake Biscoff Cheesecake
The full recipe card is below, but here’s how I make it step by step.
Step 1: Make the biscoff ganache
I start with the ganache because it needs time to cool. I warm the heavy cream and glucose syrup (if I’m using it) in a small saucepan over medium heat until it’s hot but not boiling. Then I take it off the heat and whisk in the Biscoff spread until it’s completely melted and smooth.
I place the chopped white chocolate in a heatproof bowl and pour the hot cream mixture over it. I let it sit untouched for 2–3 minutes so the chocolate can melt gently, then I stir slowly from the center outward until the ganache turns glossy and uniform. If I see any stubborn bits of chocolate, I microwave it briefly and stir again until it smooths out.
I set the ganache aside to cool to room temperature while I prep everything else. If I’m making this ahead, I refrigerate the ganache and bring it back to room temp before using it so it pours nicely.
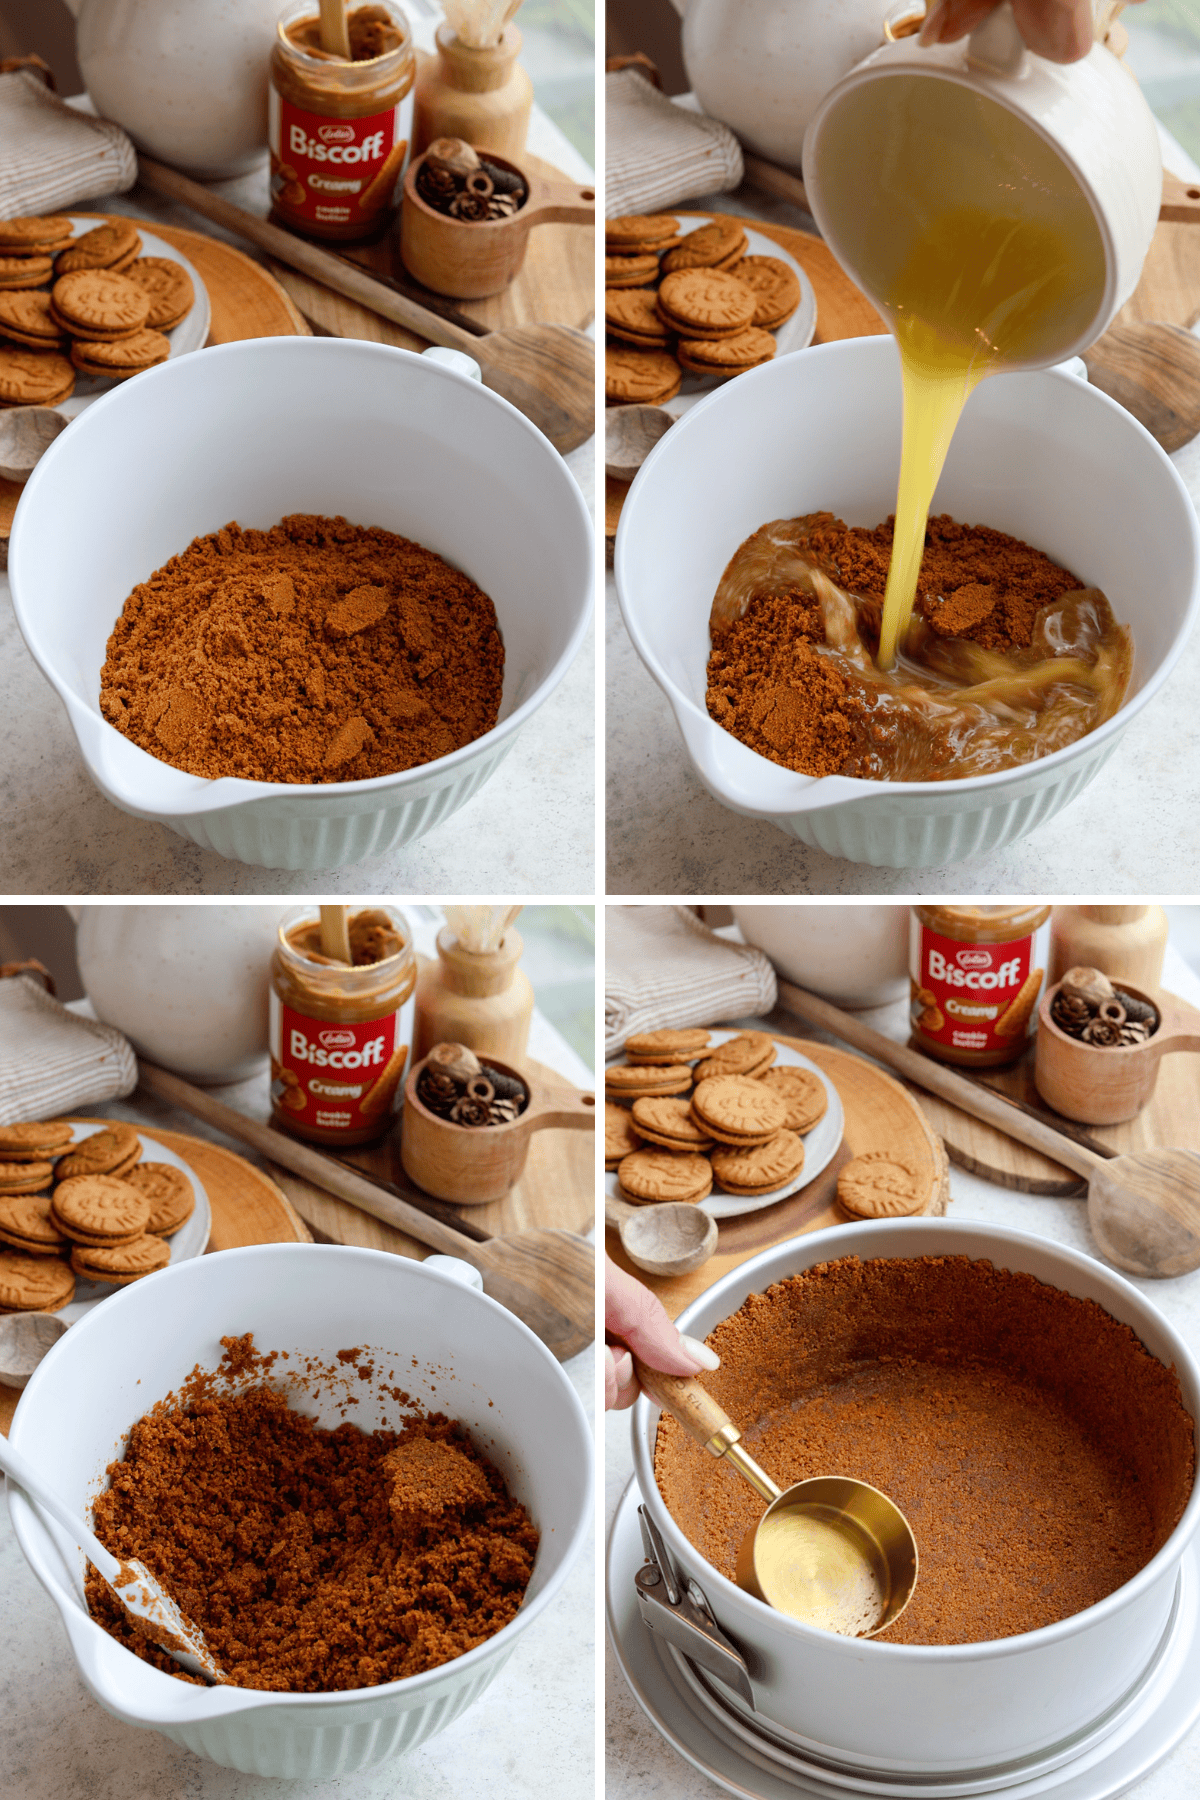
Step 2: Prepare the Crust
I lightly grease and line an 8- or 9-inch springform pan with parchment. Then I crush a full pack of Biscoff cookies into fine crumbs—usually in a food processor, because it’s faster and more even. I mix the crumbs with melted butter until the texture looks like damp sand and holds together when pressed.
I press the mixture firmly into the bottom of the pan, using the bottom of a measuring cup or glass to really compact it. This is what keeps the crust from crumbling when you slice.
If I’m keeping the cheesecake fully no-bake, I freeze the crust for about 30 minutes while I make the filling. If I want a slightly sturdier, cleaner-slicing base, I bake it at 325ºF for about 15 minutes and let it cool completely. Both work—this is just preference.
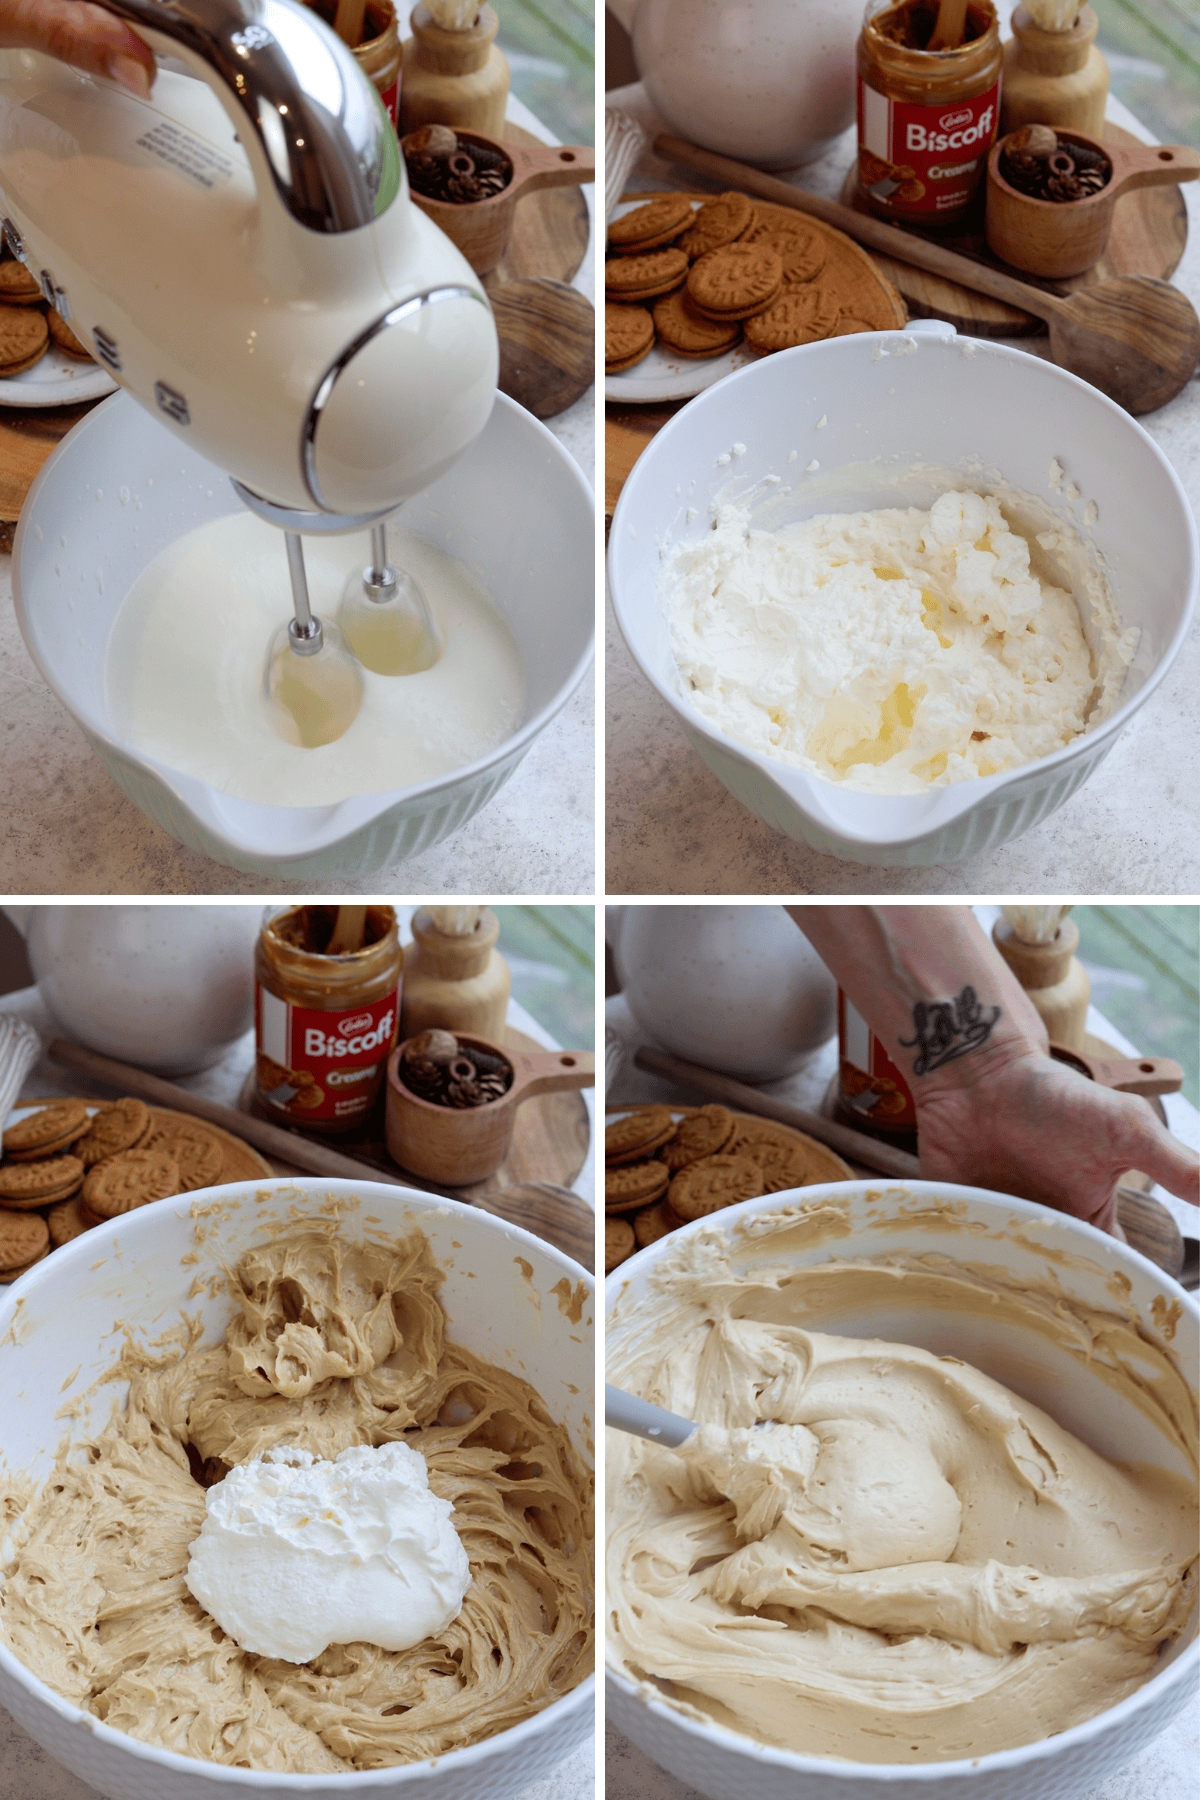
Step 3: Make the cheesecake batter
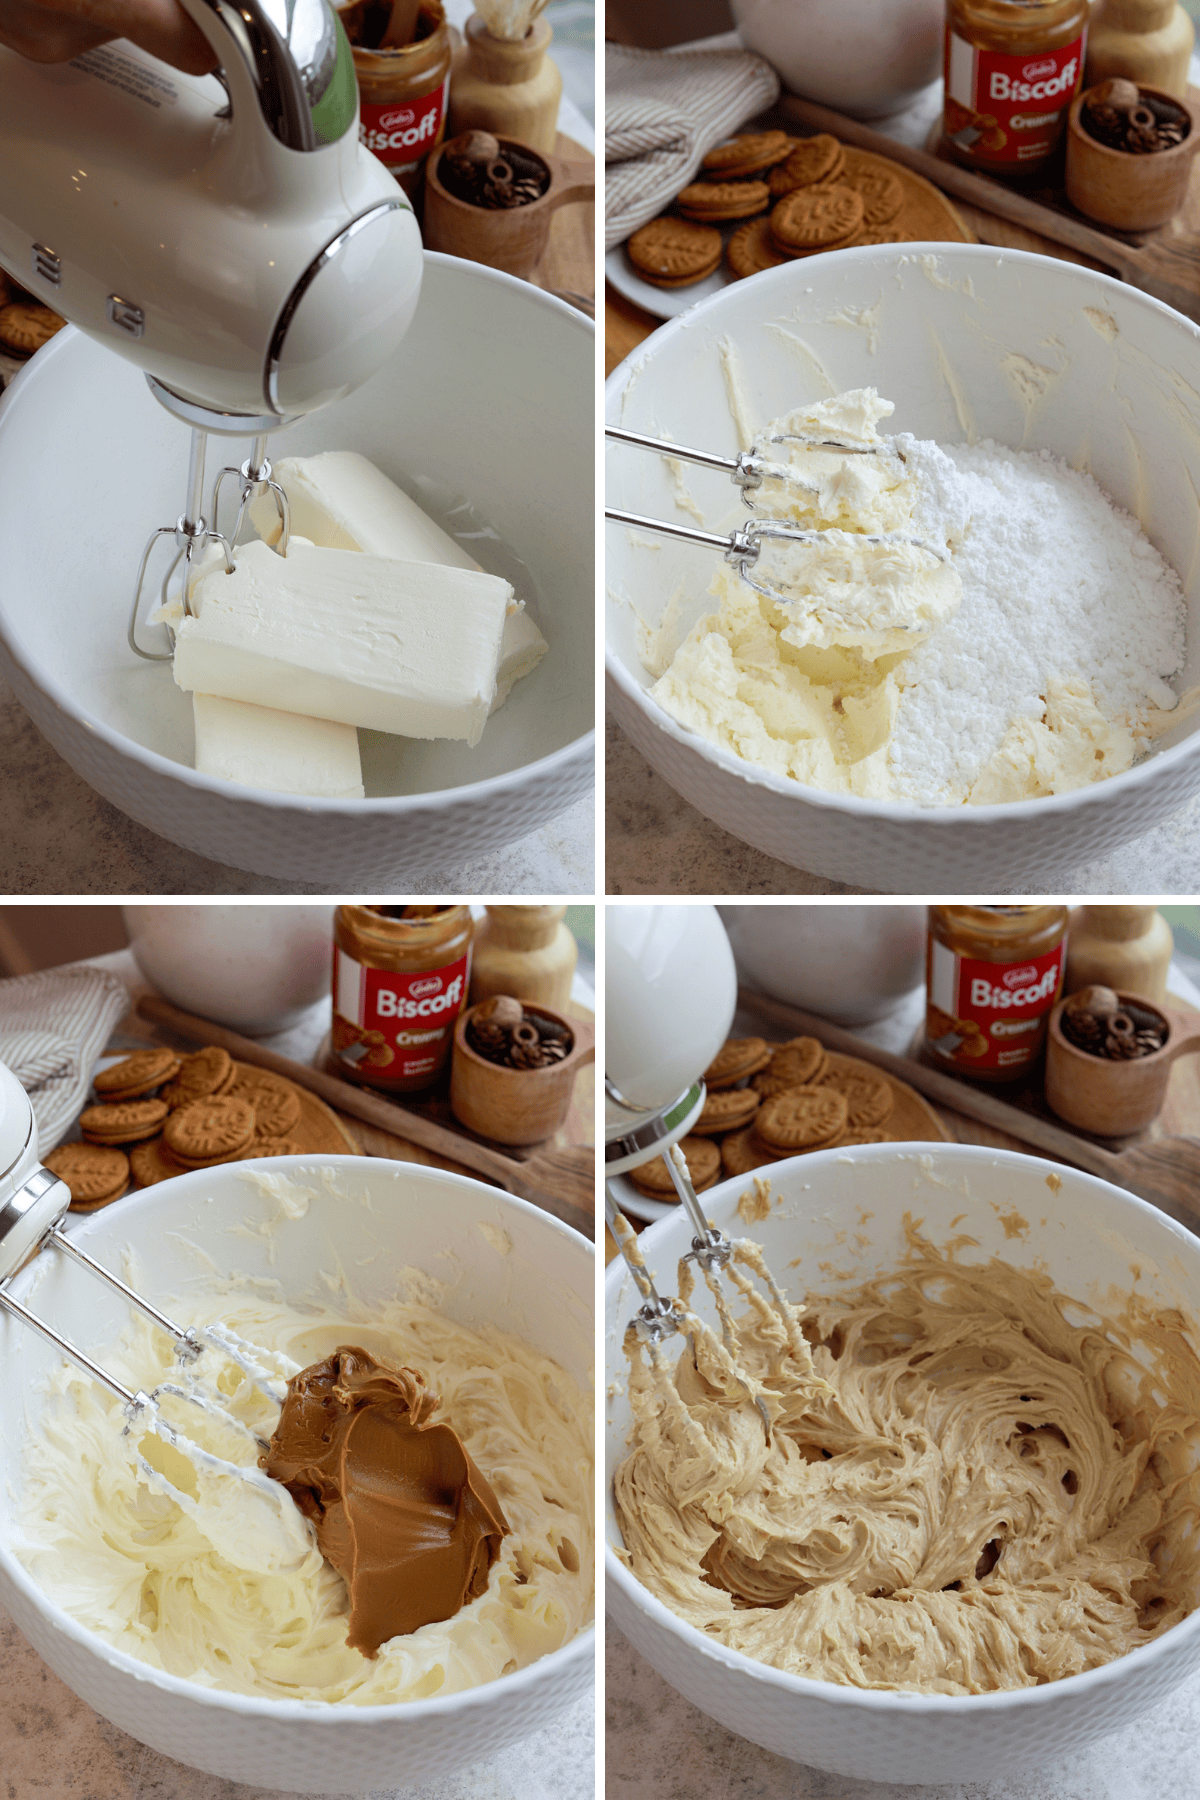
I beat the softened cream cheese for about 2 minutes until creamy, then add the powdered sugar and mix for another minute. I scrape the bowl well here—small lumps are almost always just cream cheese stuck to the sides.
Next, I add the Biscoff spread (any cookie butter brand you love works), plus sour cream, lemon juice, and vanilla. I mix just until smooth and fully combined. The lemon juice isn’t there to make it “lemony”—it just lifts the sweetness and keeps the filling from tasting flat.
Step 4: Whip heavy cream and add
In a separate bowl, I whip the cold heavy cream to stiff peaks. I want it to hold its shape clearly when I lift the whisk. Then I fold half of the whipped cream into the cream cheese mixture to lighten it, and fold in the rest gently until the filling looks smooth and airy. I keep the folding calm and deliberate so the mixture stays light.
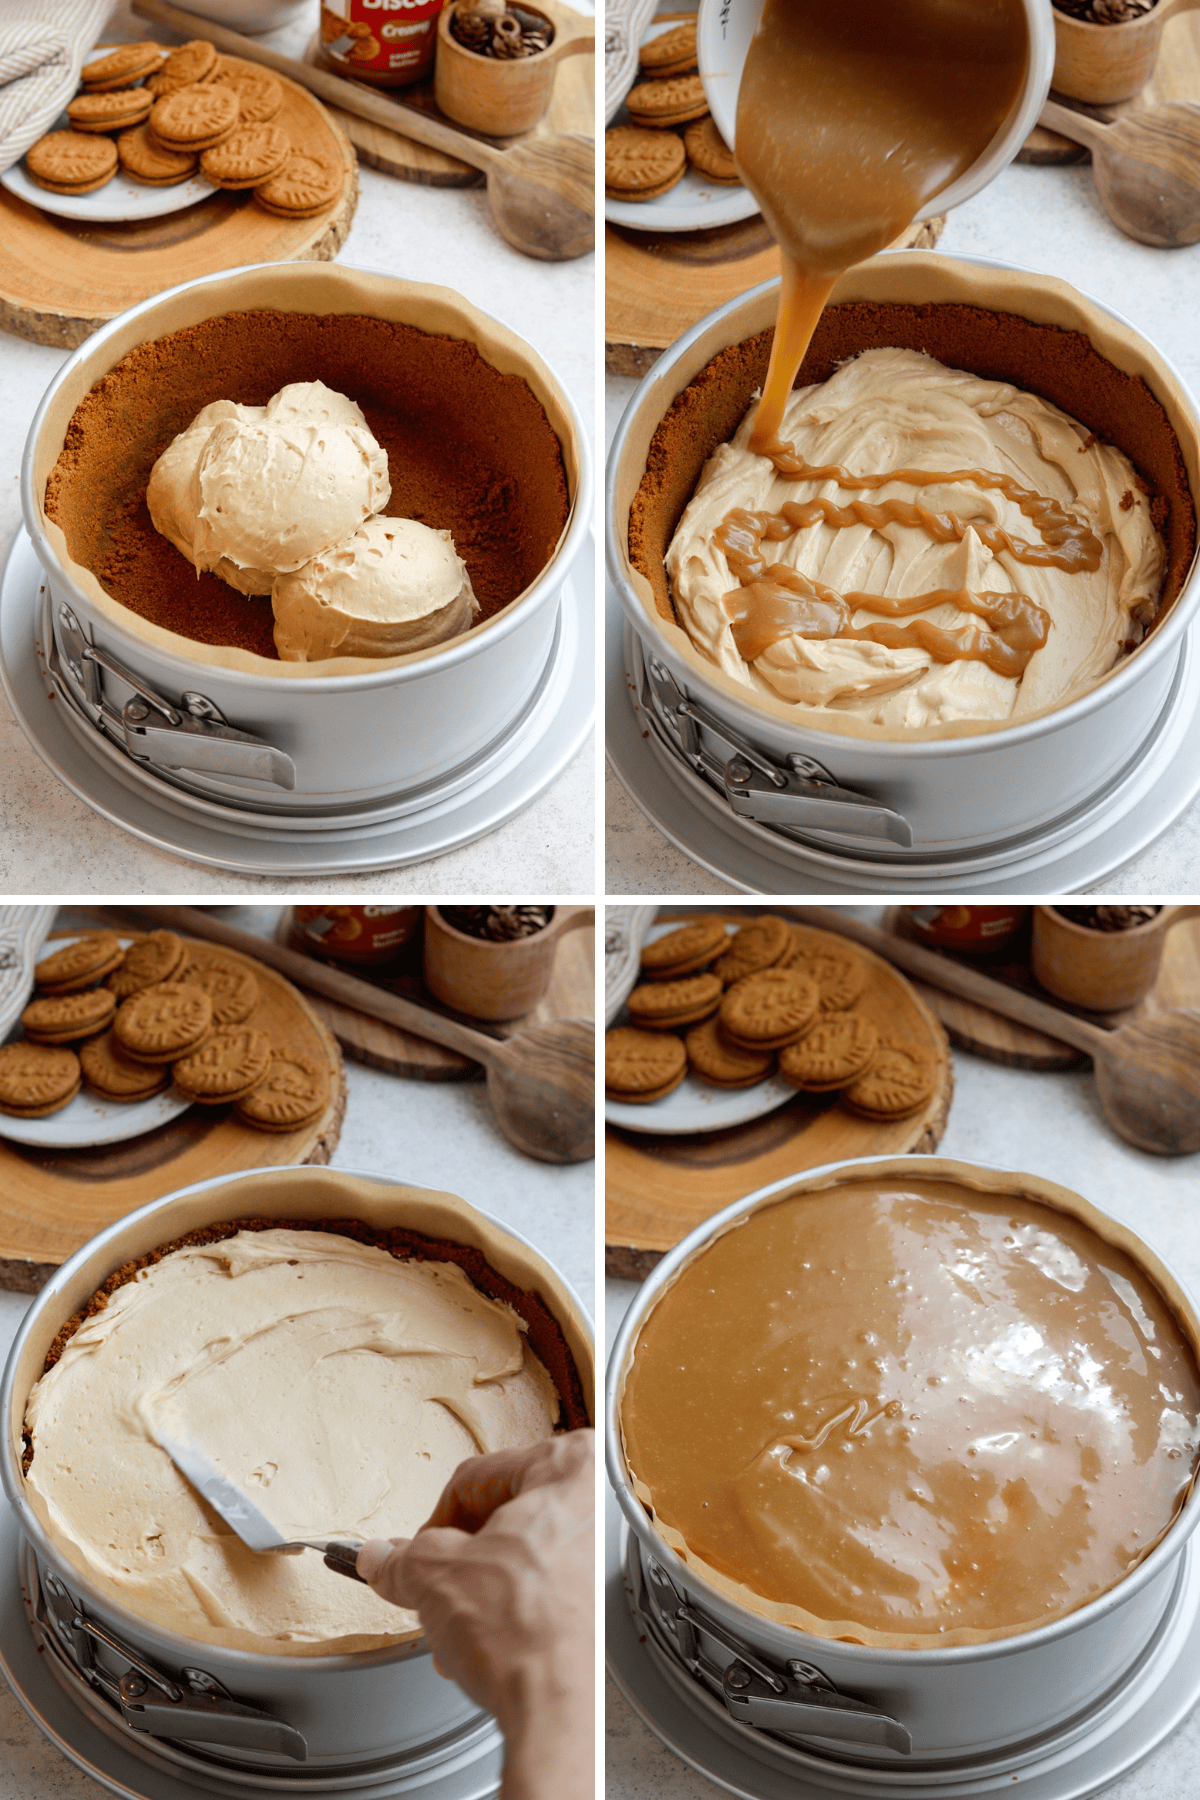
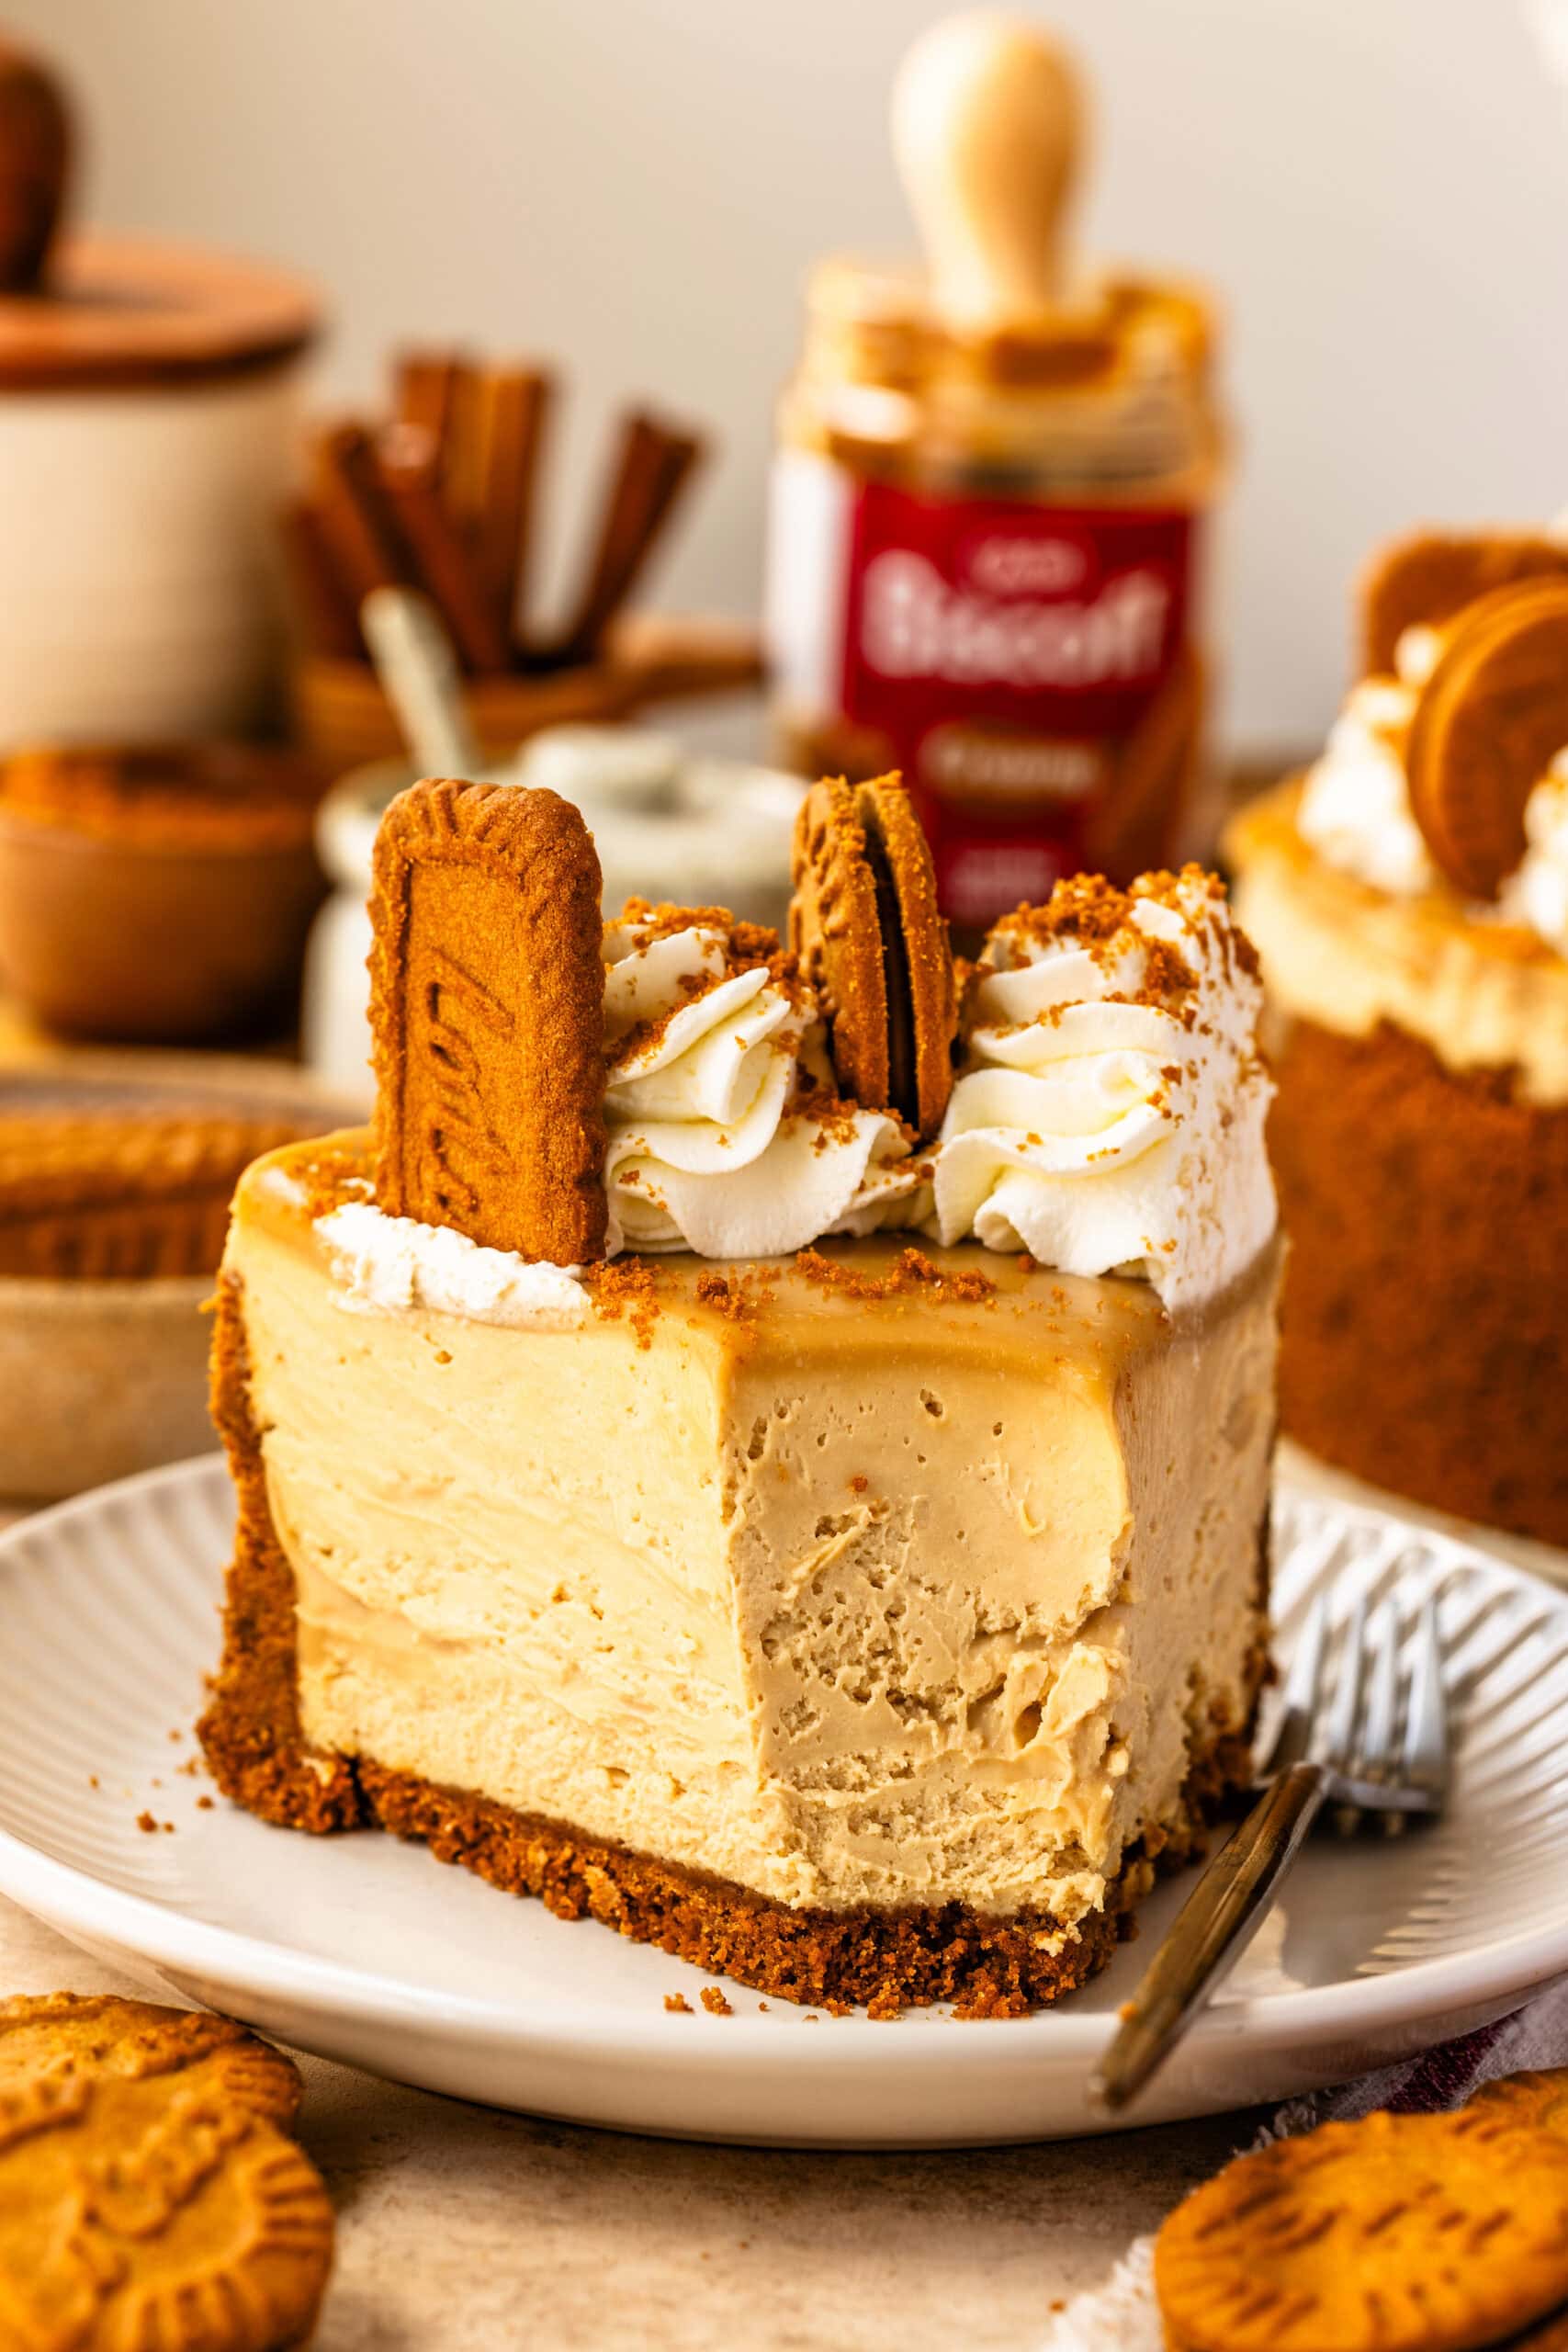
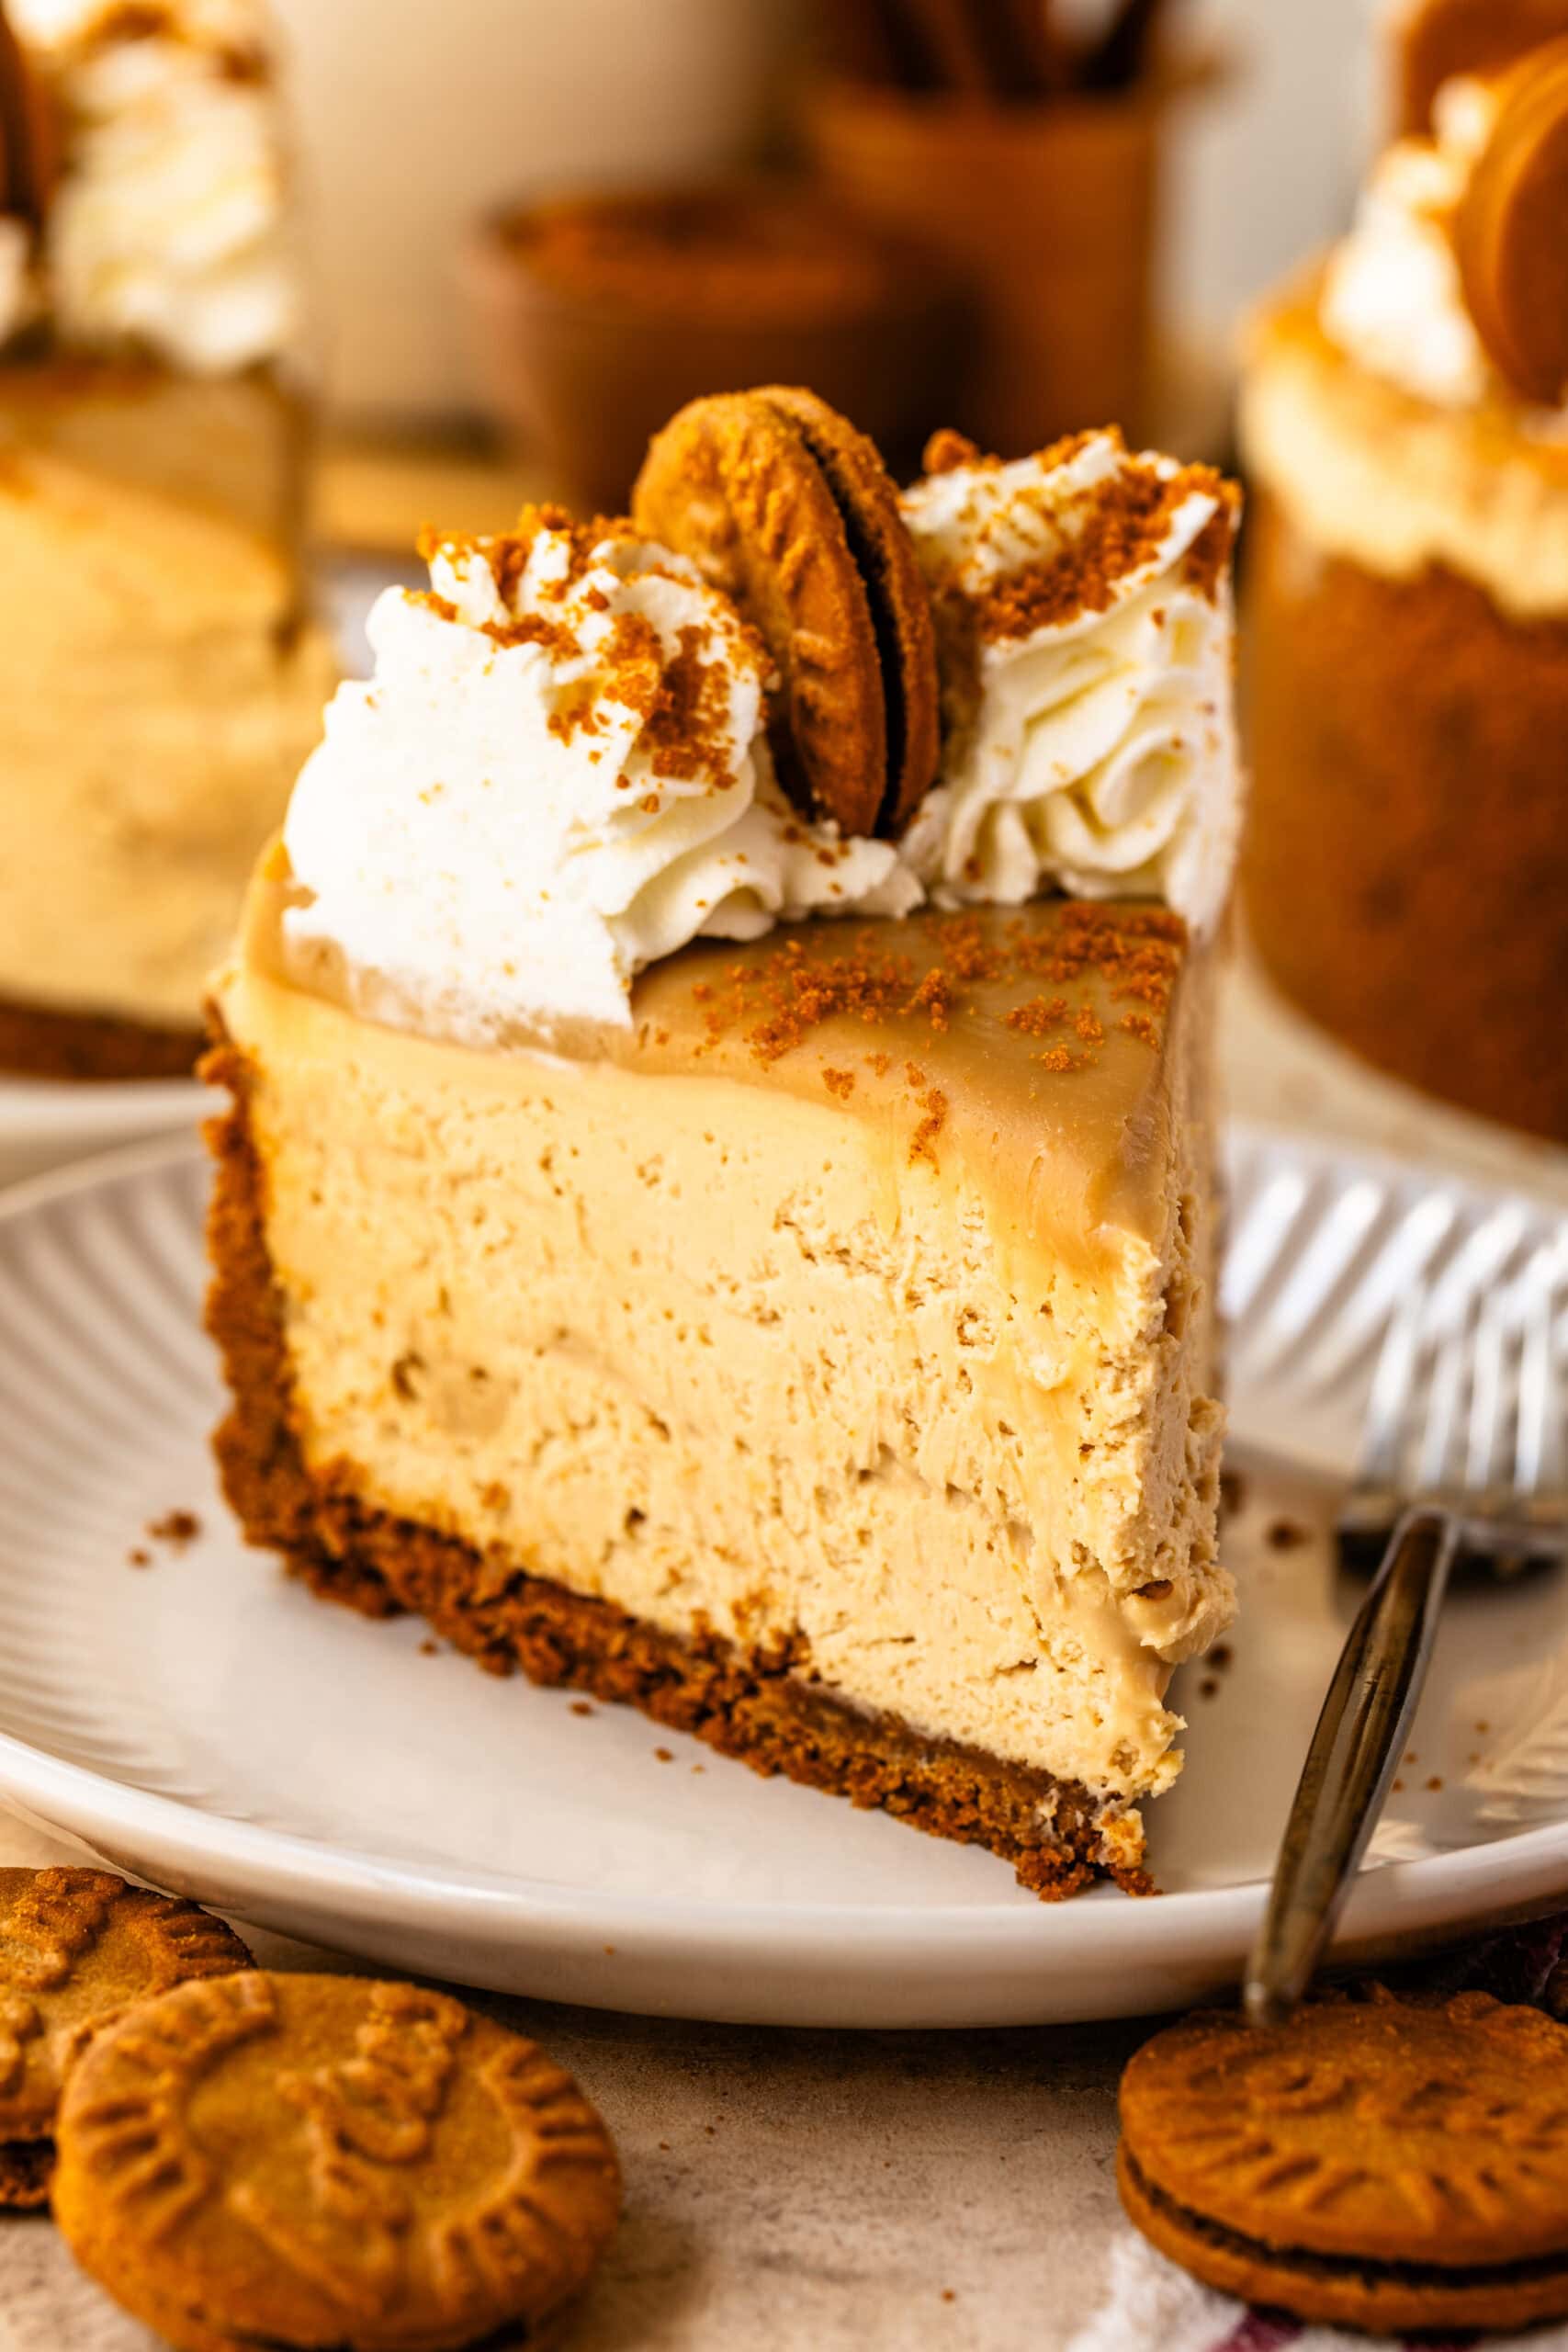
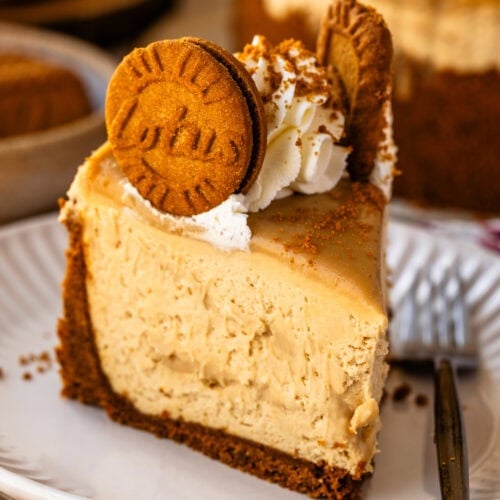
Step 5: Assemble & chill
I spread about one-third of the cheesecake filling over the chilled crust and smooth it into an even layer. I drizzle some of the cooled ganache over the surface and swirl it lightly with a knife, keeping the motion loose so the layers stay defined.
I repeat this layering once more with filling and ganache. Then I add the final layer of filling, smooth the top, and pour the remaining ganache over the surface, spreading it into an even layer.
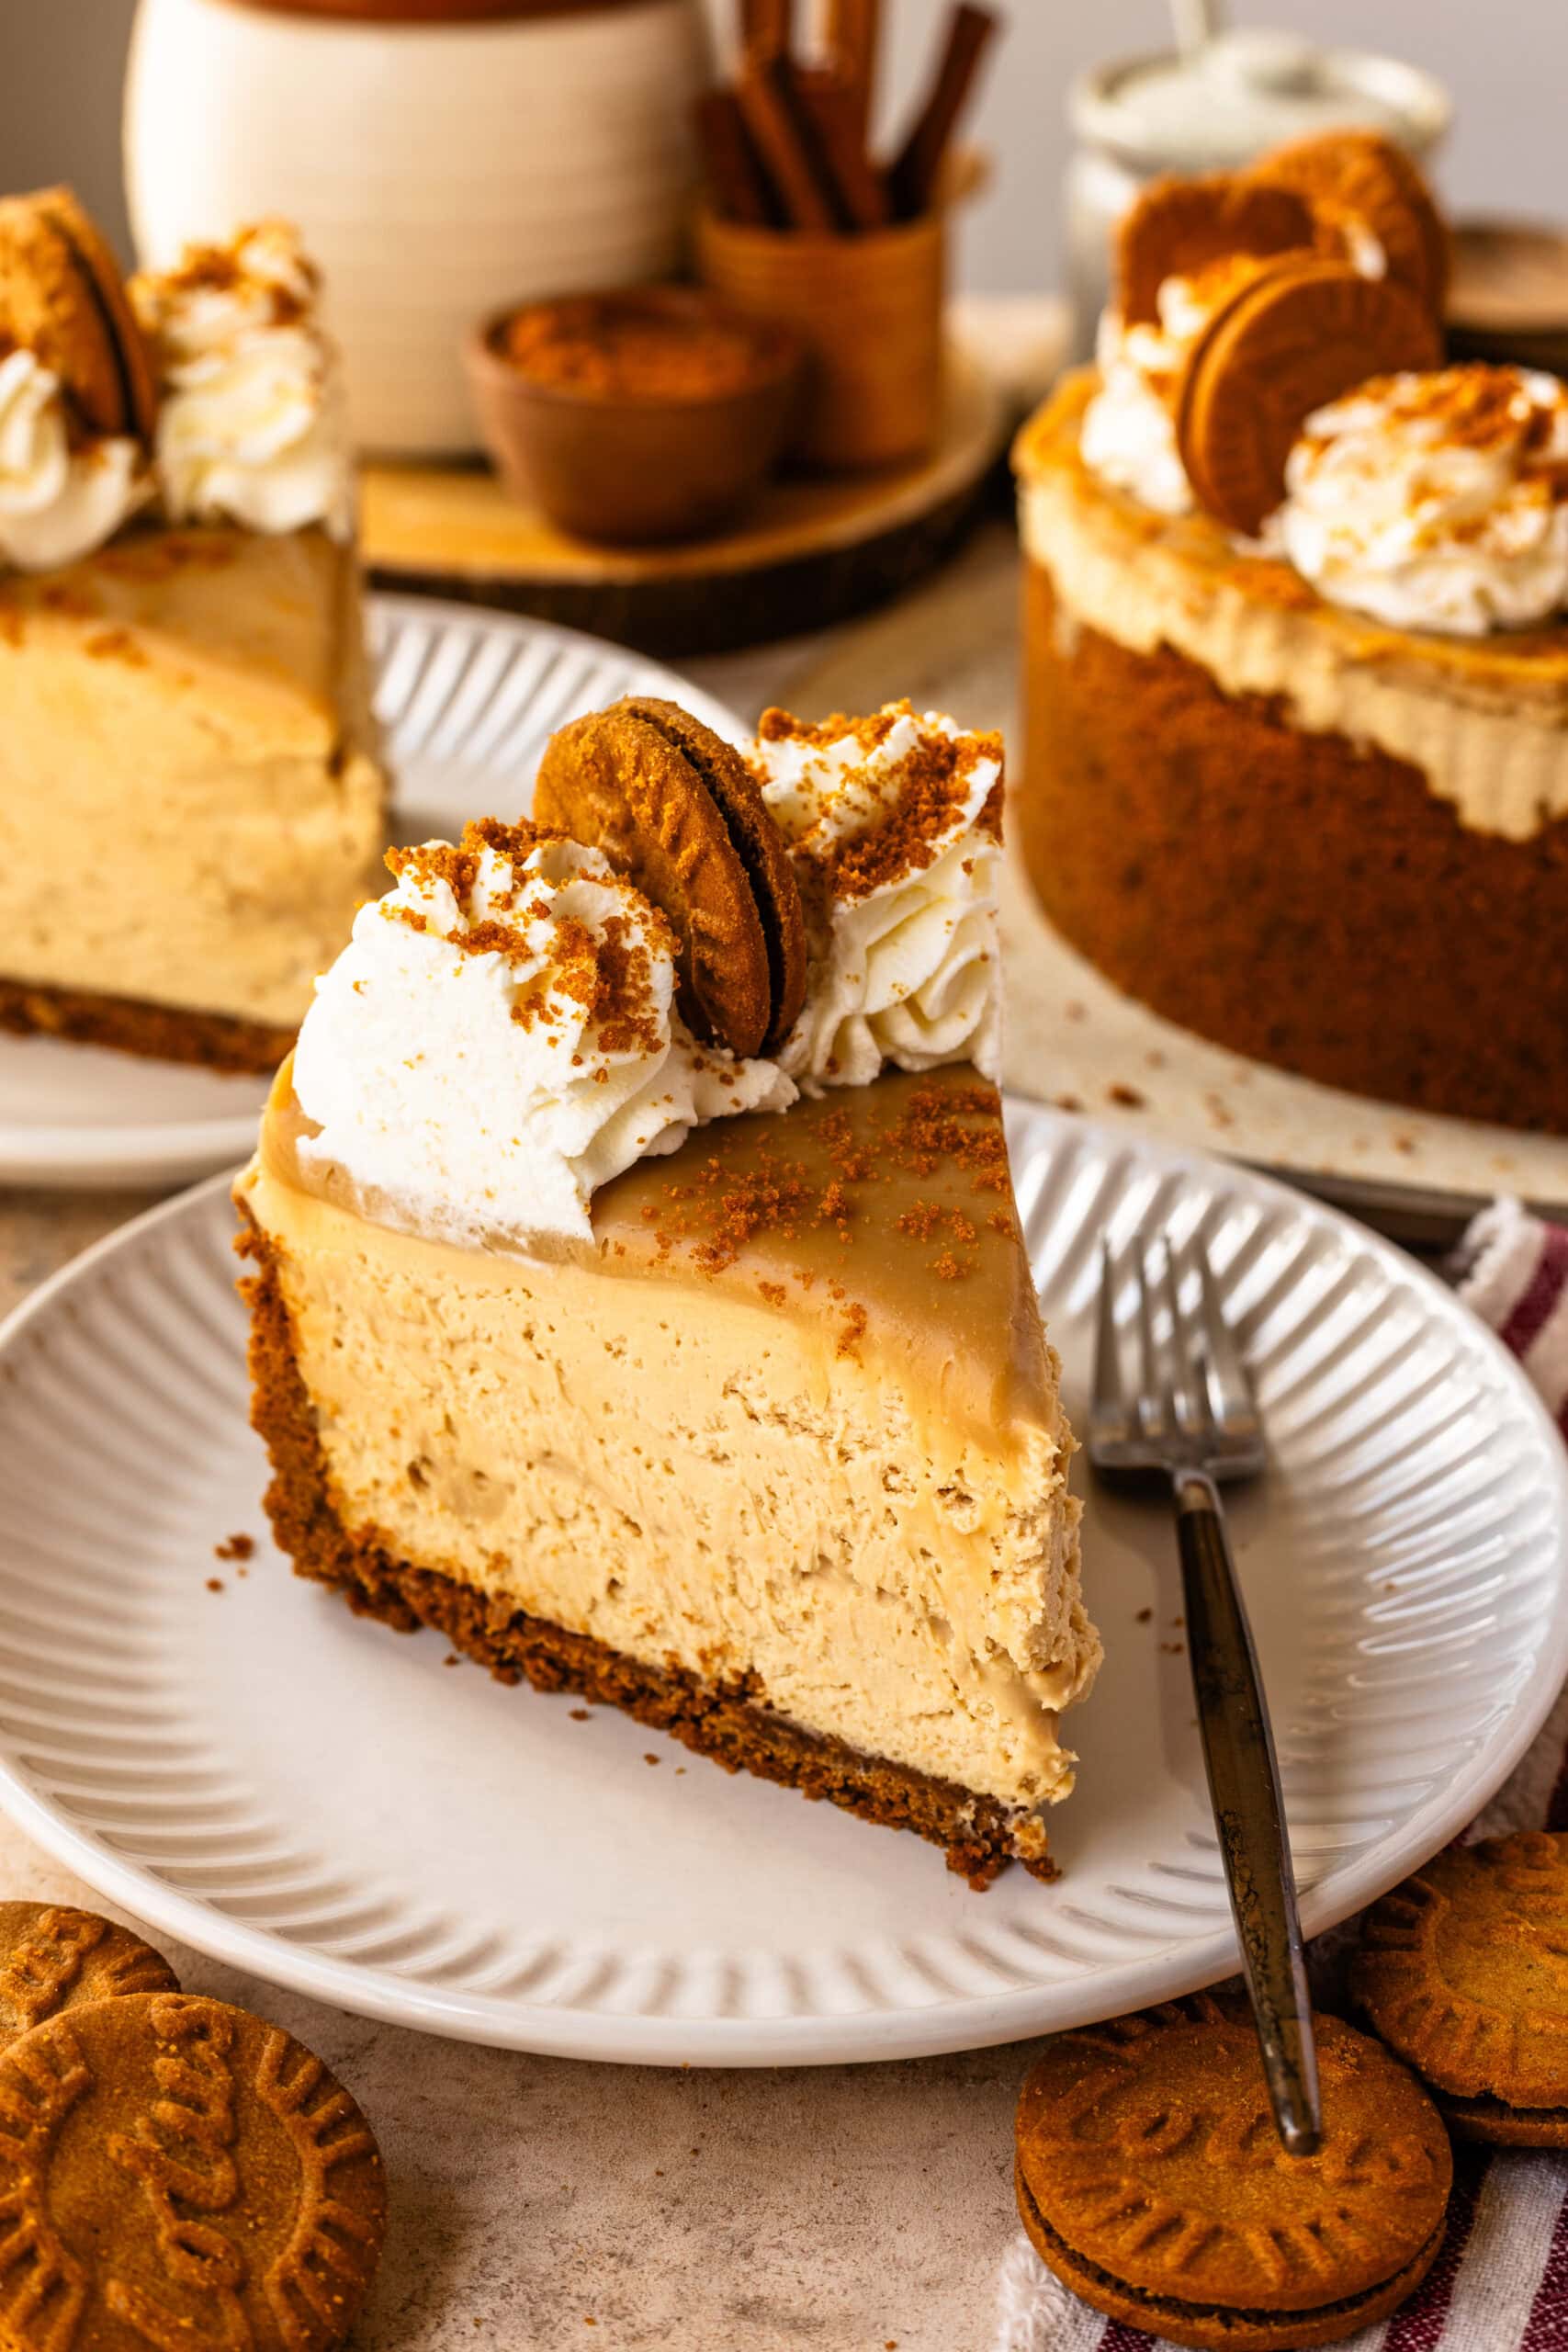
I refrigerate the cheesecake for at least 6 hours, though overnight is ideal. This resting time allows the filling to fully set and gives the cheesecake its clean, sliceable structure.
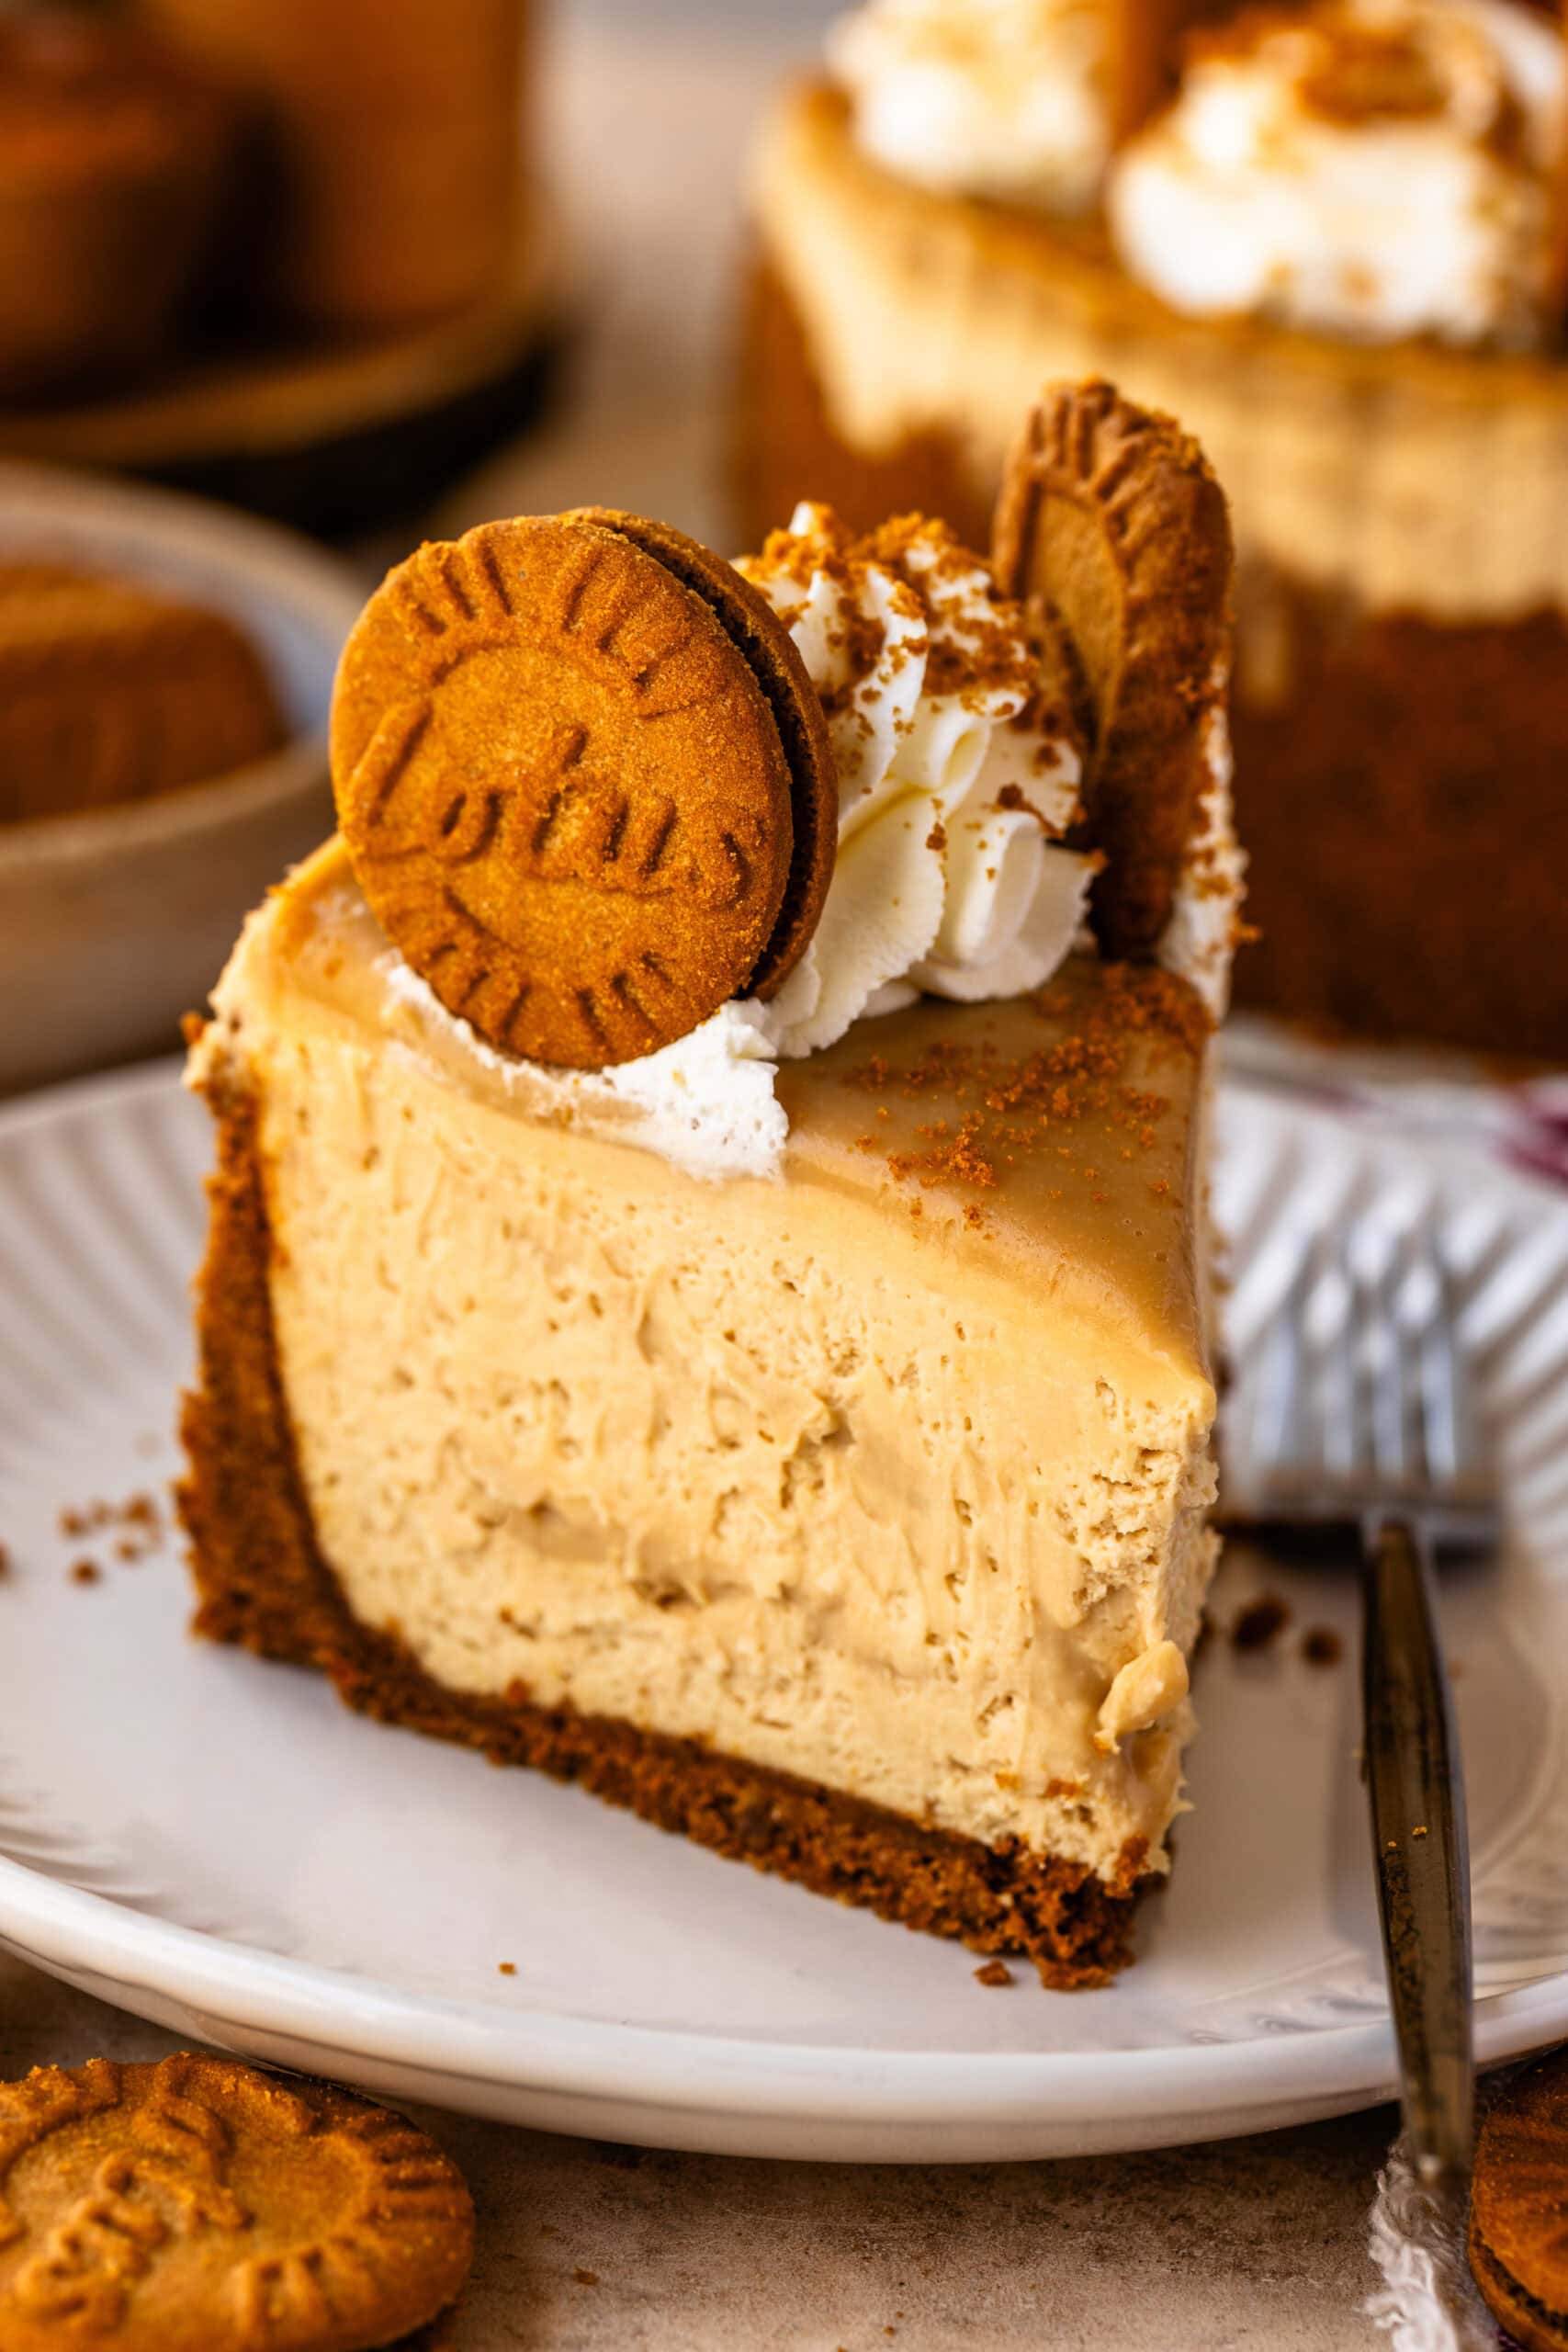
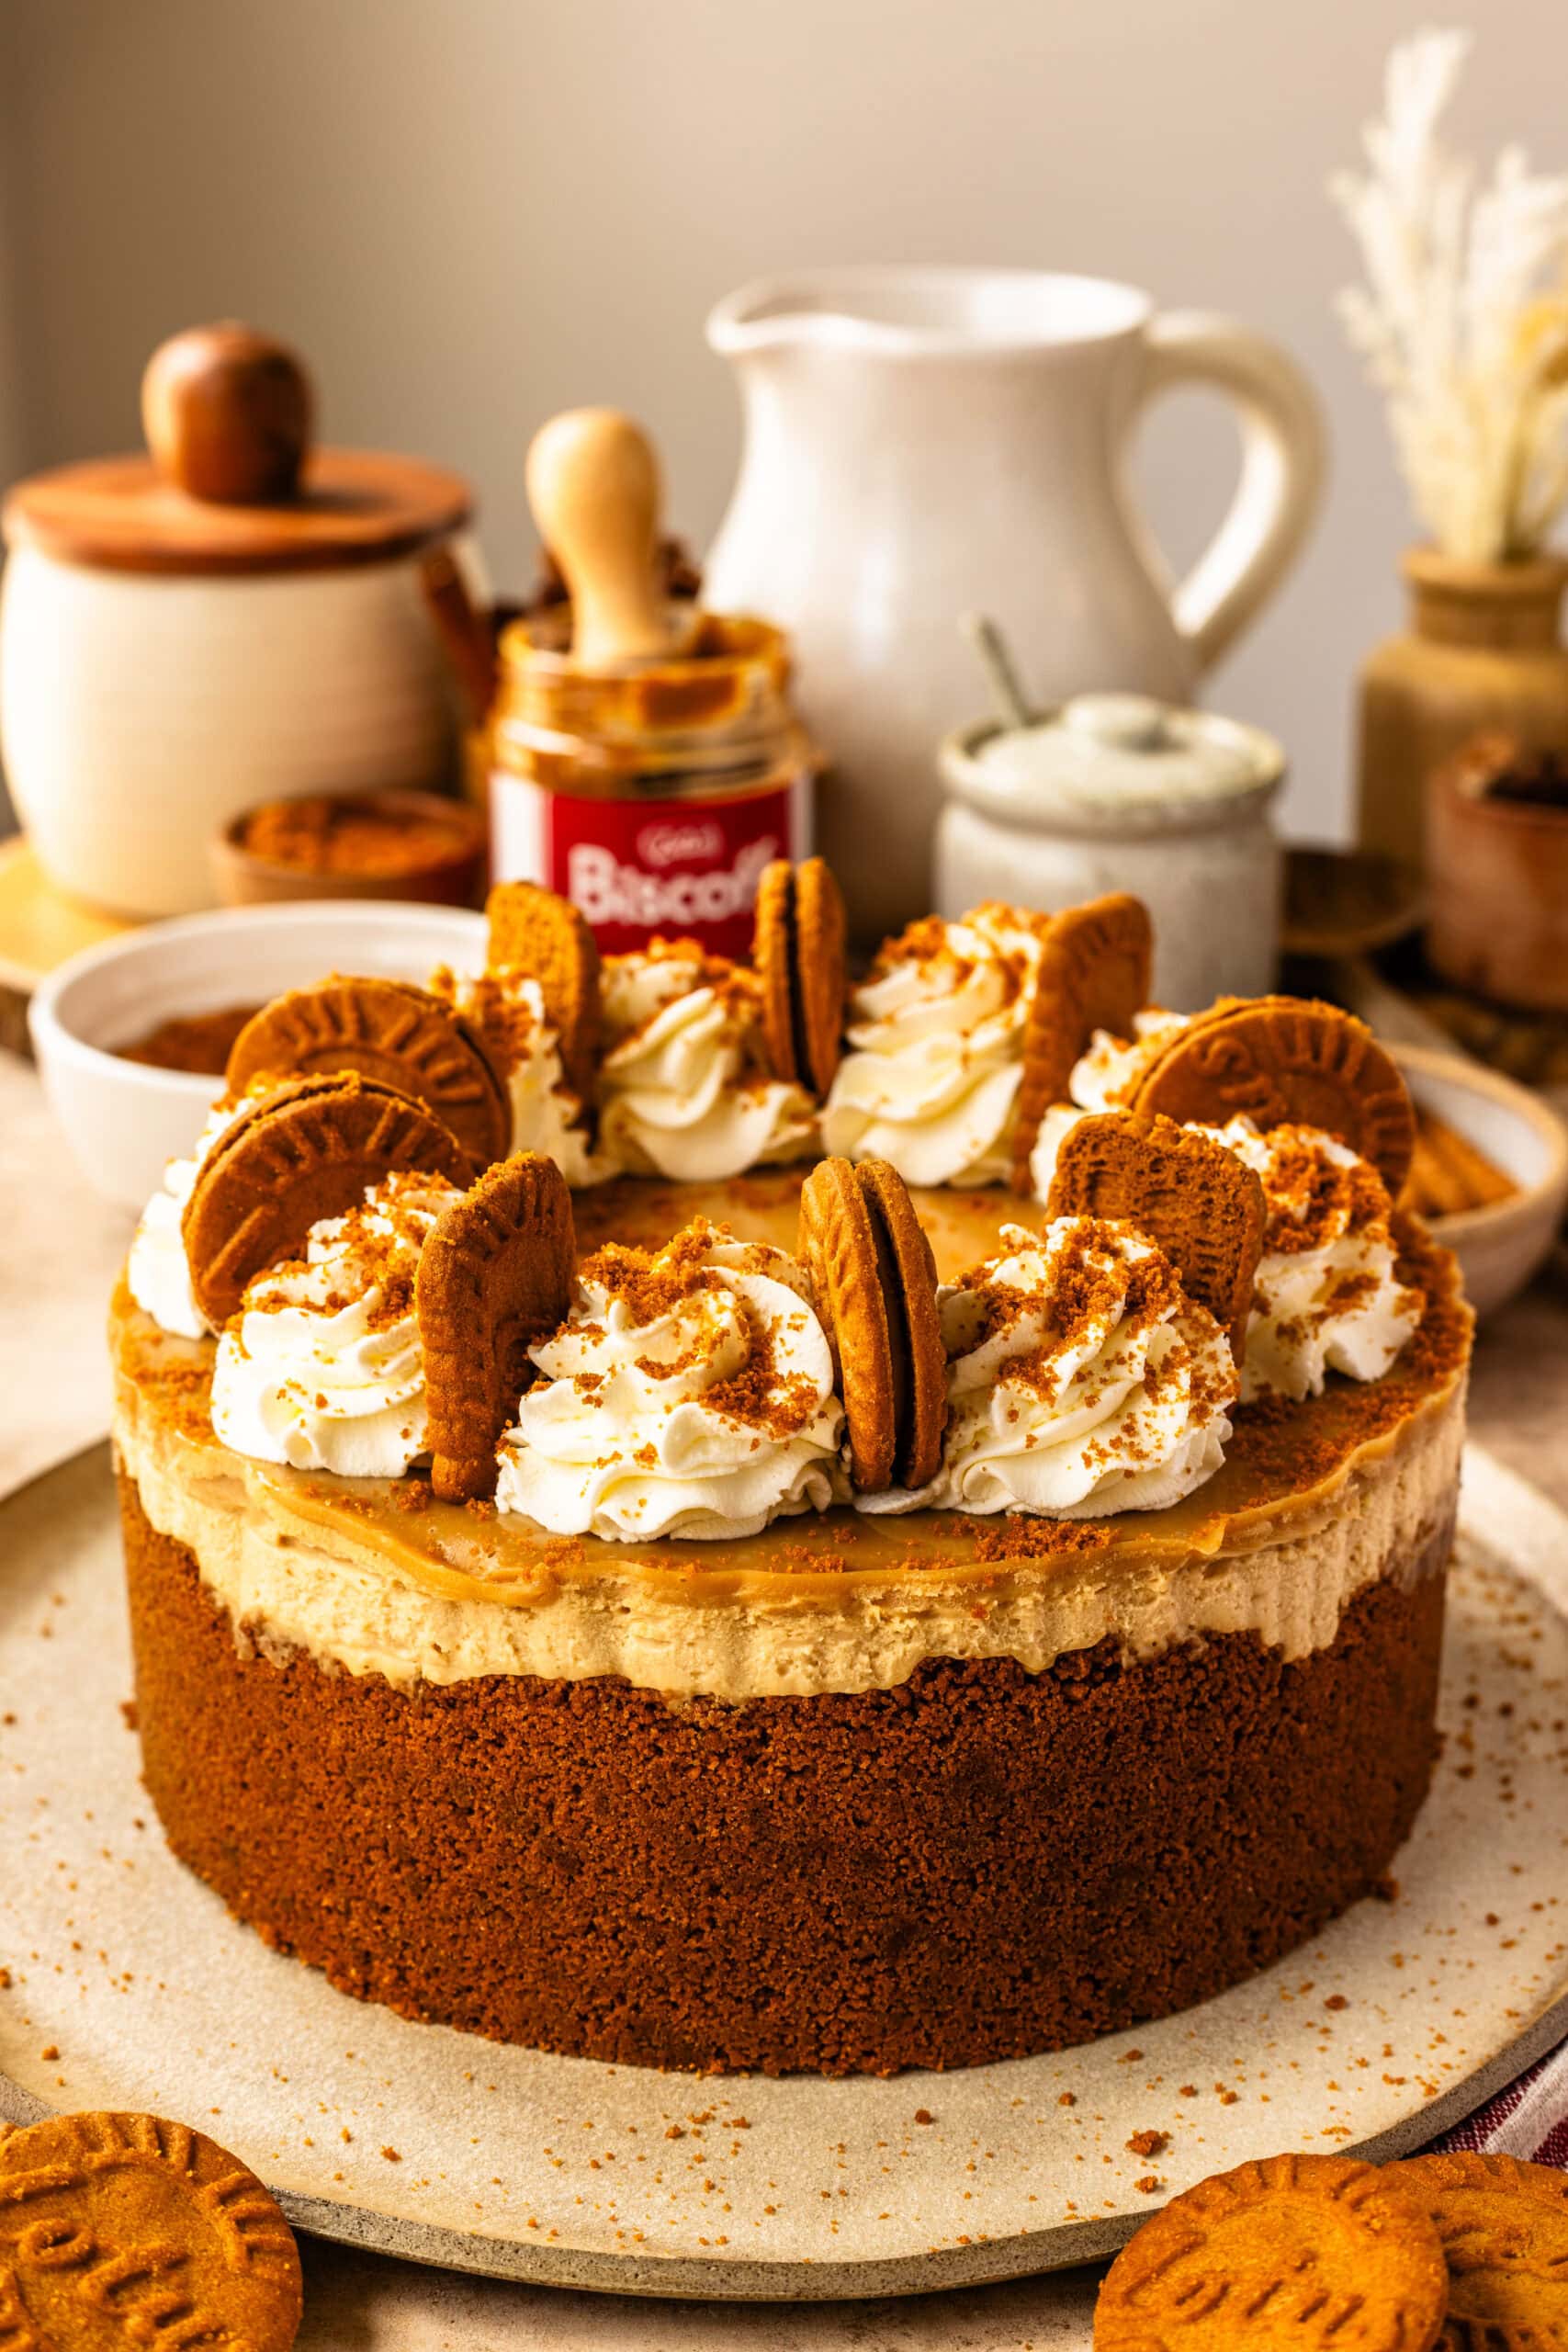
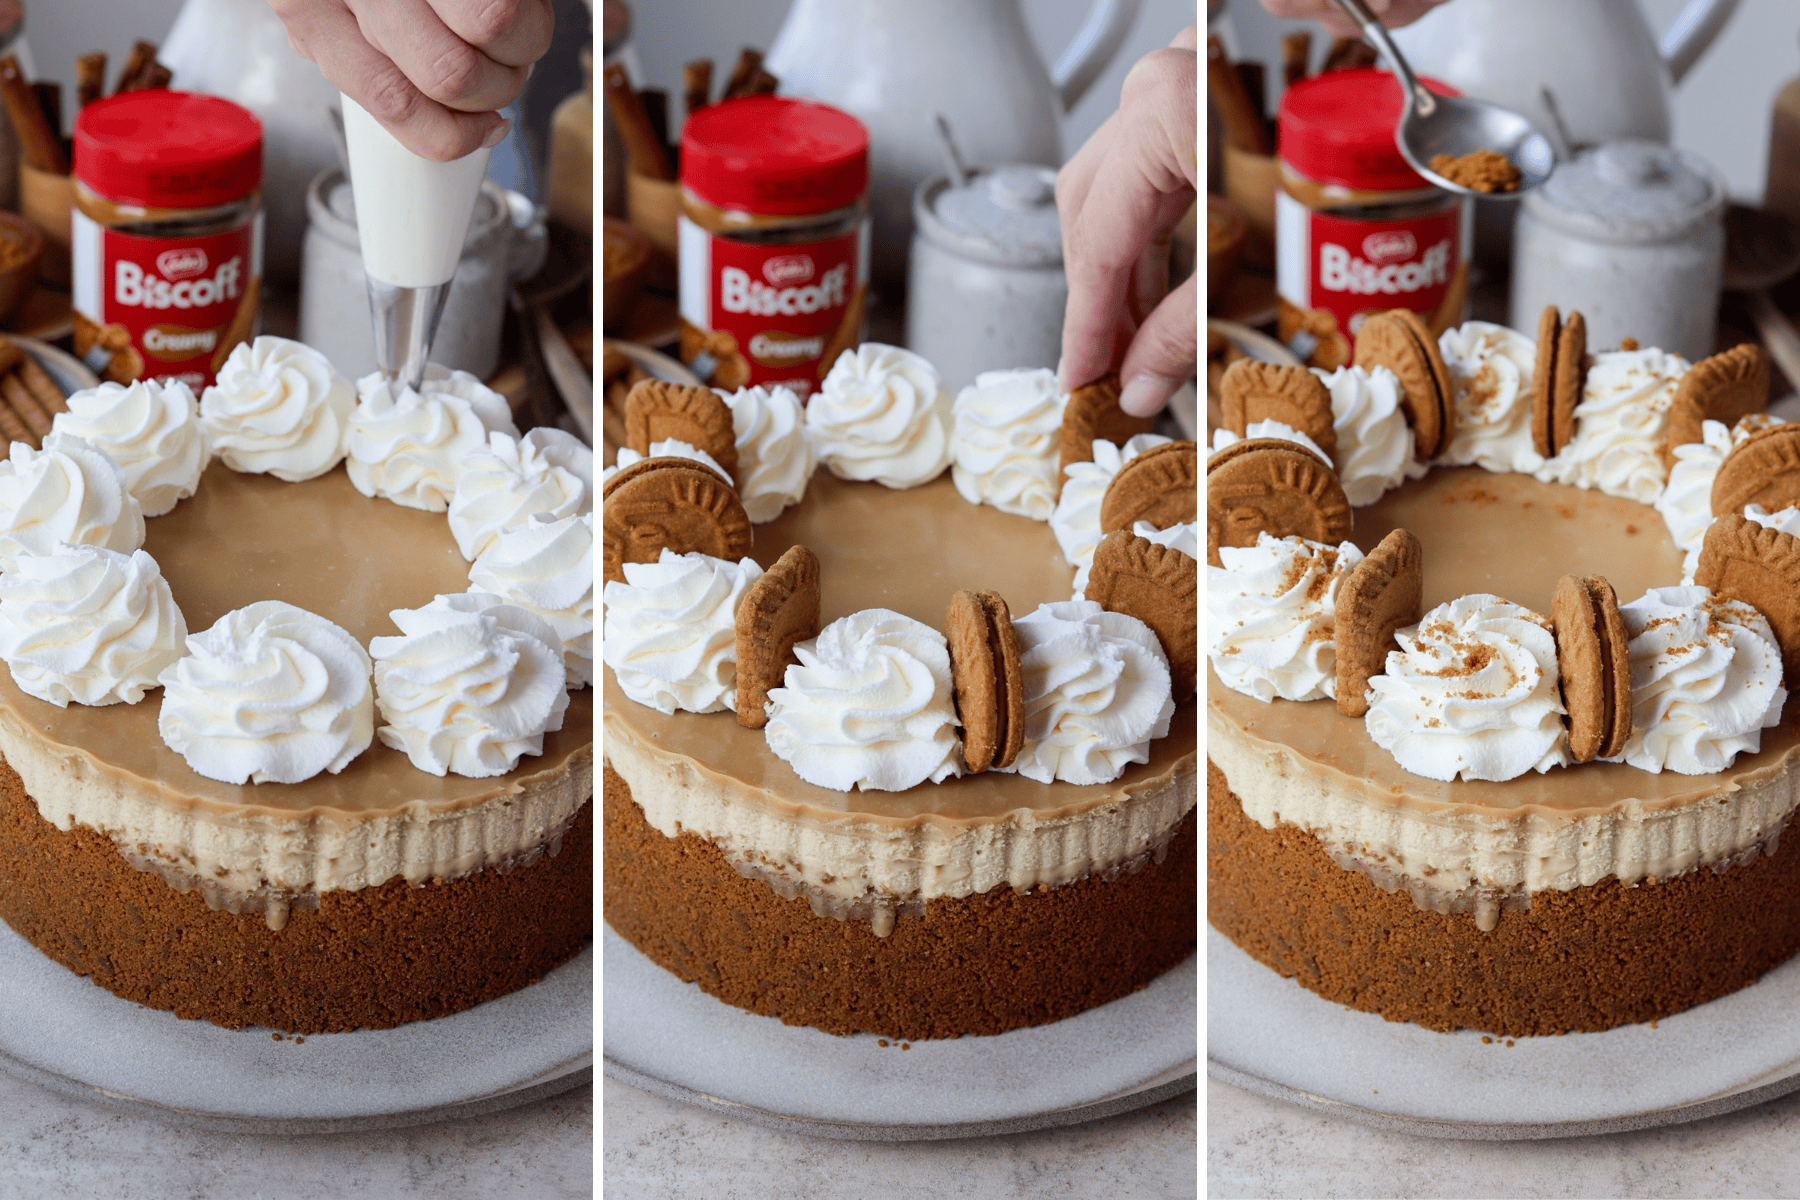
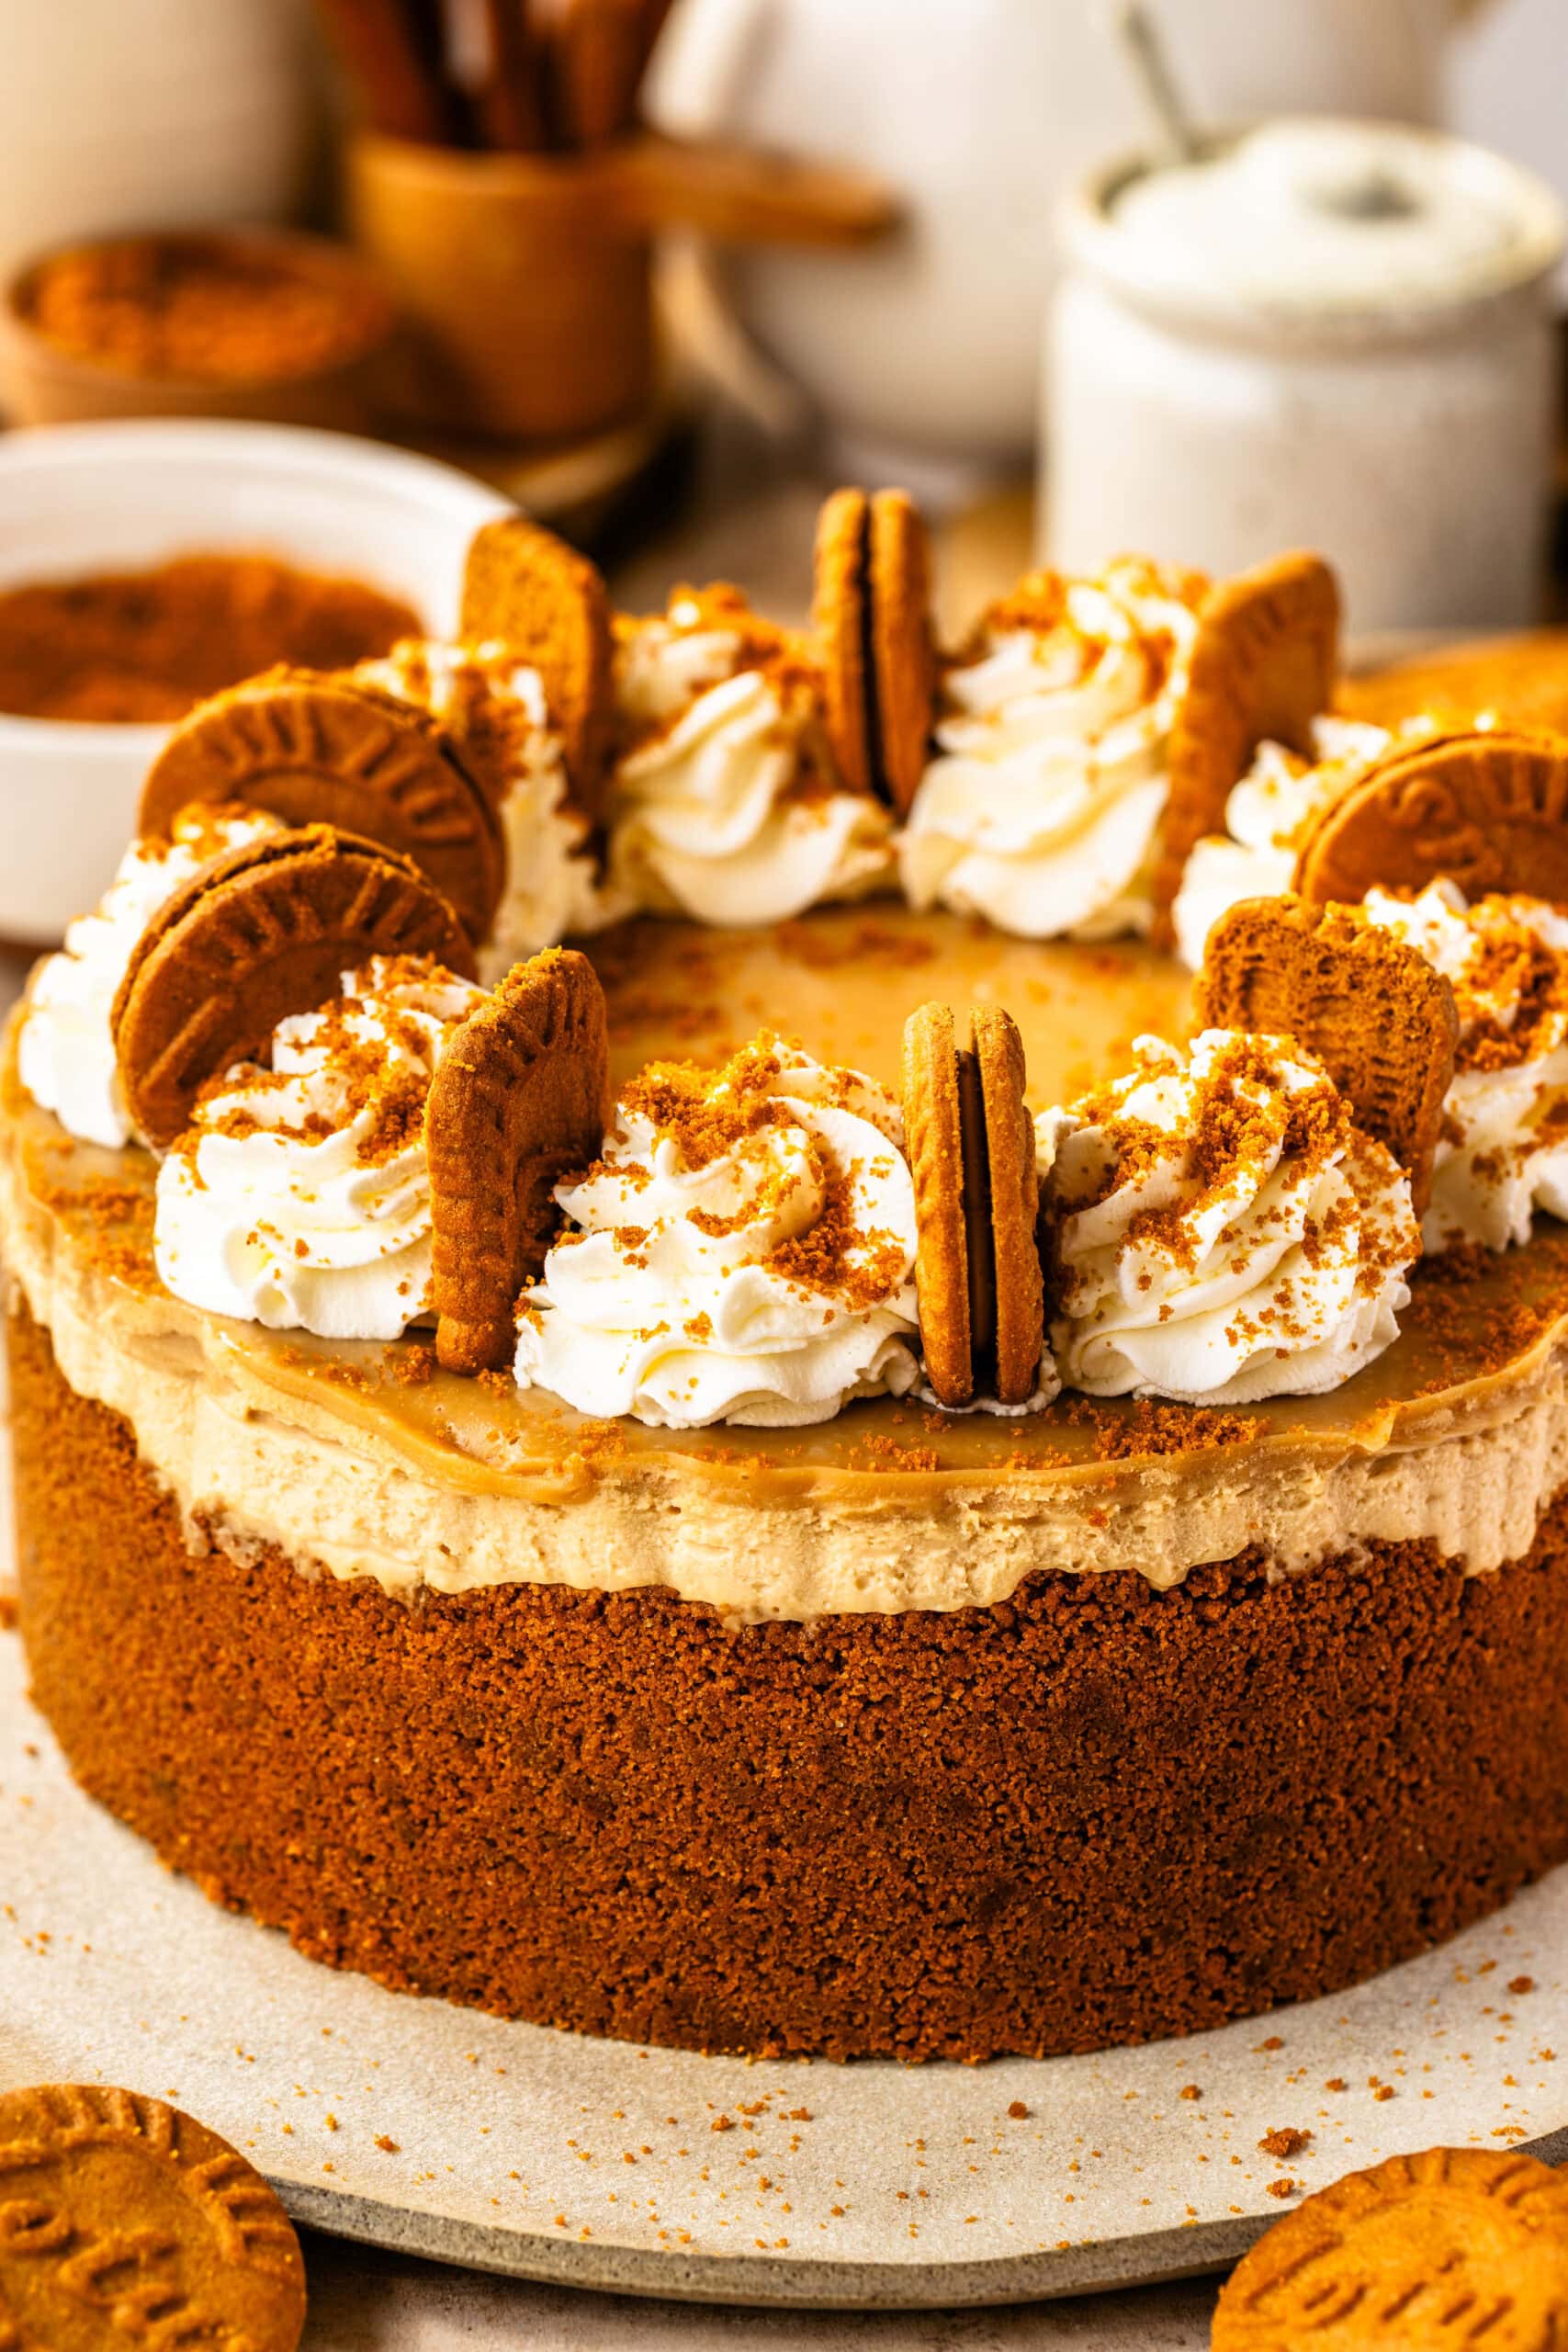
Step 6: Decorate
Right before serving, I whip fresh cream and transfer it to a piping bag. I pipe swirls around the edge of the cheesecake, then finish with crushed and whole Biscoff cookies. I decorate at the end so the whipped cream stays fresh and the cookies remain crisp.
Storage & Freezing
Baked cookies keep well in an airtight container at room temperature for 3–4 days.
The dough freezes beautifully for up to 3 months. I bake straight from frozen — just add 1–2 extra minutes to the bake time. I almost always keep a batch in the freezer.
Expert Tips
No-bake cheesecakes can be a little daunting, I get it. Check out these tips! For even more advice, check out this post.
- I let the ganache cool fully before using it; warm ganache can soften the filling and blur the layers.
- Pressing the crust firmly matters more than it seems—it’s the difference between clean slices and a crumbly base.
- If the ganache thickens too much while standing, I warm it briefly and stir gently until smooth again.
- For the cleanest cuts, I chill overnight and wipe the knife between slices.
Variations
This cheesecake is so good, but if you had to change a few things, here’s what I would do.
- Swap the Biscoff ganache for a dark chocolate ganache for contrast
- Fold crushed Biscoff cookies into the filling for added texture
- Add a pinch of cinnamon or nutmeg to the crust for a warmer spice note
- Add a drizzle of caramel sauce for even more sweet goodness!
FAQs
Yes. This is a great make-ahead dessert. Prepare it 1–2 days in advance, refrigerate, and decorate just before serving.
No. Freezing works perfectly, but baking helps the crust hold together more firmly when sliced.
Yes, though it adds beautiful flavor and shine. You can drizzle melted Biscoff spread on top as an alternative.
Chill for at least 6 hours, or overnight, so the cheesecake filling sets properly.
Yes. Wrap well and freeze (without whipped cream) for up to 2 months. Thaw in the fridge overnight.
Even more biscoff….
If you loved this No-Bake Biscoff Cheesecake, try some of my other Biscoff desserts. My Biscoff Cheesecake is so creamy and delicious, perfect for parties. For something ultra-rich, my Biscoff Brownies layer cookie butter over fudgy chocolate batter. If you love cake, my Biscoff Layer Cake is light, spiced, and ideal for special occasions. And don’t miss my Biscoff Cupcakes—they’re airy, elegant, and a great make-ahead dessert for entertaining.
Did you make it?!
If you make this recipe, I’d love to see it. Tag me on Instagram or leave a comment and rating below—it really helps, and I always enjoy seeing how these turn out.
Watch Video

No-Bake Biscoff Cheesecake
Ingredients
Biscoff Cookie Crust
- 250 grams Biscoff cookies 1 package of Biscoff cookies
- ⅓ cup unsalted butter 75g
Biscoff Ganache
- ⅔ cup heavy cream 160ml
- ½ tbsp glucose syrup 7g (optional)
- 3 tbsp Biscoff butter 55g
- 1 cup chopped white chocolate callets (170 g)
Cheesecake Batter
- 3 blocks cream cheese softened 678 g
- 1 cups powdered sugar 125g
- 1 cup Biscoff spread 240g
- ¼ cup sour cream 60g
- 1 tbsp lemon juice
- 2 tsp vanilla extract
- 1¼ cups cold heavy whipping cream 300ml
Whipped Cream
- 1 cup heavy whipping cream, cold
- 3 tbsp powdered sugar
- ½ tsp vanilla
Decoration
- Biscoff cookie crumbles
- Biscoff cookies
Instructions
Biscoff Ganache
- In a small saucepan, or in a microwave-safe bowl, combine the heavy cream and glucose syrup (if using). Warm over medium heat, don’t let it come to a boil.
- Remove from the heat and whisk in the Biscoff butter until fully melted and smooth.
- Place the white chocolate in a heatproof bowl. Pour the hot cream mixture over it and let it sit for 2–3 minutes to soften the chocolate.
- Stir gently from the center outward until the mixture becomes smooth and glossy. If any pieces of chocolate remain, microwave for 5–10 seconds and stir again.
- Let the ganache cool at room temperature. If making ahead, place it in the fridge, and let it come to room temp before using.
Biscoff Cookie Crust
- Pre-heat the oven to 325ºF.
- Grease lightly and line the sides of a springform pan with parchment paper.
- Place the biscoff cookies in a food processor and process to obtain fine crumbs.
- Melt the butter and mix with the biscoff crumbs.
- Press the mixture on the bottom of an 8” or 9” cheesecake pan. If using an 8” pan, it must be deep.
- Bake the crust in the oven for 15 minutes, or to keep it completely no-bake, place it in the freezer for thirty minutes while you prepare the batter. (Read notes).
- Remove it from the oven and let it cool completely.
Cheesecake Batter
- Place the cream cheese in a large bowl or in the bowl of a stand-mixer fitted with the paddle attachment. Beat at medium speed for 2 minutes. Add the powdered sugar, beat for another minute. Scrape the bowl.
- Add the Biscoff butter and beat until combined. Scrape the bowl and beat for another minute.
- Add the sour cream and mix to combine. Add the lemon juice, vanilla, and mix. Set aside.
- In a separate bowl, whip the heavy cream until stiff peaks form, for one to two minutes. It helps to have a cold bowl and cold whisk.
- Once the cream has reached stiff peaks, add half of it to the cheesecake batter. Fold to combine. Add the remaining whipped cream and fold until smooth and airy.
Assemble
- Pour one third of the batter over the chilled crust. Use a spatula to spread it on an even layer.
- Drizzle about ¼ cup of the ganache on top. Swirl with a knife.
- Top with another third of the batter, smooth it out, and then repeat with another layer of ganache swirled on top.
- Top with the remaining cheesecake batter. Pour the remaining ganache on top.
- Chill for at least 6 hours, preferably overnight, until set.
Whipped Cream
- Add the cold heavy cream, powdered sugar, and vanilla to a chilled bowl. Whip on medium speed for 1–2 minutes, until soft to medium peaks form. Don’t overwhip—stop as soon as it holds shape. Transfer to a piping bag fitted with the tip of choice. I used 1M.
Decorate
- Pipe whipped cream on top of the cheesecake if desired. Decorate with crushed or whole Biscoff cookies around the edges.
I’ve tried several of your cheesecakes and I gotta say, they never disappoint! Thank you
Thanks, Tammy! I’m so happy to hear!!
This looks delicious! Is it better to use the metric measurements for the ingredients or the volume measurements?
Thank you! I recommend using the metric measurements whenever possible for the most accurate results, especially for baking. The volume measurements will work, but weighing the ingredients is much more accurate.
Thank you so much! That is great! I prefer metric measurements.
How long can it stay in the fridge?
up to 4 to 5 days. I’ve left it in the fridge even up to a week, but I recommend placing it in the freezer if you’re leaving it that long. It freezes really well, and you can just remove it from the freezer about 30 minutes before serving (if freezing slices) and a few hours if freezing the whole cheesecake.
Thank you very much for your answer! I just completed it, and now it’s in the fridge. I have another question. After I decorate with the whipped cream, how long can it stay out of the fridge? The cheesecake is going to Liguria, three hours from Turin by car, and I want to make sure the whipped cream will hold up during the trip or even the day in the fridge
Because of food safety concerns, it’s recommended not to stay out of the fridge for longer than 2 hours. And the whipped cream will also soften up during the trip. If you can manage to put it in a cooler, that would be optimal.