Crème Brûlée Cheesecake
This Crème Brûlée Cheesecake remains one of my favorite cheesecakes I’ve ever made! Read some of the comments below and see how much people enjoy it. What I love most about it is how creamy it is—and how satisfying it is to crack the caramelized top with a fork before taking a bite. It’s just as fun to make as it is to eat, since it gives me an excuse to use my kitchen torch.
Brimming with vanilla aroma and flavor, I hope this cheesecake also becomes one of your favorites once you try it for yourself.
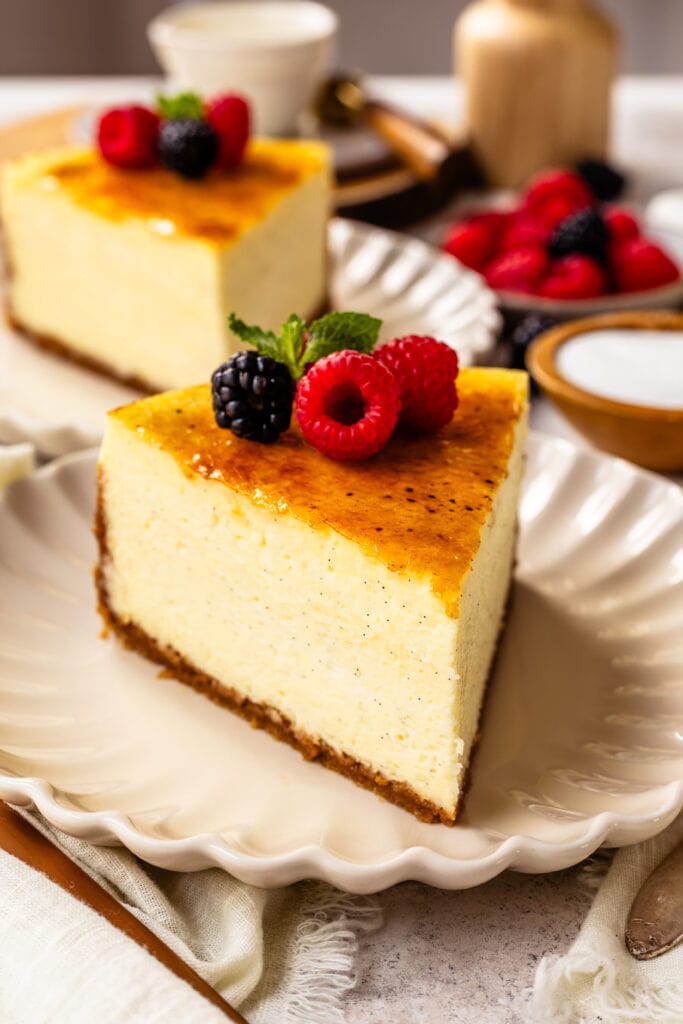
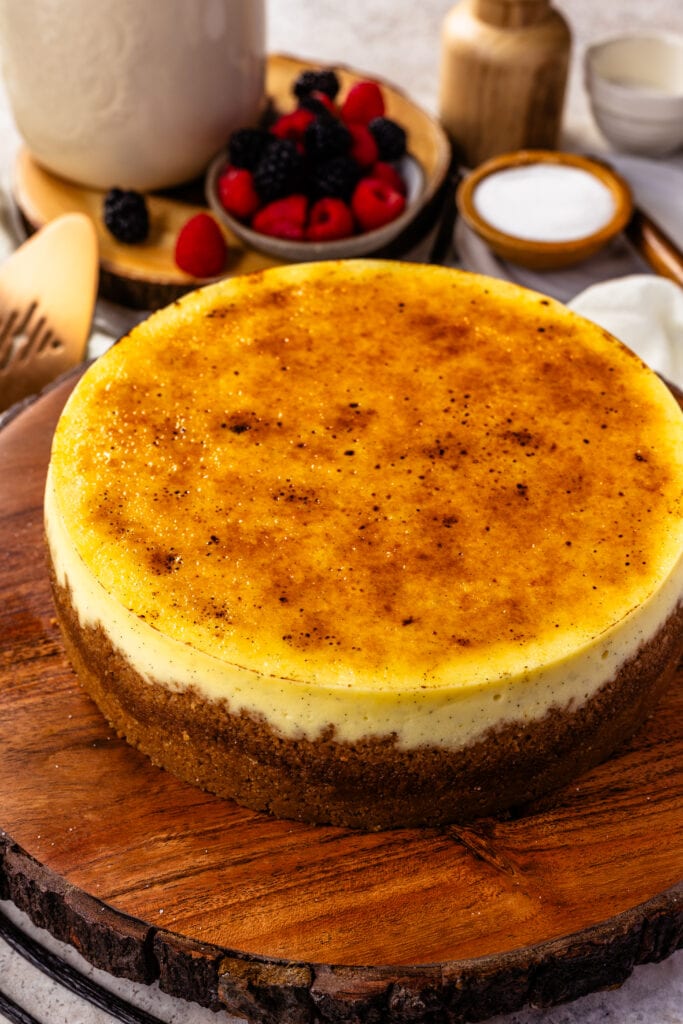
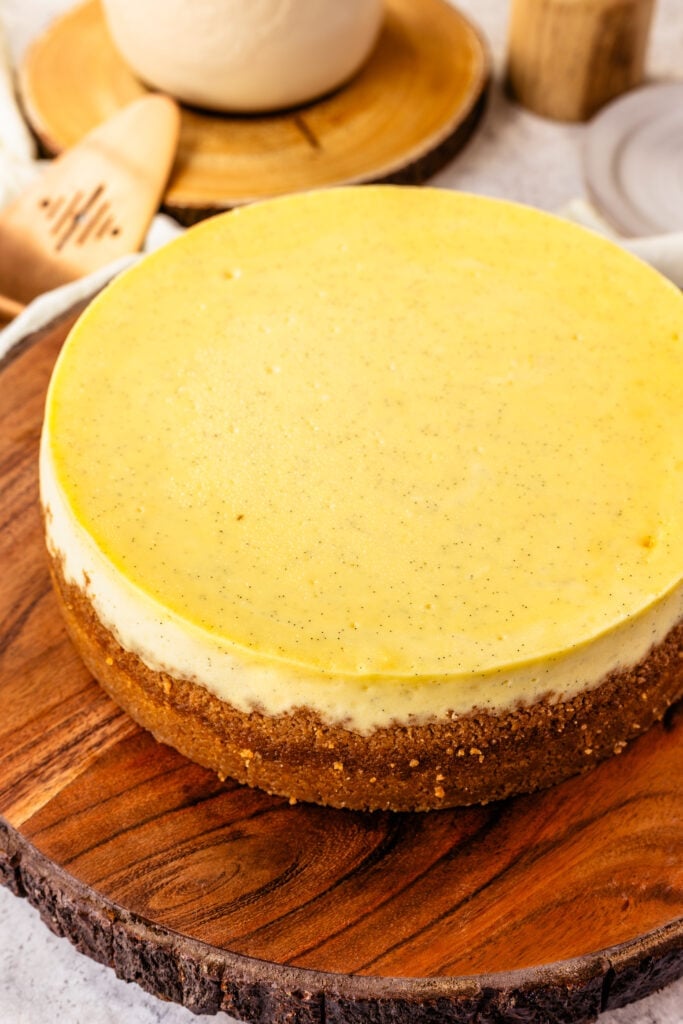
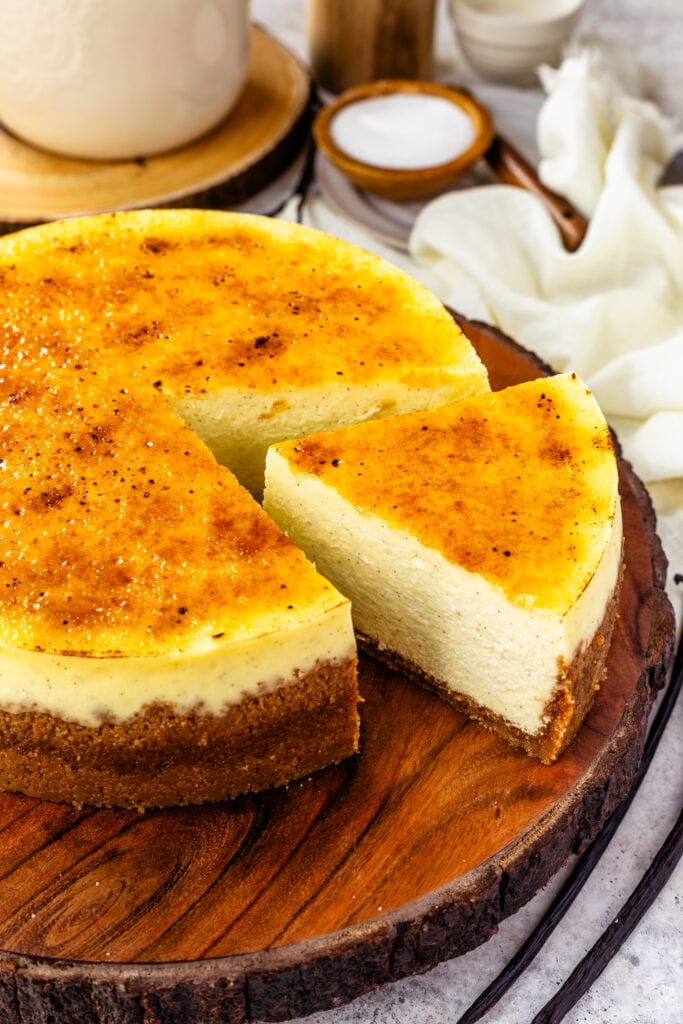
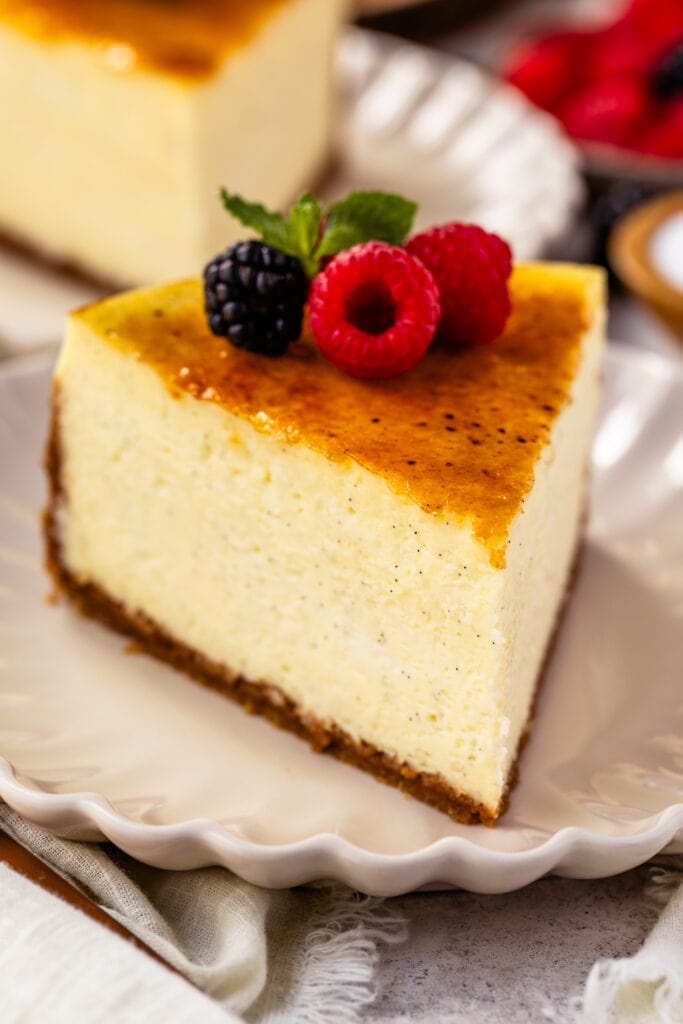
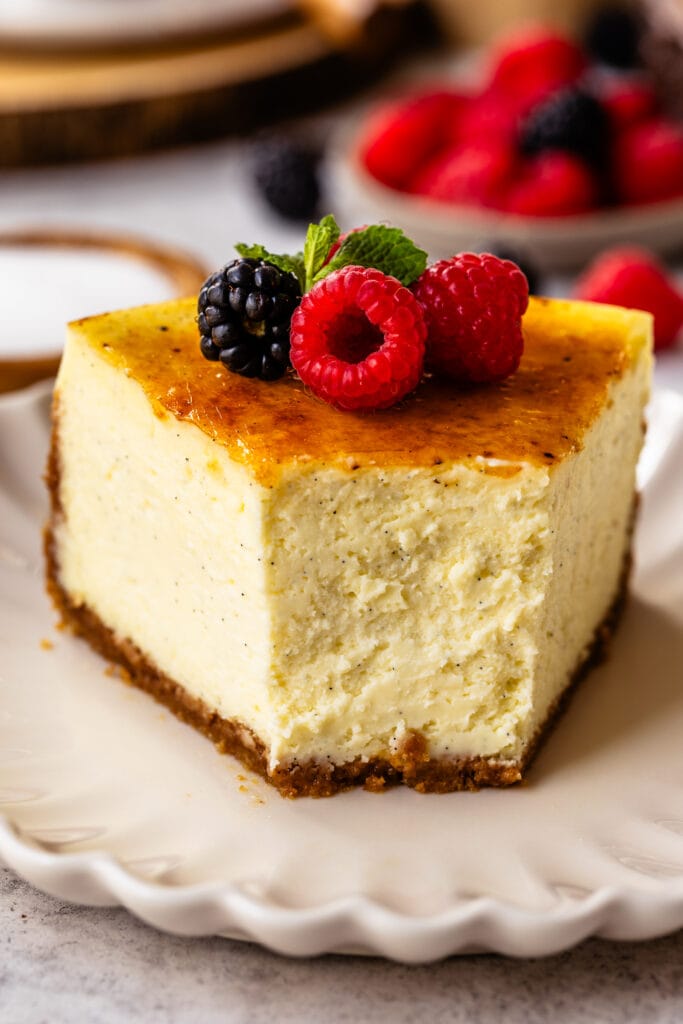
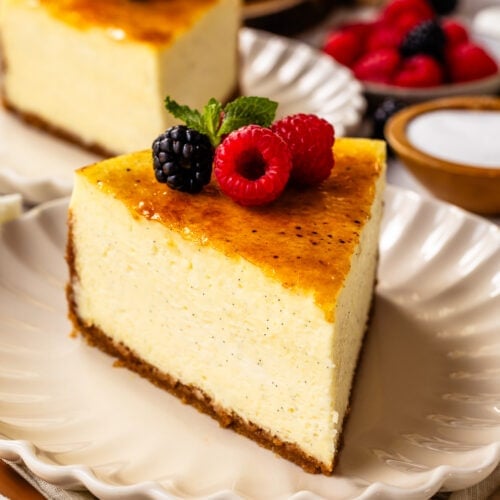
Look at this fabulous creamy texture, that goes so well with the flavors of the caramelized sugar topping, and the super buttery and crunchy graham cracker crust.
This post may contain affiliate links. I earn a commission from qualified purchases. Please read our Privacy policy here.
Crème Brûlée Cheesecake Recipe
I will show you step-by-step how to make this Creme Brulee Cheesecake.
Find the full ingredients list on the bottom of the page.
This post contains a lot of tips on how to make a perfect cheesecake that won’t break on top, so make sure to read the instructions thoroughly to ensure the best results.
Graham Cracker Crust
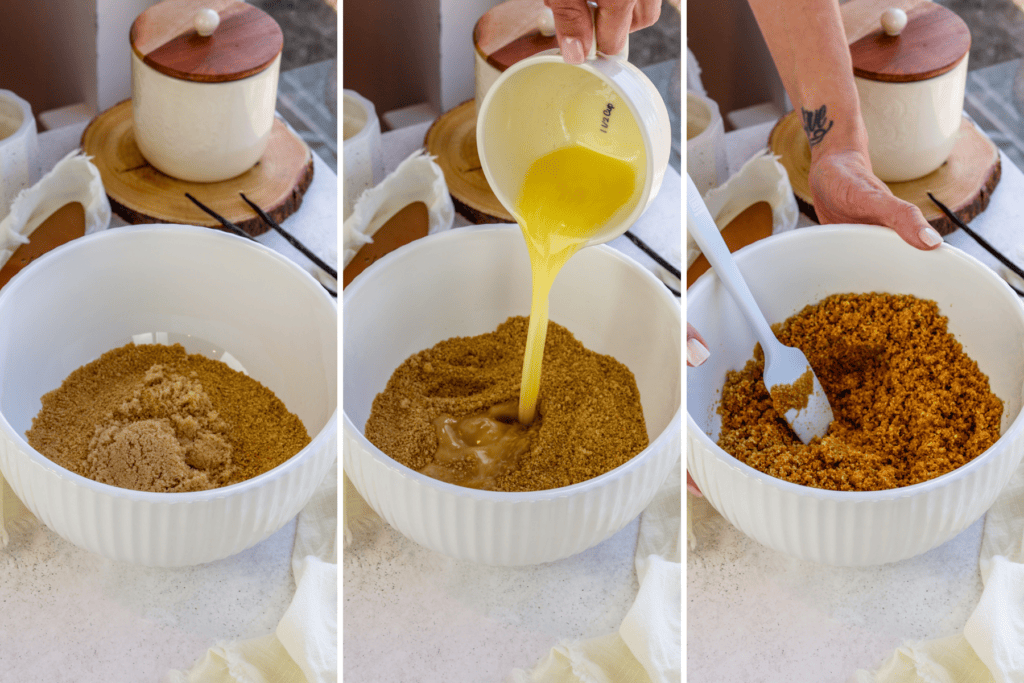
Start by making the graham cracker crust. To a bowl add the graham cracker crumbs and brown sugar. Mix to combine. Add the melted butter to the bowl and mix.
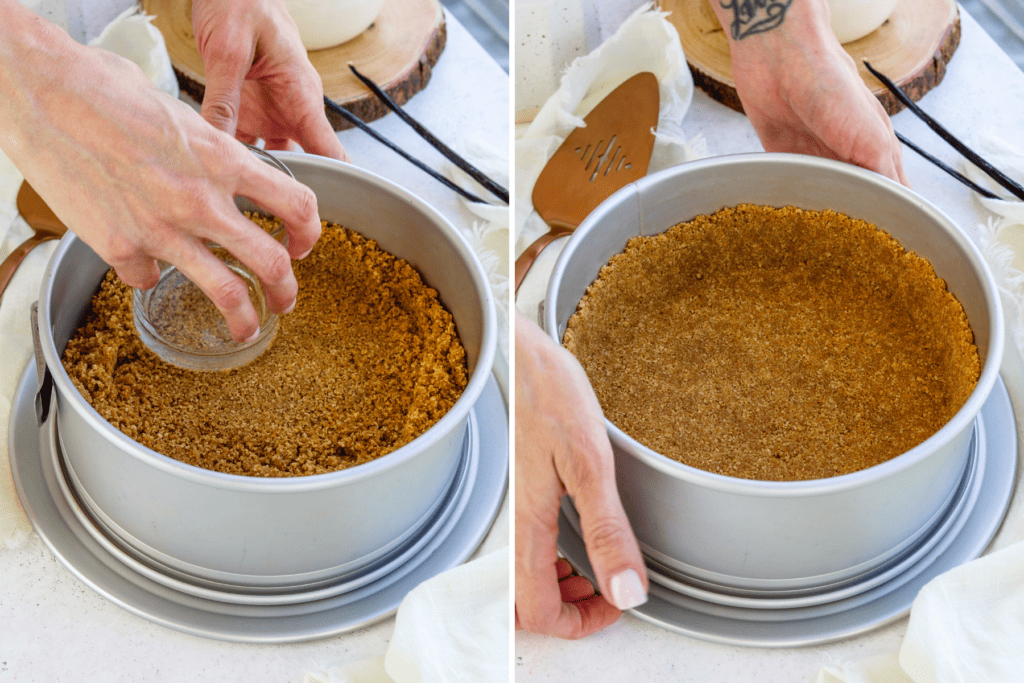
Press the mixture on the bottom of an un-greased springform pan. Use a cup to pack the crust tightly on the bottom and slightly up the sided of the pan. I am using a 8″ springform pan. You can also make this recipe in a 9″ pan. If using an 8-inch pan, make sure it’s tall enough. Mine is 3-inches tall, from the brand Fat Daddio, and it’s my favorite cheesecake pan.
Bake the crust in the oven for 10 minutes.
Remove it from the oven and let it cool down. Grease the exposed sides of the cheesecake pan where the cheesecake batter is going to touch, so it doesn’t stick.
Now make the cheesecake filling.
Cheesecake Filling
In the bowl of a stand mixer, or in a large mixing bowl, beat the cream cheese. If using the stand mixer, use the paddle attachment.
Make sure to scrape the bowl in between mixing, to ensure all ingredients are getting nicely incorporated together, and the batter won’t be lumpy. Add the granulated sugar and scrape the vanilla bean seeds into the bowl. Mix to combine, until creamy.
Instead of vanilla beans, you can use vanilla bean paste, but add it at the end with the eggs.
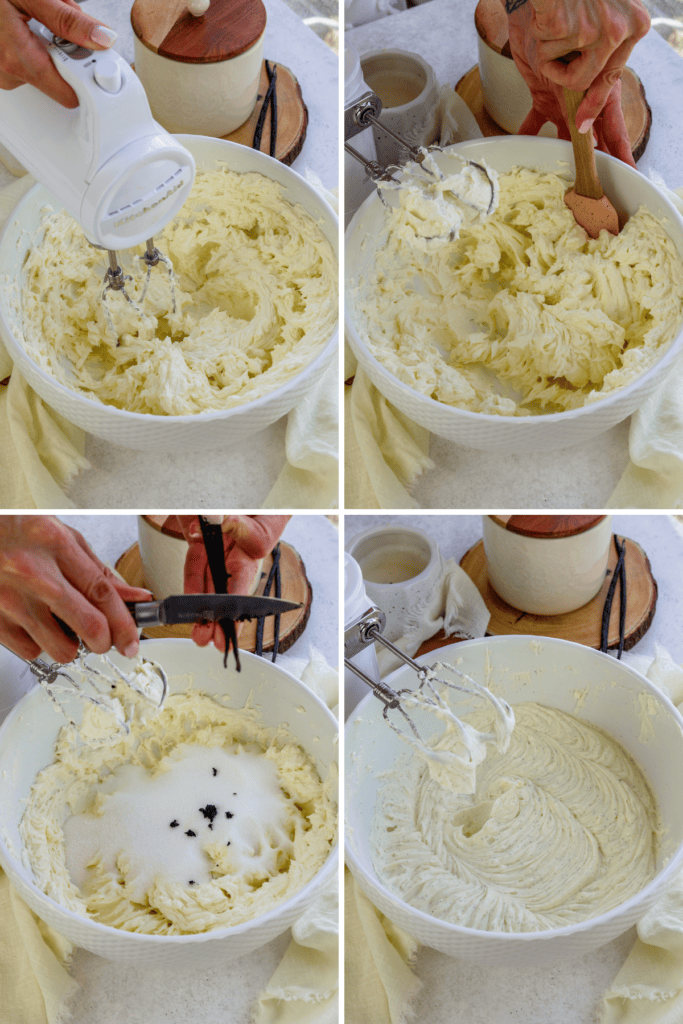
Once the sugar and vanilla beans are mixed in, add the sour cream, and mix to combine. Add the eggs, one at a time, mixing until fully incorporated before adding the next egg. Scraping the bowl in between. Along with the last egg, add the vanilla extract (and also the vanilla bean paste if using that instead of vanilla bean seeds), and the salt.
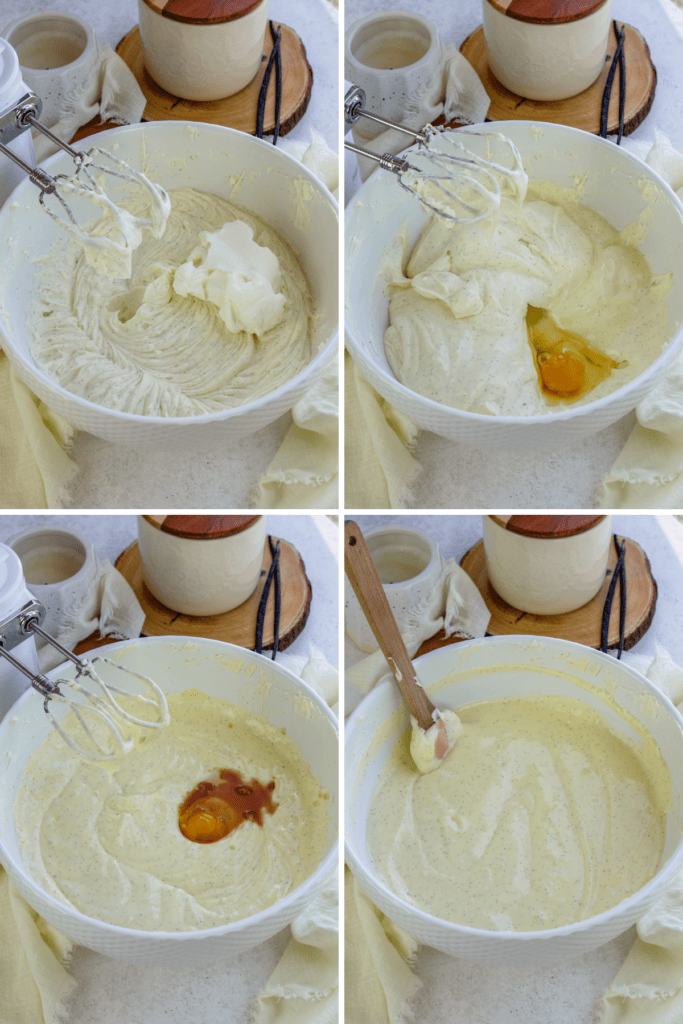
Once the batter is smooth and creamy, pour on top of the baked crust.
Baking
Wrap the bottom of the cheesecake pan in several layers of aluminum foil. I like to use the widest type of foil available (18 inches wide). This really helps cover the bottom and sides of the pan in a way that the water from the water bath won’t have a chance to slip through.
Place the wrapped cheesecake pan inside of a large roasting pan. Fill the roasting pan with hot water.
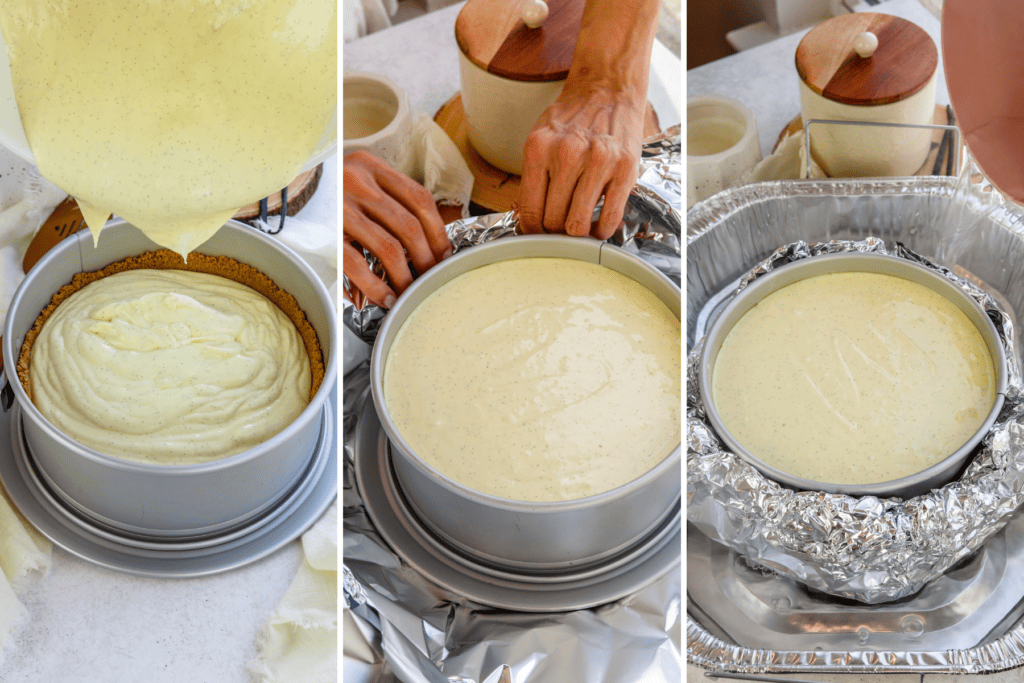
Bake the cheesecake in the 325ºF oven for 60 to 75 minutes. When done baking, the cheesecake should be slightly jiggly in the center, and set around the edges.
It can take a bit longer to bake depending on your oven. Check the recipe card below for recommendations on using a convection oven instead of regular. Once the cheesecake is done baking, turn the oven off. Leave the cheesecake in the oven with the door shut for one hour.
Remove the cheesecake from the oven after the hour has passed. Let it cool down and place it in the fridge, with the ring still on the pan. Only remove the ring from the pan after chilling the cake.
Caramelizing the top
When you are ready to serve the cheesecake, remove it from the fridge, and remove the ring from the pan.
Use a cake scraper to transfer the cheesecake to a serving plate. Sprinkle the granulated sugar on top of the cheesecake on an even layer. Use a torch to toast the top. I like to use my torch on the lowest setting, to avoid burnt spots.
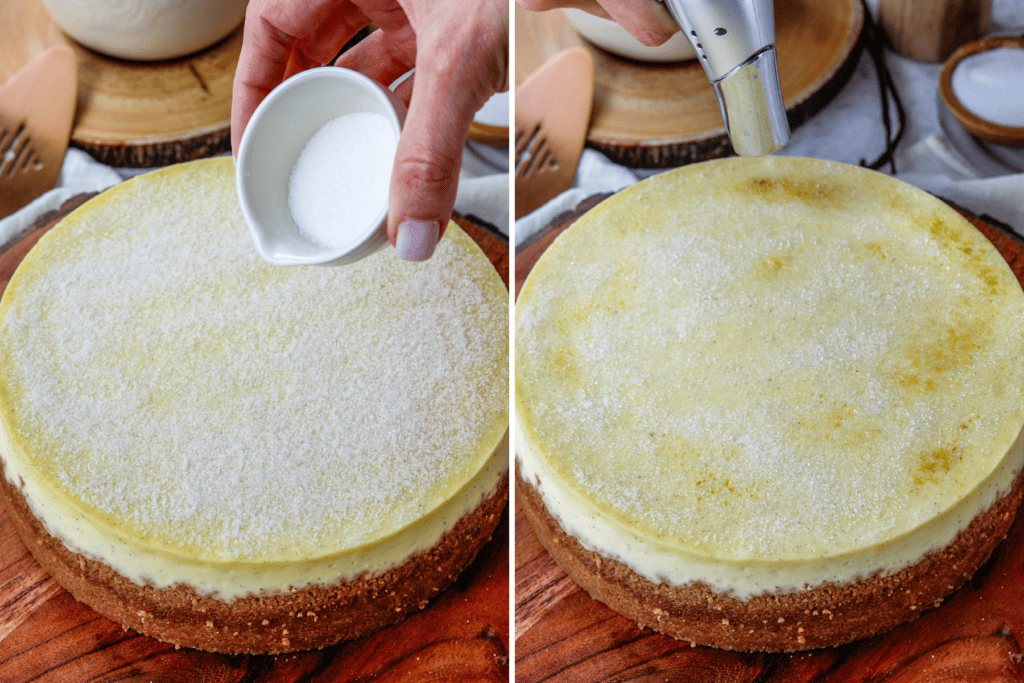
Keep moving the torch around in circular motions, not hovering too long above one spot, to ensure an even caramelized layer. Allow for the caramel layer to cool down and harden up, which should take a few minutes. Slice and serve the cheesecake.
Tips for making cheesecake
- I actually prefer using a hand mixer to make cheesecake over a stand mixer. The KitchenAid bowl is so deep, and not wide enough, and the whisk doesn’t reach all the way around the sides of the bowl, which can lead to the batter becoming lumpy. You can mitigate that by scraping the bowl several times during the mixing process. I still find it way better to use a hand mixer to make cheesecake to avoid lumps.
- Make sure to use room temperature ingredients (cream cheese, sour cream, eggs).
- Scrape the bowl several times while making the batter to avoid lumps, and to ensure a smooth batter.
- Once the eggs are added, don’t over mix the batter, that can also cause the cheesecake to expand too much while baking, and then deflating, which will cause cracks.
- Once the cheesecake is done baking, shut the oven off and keep it there for one hour, because removing the cake immediately from the oven will cause it to break on top.
This Crème Brûlée Cheesecake is a perfectly indulgent dessert to bring to any celebration or gathering. Everyone will be sure to love it!
I love serving this cake with berries on top, the freshness of the berries really compliment the rich and tangy cheesecake.
If you like this recipe, here are some other recipes you may like:
- Ube Cheesecake
- Nutella Cheesecake
- Dulce de Leche Cheesecake
- Caramel Cheesecake
- Biscoff Cheesecake
- Lemon Cheesecake
- Pistachio Cheesecake
I hope you loved this recipe. If you make it, leave a comment below or tag me on instagram I love hearing from you!
Watch Video

Crème Brûlée Cheesecake
Ingredients
Graham Cracker Crust
- 1 1/2 cups graham cracker crumbs 180 grams, or digestive biscuits
- 1/4 cup brown sugar 55 grams
- 6 tbsp unsalted butter melted 85 grams
Cheesecake batter
- 907 grams cream cheese softened 4 packages of 8 oz.
- 1 1/3 cup granulated sugar 266 grams
- 2 vanilla bean pods see notes
- 1/2 cup sour cream 120 grams
- 4 large eggs room temp
- 1/2 tbsp vanilla extract
- 1/2 tsp salt
For the topping
- 1/4 cup granulated sugar 50 grams
Instructions
Graham Cracker Crust
- Pre-heat the oven to 325ºF.
- Place the graham cracker in a food processor and process to obtain fine crumbs.
- Add the brown sugar and mix to combine.
- Melt the butter and mix with the crumbs and sugar.
- Press the mixture on the bottom of an 8” or 9” cheesecake pan. If using an 8” springform pan, it must be deep.
- Bake the crust in the oven for 10 minutes.
- Remove it from the oven and let it cool down.
Cheesecake Batter
- Grease the sides of the cheesecake pan. (Read notes)
- Beat the cream cheese for 3 minutes with a mixer at medium speed, until creamy.
- Add the granulated sugar to the bowl.
- Split the vanilla bean pods in half with a pairing knife then open them and scrape the seeds from into the bowl with the sugar and cream cheese.
- Beat the cream cheese, vanilla bean seeds, and sugar for 2 minutes at medium speed.
- Scrape the bowl and beat for another 30 seconds.
- Add the sour cream and mix to combine. Scrape the bowl.
- Make sure to scrape the bowl a few times during the mixing process, to avoid the cream cheese from forming lumps in the batter.
- Add the eggs one at a time to the bowl, mixing until incorporated before adding the next one.
- Avoid over mixing once the eggs are added, to prevent cracking of the cheesecake.
- Add the vanilla extract (and or vanilla bean paste), salt, and mix briefly.
- Pour the cheesecake batter in the pan, over the baked and cooled crust.
- Wrap the bottom of the pan with a few layers of foil.
- Place the pan in a larger roasting pan, and add hot water to the roasting pan, to form a water bath. This is very important so the cheesecake doesn’t crack.
- Bake the cheesecake in the pre-heated 325ºF oven for 60 to 75 minutes.
- To check if the cheesecake is done baking, give the pan a little wiggle, it should jiggle slightly in the center, but the edges should look set.
- Turn the oven off, and leave the cheesecake in there for 1 hour.
- Remove the cheesecake from the oven, let it cool down. Don’t remove the ring of the pan yet, place the cheesecake in the fridge to chill for at least 6 hours.
To decorate
- After the cheesecake has been done chilling, remove from the fridge. Remove the ring from around the pan.
- Sprinkle the sugar on an even layer on top of the cheesecake. Use a torch to caramelize the sugar on top. I like to use my torch on the lowest setting and do this step slowly, to avoid burned spots on the surface.
- Use a circular motion, and don’t hover over one spot for too long, keep it moving, trying to get the whole surface of the cheesecake evenly.
- Allow for the caramelized sugar to harden up on top, which should take a few minutes. Slice and serve.
- If you have cheesecake leftovers, the caramelized sugar on top will become soft. I found that if you take the torch and toast the top of the cheesecake again, using a low setting, it should harden the sugar up again. It won’t be as crunchy as it was when you first did it, but it will do the trick.
Seeing the brûlée will soften. How long before serving can I torch the sugar? Can I fridge it while serving guest dinner or will that soften it?
It should be fine but it will soften a bit. For the best texture torch right before serving, or you can re-torch it.
Delicious! I had trouble envisioning how to cut the cake after heating the sugar, so we torched them after cutting and it worked just fine. We just divided the sugar between the slices and stored the unsugared slices for later.
That’s a great idea!!! I’m glad you liked it!
Can’t wait to make this! If I want to use Vanilla Extract instead, how much would I use?
hi Trisha, it’s right in the notes of the recipe.
Vanilla Bean Pod: In place of the vanilla bean pod, you can use 1 tbsp of vanilla bean paste (or extract). If using the vanilla bean paste instead of the vanilla bean seeds, add it at the end, when adding the eggs.
Thank you for your reply! So just to be clear, if not using the vanilla pods or paste, I will be using 1 1/2 Tablespoons of vanilla extract for the entire recipe? ( It says 1/2 tbsp. vanilla extract for the batter when using the vanilla pods)
I want to make this so badly but I don’t have a torch.
Is there any other way I can get the same effect?
Chill the cheesecake: Make sure the cheesecake is completely chilled before attempting to caramelize the sugar.
Sprinkle sugar on top: Spread an even layer of granulated sugar on top of the cheesecake, just as you would for a traditional crème brûlée.
Use the oven broiler: Preheat the broiler on high. Place the cheesecake on the top rack, close to the broiler. Keep the oven door slightly open so they can keep an eye on the sugar.
Watch carefully: The sugar will caramelize very quickly (usually within 1–3 minutes), so it’s important to watch it closely to prevent burning. Once the sugar has melted and turned golden brown, carefully remove the cheesecake from the oven.
Cool and serve: Allow the cheesecake to cool slightly so the caramelized sugar hardens into a crunchy topping.
Hi I need to send the cheesecake to someone tonight and wanted to know- once ive bruleed the sugar on top- will the sugar layer remain crunchy after a few hours or even the next day?
It’s better to brulee right before serving or you can just brulee again later, it will become crispy again
Hi! Can I half the recipe and use a 6 inch springform pan? Would all the baking instructions be the same?
baking time will be reduced, but everything else is the same.
Hi! This looks amazing and I’ll be making it tonight however, I could not find vanilla bean pods or vanilla bean paste. I just have vanilla extract. Wiil it be as good?
Im sure it will definitely be delicious!
Thank you, Camila! It was! In fact, my son-in-law’s whole firehouse was raving over it. My daughter delivered it today for my son-in-law’s bday and said that one person exclaimed that cheesecake is their favorite dessert and this one was by far their favorite…EVER and another, who commented they don’t usually like cheesecake, said they loved it and went back for seconds! I am so happy I didn’t need the vanilla bean pods or paste however, next time I make this, I’m going to look harder to find them so that I compare. Thank you for this awesome recipe. I will only be trying many more of your recipes in the future.
*Just a wee, little note. I’m still a bit of a novice and am thinking that it would be helpful for others like me if you notated the hour of resting in the oven and the 6 hours of chilling in the total length time. I realize I should have read ahead, and I still had time to get this done but it would just be helpful. Thanks again!
Would it be possible to make this recipe using a mini cheesecake pan instead of the springform pan?
certainly. you can make mini cheesecakes with this recipe. You will have about 24 mini cheesecakes. Bake for 20 to 25 minutes, no need for bath water.
Could this be baked in a 10 inch springform pan? Would I need to increase the crust ingredients and decrease the bake time?
I would increase the crust ingredients. And you can, the cheesecake will be short, it wont be too tall.
And yes decrease bake time probably.
Saw this procedure on Instagram & I’m hoping the slicing with the top bruleed will work as yours did? I’m guessing the crust will have to be very thin so that knife can slice without crushing that top. Anxious to try!
Yes it will be easy to slice. You will see! 🙂
Your video starts & then the obnoxious ads take over then you jump to another recipe🙄 Extremely annoying because my main interest is the finished product where you slice the hard sugar crust without smashing the cake!! Would love to see how you do this because the finished slices aren’t going to be pretty!
Hi! I’ve made this a couple times already and it’s ALWAYS a HIT! Today however, I ran out of butter so I had to use margarine for the graham cracker crust. The consistency looks different when I mixed it and it looks harder than usual…did I ruin the cheesecake??
I think it should be fine
Sooo delicious! My family were all impressed!
I made this when our friends came over, it was a huge hit!! Best cheesecake we have ever had!!! I will be making this again.
Maravilhoso!! O melhor dos cheesecakes. Adorei a receita!😋😋😋😋👏🏻👏🏻👏🏻