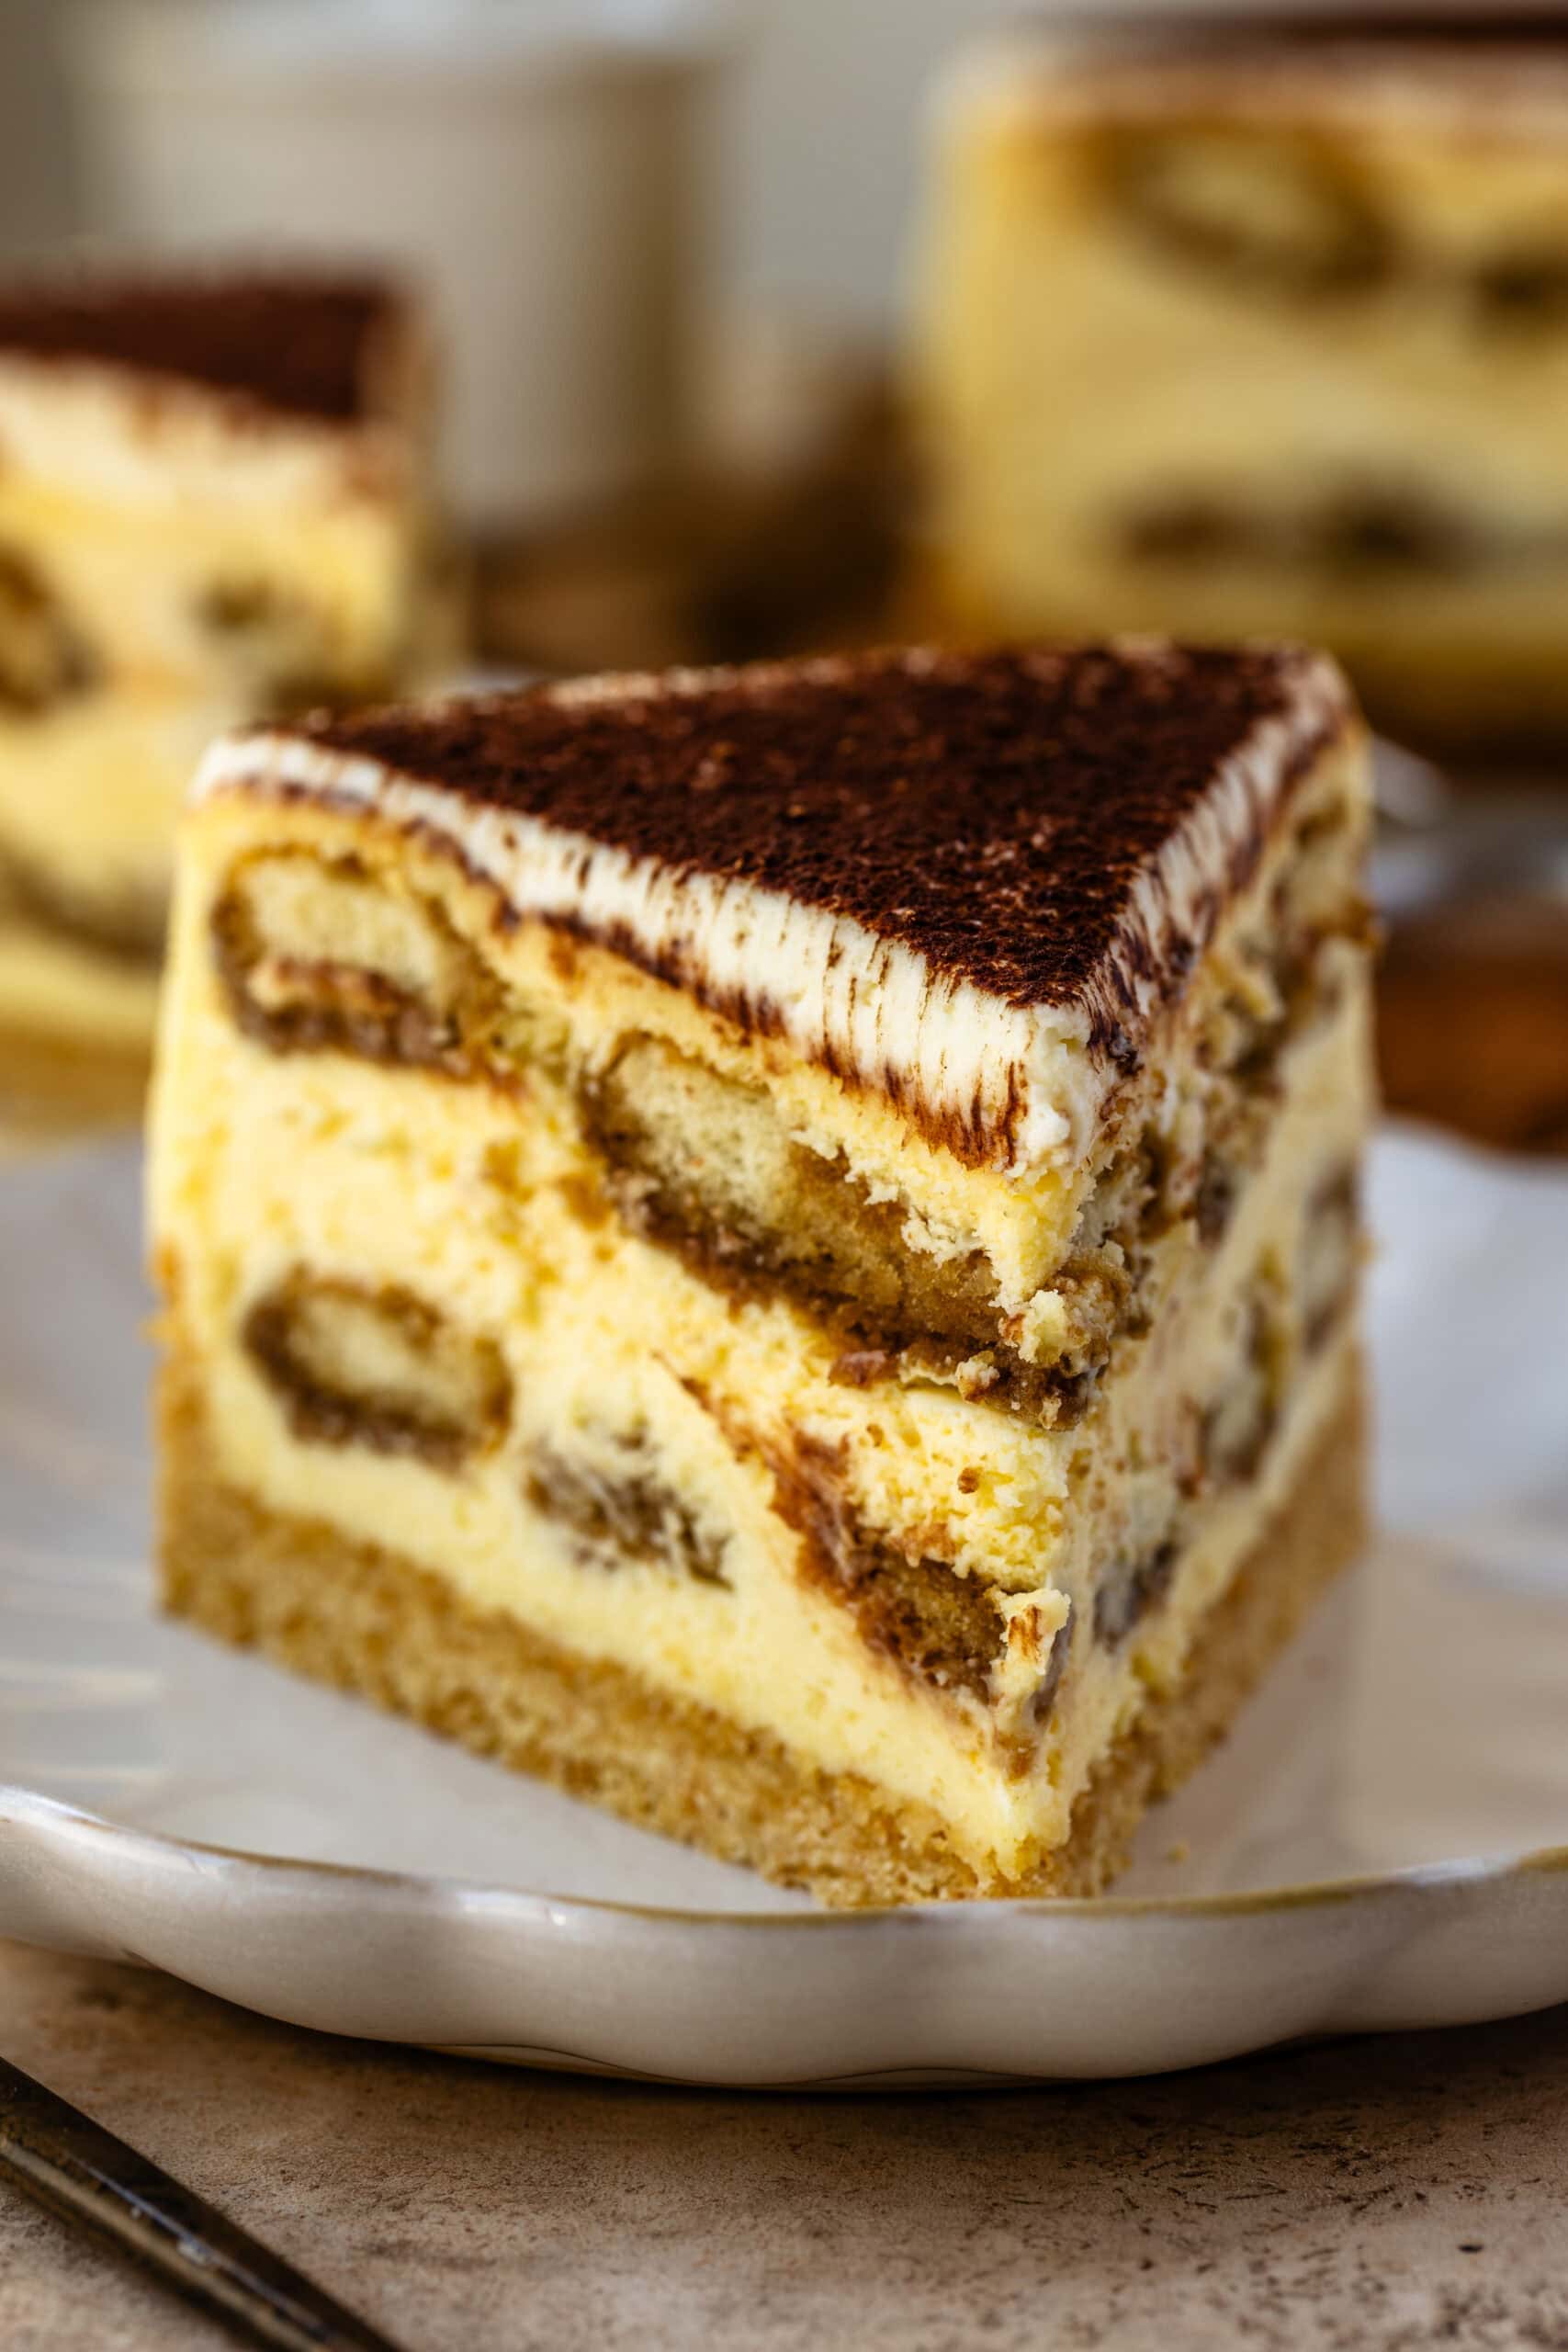
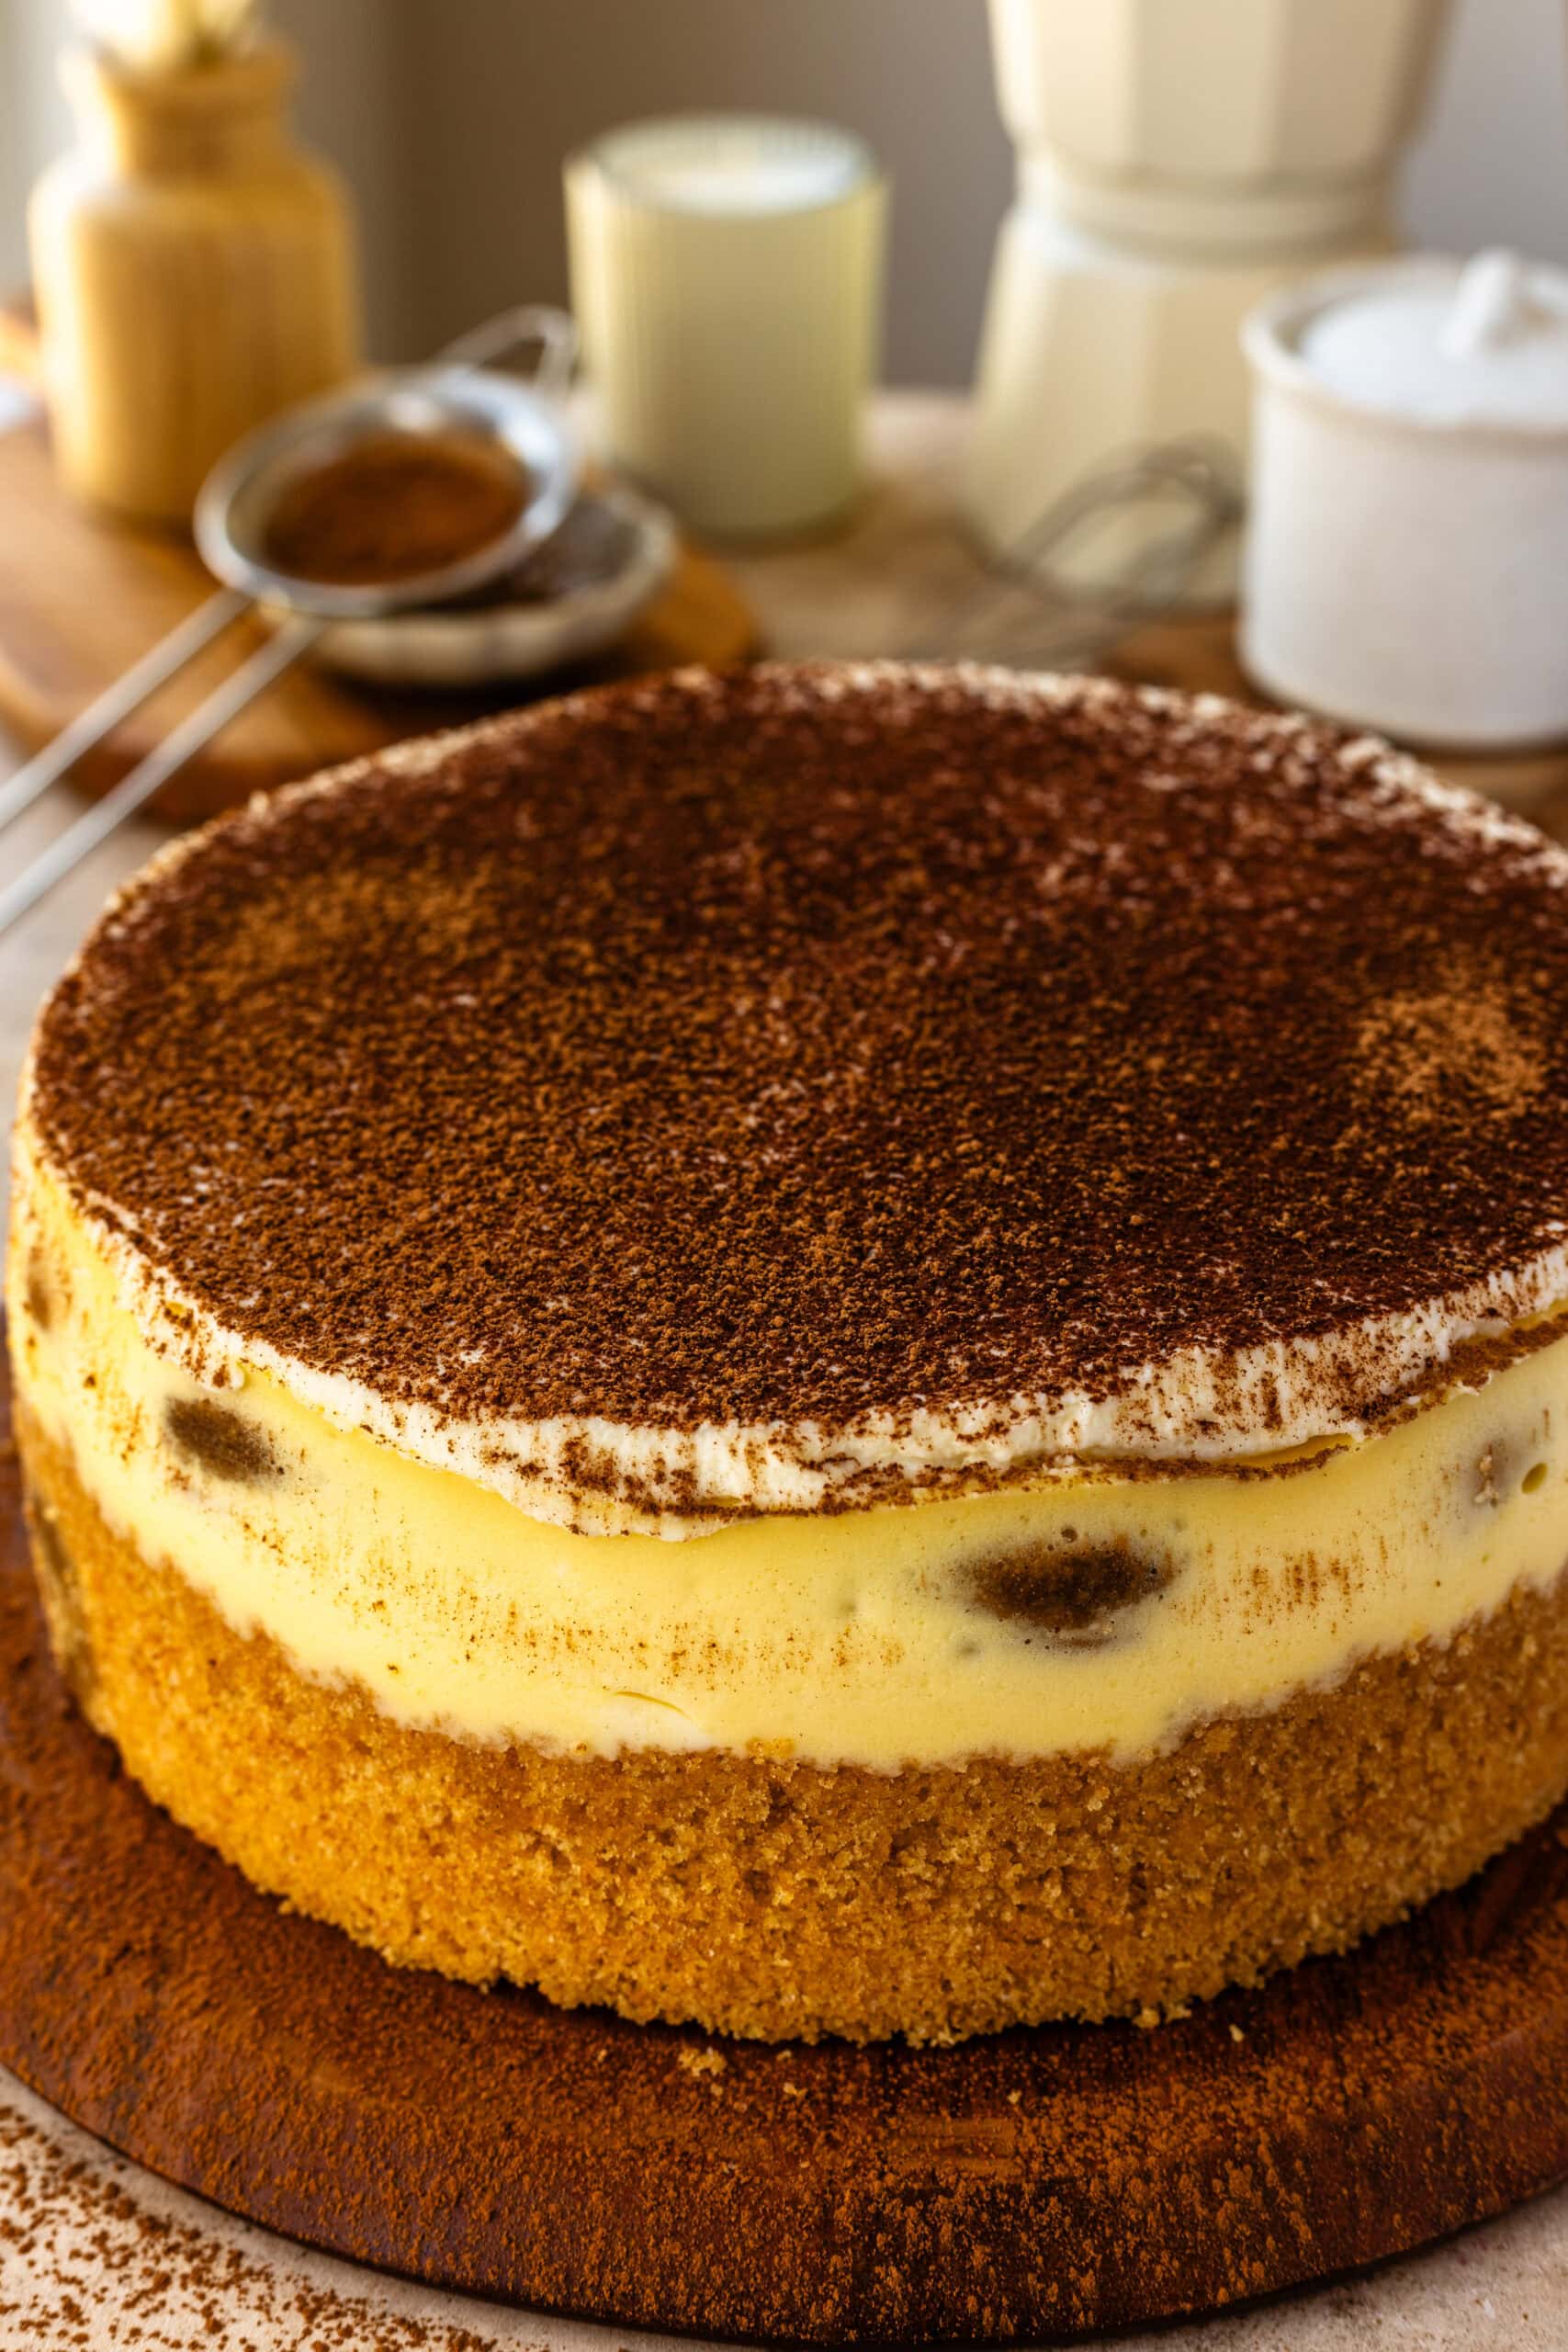
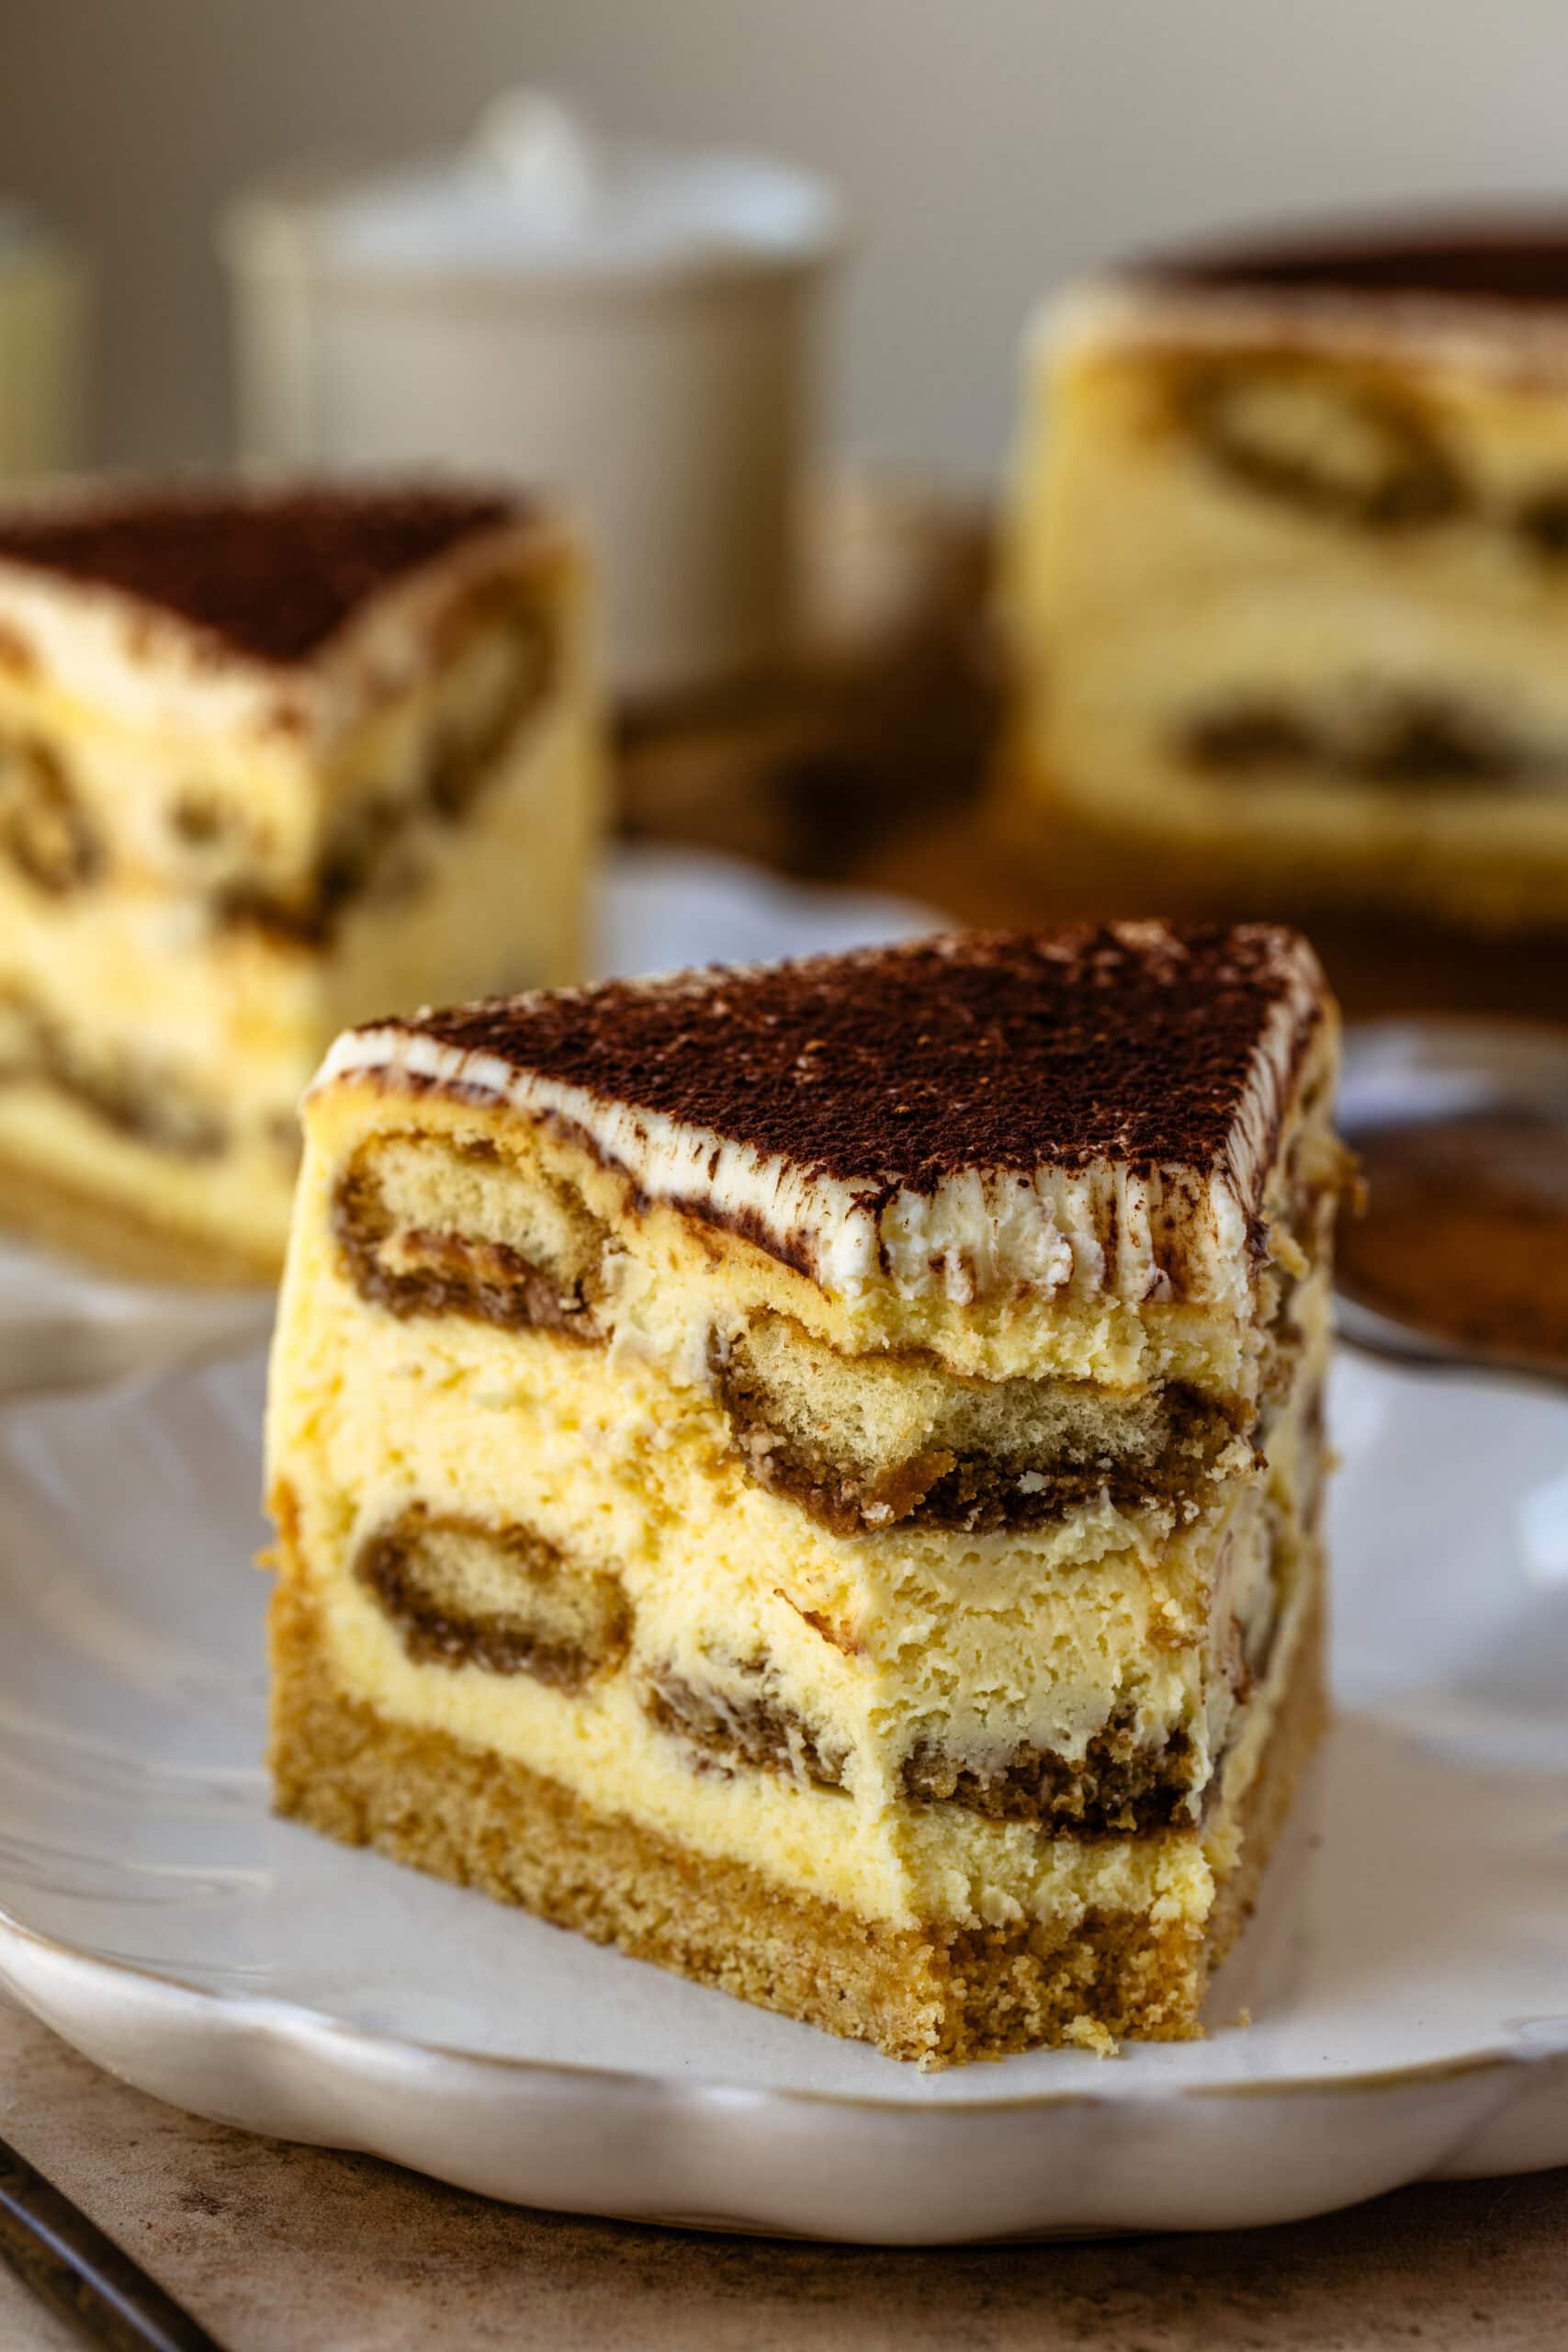
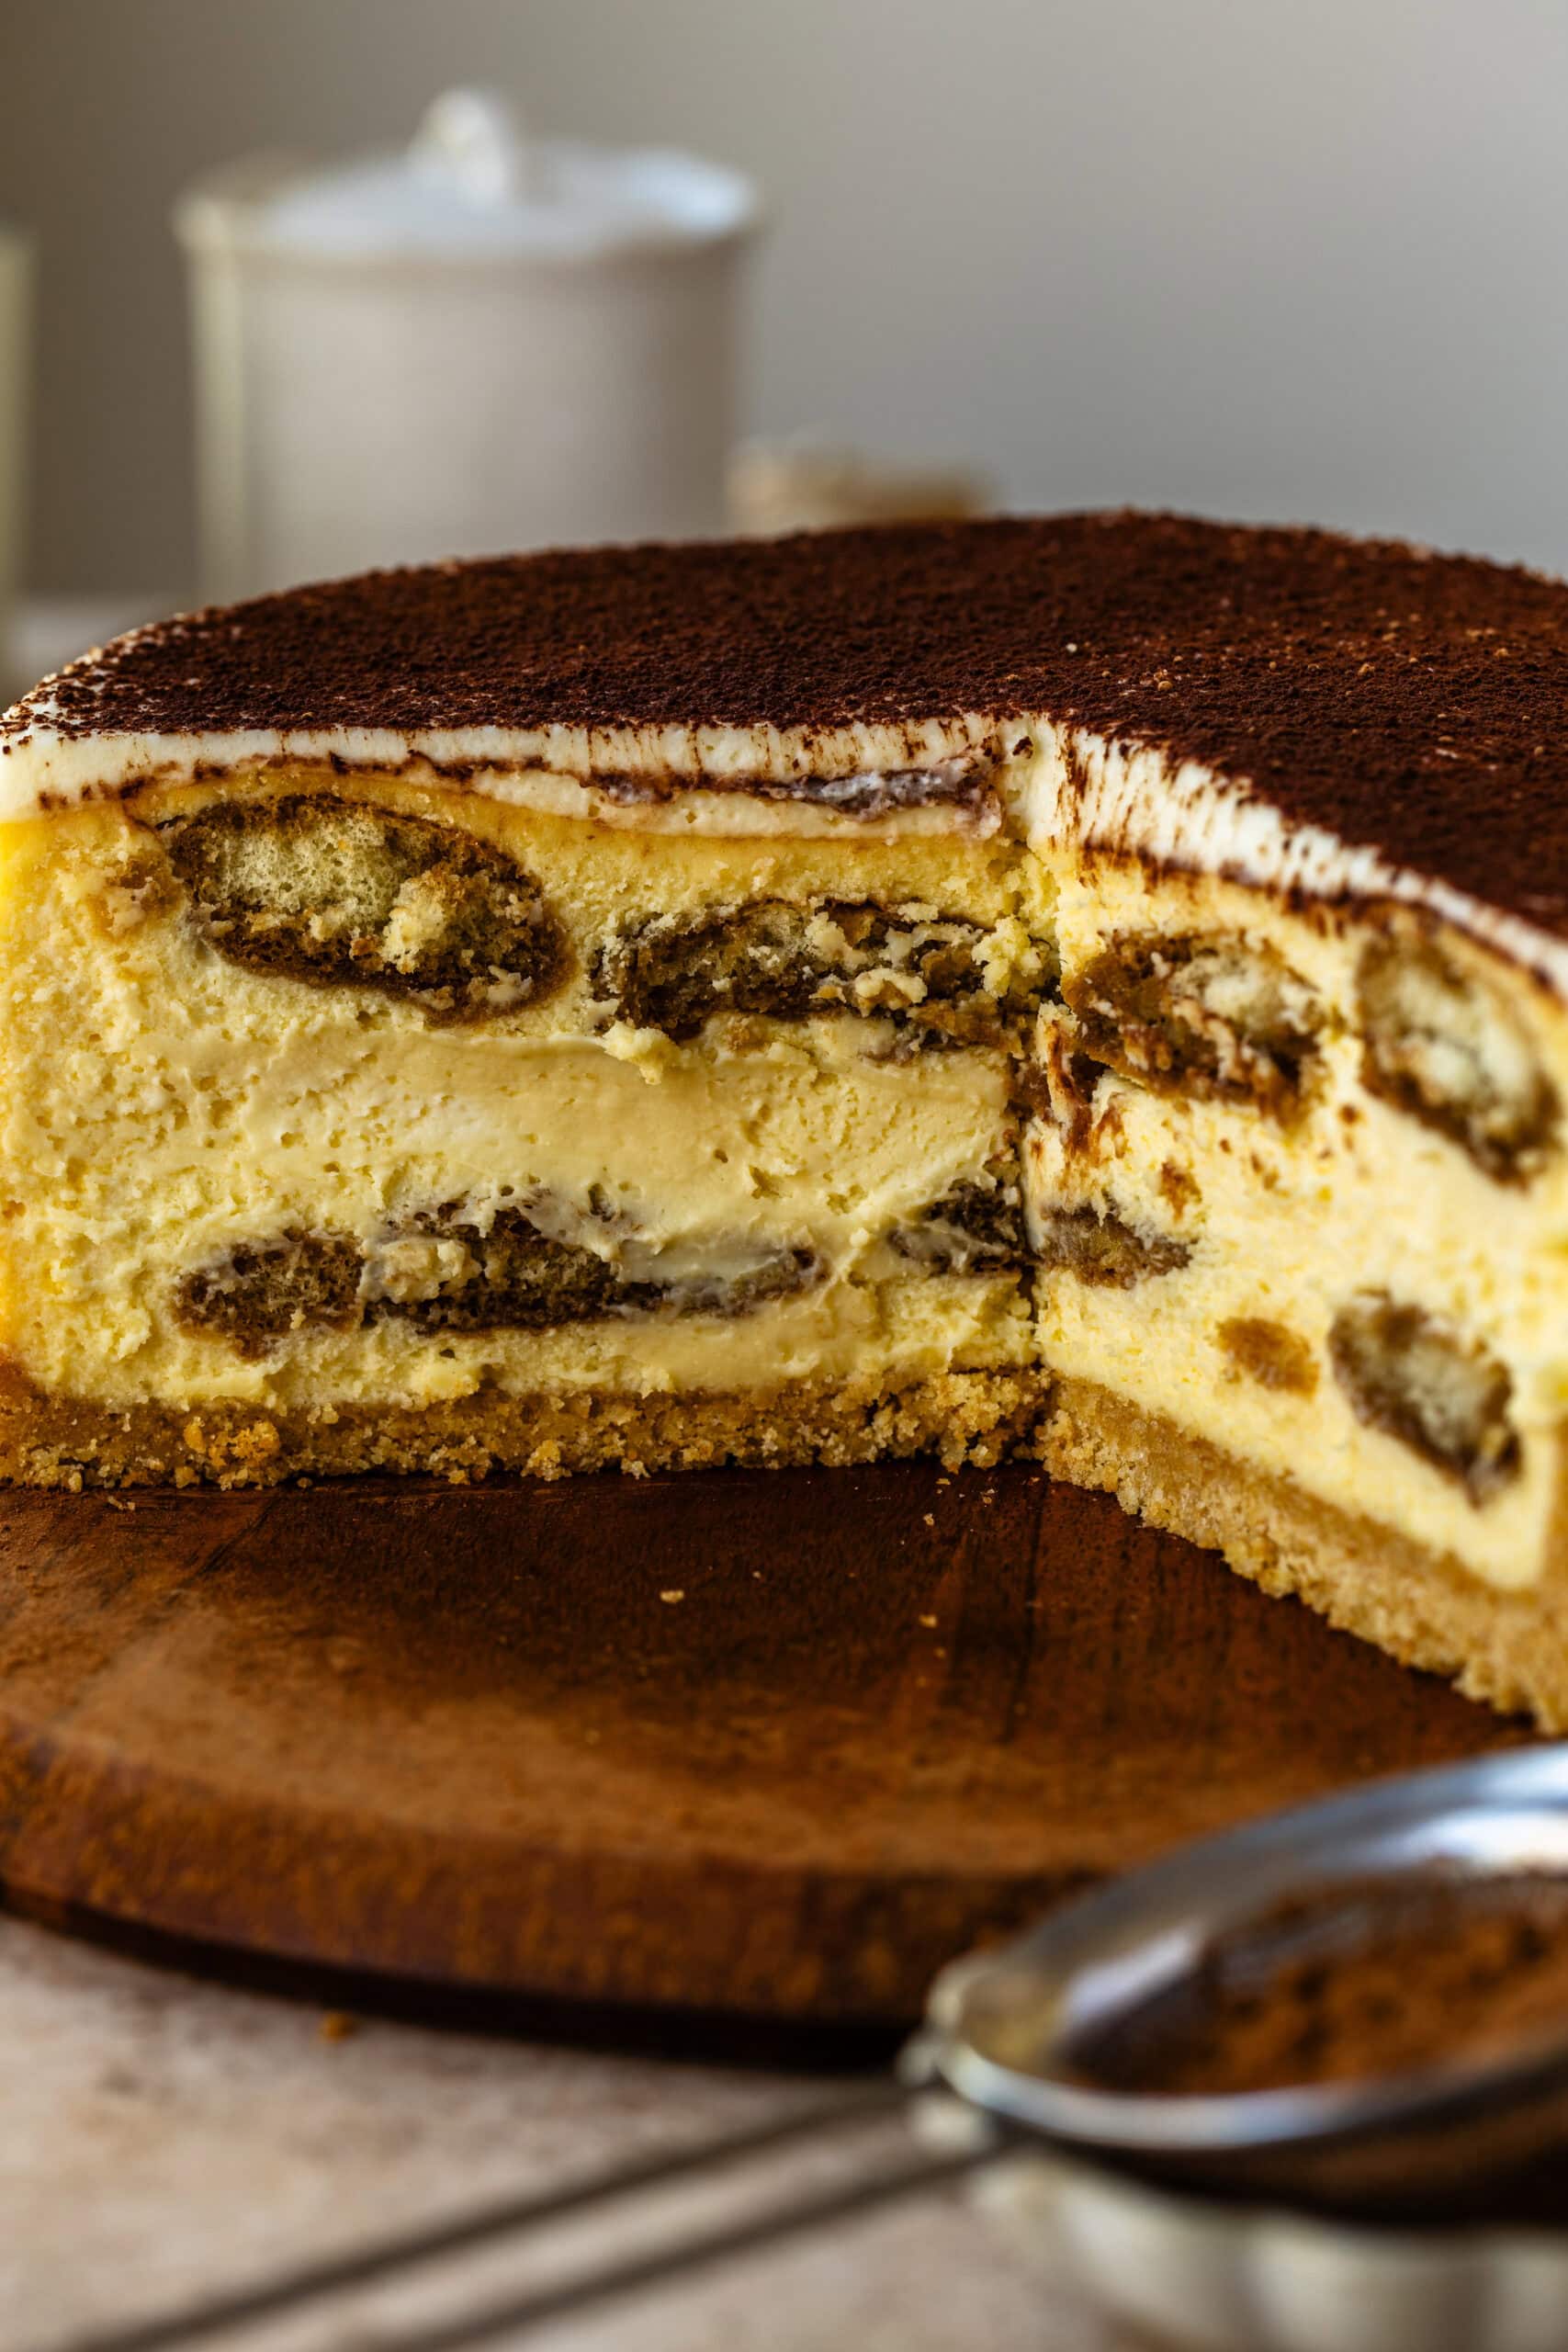
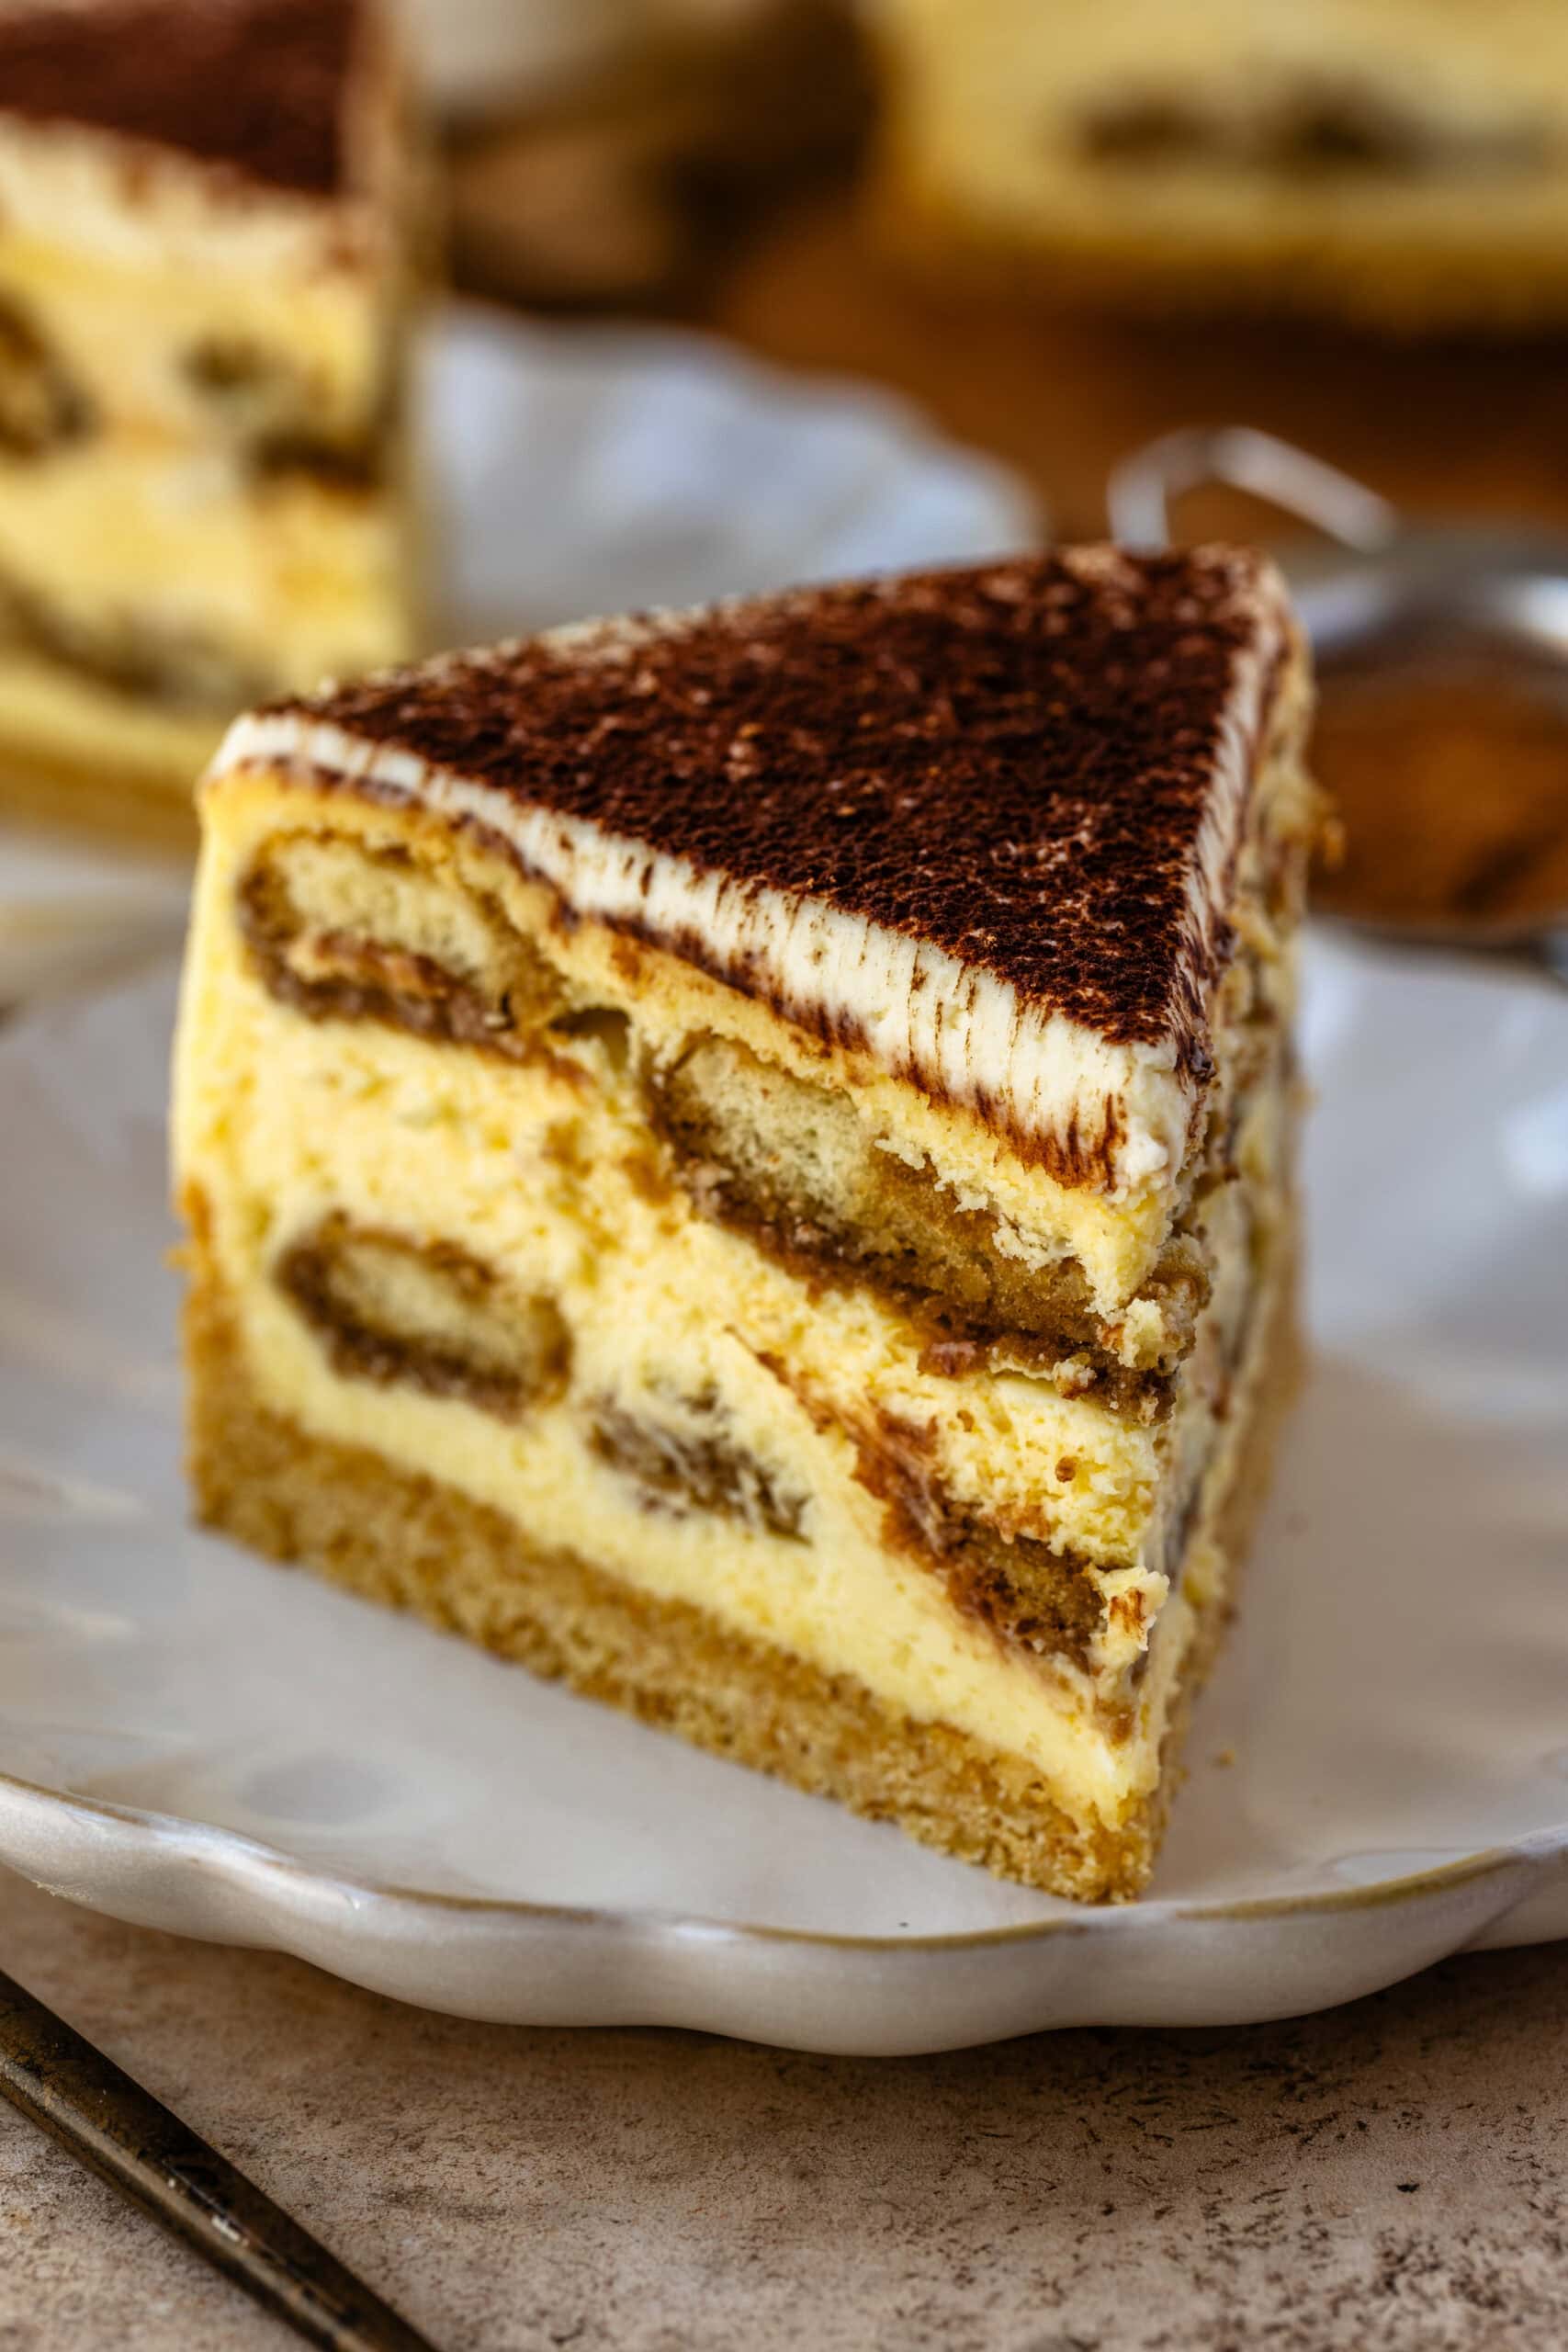
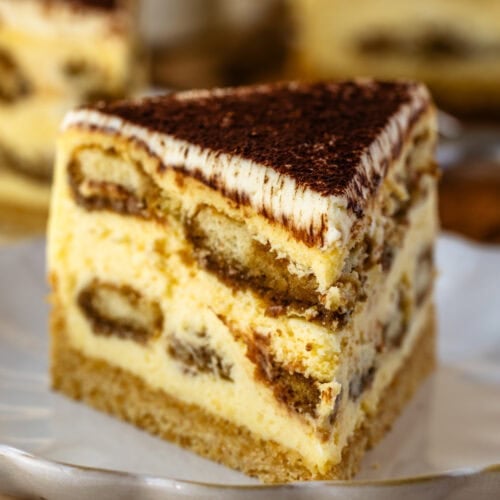
Tiramisu Cheesecake
Tiramisu is absolutely one of my favorite desserts, so turning it into a cheesecake felt inevitable. As you may know, cheesecakes are one of my specialities, and this recipe did not dissapoint! This version lets the coffee-soaked, mascarpone-rich flavors of tiramisu come through while still baking up into a perfect cheesecake.
I Love This Cheesecake Because…
You’ll love this cheesecake because it delivers everything you want from tiramisu in a form that actually slices clean and holds its shape. The espresso-soaked ladyfingers bring in that familiar coffee depth without turning the cheesecake wet, while the combination of mascarpone and cream cheese keeps the texture rich but balanced. It’s smooth, creamy, and deeply flavored, with just enough structure to feel dependable every time you bake it.
Key Ingredients & Why I Use Them
Cocoa powder – A light dusting on top adds contrast and keeps the finish true to tiramisu.
Ladyfingers – I use these as layers rather than a crust so they absorb espresso without collapsing into the cheesecake.
Espresso or strong coffee – This is where the tiramisu flavor really comes from, so I keep it concentrated and lightly sweetened.
Mascarpone – It softens the cheesecake and gives it that classic tiramisu richness without heaviness.
Cream cheese – It wouldn’t be a cheesecake without cream cheese! Cream cheese provides structure so the cheesecake bakes up smooth, firm, and easy to slice.
Eggs – These set the cheesecake gently and create a creamy, custard-like interior.
This post may contain affiliate links. I earn a commission from qualified purchases. Please read our Privacy policy here.
How To Make This Tiramisu-Inspired Cheesecake:
Making cheesecake can be tough, so I’ll be there with you every step of the way! Full ingredients and isntructions can be found at the bottom of this post in the recipe card.
Step 1: Ladyfinger Crust
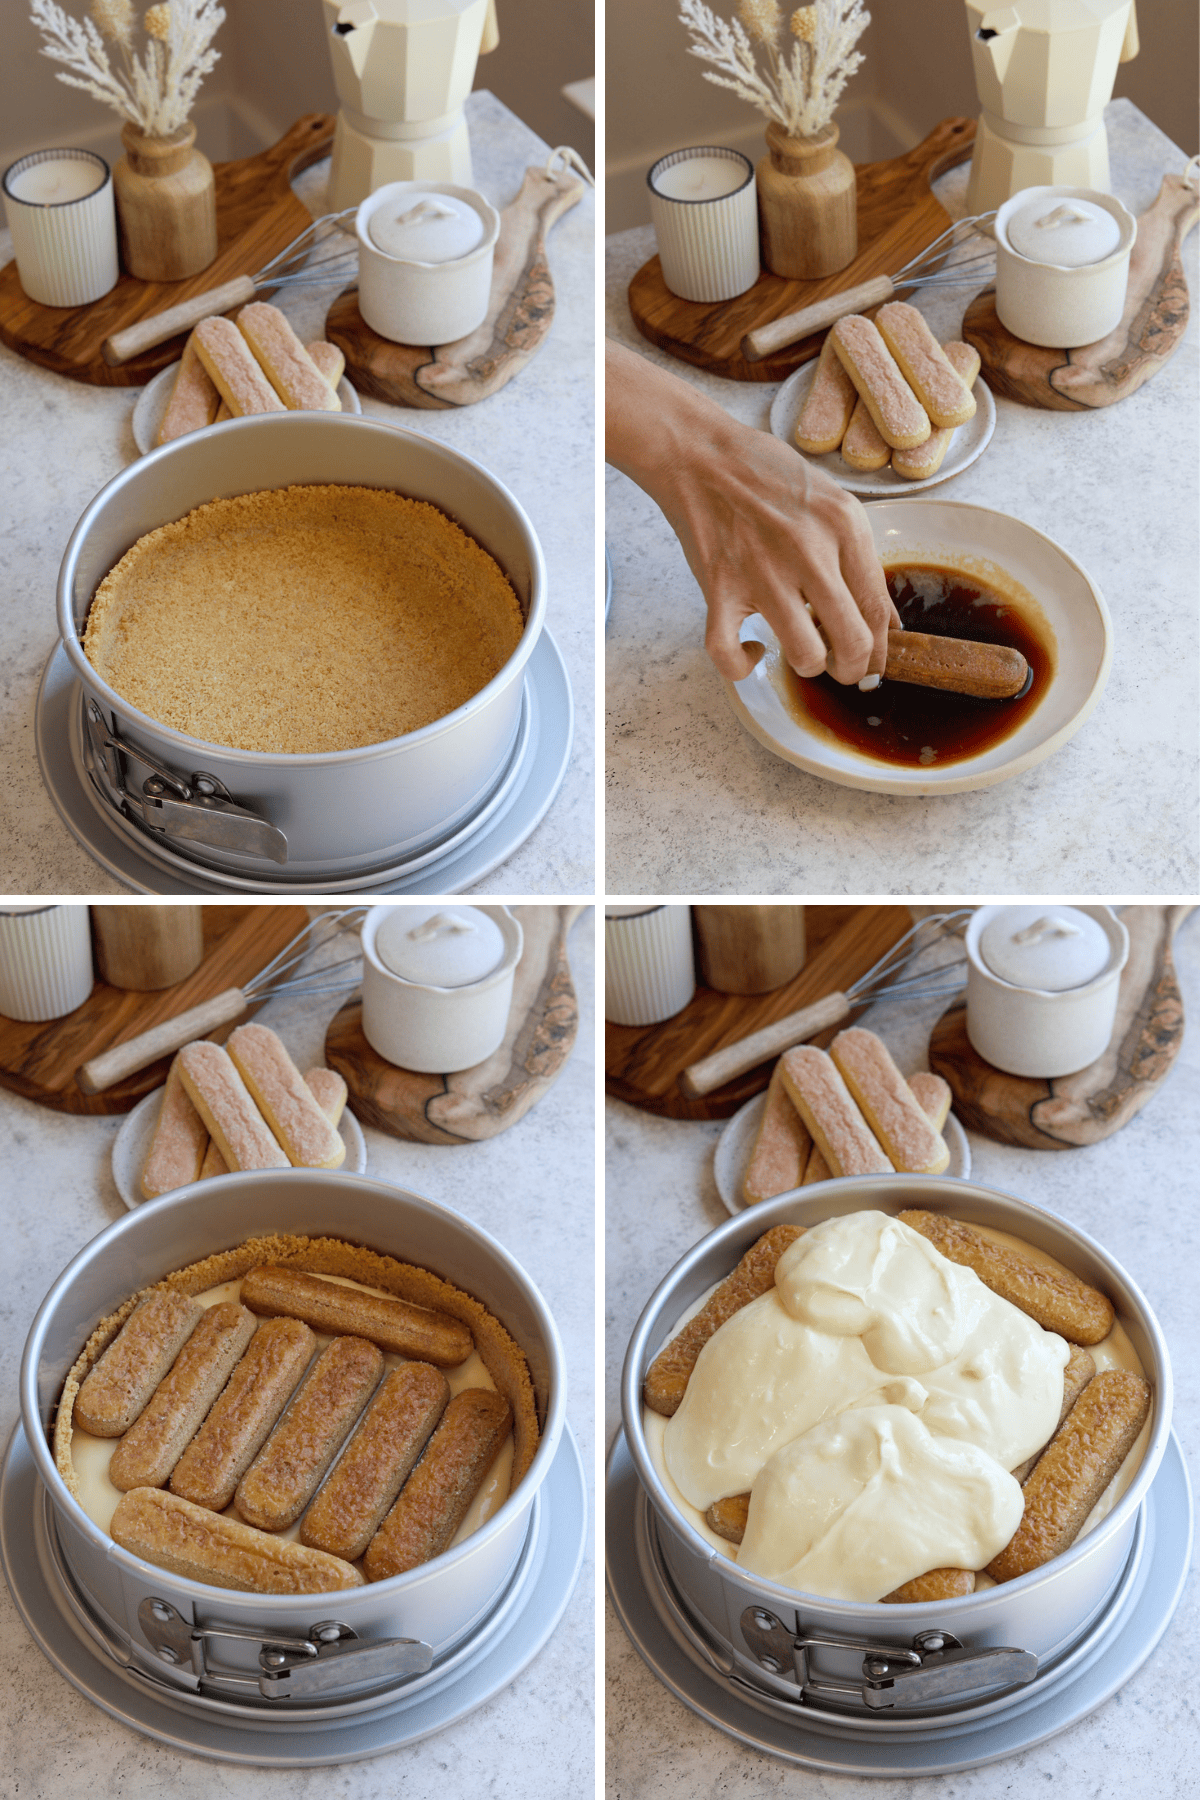
Preheat your oven to 325ºF. Place the ladyfingers in a food processor and pulse until fine crumbs form. Mix in granulated sugar, then add melted butter and stir until fully combined. Press the mixture firmly into the bottom and slightly up the sides of an 8- or 9-inch springform pan. If using an 8-inch pan, ensure it is at least 3 inches deep. Bake for 12 minutes, then allow the crust to cool completely.
Step 2: Tiramisu Cheesecake Batter
I always start by bringing a large pot of water to a boil for the water bath so it’s ready to go. Then inn a mixing bowl, I beat room-temperature cream cheese for 2 minutes until creamy. I then add the mascarpone and mix until incorporated and gradually beat in granulated sugar, then scrape the bowl and mix again.
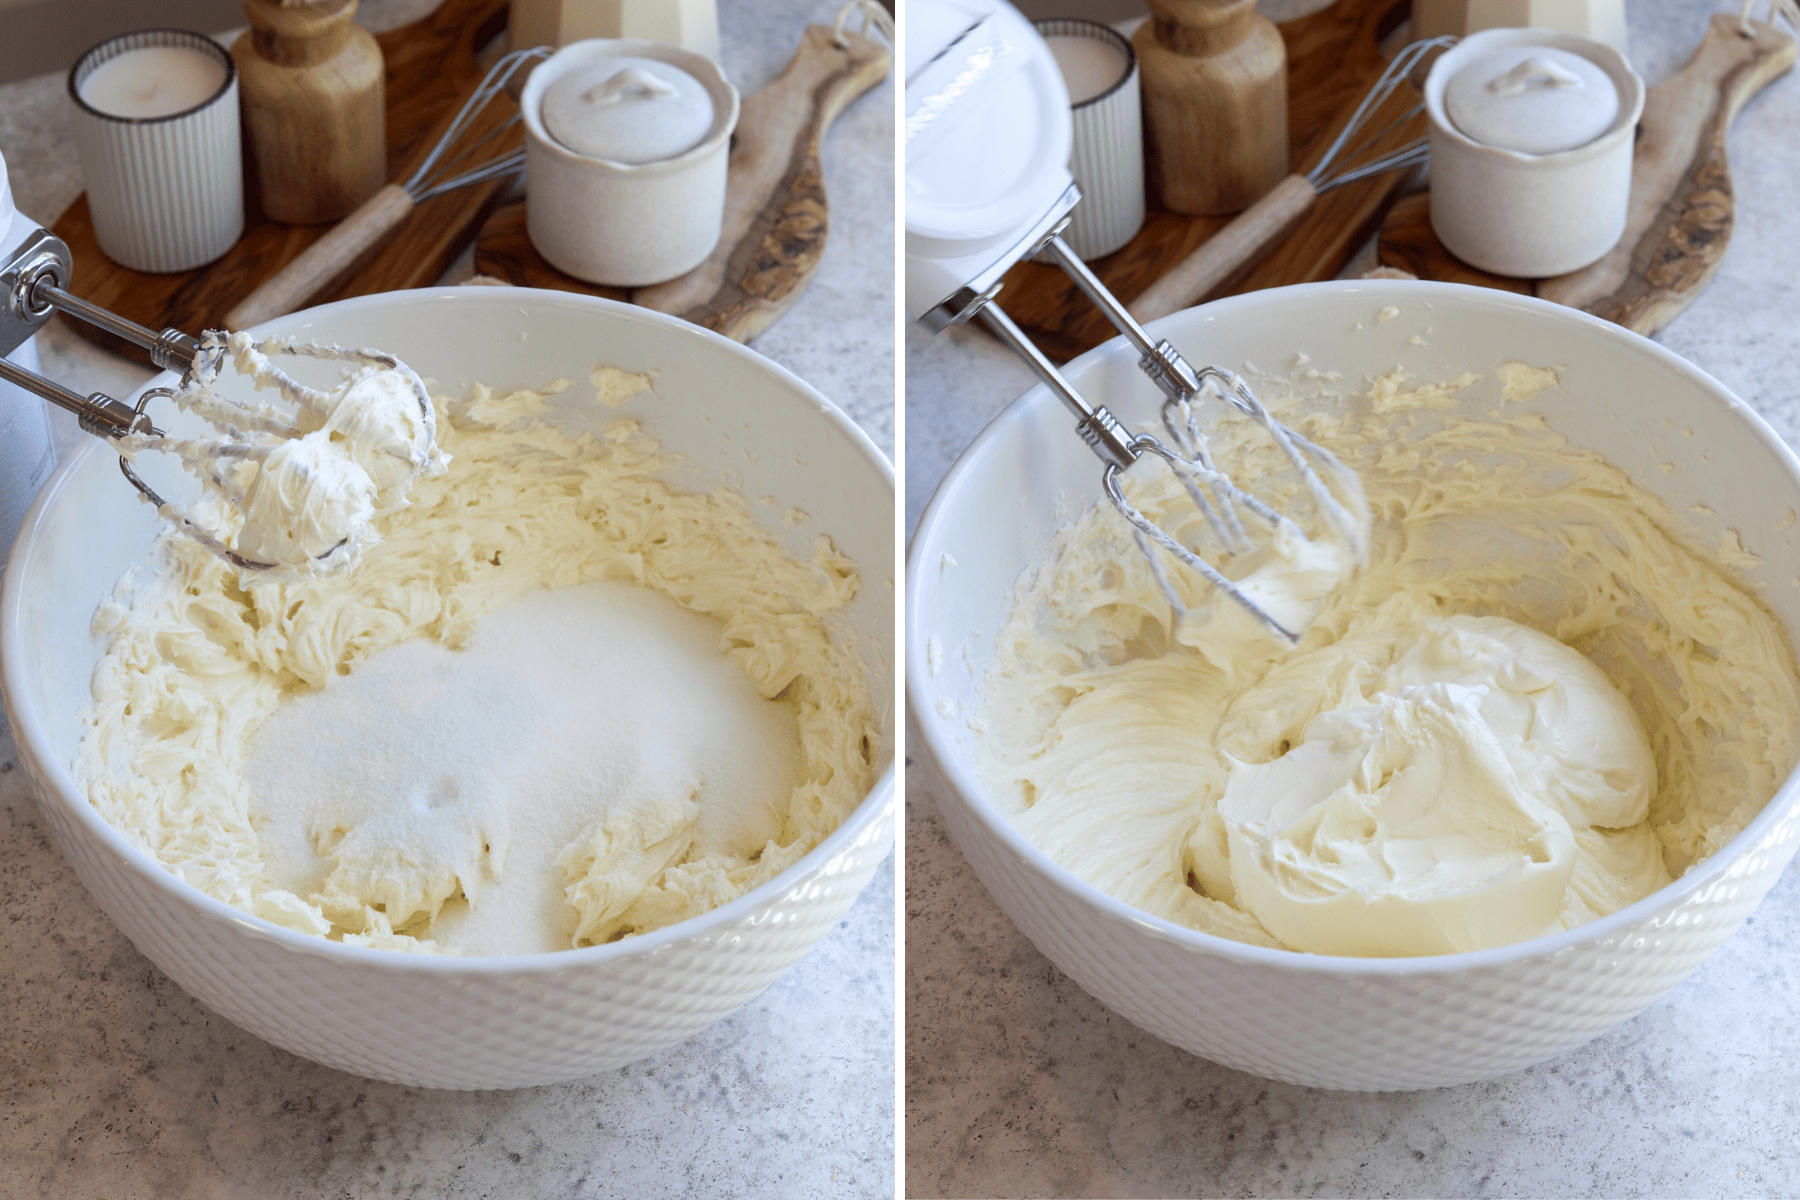
Add sour cream and mix until combined. Scrape the sides of the bowl frequently to prevent lumps. Add eggs one at a time, mixing just until combined to avoid overmixing. Stir in vanilla extract, salt, and Kahlua if using.

Step 3: Assembling The Cheesecake
I grease the sides of the springform pan, then pour about one-third of the cheesecake batter over the baked crust. I quickly dip each ladyfinger into the cooled espresso, turning it once without soaking, and arrange them in a single layer over the batter. I pour another third of the batter on top, repeat with a second layer of dipped ladyfingers, and finish by covering everything with the remaining batter.
Step 4: Water Bath Baking
I wrap the outside of the springform pan with three wide strips of aluminum foil, overlapping them so no water can seep in, because even a small leak can ruin the crust. I place the pan in the center of a large roasting pan, then carefully pour in the hot water I boiled earlier until it reaches about halfway up the sides. The water bath keeps the oven heat gentle and even, which is what helps the cheesecake bake smoothly and prevents cracking.
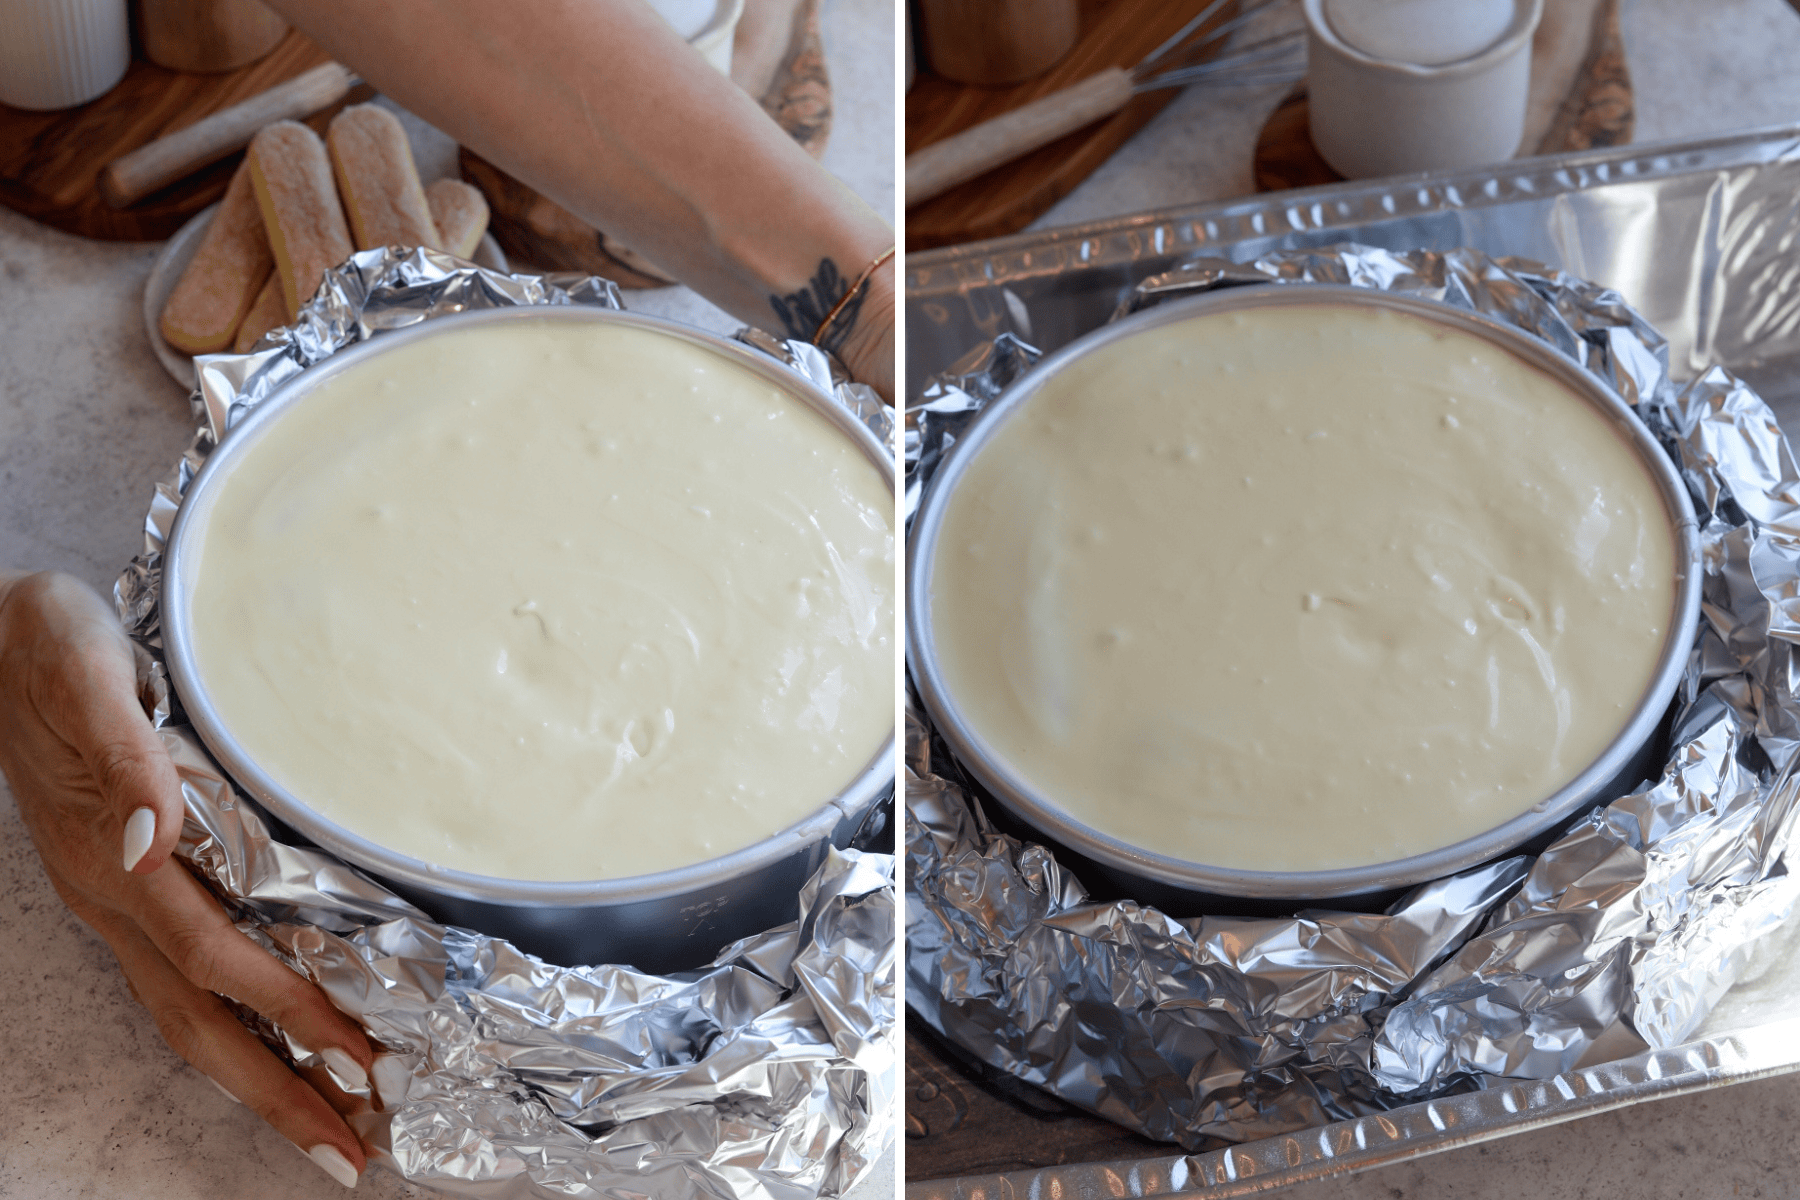
I bake the cheesecake at 325ºF for about 70 minutes, until the edges are set and the center still has a slight jiggle. I then turn off the oven and let it sit inside for an hour so it cools gradually, which helps prevent cracks. After that, I refrigerate it for at least 6 hours before removing the springform ring.
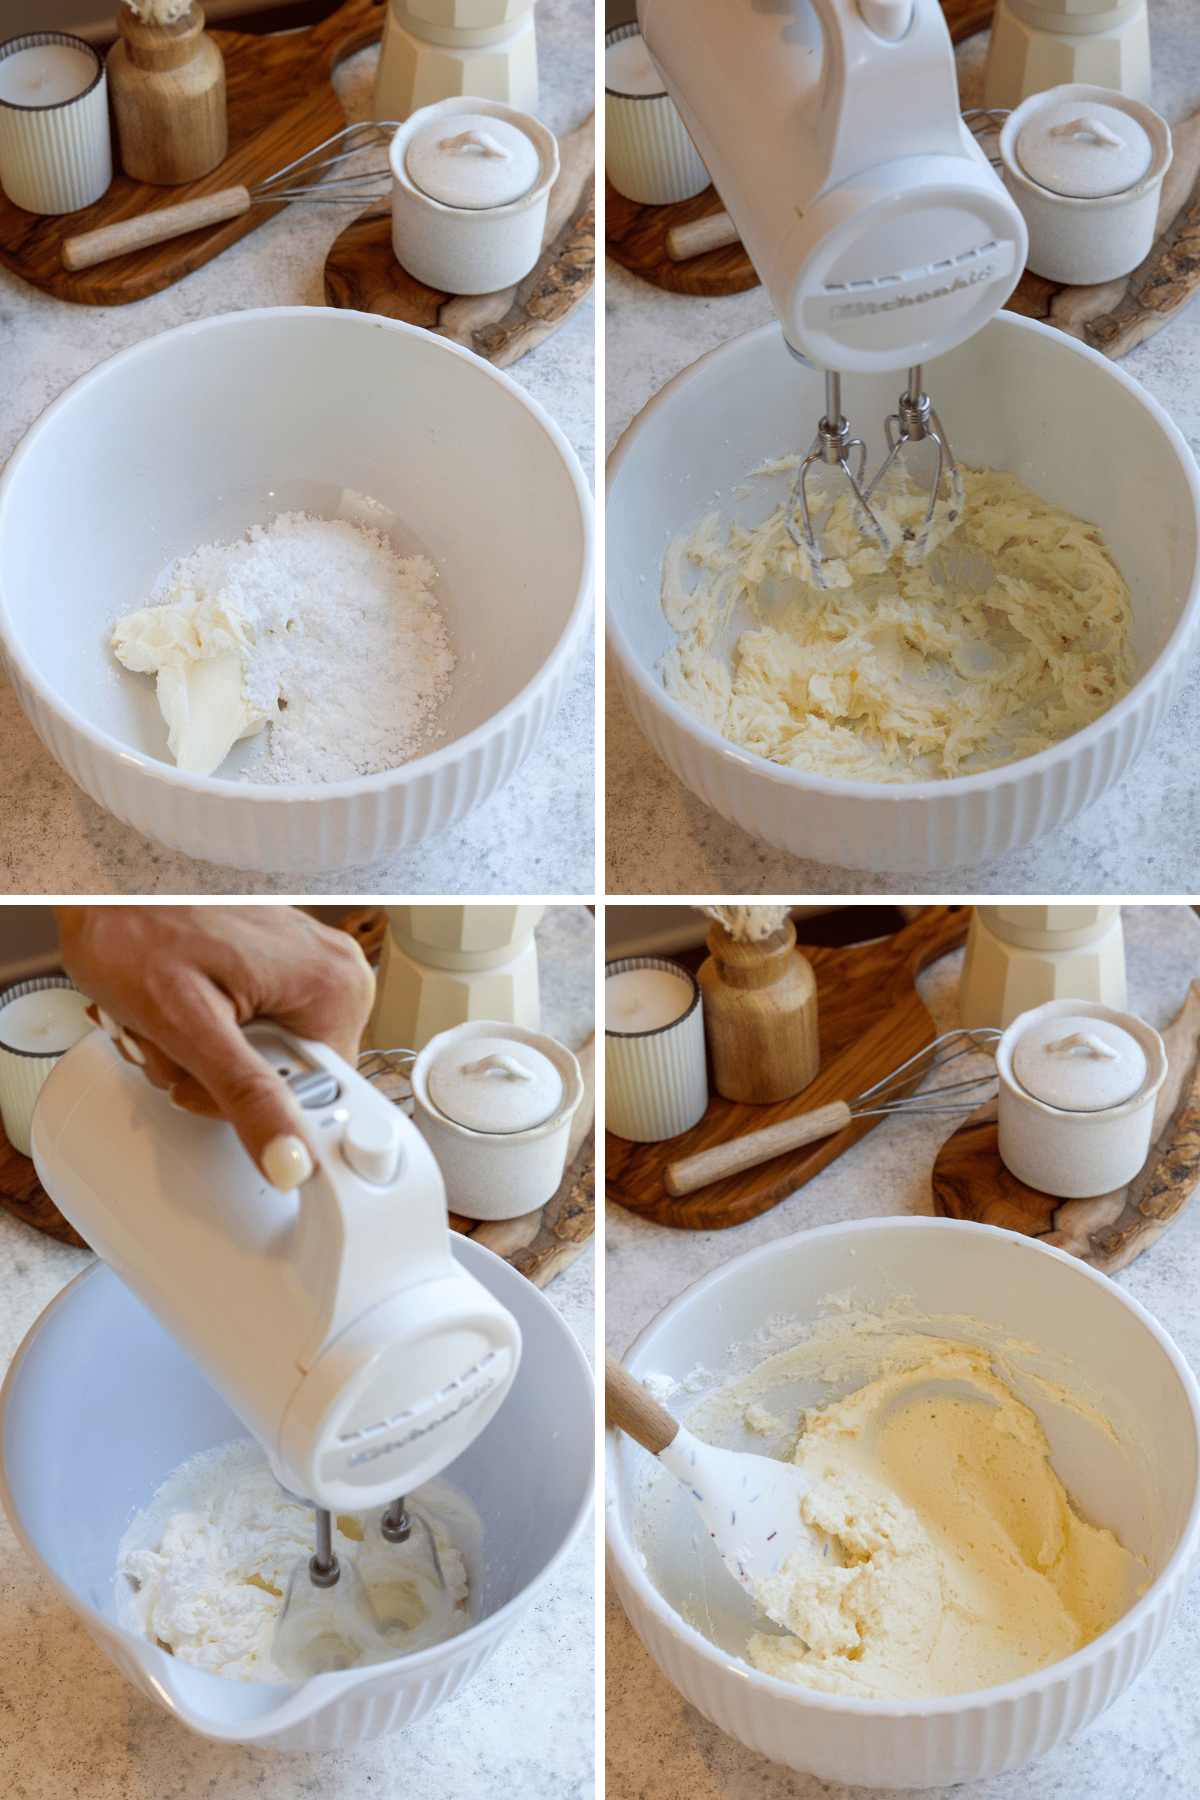
Step 5: Mascarpone Frosting
I beat the mascarpone with the powdered sugar on medium-low speed until smooth, keeping it gentle so it stays creamy. In a separate bowl, I whip the cold heavy cream to stiff peaks, then gently fold it into the mascarpone along with the vanilla, stopping as soon as the mixture is light and fully combined.
Step 6: Decorating
Once the cheesecake has fully chilled, spread the mascarpone frosting over the top, smoothing it with a spatula. Dust the surface with cocoa powder for a classic tiramisu finish. You can also add a sprinkle of instant espresso powder.

Variations on Tiramisu Cheesecake
This cheesecake is pretty much perfect on it’s own, but if you had to change a few things, I recommend the below!
- Alcohol Free Version: Not everyone wants alcohol, so you can replace the Kahlua with extra espresso.
- Chocolate Twist: Add a layer of finely chopped dark chocolate between the ladyfinger layers.
- Classic Graham Cracker Crust: Swap the ladyfinger crust for a graham cracker base like in this New York Cheesecake.
- Extra Coffee Flavor: Brush the ladyfingers with a stronger espresso concentrate for an intense coffee taste.
Tips & Tricks
Making cheesecake can be tricky, so I highly recommend you check out this post to learn some crucial tips! But also read below…
- Prevent Overmixing: Once the eggs are added, mix the batter gently to prevent cracking.
- Use an Oven Thermometer: Cheesecakes bake best at an accurate temperature—adjust if needed.
- Chilling is Essential: Let the cheesecake chill for at least 6 hours, or overnight, for the best texture.
Storage
Store the cheesecake in an airtight container in the fridge for up to 5 days. For longer storage, freeze for up to 2 months. To freeze, first chill the cheesecake, then wrap it tightly in plastic wrap before placing it in an airtight container.
FAQs
Yes. I actually prefer making it a day ahead so it has plenty of time to chill and fully set. The flavor and texture are better once it’s rested overnight.
That slight jiggle is intentional. The cheesecake will continue to set as it cools, and pulling it earlier keeps the texture creamy instead of dry.
You can. I freeze it fully chilled and well wrapped, without any whipped topping. Thaw overnight in the refrigerator before serving.
More recipes you might enjoy
If you liked this tiramisu cheesecake, you might also enjoy my Funfetti Cheesecake for something playful, Carrot Cake Cheesecake when you want spice and texture, Cinnamon Roll Cheesecake for cozy mornings, Biscoff Cheesecake if you love deep caramelized flavor, or Lemon Cheesecake when you’re craving something bright and clean.
If you make this tiramisu cheesecake, I’d love to see it. Share a photo on Instagram and tag me so I can admire your creations, and make sure to leave a comment below to let me know how it turned out—I truly love seeing what you create.
Tiramisu Cheesecake
Ingredients
Ladyfingers Crust
- 2 cups ladyfingers, finely ground 160 grams
- 2 tbsp granulated sugar
- 6 tbsp unsalted butter melted (85 grams)
Tiramisu Cheesecake Batter
- 680 grams cream cheese room temperature 3 packages of 8 oz.
- ¾ cup mascarpone cheese 170 grams
- 1⅓ cup granulated sugar 266 grams
- 3 large eggs room temperature
- ¼ cup sour cream 60 grams
- ½ tbsp vanilla
- ½ tsp salt
- 1 tsp kahlua optional
To Assemble
- 2 cups brewed espresso cooled (or coffee)
- 1, 7 oz package of ladyfingers
Mascarpone Frosting
- ½ cup mascarpone cheese 113 grams
- ⅓ cup powdered sugar 42 grams
- ½ cup heavy cream 120 ml
- ½ tsp vanilla
Instructions
Ladyfingers Crust
- Pre-heat the oven to 325ºF.
- Place the ladyfingers in a food processor and process until you obtain fine crumbs. You may have to do it in batches so you can fit.
- Add the sugar to the ladyfingers and mix.
- Add the melted butter and stir to combine.
- Press the mixture on the bottom and up the sides of a 8” or 9” springform pan. If using a 8” pan, it must be deep (at least 3”).
- Bake for 12 minutes. Remove and let it cool down.
Tiramisu Cheesecake Batter
- Bring a large pot of water to a boil as you start making the cheesecake, to make the water bath.
- Beat the cream cheese for 2 minutes with a mixer at medium speed, until creamy.
- Add the mascarpone and mix on medium-low to combine.
- Add the granulated sugar to the cream cheese and beat for another 2 minutes at medium speed.
- Scrape the bowl and beat for another 30 seconds.
- Add the sour cream and mix to combine.
- Make sure to scrape the bowl a few times during the mixing process, to avoid the cream cheese from forming lumps in the batter.
- Add the eggs to the batter, one at a time, mixing until incorporated before adding the next egg. Avoid over mixing once the eggs are added, to prevent cracking of the cheesecake.
- Add the vanilla, salt and Kahlua if using. Mix to combine.
- Grease the exposed sides of the cheesecake pan.
- Pour one third of the cheesecake batter in the pan, over the baked and cooled crust.
- Dip each ladyfinger cookie quickly on the cooled espresso or coffee, turning it once. Don’t let it soak in the liquid.
- Lay the cookies on top of the batter to cover the surface.
- Pour another third of the batter on top. Repeat with the cookies to form another cookie layer.
- Top with the remaining batter.
- Prepare a water bath: Wrap the outside of the springform pan with three wide strips of aluminum foil, overlapping them to ensure no water seeps in. Place the cheesecake pan in the center of a large roasting pan. Carefully pour the hot water into the roasting pan until it reaches halfway up the sides of the springform pan. This water bath helps maintain an even baking temperature and prevents cracks.
- Bake the cheesecake in the pre-heated 325ºF oven for about 70 minutes. It can take longer or less time depending on your oven.
- To check if the cheesecake is done baking, give the pan a little wiggle, it should jiggle slightly in the center, but the edges should look set. Time baking depends on your oven, and if it runs low or high in temperature.
- Turn the oven off, and leave the cheesecake to rest inside for 1 hour.
- Remove the cheesecake from the oven and place it in the fridge for at least 6 hours. Don’t remove the ring from the pan until after the cheesecake is done chilling.
Mascarpone Frosting
- Beat the cold mascarpone and powdered sugar with a mixer on medium-low speed until combined. Set aside.
- In another bowl, beat the heavy cream until stiff peaks form.
- Add the heavy cream to the mascarpone mixture, add the vanilla. Fold gently to combine.
To Decorate
- Spread the mascarpone frosting on top of the chilled cheesecake. Use a spatula to smooth it out.
- Dust the top with cocoa powder and serve!
Hi, when you rest the cheesecake in the oven after baking, do you crack the oven door at all?
Hi, it says 3/4 cup of mascarpone in the batter for 85 grams, and then in the frosting it’s 1/2 cup for 113 grams. Are the grams correct? Thank you!
You’re correct, it’s supposed to be 170g for the 3/4 cup. fixing now. sorry about that!
Hi, I’m planning on baking this ahead and freezing, what is the best way to defrost? Thanks so much!
In the fridge overnight.