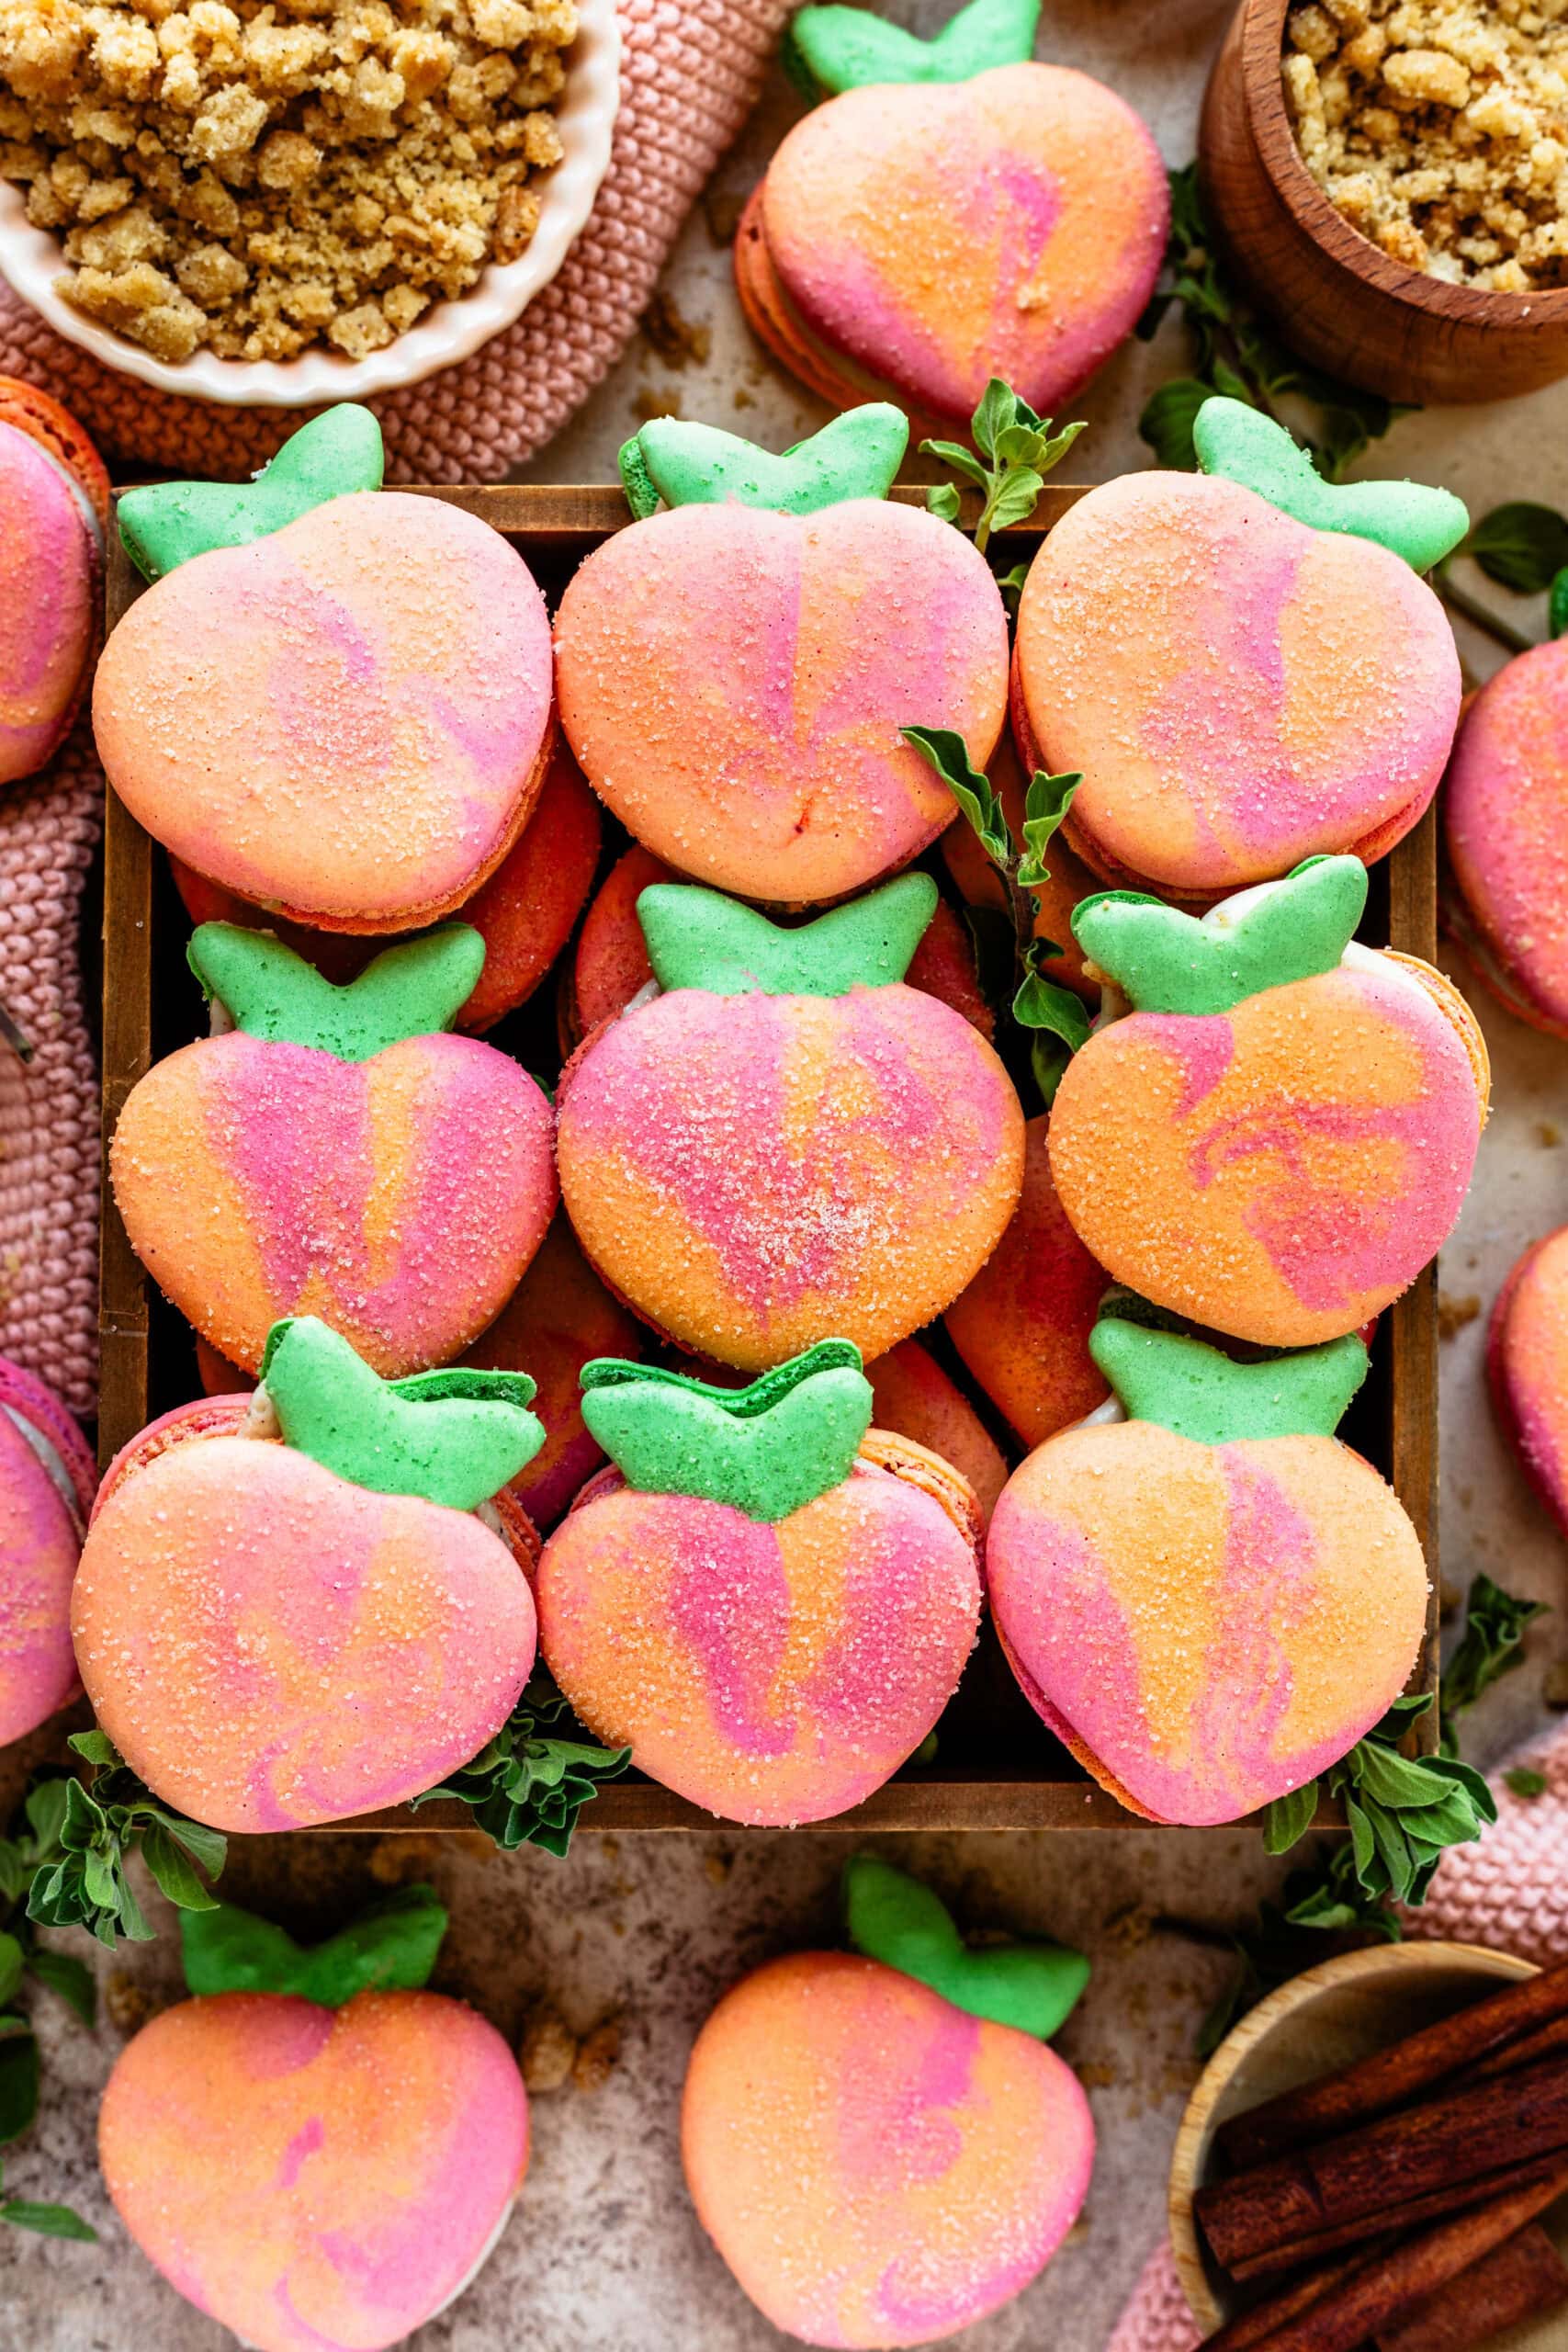
Peach Macarons
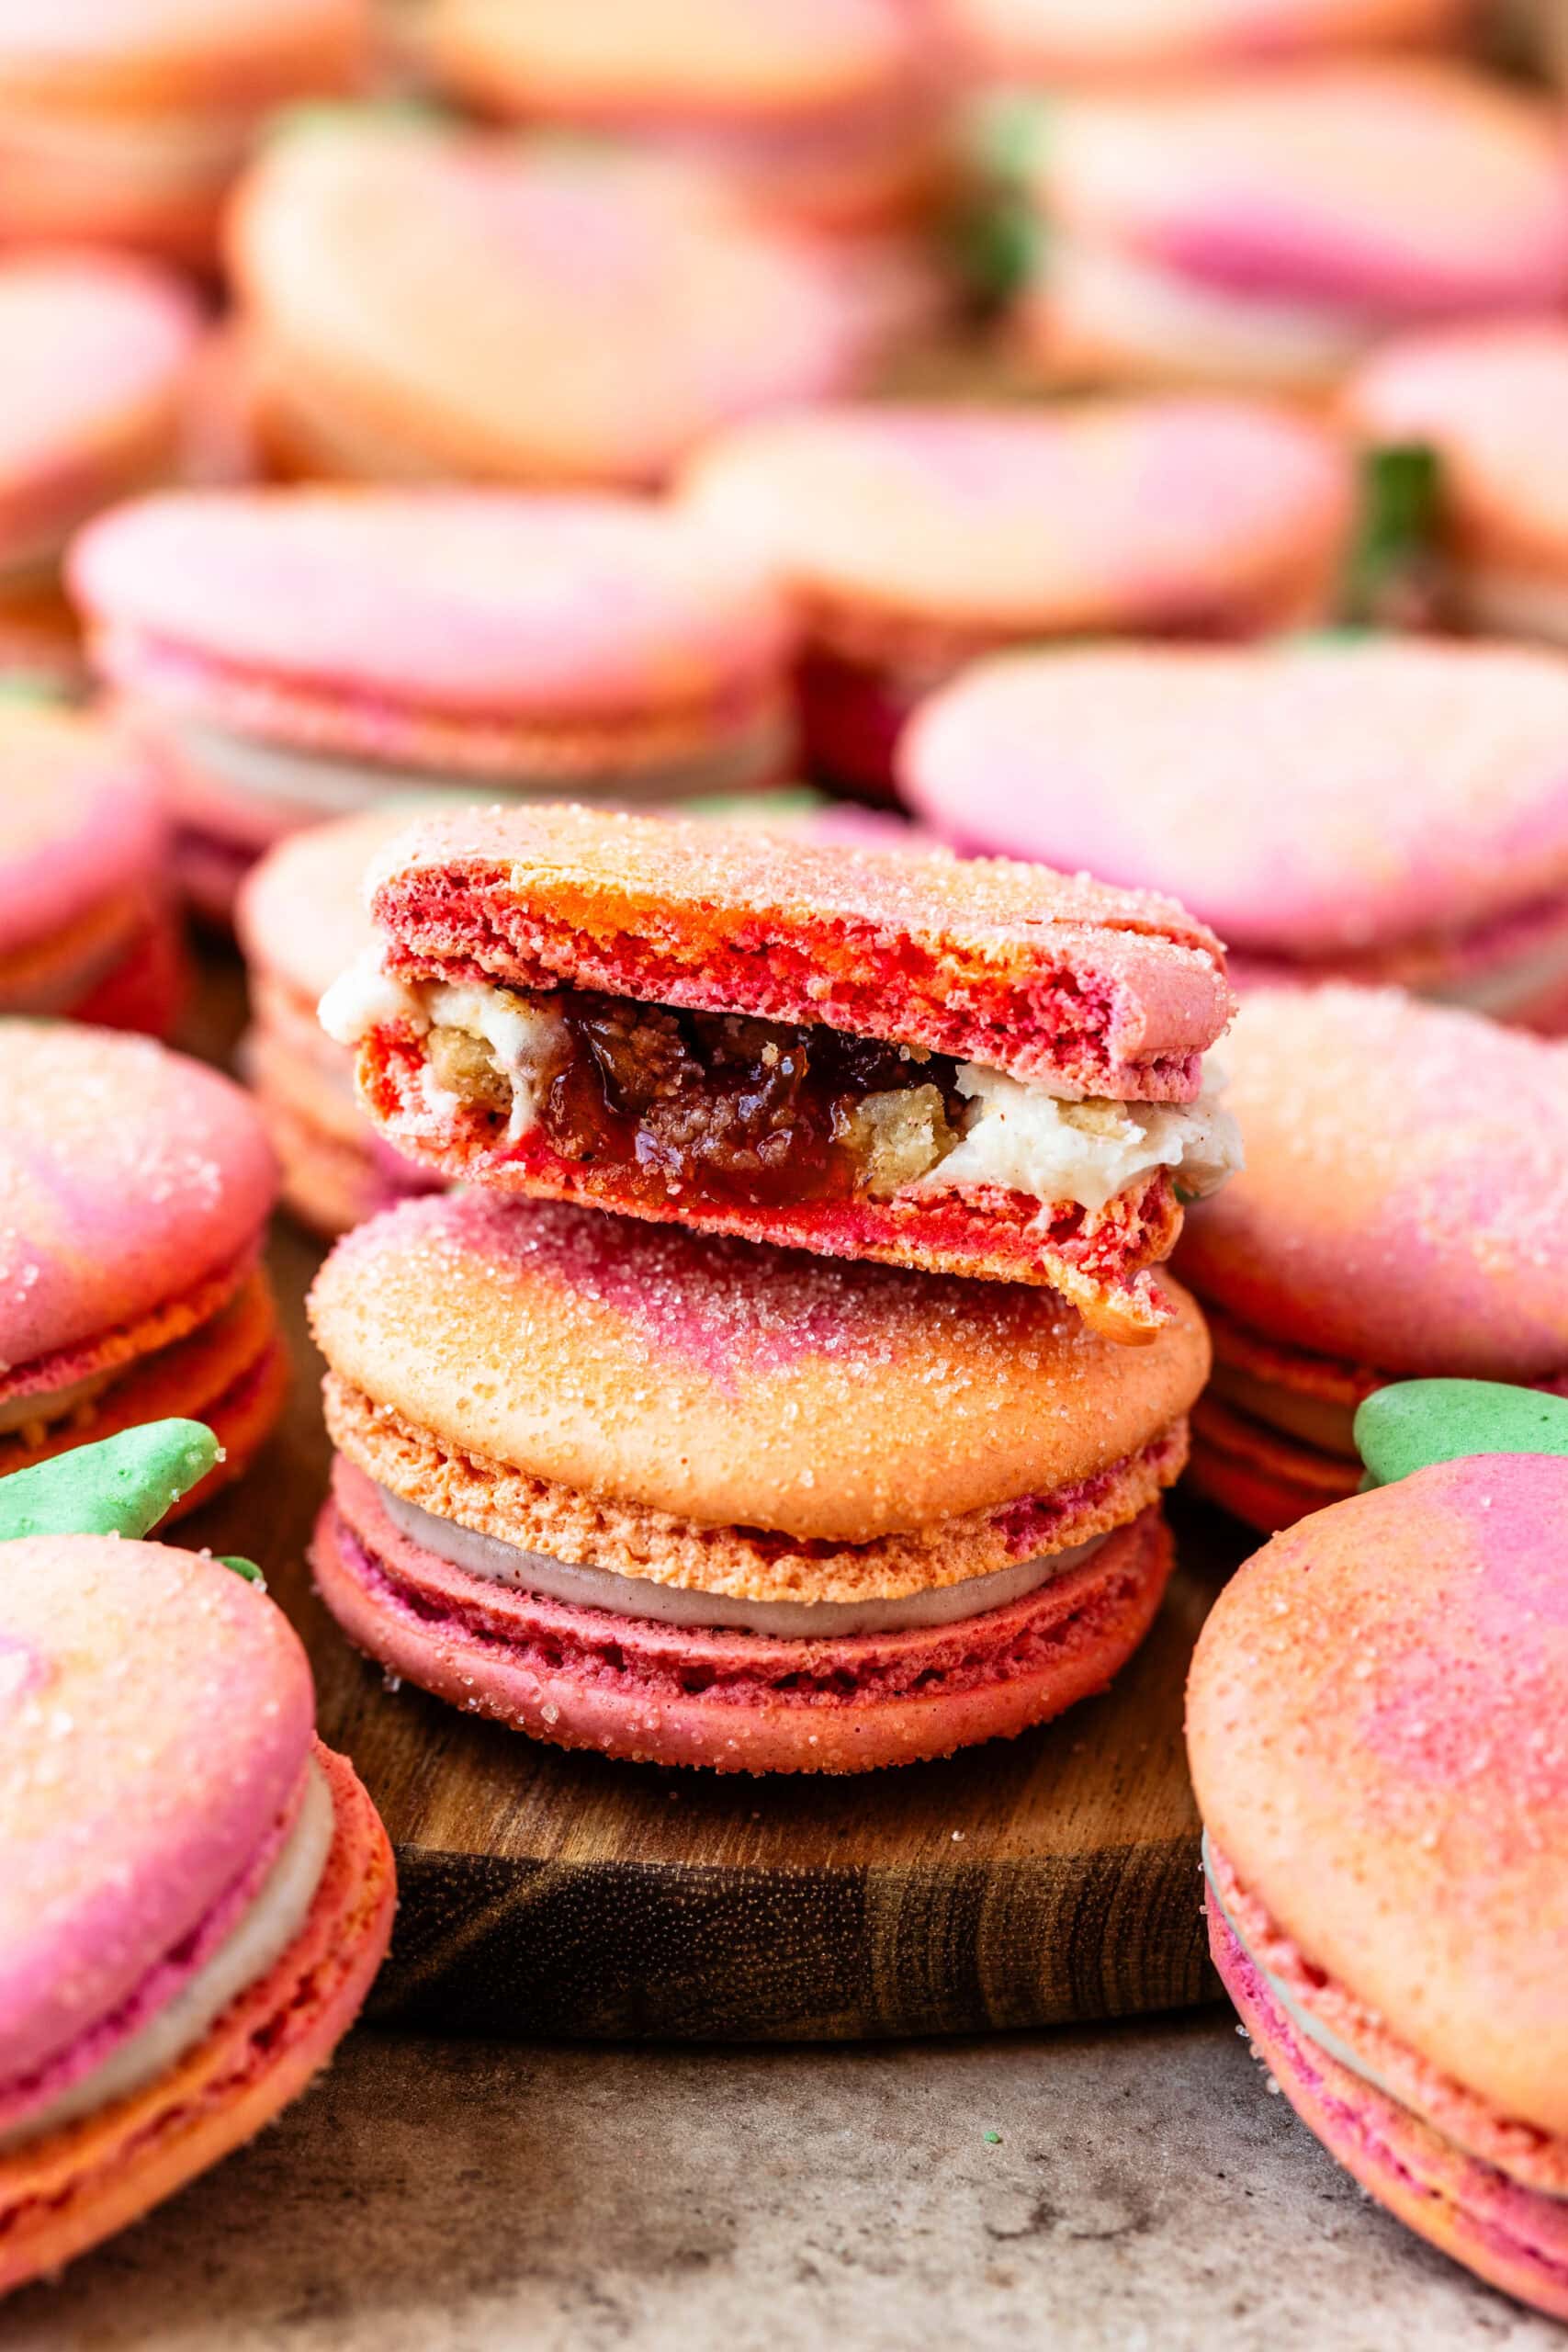
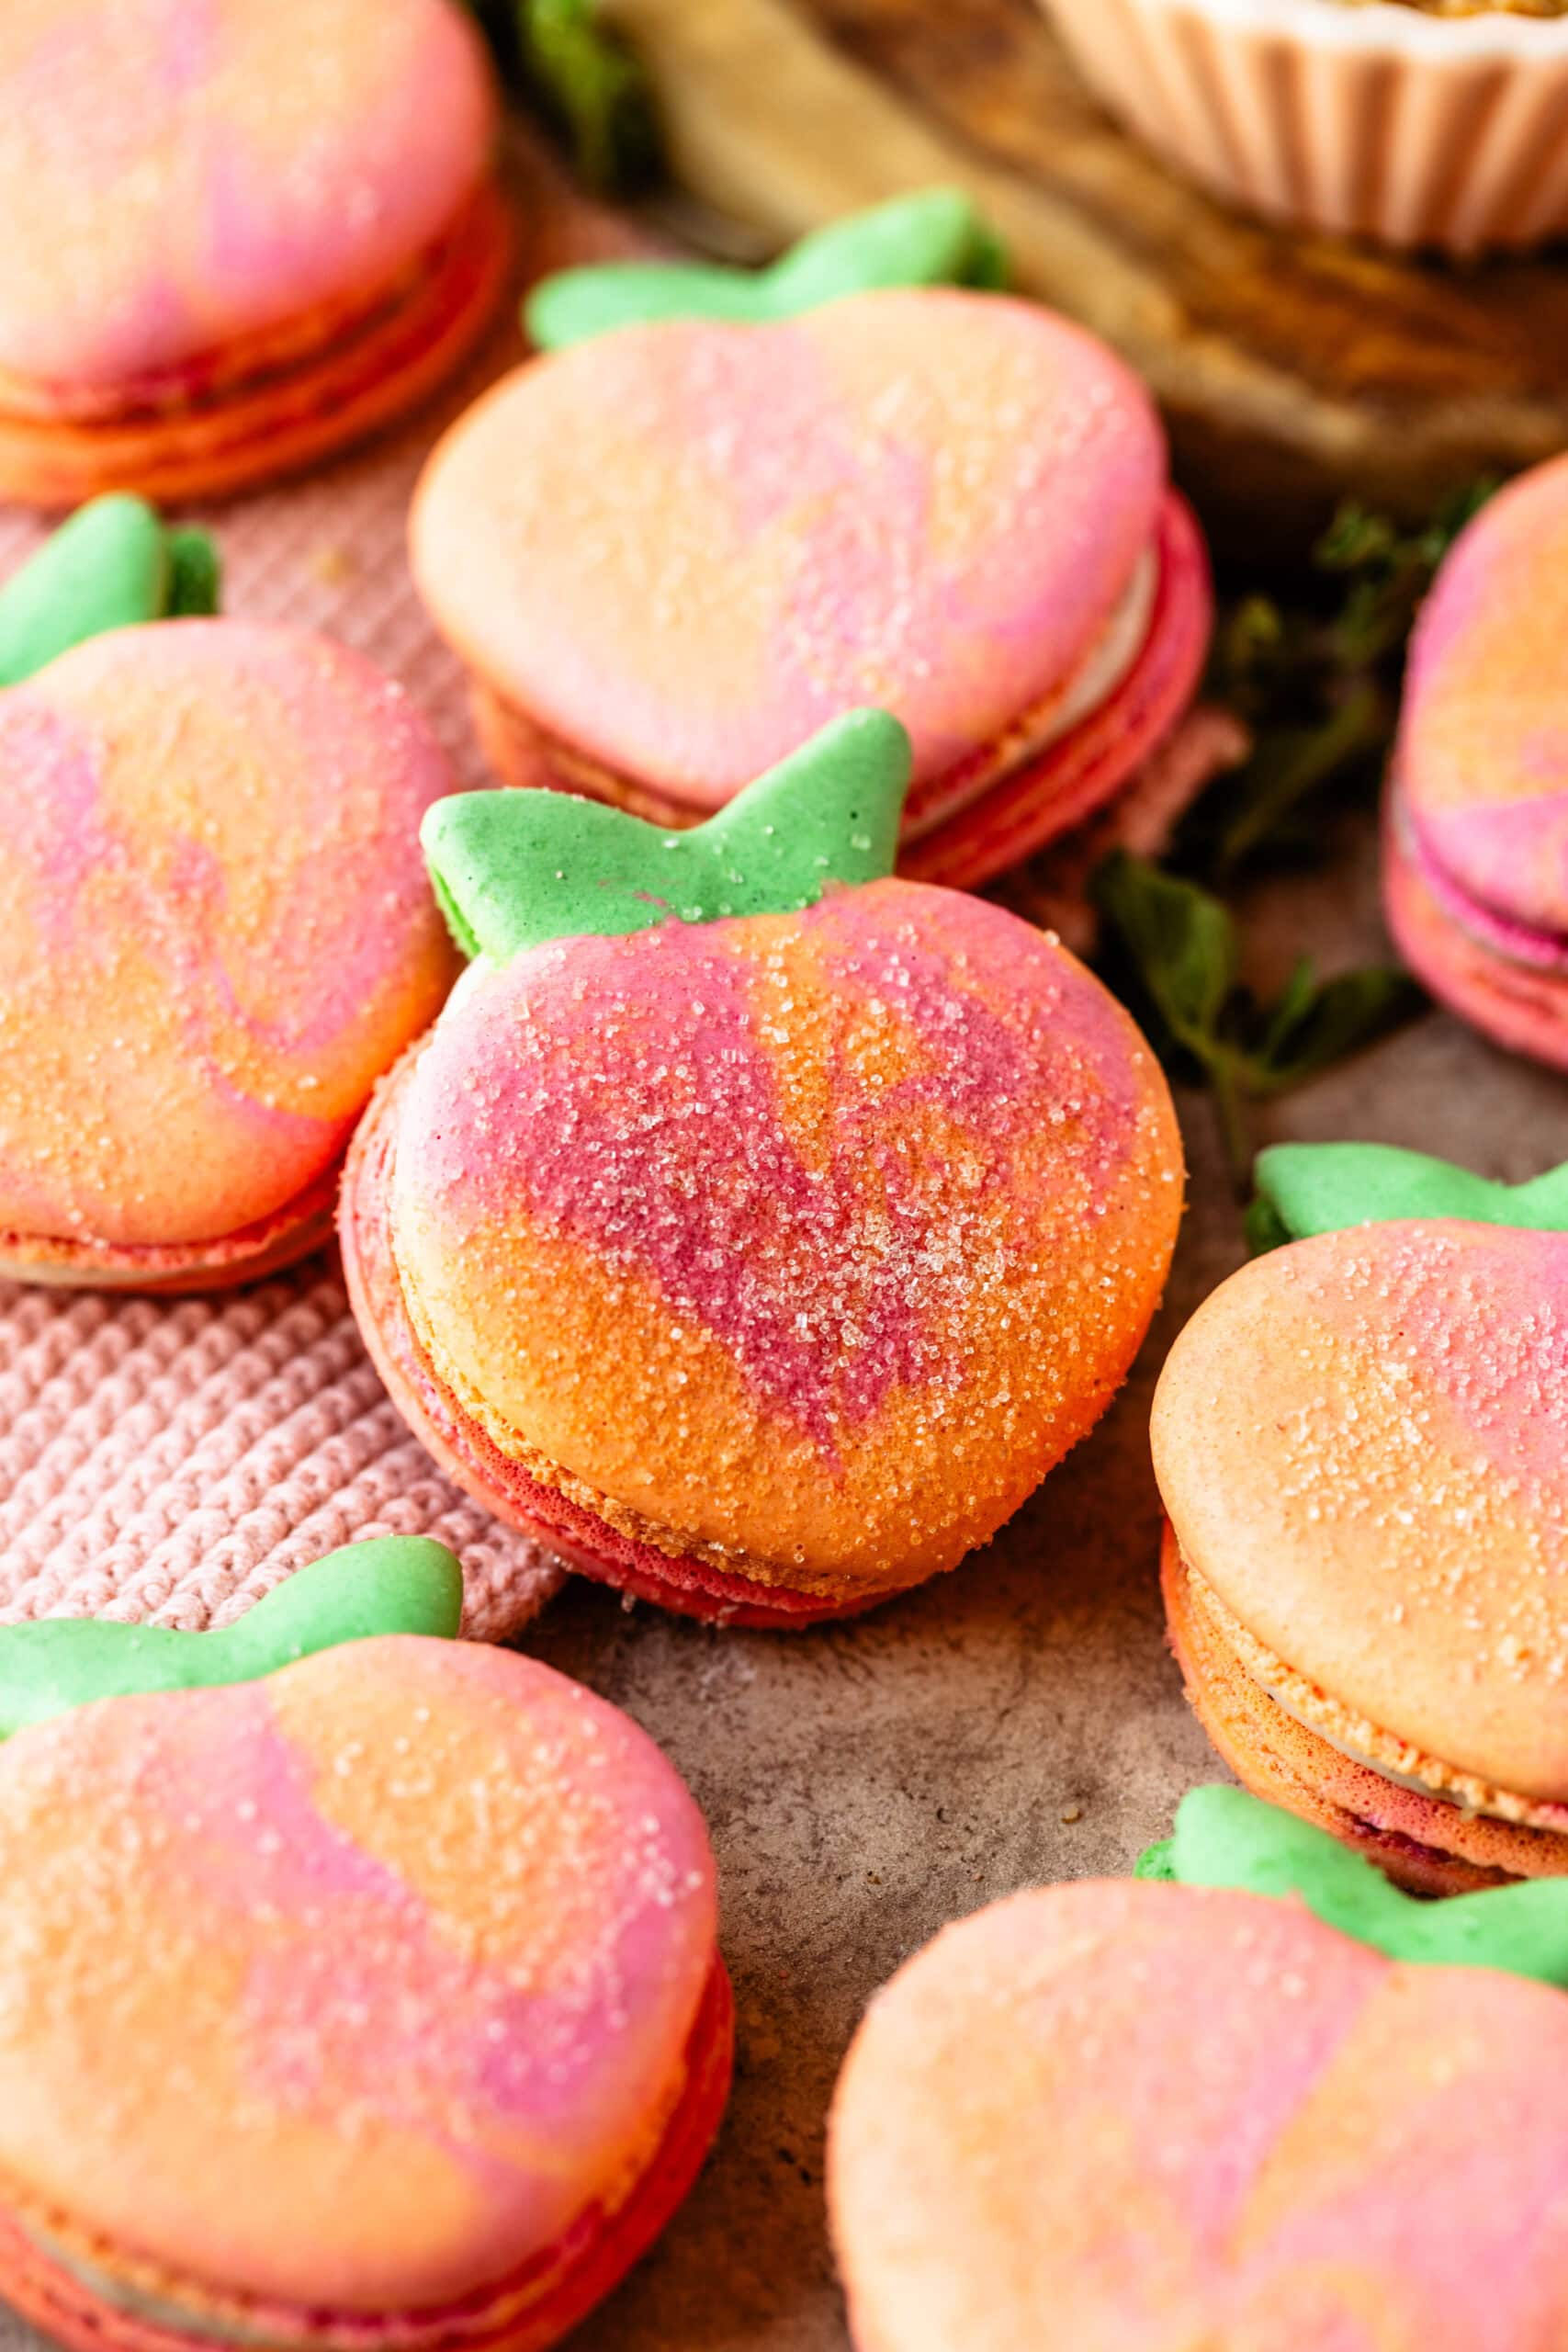
Hello friends! Discover the joy of baking with these delightful Peach Macarons. With their crisp, delicate shells, luscious peach jam filling and a cinnamon cream cheese frosting, these macarons offer a ton of flavor that captivate the senses.
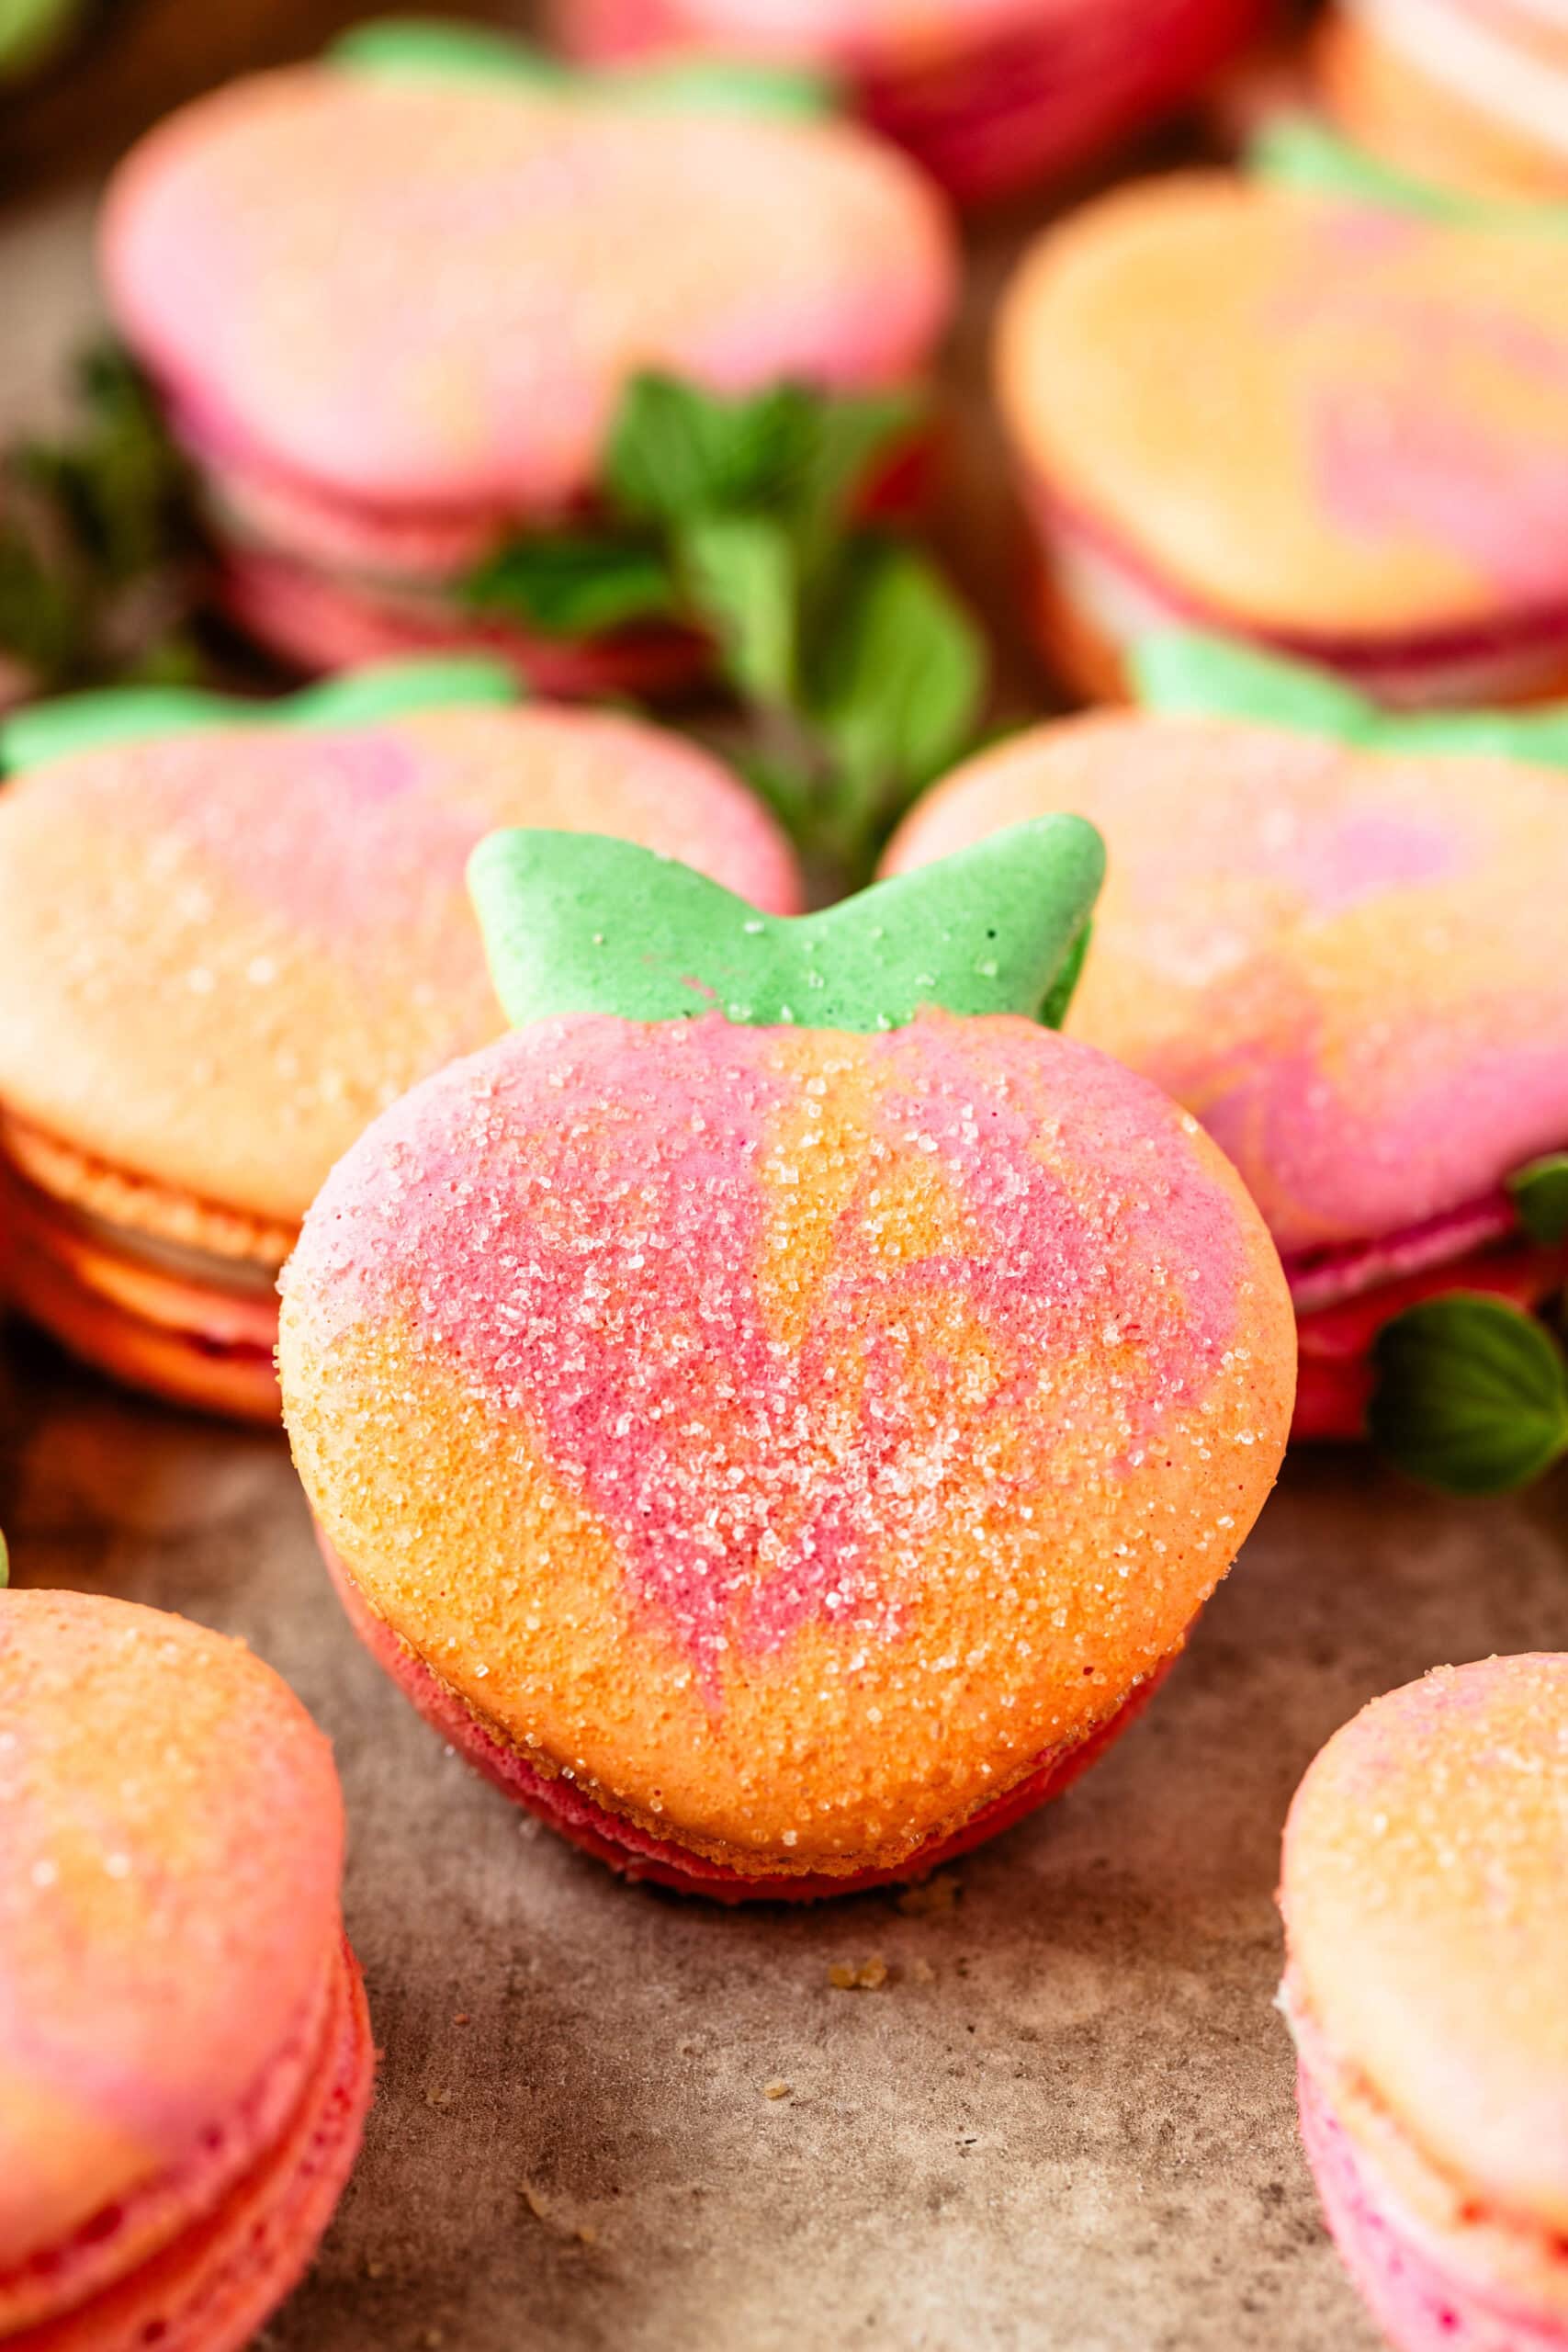
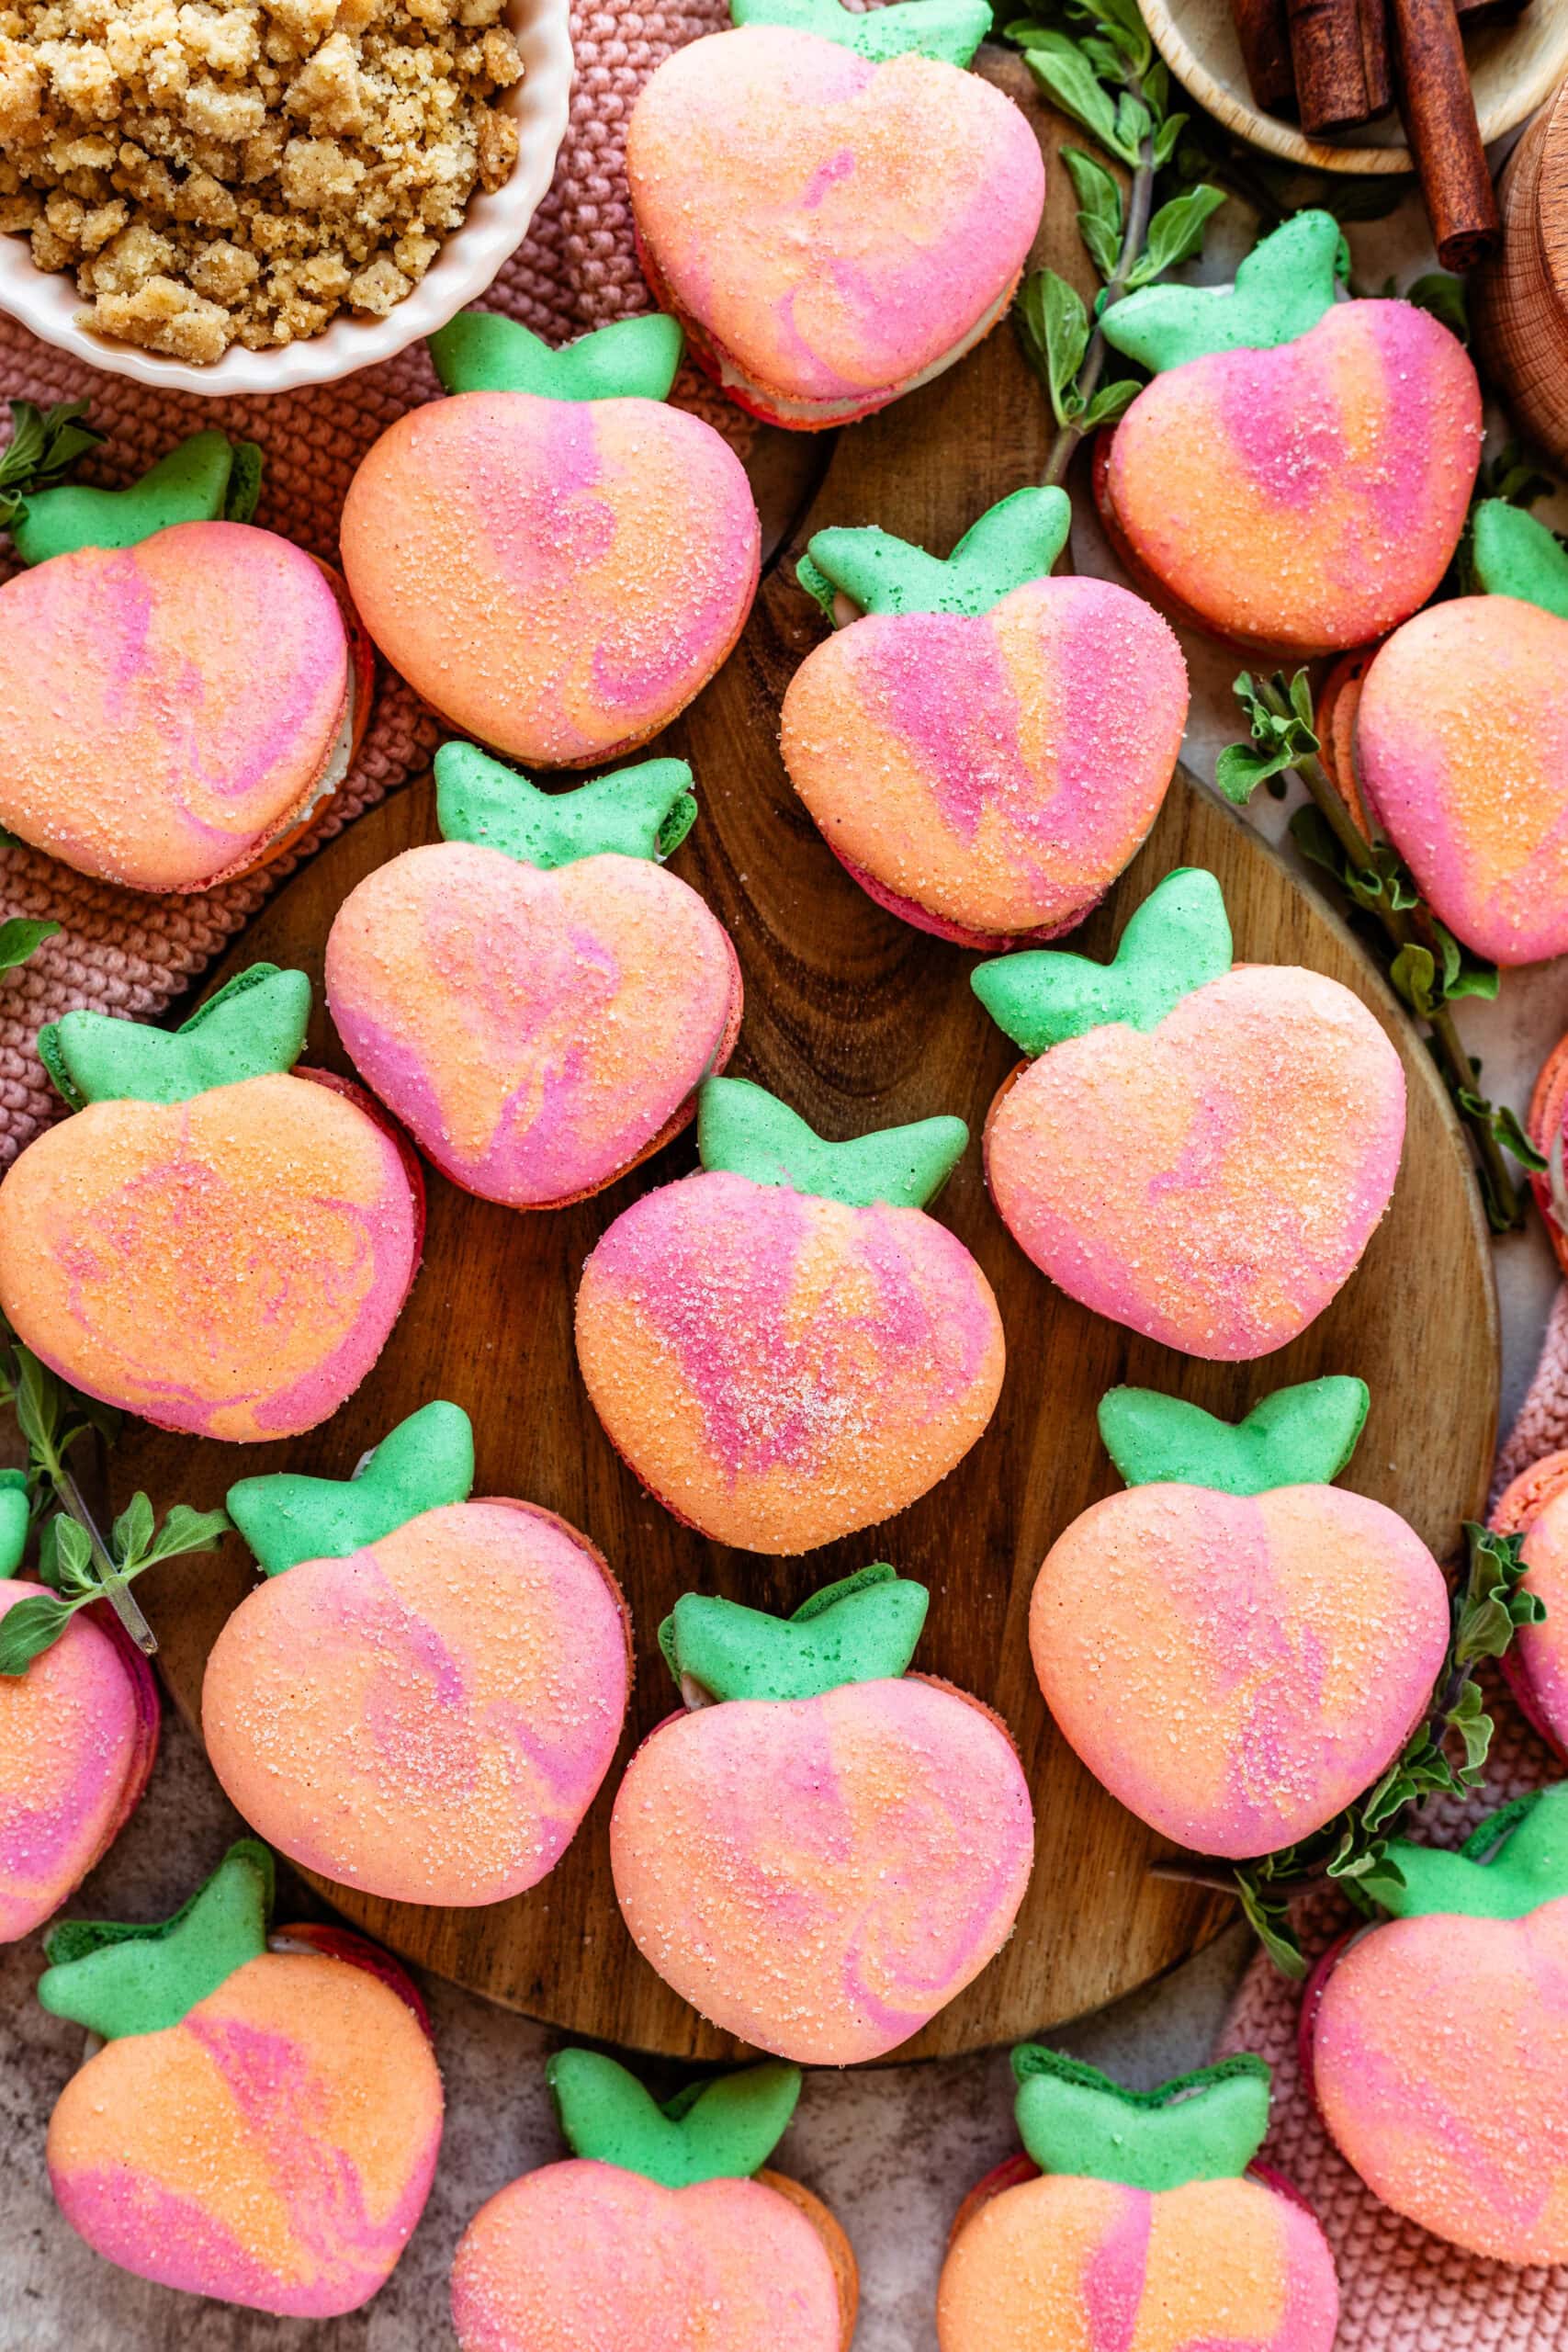
Not only do these macarons taste delicious, they really look like mini peaches! I use two different batter colors in a piping bag to achieve the different colors in the macaron shell! It is kind of similar to my tie-dye recipe! I also use a template to make sure I’m achieving the perfect peach shape!
This recipe was first published to my course Macaron School Course, which has over 100 recipes, over 70 videos, and teaches you step-by-step how to make macarons. The course contains everything you need to know to become a macaron master!
This post may contain affiliate links. I earn a commission from qualified purchases. Please read our Privacy policy here.
Whether you’re celebrating a special occasion or simply treating yourself to something extraordinary, these Peach Macarons promise to elevate your dessert experience.
The Best Peach Macarons Recipe
Creating Peach Macarons is a delicate process that requires patience and precision. It’s also super fun! In this post, I’ll guide you through each step to ensure your creation is as stunning as it is delicious.
Please find ingredient amounts at the bottom of the page, and the instruction pictures right below.
Peach Template
First things first, here is the Peach Template. You can download it, print it, and place under your silicone mat or parchment paper to pipe your peaches! This is crucial to getting uniform macarons!
Peach Filling
First we need to make the fillings so they have time to cool.
For the peach jam, place chopped peaches, lemon juice, sugar, cinnamon, and nutmeg in a saucepan over medium heat. Cook until soft, about 5 to 10 minutes.
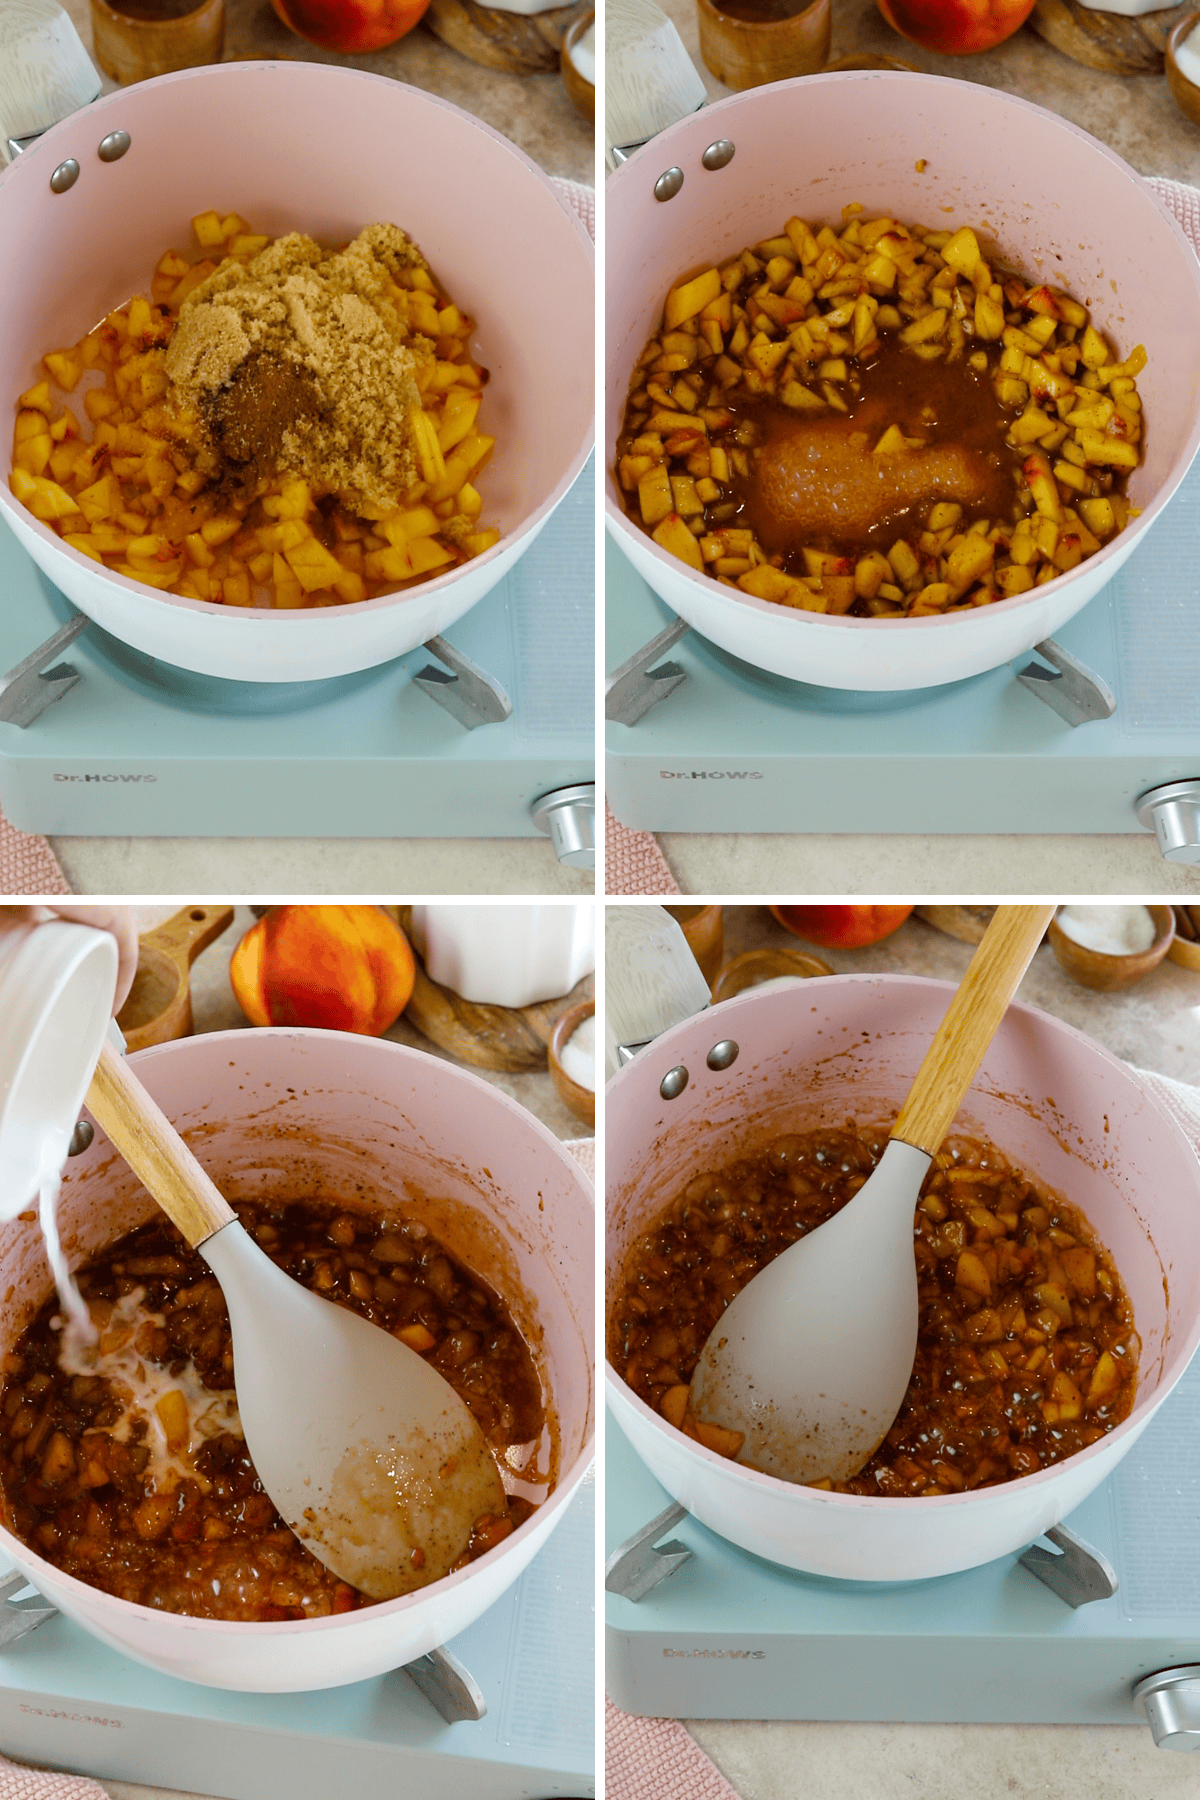
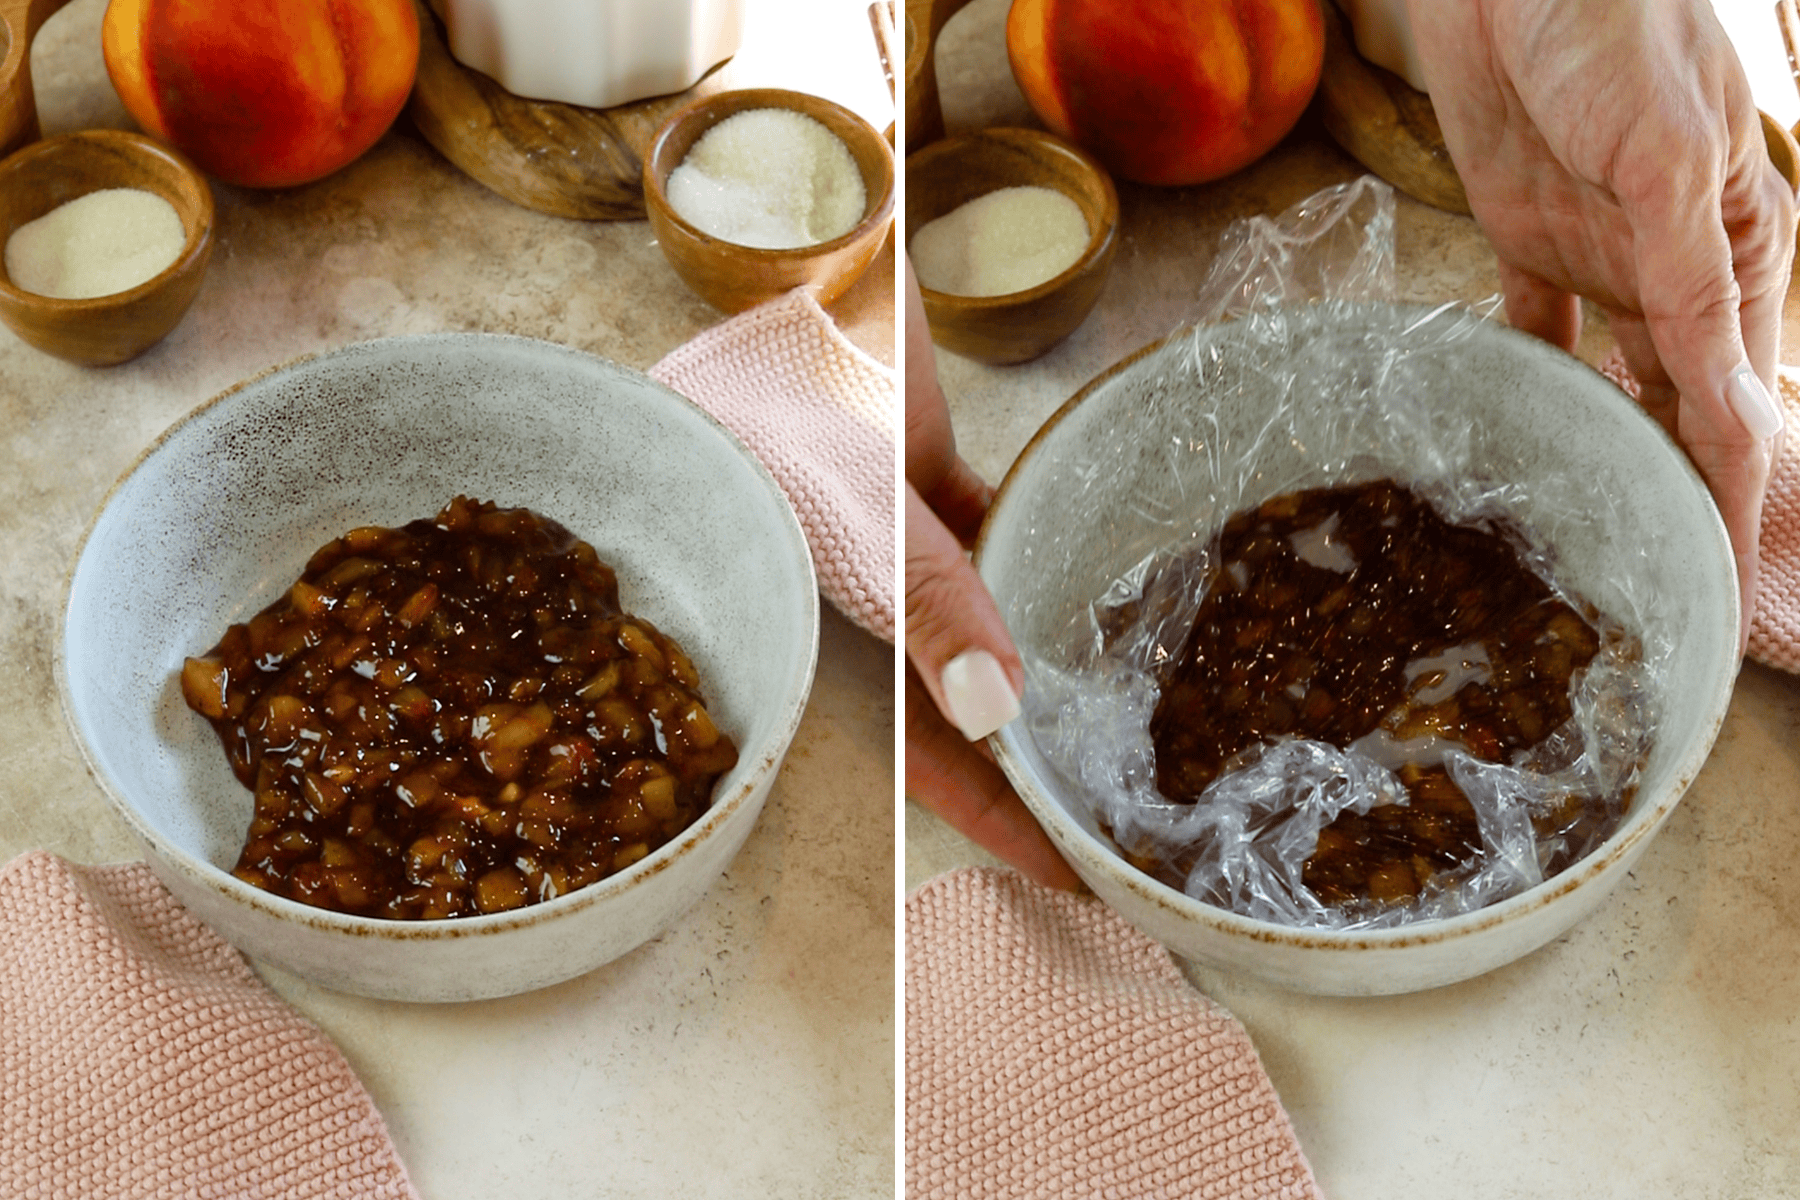
Mix cornstarch and water, then add to the peaches. Cook for another 1 to 2 minutes until thick. Transfer to a bowl and cover with plastic wrap.
Let the mixture cool to room temperature, then chill for a couple of hours.
Streusel Crumb
For the Streusel Crumb, pre-heat the oven to 350ºF. Line a baking sheet with parchment or silicone.
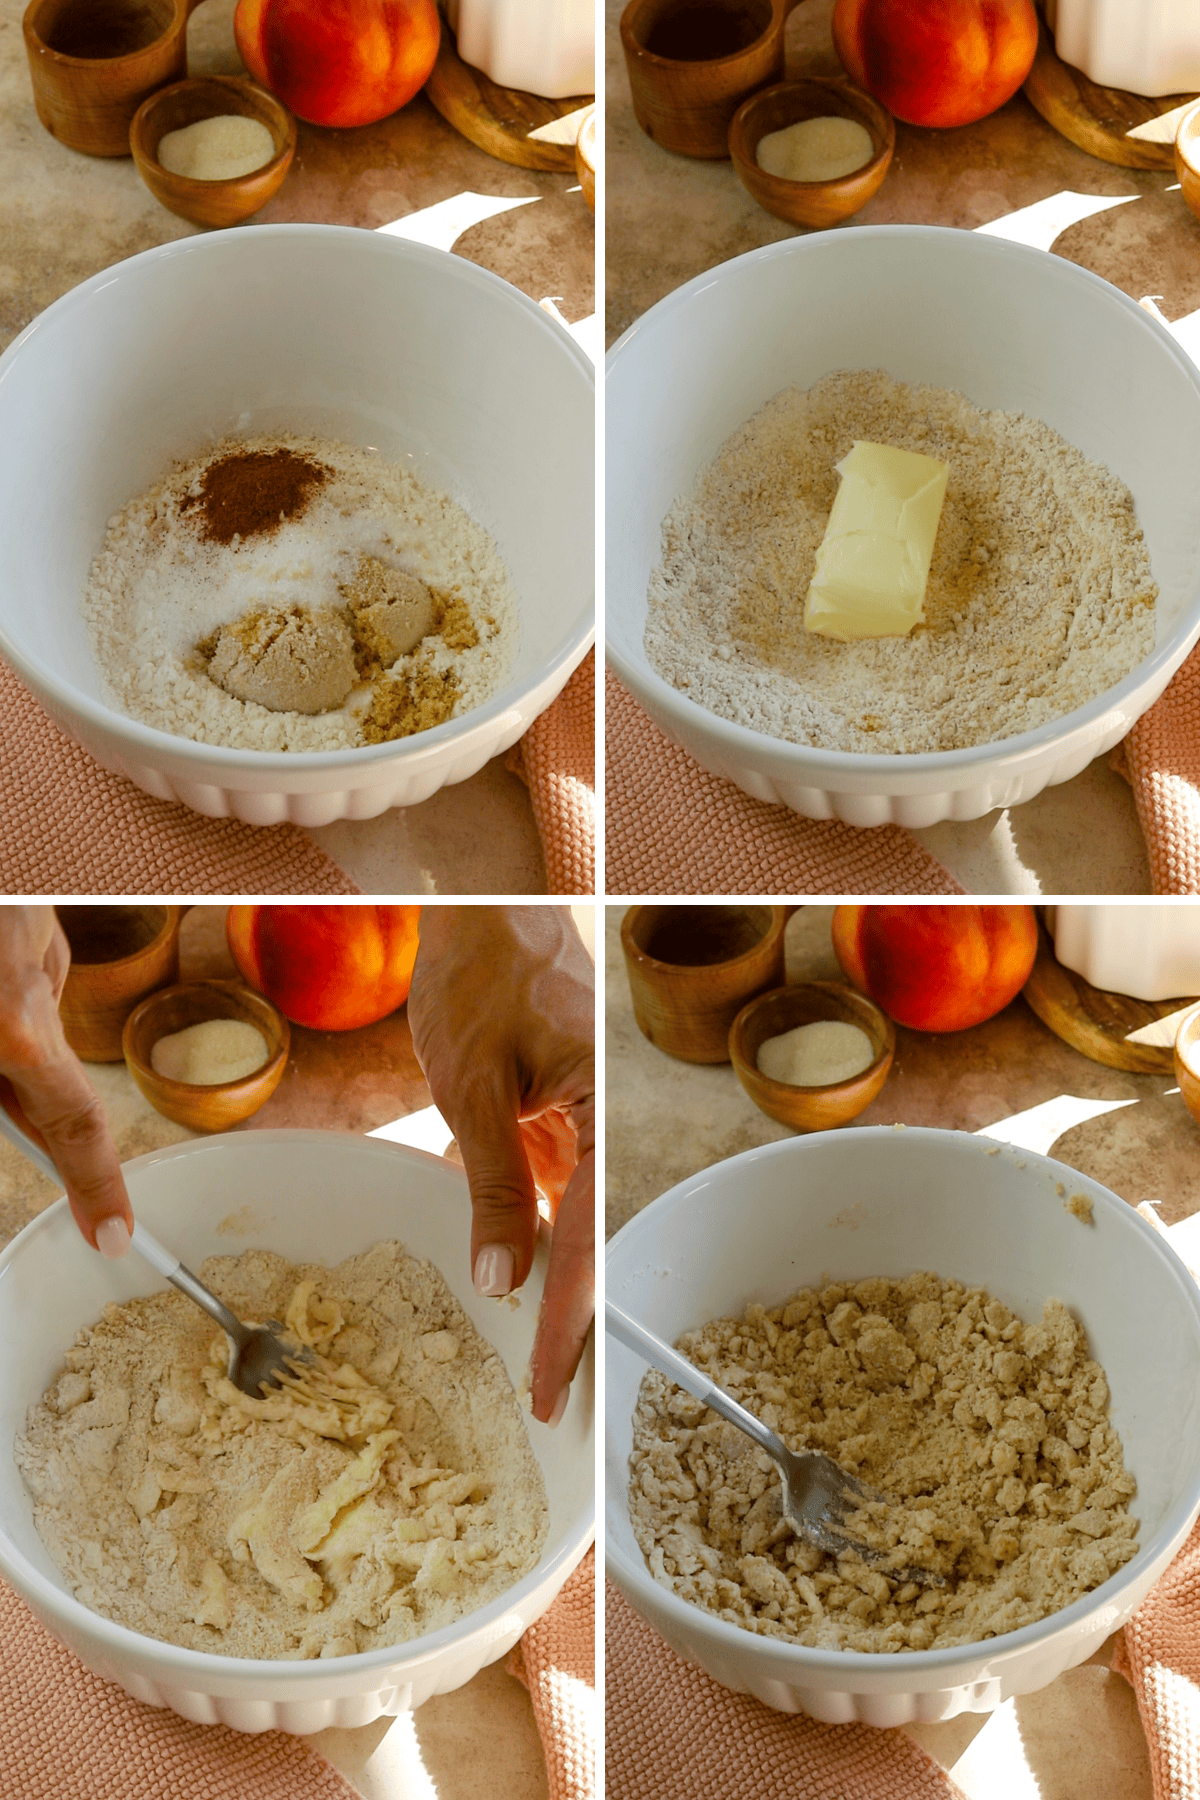
Mix flour, sugar, nutmeg, and cinnamon in a bowl. Add butter and mix until crumbly.
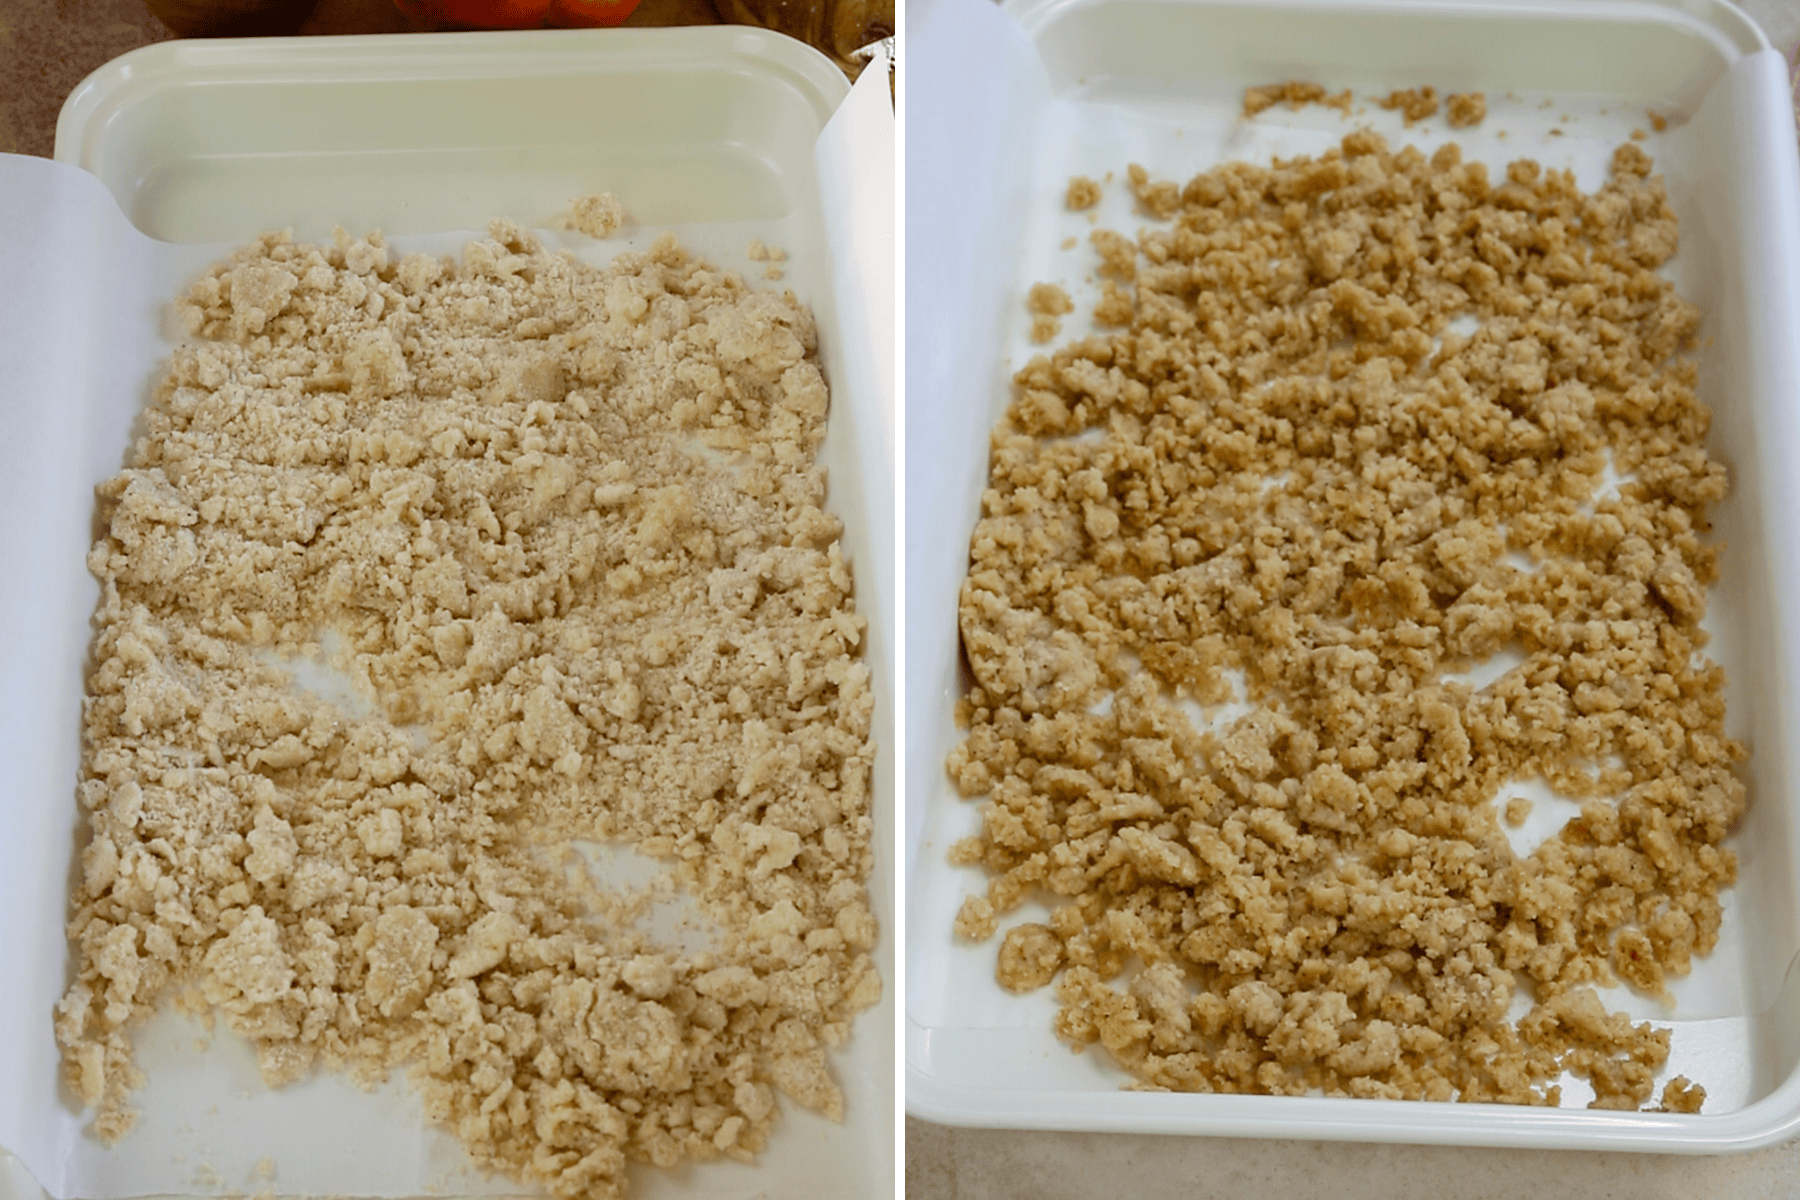
Bake for 10 to 15 minutes until golden brown. Stir to break up the crumbs and let cool.
Prep the Ingredients and Tools
Before you start, get all the ingredients ready. Prepare a large piping/pastry bag fitted with a number 10 round tip. Prepare another piping bag with a small 3 round tip to pipe the leaves. Set aside.
Line two baking sheets with parchment paper or a silicone mat. Place the template underneath the parchment paper.
Wipe the tools such as bowls, spatulas, and silicone mats with vinegar if desired to remove any grease particles.
Measure out all the ingredients and set them aside so they’re ready to go!
Sift the powdered sugar and almond flour together. Set it aside.
Start pre-heating the oven. Oven temperature will vary according to your oven. Read this post for more information, or the notes below in the recipe to see which temperatures I personally use.
Making the Swiss Meringue
Now that everything is prepped, it’s time to make the swiss meringue!
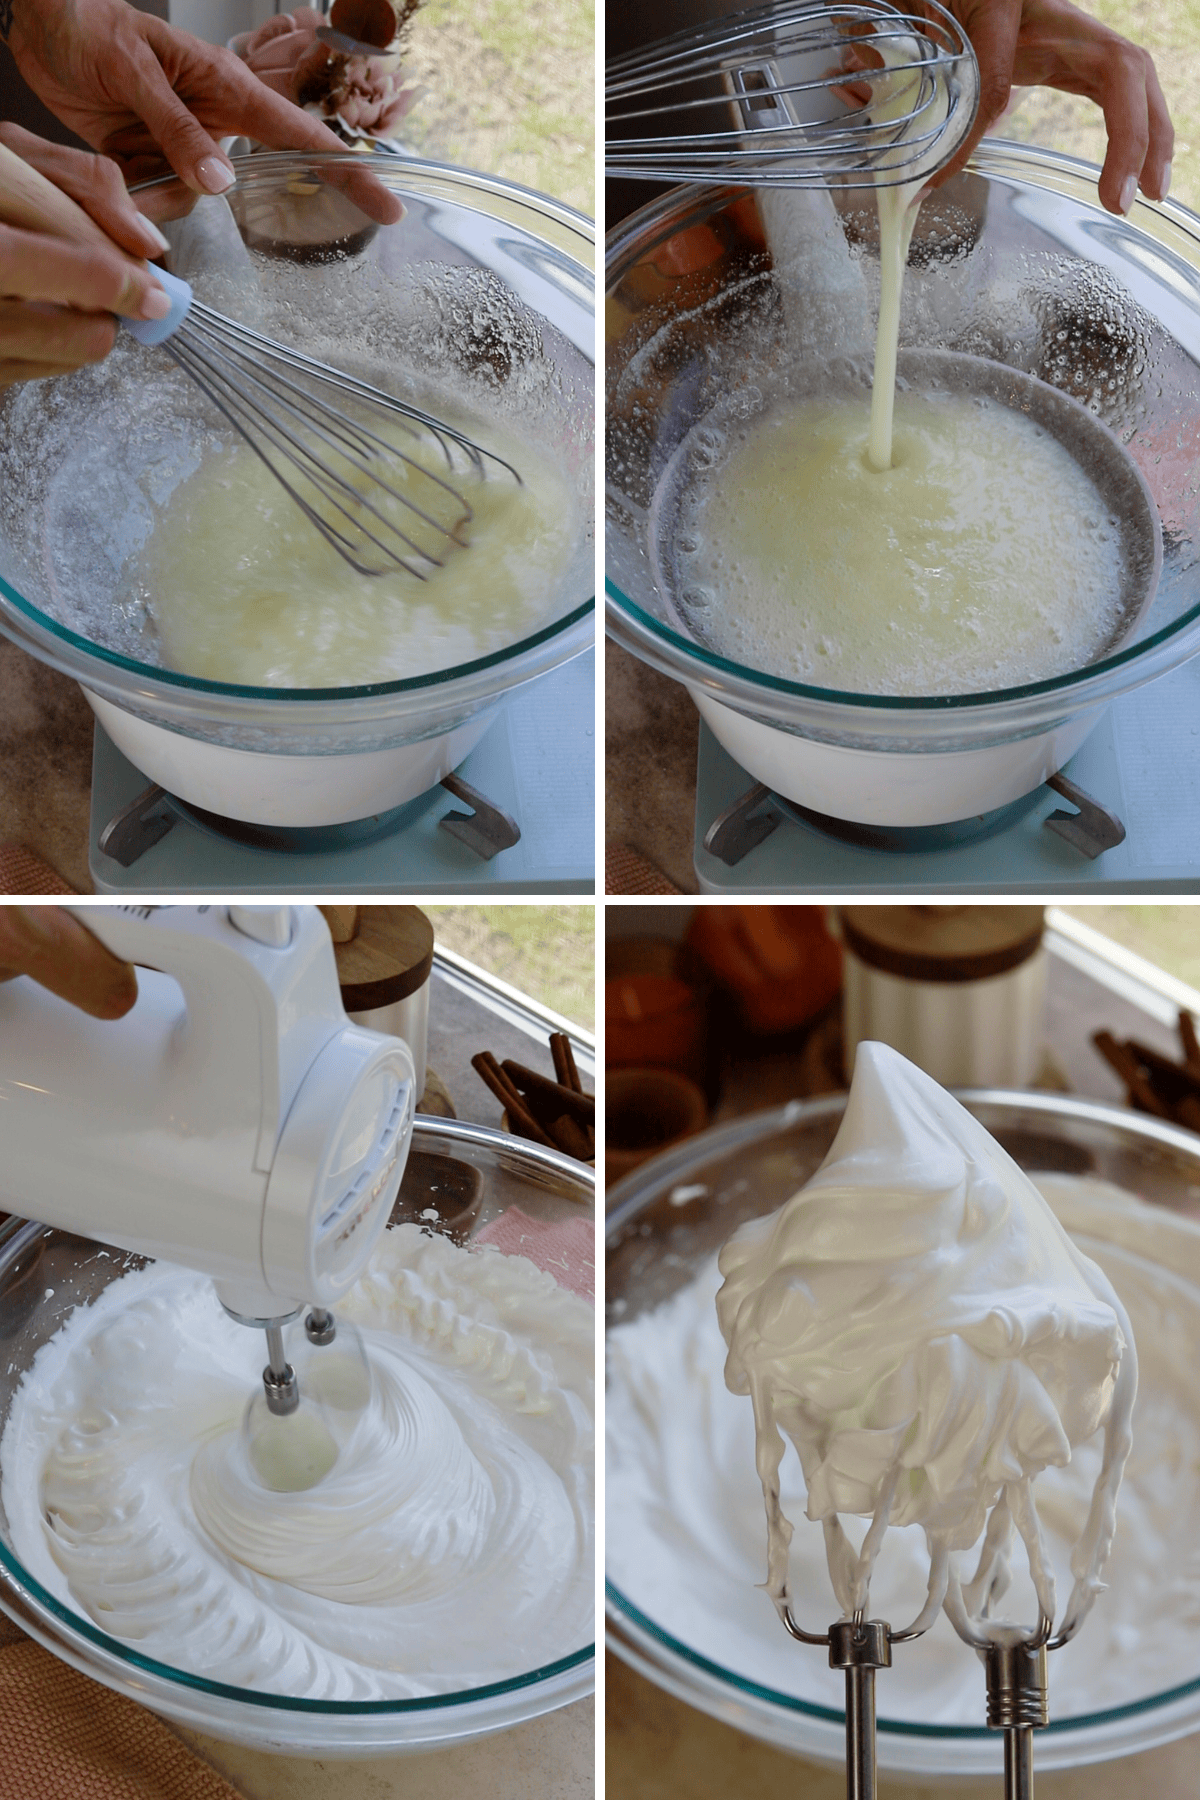
Place a bowl over a pan with barely simmering water. Add the sugar and egg white powder (if using) to the bowl. If not using egg white powder, simply skip it. Whisk together to prevent the egg white powder from clumping up.
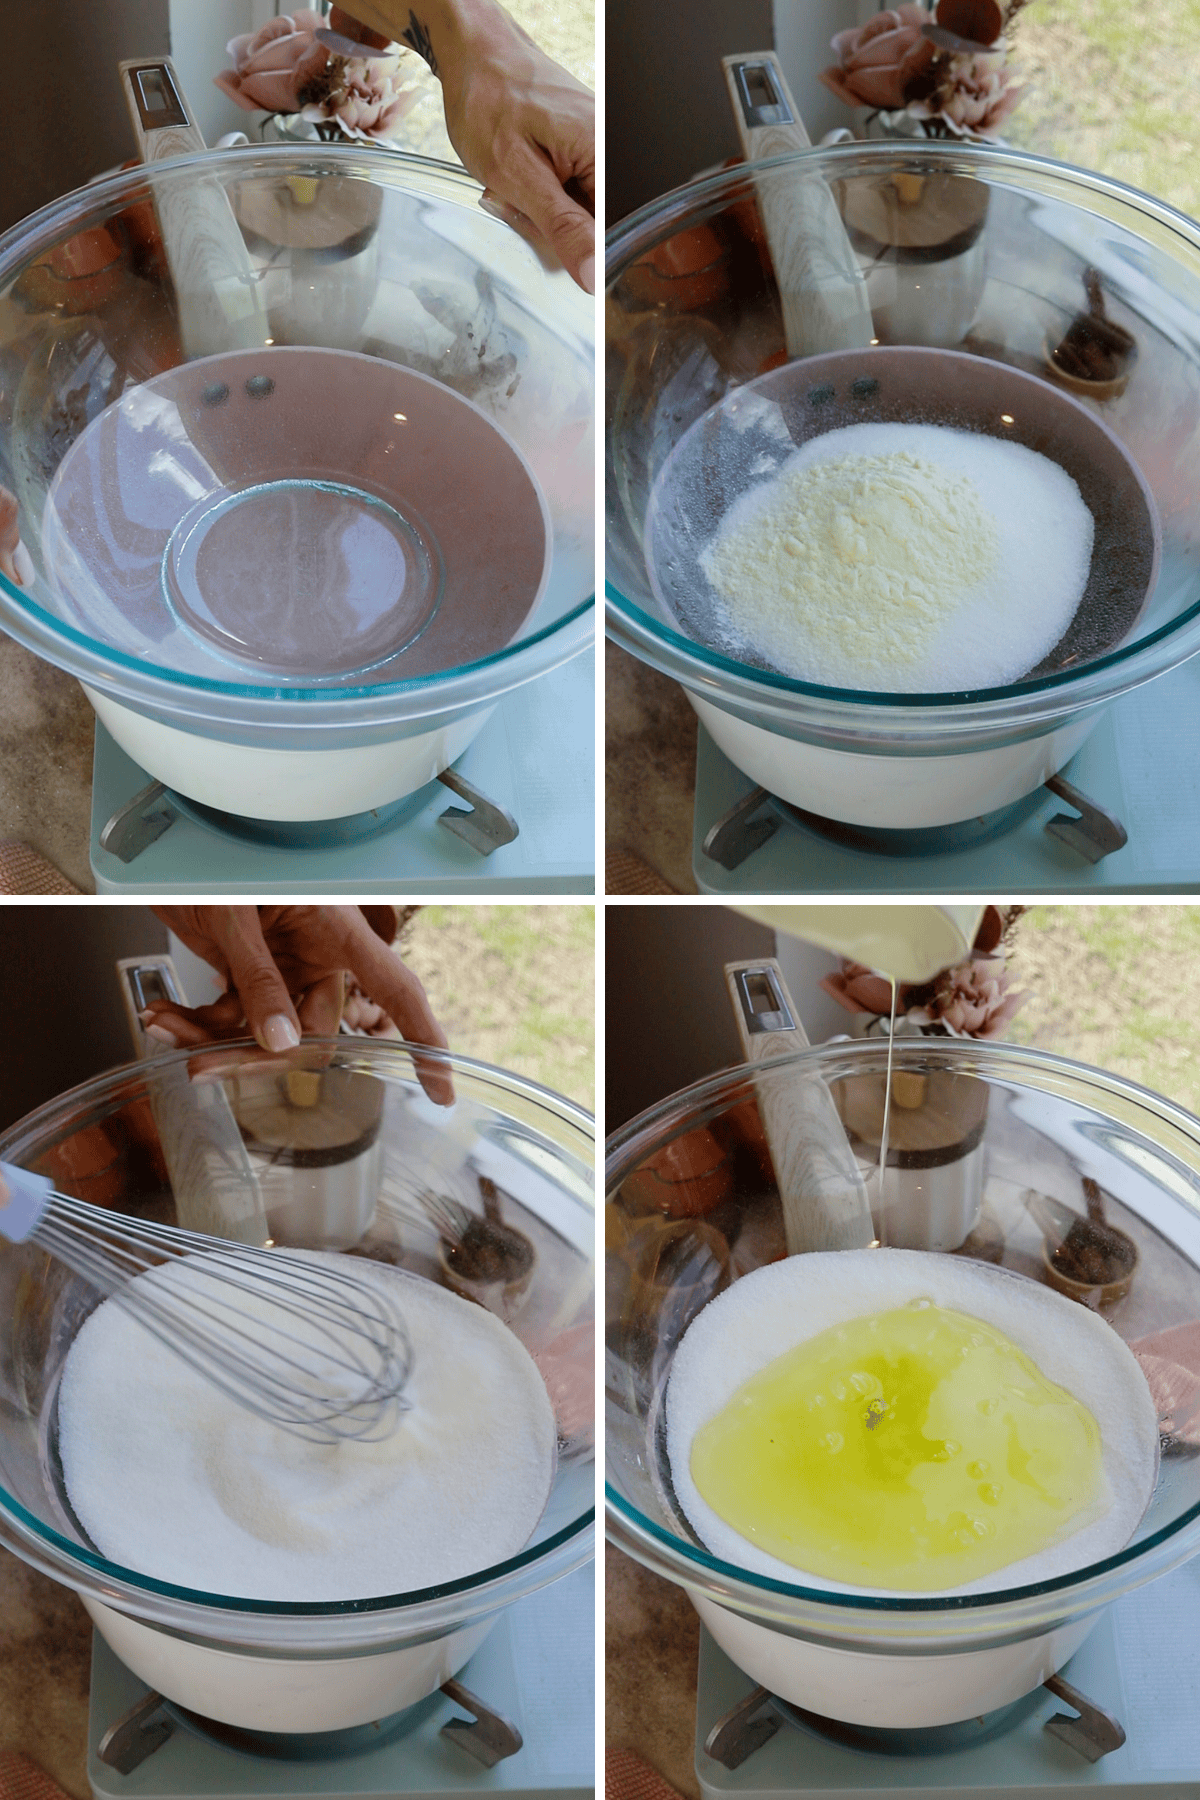
Add the egg whites to the bowl and whisk until the sugar is completely melted.
It will take a couple of minutes. Test by touching the mixture between your fingers; if you feel any sugar granules, keep whisking.
Transfer the syrup to the bowl of a stand mixer, or if using a hand mixer like I am below, simply begin whipping. Whip on low speed for about 30 seconds, then increase speed to medium. Whisk until stiff peaks form, about 13 to 15 minutes.
The peaks should be shooting straight up, the meringue should have a nice base at the bottom, and defined waves.
Macaronage
Now is where the magic happens! The macaronage process: folding and mixing ingredients together to create a smooth and consistent batter.
Pour the sifted powdered sugar and almond flour into the stiff meringue and start folding gently.
Mix just until the dry ingredients have incorporated with the meringue.
Once the dry ingredients are incorporated, divide the batter between 3 bowls. Keep the other bowls covered while working with one.
Add food coloring to each bowl. To one, add peach, mauve, and orange. To the second, add fuchsia and electric purple. For the last add green leaf food coloring.
Squeeze the air out of the batter by pressing it down along the sides of the bowl as you fold.
Read the recipe below for more tips on how to identify if the batter has been folded enough. Basically the batter should be flowing off the spatula slowly but effortlessly.
Transfer the green batter to the smaller piping bag.
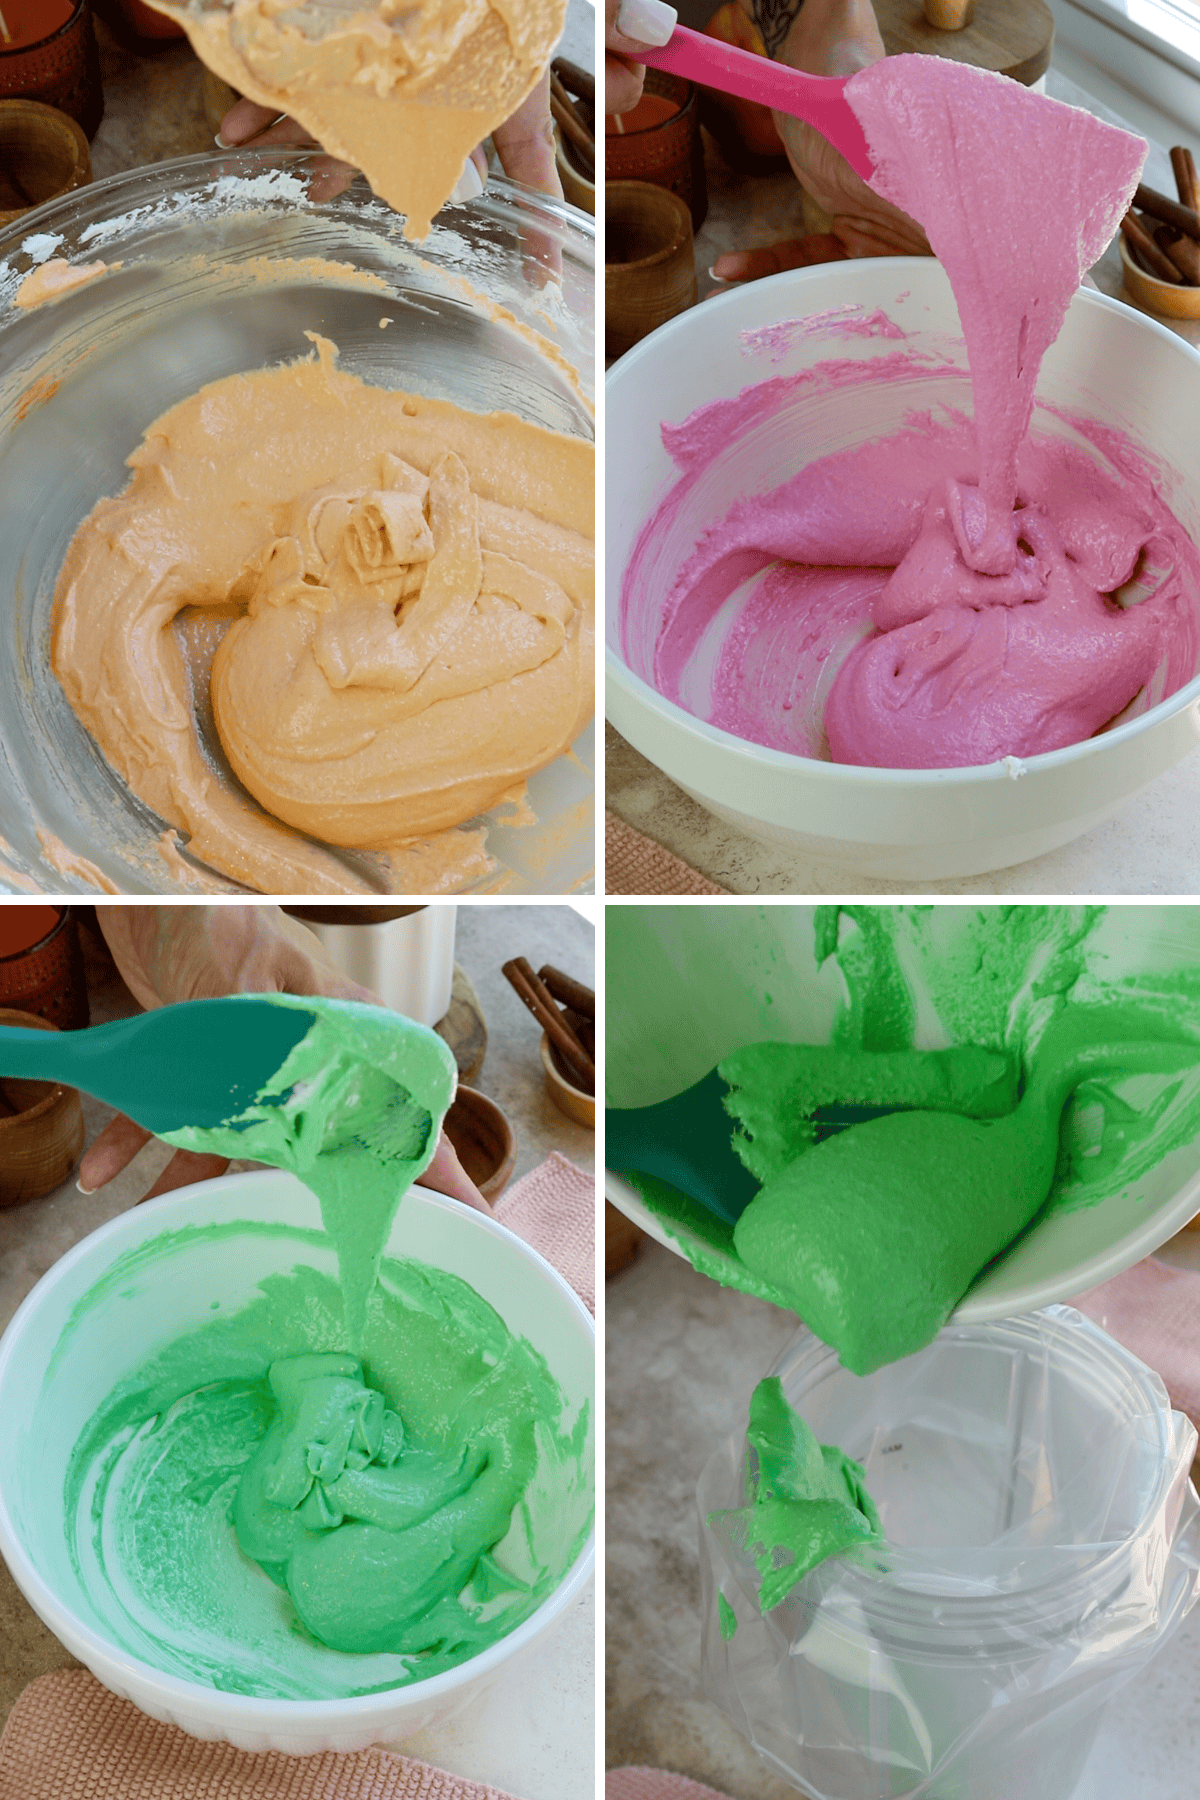
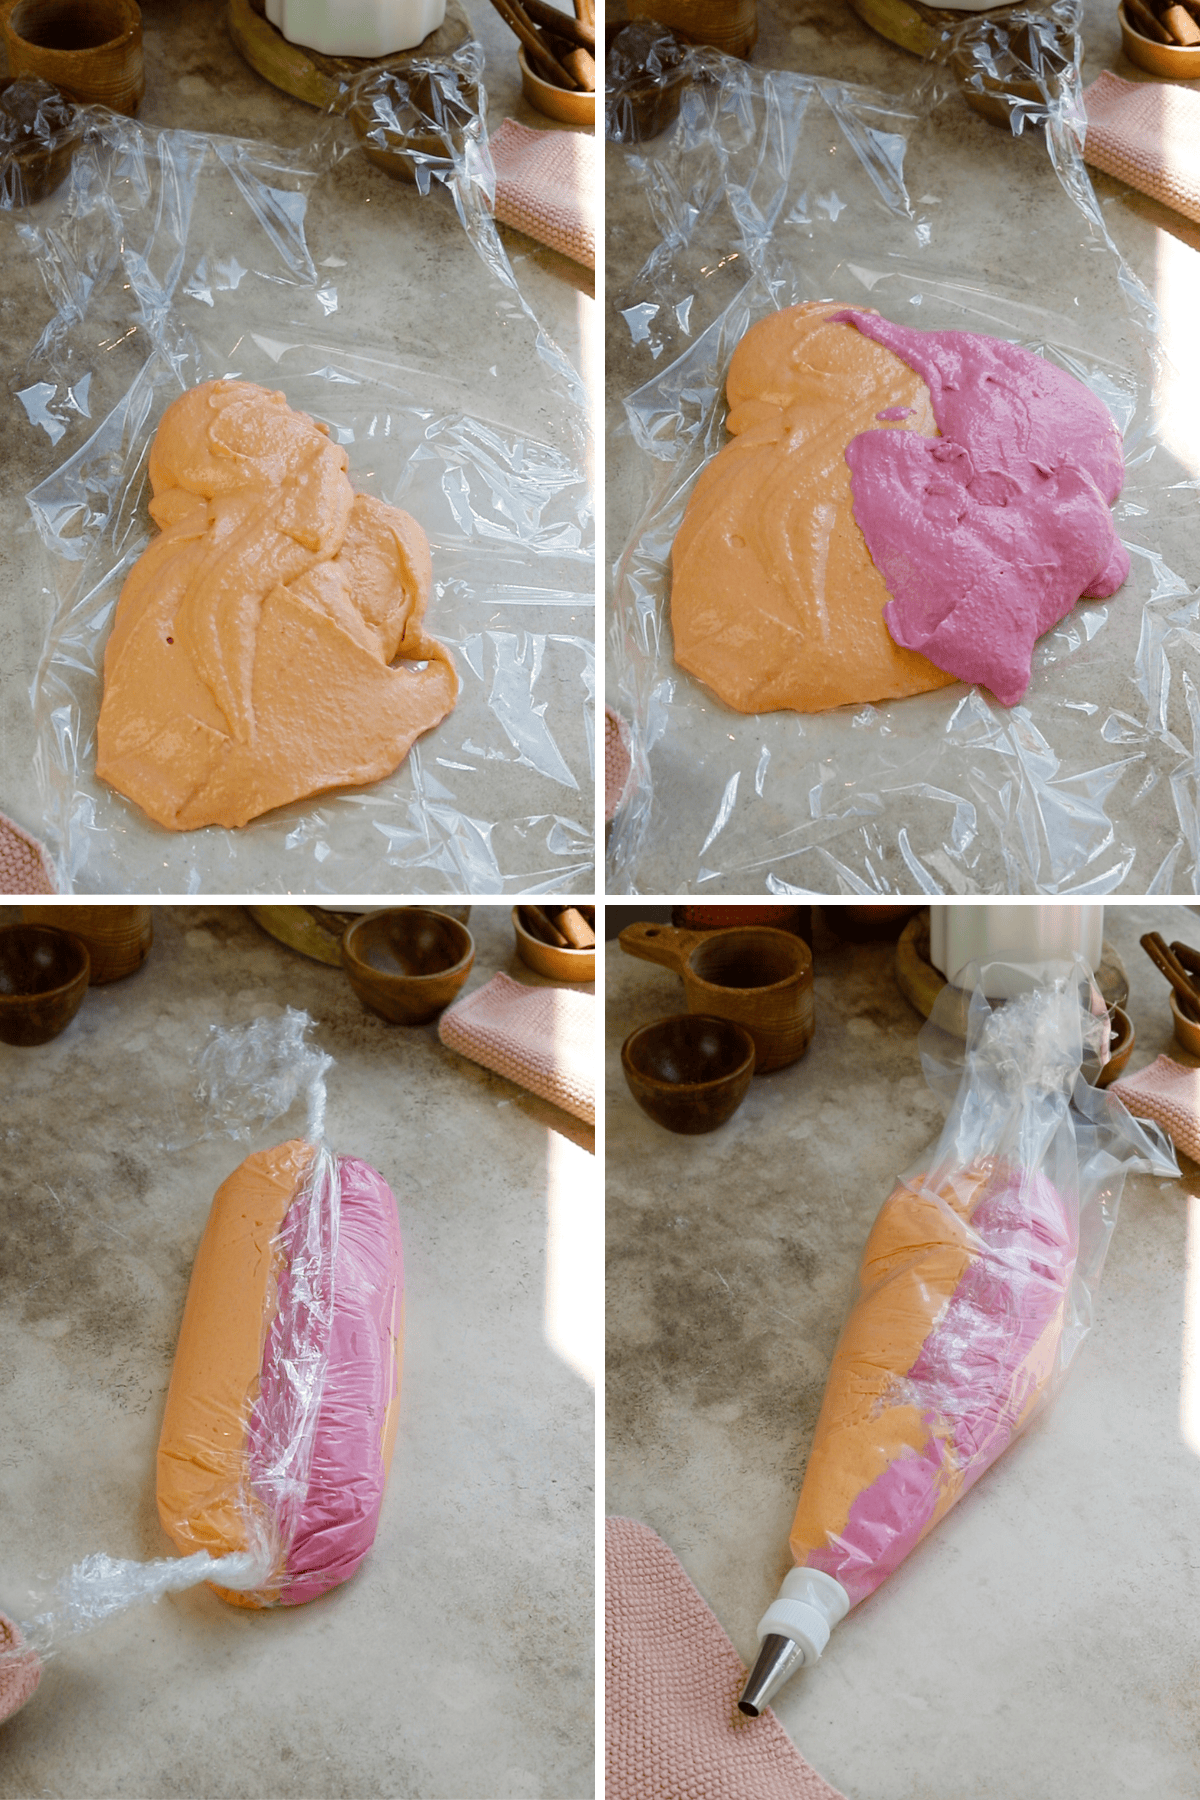
We’re going to use the orange & pink macaron batter in the same piping bag. So first, lay out a piece of plastic wrap, pour the orange batter on one side and the pink on the other. Roll the plastic wrap to form a log. Cut off the end and place the log in a piping bag fitted with the number 10 tip. Set aside.
Piping the Peach Macarons + Tips
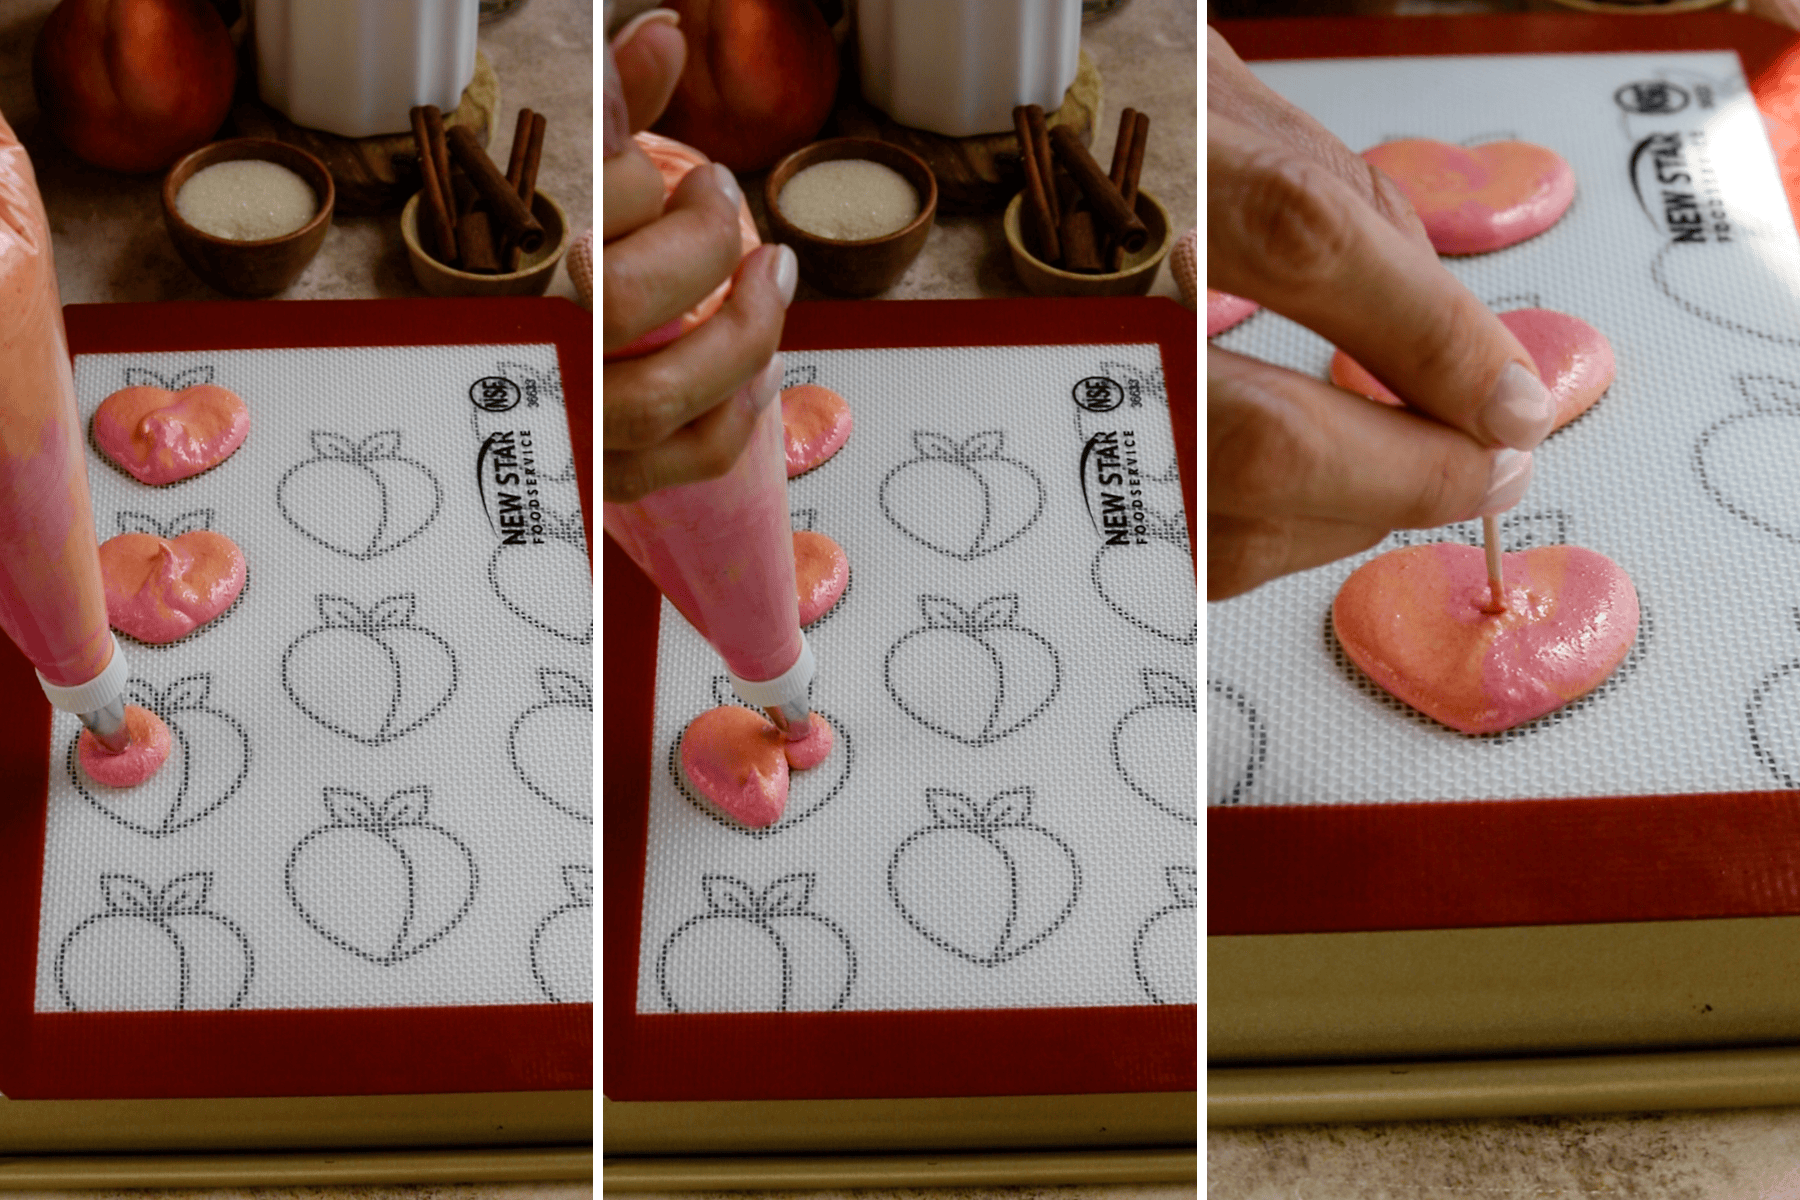
Using the template as a guide, pipe the orange and pink batter by piping one side first, starting from the top, dragging the batter to the bottom in the center. Then move over to the other side and repeat. Use a toothpick to pop any air bubbles and smooth out the batter.
Pipe the leaves by piping the outline, then filling it out with the green batter inside.
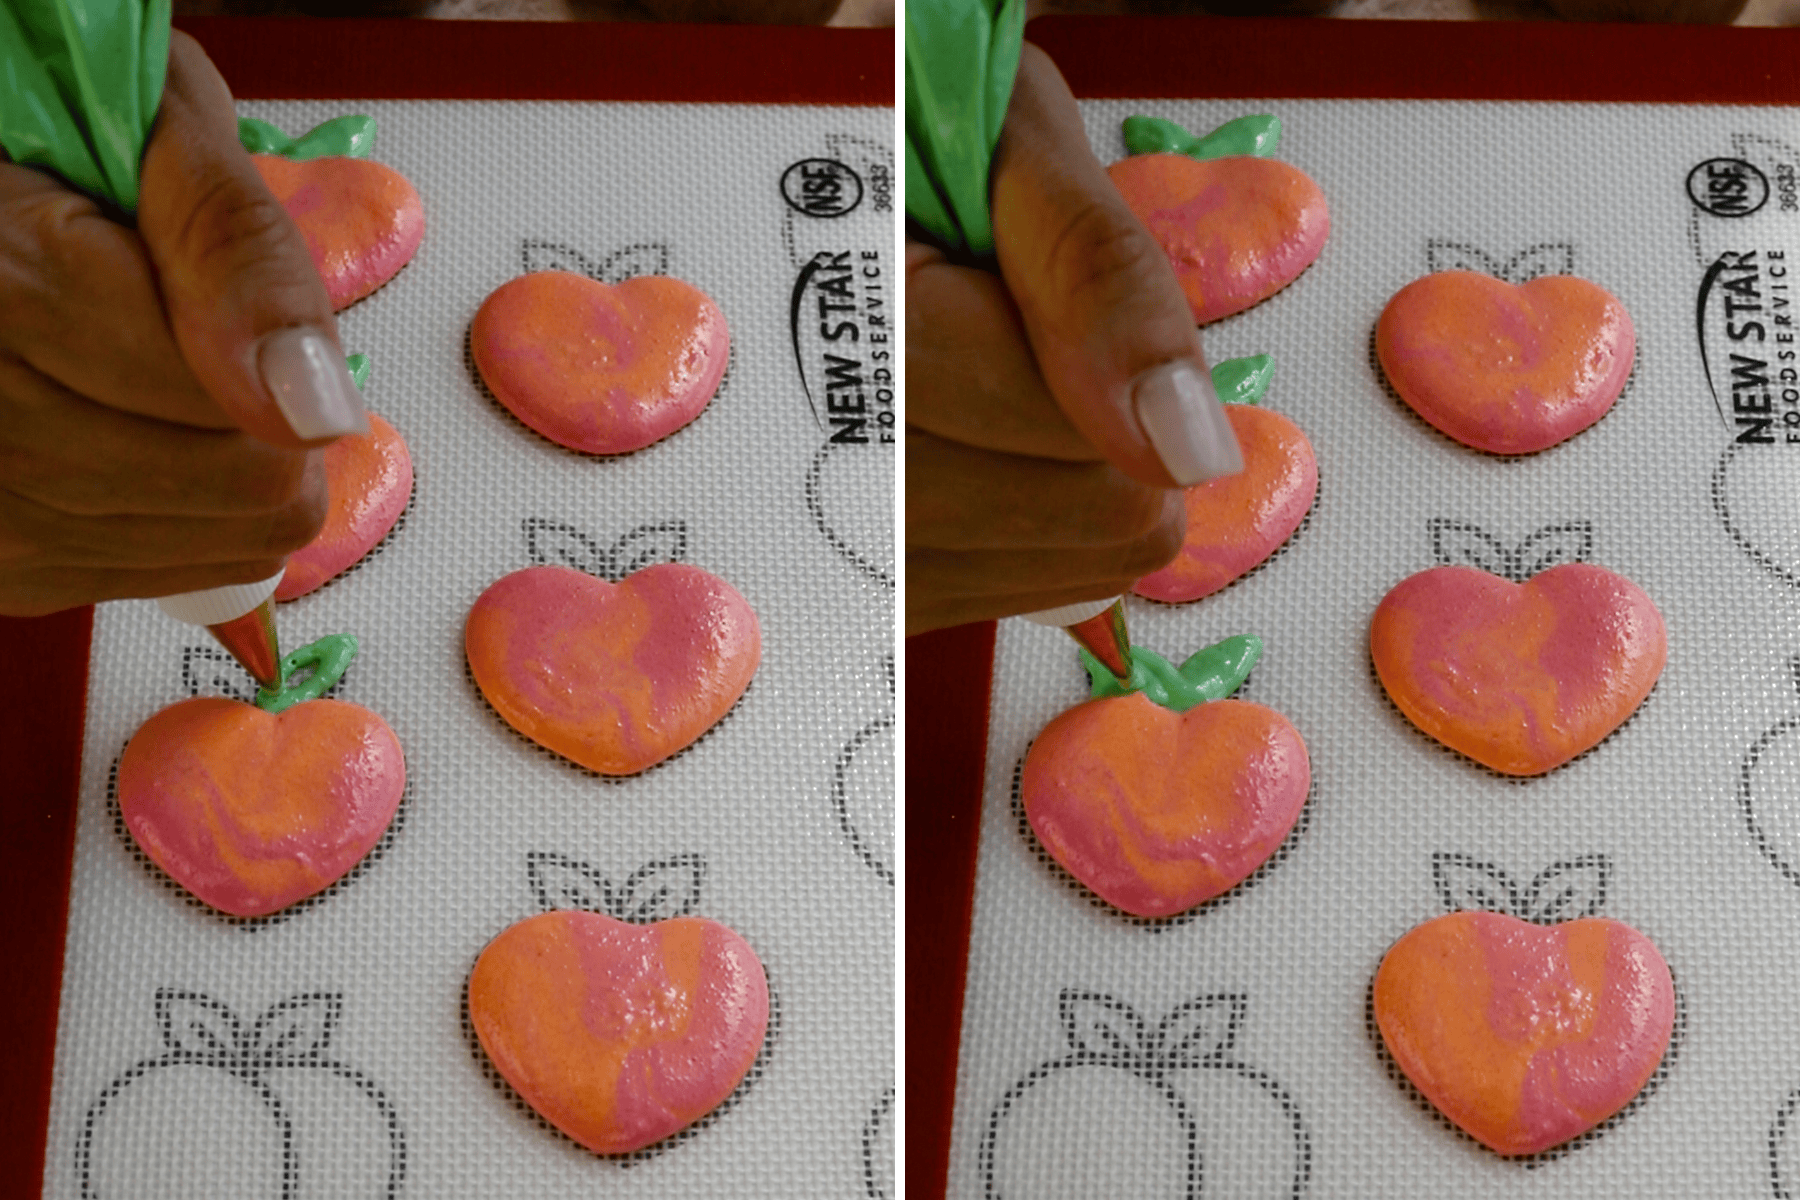
Sprinkle gold sugar or turbinado sugar over the macarons for a fuzzy look before the shells dry.
Tips for Piping Macarons
- When piping shapes it helps if the batter isn’t too thick. If the batter is too thick or on the under mixed side, the macarons are not going to be smooth.
- Tap the tray against the counter or against the palm of your hand a few times to release air bubbles and to help the batter spread out.
- Also use a toothpick to pop air bubbles and to help drag the batter to the outlines if necessary.
Resting and Baking
Let the macarons sit at room temperature, uncovered until they are dry to the touch, with a thick skin on top. It’s very important to let shaped macarons dry before baking, as they tend to crack if they don’t rest.
Once rested, bake until the macarons aren’t jiggly when you try to move them, and the top of the shell isn’t soft when you touch it.
Let the macarons cool before filling.
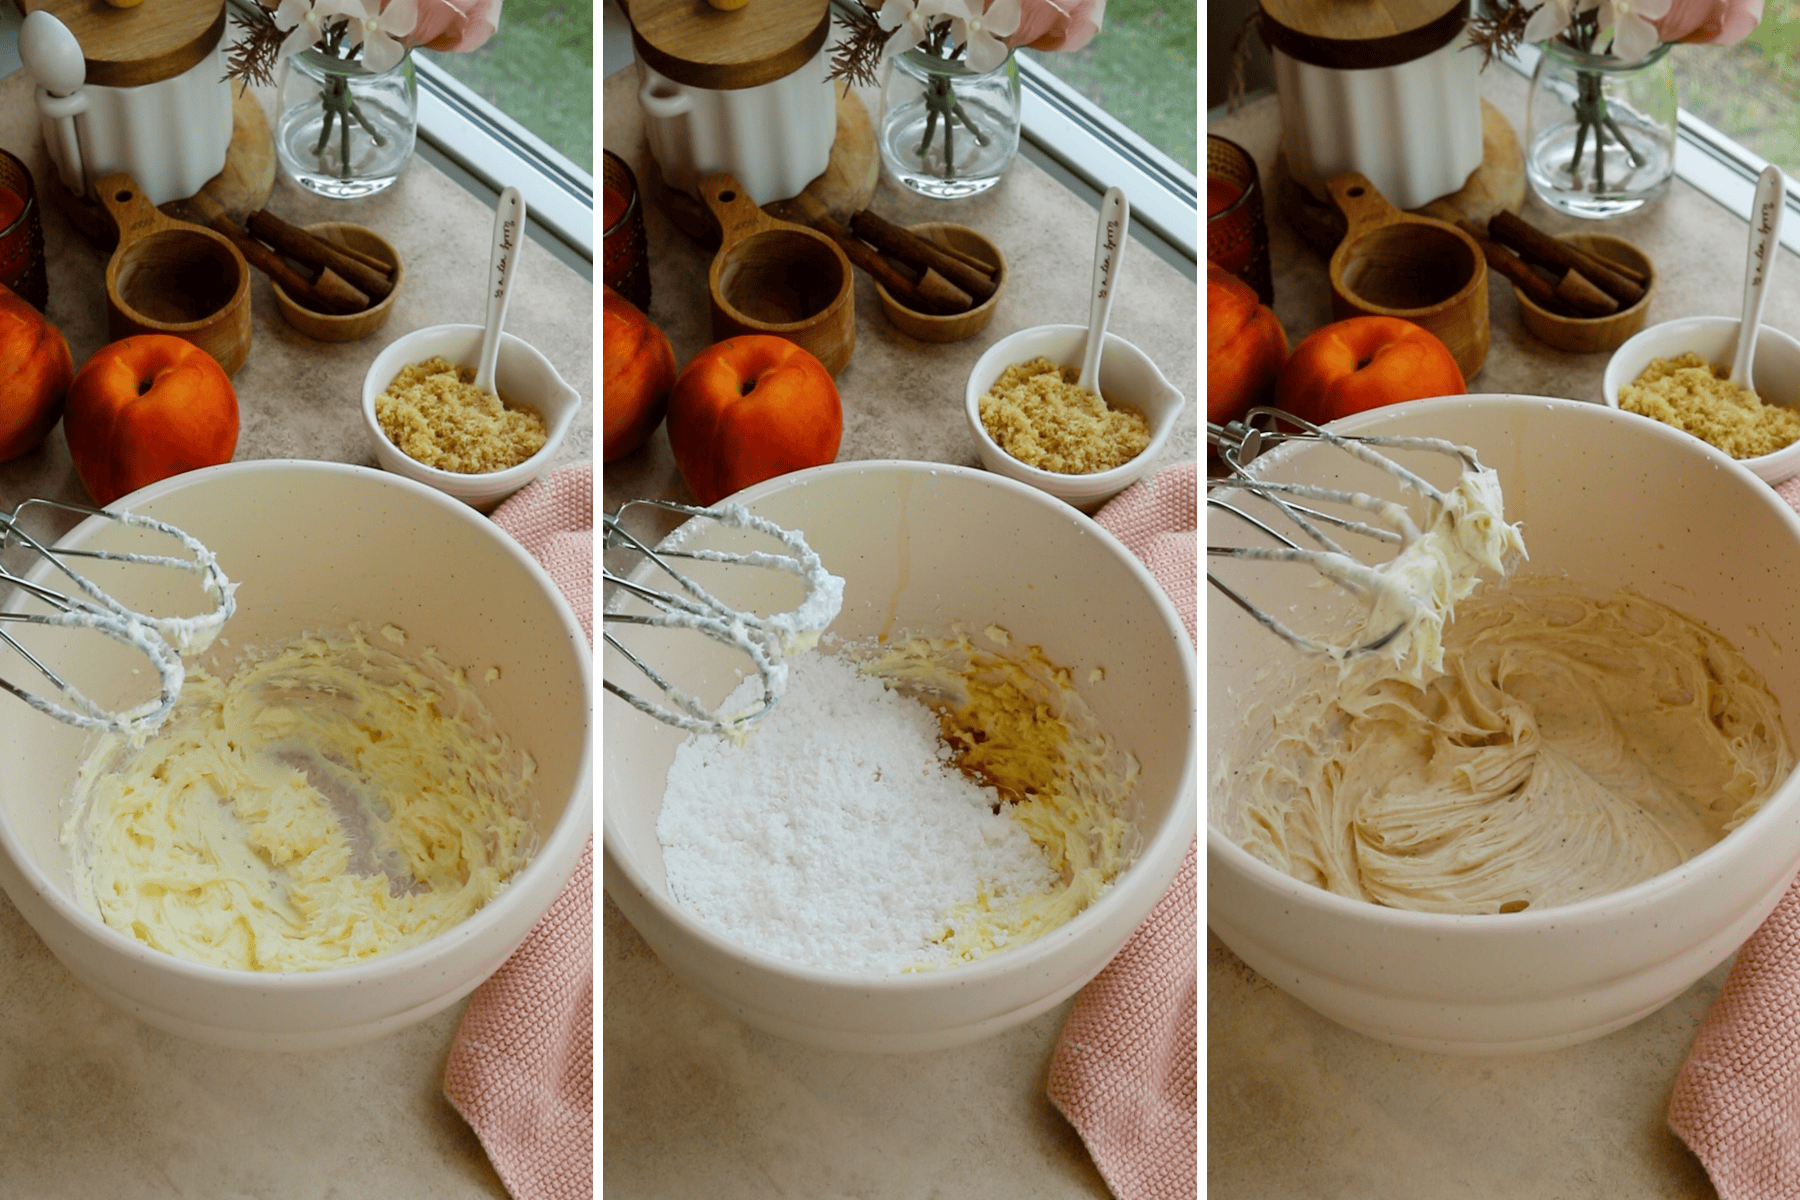
Make the Cinnamon Cream Cheese Frosting
Sift powdered sugar with the cinnamon. Beat room-temperature cream cheese and butter together until light and fluffy. Combine the wet ingredients, dry ingredients, and vanilla extract and beat until incorporated.
Store the frosting in the fridge for up to 5 days, covered.
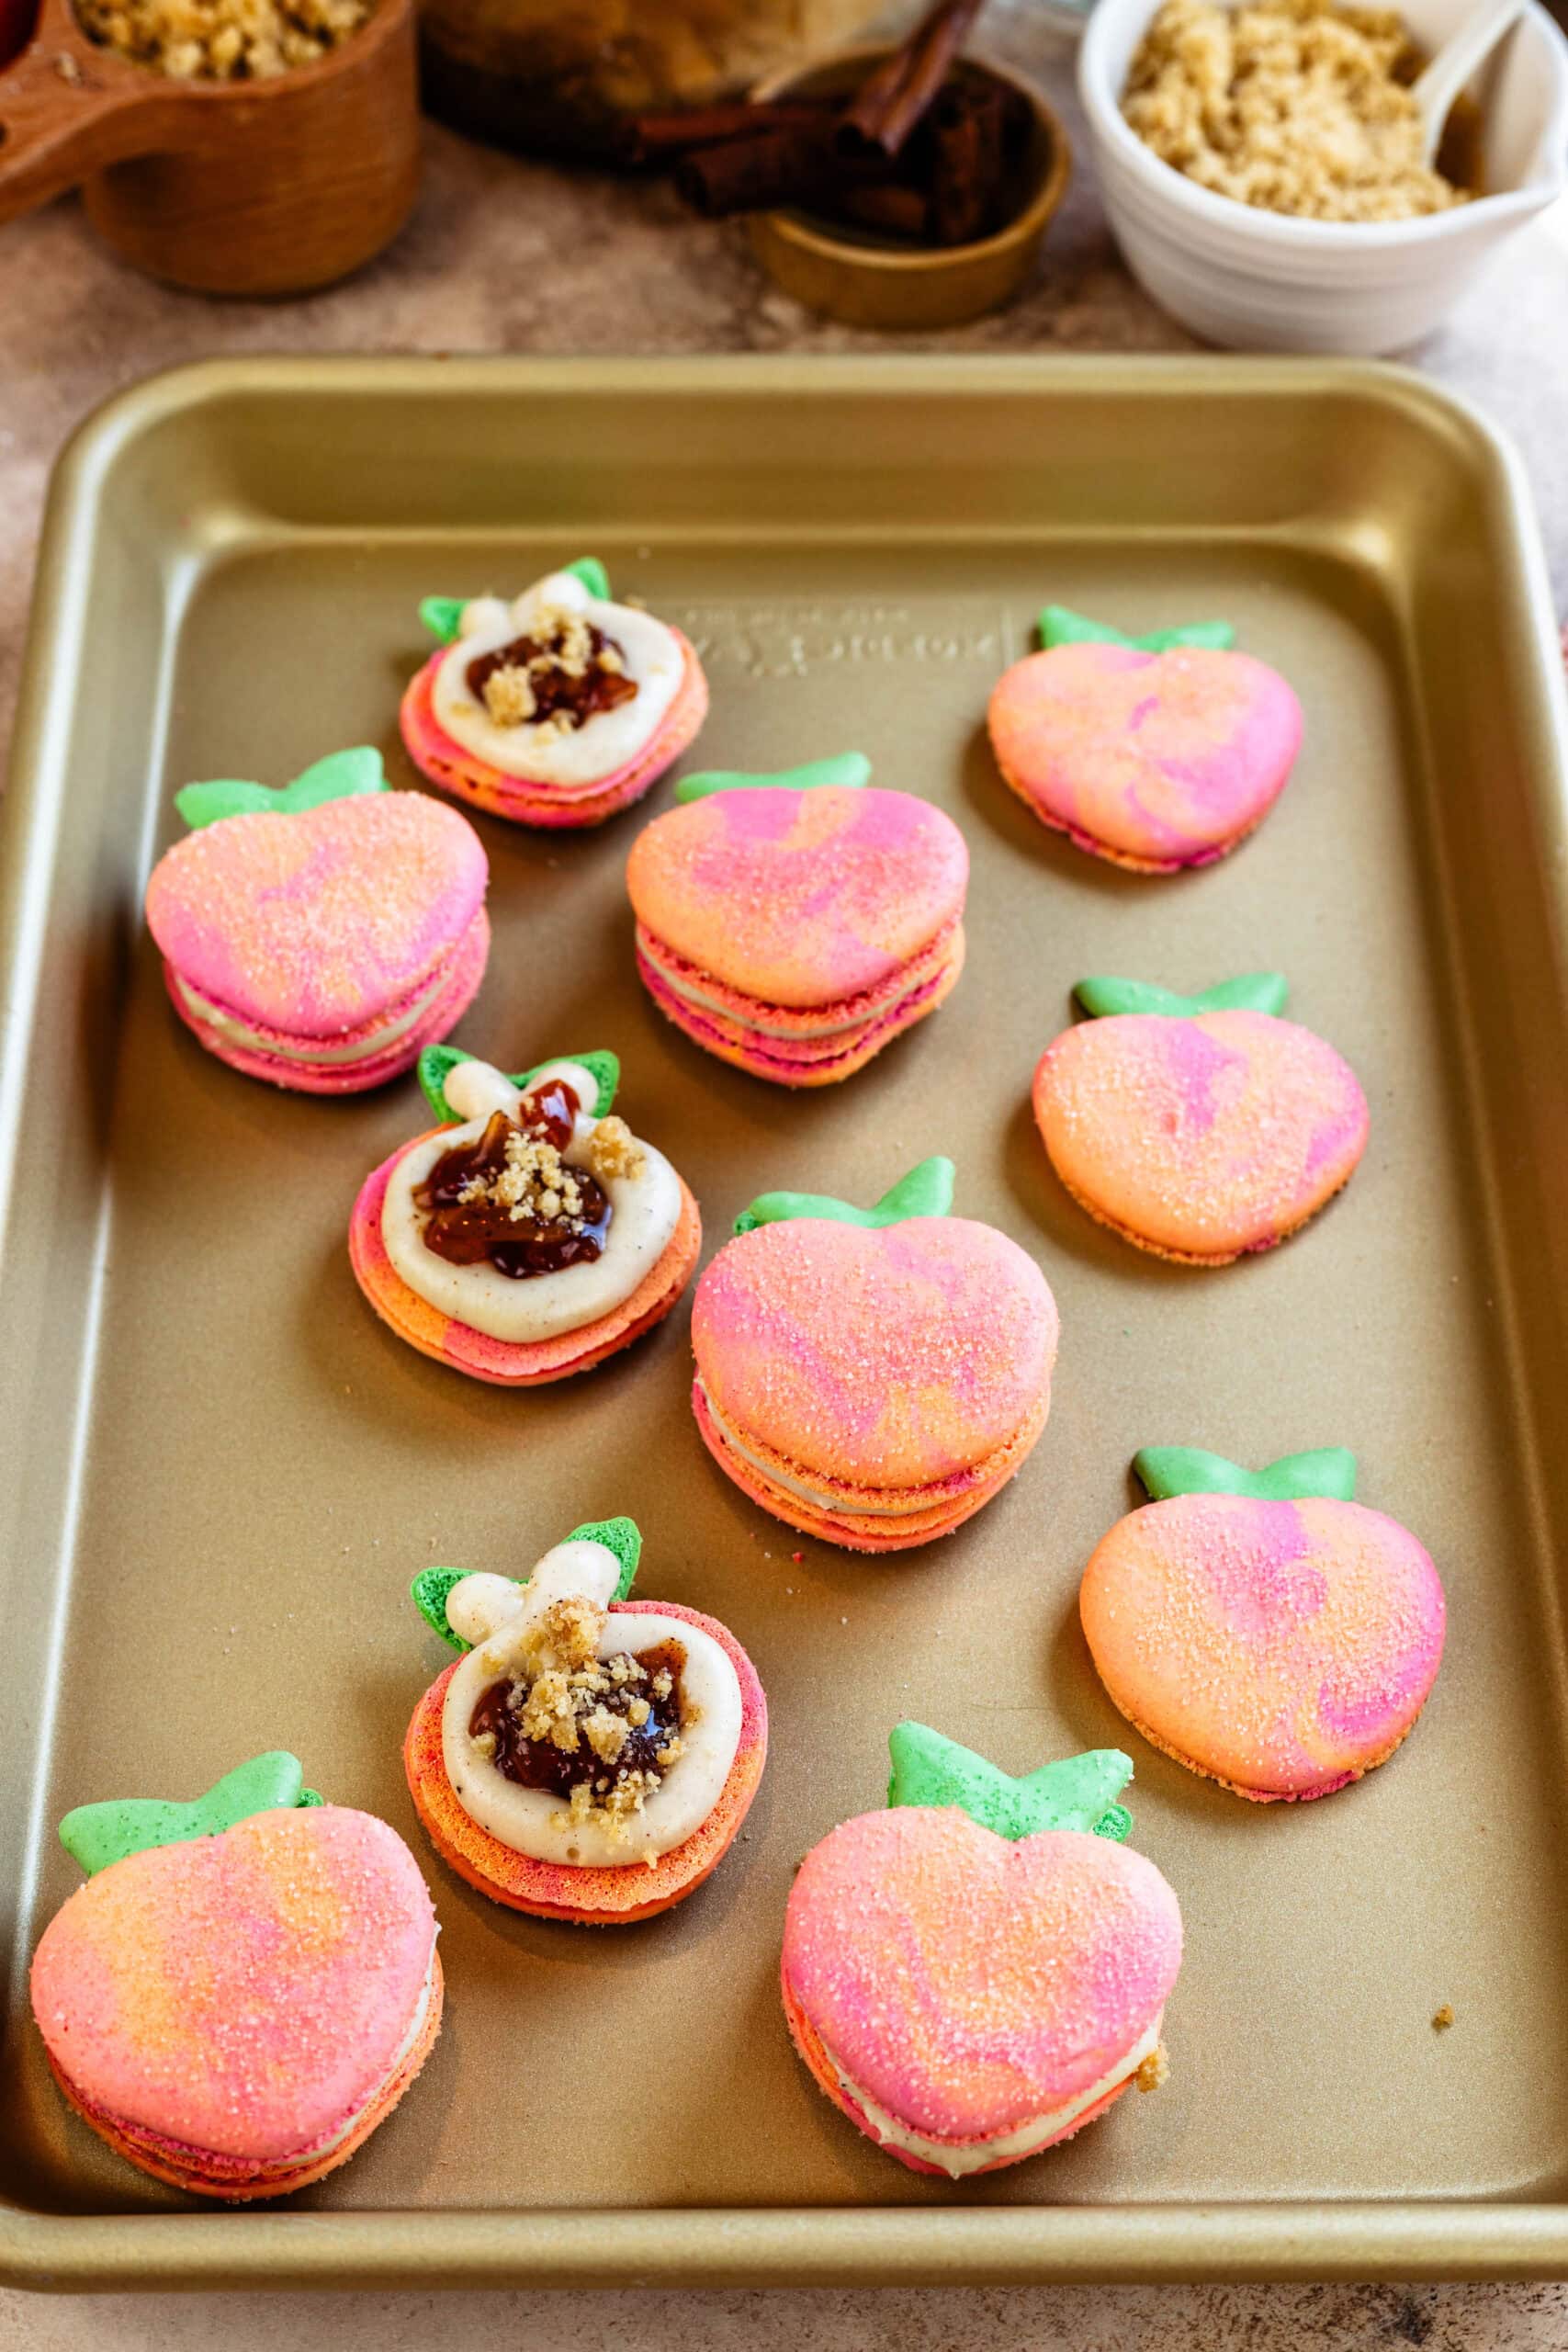
Assembling the Macarons
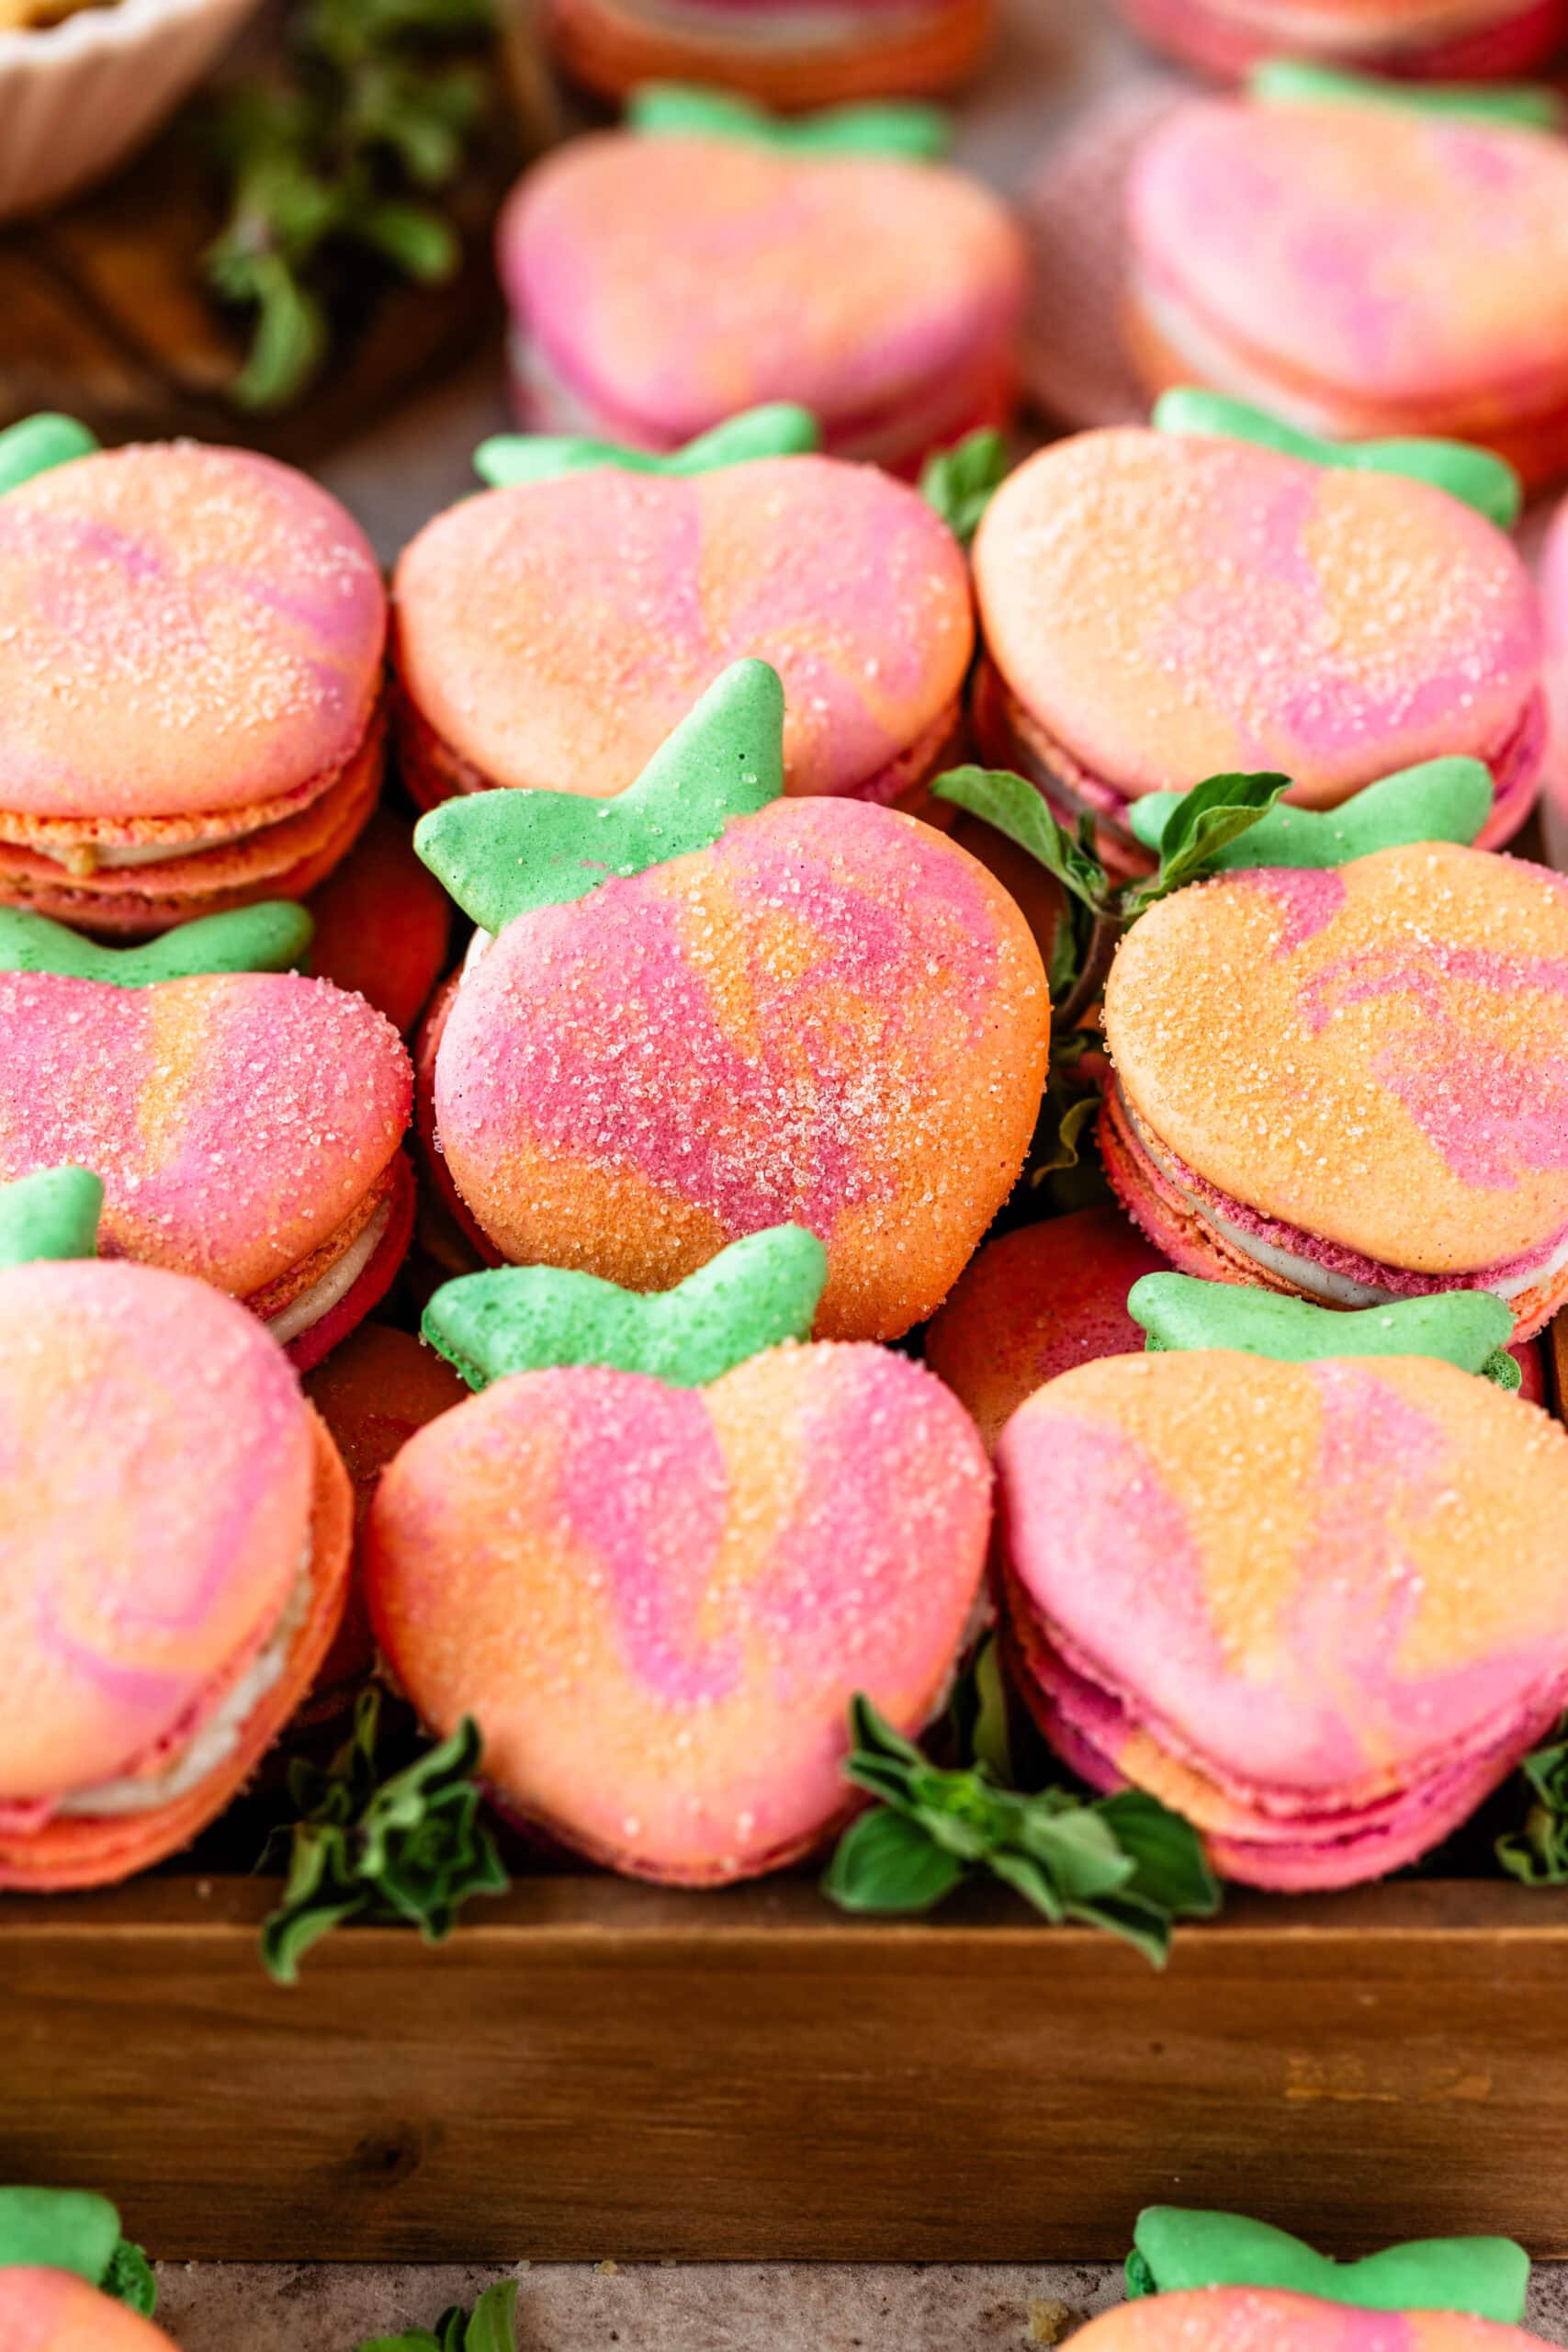
Pipe the cream cheese frosting around the edges of the bottom shell. Fill the center with peach jam and sprinkle streusel crumbs on top. Top with another shell.
Let the macarons mature in the fridge for 1 day before serving.
Storage and Serving
Store macarons in the refrigerator for up to 5 days, and in the freezer for up to 1 to 2 months.
Why You’ll Love These Peach Macarons
You’re going to love these Peach Macarons! The crispy, delicate shells pair perfectly with the sweet and tangy peach jam filling. Not only do they look amazing, but they taste incredible too. These macarons are perfect for any occasion and are sure to impress and satisfy your sweet tooth cravings.
Tips and Tricks
- Resting the Batter: Allow the macaron batter to rest at room temperature until they feel dry to the touch and a thick skin develops. This can be different based on the humidity in your kitchen. Read this article about humidity for more tips! This resting period helps the flour hydrate fully and reduces the likelihood of the macarons cracking while baking. It also what allows the macarons to have the iconic feet.
- Don’t Overmix: You don’t want your batter to be too runny by overmixing. So be careful! It’s always best to under mix and test several times until the proper consistency has been achieved.
- Controlling Heat: Adjust the heat of your oven carefully. And know your oven!
- Uniform Macaron Size: Use a template as you pipe for each macaron. Aim for consistency in size to ensure uniform layers when assembling the macarons.
- Use egg white powder: Egg White Powder is not the same as meringue powder. Egg White Powder is made of only egg whites. They help with getting fuller shells, and specially when adding a lot of food coloring to the batter, because they make the shells dry faster. I recommend experimenting with it if you can find it.
- Use a Scale: Please use a scale when measuring the ingredients for accuracy. Macaron amount: it will vary greatly depending on how big you pipe the shells, and on how runny or thick the batter is.
- Oven thermometer: Make sure to have an oven thermometer to bake macarons. It’s on of the most important things about making macarons. Home ovens aren’t accurate at all at telling the temperature, and even a slight 5 degree difference can make or break your whole batch. Read more about it here.
Peach Macaron Variations
- Don’t have Cream Cheese? You can use mascarpone instead.
- Use Lemon Curd Instead of Peach Jam: Want some more zing to this recipe? Replace the peach jam in these macarons with my delicious lemon curd! You should still add some cooked diced peaches to the curd to make sure it stays peachy!
- Use White Chocolate Buttercream: Instead of the Cream Cheese Frosting, try out my White Chocolate Buttercream!
If you like this macaron recipe…you’ll love these other ones!
- Passionfruit Macarons
- Beach Macarons
- Mango Raspberry Macarons
- Creme Brûlée Macarons
- Dragon Fruit Macarons
I’d love to hear what you think!
I love hearing feedback about my recipes so please let me know if you make it and tell me what you think! You can share photos with me on Instagram or Facebook!
Peach Macarons
Ingredients
Macaron Shells
- 100 grams white granulated sugar
- 4 grams egg white powder optional, read notes below
- 100 grams egg whites
- 105 grams almond flour
- 105 grams powdered sugar
- Food coloring orange, peach, purple, pink, green
Peach Jam Filling
- 1 cup chopped peaches 160 grams, about 1 peach
- 1 tbsp lemon juice
- 1/4 cup brown sugar 50 grams
- 1/2 tsp cinnamon powder
- 1/4 tsp nutmeg powder
- 2 tsp water
- 1 tsp cornstarch
Streusel Crumb
- 1/2 cup all-purpose flour 63 grams
- 3 tbsp brown sugar 27 grams
- 3 tbsp granulated sugar 27 grams
- 1/2 tsp cinnamon powder
- 1/4 tsp nutmeg powder
- 1/4 cup unsalted butter
Cinnamon Cream Cheese Frosting
- 85 grams cream cheese softened
- 42.5 grams unsalted butter softened
- 125 grams powdered sugar 1 cup
- 1/2 tsp cinnamon powder or more to taste
- 1/4 teaspoon vanilla extract
Instructions
Macaron Shells
Prep the ingredients and tools
- Before you start, get all of the ingredients ready. Prepare a large piping pastry bag, fitted with a number 10 round tip. Prepare another piping bag with a small 3 round tip to pipe the leaves. Set aside.
- Line two baking sheets with parchment paper or silicone mat. Place the template underneath the parchment paper.
- You can download the template above on the post, or below in the notes.
- Wipe the tools such as bowls, spatulas, and silicone mats with vinegar if desired, this helps getting rid of any grease particles that might be in the tools.
- Measure out all of the ingredients.
- Sift the powdered sugar and almond flour together. Set it aside.
- Start pre-heating the oven. I pre-heat my large oven to 310ºF for 60 to 90 minutes, this helps with temperature fluctuations. I pre-heat the countertop oven to 285ºF for 30 to 45 minutes. Oven temperature will vary according to your oven.
Making the Swiss Meringue
- Place a bowl over a pan with barely simmering water. Add the sugar and egg white powder to the bowl if using. If you’re not using egg white powder simply skip it, nothing needs to be changed in the recipe.
- Whisk the sugar and egg white powder so it doesn’t clump up.
- Add the egg whites to the bowl and whisk until the sugar is completely melted. It will take a couple of minutes. You can test by touching the mixture between your fingers, and if you feel any sugar granules just keep whisking the mixture over the water bath.
- Make sure the bottom of the bowl isn’t touching the simmering water because you don’t want the whites to cook.
- Also, don’t overheat the sugar syrup, you are just looking to melt the sugar, no need to bring it to a certain temperature.Transfer the syrup to the bowl of a stand mixer. Before transferring the syrup, you might consider whipping the bottom of the bowl with a towel so the water doesn’t fall into the mixer bowl.
- With the whisk attachment, start whisking mixture on low (speed 2 of the KitchenAid) for about 30 seconds, then gradually start increasing speed to medium. Whisk on medium (speed 4) for one to two minutes, until the mixture is white and starting to become fluffy. Raise the speed to medium or medium-high and whip for a few minutes until stiff peaks are formed. I like to finish whipping the meringue on speed 6 of the KitchenAid.
- It takes me about 13 to 15 minutes to whip the meringue, but you shouldn’t go by time, go by what the meringue is supposed to look like because a lot of things can affect whipping time, such as the quality of the eggs, the weather, how powerful your mixer is, and more.
- Once the meringue gets glossy and you start seeing streaks formed by the whisk, and the meringue raising in the center of the whisk, it might be time to stop.
- Whisk until stiff peaks have formed. When you pull the whip up, the peak should be stiff and shooting straight up, with possibly a slight bend at the top, but not bending to the side.
- Also when you swirl the whisk around in the bowl to collect the meringue, you should feel some resistance from the meringue. And when you look on the bottom of the whisk the meringue collected should be forming soft but defined waves.
Macaronage
- Before you start the macaronage have 2 extra bowls and 2 extra spatulas nearby.
- Pour the sifted powdered sugar and almond flour into the stiff meringue.
- Start folding gently forming a letter J with a spatula.
- Once the dry ingredients have incorporated with the meringue, and you see no more flour or powdered sugar, divide the batter between 3 bowls. You will need a small amount of batter for the green leaves, probably between 1/2-1 cup would do. Divide the remaining batter in two: orange and pink.
- Work with one bowl at a time, keeping the other bowls covered meanwhile.
- To the orange bowl, I added a bit of peach food coloring, a bit of mauve, and a bit of orange food coloring.
- To the pink bowl, I added fuchsia and electric purple.
- And to the green bowl, I added green leaf food coloring. All gel food coloring I use is from Americolor.
- Once you add the food coloring to the bowl, you can start squeezing the air out of the batter by pressing it down along the sides of the bowl as you fold.
- How to know when to stop folding the batter: It’s time to stop folding when the batter is glossy and has a thick and flowing consistency. There are several ways to test this.
- First, pick up some batter with the spatula and try to draw a figure 8 with the batter that is dripping off the spatula. If you can form several 8 figures without the batter breaking up, that’s one indication that it might be ready.
- The batter that’s falling back into the bowl should take 10 to 15 seconds to incorporate with the batter that’s already in the bowl.
- There’s another test you can do. I call it the Teaspoon test. Grab a teaspoon of batter and spoon onto the parchment paper or silicon mat. Wait a minute to see how it behaves.
- If the batter stays stiff, forming a point and doesn’t spread out, fold a little bit more, about 3 folds.
- Test again.
- Once the batter spreads out a bit and starts to look glossy and smooth on top, on the parchment paper or silicone mat, it’s ready.
- You don’t want your batter to be too runny either. So be careful not to over mix. It’s always best to under mix and test several times until the proper consistency has been achieved.
- When you hold the spatula with batter on top of the bowl and the batter falls off the spatula slowly but effortlessly the batter is ready. The batter will keep flowing off the spatula non-stop, but not too quickly.
- Transfer the green batter to the piping bag.
- Lay out a piece of plastic wrap on the counter, pour the orange batter on one side, and pour the pink right next to it. Roll the plastic wrap onto itself to form a log. Snip the end with scissors, and place the plastic with the batters inside the piping bag lined with the number 10 piping tip.
- I also like to seal the top with a bag tie, so the batter doesn’t dry out and it gives you more control while piping because there’s no risk of the batter escaping through the top of the piping bag.
- Pipe the peaches by placing the piping bag on the top left of the shape, dragging the batter to the bottom, then move the bag up to the top right and pipe the batter moving the bag towards the bottom again.
- Pipe the leaves using the tip number 3. Make sure to pipe enough batter, that’s as thick as the peach batter, this way the shape will be less likely to crack, and more likely to have nice even feet.
- Use a toothpick to pop any air bubbles in the surface of the shells. And to help smooth out the batter where needed.
- Right after you are done piping the macarons, you can sprinkle some gold sugar, or turbinado sugar over the macarons, to give a bit of a fuzzy look. Sprinkle it before the shells dry.
Resting time
- Rest the macarons until they are dry to the touch, with a thick skin on top. This is very important when making shapes. If you don’t rest them, they tend to crack, or have very small feet.
Baking
- On my large oven I bake the macarons at 310ºF, and on the small countertop oven I bake them at 285-290ºF. I pre-heat both ovens for quite a bit of time. I pre-heat the large oven for 60 to 90 minutes, and the small oven for 30 minutes or so.
- Bake one tray at a time.
- Bake for 5 minutes, rotate the tray. This step is not necessary, I don’t rotate the trays on the small oven, but I have to do so on my large oven, otherwise the macarons will be lopsided. Not all bakers have to rotate the tray.
- I bake each tray for about 15 to 20 minutes.
- When baked, the macarons will have a deeper color and formed feet. If you try to move a macaron, it shouldn’t feel jiggly. If the macaron is still jiggly, keep baking. Also try to touch the top of a macaron and it shouldn’t feel soft, if it’s still soft, keep baking.
- Remove from the oven and bake the other tray.
- Let the macarons cool down before proceeding with the filling.
Peach Jam Filling
- To make the Peach Jam Filling, start with the peaches, it’s best to use ripe peaches. make sure the peach is peeled. Slice and dice it fairly small, because it will be in the filling of the macaron, so you don’t want huge pieces of peach in there.
- Place the chopped peaches in the small saucepan with lemon juice, sugar, cinnamon, and nutmeg.
- Place the pot over medium heat and cook the peaches until they become soft, and the syrup becomes dark. About 5 to 10 minutes, stirring often. Control the heat, reduce it if the peaches are drying out. You can also add a bit more lemon juice or water if the peaches are drying too fast.
- While the peaches cook, mix the cornstarch and water together.
- Once the peaches are soft, add the cornstarch to the pan and cook for one to two minutes, until thick.
- Remove the peaches to a small bowl. Cover the surface with plastic wrap.
- Let the mixture cool down to room temperature. Chill for a couple of hours or up to 4 days in the refrigerator.
Streusel Crumb
- To make the Streusel Crumb, pre-heat the oven to 350ºF. Line a baking sheet with parchment or silicone.
- In a medium bowl, add the flour, sugar, nutmeg, and cinnamon. Stir with a fork to combine.
- Add the butter and mix with the fork until you obtain a crumbly mixture, and all the butter is incorporated with the dry ingredients.
- Transfer the crumb mixture to the baking sheet.
- Bake in the oven for 10 to 15 minutes, stirring every so often, to break up the crumbs.
- Bake until the crumbs are golden brown.
- As soon as you remove it from the oven, give it a good stir to break up the crumbs.
- Set it side to cool down.
Cinnamon Cream Cheese Frosting
- Start by sifting the powdered sugar with the cinnamon. Set it aside.
- Now, beat the softened cream cheese and butter together in the bowl of an electric mixer, for about 1 minute, until light and fluffy.
- With the mixer off, add powdered sugar/cinnamon mixture to the bowl.
- Turn mixer on low to incorporate the powdered sugar with the cream cheese and butter.
- Once you see no streaks of dry powdered sugar, beat the mixture on medium high for one minute.
- Add vanilla extract. Mix to combine.
- If the frosting is dry add a bit of milk or water, and if it’s too soft, add more powdered sugar as needed.
- This frosting will store well in the fridge for up to 5 days, covered.
- Make sure to always leave your frosting covered. Cover the bowl with a lid or plastic wrap, because otherwise, the surface will dry out and create a skin.
To assemble
- To assemble the macarons, pipe the Cream Cheese Frosting around the edges of the bottom shell.
- Fill the center with the Peach Jam and sprinkle some of the Streusel Crumbs on top.
- Top with another shell.
Storage and serving
- Let the macarons mature in the fridge for 1 day before serving.
- Store the macarons in the refrigerator for up to 5 days, and in the fridge for up to 1 to 2 months.
Can we use Sanding sugar instead of gold sugar? I have turbinado sugar but its too big to give the fuzz look. Should I color the sanding sugar yellow or gold? Thank you.
Yes you can use sanding sugar, I’d prefer gold, but I think it depends on the tone of the sugar, maybe sprinkle over one of the macarons and see how it looks. You can also use just plain granulated sugar, it will also give the fuzz look and not change the color of the shell.
These look absolutely delicious! The marbled colours came out perfectly.