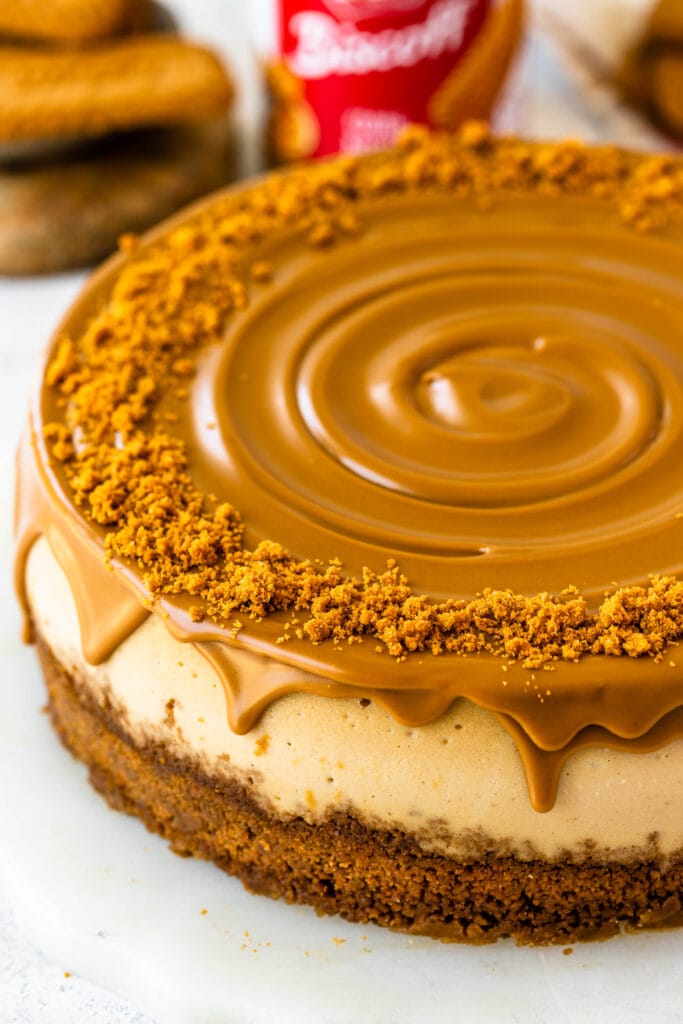
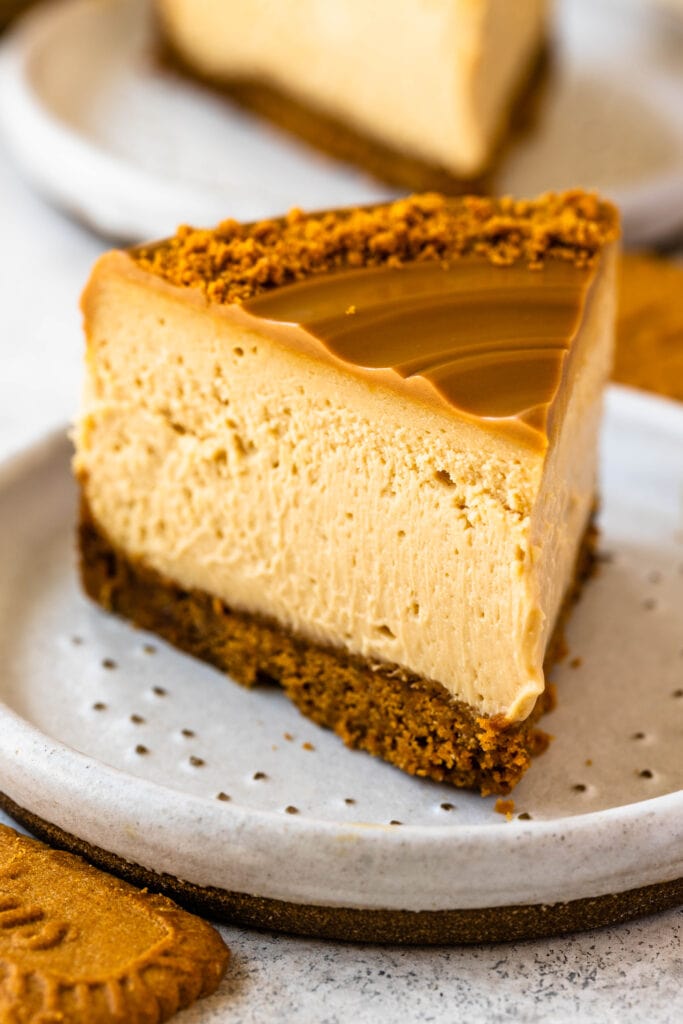
Biscoff Cheesecake
This Biscoff Cheesecake is creamy, rich, and packed with warm speculoos flavor. It starts with a buttery Biscoff cookie crust, then gets filled with a silky batter that bakes up perfectly smooth. A glossy layer of melted Biscoff cookie butter takes it from delicious to unforgettable.
I’ve tested hundreds of cheesecake recipes over the years, and I’m currently writing an entire book dedicated to cheesecake. And truly, this one ranks among my top recipes. It’s reliable, impressive, and the kind of dessert people remember long after the last bite. Check the reviews below this post and see for yourself!
What Is Biscoff?
Biscoff is a spiced shortcrust cookie made by Lotus Bakeries. The flavor is similar to a caramelized, lightly spiced shortbread with cinnamon, brown sugar, and warm buttery notes. When blended into cheesecake batter, it creates a flavor that tastes like speculoos + cheesecake + caramel butter all in one.
This post may contain affiliate links. I earn a commission from qualified purchases. Please read our Privacy policy here.
If you already love Biscoff cookies or Biscoff spread, this dessert is the ultimate way to enjoy them.
Why you will love this recipe
- Thick, crunchy Biscoff crust
- Creamy, luxurious filling with no graininess
- No complicated steps — perfect for beginners
- Water bath for a crack-free cheesecake
- Stunning presentation with melted Biscoff topping
- Perfect make-ahead dessert
- Amazing reviews, read them for yourself!
The ingredients
- Lotus Biscoff biscuits – finely crushed; I don’t recommend substitutes here because the caramelized spice is essential to the flavor balance. However, you can use a graham cracker crust instead, if you can’t find Biscoff cookies.
- butter
- cream cheese – full-fat, brick-style, fully softened; avoid spreadable tubs, which can make the filling loose. Also, make sure it’s at room temperature, to prevent lumps in the cheesecake.
- brown and granulated sugar – brown sugar deepens the caramel notes, while white sugar keeps the filling from tasting heavy
- sour cream – it adds tang and keeps the cheesecake from being dense. You can substitute for yogurt if you don’t have sour cream.
- Biscoff cookie butter – the star of the show! I prefer using creamy Biscoff cookie butter for a smooth filling.
- vanilla extract – essential to the recipe. It rounds out the flavors.
- salt – essential for balance.
- eggs – use room temperature eggs. You should not try to substitute the eggs in this recipe. If you want to make an eggless version, you can check out this No-Bake Biscoff Cheesecake recipe.
The tools
- Large roasting pan for the water bath – I prefer using a disposable roasting pan, which I reuse multiple times since it only ever holds water.
- Food processor (or a rolling pin to crush the cookies) – A food processor works best because it creates very fine crumbs, but a rolling pin will work well if you don’t have one.
- Electric mixer – A hand mixer or stand mixer both work; you’ll need one to properly beat the filling.
- 9-inch or 8-inch springform pan – I use an 8-inch Fat Daddio’s pan that’s 3 inches tall. This recipe also works well in a 9-inch pan. You can bake the batter in cupcake pans too; you’ll get about 32 mini cheesecakes, and they’ll need roughly 20–25 minutes in the oven.
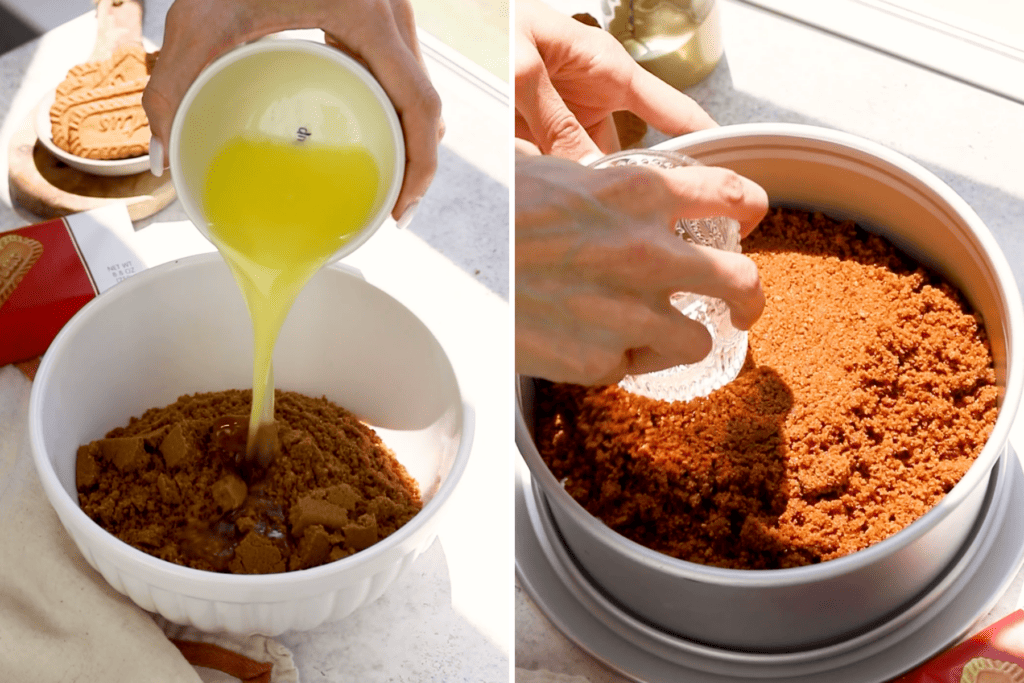
Biscoff Cookie Crust
Let’s begin with the Biscoff cookie crust. Crush the Biscoff cookies into crumbs. Mix with melted butter, and press the crumbs onto the bottom of your springform pan.
Bake in the oven for about 10 minutes – your crust should come out slightly golden. While the crust is baking and cooling, it’s time to prepare the cheesecake filling.
How to make the cheesecake
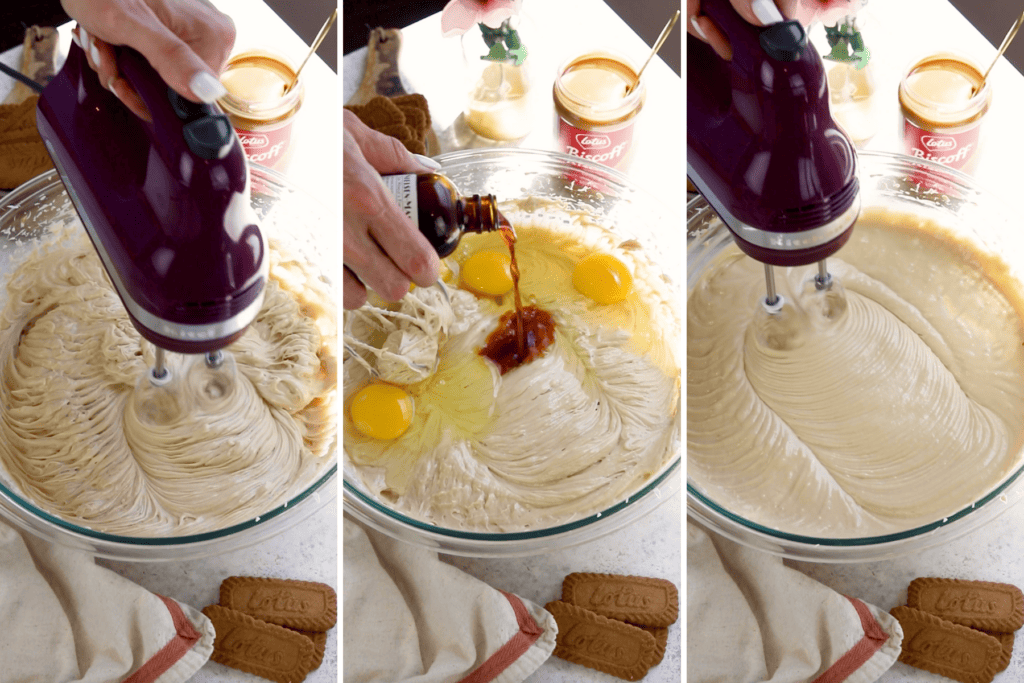
To make the cookie butter cheesecake batter, start by beating the full-fat cream cheese with an electric mixer. If using a stand mixer, use the paddle attachment. I just used a hand mixer.
Add the brown sugar and granulated sugar to the bowl and beat.
Then, add the cookie butter spread along with the sour cream and mix to combine.

Finally, add the eggs, the vanilla, and salt.
I added the eggs all at once, but often times when making cheesecake, it’s recommended that you add the eggs one at a time, waiting for one egg to be incorporated before adding the next one. That is because you want to avoid over mixing the batter once the eggs have been added. Beating the eggs too much can cause the cheesecake to crack.
Since I was using my hand mixer, and it’s not very powerful, I know the batter wouldn’t be over mixed if I added all the eggs at once. However if I was using my KitchenAid stand mixer, I would add the eggs one at a time.
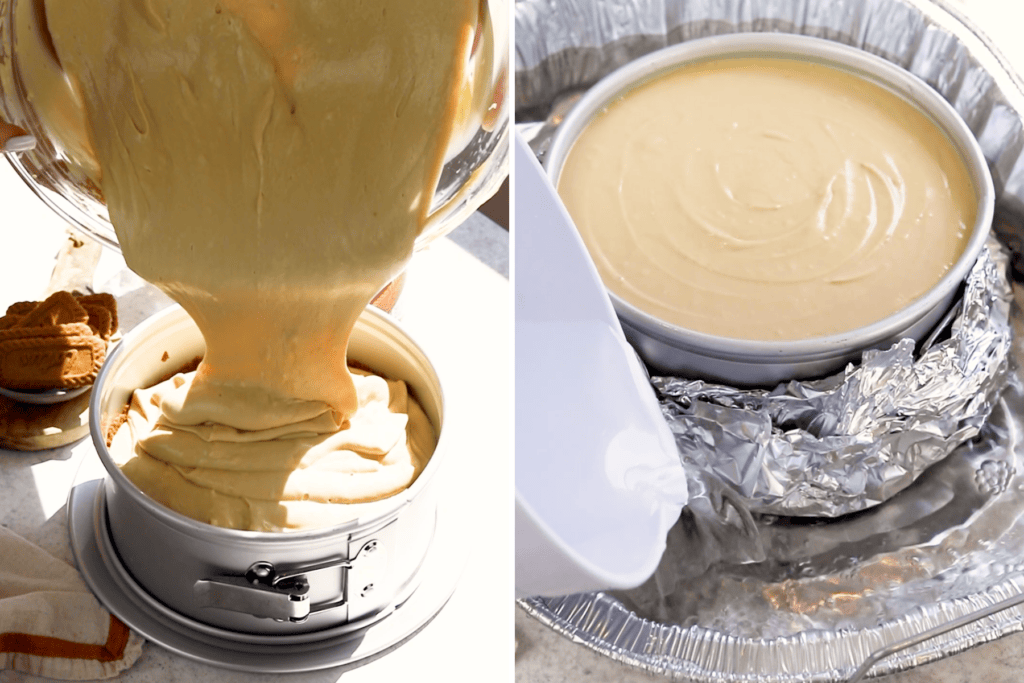
Spread the cheesecake mixture on top of the baked cookie crust. I used a deep 8-inch springform pan to make the cheesecake, you can also use a 9-inch springform pan. The brand I use is called Fat Daddio. I always get asked about this pan, and I can’t recommend it enough.
Wrap the bottom of the springform pan with a few layers of aluminum. Then, place it in a large roasting pan. Pour hot water in the roasting pan to form a water bath.
Baking
Bake the cheesecake for 60 to 70 minutes in the 325ºF oven.
To check if the cheesecake is done baking, wiggle the pan gently. The center should be slightly jiggly, while the edges of the cheesecake should look set. Some ovens might take longer, even as long as 90 minutes to fully bake the cheesecake.
Once the cheesecake is done baking, turn the oven off, and leave the cheesecake in there for one hour. If you remove the cheesecake from the oven immediately after baking, the sudden temperature change can cause the cheesecake to collapse and break.
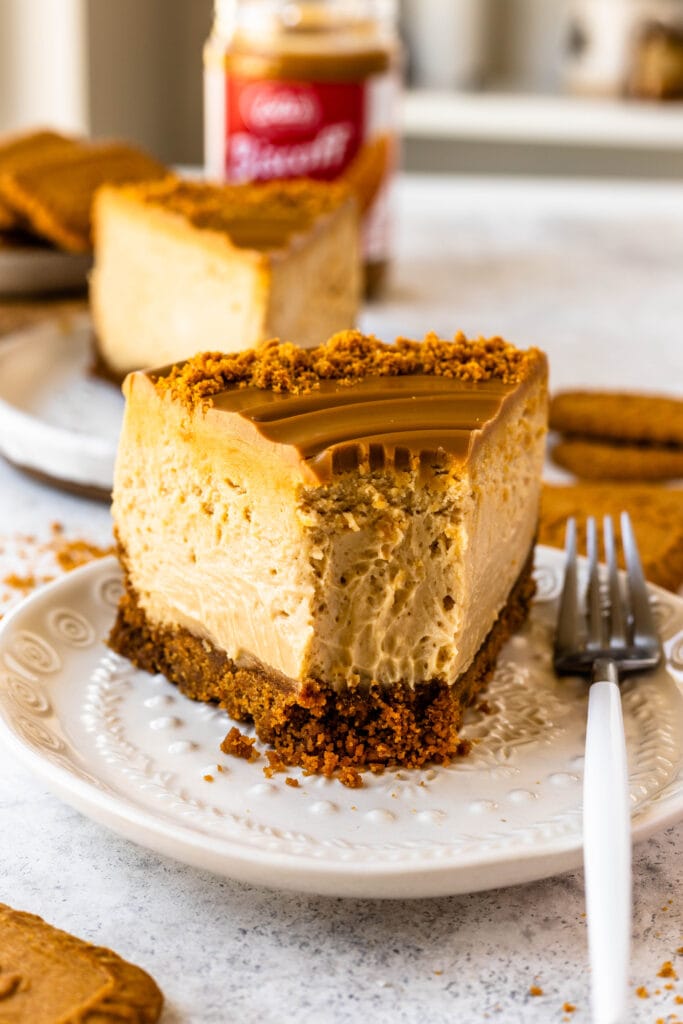
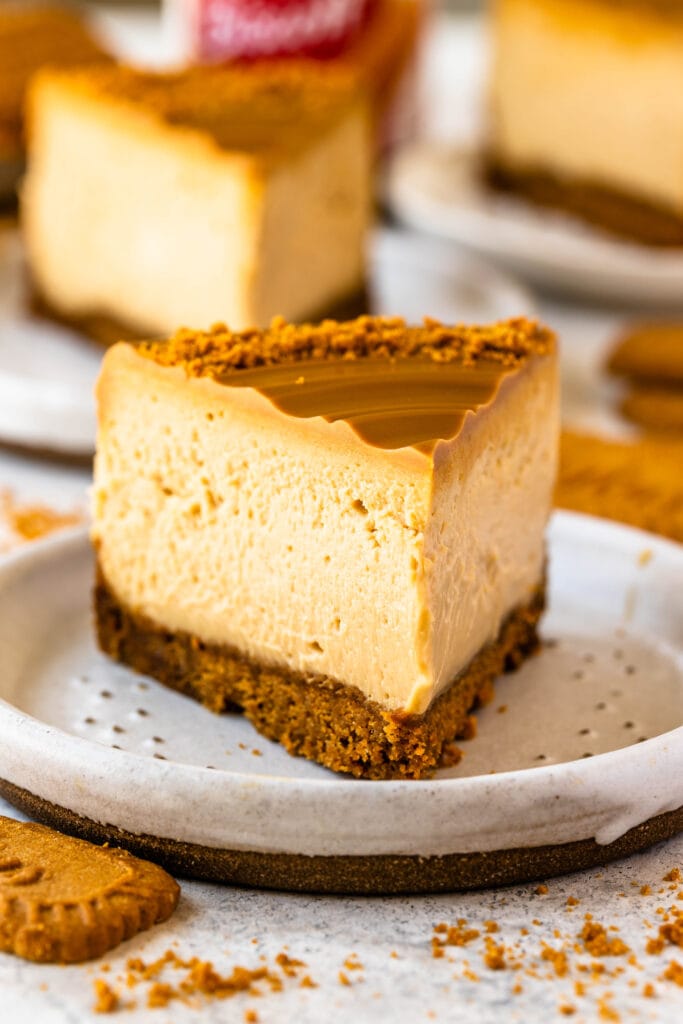
Place the cheesecake in the fridge to chill for at least 6 hours before serving.
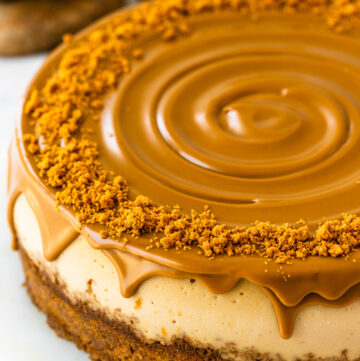
To decorate
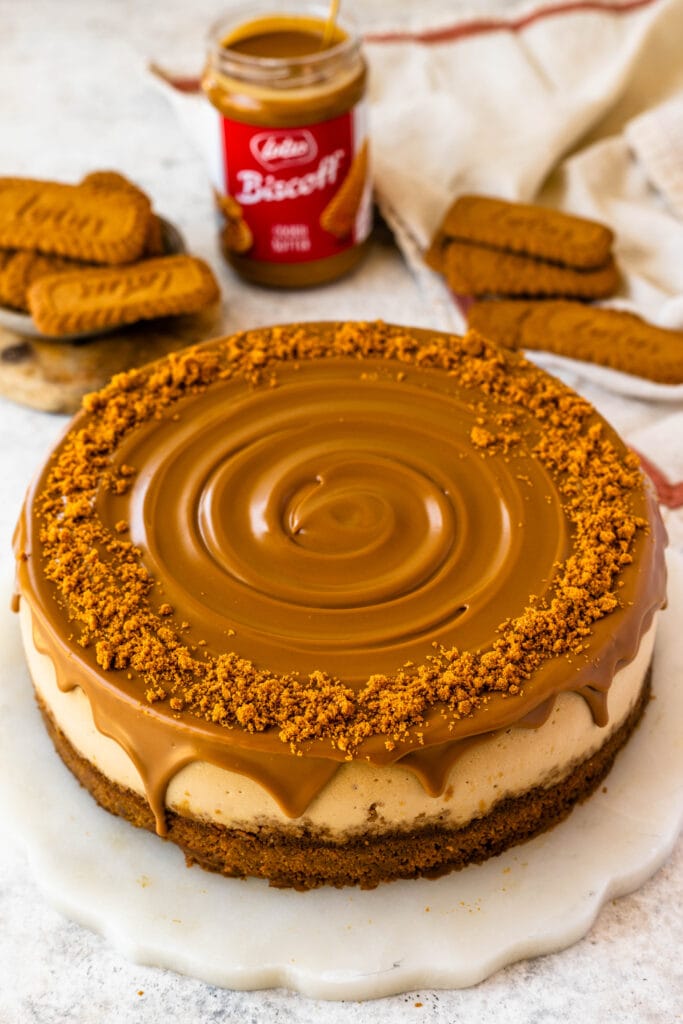
To decorate, melt some biscoff lotus cookie butter in the microwave and drizzle on top of the chilled cheesecake. Use an offset spatula to spread it around. Sprinkle biscoff crumbs around the edges.

Tips for Cheesecake Success
- Use room temperature ingredients for a smooth batter.
- Do not over-mix after adding the eggs. It can add too much air into the batter and cause the cheesecake to expand too much and crack.
- Grease the sides of the pan, however, only do it after baking the crust. You can use oil spray or brush a bit of neutral oil. Avoid using butter due to the water content, it can make the crust soggy.
- Don’t open the oven during baking, only towards the end to check if the cheesecake is done baking.
- Make sure to leave the cheesecake in the oven for one hour after baking is completed, to prevent cracking.
- Chill completely for the creamiest texture.
- Only remove the ring from the pan after chilling the cake.
- Freeze slices individually for easy future desserts.
Frequently Asked Questions
Can I use another type of cookie for the crust?
Yes, graham crackers or digestive biscuits can be swapped in, but Biscoff cookies give this cheesecake its signature flavor and make it stand out from other cake recipes. You can also make a graham cracker crust instead.
Do I need a water bath?
I always recommend a water bath (or at least a pan of water on the rack below) to help prevent cracks and keep the texture extra creamy.
Can I make this cookie butter cheesecake ahead of time?
Yes! It tastes even better the next day.
How should I store leftovers?
Store the cheesecake covered in the refrigerator for up to 5 days. It also freezes beautifully — just wrap slices individually for an easy make-ahead dessert. You can freeze the whole cheesecake as well as long as you have a container that comports it.
Can I use crunchy Biscoff spread instead of smooth?
Yes! Either works well.
If this recipe wins you over, make sure to try the No-Bake Biscoff Cheesecake next—it’s just as flavorful but even creamier, and requires zero oven time. You might also enjoy my Tiramisu Cheesecake, Chocolate Cheesecake, and Oreo Cheesecake, all rich, crowd-pleasing desserts that showcase different flavors and textures.
If you try this recipe let me know in the comments below or tag me on Instagram, I love to see your creations!
Watch Video

Biscoff Cheesecake
Ingredients
Biscoff Crust
- 250 grams biscoff cookies 1 package of biscoff cookies
- 1/3 cup unsalted butter 75 grams
Biscoff Cheesecake Batter
- 907 grams cream cheese softened (4 packages of 8 oz.)
- 1 cup brown sugar 200 grams
- 1/4 cup granulated sugar 50 grams
- 1/2 cup sour cream 120 grams
- 1 cup biscoff cookie butter 240 grams
- 1 tbsp vanilla extract
- 1/4 tsp salt
- 4 large eggs room temp
To decorate
- 1/2 cup biscoff spread
- 1/4 cup biscoff cookies crumbled
Instructions
Biscoff Crust
- Pre-heat the oven to 325ºF.
- Place the biscoff cookies in a food processor and process to obtain fine crumbs.
- Melt the butter and mix with the biscoff crumbs.
- Press the mixture on the bottom of an 8” or 9” cheesecake pan. If using an 8” pan, it must be deep.
- Bake the crust in the oven for 10 minutes.
- Remove it from the oven and let it cool down.
- After the crust is baked, grease the exposed sides that will touch the cheesecake batter with oil spray or by brushing a bit with neutral oil.
Biscoff Cheesecake Batter
- Beat the cream cheese for 3 minutes with a mixer at medium speed, until creamy.
- Add the brown sugar and granulated sugar to the cream cheese and beat for another 2 minutes at medium speed.
- Scrape the bowl and beat for another 30 seconds.
- Add the sour cream and biscoff cookie butter to the bowl, and mix to combine. Scrape the bowl.
- Add the vanilla, salt, and mix.
- Make sure to scrape the bowl a few times during the mixing process, to avoid the cream cheese from forming lumps in the batter.
- Add the eggs to the batter, mix just until combined. It’s best to add one egg at a time, waiting for one egg to be incorporated before adding the next one.
- Avoid over mixing once the eggs are added, to prevent cracking of the cheesecake.
- Pour the cheesecake in the pan, over the baked and cooled crust. Some cheesecake pans, such as my own, require the sides to be greased before adding the batter in, or the cheesecake sticks, so I always spray the sides of my pan with oil before pouring the cheesecake batter in.
- Wrap the bottom of the pan with a few layers of foil.
- Place the pan in a larger roasting pan, and add hot water to the roasting pan, to form a water bath. This is very important so the cheesecake doesn’t crack.
- Bake the cheesecake in the pre-heated 325ºF oven for 60 to 70 minutes.
- To check if the cheesecake is done baking, give the pan a little wiggle, it should jiggle slightly in the center, but the edges should look set.
- Turn the oven off, and leave the cheesecake in there for 1 hour.
- Remove the cheesecake from the oven and place it in the fridge for at least 6 hours.
To decorate
- Melt the biscoff cookie butter in the microwave for a few seconds until it’s runny.
- Pour over the cheesecake and spread with a spatula.
- Spread biscoff cookie crumbs around the edges of the cheesecake.
Wow!! I made this recipe for Easter dinner this evening also made a mini egg one and the entire family voted this was the best!! It was so beautiful wish I could share a picture…
Also this is my first time ever writing a review on a recipe! It was that good
Hi Celine, I am so glad to hear that! Thank you! I’m very happy you had a fabulous dinner and your family loved the cheesecake you made!
Happy Easter!
Camila
Hi! Love this recipe. Does the oven need to be cracked open during the hour after baking?
I don’t crack mine open. I leave it shut.
This cheesecake is super easy to make and came out perfect!! Sooooo creamy and delicious. Everyone loved it. Will make again for sure!!
this is the best most easiest recipe to follow. It tastes great. it was my first time making cheesecake and it turned out amazing. it left it for 70 minutes in the oven because I was afraid it wasn’t going to set but it did.
Oh awesome! Thank you!!! Im so happy to hear!
I tried this recipe for the first time and wow. It was the most amazing cheesecake I’ve ever tasted. Everyone in my family had the same opinion as myself. The tips to make the cheesecake moist and not crack were so helpful. I cannot speak highly enough about this cheesecake. Only sad part is that we finished it so fast! Definitely going to be a go to recipe from now on!
Thank you so much Sara, that is wonderful to hear!
What size package of biscoff cookies?
Hi Lindsay! Any package that gets you 250g worth of biscoff cookies will be good!
Has anyone tried, or is it possible, to use crushed biscoff cookie sandwiches, with the filling, for the crust? And if so how many, any modifications?
Thank you
I would approach as the oreo crust recipe for example this one: https://www.piesandtacos.com/cranberry-cheesecake/ use the golden oreo recipe in this recipe substituting for the filled biscoff cookies instead.
Hi! In error, I bought cottage cheese instead of sour cream. Do you think that will work?
Using cottage cheese instead of sour cream can work as a substitute in the cheesecake batter, but you’ll need to make some adjustments to ensure the texture and flavor remain smooth and creamy. Cottage cheese has a different texture and tang compared to sour cream, but when blended, it can provide similar moisture and tanginess. So just make sure you blend well.
Hi! I’ve made this recipe before and it’s amazing. I plan on making one for each gathering I’m having this weekend with friends, one Saturday and one Sunday. Would it be okay for me to make a double batch of the batter tonight (Wednesday) or tomorrow and save half of it in the fridge for Sunday to save time?
Hi Sam yes absolutely it’s ok, just make sure to cover it tightly with plastic, or with a lid.
Thanks so much! So I made my first cheesecake on Wednesday then last night (Thursday) realized maybe I should put it in the freezer so I did. If I’m serving it Saturday night when should I take out of the freezer?
Congrats on making your first cheesecake, how exciting! 🎉 You can take it out of the freezer today and let it thaw in the refrigerator overnight. It will be perfectly defrosted and creamy by Saturday night. Enjoy your cheesecake! 🍰✨
How many mini cheesecake would this make and would there be any changes that I would have to make in the recipe instructions?
To adapt this Biscoff Cheesecake recipe for mini cheesecakes, here’s how you can adjust:
Yield: This recipe would make approximately 24-30 mini cheesecakes, depending on the size of your mini cheesecake or cupcake pan. Standard cupcake pans hold about 2-3 tablespoons of batter per cavity.
Crust Preparation: Line a standard cupcake/muffin pan with paper liners for easy removal.
Divide the Biscoff crust mixture evenly among the cavities (around 1 tablespoon per cavity), then press it firmly into the bottom using a spoon or the flat side of a small glass. Bake the crust at 325ºF for 5 minutes, then let it cool.
Cheesecake Batter: Prepare the batter as directed. Use a cookie scoop or spoon to evenly distribute the batter over the baked crusts, filling each cavity almost to the top.
Water Bath Alternative: no need for water bath with mini cheesecakes.
Baking Time: Reduce the baking time to 18-22 minutes. Check for doneness by gently jiggling the pan—each mini cheesecake should be set at the edges with a slight jiggle in the center.
Cooling: Let the cheesecakes cool in the pan for about 15 minutes before transferring them to a cooling rack. Once completely cooled, refrigerate for at least 4 hours (or overnight) to set.
Decorating: Follow the same decorating instructions, drizzling melted Biscoff spread over the tops and sprinkling cookie crumbs around the edges or as desired.
Yeah I made this for thanksgiving and it was beyond good! Had to cut it into 16ths because I was silly and did 8 slices at first and almost went into a coma eating an 1/8th of a slice 😂 but jeeze. This recipe was so good. Everyone that had it loved it. Gonna look at your other recipes! Thanks a million!
I am so glad you liked it!! Thank you so much for your comment!
Excellent recipe and looks so impressive!! The BEST cheesecake I have ever made. Total crowd pleaser. Super delish!!
Thank you for sharing your amazing recipes!! (The chocolate cheesecake recipe is a very close second to this one)
Looking forward to trying your Lemon Cheesecake recipe.
Thank you so much for your wonderful feedback! 😊 I’m thrilled to hear that this cheesecake was such a hit!
I’m so happy you’re enjoying the recipes, and it’s great to hear the chocolate cheesecake is also a favorite. I can’t wait for you to try the Lemon Cheesecake! Please let me know how it turns out, your feedback always makes my day. 💛
Happy baking!
Tasted amazing! I let it get almost to room temperature before placing in the fridge and no cracks! As a person with a big sweet tooth I would say this cheesecake is very sweet. If I was to make it again I’d probably cut down on the sugar just a tad.
I just made this for Thanksgiving and it was a big hit! The whole family loved it and ‘was the best cheesecake they ever had’. The texture was perfect and with that crunchy biscoff crust…yum! I let mine cool in the oven for an hour and it was still pretty hot so I put it on a wire rack to cool down further before moving to fridge overnight. It released perfectly from the springform as I just sprayed non stick spray on a paper towel and wiped it on the sides after baking crust. I made the brave decision to invert it to get the bottom metal tin off. I just placed a parchment covered cake board on top, flipped it over, popped the tin off with an offset spatula then placed my cake board on crust and flipped back over. This can get tricky because the crust is pretty slippery on a cake board so must be done carefully. Scary but everything was perfect! Then I saw you use your cake mover in the video, will have to try that next time. Thank you Camila for this wonderful recipe. I’m going to see which cheesecake of yours I can make next!
Also, I just noticed where you said you like the Fat Daddio pans and I see that the bottom on those is nice and flat to easily remove the cheesecake with a spatula or cake mover. I use a Calphalon pan where the lip of the bottom tin is raised. I think the Fat Daddio is worth buying for that reason alone!
Made this for Thanksgiving, and it came out PERFECT! What an absolutely delicious cheesecake! Every member of my family was freaking out over how insanely good this was. Perfect balance of creaminess and bit of tang from the sour cream, and the cookie butter sent it over the top. Cannot wait to try more of your cheesecake recipes!
That’s amazing to hear!! Thank you so much!!!