Bagel Recipe
This bagel recipe is the result of years of practice and fine-tuning every step. I like bagels that are perfectly chewy and soft, with a fluffy interior and a crisp crust. When I worked at a deli, we made bagel dough twice a week, and I learned the techniques firsthand from the chef, along with plenty of lessons from my own mistakes. In this post, I’m sharing all those tips and tricks so you can recreate authentic, bakery-style bagels at home.
Why You’ll Love These Bagels
What makes this recipe work is simplicity and technique. At the deli, we didn’t rely on fancy ingredients — just strong bread flour, tight kneading, and a quick boil to set the crust before baking. The dough should feel dense and smooth, almost firmer than regular bread dough. That firmness is what gives bagels their signature chew.
This recipe is:
This post may contain affiliate links. I earn a commission from qualified purchases. Please read our Privacy policy here.
- Easy to customize once you master the base dough
- Chewy interior with a shiny, properly set crust
- Strong enough to hold its shape during boiling and baking
- Neutral flavor that works for sweet or savory toppings
Key Ingredients & Why I Use Them
Bread flour: I always use bread flour for bagels. The higher protein content gives the dough enough strength to stay dense and chewy instead of soft and bready.
Yeast: This is a yeast-based dough, so I make sure the yeast is active before moving forward. If the yeast doesn’t foam, I stop and start over.
Maple syrup or barley malt syrup: I use this both in the dough and sometimes in the boiling water. It adds subtle flavor and helps with browning, but it’s not overpowering.
Salt: Bagel dough needs enough salt to keep the flavor from falling flat, especially since the crumb is dense.
Instructions for the Perfect Bagel
The full recipe card is below, but this is how I make them step by step and where I pay close attention.
Step 1: Start with the Dough
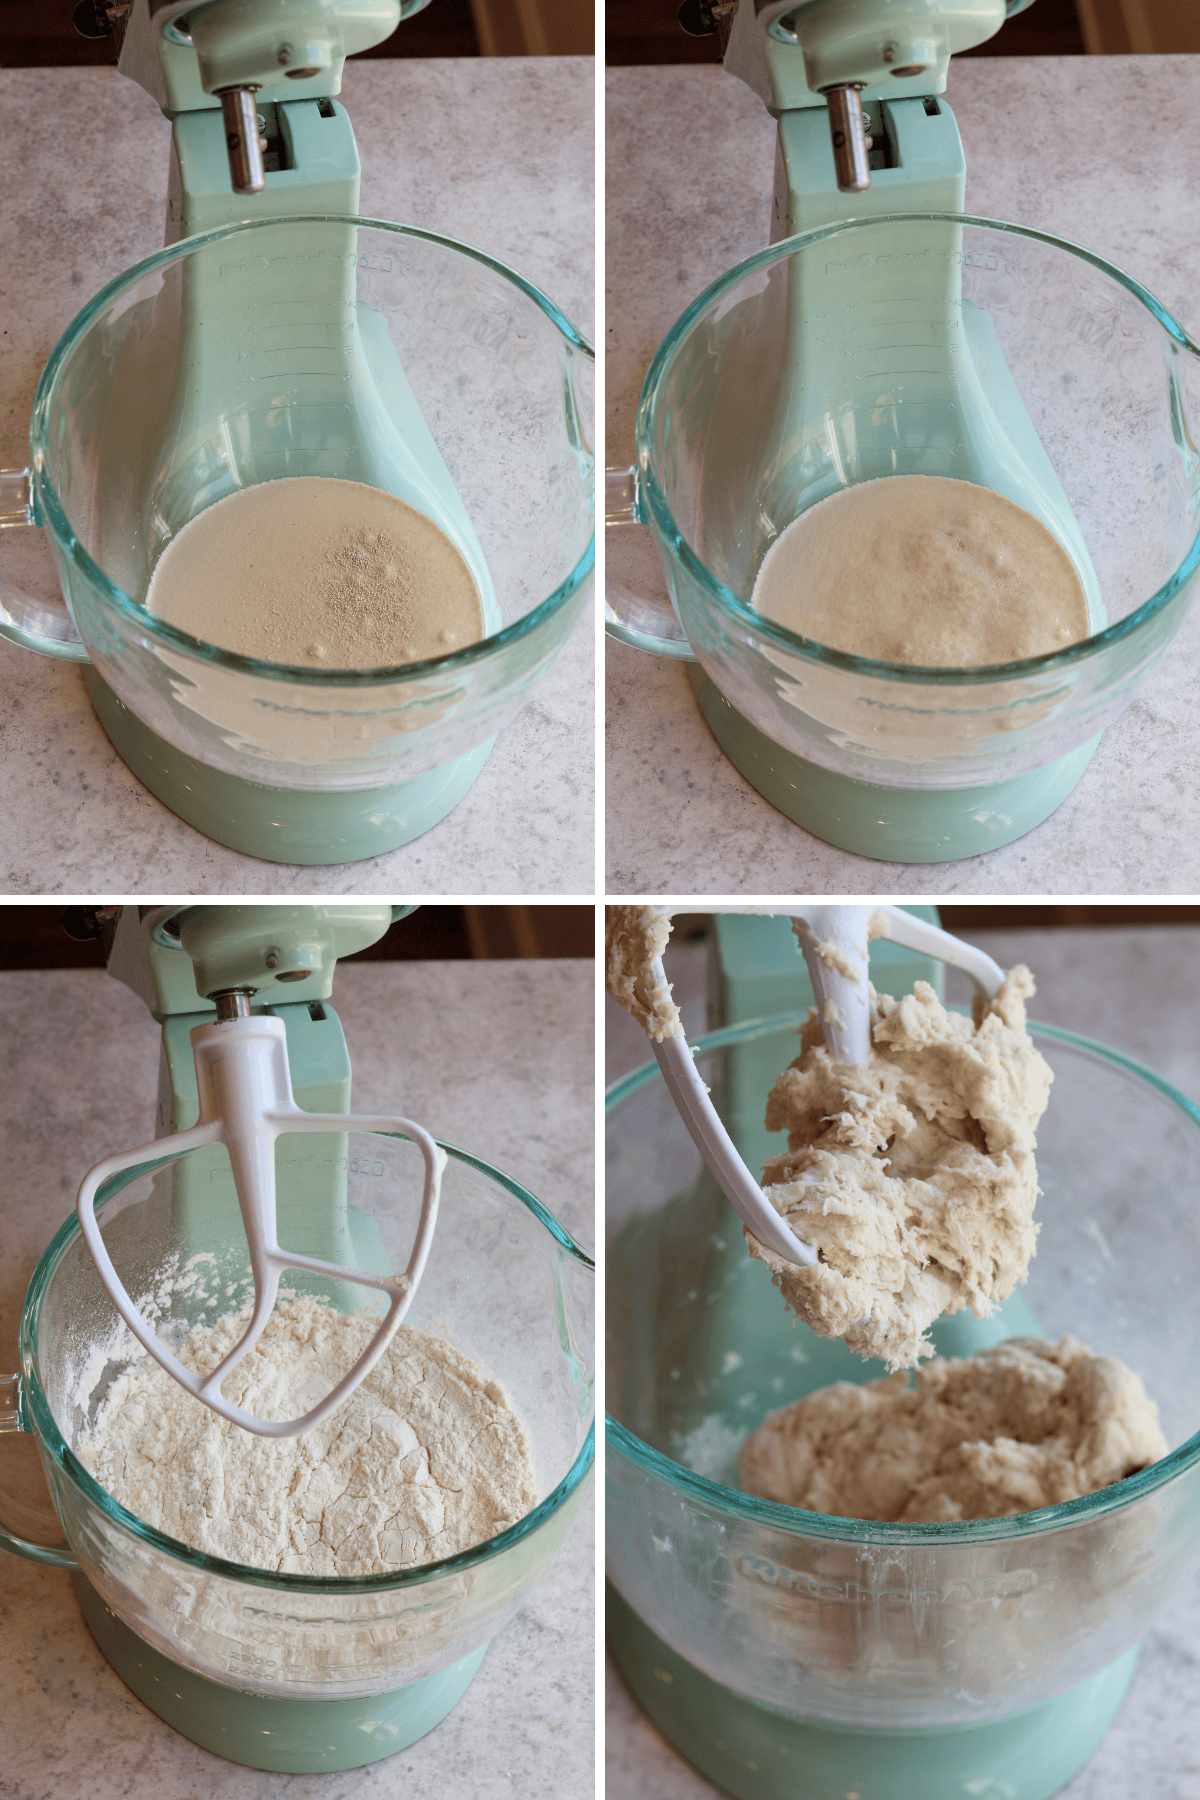
Let’s start by activating the yeast. Combine warm water with maple syrup or barley malt syrup in a large bowl, then sprinkle the yeast over the top. I let it sit for 5–10 minutes until it looks foamy. If nothing happens, I start over. If it doesn’t get foamy, your yeast could be bad or the water was too warm.
Step 2: Mix and Knead the Dough
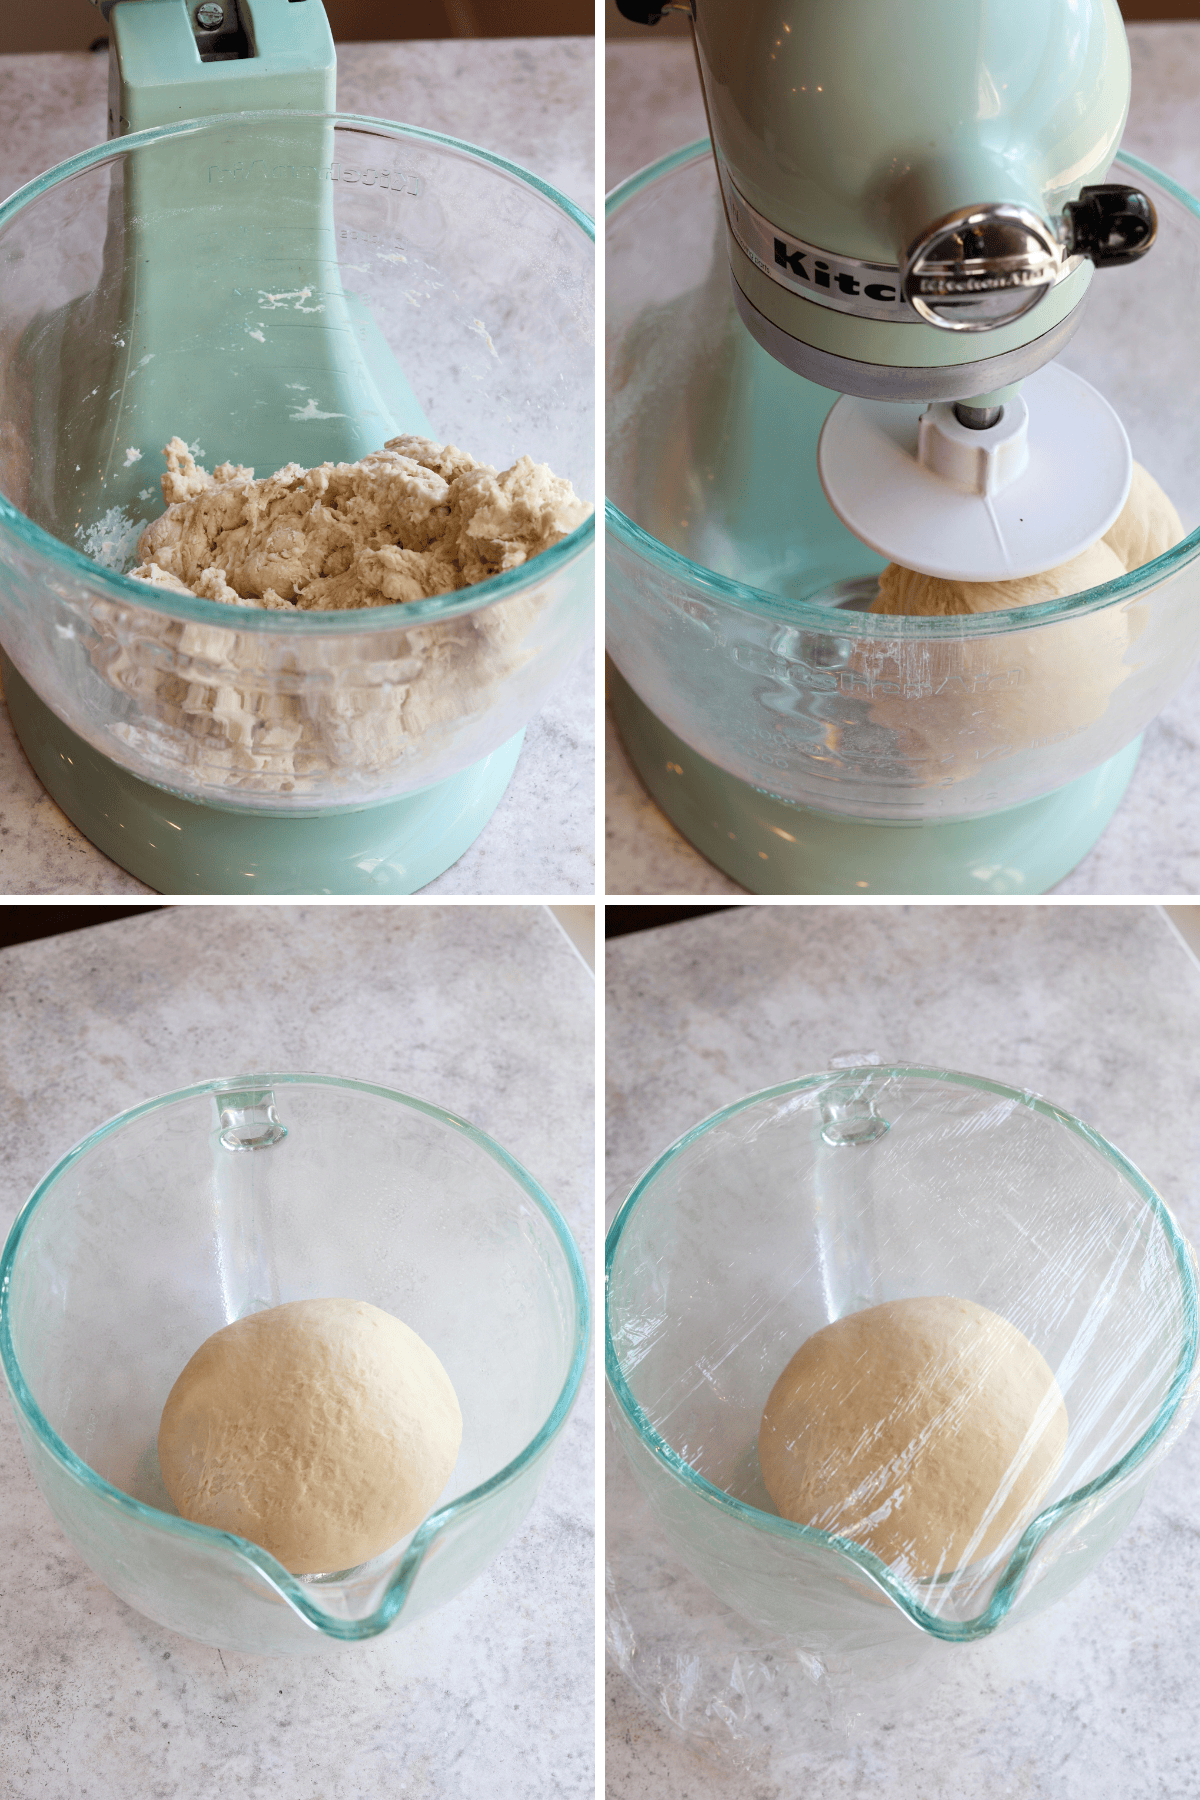
Once the yeast is active, I add the bread flour and salt and stir until a shaggy dough forms. I knead the dough by hand for about 8–10 minutes, or with a stand mixer and dough hook for 6–8 minutes. I stop when the dough feels smooth, elastic, and only slightly tacky. It should be firm, not soft.
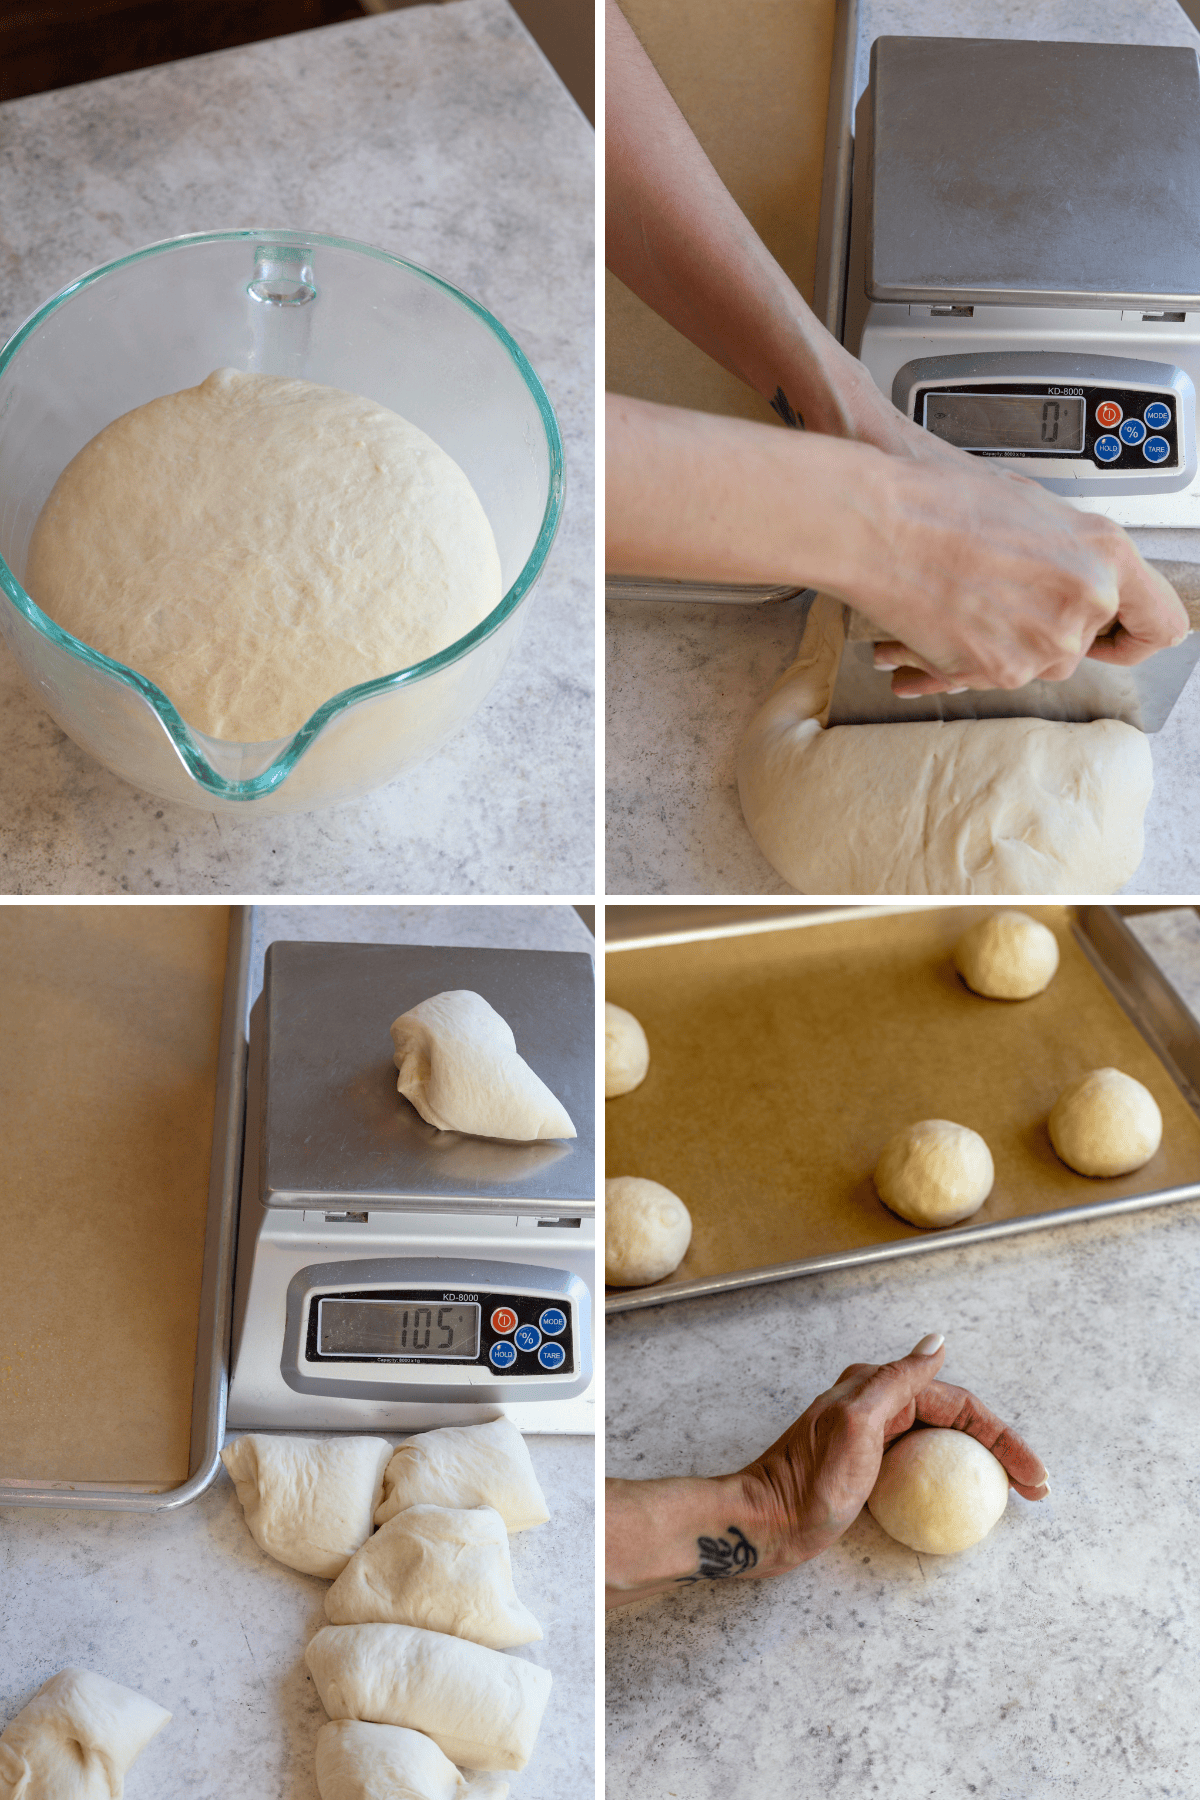
I transfer the dough to a lightly oiled bowl, turn it once to coat, cover it, and let it rise in a warm spot until doubled in size—usually 60 to 90 minutes in my kitchen.
Step 3: Shape the Bagels
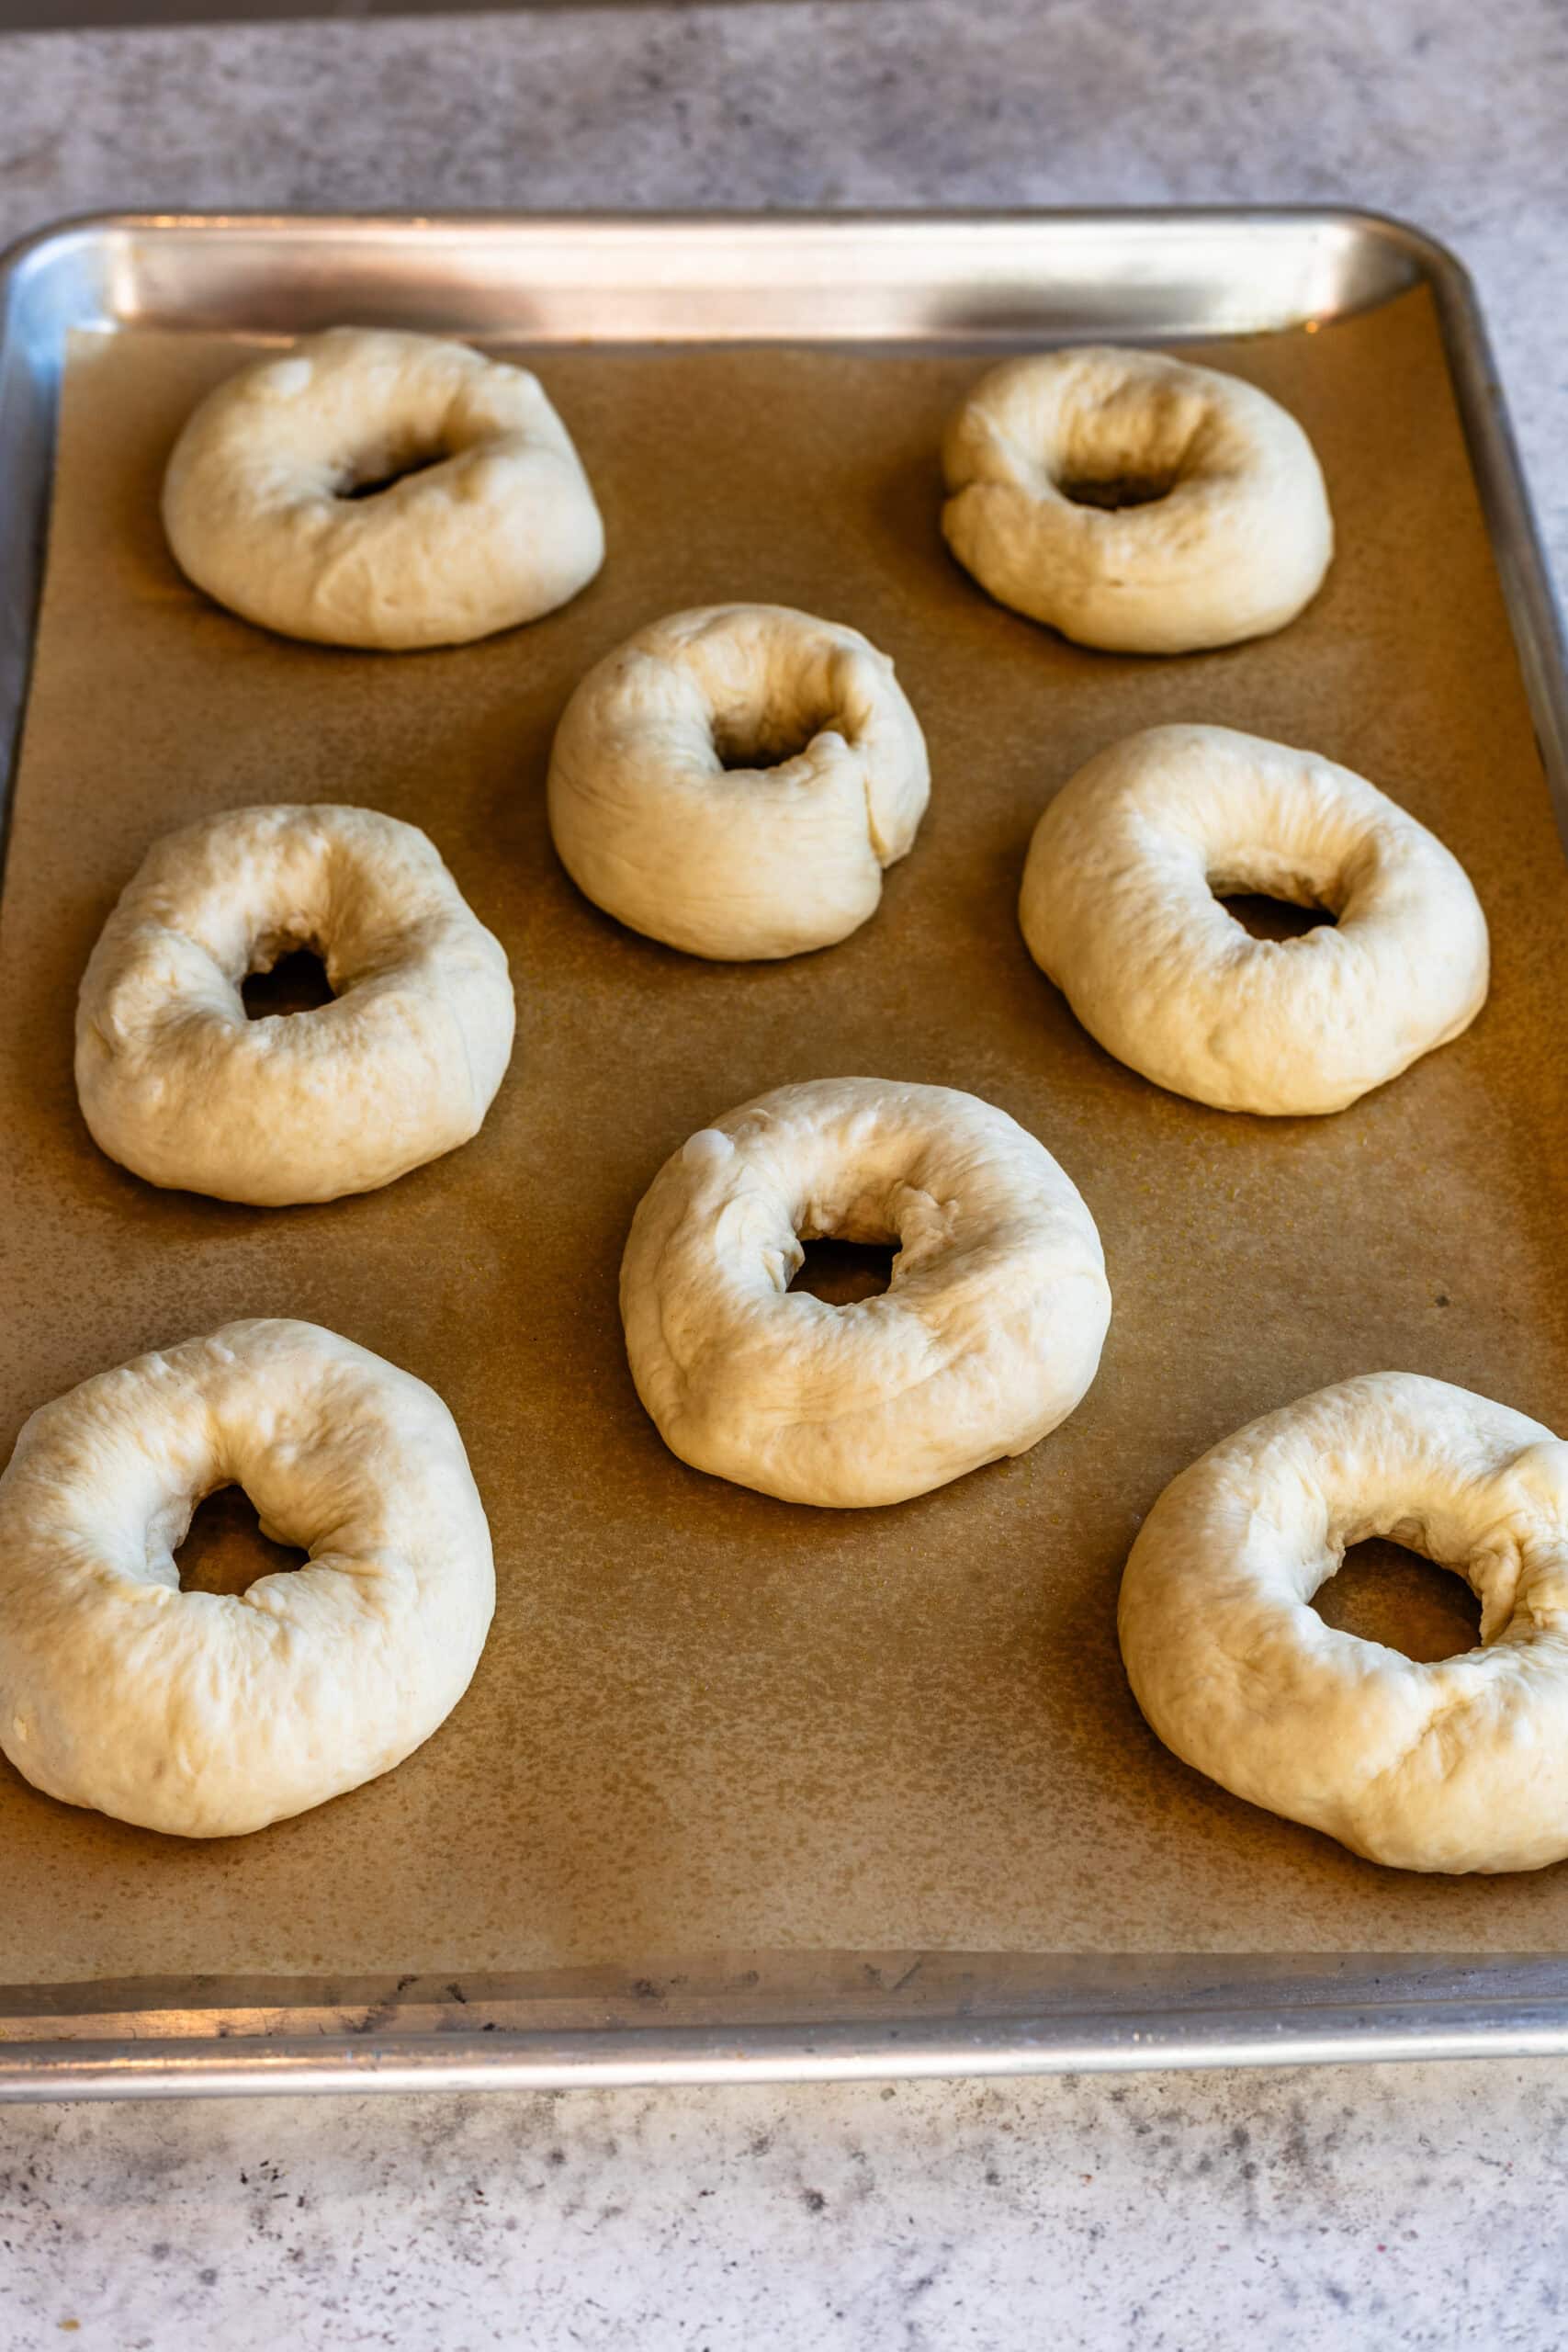
After the rise, divide the dough into 8 equal pieces. I shape each piece into a tight ball by cupping my hand and rolling it against the counter to build surface tension. Let the balls rest for about 5 minutes so the gluten relaxes.
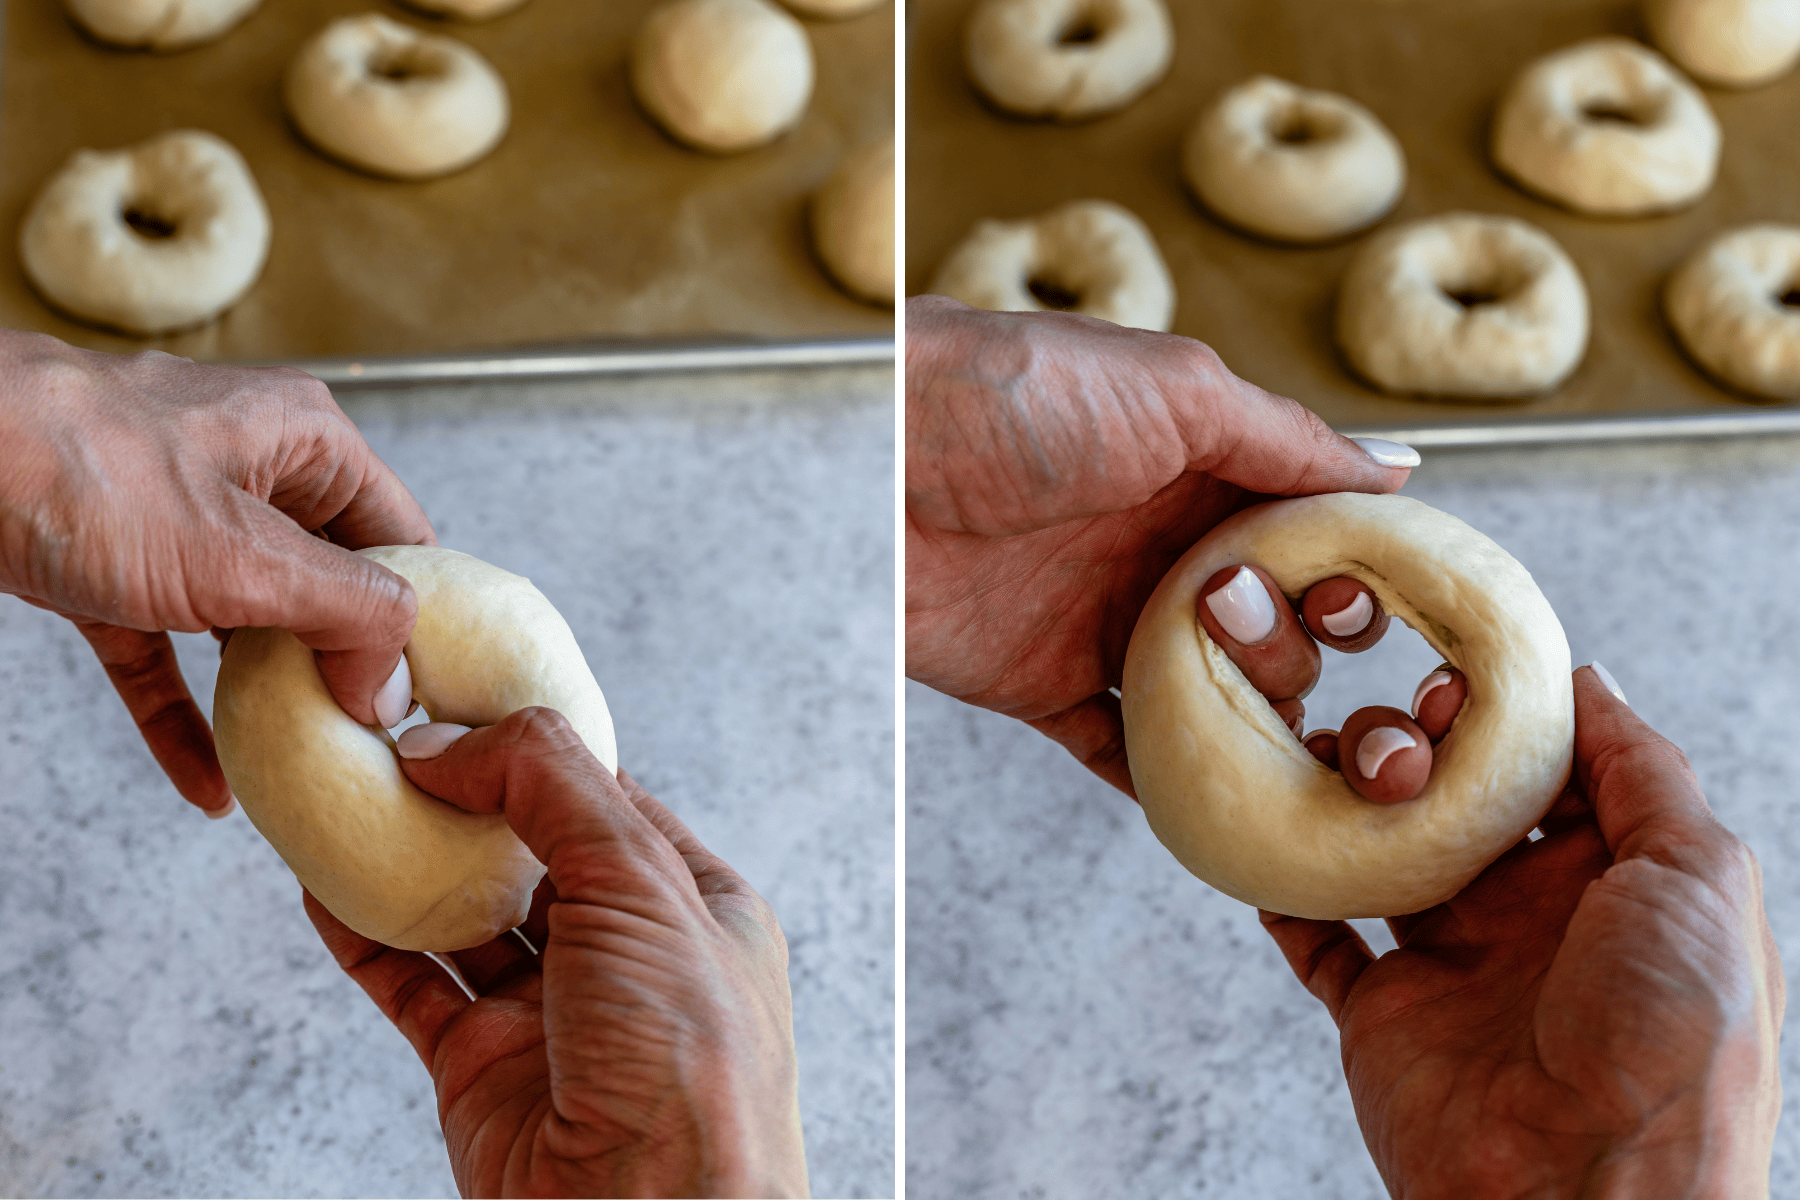
To shape the bagels, I poke a hole through the center of each ball with my thumb and gently stretch it to about 1½–2 inches wide, rotating the dough to keep it even. I prefer this method because it gives me more control over thickness. I place the shaped bagels on a parchment-lined tray and let them rest briefly.
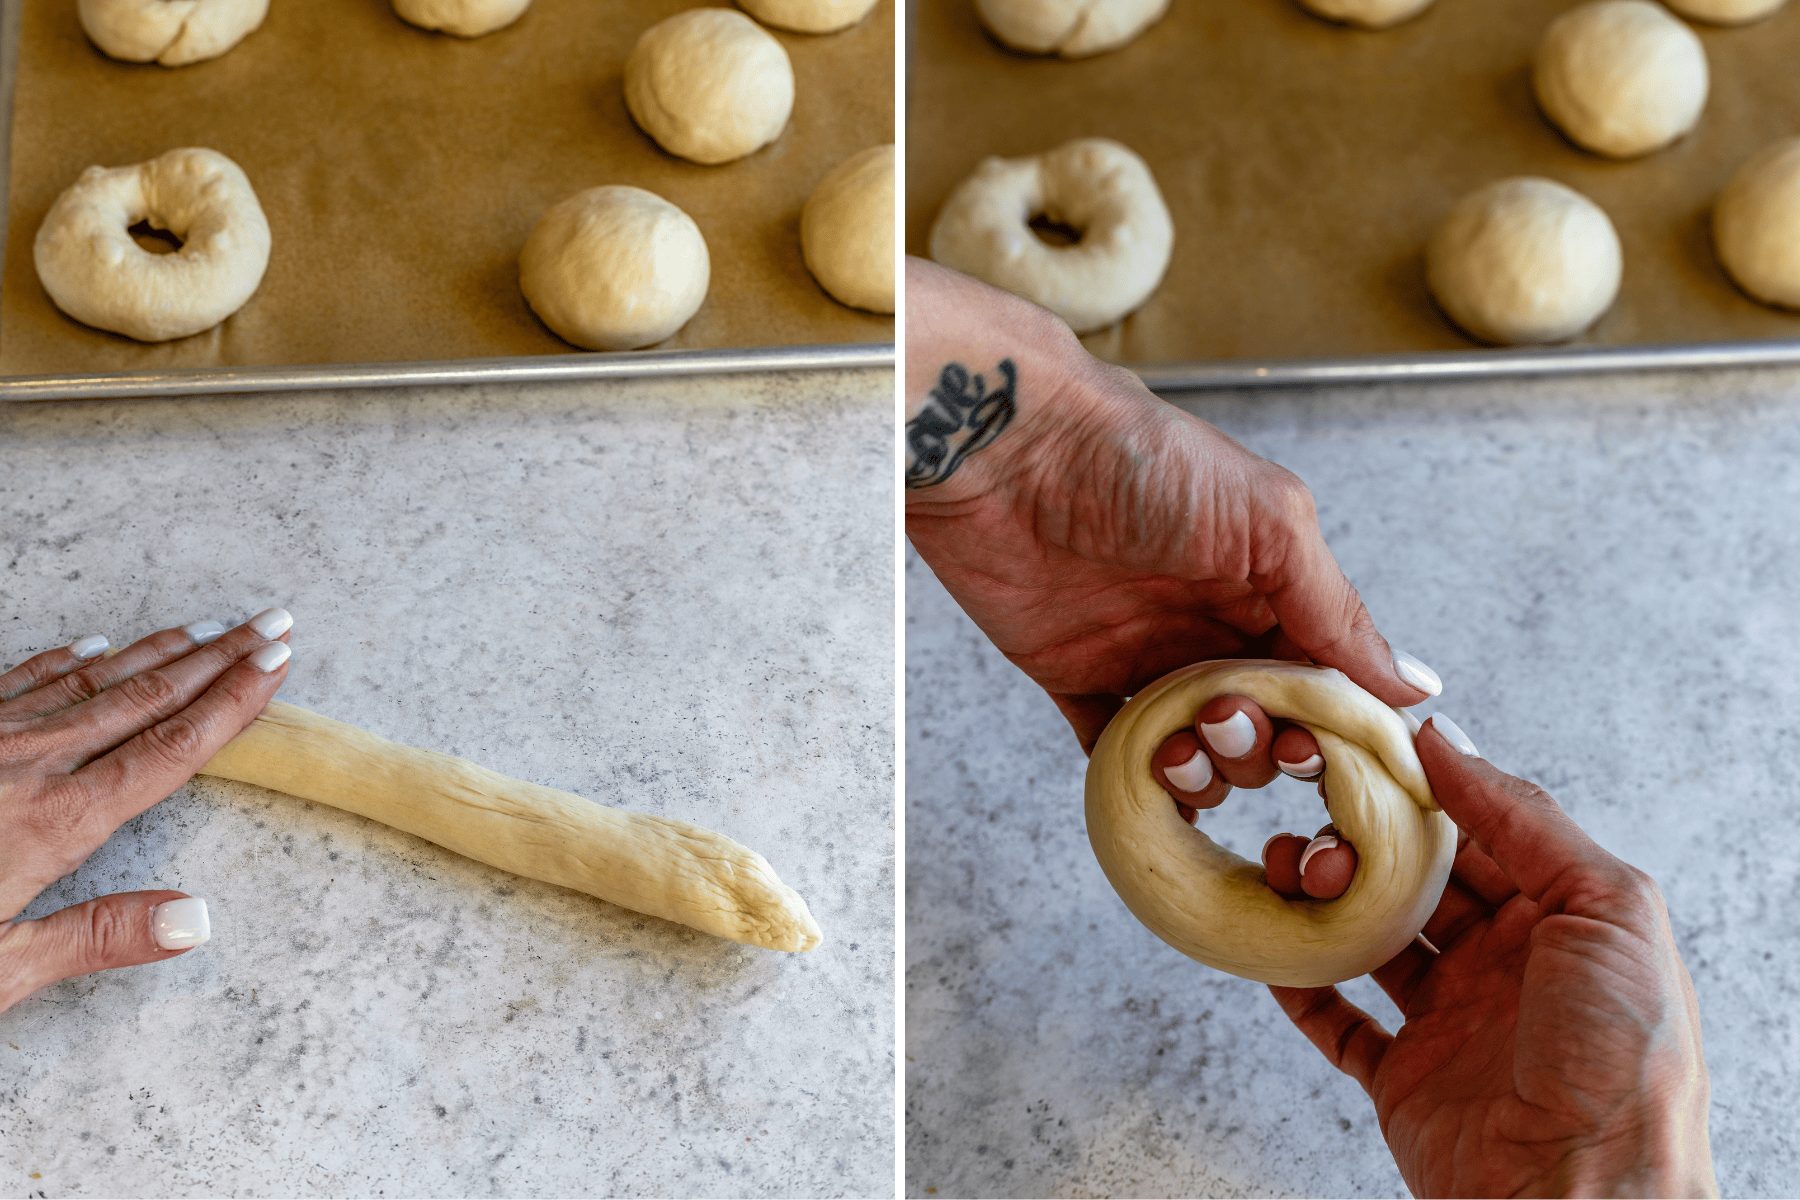
You can also shape the bagels by rolling each ball into a 8 to 9″ log and pinch the ends together to form a ring. Make sure to pinch until it’s sealed well together so it doesn’t unravel when it’s boiling and baking.
Place shaped bagels on a parchment-lined tray and let them rest for 5 minutes.
Step 4: Boil the Bagels
I preheat the oven to 425°F and bring a large pot of water to a boil. Sometimes I add a tablespoon of maple syrup or barley malt syrup to the water, and occasionally a teaspoon of baking soda, depending on how deep I want the crust color.
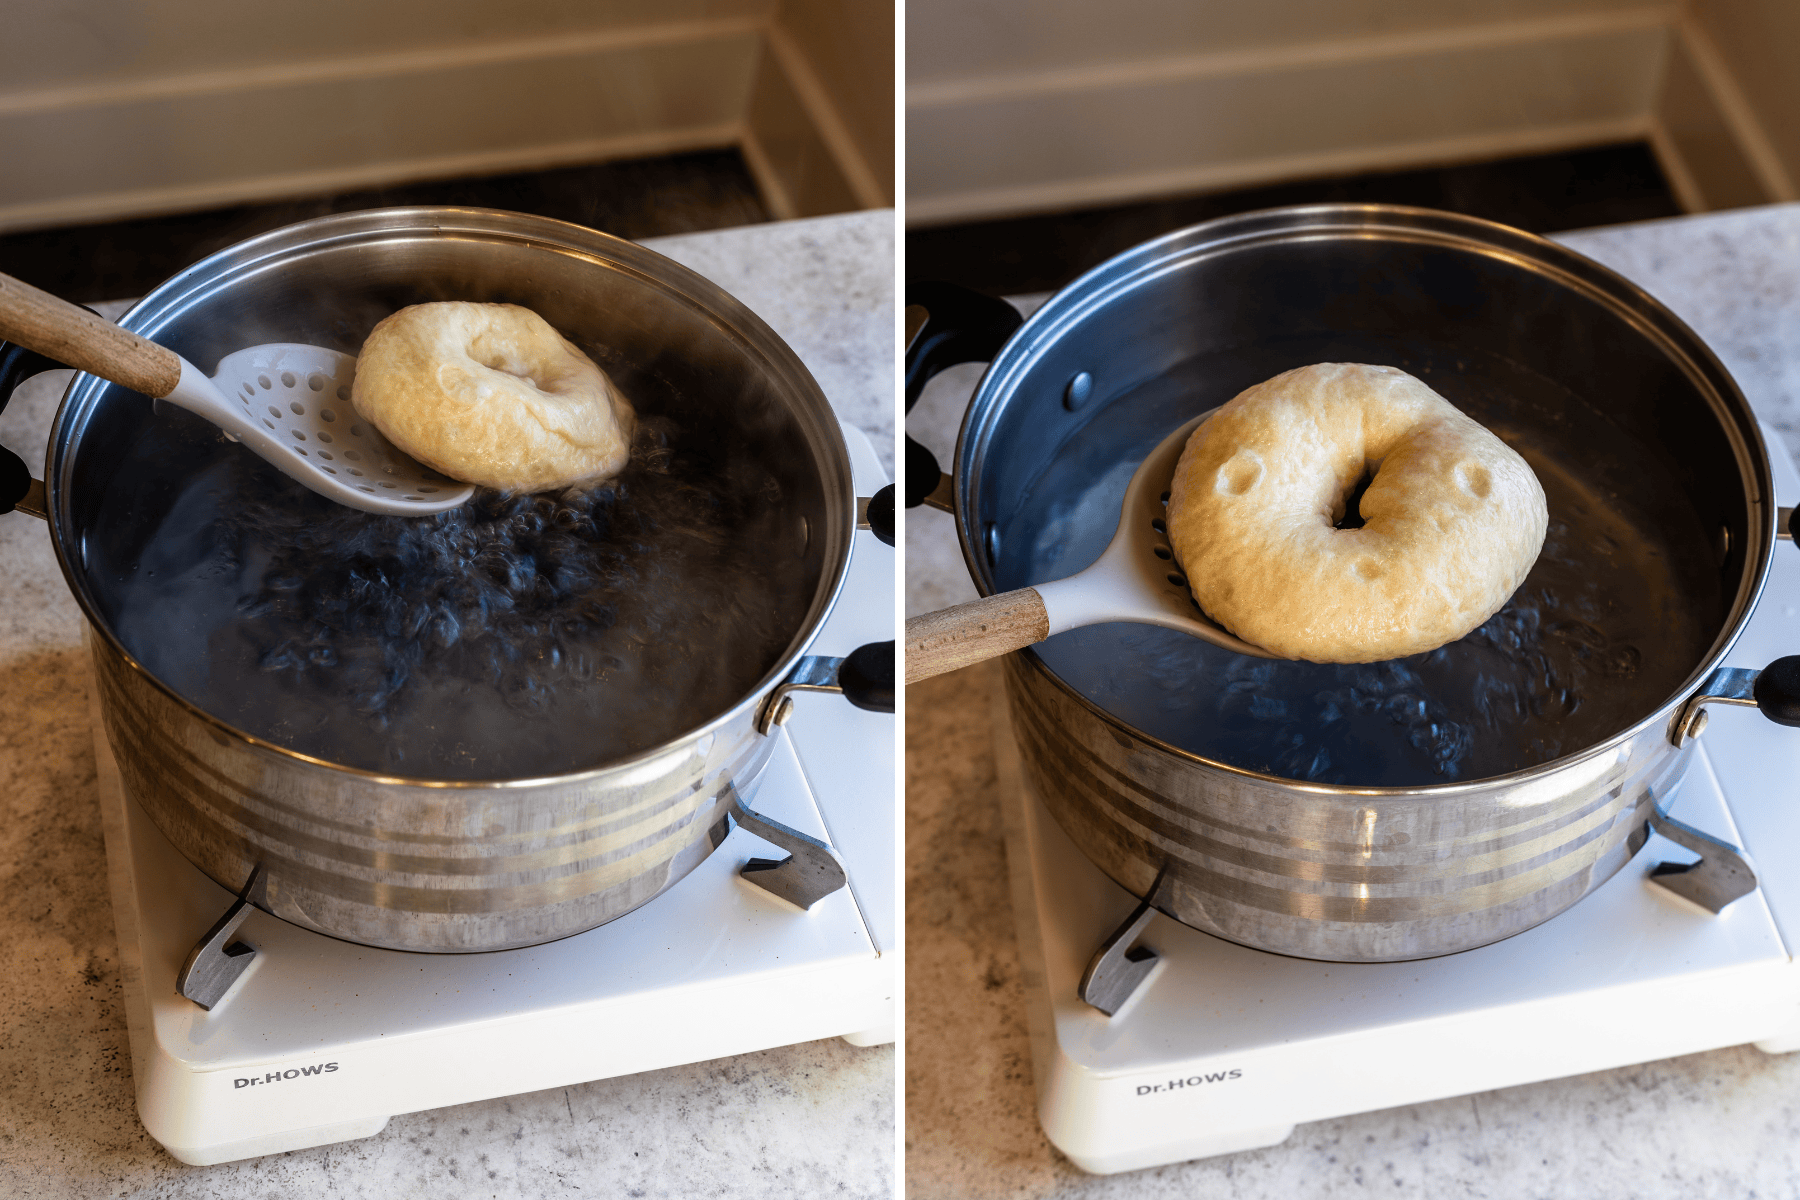
I boil the bagels in batches, usually 2–3 at a time, for about 1 minute per side. I don’t boil longer unless I specifically want an extra-thick crust. Once boiled, I remove them with a slotted spoon and place them back on the lined baking sheets.
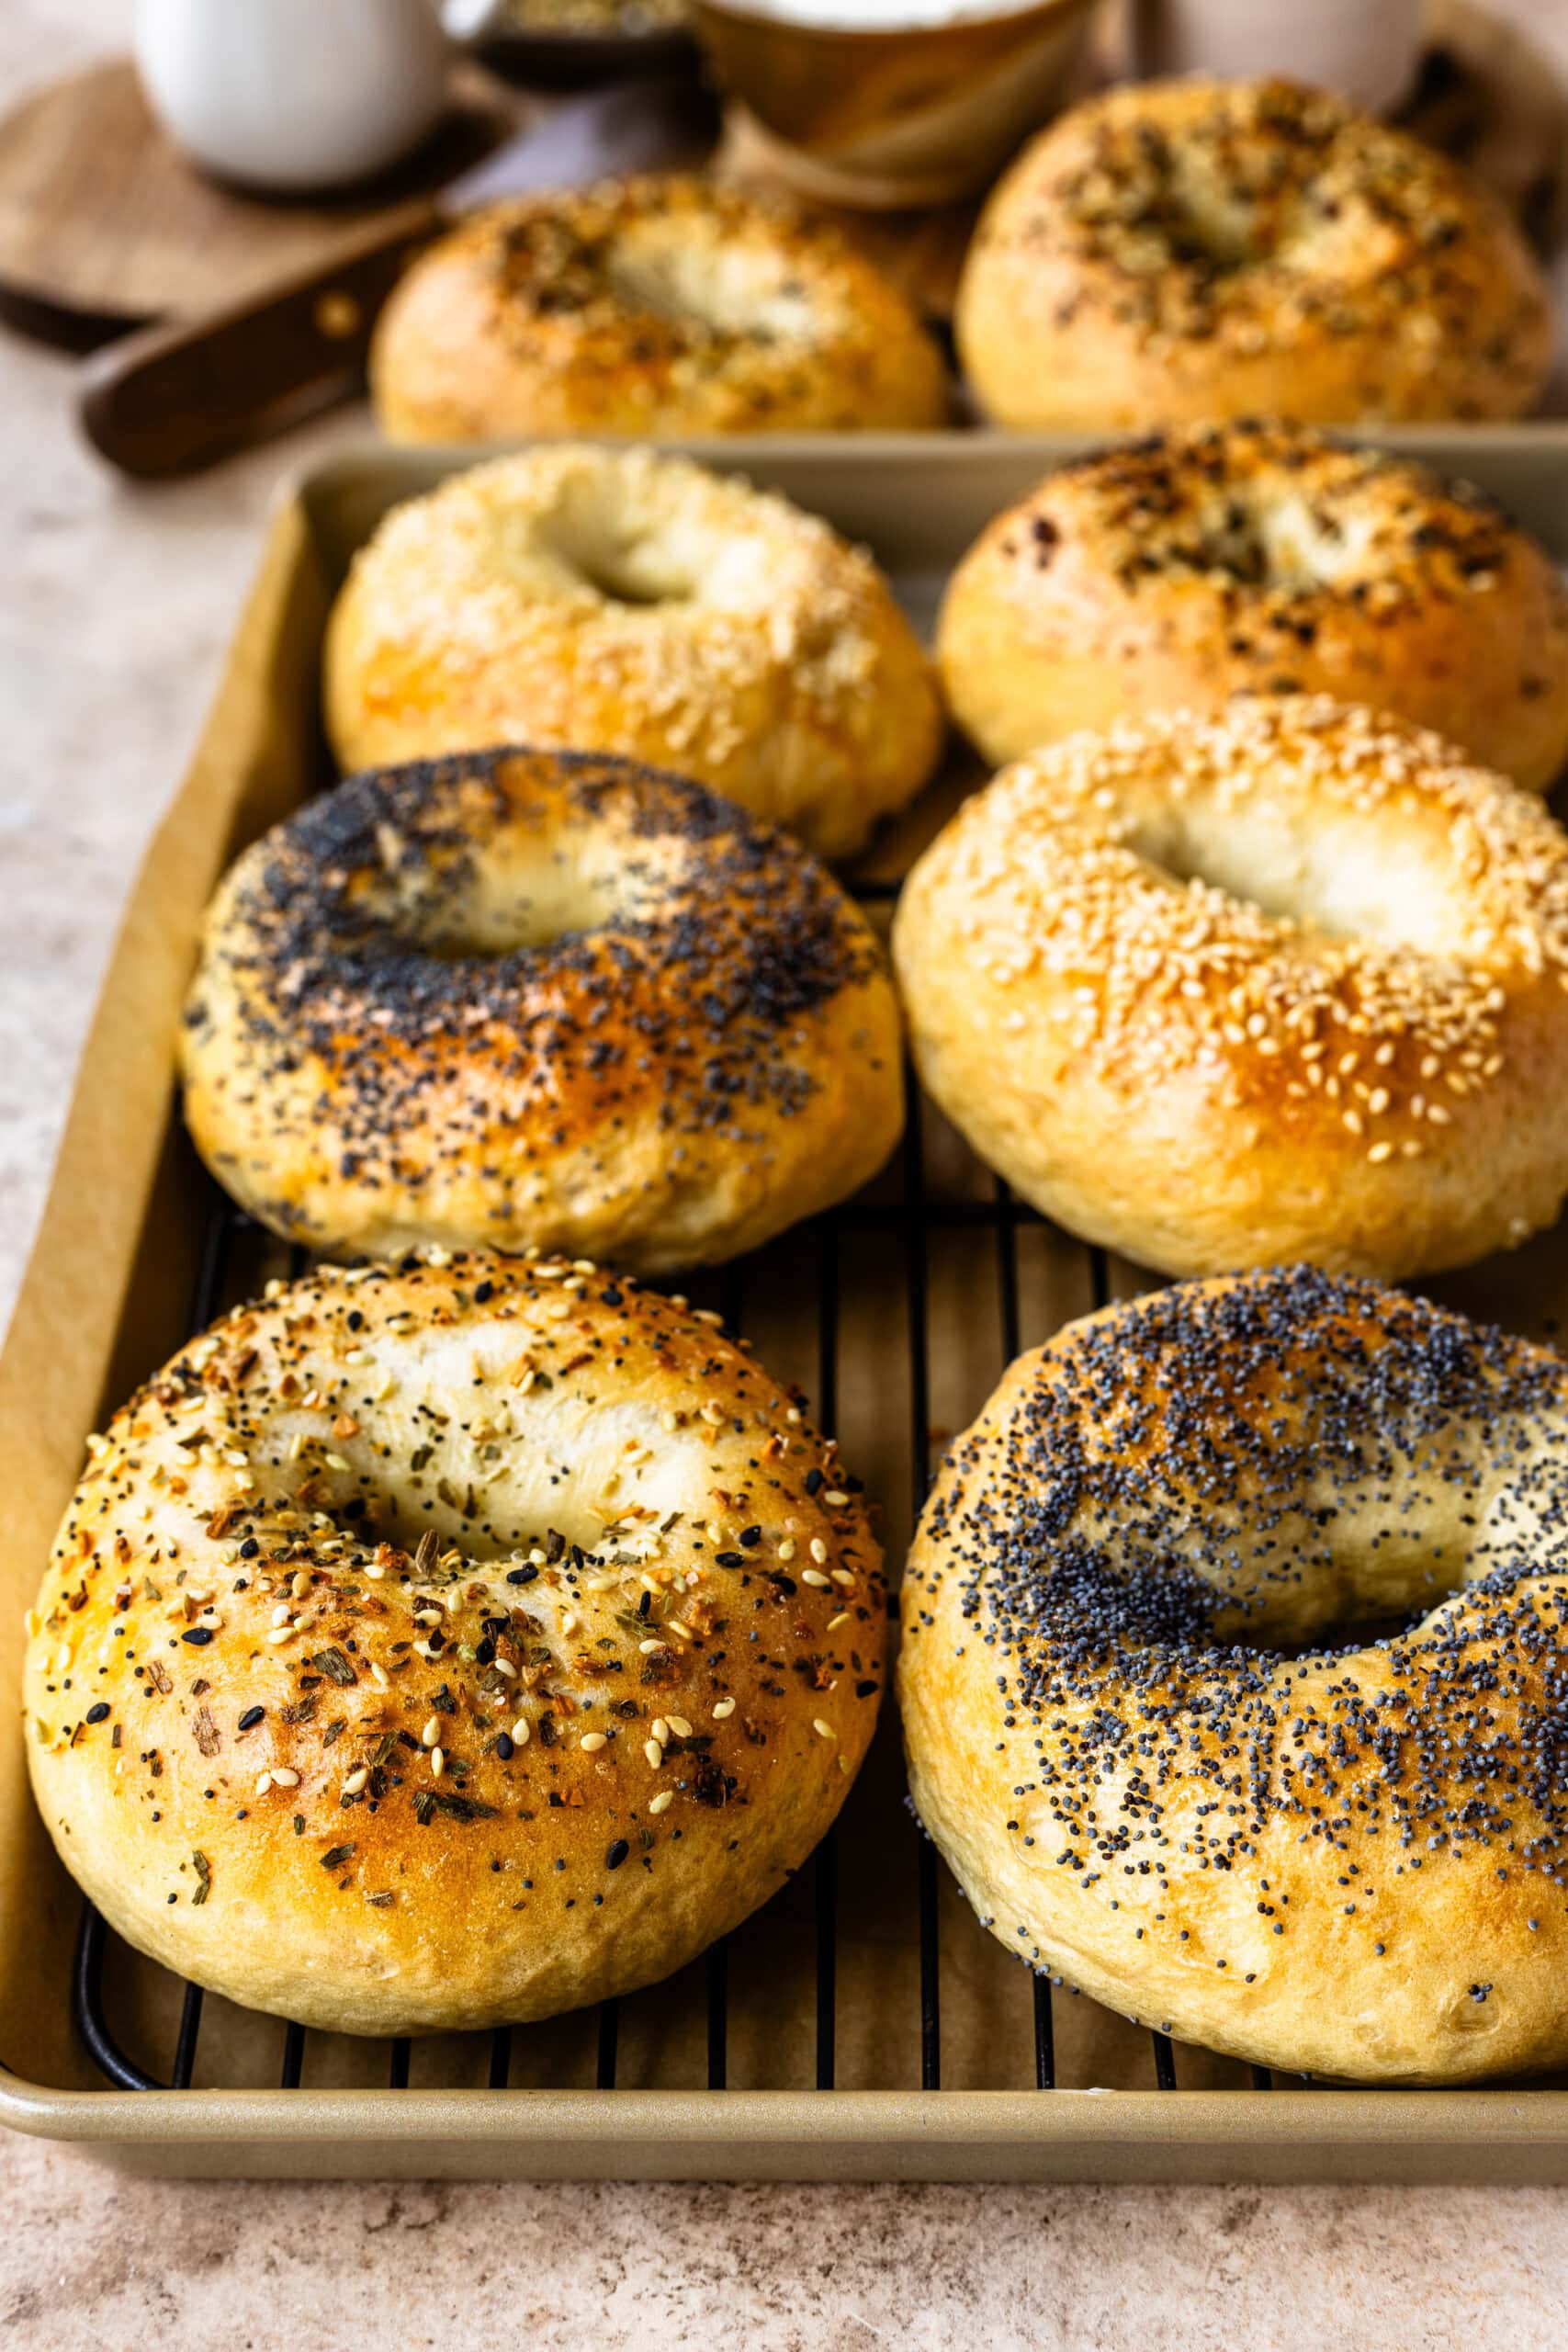
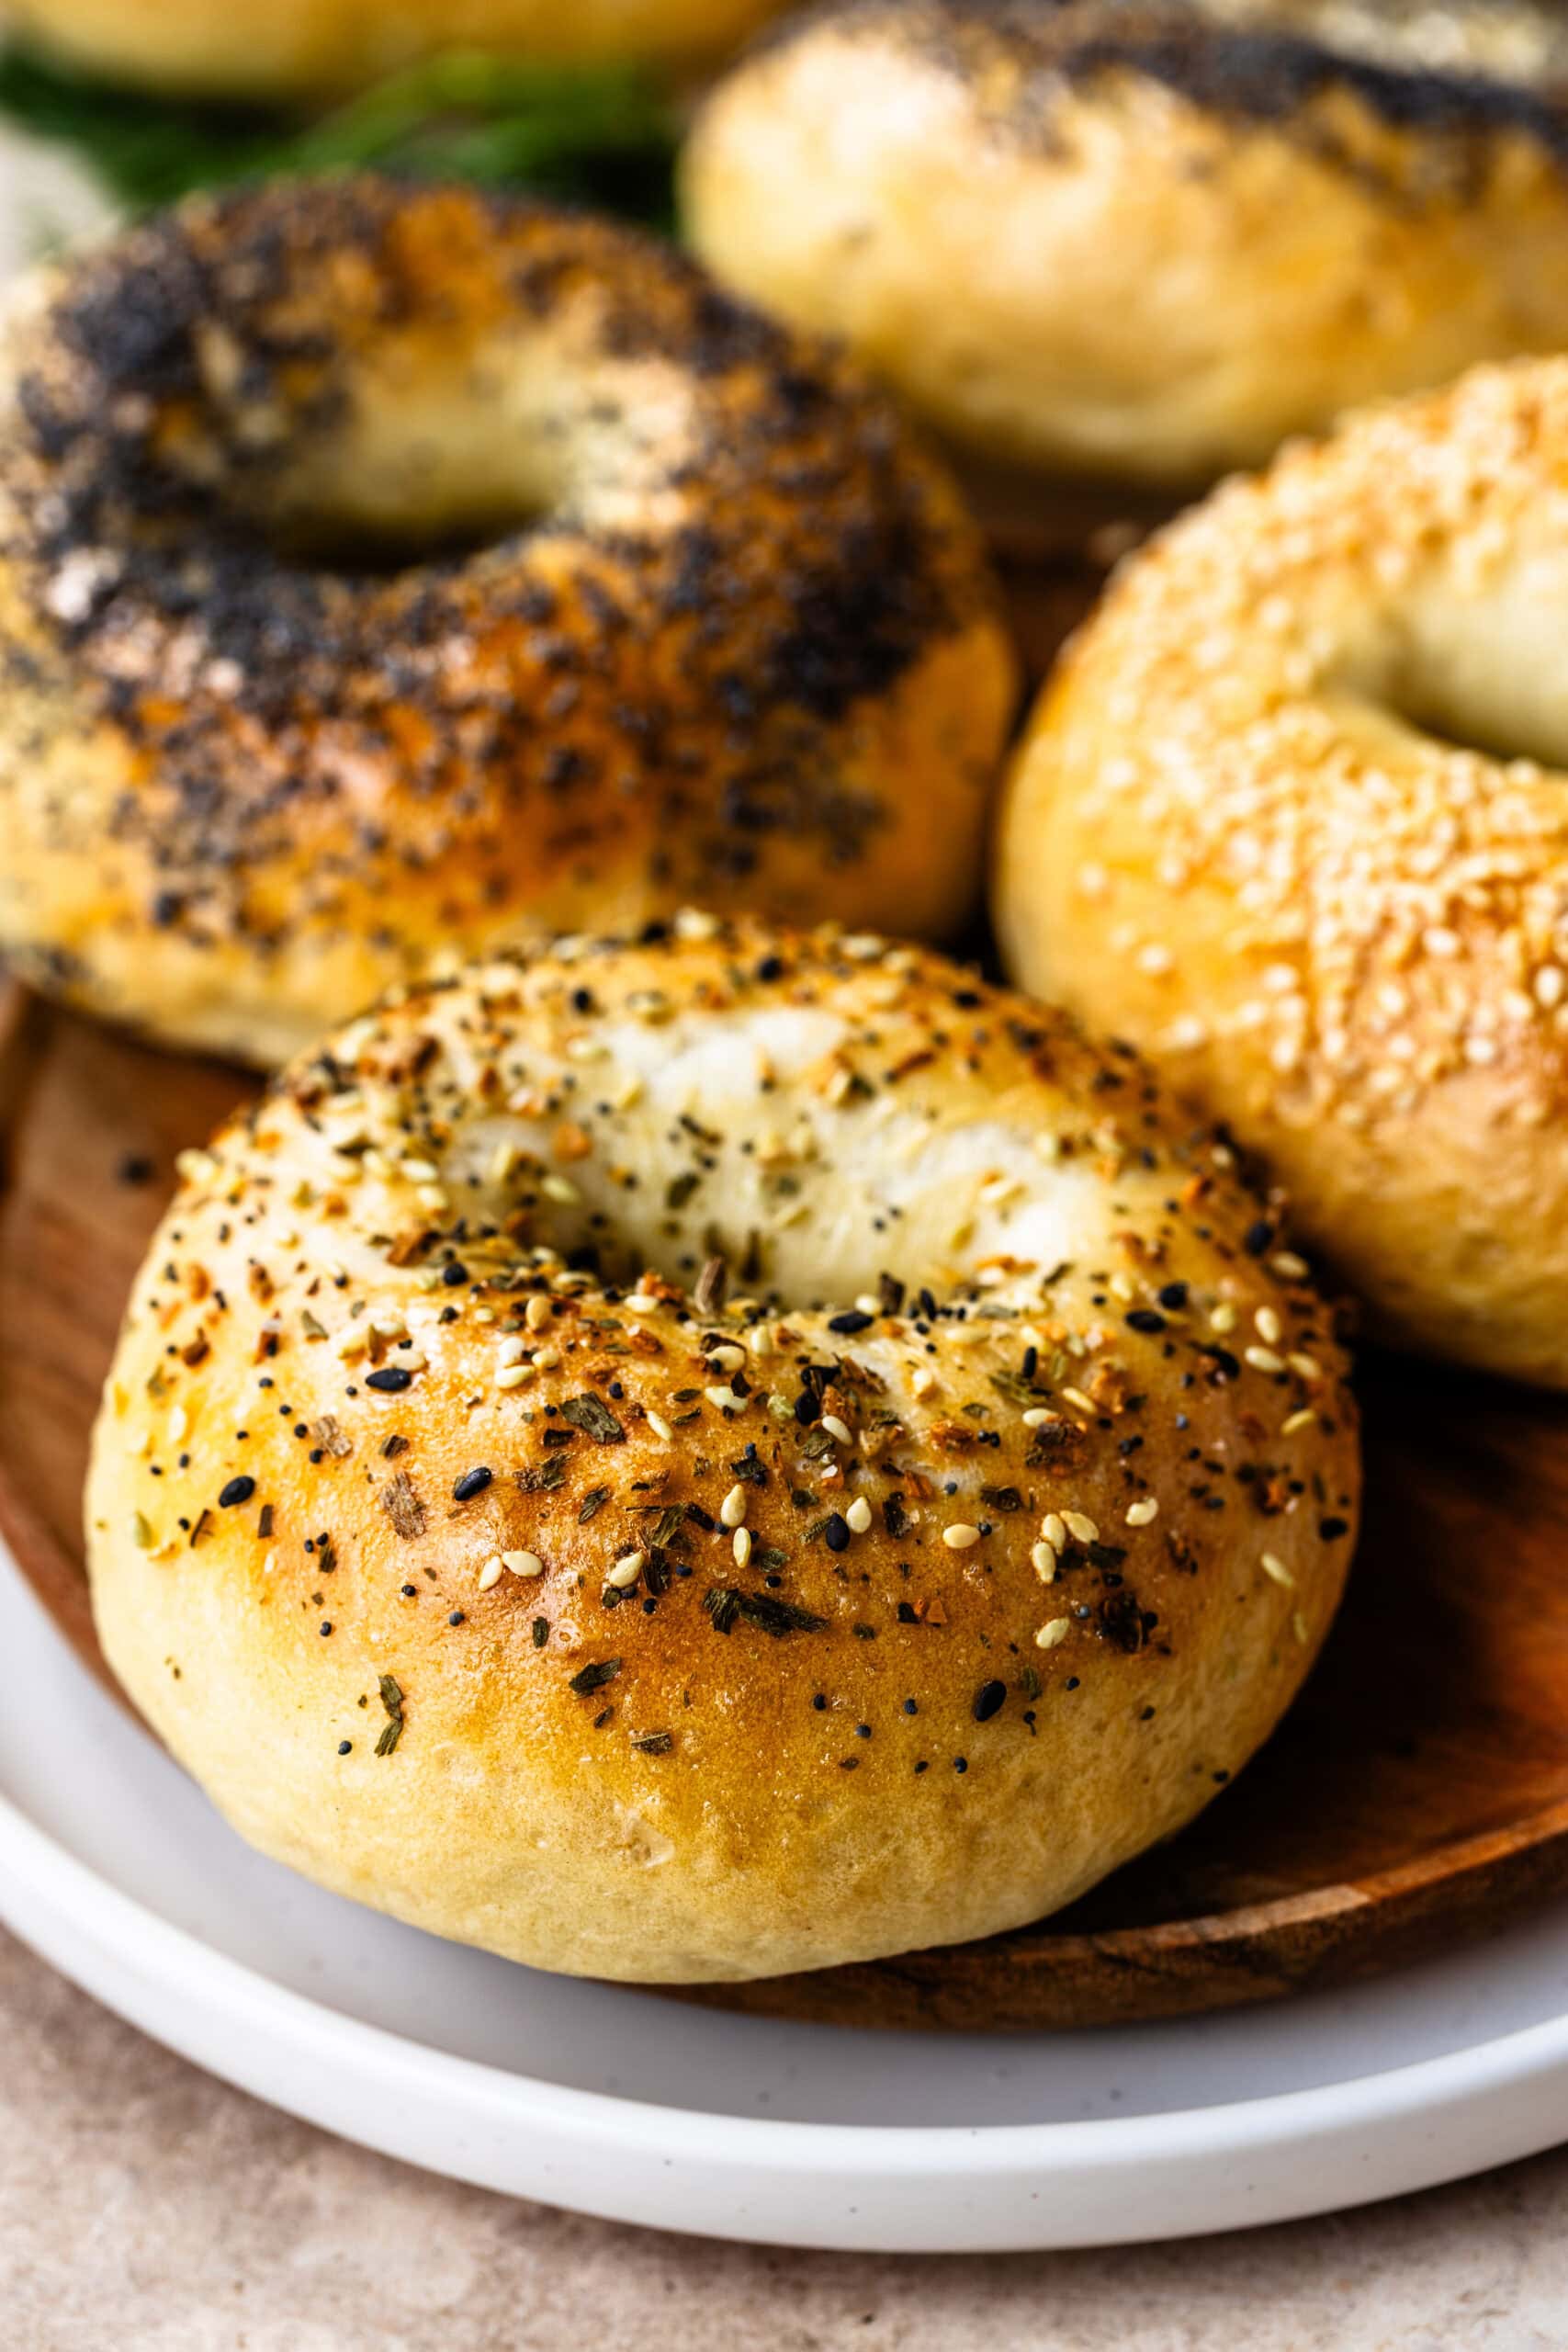
Step 5: Topping & Baking
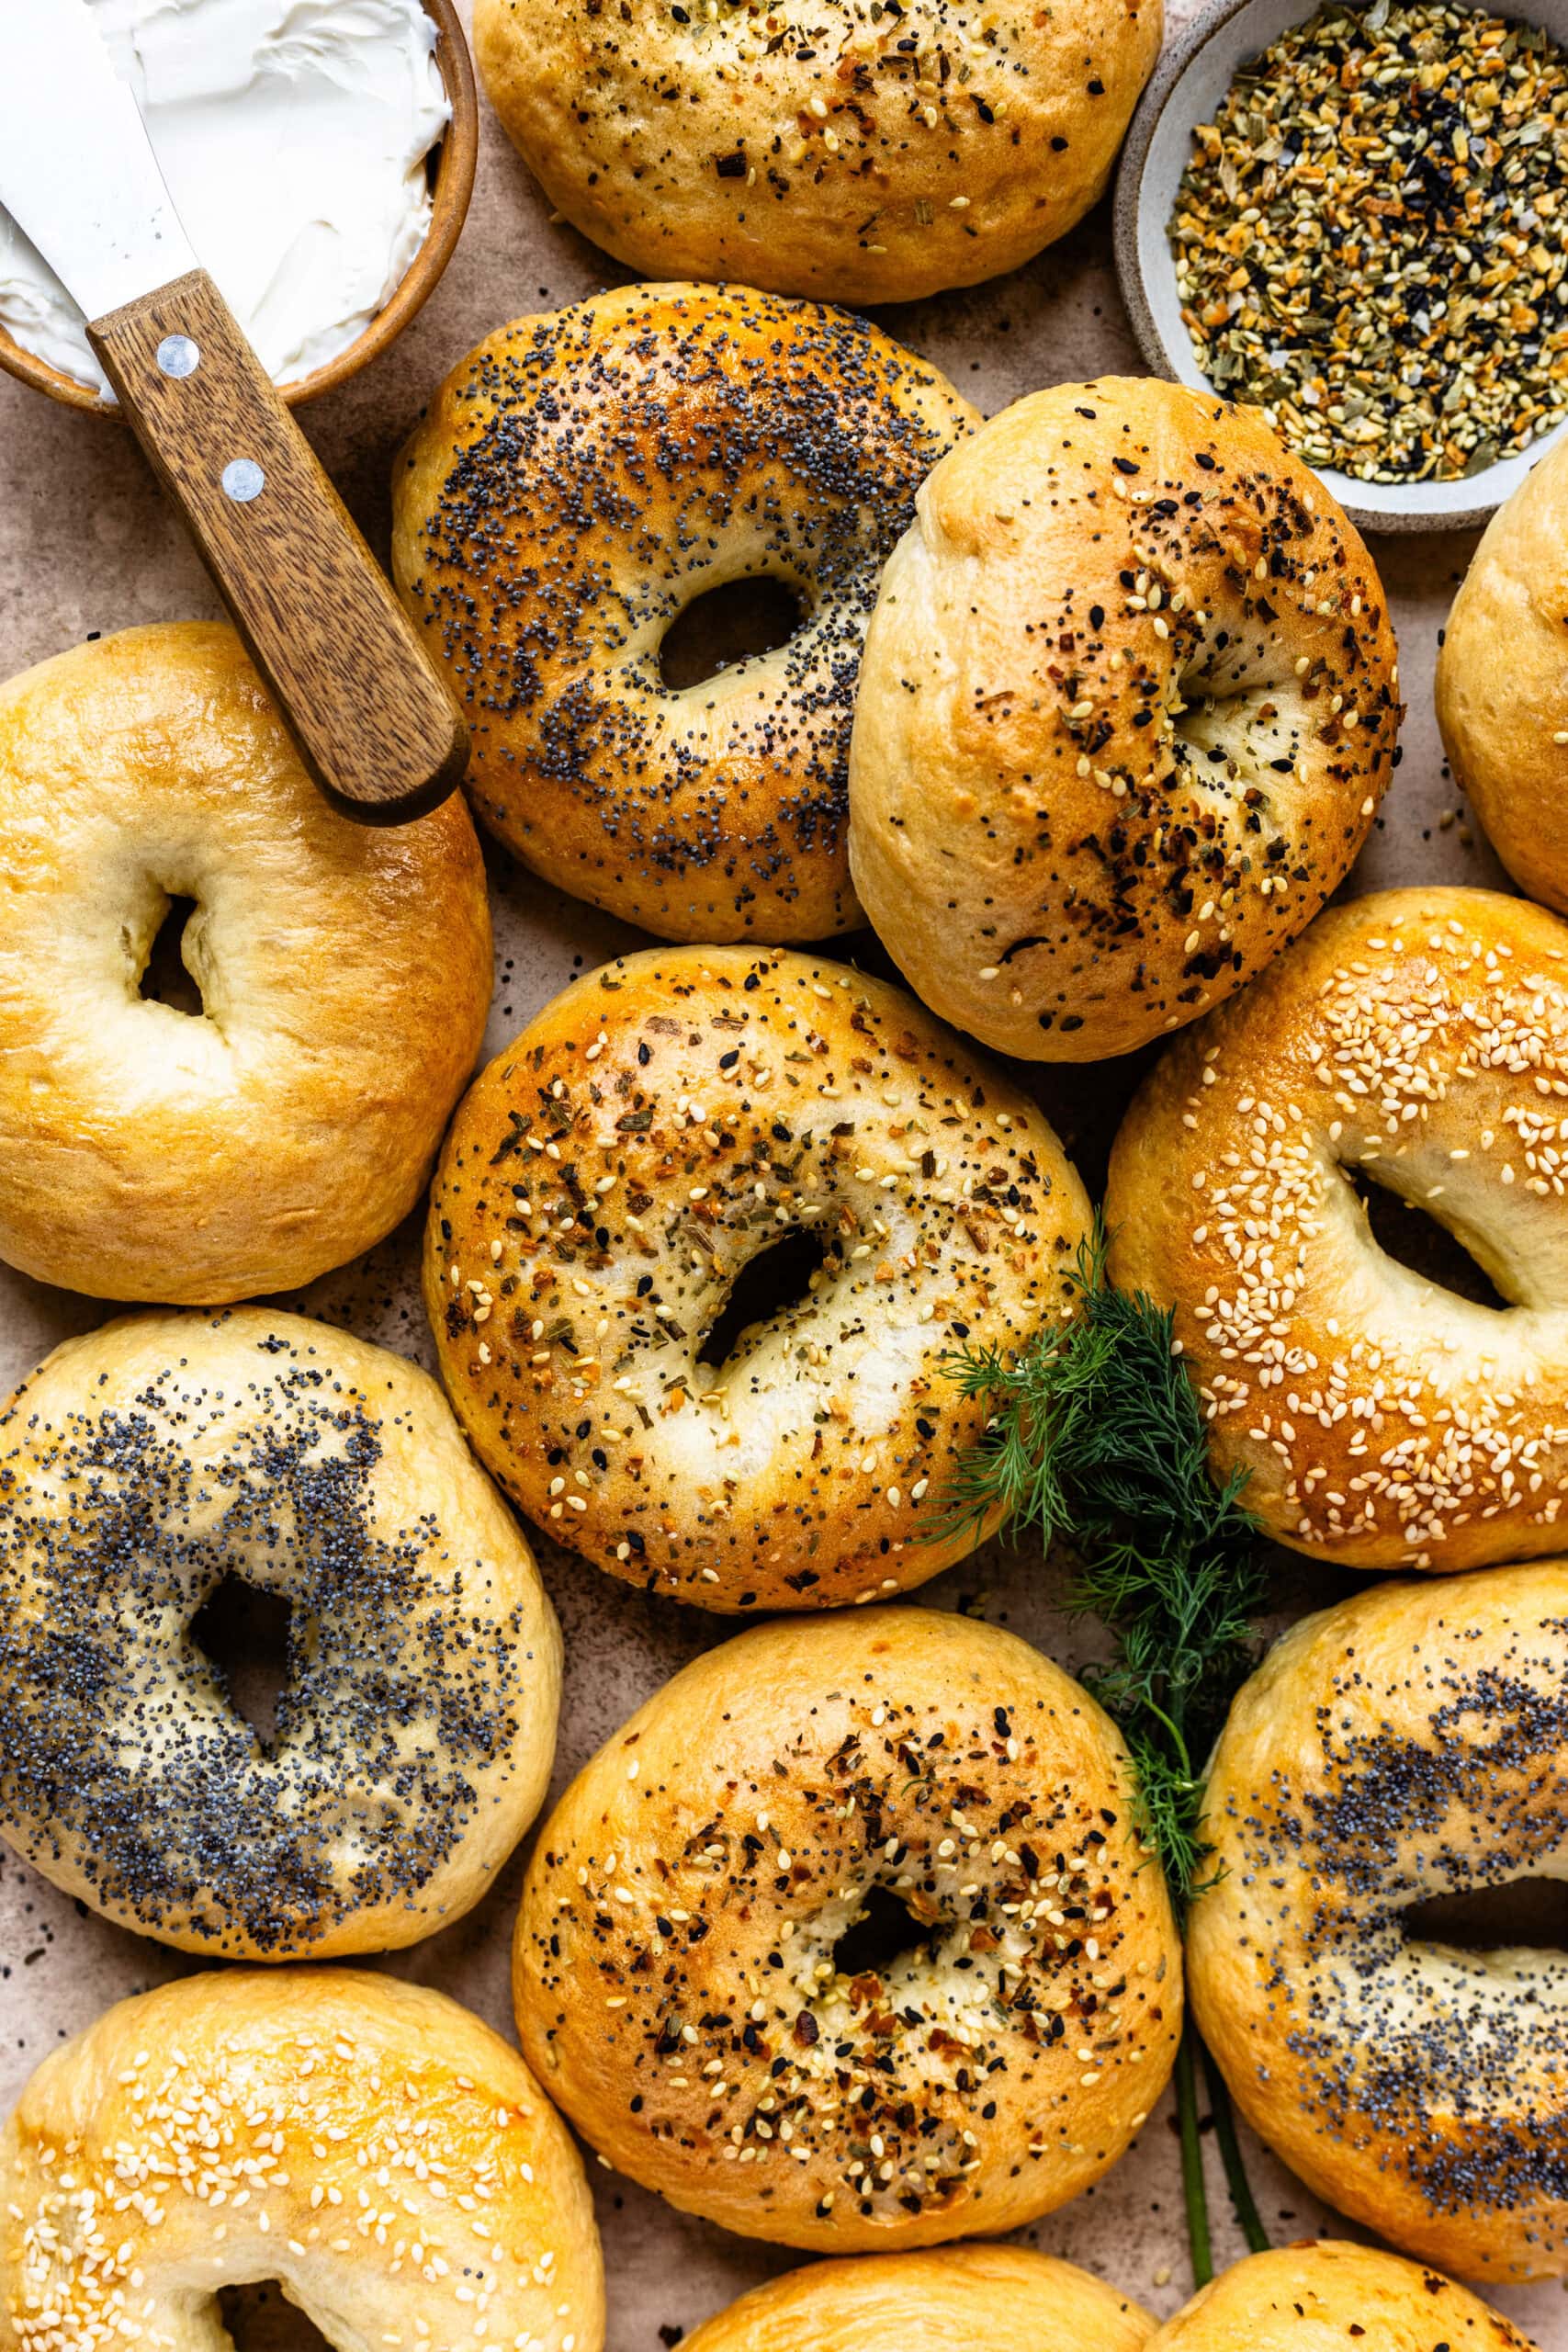
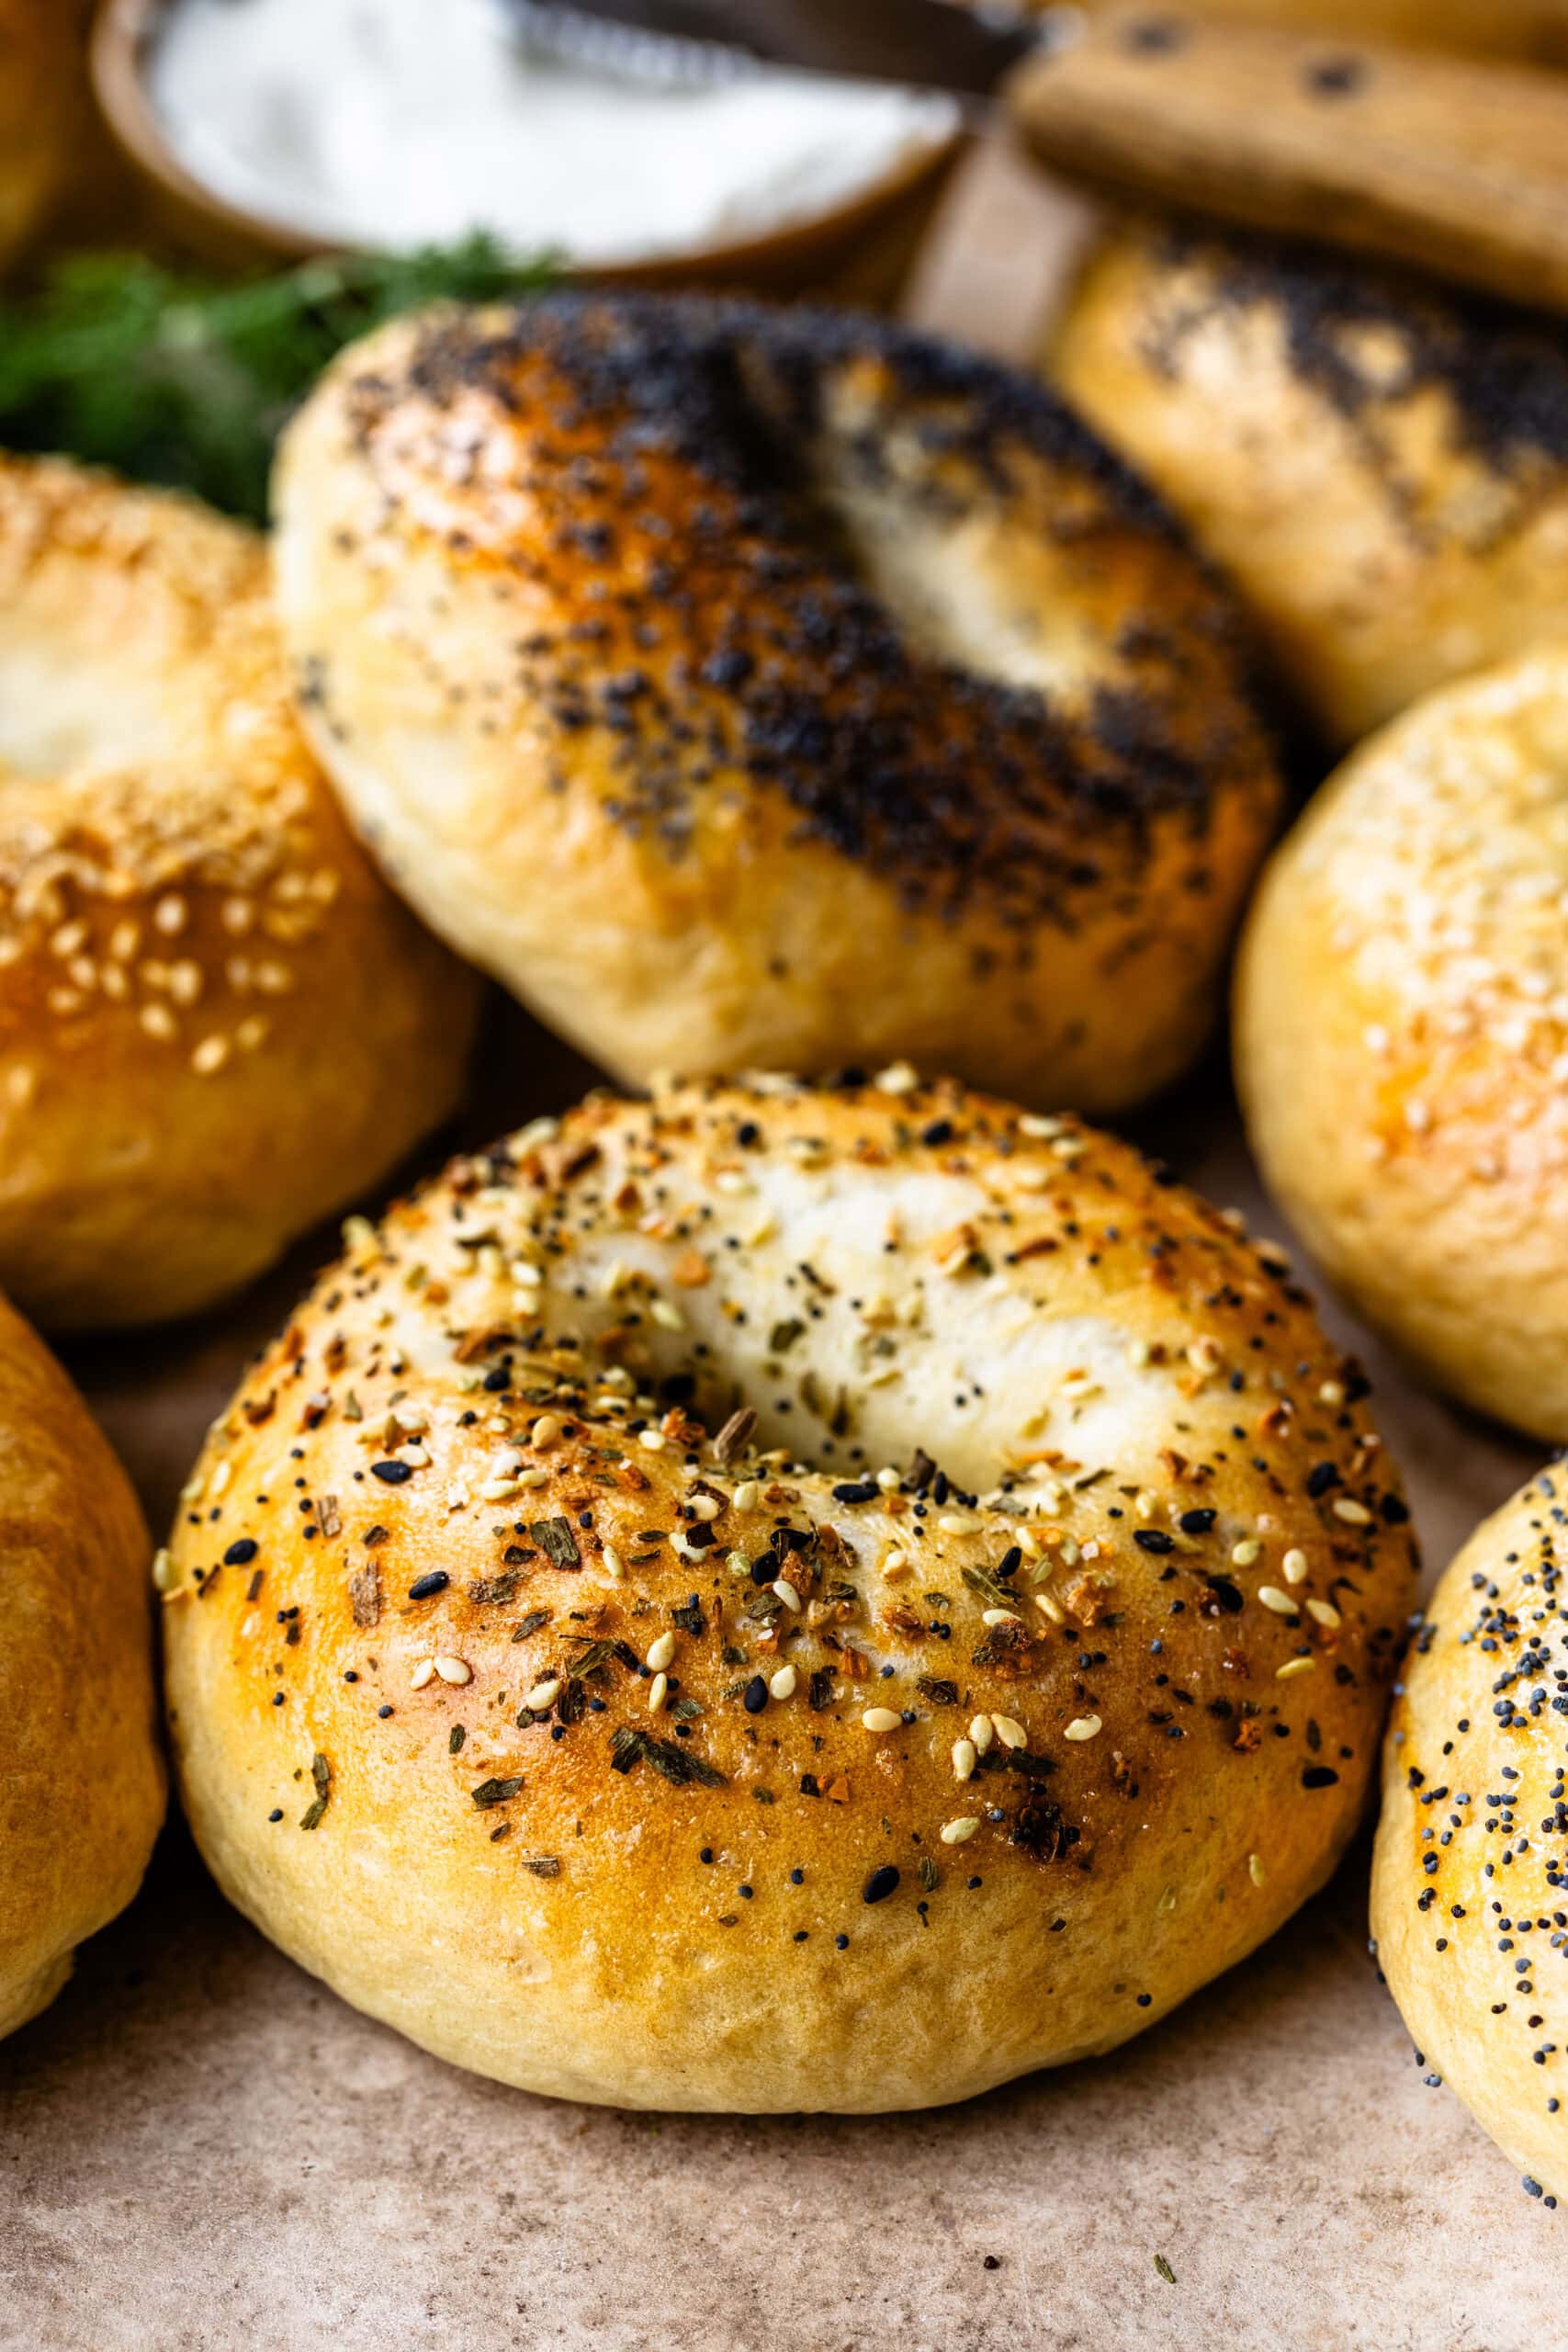
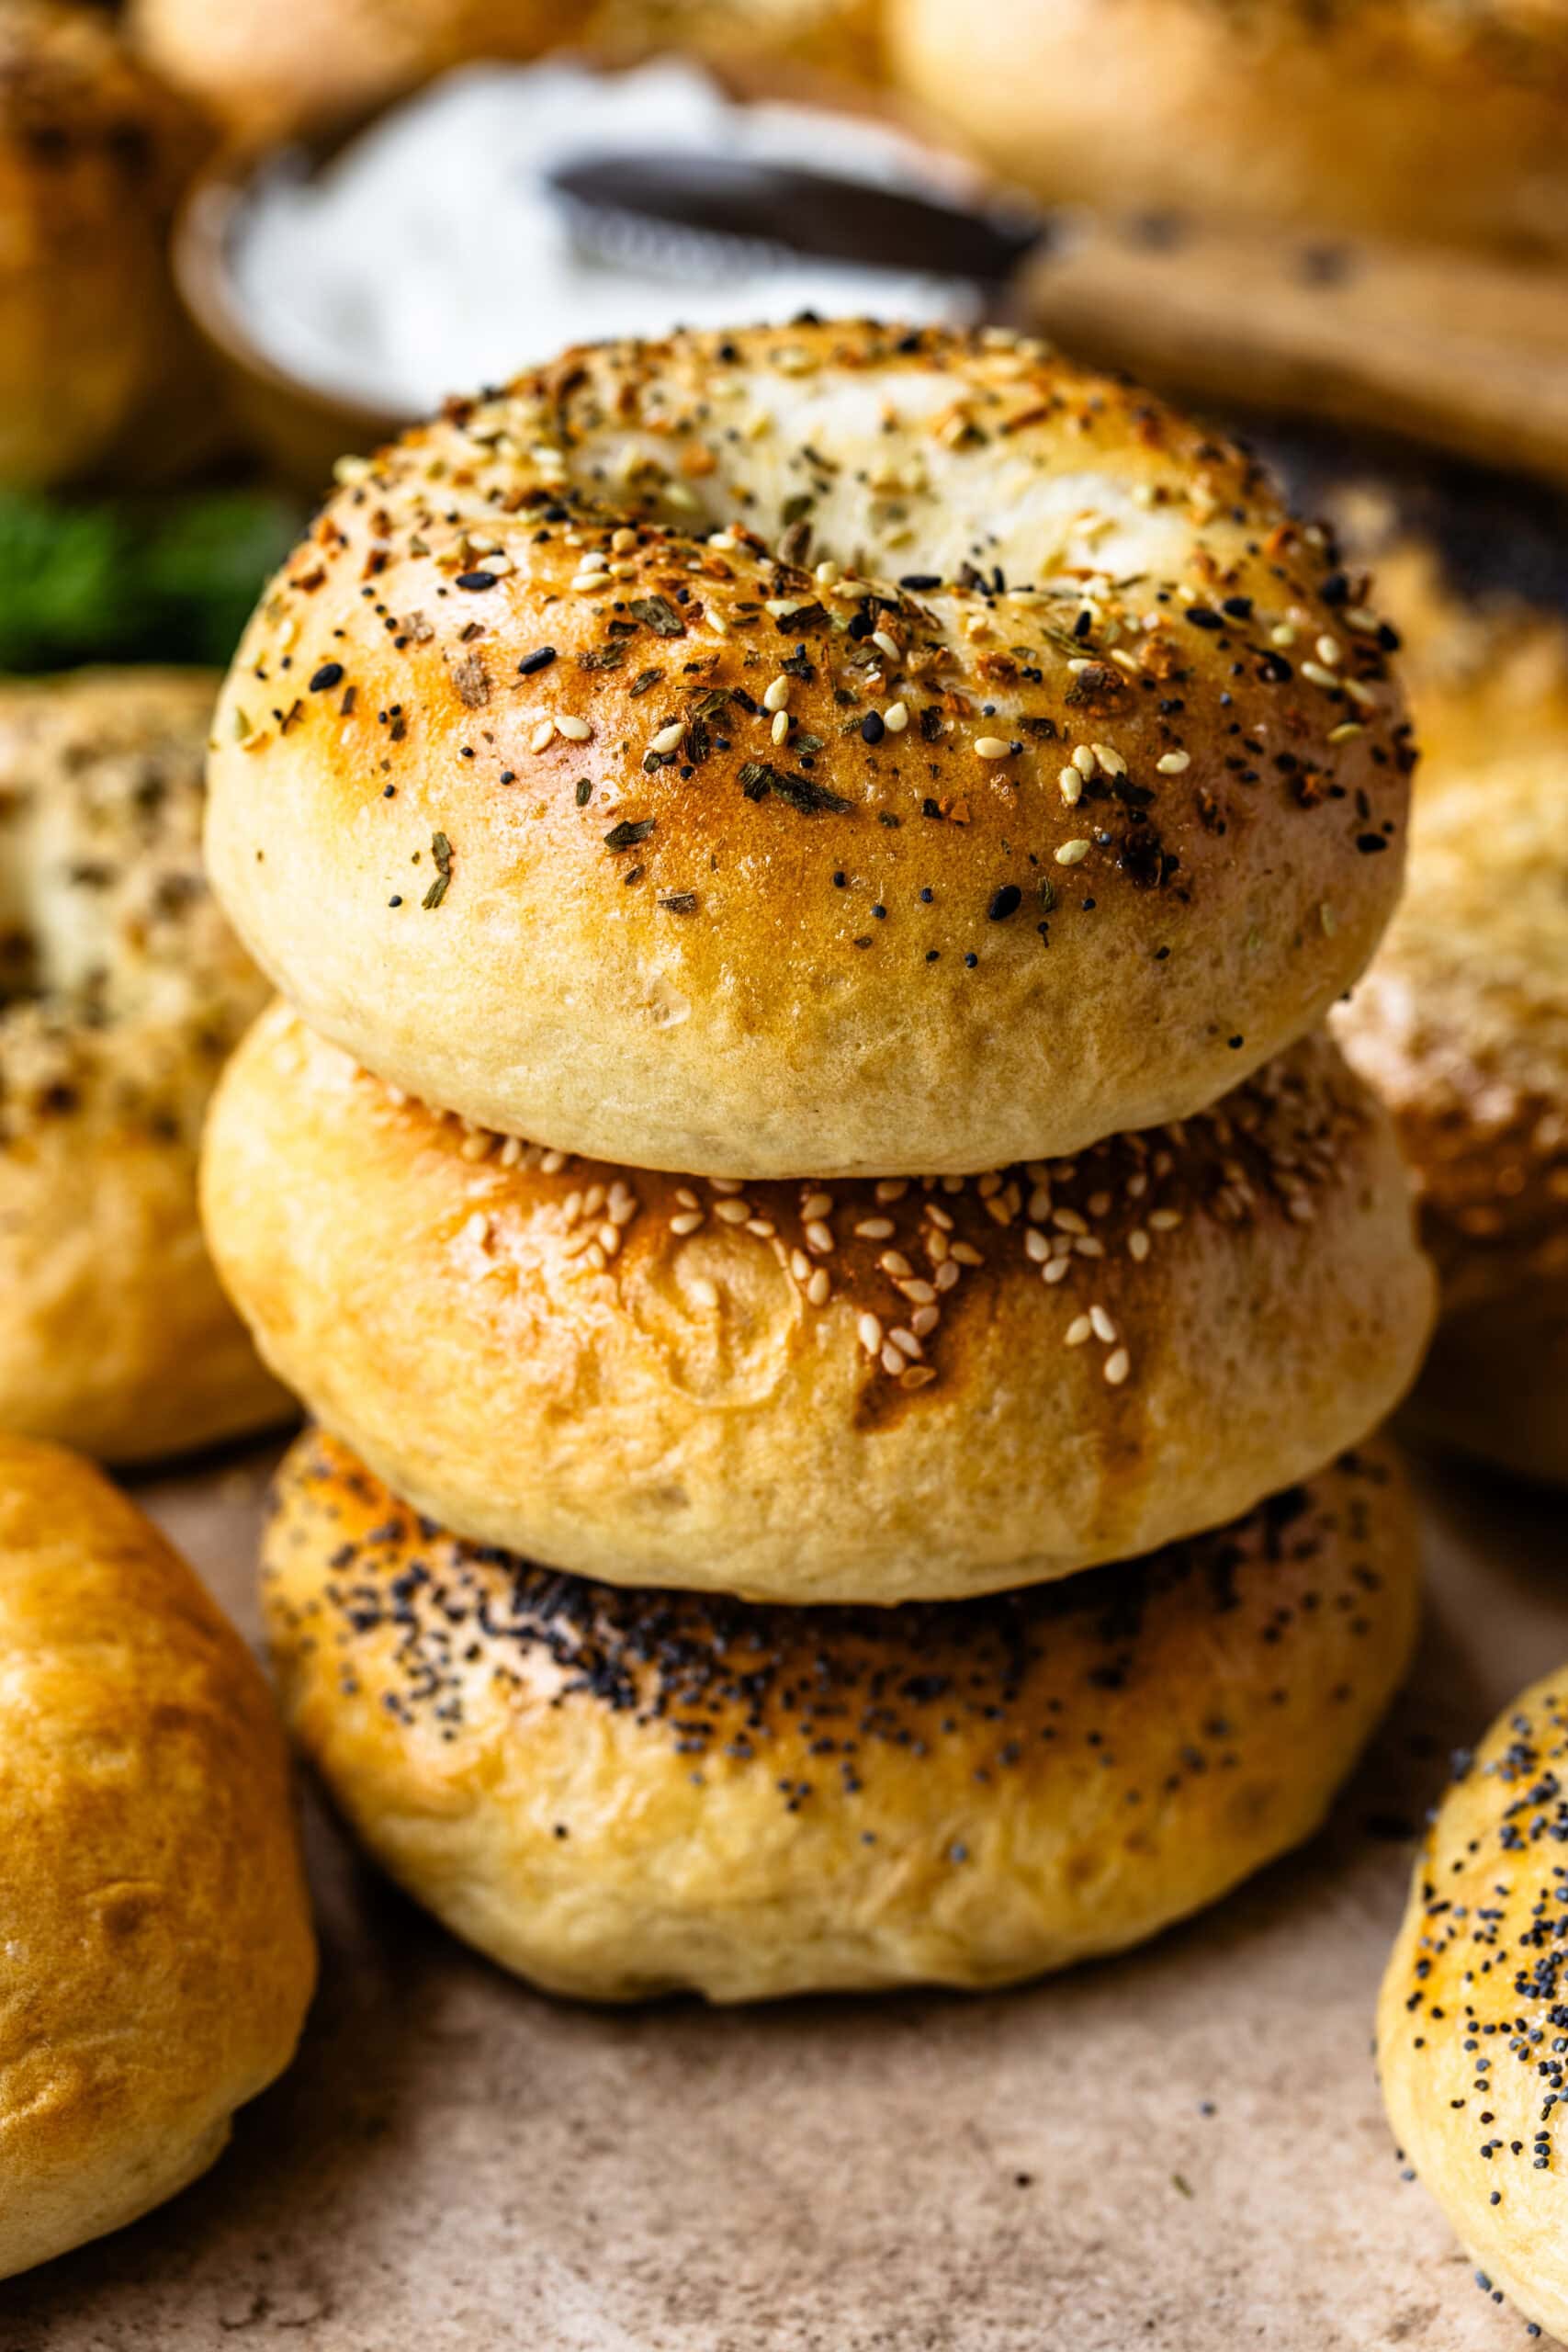
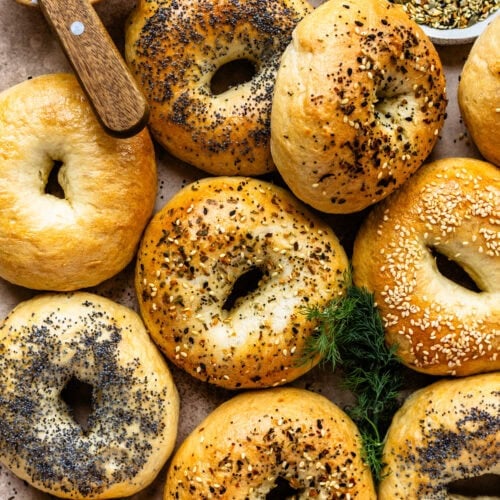
While the bagels are still damp from boiling, I brush them with egg white and add any toppings I’m using—everything seasoning, sesame seeds, poppy seeds, or cheese.

I bake the bagels for 20–25 minutes, rotating the pans halfway through, until they’re deeply golden and firm to the touch. I let them cool for at least 10 minutes before slicing so the interior sets properly.
Expert Tips
Making bagels for the first time can be daunting, but it’s a lot simpler than it looks. Stick with these below tips and you’ll do great.
- Kneading matters more than it looks. This is what gives bagels their chew.
- Don’t skip the boil. This is what sets the crust and locks in structure.
- Make the hole bigger than you think. It will shrink during baking.
- Use parchment or silicone. Bagels stick easily without it.
Classic Toppings
Whether you’re enjoying your bagel for breakfast, lunch, or a snack, these topping ideas will elevate your homemade bagels:
- Cream cheese (plain, herbed, or flavored varieties like scallion or veggie)
- Butter or ghee
- Peanut butter, almond butter, or other nut butters
- Fruit preserves or jam
Savory Combinations
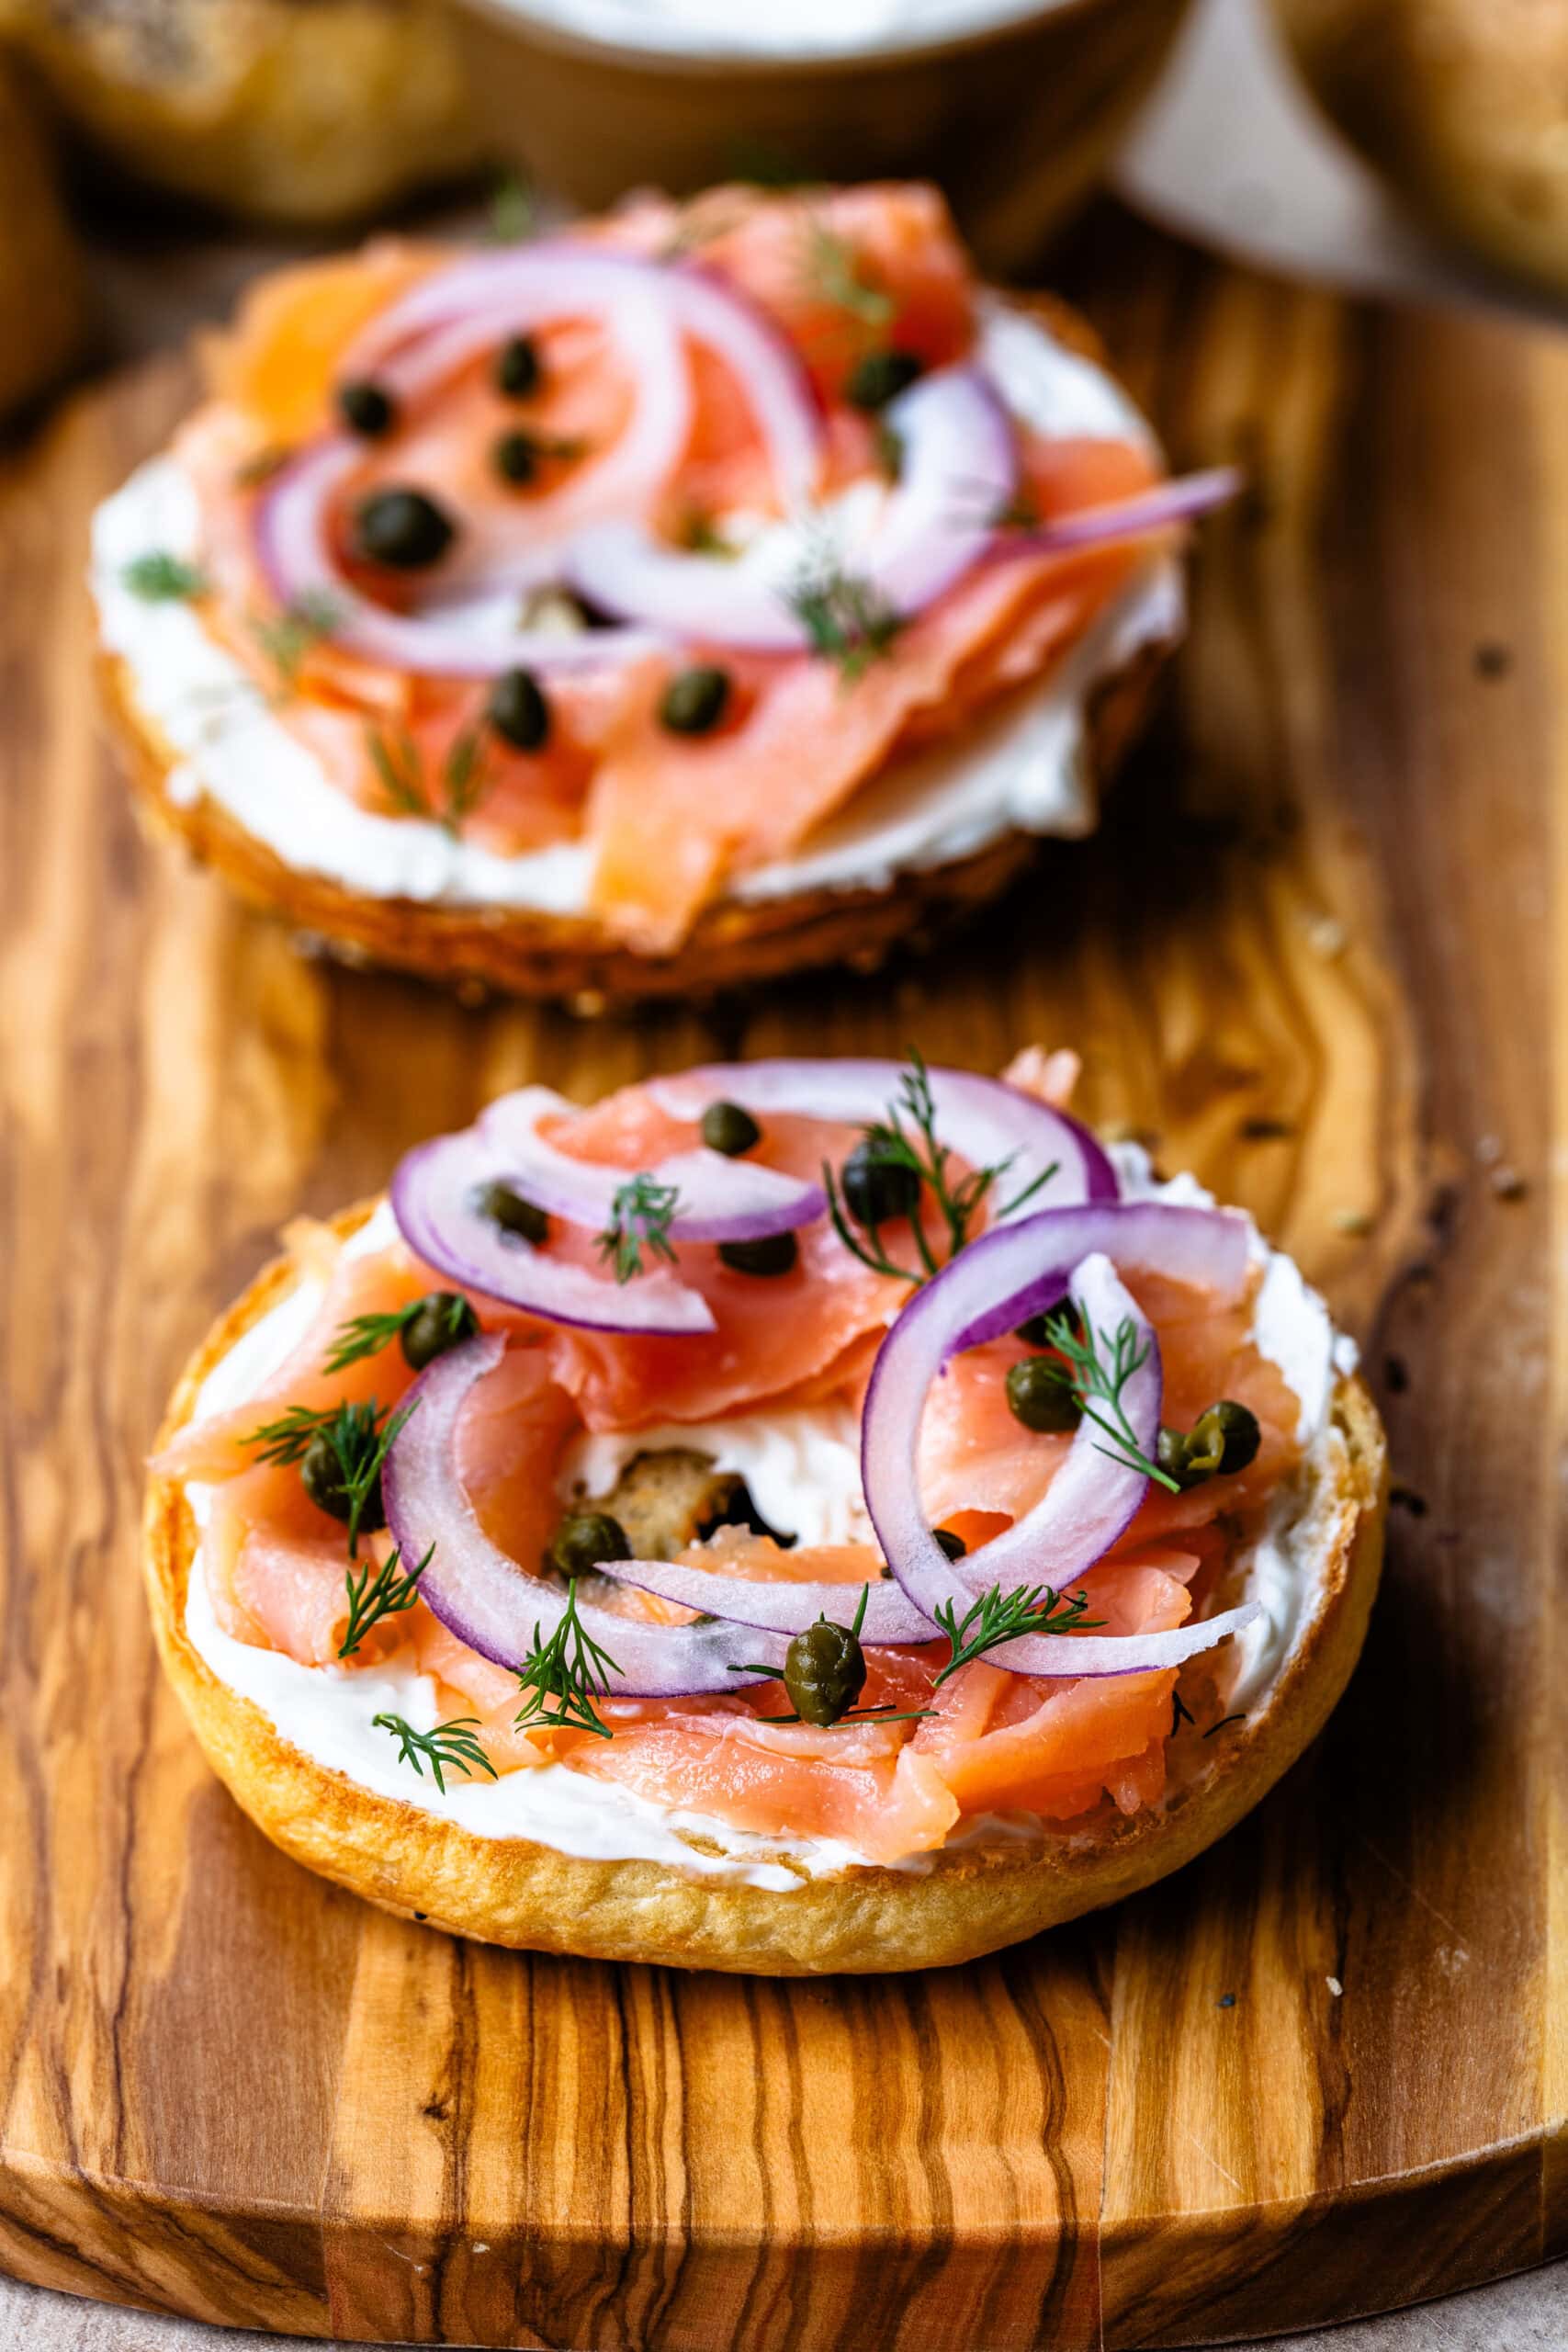
I keep toppings simple and familiar. A classic lox and cream cheese with smoked salmon, red onion, capers, and dill is always a favorite, and these bagels also hold up well to a bacon, egg, and cheese when I want something more filling. For something lighter, I like using them as an avocado toast base with salt, pepper, and a pinch of red pepper flakes. They’re also sturdy enough for egg salad or tuna salad, and occasionally I’ll turn one into a quick bagel pizza with marinara and mozzarella, toasted just until the cheese melts. I also have a high-protein bagel recipe and a sourdough bagel recipe for you to try!
Sweet Combinations
When I want to take these in a sweeter direction, I keep the toppings simple but intentional. Cream cheese with a drizzle of honey is an easy favorite, and Nutella with sliced banana makes a more indulgent option. Sometimes I’ll mix softened butter with cinnamon and sugar and spread it on a toasted bagel, or use whipped cream or mascarpone with fresh strawberries when I want something lighter. Lemon curd with berries is great if I’m in the mood for something bright, and for a dessert-style bagel I’ll go with marshmallow fluff and a sprinkle of chocolate chips. Almond butter with chia seeds and a little agave works well for something more filling, and in the fall I’ll mix pumpkin purée into cream cheese with warm spices and maple syrup. I also have a sourdough cinnamon raisin bagel recipe that’s quite good!
Storage Tips
Store cooled bagels in an airtight container at room temperature for up to 2 days or in the refrigerator for up to 5 days. To freeze, slice them in half first, and then wrap each bagel tightly in plastic wrap, place them in a freezer-safe bag, and freeze for up to 2 months. Reheat by toasting or warming in the oven.
FAQs
Yes. I often bake them the day before and toast as needed.
This is usually under-kneading or using all-purpose flour instead of bread flour.
Yes, but longer boiling creates a thicker, tougher crust.
Absolutely. This dough is meant to be a neutral base.
Nutrition Information
Each bagel contains approximately 250 calories and 8 grams of protein, making them a satisfying and energy-packed option for breakfast or snacks. The exact nutritional content may vary depending on the toppings or additional ingredients used, but these homemade bagels are a wholesome choice compared to store-bought options, with no unnecessary additives or preservatives.
If you make these bagels, I’d love to see them. Leave a comment or rating below, or tag me on Instagram—seeing your results is always my favorite part.
Bagel Recipe
Ingredients
- 1¼ cups warm water about 105°F
- 1 tbsp maple syrup or barley malt syrup
- 1 1/4-ounce package active dry yeast (2 1/4 tsp)
- 4 cups bread flour 510 grams
- 2 tsp salt
For Poaching
- 4 quarts water
Toppings (optional)
- 1 egg white beaten (for brushing)
- everything bagel seasoning sesame seeds, poppy seeds, or grated cheese
Instructions
Activate the Yeast
- In a large mixing bowl, combine the warm water and maple syrup (or barley malt syrup). Sprinkle the yeast on top and let it sit for 5–10 minutes until it becomes foamy. This indicates the yeast is activated.
Mix the Dough
- Add the flour and salt to the yeast mixture and stir with a wooden spoon or with the paddle attachment if using a stand mixer until the dough comes together.
- To knead with the mixer: Attach the dough hook to your stand mixer. Knead with the dough hook on low or medium-low speed for 6–8 minutes, or until the dough is smooth and elastic, and pulls away from the sides of the bowl.
- To knead by hand: Turn the dough onto a clean surface and knead for about 8–10 minutes. Use the heels of your hands to push the dough away from you, fold it over, and turn it 90°. Repeat until the dough is smooth, elastic, and slightly tacky to the touch.
Rising the Dough
- Place the kneaded dough in a lightly oiled bowl, turning the dough to coat it with oil. Cover with plastic wrap or a clean kitchen towel.
- Let the dough rest in a warm, draft-free spot for 60 to 90 minutes, or until it doubles in size.
Shape the Bagels
- Once the dough has risen, turn it onto the counter. Divide it into 8 equal pieces.
- Roll each piece into a smooth ball by cupping your hand over the dough and gently pulling it toward you against the countertop. This motion creates surface tension, which helps form a tight, smooth ball.
- Let the balls rest for 5 minutes on the counter, so the gluten can relax slightly.
- Then use your thumb to poke a hole in the center of each ball. Gently stretch the hole to about 1.5–2 inches in diameter, as it will shrink slightly during baking.
- Alternatively, you can roll each ball into a log, and pinch the ends together. Place the shaped bagels on a parchment-lined tray.
Poach the Bagels
- Preheat your oven to 425°F (220°C). Line two baking trays with parchment paper.
- Bring 4 quarts of water to a boil in a large pot. Add a tablespoon of maple syrup or barley malt syrup to the water if desired (this adds a subtle sweetness and helps with browning, but it’s not necessary).
- Gently drop 2–3 bagels into the boiling water, making sure they don’t overcrowd the pot. Boil for 1 minute on each side. Use a slotted spoon to remove the bagels and let them drain briefly on a clean kitchen towel.
- Place the poached bagels onto the prepared parchment-lined trays, spacing them evenly.
- Add Toppings (Optional)
- If using toppings, brush the tops of the bagels with the beaten egg white to help the toppings stick. Sprinkle generously with your choice of everything bagel seasoning, sesame seeds, poppy seeds, or grated cheese.
Bake
- Bake in the preheated oven for 20–25 minutes, or until the bagels are golden brown and firm.
- Rotate the trays halfway through baking for even browning.
Cool and Serve
- Remove the bagels from the oven and let them cool on a wire rack for at least 10 minutes before serving.
Very nice recipe , Thanks you so much for the lovely recipe was a super hit in my house! ❤️🙏
I have made many bagel recipes in search of one that reliably works, and I am so happy I tried this one! They turned out absolutely perfect and I can’t wait to make them again. I couldn’t believe how easy it was – so many other recipes have lots of extra steps that don’t really make a difference, in my opinion. Nothing I’ve made has held a candle to this recipe!
Hi Leah, I am so happy to hear that!! I tried really hard and many recipes and methods to get to this recipe! So I am super glad it has worked well for you!! Thank you so much!