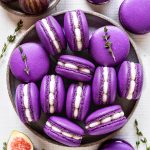
Fig Macarons
These delicious Fig Macarons are filled with Honey Cream Cheese Frosting and homemade Fig Jam. You can use store-bought fig jam, specially because fig season tends to be so short. These macarons are so worth making!
Servings 20 macarons
Calories 120kcal
Ingredients
Macaron Shells
- 4 grams egg white powder optional, read notes
- 100 grams granulated sugar 3.5 oz
- 100 grams egg whites 3.5 oz
- 105 grams almond flour 3.7 oz
- 105 grams powdered sugar 3.7 oz
- Food coloring I used purple, blue, and pink
Fig Jam
- 1/2 lb fresh figs stemmed and halved
- 1/4 cup granulated sugar
- 2 tbsp honey
- 2 tbsp lemon juice 1 lemon
Honey Cream Cheese Frosting
- 2 tbsp unsalted butter softened 28 grams, 1 oz
- 1/4 cup cream cheese softened 56 grams, 2 oz
- 2 tbsp honey 30 ml
- 1 1/2 cups powdered sugar 187 grams, 6.5 oz
Instructions
Macaron Shells
- Before you start, get all of the ingredients ready. Prepare a large piping bag, fitted with a large round tip, I use a 1/2” diameter tip. Set aside.
- Line two baking sheets with parchment paper or silicone mat.
- Measure out all of the ingredients.
- Sift the powdered sugar and almond flour together. Set it aside.
- Whisk the sugar and the egg white powder (if using) in a bowl, and place it over a pan with barely simmering water. Add the egg whites to the sugar and whisk the mixture until frothy and the sugar is completely melted. It will take a couple of minutes. You can test by touching the mixture between your fingers, and if you feel any sugar granules just keep whisking the mixture over the water bath.
- Make sure the bottom of the bowl isn’t touching the simmering water because you don’t want the whites to cook.
- Also, don’t overheat the sugar syrup, this may cause issues down the line, such as wrinkly macarons.
- Transfer the syrup to the bowl of a stand mixer.
- With the whisk attachment, start whisking mixture on low for about 30 seconds, then gradually start increasing speed to medium. Whisk on medium for one to two minutes, until the mixture is white and starting to become fluffy. Raise the speed to high, or medium-high and whisk for a few minutes until stiff peaks are formed. Best way to check this is to keep your eye on the whites. Once they get glossy and you start seeing streaks formed by the whisk, it might be time to stop.
- Whisk until stiff peaks have formed. When you pull your whip up, the peak should be stiff and shooting straight up, with possibly a slight bend at the top, but not bending down to the side.
- Pour the sifted powdered sugar and almond flour into the stiff meringue.
- Start folding gently forming a letter J with a spatula.
- Add the food coloring at this point, if using. I’ve added purple, blue, and pink food coloring.
- How to know when to stop folding the batter: It’s time to stop folding when the batter is glossy and has a thick and flowing consistency. There are several ways to test this.
- First, pick up some batter with the spatula and try to draw a figure 8 with the batter that is dripping off the spatula. If you can form several 8 figures without the batter breaking up, that’s one indication that it might be ready.
- There’s another test you can do. I call it the Teaspoon test.
- Grab a teaspoon of batter and spoon onto the parchment paper or silicon mat. Wait a minute to see how it behaves.
- If the batter stays stiff, forming a point and doesn’t spread out, fold a little bit more, about 3 folds.
- Test again.
- Once the batter spreads out a bit and starts to look glossy and smooth on top, on the parchment paper, it's ready.
- You don’t want your batter to be too runny either. So be careful not to overmix. It’s always best to undermix and test several times until the proper consistency has been achieved.
- When you hold the spatula with batter on top of the bowl and the batter falls off the spatula slowly but effortlessly the batter is ready. The batter will keep flowing off the spatula non-stop, but not too quickly.
- Transfer the batter to the piping bag.
- Place the piping bag directly 90 degrees over the center of each macaron template. Apply gentle pressure and carefully pipe for about 3 seconds, and then quickly pull the bag up twisting slightly.
- Once you’ve piped as many circles as you could, bang the trays against the counter a few times each. This will release air bubbles that are in the batter and prevent your macaron shells from cracking.
- Use a toothpick to pop any air bubbles in the surface of the shells.
- Let the trays sit for a while so the shells will dry out a little bit. I usually leave about 20-40 minutes, depending on how humid the day is. You’ll know they’re ready when you gently touch the surface of a macaron and it seems dry.
- Pre-heat the oven to 300ºF.
- Bake one tray at a time.
- Bake for 5 minutes, rotate tray.
- Bake for 5 more minutes. Rotate again.
- I bake each tray for about 15 to 20 minutes.
- When baked, the macarons will have a deeper color and formed feet. If you try to move a macaron, it shouldn’t feel jiggly. If the macaron is still jiggly, keep baking.
- Remove from the oven and bake the other tray.
- Let the macarons cool down before proceeding with the filling.
Fig Jam
- Place the figs, sugar, honey, and lemon juice in a small saucepan with a heavy bottom.
- Bring to a boil over medium heat. Reduce the heat and continue to cook the figs, while stirring occasionally, for about 40 minutes.
- By then, the figs should have dissolved, and the jam will be very thick.
- Keep an eye during cooking, if the mixture gets too dry and starts to stick to the bottom of the pan, add a splash of water to the pan.
- Remove from the heat once the jam is thick.
- You can wait for it to cool slightly and then process it in a small food processor, to make it easier to fill the macarons without huge chunks of figs in there.
- Place the jam in the fridge until ready to fill the macarons.
Honey Cream Cheese Frosting
- Add the butter and cream cheese to a bowl, and cream with a mixer for about 2 minutes, until fluffy.
- Add the honey, and mix to combine.
- Add the powdered sugar and mix on low until incorporated, then raise the speed to medium-high until creamy.
- If the frosting is too runny, add more powdered sugar to thicken it. And if the buttercream is too stiff, add a teaspoon or so of water or milk to thin it out.
To assemble
- Place the Honey Cream Cheese Frosting in a piping bag fitted with the tip of choice. I used a small star tip.
- Then pipe a ring of frosting around the edges of each bottom shell. I chose to pipe little dots to form a ring.
- Next, fill the middle of each bottom shell with a bit of jam. Top with another shell.
Storage
- Store the macarons in the fridge for up to 6 days.
- You can freeze these macarons for up to 1 month, as long as the jam isn’t too runny, otherwise the macarons will end up being soggy.
Notes
Egg white powder: Egg white powder is not the same as meringue powder. Egg white powder is made of only egg whites. They help with getting fuller shells, and specially when adding a lot of food coloring to the batter, because they make the shells dry faster. I recommend experimenting with it if you can find it. I use 4 grams for each 100 grams of egg whites.
Food coloring: Make sure to use gel food coloring. I use Wilton Color Right Performance Food Coloring Set. If you are a beginner macaron baker, I recommend going easy on the food coloring, as it can alter your batter a lot, and it can take extra mixing time, specially if you continue to add the food coloring as you do the macaronage.
Scale: Please use a scale when measuring the ingredients for accuracy.
Macaron amount: it will vary greatly depending on how big you pipe the shells, and on how runny or thick the batter is.
Baking time/temperature: Baking time and temperature will vary according to your own oven. I recommend experimenting with your oven to find out the best time, temperature, position of the baking tray.
Oven thermometer: Make sure to have an oven thermometer to bake macarons. It’s one of the most important things about making macarons. Home ovens aren’t accurate at all at telling the temperature, and even a slight 5 degree difference can make or break your whole batch.
Tray rotation: Lots of bakers don’t have to rotate the trays 180 degrees in the oven every 5 minutes, but I do have to with my oven, or I will get lopsided macarons. Please adjust this according to your oven.
is not the same as meringue powder. Egg white powder is made of only egg whites. They help with getting fuller shells, and specially when adding a lot of food coloring to the batter, because they make the shells dry faster. I recommend experimenting with it if you can find it. I use 4 grams for each 100 grams of egg whites.
Food coloring: Make sure to use gel food coloring. I use Wilton Color Right Performance Food Coloring Set. If you are a beginner macaron baker, I recommend going easy on the food coloring, as it can alter your batter a lot, and it can take extra mixing time, specially if you continue to add the food coloring as you do the macaronage.
Scale: Please use a scale when measuring the ingredients for accuracy.
Macaron amount: it will vary greatly depending on how big you pipe the shells, and on how runny or thick the batter is.
Baking time/temperature: Baking time and temperature will vary according to your own oven. I recommend experimenting with your oven to find out the best time, temperature, position of the baking tray.
Oven thermometer: Make sure to have an oven thermometer to bake macarons. It’s one of the most important things about making macarons. Home ovens aren’t accurate at all at telling the temperature, and even a slight 5 degree difference can make or break your whole batch.
Tray rotation: Lots of bakers don’t have to rotate the trays 180 degrees in the oven every 5 minutes, but I do have to with my oven, or I will get lopsided macarons. Please adjust this according to your oven.