How to make a Mediterranean Gift Basket
I made a Mediterranean Gift Basket inspired by my Mediterranean Platter.

I actually made the basket for a friend.
This post may contain affiliate links. I earn a commission from qualified purchases. Please read our Privacy policy here.
She just had a baby.
I remember those days. Sleepless nights, hungry all the time, exhausted and disoriented, the whole thing! But she is a Super Mom so I know she is tackling all of this.
When I had my son Luke, two years ago, she brought me some delicious food, and a big basket of presents!
So now, she gets a basket!

This is my Mediterranean Gift Basket! Just a small treat for a friend!
How to make a Mediterranean Gift Basket
My basket contained:
- Edamame and Chickpea Hummus
- Tzatziki
- Rosemary Pita Chips
- Sourdough Grissini
- Cucumbers, Carrots, Grapes
- Kalamata Olives
- Crispy Chickpeas
- Stuffed Cherry Peppers
For the Edamame and Chickpea Hummus, you can find the recipe down bellow. And for the Tzatziki, you can find a recipe right here. I was inspired by my friend HeeJee from White Blank Space, to make the Edamame Hummus, because ever since I’ve seen her recipe, this has been on my list of things to try! Check out her blog and amazing photography!!
And here’s how I packaged it

On the back you can see my lovely Rosemary Pita Chips and also my Sourdough Grissini! Which we will get into in just a moment.
But, cmon, how so adorable, right?! I got those little wooden spoons on Amazon, right here.
I keep them around for situations like this one, when I want to make a gift basket, or present something in a nice and pretty way!![]()

About the Rosemary Pita Chips. They are my regular pita bread recipe, with some chopped rosemary in the dough.
What a terrific flavor! After making my Rosemary Pita Bread, I sliced the pita pockets into triangles and baked them with olive oil and sea salt!
Remember! The thinner your pita bread is, the crispier your chips will be.
Sometimes I will roll my pita bread too thick, because that’s how I like my pita pockets for sandwiches. However, those don’t make very good chips. If you want the crispiness, your pita bread has to be very thin rolled!
And the chips will be something like this:

I was looking for a cute way to package them, so the little rosemary sprig gave me an idea. And this is how I did it!

About the Grissini. My recipe is totally inspired by the book Artisan Sourdough Made Simple![]() , by Emile Raffa, blogger over at The Clever Carrot. Which, by the way, is a book that I’ve recommended before and I will recommend again. If you’ve got any Sourdough Books recommendation, I’d love to hear them too!
, by Emile Raffa, blogger over at The Clever Carrot. Which, by the way, is a book that I’ve recommended before and I will recommend again. If you’ve got any Sourdough Books recommendation, I’d love to hear them too!

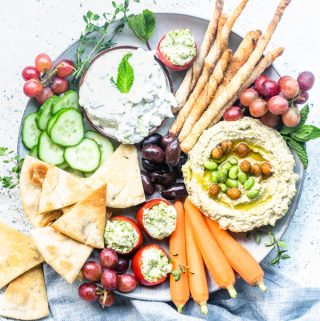
Those peppers you see in the picture of the platter are actually roasted cherry peppers filled with a creamy seasoned feta cheese.
Sadly, I ended up not including the peppers in the basket, because they were too messy and I couldn’t find a way to better package those delicious bites. I wasn’t too mad about having to eat them though!
Another delicious part of the basket was the crispy chickpeas! They’re my absolutely favorite snack! Watch for a crispy chickpea recipe soon!

And that’s it!
Sometimes it feels nice to make a basket for someone, you should try it!
Below you can find the recipes for the Edamame and Chickpea Hummus, the Rosemary Pita Chips, and the Sourdough Grissini.
Hope you all like my basket! Have a sweet day!
Oh, and I really wanted to show you something! This is the evolution of my Mediterranean Platters. The first one was made about 6 months ago.
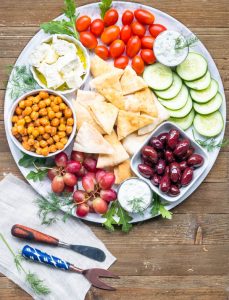
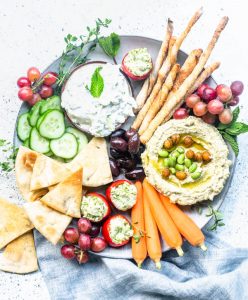
So, what do you think? Getting better? Thanks for reading, friends!
Mediterranean Platter
Ingredients
Edamame and Chickpea Hummus
- 1 cup edamame shelled and ready to eat
- 1 cup chickpeas cooked
- 2 tablespoons water
- 1/4 cup lemon juice
- 1/4 cup tahini
- 1 garlic clove
- Sprinkle cumin
- 1/2 teaspoon salt
- 1/4 cup olive oil
Sourdough Grissini
- 2 1/2 ounces starter active
- 1/2 cup warm water 90F-100F
- 1 tablespoon honey
- 9 ounces all-purpose flour
- 1 teaspoon fine sea salt
Rosemary Pita Chips
- 1 cup warm water 90F
- 1 teaspoon honey
- 2 teaspoons instant yeast
- 4 tablespoons whole wheat flour about 40 g
- 2 1/3 cups all purpose flour 300g
- 1 teaspoon kosher salt
- 2 tablespoons olive oil
- 1 tablespoon chopped fresh rosemary
- 4 tablespoons olive oil
- 2 teaspoons coarse sea salt
Instructions
Edamame and Chickpea Hummus
- You can use fresh or frozen edamame. Just make sure it’s cooked and ready to eat.
- If using chickpeas from a can, make sure to drain and rinse chickpeas.
- Place cooked chickpeas in a clean towel to dry them. You can kind of rub them with the towel, to make skin come off easier.
- Start peeling the chickpeas. Might take some time. But it’s a worthy step!
- Place edamame, chickpeas, water, lemon juice, tahini, garlic, cumin, and salt in the bowl of a food processor. Process for about 1 minute to combine, stopping in between to scrape the sides of the processor bowl.
- Once ingredients have been processed together, slowly add olive oil with the machine running.
- Taste for salt.
- Serve with some more olive oil drizzled on top.
- Store in the refrigerator, covered, for 1-2 days.
Sourdough Grissini
- Mix starter, warm water, and honey together.
- Add flour and sea salt.
- Mix with your hands or with a spatula until incorporated and a dough has formed.
- Knead the dough lightly with your spatula or with your hands for about 2 minutes.
- To knead the dough with your spatula, simply use your spatula to grab an amount of dough and fold it over. Grab more dough from the other side and fold it over. Just keep folding the dough over itself with the help of the spatula.
- Cover dough with plastic wrap and let it rest on the counter overnight.
- The next morning, put dough in the fridge for 1-2 hours before you start making the Grissini.
- Line 3 baking sheets with parchment paper, or a silicon mat, and sprinkle a generous layer of semolina or cornmeal flour over.
- Pre-heat oven to 400F.
- Remove bowl from the fridge.
- Divide dough into 4 equal pieces.
- Roll each piece into a 15x5” rectangle.
- If the dough keeps springing back, let it rest on the counter for 10 minutes before proceeding.
- With a pizza cutter, cut strips of dough that are about 1/2” thick. Each strip should be 15 inches long and 1/2 inch thick.
- Grab dough by both ends, lift it up and start twisting. Each hand is going to twist to one direction. If you twist the left side towards yourself, you have to twist the right side to the opposite direction.
- Try to make the twist tight and not so loose.
- Place Grissini in prepared baking sheets. You may place them fairly close to one another. Of course, you want to give them about 1 inch distance or so.
- Bake each pan for about 12 minutes, rotating pans in between.
- Cool completely so it will crisp up.
- Store in an air tight container for up to 2 days. The Grissini will be better if eaten on the same day. On the next day, they might be hard to chew.
Rosemary Pita Chips
- Mix all ingredients together in the bowl of a stand mixer, if using one. If you are kneading by hand, just use any bowl.
- Once ingredients have incorporated, knead them for about 2 minutes with the dough hook on medium-low speed. Or about 4 minutes by hand.
- Cover dough with a towel and let it rest for 10 minutes.
- Once the 10 minutes have passed, knead dough for another 3 minutes with the dough hook, or about 5 by hand.
- Transfer dough to oiled bowl. Cover with a towel or plastic and let it rise at room temperature for about 1 hour, until doubled in size.
- Pre-heat oven to 475F. Place a pizza stone, or a cast iron pan (or any other oven proof pans) in the bottom of your oven.
- Divide dough into 10 equal pieces. Shape pieces into balls. Flatten each ball, by pressing down on them, slightly, with the palm of your hand.
- Using a rolling pin, roll each ball out into a flat 8 inch circle.
- One by one, place dough on top of hot pizza stone or pan. Close oven door. Let it bake for about 2 minutes. Using tongs, flip bread over. Close oven door. Let it cook for another 2 minutes. It should puff up beautifully.
- Remove dough from the oven and place in a brown bag or a closed container, so it doesn’t get tough as it cools down.
- Repeat with remaining dough pieces.
- Pre-heat oven to 350F.
- Once all pieces have cooled down, you may slice as many as you’d like to turn into chips. Cut each pita bread into 8 triangles.
- Lay triangles over 2 sheet pans greased with half of the olive oil.
- Pour the other 2 tablespoons of olive oil over chips and sprinkle coarse sea salt on top.
- Bake chips fo about 7 minutes each tray, rotating in between.
- Once chips are lightly browned, you may remove them from the oven.
- Store in air tight container for up to 2 days.
SaveSave
SaveSave


This is so gorgeous, Cam – what a special treat for your friend! I especially love that it’s sort of “snacky” food that is still healthy – really just what you need right after bringing home baby! And the way you packaged everything is gorgeous.
Not only everything is homemade but also so beautifully wrapped and packaged. Your friend must felt so happy! All the care that went into this gift box is amazing.
Thank you so much, HeeJee, also thank you for the inspiration to make the delicious Edamame Hummus!!
What a lucky friend you have! This is absolutely gorgeous!! I can’t wait to make your edamame hummus~it sounds divine!
Everything is home made – absolutely love this ! It is a gorgeous treat ! One lucky friend you have. Loved the herbs in the platter and packaging. I think I will be making one soon – just as gift to myself 😉 .
What a lovely idea! As I remember all too well with a new baby you feel like you need to eat all the time so snackable food like this is perfect. Plus it looks so pretty in those jars etc.
Thank you Caroline!
Fabulous ideas here for gifts! I love the attention to detail not only with the decor, but also with the basket contents. This is the kind of gift I love to give.
Me too, Leslie! I love making food gift baskets like this one!
Oh this is just the most perfect food basket. You friend is one lucky girl 😀
Everything about this would make me happy if I received it.
And your packaging ideas are super cute!
Thank you so much, Claire, I had a great time making this food gift basket!!
Yum this Mediterranean gift basket looks so gorgeous and delicious! I would definitely indulge!
What a fabulous idea. Your basket looks and sounds wonderful. I’m sure your friend really appreciated it! I like the sound of making hummus with edamame. I’d love to try that!
Love Love Love this recipe! I’m sure these tastes are amazing! So YUMMY! Now, this recipe will be one of my favorites. Looks incredible! An interesting mix of ingredients. Thank you!
What a great idea for a lunch/dinner sharing starter!
Thank you!
This is such a cute idea. You are such a great friend! I would go crazy for that edamame and chickpea hummus!!
What a fun idea, my mom and I are always looking for good welcome basket ideas, and this will be perfect!
what a great idea with all the necessary stuff for a perfect meze platter
When I first saw this all I could think of was “Ooooh! I want one!” 🙂 It looks beautiful and all the items sound amazing!
Thanks, Lisa!!
This looks amazing!! Your styling is on point, too!! I would certainly love it if someone gave me a gift basket like this!
Thanks, Steph! You’re the best! Wish I could gift you one!