Macarons with All-purpose Flour
Hello friends, today we are making a highly requested recipe: Macarons with all-purpose flour! Can you make macarons with all-purpose flour? But yes of course!
I am going to show you how! And here is a big disclaimer: lots of people in the macaron community love to say that you shouldn’t call macarons made with all-purpose flour macarons, because traditionally they should be made with almond flour. But then again, vegan macarons are made with aquafaba instead of egg whites and we still call them macarons.
So I am going to go ahead and vouch for All-purpose Flour Macarons for lots of reasons that I will disclose below. If you don’t believe in making macarons with wheat flour, then don’t make them, but they can be helpful for people with allergies, and they can also be a matter of preference.
This post may contain affiliate links. I earn a commission from qualified purchases. Please read our Privacy policy here.
Anyway, there is definitely some adjusting to be made to the method, so I suggest you read the post below and the recipe card carefully, and also watch the video on this page or on my YouTube channel, so you can make the best out of your experience with macarons made with wheat flour.

This isn’t my first time making all-purpose flour macarons, I actually made them a couple of years ago for my son’s class, he went to a pre-school that was 100% nut-free, so I made nut-free macarons to gift to his teachers for Teacher’s Day.
And to make nut-free macarons, I went with all-purpose flour. At the time, I reduced the amount of flour slightly because my first attempt didn’t turn out alright, so I thought that reducing the amount of flour would do, but it also didn’t work well.
So this time around I decided to go with a 1:1 substitution, because I knew the mistake was in the technique rather than in the ratios.
The thing is that all-purpose flour has an entirely different consistency than almond flour. It soaks up more moisture, it’s finer, has less fat content, has gluten, whereas almond flour has higher protein and fat content, which means it provides more moisture to the batter, it has no gluten, and it’s chunkier than all-purpose flour.
So there are some adjustments you’ll have to make. The first adjustment is to the macaronage.

Macaronage in macarons made with all-purpose flour
The macaronage for the batter made with wheat flour will take way less time than with the regular almond flour we usually use.
The batter will feel very weird and stiff, kind of hard to fold, and then all of a sudden it will become thin and runny. You must stop before this happens, or the macarons will turn out wrinkled, or with the feet spread out, or super delicate on top, with the shell cracking easily even when you just pick it up.
Stop folding before reaching the figure-8 stage. The batter should be falling from the spatula into chunks, and you might not even think the batter is done folding yet, but trust me, once you pipe the shells they will spread out considerably and smooth out.
Piping Macarons with All-purpose Flour
When piping the shells, pipe them a bit smaller than you would like them to be, because they will likely spread out considerably. Remember this batter is different! Don’t treat it like you would the almond flour macaron batter.
Maybe pipe one shell at first, wait a while and see how it behaves.
Also, remember not to slam the trays or bang them too hard on the bottom, because the macarons will end up spreading out even more, and may become misshapen.
Baking All-purpose Flour Macarons
The macarons made with all-purpose flour bake differently than the macarons made with almond flour.
Just like when you bake regular chocolate chip cookies, it’s always said to remove them from the oven before they actually appear to be done, because they continue to cook as they cool down.
The same is true for macarons with all-purpose flour. Usually when making almond flour macarons, we bake them until we can move one in the oven and it doesn’t feel jiggly or soft on top.
However, for the all-purpose flour macarons, you will want to remove them a bit before they are completely firm in the oven.
The full baking time will depend on your own oven, so have this in mind. Perhaps experiment with baking a smaller amount of shells first, wait for them to cool down to see what kind of baking time is required, but have in mind that they will continue to cook as they cool down, so they will harden up and firm up then.
The trays that I baked until they were firm in the oven, ended up becoming super hard and brittle.
The ones that I removed slightly before that happened ended up softer.
Texture of the Macarons with All-purpose Flour versus Almond Flour
The macarons made with all-purpose flour do end up a bit chewier and harder than almond flour macarons. That’s because the all-purpose flour soaks up the moisture in the batter.
Flavor of the Macarons with All-purpose Flour versus Almond Flour
The macarons made with almond flour taste delicious as you probably know, they have a delicate sweetness to them. However, expect the macarons made with all-purpose flour to be chalky and not taste sweet. I actually found their taste to not be very pleasant on their own, without any filling.
However, once you fill them with the filling of your choice and let them mature, they should become delicious as they absorb the moisture of the filling and get hydrated.
Maturing process
As stated above, don’t underestimate the maturing process for the all-purpose flour macarons. These nut-free macarons might take longer to mature than your regular almond flour ones.
The maturing process will do wonders for the texture and flavor of the all-purpose flour macarons.
Filling
I recommend strongly going with a filling that is not so mild in taste. For example, I wouldn’t recommend a Swiss Meringue Buttercream alone to fill these shells, because you need a strong filling to help the taste of the cookie come together and improve. Swiss Meringue Buttercream tends to be very mild and not overly sweet, so it won’t pair well with the all-purpose flour shells, since they are chalky and also not very sweet.
What I recommend is using a stronger filling like: White Chocolate Ganache, or Ruby Ganache, American Buttercream, Cream Cheese Frosting. I also recommend any curd or jam paired with those aforementioned frostings/ganaches. The wetness of the jam or curd will also help the texture of the shells immensely.
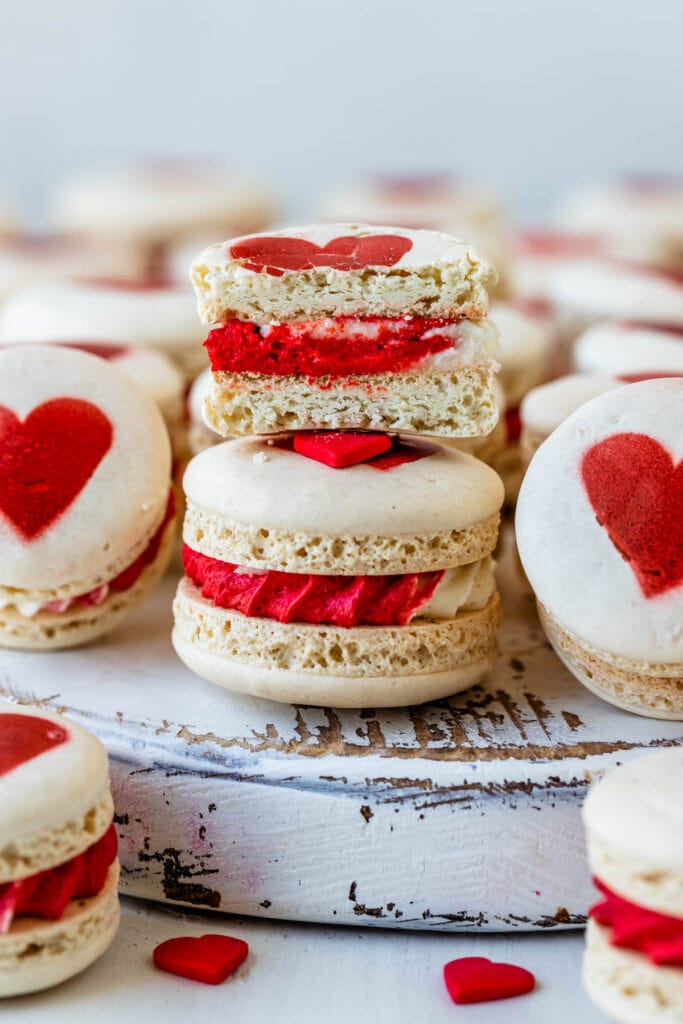
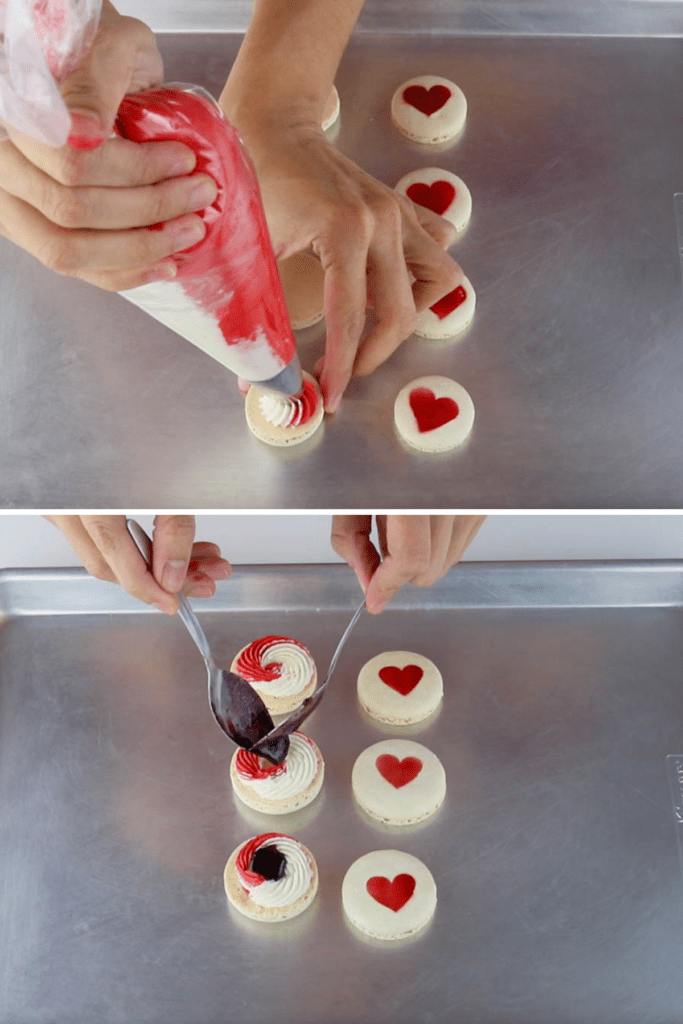
You will notice in the video I did use jam to fill some of the macarons.
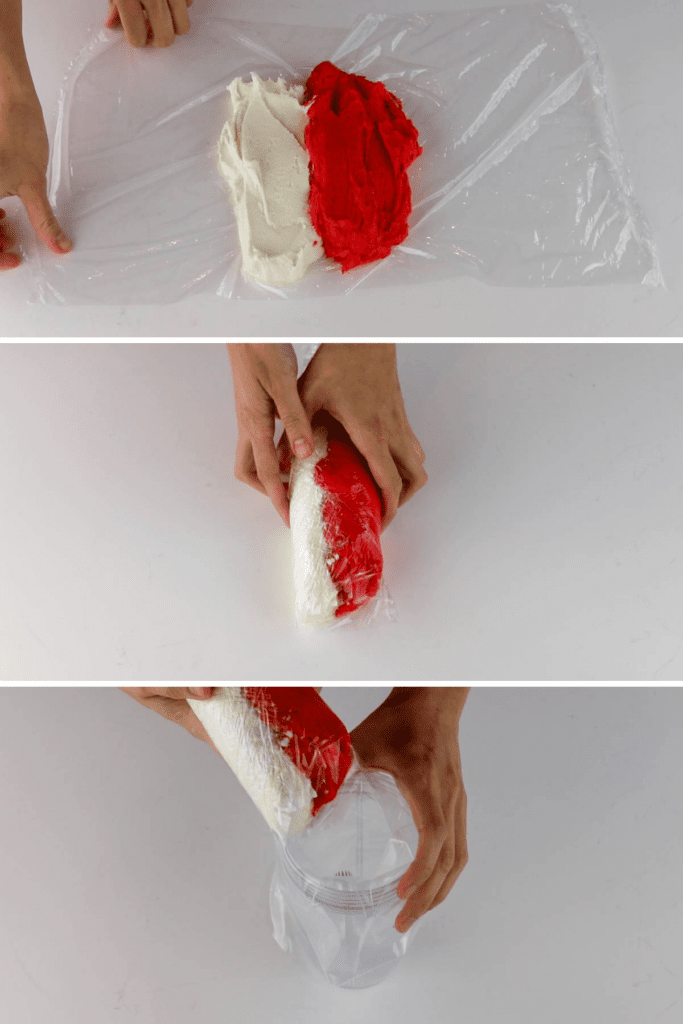
I also used a bicolor filling, which is very simple to accomplish.
Lay out a piece of plastic wrap on the counter. Then spread the two different color frostings on top of the wrap, one next to the other. Roll the plastic into a log, then place the log of frosting inside of a piping bag fitted with the tip of your choice. I used a Wilton 6B.
And then simply pipe the frosting on top of the bottom shells of the macarons.
Like I mentioned above, I also used jam to fill some of the shells.
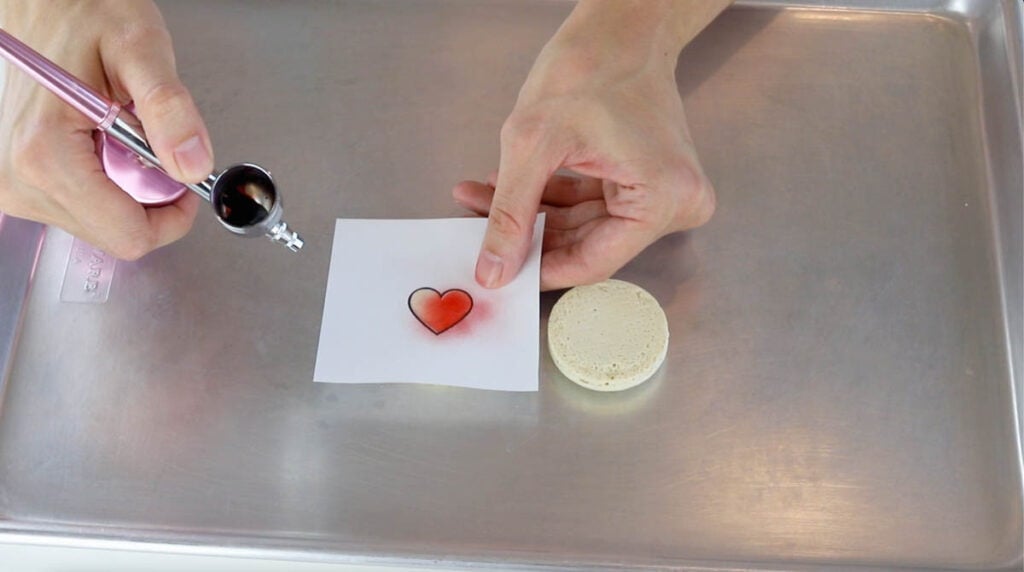
To decorate the shells I used a heart stencil and an airbrush machine.
I cut out a heart and placed it on top of the macaron shells. And then gently and very lightly airbrushed the center of the heart.
This is the airbrush machine I am using. It’s cordless, rechargeable, and I love it. I still have my old Cake Boss one, which works wonderfully, but the wires always get in my way when I am trying to film my videos and airbrush my macarons, so I looked for a cordless one and it happens to be perfect for macarons because it doesn’t dispense a whole lot of color, which can make the shells soggy. So I definitely recommend this airbrush machine.

Always remember to let people know these are made with all-purpose flour when serving these to them, because some people might have gluten allergy but they can be used to trying gluten-free macarons, since they typically are made with almond flour. So you do want to let people know these are made with actual all-purpose flour.
The veredict
Making nut-free macarons with all-purpose flour can definitely have its benefits. From cost, to being able to cater to people with nut allergies, and as a matter of personal preference.
Overall, I am not the biggest fan of the taste and texture of the shells before filling. Maturing definitely improves the whole experience of the all-purpose flour macaron, but it’s still not like a regular almond flour macaron.
There are important changes to be made to the technique as far as macaronage, piping, and baking goes, which can take a few tries to get right. It took me 4 tries to get them to my liking.
Remember, if the feet spread out, if the shells are too delicate on top, or if the macarons are wrinkled, it’s due to over mixing the batter during the macaronage, and if the macarons are hard like brittle, it’s because they’ve been over baked.
One great way to soften them up, is to place them in an air tight container with a slice of bread inside for 1 or 2 days. Don’t let the bread directly touch the shells, put a layer of plastic in between to avoid them from touching. The sugar in the macaron shells will absorb the moisture from the bread and will help the shells soften up.


Macarons with All-purpose Flour
Ingredients
Macaron Shells with All-purpose Flour
- 100 grams white granulated sugar
- 100 grams egg whites
- 105 grams all-purpose flour
- 105 grams powdered sugar
- Food coloring if desired
Almond Buttercream
- 2 cups powdered sugar 250 grams
- 1/4 cup almond flour 24 grams
- 6 tbsp butter softened 84 grams
- 1 tsp almond extract
- 1-2 tbsp milk if necessary
Instructions
Prep the ingredients and tools
- Before you start, get all of the ingredients ready. Prepare a large piping pastry bag, fitted with a large round tip, I use a 1/4” diameter tip, or a Wilton 12. Set aside.
- Line two baking sheets with parchment paper or silicone mat.
- I use a baking mat with the macaron template already in it.
- Wipe the tools such as bowls, spatulas, and silicone mats with vinegar if desired, this helps getting rid of any grease particles that might be in the tools.
- Measure out all of the ingredients.
- Sift the powdered sugar and flour together. Set it aside.
- Start pre-heating the oven. I pre-heat my large oven to 310ºF for 60 to 90 minutes, this helps with temperature fluctuations. I pre-heat the countertop oven for 30 to 45 minutes.
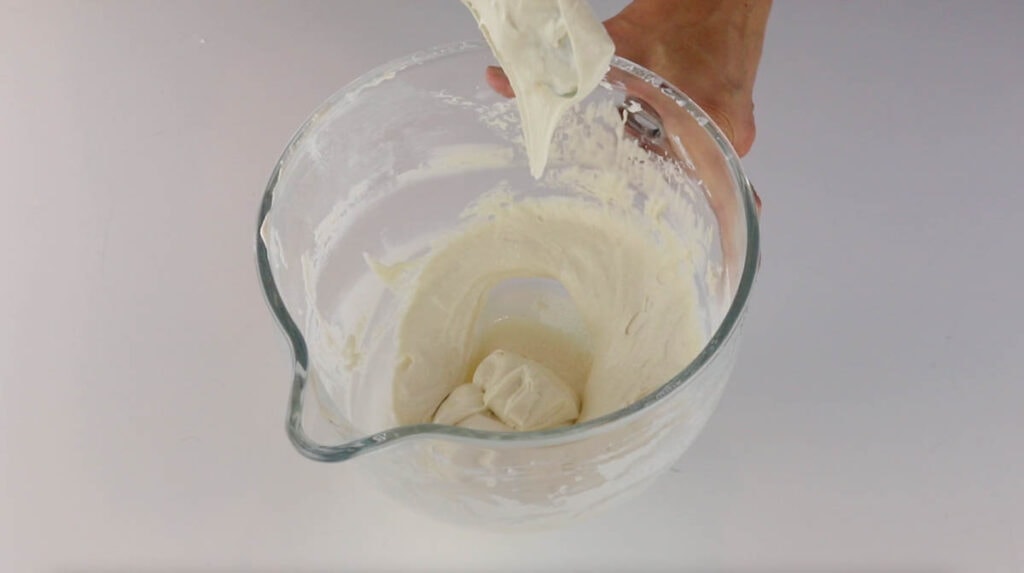
Making the Swiss Meringue
- Place a bowl over a pan with barely simmering water. Add the sugar and egg whites to the bowl and whisk until the sugar is completely melted. It will take a couple of minutes. You can test by touching the mixture between your fingers, and if you feel any sugar granules just keep whisking the mixture over the water bath.
- Note: You will notice I am not using egg white powder with this recipe because on my initial testing it made the shells way too hard and crunchy, so I am leaving egg white powder out.
- Make sure the bottom of the bowl isn’t touching the simmering water because you don’t want the whites to cook.
- Also, don’t overheat the sugar syrup, you are just looking to melt the sugar, no need to bring it to a certain temperature.Transfer the syrup to the bowl of a stand mixer. Before transferring the syrup, you might consider whipping the bottom of the bowl with a towel so the water doesn’t fall into the mixer bowl.
- With the whisk attachment, start whisking mixture on low (speed 2 of the KitchenAid) for about 30 seconds, then gradually start increasing speed to medium. Whisk on medium (speed 4) for one to two minutes, until the mixture is white and starting to become fluffy. Raise the speed to medium or medium-high and whip for a few minutes until stiff peaks are formed. I like to finish whipping the meringue on speed 6 of the KitchenAid.
- It takes me about 13 to 15 minutes to whip the meringue, but you shouldn’t go by time, go by what the meringue is supposed to look like because a lot of things can affect whipping time, such as the quality of the eggs, the weather, how powerful your mixer is, and more.
- Once the meringue gets glossy and you start seeing streaks formed by the whisk, and the meringue raising in the center of the whisk, it might be time to stop.
- You don’t want to over whip the meringue at this point because that can cause several issues, mainly hollow macarons.
- Whisk until stiff peaks have formed. When you pull the whip up, the peak should be stiff and shooting straight up, with possibly a slight bend at the top, but not bending to the side.
- Also when you swirl the whisk around in the bowl to collect the meringue, you should feel some resistance from the meringue. And when you look on the bottom of the whisk the meringue collected should be forming soft but defined waves.
Macaronage
- Pour the sifted powdered sugar and all-purpose flour into the stiff meringue.
- Add the food coloring at this point, if using. I added a teaspoon of white powder food coloring by The Sugar Art.
- Start folding gently forming a letter J with a spatula.
- IMPORTANT: The macaronage for these all-purpose flour macarons will take WAY less time than the macaronage for regular almond macarons.
- First you will notice the batter is very stiff, but then all of a sudden it will turn very runny, so be careful not to overmix, or your macarons will be hollow and have delicate tops that will break easily.
- Don’t wait to make a figure 8 with the spatula, because that will mean that the batter is over mixed.
- The batter will be falling into chunks off the spatula. Instead of focusing on how the batter is falling off the spatula, let’s focus instead on how quickly the batter that's falling, incorporates back with the batter that’s already in the bowl.
- It’s very hard to gauge when the batter is ready because we are so used to the almond flour macaron batter consistency, that this will feel weird at first.
- The batter can definitely go from feeling "hard" to being runny and over mixed in the blink of an eye, so I recommend extreme attention when doing the macaronage. You will know as you are baking the macarons if you've over mixed or not, because the feet are going to spread right out if you have over mixed the batter.
- Transfer the batter to the piping bag. I also like to seal the top with a bag tie, so the batter doesn’t dry out and it gives you more control while piping because there’s no risk of the batter escaping through the top of the piping bag.
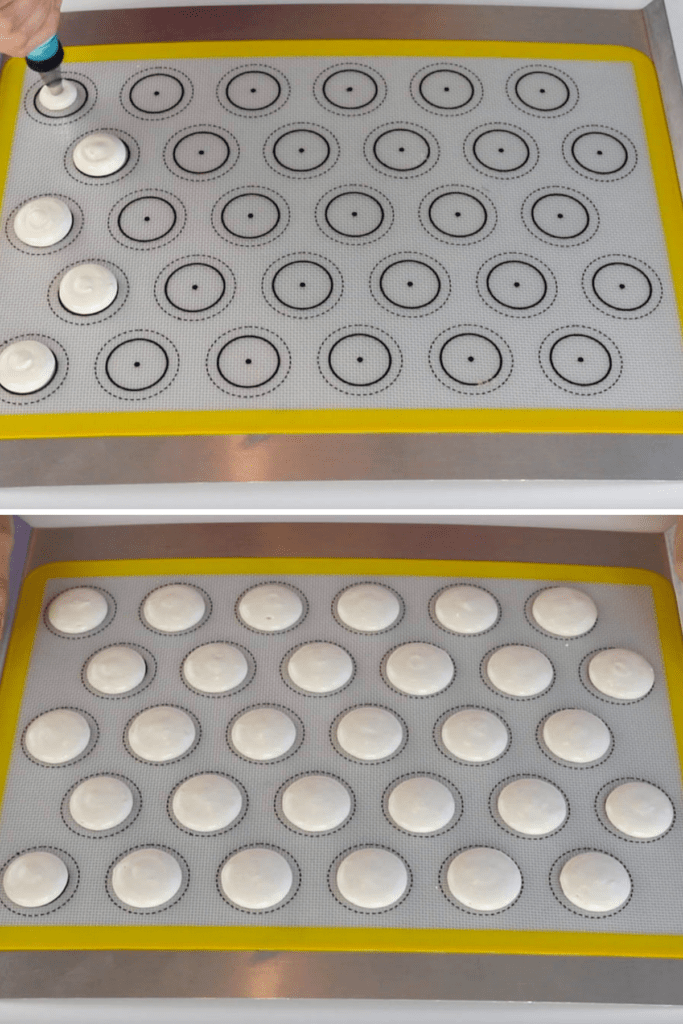
- Place the piping bag directly 90 degrees over the center of each macaron template. Apply gentle pressure and carefully pipe for about 3 to 5 seconds, and then quickly pull the bag up twisting slightly at the top.
- Once you’ve piped as many circles as you could, bang the trays against the counter gently or against the palm of your hand. I didn't bang the trays too much since the batter seemed runny and the macarons were becoming misshapen as I banged the tray.
- Use a toothpick to pop any air bubbles in the surface of the shells.
Resting or not resting the shells
- Let the trays sit for a while so the shells will dry out before baking, if you are resting the macarons. I usually leave about 20-40 minutes, depending on how humid the day is. You’ll know they’re ready when you gently touch the surface of a macaron and it seems dry.
- To do the no-rest method, you can bake the trays immediately.
- The no-rest method will depend on your oven and baking sheets you are using. Read the post above for more information.
- I can do the no-rest method on my small counter top oven, but not on my large oven, because the temperature is too uneven on the large oven.
Baking
- On my large oven I bake the macarons at 310ºF, and on the small countertop oven I bake them at 290ºF. I pre-heat both ovens for quite a bit of time. I pre-heat the large oven for 60 to 90 minutes, and the small oven for 30 minutes or so.
- Bake one tray at a time.
- Bake for 5 minutes, rotate the tray. This step is not necessary, I don’t rotate the trays on the small oven, but I have to do so on my large oven, otherwise the macarons will be lopsided. Not all bakers have to rotate the tray.
- Baking all-purpose flour macarons is trickier than almond flour macarons if that's what you are used to. The almond flour macarons are done baking when they aren't jiggly anymore. However, I found with the all-purpose flour macarons, that if I removed them from the oven once they were completely firm and not jiggly anymore, they would cool down to become hard and crispy.
- I baked each tray for about 15 minutes in the large oven, and almost 20 in the small counter top oven. I strongly advise you play around with the time, maybe bake a small batch at first and wait for it to cool down before baking the second one, so you can check if they turned out to be hard or not with the baking time you've experimented.
- Let the macarons cool down before proceeding with the filling.
Storage
- I store the unfilled shells in an air tight container in the fridge for up to 5 days, and in the freezer for 1 to 2 months.
To decorate the shells
- Using scissors, cut the inside of a small heart, to form a stencil that will fit on top of the shell. Place it over the center of each macaron and use the airbrush machine to spray gently and lightly inside the heart. Let it dry before handling.
Almond Buttercream
- Sift the almond flour and powdered sugar together. Set it aside.
- Beat the butter with a mixer, until creamy and fluffy for about 2 minutes.
- Add the powdered sugar and almond flour to the bowl and mix on low to combine. Add the almond extract. Raise the speed to medium high and mix for another minute or so.
- If the buttercream is too stiff you can add a little bit of milk or water to thin it out.
Bicolor filling
- Split the buttercream between two different bowls.
- To one of the bowls I added red food coloring, and left the other one plain.
- Mix to combine each color.
- Lay a piece of plastic wrap on the counter. Spread the red and the white frosting next to each other. And then roll the frosting into a log.
- Place the log of frosting inside a piping bag lined with the tip of choice. I am using a Wilton 6B.
- Pipe the frosting on the bottom shells of the macarons and place a decorated shell on top.
- I store the macarons in an air tight container in the fridge for up to 5 days, and in the freezer for 1 to 2 months.
Como todas suas receitas, esses macarons ficaram maravilhosos!!!!!!
I will definitely have to give these a try, thank you for posting. Where did you get your air sprayer from?
It’s from Amazon, I am putting a link above on the post right now 🙂 It’s wonderful I definitely recommend it.
I want to try it.
Hello!
Your macaron school is impressive! Thank you for posting so much learning!
I am curious— for these nut free/ap flour macarons, have you experimented with adding some (probably very small) (like, minuscule?) amount of a fat, or oil, to the AP flour? I wonder whether it might: 1) substitute for the fat ordinarily present in the almond flour; and 2) reduce how absorbent the flour is, so that it absorbs less of the batter’s water content.
Sunflower seed oil? Olive oil? Clarified butter?
I may get around to experimenting myself, but have you thought of trying this?
Cheers!
I havent tried it and I am always very scared of adding anything like that to the batter, since oils and fat will break the meringue. Because the fat in almond flour is not exactly in liquid form, so I am not sure how a liquid fat would react with the batter.
can I replace the almond butter with all purpose flour for the filling?
sorry I dont get it, there’s no all-purpose flour in the filling.
I think why Grace asked if she can replace AP flour instead of Almond flour is bcoz its supposed to be not free macaron.
Que delícia esses macarons!! A cor está linda!! Amei!!
Just curious, if this is a nut-free macaron, then why is it requiring an almond buttercream? Doesn’t that kinda defeat the purpose of being nut-free? The almond buttercream can cause some really dire or life threatening side effects to someone who has a nut allergy.
cause you can use whatever buttercream you want for the filling, the point here is the recipe for the shells being made with all-purpose flour, and i am sure that people that have almond allergies wont make an almond buttercream.
Can you use almond extract to flavor the macrons?
add about 1/4 tsp to the meringue when it’s done whipping, before starting the macaronage.
6.Sift the powdered sugar and almond flour together. Set it aside.?
ops sorry i fixed it
Adoro os macarons que você faz. Em todos rles, além da doçura, tem carinho! 😍😍🥰🥰💝
Looking forward to making these! What would you recommend on how to do red velvet macarons this way? Like subbing some of the AP flour for cocoa powder?
you could do that yes! I wouldn’t do over 14 grams tho.
Would you mind giving the conversions for the macaron shells as well. There are many different answers on the internet.
It’s very important to use a scale when making macarons. making macarons is already tricky, there are so many variables that come into play, so you have to take advantage of the variables that you actually can control, such as the ingredients measurement, to minimize the chances of things going wrong.
Why give a nut icing with a nut free recipe???
In hindsight yes youre right, doesnt make sense. anyway, I do have over 150 other filling options here on the blog. or just leave the almond flour out of the filling. it will be a plain regular american buttercream.
did everything it said tried 3 times with heaps of troubleshooting guides and they still didn’t work. waste of ingredients
troubleshooting guides won’t work for this, since it’s made with all-purpose flour and very different than regular almond flour macarons.