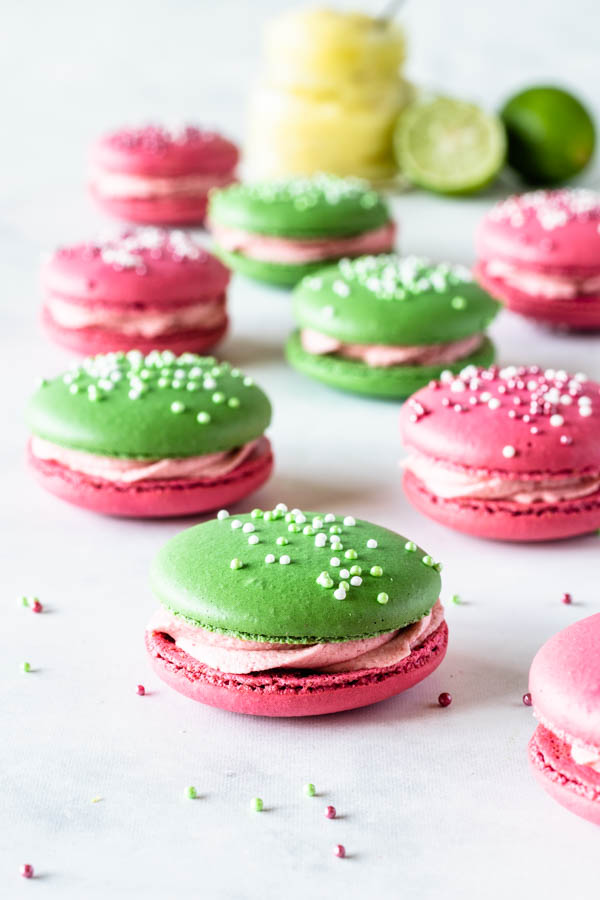
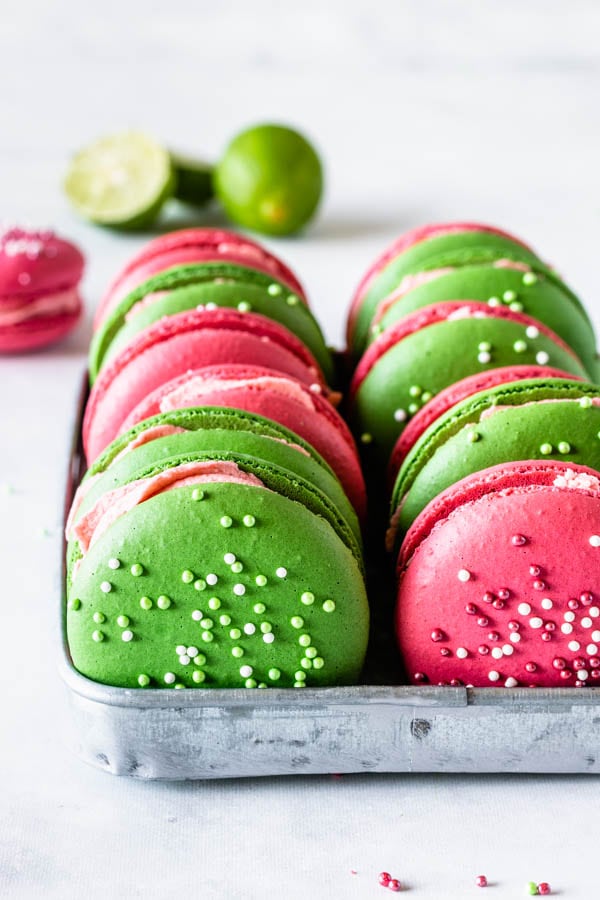
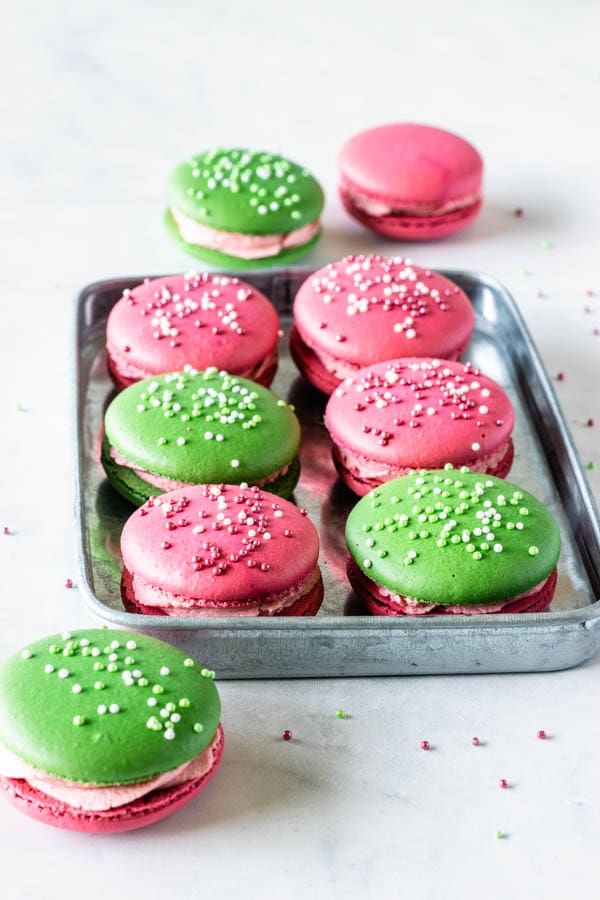
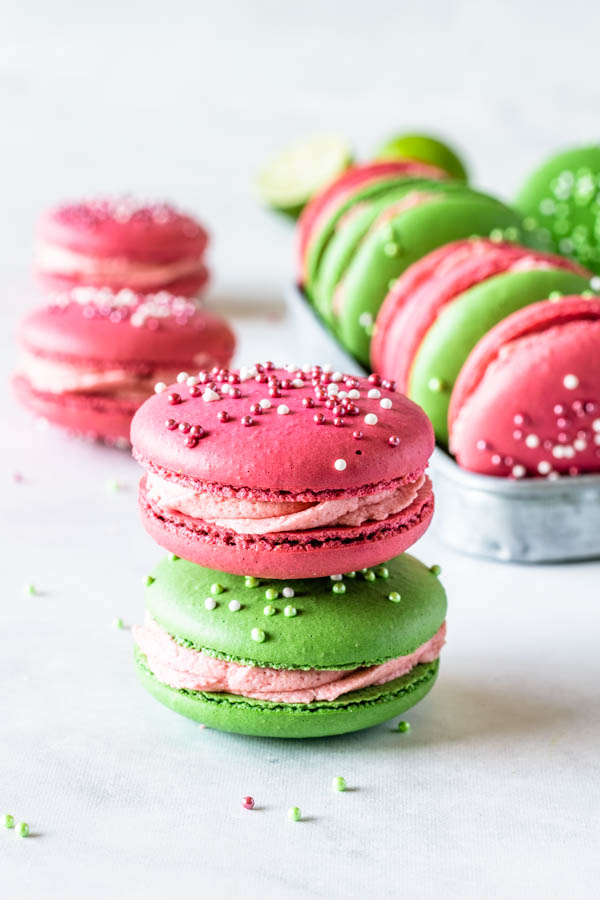
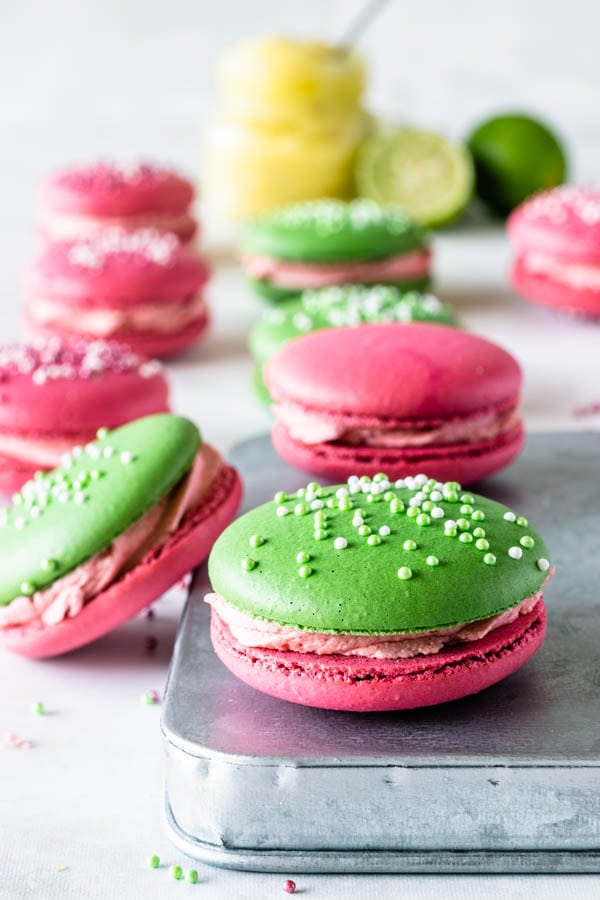
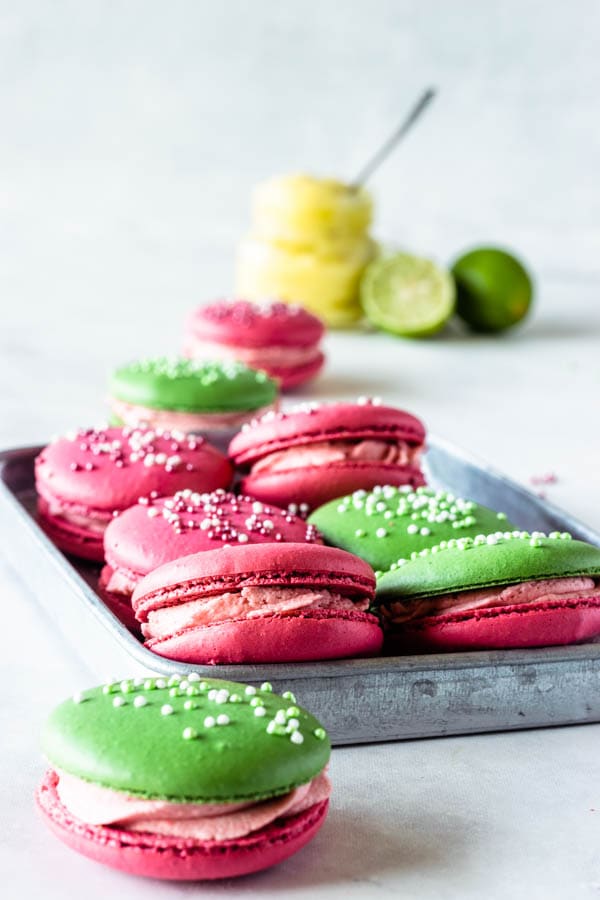
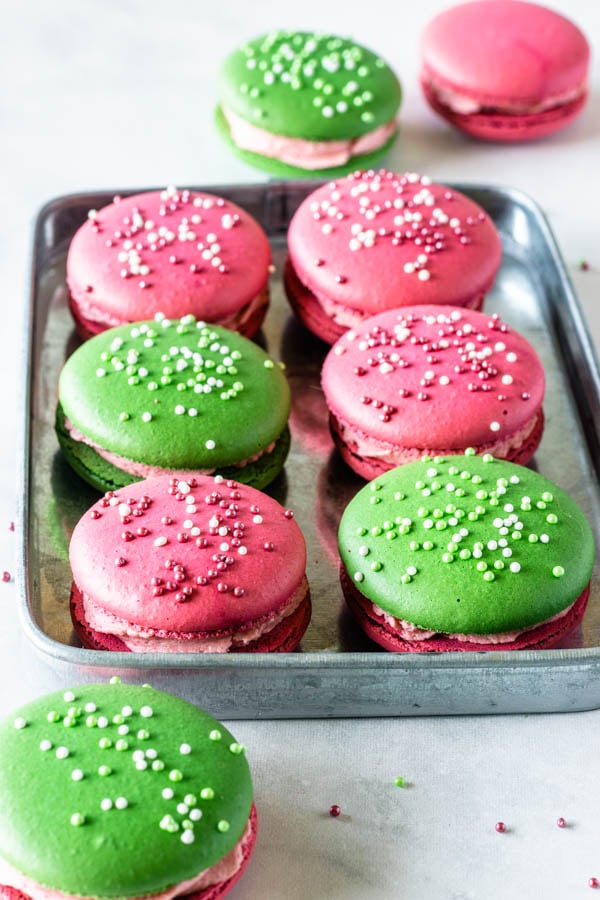
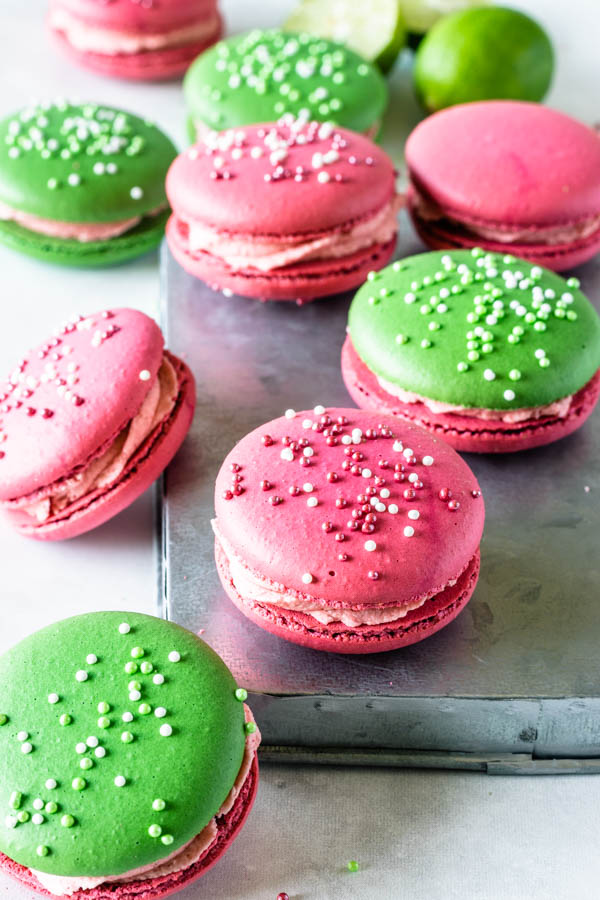
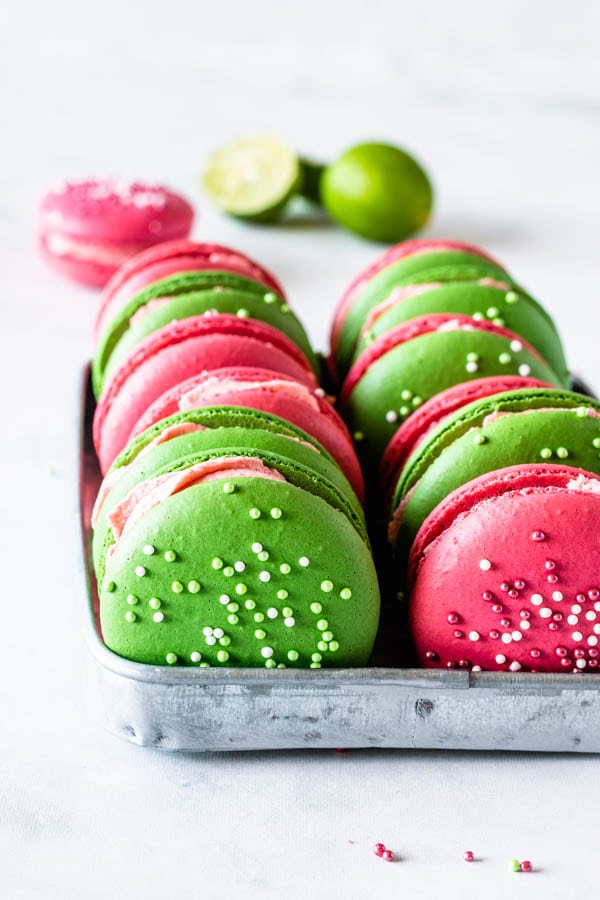
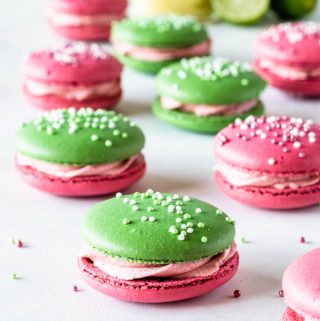
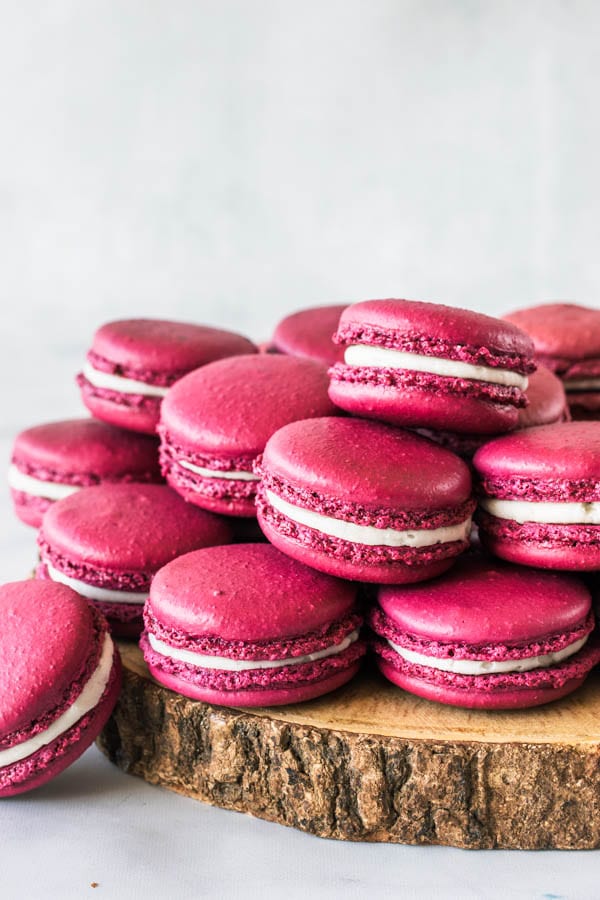
Key Lime Raspberry Macarons
One more macaron recipe for the blog! Today we are making Key Lime Raspberry Macarons, friends! Filled with key lime curd, and raspberry buttercream. Check it out!
This flavor was requested by 3 people, and here it is! A few months later, they are ready! Lol, the baking list is so huge!!
I have a lot of macaron recipes and ideas here on the blog. You can check them out here.
This post may contain affiliate links. I earn a commission from qualified purchases. Please read our Privacy policy here.
And I have used key lime to make the curd for the middle, but you can also use regular lime. Key Lime is in season around here, so I have been making a lot of key lime recipes and desserts.
In the past couple of weeks I have made Key Lime Pie Macarons, Key Lime Pie Cake, and Key Lime Brigadeiros (fudge truffles).
And I am wrapping up Key Lime baking season with these Key Lime Raspberry Macarons!
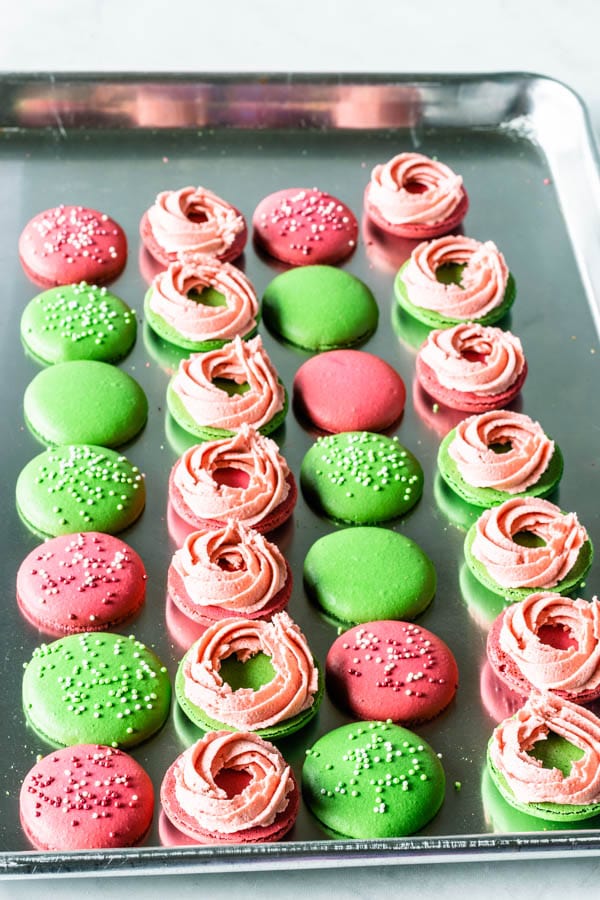
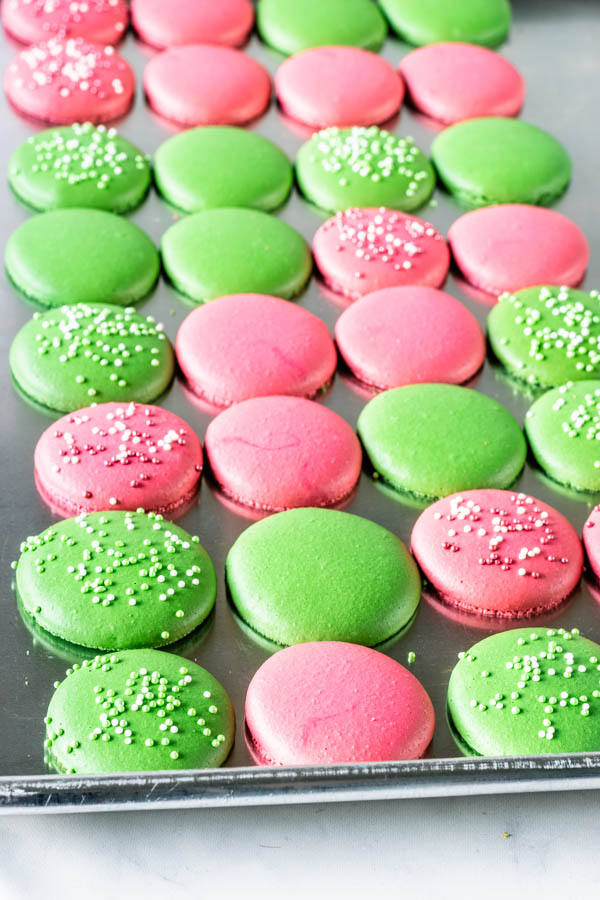
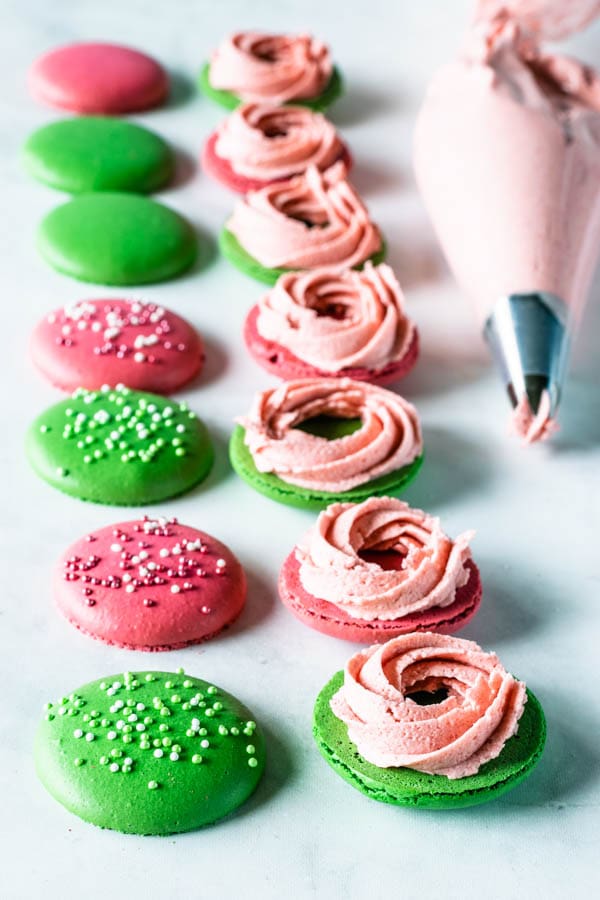
So, let’s start with the shells. I made only one batch of macarons to make the two color shells, and you can watch a video here where I show you exactly how to split the batter and make it into different colors.
WATCH THE VIDEO SHOWING YOU HOW TO MAKE DIFFERENT COLOR SHELLS FROM ONE BATCH OF MACARONS.
It’s pretty easy, actually. After you whip the meringue to stiff peaks, add the dry ingredients and start the macaronage. STOP when you see no more streaks of dry ingredients. At this point, split the batter between the number of bowls for the different colors you want to color your batter.
Work with one batter at a time, add food coloring, and continue the macaronage until the perfect consistency. (You can watch my videos, or read the post below for the best clues on how to know when to stop folding the macaron batter)
Then, place the first color in a piping bag, set aside, and move on to the next color.
After the entire batter has been colored and has achieved the perfect consistency, you can start piping them.
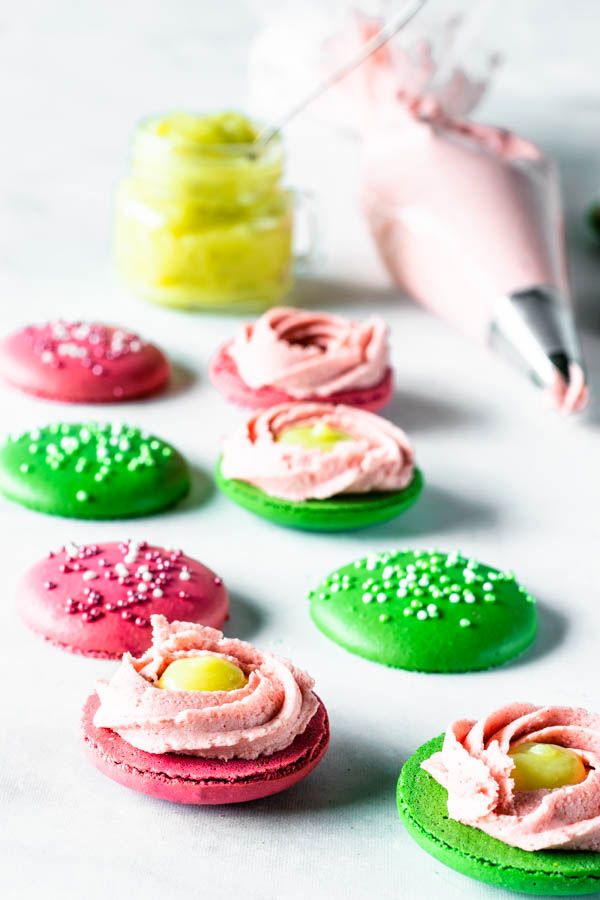
Let’s make the Lime Curd for the filling, as you should let it cool down completely in the fridge before filling the Key Lime Raspberry macarons.
How to make Lime Curd
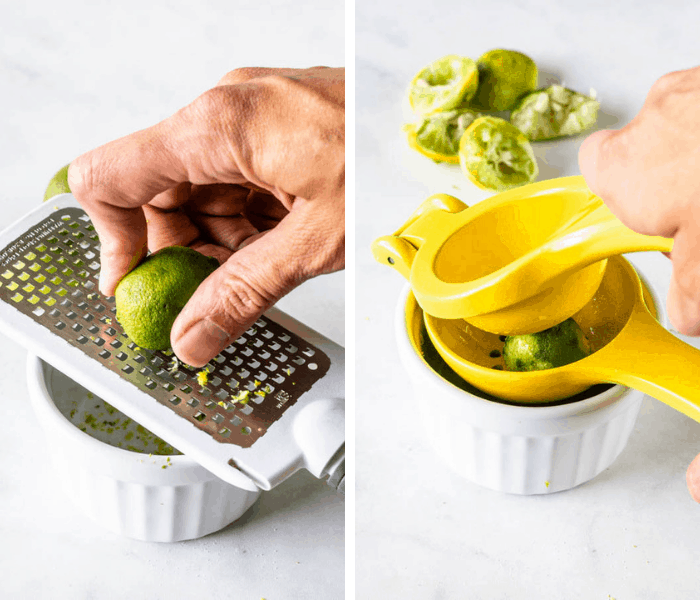
It only takes a few simple ingredients to make the key lime curd. I used key limes, which are smaller than limes, but you can make this curd with regular lime, or lemon too. Actually I use the same recipe on my Lemon Macarons.
It is very easy and quick to make homemade lime curd.
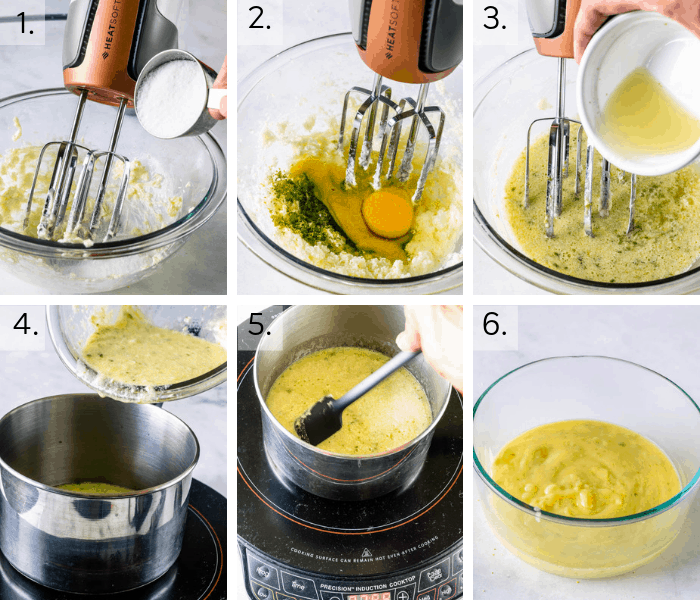
- Cream butter, add sugar and cream until light and fluffy.
- Add salt, lime zest, and eggs to the mixture. Cream again until incorporated.
- Add lime juice.
- Pour mixture into a small saucepan.
- Cook at medium low heat for a few minutes until mixture is thick and a thermometer should register 170 F.
- Pour curd in a bowl, let it cool. Place it in the fridge until it is thoroughly chilled.
It takes about 10 minutes to make this curd, not including dishes time 😅.
Let’s also go over how to make the Raspberry Buttercream.
This frosting actually takes cream cheese in the recipe. You could substitute and make it all butter, if desired. Simply substitute the same amount.
And for the Raspberry frosting, we also use raspberry powder, which is freeze dried raspberries processed in a food processor until a fine powder.
You can buy freeze dried raspberries already in powder form, if you wish to do so. If you choose to process the whole freeze dried raspberries, you will need about 1 cup to make 1/4 cup of powder, which is about 0.85 oz, or 24 grams.

![]()

![]()
And the reason why I like making the frosting with the freeze dried powder instead of whole fresh fruit, or jam, is because often times the whole fresh fruit, or the jam will make the buttercream curdle, or look watery and separated.
The powder has a very strong and delicious taste, and it doesn’t affect the texture of the buttercream at all, not to mention that the only ingredient in it is the fruit itself, that has been freeze dried!!

Plus look at just how beautiful and creamy this frosting looks!! I totally vouch for my freeze dried powdered fruits!!
So go ahead and embrace this idea! I use this method to make several recipes:
- Strawberry Lemonade Cupcakes
- Strawberry Lemonade Macarons
- Raspberry Vegan Cake
- Vegan Strawberry Cheesecake
- Vegan Raspberry Macarons
- Strawberry Macarons
But so far I have only used it for strawberries and raspberries, and I know they have freeze dried mangoes, pomegranate, etc. I really want to try a mango buttercream with the freeze dried fruit powder, because I have tried making mango buttercream before and my buttercream always separates.
These Key Lime Raspberry macarons are the perfect summer macarons! Summer is almost over and I am ready to start baking some fall desserts, but I made these a few weeks ago, and I am just getting around to posting the recipe now, between sponsored posts, learning my way through videos, and making the best out of summer with my family, this particular post here kept getting postponed. But I think it’s the best way to start wrapping up summer baking.
If you like baking macarons, here are some macaron flavors for you to check out:
- Lemon Macarons
- Balsamic Caramel and Strawberry Macarons
- Brownie Macarons
- Caramel Popcorn Macarons
- Key Lime Pie Macarons
- Strawberry Lemonade Macarons
- Cherry Macarons
- Kiwi Macarons
- Blueberry Macarons
- Cookie Dough Macarons
- Strawberry Mint Macarons
- Blackberry Macarons
- Strawberry Macarons
- Pomegranate Macarons
- Pistachio Macarons
I know it seems like a big list, but I had to trim it down so much since I have soooo many macaron recipes on my blog.
Click here to check out all of my macaron flavors.
What do you think about the combo Key Lime and Raspberry? What’s your favorite macaron flavor?
I had so many different ideas when I was trying to approach this Key Lime Raspberry Macaron. Should I make a key lime buttercream and raspberry jam filling, or a swirl of key lime buttercream and raspberry buttercream? And the winning idea was the key lime curd with the raspberry buttercream, because I just love curds so much!
If you want to know more about how to make macarons, and more tips to help you on your macaron journey, take a look at my posts and videos, I have lots of tips on all of my posts, and I try to be as detailed as possible on my recipe down below!
And you can always send me a message on instagram or via email and I will try my best to help you!
I hope you enjoyed this recipe, and I hope you come back for more. If you are someone who’s been reading my posts and following my blog already, I thank you so much for all the support and love. None of this would be possible without you!
Also, I have linked below the sprinkles I used on these macarons, which are Wilton nonpareils, the containers by Rubbermaid that I use to store my macarons and specially if I want to freeze them, and the freeze dried raspberries I have used and can vouch for! Check out the links below!
Key Lime Raspberry Macarons
Ingredients
Macaron Shells
- 100 grams egg whites
- 100 grams white granulated sugar
- 105 grams almond flour
- 105 grams powdered sugar
- Pink food coloring for half of the batch and green food coloring for the other half
Lime curd
- 3 tbsp lime zest
- 1/4 cup lime juice 59 ml
- 1/3 cup granulated sugar 66 grams, 2.3 oz
- 3 tbsp unsalted butter room temperature 42 grams, 1.5 oz
- 2 large eggs
- 1/8 tsp salt
Raspberry Buttercream
- 4 tbsp cream cheese room temperature 2 oz, 56 grams
- 2 tbsp unsalted butter room temperature 1 oz, 28 grams
- 1-1 1/2 cups powdered sugar 4.5 oz-6.75 oz, 127 grams-191 grams
- 1/4 cup freeze dried raspberry powder* 0.85 oz, 24 grams
- 1 tsp milk
Instructions
Macaron Shells
- Before you start, get all of your ingredients ready. Prepare a large piping bag, fitted with a large round tip.
- Line two baking sheets with parchment paper or silicon mat.
- I use a baking mat with the macaron template already in it. You can make your own or print it from the internet, and just place it under silicon mat, or parchment paper. I recommend using a silicon mat if you want more uniform bottoms.
- Measure out all of the ingredients.
- Sift the powdered sugar and almond flour together. Set aside.
- Place egg whites and granulated sugar in a heat proof bowl or in a double boiler. Over a pan of simmering water, whisk the whites and sugar until frothy and sugar completely melted. It will take a couple minutes. You can test by touching the mixture between your fingers, and if you feel any sugar granules just keep whisking mixture over the water bath.
- Make sure the bottom of the bowl isn’t touching the simmering water.
- Transfer mixture to the bowl of a stand mixer.
- With the whisk attachment, start whisking mixture on low for about 30 seconds, then gradually start increasing speed to medium. Whisk on medium for one to two minutes, until the mixture is white and starting to become fluffy. Raise the speed to high for a few minutes until stiff peaks are formed. Best way to check this is to keep your eye on the whites. Once they get glossy and you start seeing streaks formed by the whisk, it might be time to stop.
- Pour powdered sugar and almond flour into stiff whites.
- Start folding gently forming a letter J with a spatula. Add the food coloring at this point, if using just one.
- If using more than one color to color the batter, start folding the dry ingredients into the batter and mix them just until you don’t see any streaks of dry ingredients any longer. Once that happens, you can split the batter between the number of bowls correspondent to the colors you want to use in your batter.
- So in this case, once you see there are no more dry ingredients in the macaron batter, split it between two bowls.
- Work quickly, with each color, one at a time, folding the batter until ready, then transferring it to a piping bag. Move on to the next color and do this until the entire batter is ready. Then you can start piping.
- It’s time to stop folding when the batter is glossy and has a thick and flowing consistency. There are several ways to test this.
- First, pick up some batter with the spatula and try to draw a figure 8 with the batter that is dripping off the spatula. If you can form several 8 figures without the batter breaking up, that’s one indication that it might be ready.
- Then, grab a teaspoon of batter and spoon onto the parchment paper or silicone mat.
- If the batter stays stiff and doesn’t spread out a bit, start folding a little bit more, about 3 folds.
- Test again.
- Once the batter spreads out a bit and starts to look glossy on the parchment paper, transfer the mixture to the piping bag.
- You don’t want your batter to be too runny either. So be careful not to overmix. It’s always best to undermix and test several times until the proper consistency has been achieved.
- Once you’ve piped as many circles as you could, bang the trays against the counter a few times each.
- Let the trays sit for a while so the shells will dry out a little bit. I usually leave about 20-40 minutes, depending on how humid the day is. You’ll know they’re ready when you gently touch the surface of a macaron and it seems dry.
- Pre-heat the oven to 300°F.
- Bake one tray at a time.
- Bake for 5 minutes and rotate the tray.
- Bake for 4 more minutes, check if it needs to be rotated again. You will know if it needs to be rotated again depending on how the macarons are baking. Take a look at them, if one side seems taller than the other, maybe you have to rotate the tray again.
- Bake for 15 to 20 minutes.
- When baked, the macarons will have a deeper color and formed feet. If you try to move a macaron, it shouldn’t feel jiggly. If the macaron is still jiggly, keep baking.
- Remove from the oven and bake the other tray.
- Let the macarons cool down before proceeding with the filling.
Lime Curd
- Cream the butter at medium speed in the bowl of an electric mixer. Slowly add sugar and lime zest to butter and keep creaming at medium speed for a few minutes, until mixture is light in color and fluffy.
- Add the eggs, one at a time, waiting until egg has been completely incorporated before adding the next one.
- Add the salt. And finally, add the lime juice, and stir on low speed.
- Pour the mixture in a small sauce pan and bring it to a boil over medium heat, while stirring nonstop.
- You are looking for a very thick and creamy curd. Don’t stop stirring, don’t look away.
- The temperature of the curd should be reaching 170F.
- When that happens, remove from heat and pour into a heat proof bowl.
- Let it cool in the fridge.
- STORAGE: The shelf life of the lime curd will be up to 1 week in the fridge, and up to 3 months in the freezer, if well protected.
Raspberry Buttercream
- Sift the powdered sugar and raspberry powder together. Set aside
- Cream the butter and cream cheese at medium speed in the bowl of an electric mixer for about 1 minute. With the mixer off, add all of the powdered sugar, and powdered raspberry in.
- Mix on low speed until sugar is incorporated. Once they are incorporated, turn speed to medium and cream for 1-2 minutes until very fluffy. Add vanilla and milk in, beat for another 30-45 seconds.
- If the consistency of the frosting seems a bit runny, add more powdered sugar in it to make it thicker. If the consistency of the frosting seems too stiff, add more milk, only 1 teaspoon at a time, as necessary.
- STORAGE: Store buttercream in the fridge for up to 1 week.
To assemble
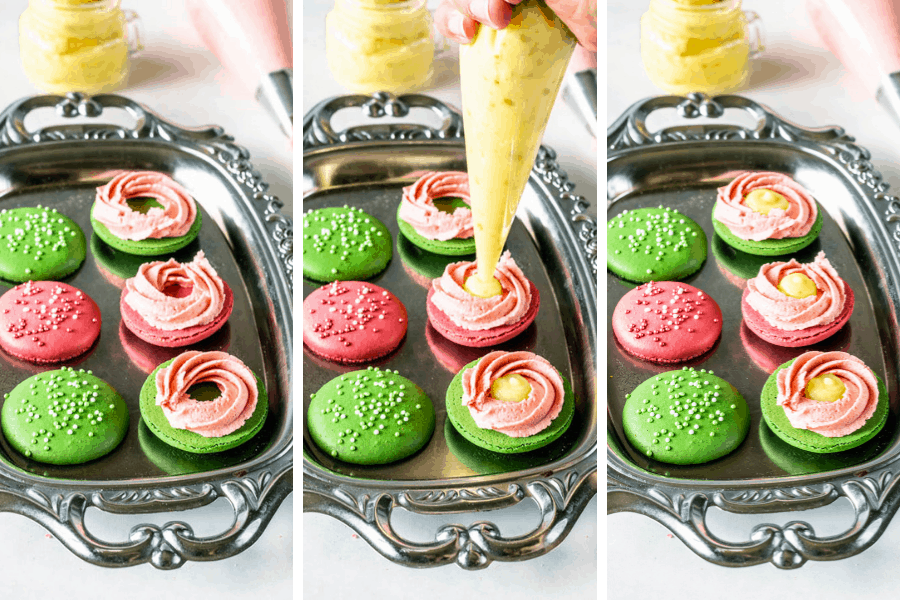
- Pipe a circle of Raspberry buttercream around the edges of the macaron, in a way that you have a little hole in the middle. Fill the little hole with a bit of lime curd. Don’t overfill it. Place another shell on top.
- STORAGE: This Key Lime Raspberry Macaron’s shelf life is 4-5 days in the fridge. I don’t recommend freezing it because the curd might make the shells soggy.
Que gostoso e que combinação de sabores, gostei muito!!!!!!
I love Macarons, but have never made them. You’re tempting me so much, especially with the key lime flavors. so pretty, too!
awe thank you Laura!!
Love this recipe! I made it once and it was a big hit!! Going to make it red and green for Christmas! Did you put the sprinkles on right after piping?
Camila, where did you find the freeze dried raspberries? Can you add a link? Do you think I could add the raspberry powder to the macaron shell, replacing a bit of the sugar or the almond flour? I want to add a bit of raspberry flavor to the shell. I was thinking 1/2 teaspoon of raspberry extract, but the raspberry powder could be an interesting option, or both?
Hi there! so I found them on amazon. There are links in the post above.
I dont recommend adding any extract to macaron shells or any liquid flavoring for that matter.You can add the raspberry freeze dried powder, just follow instructions for this post https://www.piesandtacos.comstrawberry-macaron-shells/ but substitute strawberry for raspberry, it will be the same.
Sorry, I went straight to the recipe and didn’t see the link. Perfect, thank you!
sure thing no problem 🙂
Camila in some of your recipes you indicate the oven temperature as 325, in others 315 and in this one 300. Is it because of the colors? I just bought your book on Amazon and can’t wait for it to get here. On another front, yesterday I tried the no rest method in my oven which is pretty cool and it worked perfect on the first four I placed on the top rack. When I saw this, I put the other tray (which had rested th3 20 minutes it took me to make sure the first four had developed feet) and while 80% came out fine, six or seven cracked at the top. Is that because they were in the lower rack or because they had air bubbles? I also tried different temperatures. I tried 160 (325) but they baked too fast, then I tried 150 C which is about 310 and they were better. The best came at 140 in texture but the color was “burnt”. I did a macaron course in Buenos Aires (I’m Argentinian living in Paraguay) and the teacher used 140 temperature although we did the Italian method (which I hate becuase of all the reasons you mentioned LOL). Thanks for your help
Hi Maria!
Thanks for getting the book!
So the temperature changes in certain recipes because I was living in different houses, and was kind of speaking about what was working for me. I did try to go back and fix all recipes with a note on the bottom saying that the oven temperature may vary depending on the oven. Also I posted an article about it you can read it here: Understanding your oven.
Now I use 290 on my countertop oven as well, which is a convection oven. And I use 300 on my large oven, I find it works better for shell consistency than 310.
Which is why to experiment with different temperatures.
And the reason why your shells cracked was not air bubbles, it was due to the oven rack difference. Which is why it’s also important to experiment with oven temperatures as well as oven racks, resting times, etc. all of this will be primordial to obtaining the best results once you’ve nailed down what works best.
About the colors, the only thing different I do with colors is basically resting them longer, I don’t necessarily turn the temperature up. But I might consider turning the temperature down 5 degrees or so if baking light colored shells.
Hope this helps!!
Hi Camila thanks for your lengthy reply! I am in full macaron mode and I thought “what is the point of making a meringue and then deflate it in the macaronage process? So I wondered what would happen if I did it directly in my mixer. So I googled it and found a Korean woman who makes 500 macarons on her own doing the macaronage in a mixer. Well let me tell you that I did three batches and they came absolutely perfect! It’s worth trying it and it saves you a lot of time plus the sore arm! It’s worth the try!